(1908-1954) - Soviet statesman and military figure, Colonel General,...


Cellar owners often complain about the humidity in it. Usually this problem is associated with violations made during construction. How to reduce the humidity in the cellar is a question that worries many Russians who store their vegetables in cellars and cellars.
In basements and cellars, excessive moisture often appears. If time does not begin to take measures to eliminate it, then a fungus will appear, and then mold.
For obvious reasons, moisture and dampness are unacceptable in cellars and cellars. In a room with moist air, mold and fungus appear. It is impossible to store vegetables in such a basement, and if a wet room is located in the basement, then this can adversely affect the integrity of the entire building.
One of the causes of humidity and dampness is moisture that enters the room through the walls and then accumulates on the floor. In the process of its evaporation, the humidity of the air increases many times over.
If the cellar or basement is located in a private house, the cause of dampness may be insufficient insulation of the building. At low temperatures, water penetrates through the joints in the walls of the house into the basement.
Groundwater may also be the cause. This is possible with poor waterproofing of the floor.
You can reduce the humidity in the basement different ways. But first, check the condition of the basement waterproofing. If it does not cope with the task, then it must be redone. This is often not the cheapest option.

The most inexpensive way in which the moisture in the cellar can be removed is as follows:
Back to index
Back to index

If all these simple ways cannot reduce the humidity in the cellar, then additional waterproofing must be created.
Has moisture started to appear on the floor and walls in the basement? What should be done to make it dry and suitable for storing vegetables?

Is groundwater flooding the basement floor? Dig a hole below the basement floor level. Make a gravel pillow in it, place a container on it with holes drilled in the side walls.
The container must be wrapped with a cloth that passes water well, it will prevent the holes in the container from silting up. Place a float pump in it. Water fills the tank, the float rises and turns on the pump. The water is pumped out, the float drops and the pump turns off. Such a device will allow you to effectively deal with water and humidity in the basement.
WP_Query Object ( => Array ( => 1 => rand) => Array ( => 1 => rand => [m] => [p] => 0 => => => => => 0 => => => => 0 => => => => 0 => 0 => 0 [w] => 0 => => => => => => => => => 0 => = > => [s] => => => => => => => Array() => Array() => Array() => Array() => Array() => Array() => Array() => Array() => Array() => Array() => Array() => Array() => Array() => Array() => Array() => => => 1 => 1 => 1 => 1 => => => 50 => =>) => WP_Tax_Query Object ( => Array () => AND => Array () => Array () => wp_posts => ID ) => WP_Meta_Query Object ( => Array () => => => => => => Array () => Array () =>) => => SELECT SQL_CALC_FOUND_ROWS wp_posts.ID FROM wp_posts WHERE 1=1 AND wp_posts.post_type = "post" AND (wp_posts.post_status = "publish") ORDER BY RAND() LIMIT 0, 1 => Array ( => WP_Post Object ( => 1140 => 2 => 2015-07-05 16:50:04 => 2015-07-05 12:50:04 =>
Incorrect arrangement of basements
 a sign of dampness in the cellar Disinfection of the cellar) This can be:
  Basement insulation
The disadvantages include: How to make an vent in the cellar for correct device ventilation can be seen in the video. It must always be remembered that only in a clean, dry and airtight cellar, the success of disinfection and other preventive measures increases several times. => Prevention in the Basement: Why + When Needed => => publish => open => closed => => profilaktika-v-podvale-176 => => => 2019-04-11 16:34:09 = > 2019-04-11 12:34:09 => => 0 =>?p=1140 => 0 => post => => 8 => raw => index,follow)) => 1 => -1 => => WP_Post Object ( => 1140 => 2 => 2015-07-05 16:50:04 => 2015-07-05 12:50:04 => Overwintering fuchsias in the basement Overwintering fuchsias in the basement, saving in it fresh vegetables and fruits, the cultivation of some plants and animals is great solution for owners of their plots. But many of them who have basements are thinking about how to free them from water before mold and bad smell appear there. Usually basements are often flooded with water during active snowmelt and heavy rains, and high humidity - optimal conditions for the development of mold and fungi, which quickly populate the ceiling and all walls of the room. How to care for and how to disinfect the cellar is invited to get acquainted from this article. Scheme of the formation of stagnant water zones On the diagram:
Basement insulation
The disadvantages include: How to make an vent in the cellar for correct device ventilation can be seen in the video. It must always be remembered that only in a clean, dry and airtight cellar, the success of disinfection and other preventive measures increases several times. => Prevention in the Basement: Why + When Needed => => publish => open => closed => => profilaktika-v-podvale-176 => => => 2019-04-11 16:34:09 = > 2019-04-11 12:34:09 => => 0 =>?p=1140 => 0 => post => => 8 => raw => index,follow)) => 1 => -1 => => WP_Post Object ( => 1140 => 2 => 2015-07-05 16:50:04 => 2015-07-05 12:50:04 => Overwintering fuchsias in the basement Overwintering fuchsias in the basement, saving in it fresh vegetables and fruits, the cultivation of some plants and animals is great solution for owners of their plots. But many of them who have basements are thinking about how to free them from water before mold and bad smell appear there. Usually basements are often flooded with water during active snowmelt and heavy rains, and high humidity - optimal conditions for the development of mold and fungi, which quickly populate the ceiling and all walls of the room. How to care for and how to disinfect the cellar is invited to get acquainted from this article. Scheme of the formation of stagnant water zones On the diagram: Tip: Do not build houses with basements where groundwater is located close to the surface.Many owners of their homes deliberately do not take into account the recommendations of professionals, and then after a long struggle with the presence ground water they ask themselves the question of how to properly fill the basement, which gives them so much trouble. Filling a cellar in a house correctly is no less difficult than digging it out correctly, especially if the basement is located under the house. In this case, it is necessary to make drainage, choose the right soil composition, for further passing water through it, otherwise moisture will accumulate in the basement, and not go back into the soil. In addition, it is necessary to properly lay the soil composition so that in the future it does not sag and does not push water to the surface. You can fill up the basement:
Tip: Sand is a great option if the basement doesn't have concrete stitching on the floor, but just a wooden floor.Only up to the middle of the basement will the sand get wet, if it is properly backfilled, and the ceiling of such a room will always be dry.
Tip: Here it is very important to make sure that at the very ceiling of the cellar, there is again a layer of broken construction waste.
Frogs in the cellar The presence of frogs is the first sign of dampness in the cellar, which indicates the need for thorough drying in the sun of all shelves, drawers and other containers. In addition, drying in the sun helps prevent the development of fungi and mold. Tip: If the cellar is periodically flooded in the spring, it is worth starting the fight against frogs by cementing the floors and plastering the walls. The presence of cracks is the entrance for frogs. After removing dampness and cracks, the need for poisoning with pesticides will go away. In this case, it is enough to open the cellar for a day, and the frogs will get out on their own.A little more serious is the fight against rodents, they spoil everything that is stored in the cellar. During the drying of the room, when all its contents are lifted up, disinfection should be carried out. (read more Cellar disinfection) It can be:
Basement insulation With this method, the material is fixed from the outside, which prevents the walls from freezing. At internal insulation Condensation will form at the joints of the insulation material and walls, which can ruin the entire coating. Therefore, it becomes necessary to make a more thorough waterproofing of the entire plane of the wall. In addition, the insulation material itself must be moisture resistant. For these purposes, an excellent option would be to use foam. The advantage of the material is:
Tip: Styrofoam can only be used in basements with high fire safety.Instructions for insulation of the basement with polystyrene foam offers:
Tip: To increase the strength of the screed, reinforcement is made with a metal mesh with cells of five millimeters, you can use a solution with cement grade M 100. To reduce soil pressure on the insulation, the cement screed must be supported on the walls.
The basement under the house can be used both as a cellar for food and as a utility room. However, the humidity in the basement can nullify all plans. The appearance of moisture usually leads to dampness and mold in the room. And the appearance of puddles on the floor completely makes the basement unusable. In addition, mold and puddles are dangerous for the structures of the house itself.
Before you start an uncompromising fight against dampness, you must first find out why it appeared. There are usually two reasons:
From the soil, moisture penetrates into the basement quite easily. Here, both a capillary penetration path, through microscopic pores in the material itself, and a direct ingress of water through cracks in the foundation are possible. It should be noted that microscopic pores have almost all Construction Materials- concrete, brick and wood.

Direct entry of moisture into the basement through cracks in the foundation is the scourge of many old houses. There is a whole range of problems that the owner of the house will have to solve.
When moisture condenses, water droplets appear on the ceiling and walls. The reason is the temperature difference between the air and the walls, floor and ceiling in the basement. Often, condensation is also complicated by capillary penetration of moisture through the walls. Therefore, it is desirable to approach the solution of the problem in a comprehensive manner.
There is one rule that helps to determine for what reason moisture appeared in the basement.
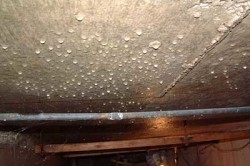
If water drips from the ceiling and collects on the top of the walls, then the problem is the condensation of water droplets from the vapors in the air.
And if water appears as drops along the bottom of the walls and stands in puddles on the floor, then the problem is in the penetration of groundwater. Methods for solving these problems are slightly different.
Back to index
How to remove humidity if it is caused by the temperature difference between the air and basement structures? First of all, you need to understand why the air in the basement suddenly starts to warm up.

Often you can find statements that the cause of condensate in the cellar is warm air, the source of which is the basement. However, the question arises - why does warm air descend into the cellar, because usually only cold air layers move down?
It should be remembered that the proximity to warm layers of air always leads to heating of the underlying cold layers. Thus, even through small gaps in the floor and the door, heat will flow down. The air warms up quickly. For example, to heat 1 m³ of air by 1˚ C, it takes 3000 times less energy than for heating the same amount of water by 1˚.
Heating the air leads to an increase in its specific humidity, since the heated air can contain more water vapor. water vapor in this case can come both from the ground, through the pores in the basement walls, and from above, from the house, through cracks in the cellar door or holes in the ceiling.
And here the solution to the problem depends on the purpose of the basement. The cellar for food is insulated from above, along the ceiling and the door, and the cellar for personal needs from below, along the walls and floor.

The reason is simple - in the cellar for storing food, a stable low temperature is needed, so the room must be protected from heat influx from above. As a result, the difference in air temperatures and basement structures is destroyed, which allows removing moisture from the cellars.
And for utility rooms it is better to create a comfortable temperature, so the best way out is to sheathe the walls with an insulator and insulate the floor. In this case, the basement temperature will rise, but the dew point, that is, the thickness of the partition on which condensation occurs, will be recessed inside the walls. This will help remove moisture from the basement, making it more comfortable for people along the way, bringing its temperature closer to the air temperature in the basement.
Back to index
In the first case, you need to start with the thermal insulation of the door. It is best to cover it with sheet foam or polystyrene foam. The thickness of the heat insulator must be at least 5 cm. The blocks or sheets are fastened to the door using a special construction adhesive.
On top of the thermal insulation, the door can be upholstered with leatherette or covered with it waterproofing film, which are now many in hardware stores. In addition, the opening should be pasted rubber seal around the perimeter to avoid heat leakage. The place where the door jamb connects to the floor must be cleaned of chips and debris, and then filled mounting foam. Then, during the day, the door is not touched so that the foam can completely harden. The next day, the foam is trimmed with a knife and covered with plaster.

Ceiling insulation for concrete and wood basement floor carried out in various ways. When concrete floor the following work needs to be done:
For a wooden floor, the following work will have to be done:
To arrange a draft floor, you have to open it. However, if there is no desire to perform such a large amount of work, you can simply fix the crate on the floor beams from the side of the cellar, put insulation sheets into it, and then cover everything with a vapor barrier film. To do this, you can use 2.5 cm nails, after placing a rubber square on each nail to seal.
Back to index

Wall cladding in such a basement can be done both with the help of sheet insulation and with the help of sprayed insulation. However, the walls should first be coated with cement milk. This is necessary to close the capillary pores of the material itself. Adding liquid glass to cement will lead to better insulation. Then, sheets of insulation are glued on top or reinforced with crates. Finally, the walls are covered with plaster. For greater decorativeness, you can create false walls by upholstering them with gypsum-fiber sheets (GVL), laying them out with tiles.
Floor insulation is best combined with waterproofing. For that on the floor basement the following works are performed:
These works can be carried out both on top of compacted soil and on top of an existing concrete pavement.
The importance of the cellar in the economy of each family is known to all. This is exactly the place where everything that is stored for the winter is stored - vegetables, various kinds of conservation. high humidity- this is enemy number 1, since vegetables in such conditions are stored poorly and not for long. The temperature should be constant - from +2 to +4°C.
The location of the cellar can be different: in the house, in the yard, in the garage. Given the close level of groundwater, it is not possible to have a cellar dug in the usual way. In this case, bulk vegetable stores are made.
In any case, water should not have access to the cellar. It often happens that in the spring, the owners suffer from floods. Many have time to remove all the contents of the cellar before they appear.
Dampness occurs when groundwater rises too high. To prevent water from penetrating into the cellar itself, clay should be used to cover the foundation with a layer of 40 cm.
In the basement, the walls are additionally lined with bricks (a gap of up to 8 cm is desirable between the wall and the new masonry). At the very top, you need to leave a hole that will connect the air in the basement with the air in the gap. Then it will serve as an element of ventilation.
The floor also needs to be covered with clay. Then a wooden one is already placed on it. An air gap should remain under the floor, which will subsequently connect with the same gap that was made between the foundation wall and the new masonry.
All these layers must have access to the hood. The chimney must be closed for the summer. This method ensures complete drying of the cellar.
It happens that there is no water as such in the cellar, but there are droplets of it on the ceiling, and dampness is felt. This can only mean that the ventilation is not arranged correctly.
Cellar ventilation
If we talk about the cellar, which is not located in the house, but on the street, then a slightly different ventilation system is required here. In opposite corners of this room, two steel pipe. One to enter Fresh air, and the second is needed to extract the fumes.
The pipe, which will serve for the flow of air, should be installed closer to the floor in the cellar at a distance of 20-50 cm from it. On the street, it should peek out of the ground a little. In order to prevent insects and pests from entering the cellar, the pipe opening must be closed with a net.
The exhaust pipe should be installed under the ceiling at a distance of 20-50 cm from it. But above the ground, the pipe should rise an average of 1.5 m. If the cellar is in the garage, then it must be brought out half a meter above the surface. The chimney must be covered with an umbrella. It will protect against the ingress of precipitation into the cellar.
Install dampers on both pipes. In especially cold weather, they will need to be covered so that the cellar does not cool down so quickly. Moreover, the exhaust damper must be closed more tightly.
The street part of the pipe does not hurt to insulate. This will reduce the formation of frost and frost. But in severe frosts, it is still worth additionally covering vegetables.
The pipe may become clogged with frost, it must be completely cleaned of it. Condensation may accumulate in it. A container placed under the pipe will protect from excess moisture on the floor. Don't forget to empty the water from the container.
cellar ventilation summer time
The main task in the summer is to dry the cellar. The air temperature outside is much higher than that in the cellar, so its penetration into the room is impossible. In this case, the method of forced ventilation operates. You can install a fan near the hood for a while. This method is quite effective, but expensive.
If condensate still collects, then you should think about raising the exhaust pipe higher. This will increase traction and ventilation respectively. If you are sure that ventilation has nothing to do with it, since it is done correctly, and moisture is still present, then you should think about waterproofing. Perhaps a mistake was made here, and moisture penetrates through the ceiling and walls.
The ceiling and walls are usually made of concrete, but sometimes they are laid out of brick. It may not be entirely clear how, but water seeps through the concrete into the cellar. Thanks to those people who came up with materials with which you can fix this.
The consumer is offered such a mixture. It is called the Pinetrate waterproofing system. The composition includes high quality cement with additives, which is diluted with water. It also prevents moisture from seeping in. The main thing is to apply it with a layer of no more than 1 mm. Can be applied to damp walls and ceilings.
As it turned out in practice, this mixture has a unique effect on concrete. It seems to merge with it, filling all the microcracks with nanocrystals and becoming one with it. This closes the access to moisture in the cellar.
After application, Pinerate is left for several days until the crystals completely fill the concrete. After that, the mixture layer can be removed. After a while, the walls will dry out. This method is not difficult, so you can use it yourself. The production of this drug is established in Belarus, so it is also affordable at a price.
Many homeowners have underground storage spaces various items and agricultural products, which quickly deteriorate in a humid environment. However, if there is a very damp basement below - what to do in this case?
First of all, the causes of this phenomenon must be determined, because next steps will depend on them.
First, I would like to consider simple recommendations that help get rid of this negative effect with low humidity. In other cases, it will be necessary to carry out a series complex work on the qualitative organization of the main systems.

Addition!
You can also get rid of dampness with the help of slaked lime by placing a wooden or metal container with a small amount of substance in the corner.
Gradually, the air will dry out.
These include the device systems, the creation of which requires certain knowledge and skills, but with the proper approach, the work can be done by hand. Knowing the basics installation work, you can correctly organize the above structures in the basement.
The formation of a barrier against moisture from the outside of the underground room is important point, since in the presence of closely spaced groundwater it will not be possible to eliminate dampness in other ways.
There are a lot of materials to create waterproofing, but in this case we will talk about bituminous mastic, which belongs to coating analogues.


Note!
Application of bituminous mastic is carried out in 2-4 layers, but it all depends on the operating conditions of the basement and external factors(groundwater occurrence, atmospheric precipitation, and so on).
So, if there is strong dampness in the basement - what else to do? Now you need to properly organize another system, without which even when humidity can be maintained, because air flows must move correctly.
Moreover, since the forced system needs additional energy resources and costs.


Structure of forced air exchange for comparison.
(1908-1954) - Soviet statesman and military figure, Colonel General,...

General information: Approximate trophy difficulty: 7/10 Offline: 34 (20 , 7 , 6 ,...

Hide and seek is one of the most popular games for children. Kids of all ages love this...