

If you adhere to proper nutrition, then avocados are probably in ...


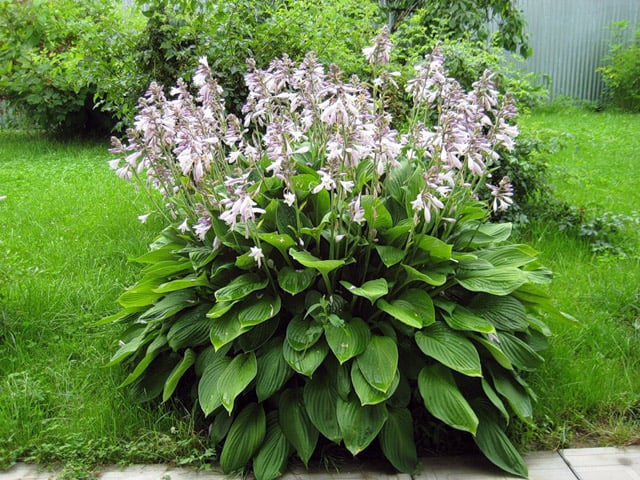
Hosta or funkia, is a shrub plant of the asparagus family, with beautiful leaves various shades and an amazingly beautiful flower, collected in an inflorescence brush and located on a high peduncle. Hosta seeds ripen in a trihedral leathery box. The funkia reaches its peak of beauty at the age of 5 and can delight with its originality without being transplanted for 25 years. There are more than 4,000 species of this perennial herbalist, a lover of shady areas.
Hosta sets seeds two months after pollination. It happens at the beginning autumn period. We must wait until the seed box turns brown and opens - it's time to collect precious seeds. Further, the seeds are dried, cleaned of the lionfish, and for better germination and hardening, they undergo a stratification process, with the seeds placed in the refrigerator for a month.
With a seed germination of about 80%, it is recommended to take for sowing large quantity planting material, they begin to plant prepared seeds in early April, after soaking them in a growth stimulator.
Amateur gardeners, based on practice, recommend using a sterile substrate, which includes peat, vermiculite, perlite, to ensure successful cultivation. The presence of fungi and microbes in the ground is not permissible. It is better to purchase the mixture corresponding to these parameters in specialized stores.
An ideal container for planting is a plastic pot with many holes on the bottom, which must first be treated with ethyl alcohol or manganese solution. Drainage is laid out at the bottom, and then a prepared, moistened substrate. Hosta seeds are scattered on the surface of the soil and sprinkled with the same soil by 5-7 mm, lightly tamped to preserve moisture, covered with foil and installed in a warm place, with an air temperature of 20-25 degrees, not necessarily bright.
If everything is done according to the rules:
- soil moisture is maintained
- the optimum temperature is maintained
- do not burn direct sunlight
- excess condensate is removed in a timely manner.
Seedlings should be expected 2-3 weeks after sowing. Dishes with emerging shoots are rearranged to a well-lit place.
Dive and plant seedlings of hosts
When the first two leaves are formed, you can start diving the seedling. Plants are planted one at a time in separate pots filled with soil consisting of 25% sand. Pots are placed on trays filled with water to provide bottom watering and covered with foil or glass. After 10-14 days, the coating can be removed and the seedlings can be hardened off, taking them outside for a short time, gradually increasing it.
Before planting strengthened and grown seedlings in the ground, it should be borne in mind that the roots of the flower grow horizontally, therefore, the holes must be made larger and wider. Before planting, the seedlings are watered abundantly and immersed in the hole along with the contents of the pot.
Hosta is called the "queen" of shady areas and garden seating areas. This is a real emerald in the front garden, in any flower bed. Hosta planting and care open field will not deliver special trouble gardeners or gardeners. The flower can be propagated by division, cuttings and seeds.
Planting begins in August and ends in September. These dates may change depending on the weather and location of the region. It is necessary to calculate the landing time so that the hosts take root before frost. With the early onset of cold weather, young plants must be covered.
Most of all, the root zone needs winter shelter, on which brushwood or other suitable material is laid.
The host is divided and planted in the spring, before the leaves bloom. A plant with a root ball, purchased in a store or donated by friends, takes root better. Before planting, the hosta can be stored briefly in the basement or in the vegetable section of the refrigerator. Plant out outdoors when danger of late frost has passed.
Sowing hosta seeds is an opportunity to get a lot of seedlings and seedlings for landscaping a large area. The labor-intensive procedure requires certain knowledge and skills. Unfortunately, seed-grown hostas do not always inherit the characteristics of the mother plant. This is especially true for variegated varieties.

Germination time varies from 7 days to 3 weeks. Usually shoots appear after 2 weeks. Seedlings are dived into other containers, hardened in the fresh air, but protected from direct sunlight. Seedlings develop slowly at first, acquiring the characteristics of a variety only after 3–4 years.
The most common methods for obtaining new plants are used in the presence of at least one bush at the age of 3–5 years. Propagation by cuttings and division is not recommended 1-2 years after planting. During this period, they give the opportunity to strengthen the underground and aboveground organs.

Dividing the bush and cuttings allows you to get hostas of the same variety as the mother plant.
The best time for propagation by vegetative means is in the spring when shoots appear. The mother plant is carefully dug up, large lumps of soil are shaken off the rhizome, old and rotten parts are cut off. Cut the hosta with a shovel or a sharp knife. Parts of a divided bush must necessarily have buds and pieces of root.
Cuttings - separation of the part with the kidneys and a piece of rhizome - can be carried out from spring to autumn. Sometimes the procedure fails, there are almost no roots left, but there are buds, or there is no outlet, but there is a rhizome. Do not throw away even such a defective planting material. Cuttings are planted in the shade, covered with cropped plastic bottle. The missing organs gradually grow, and full-fledged leaves are formed.
The hosta flower, in its homeland in Asia, is found in meadows, along the banks of rivers and lakes, on shady edges moist forests. It is recommended to create conditions for plants in the garden and in the flower bed that resemble their natural habitat.
Need well-drained soil rich in moisture and nutrients. There are no special pH requirements, moderately acidic and alkaline substrates are suitable. Variegated forms require shading during the midday hours. Under the direct rays of the sun, colored stripes and spots disappear. Varieties with blue foliage also change color. Only single-color green forms retain their characteristics in the sun, but subject to good soil moisture.
The plant does not need frequent watering with sufficient rainfall and placement in a shady place. In the dry season, it is necessary to water 2 times a week. The soil under the hosts should not dry out even in winter. In summer, you can pamper the leaves with an evening shower. Feeding is also best done in the evening.

A young plant needs more care and nutrients, so fertilize 2-3 times. In the spring, top dressing is carried out at the very beginning of the growing season. The next time fertilizer is applied to the soil during flowering. The third top dressing is needed for plants after flowering. It is advisable to alternate the application of compost and complex fertilizers. Be sure to mulch the soil immediately after watering and fertilizing, but only without damage. lower leaves plants.
The rhizome of the hosta is located in the upper loose soil layer. Loosening is done carefully so as not to damage the roots. Sometimes replaced by mulching after watering, then the soil retains moisture for a long time.
Peduncles are usually removed, but they are beautiful flowering varieties leave and cut before the seeds ripen (if not in the plans seed propagation hosts). Cut off dry and damaged leaves throughout the season. Experienced flower growers recommend leaving foliage in the fall to protect the roots from frost.

The best material for transplantation is plants with 2–3 buds and well-developed roots 10 cm long. The planting hole is made wide because the underground organs grow in a horizontal direction. The depth should be at least 30 cm. A mixture of compost, garden soil, peat and sand is poured onto the bottom. You can sprinkle with a handful of wood ash to normalize the pH and disinfect.
The planting hole is filled with a substrate to 70% of the height, moistened abundantly. The host is positioned so that the roots are on the surface of moist soil, the growth buds are at ground level. Sprinkle with soil, compact and water again. In conclusion, a layer of mulch up to 2 cm high is poured. Peat or sawdust is used as a mulching material.
During the summer, the hosta is regularly watered, dry parts are cut off, weeds are weeded. In autumn, after the first frost, the leaves begin to wither. You don't need to cut or rip them off. Foliage protects the soil above the roots from freezing. Additionally, you can cover the plant with agrofiber. In the spring, the remaining leaves must be removed (plucked out).
The plant is not very susceptible to disease, but becomes infected from horticultural crops phyllostictosis (brown spotting). A severely affected host must be destroyed, the soil should be disinfected with a fungicide. Against pathogens of fungal and bacterial diseases, they are sprayed with biopesticides.

Slugs gnaw holes in the leaves, they become less decorative. It is recommended to regularly inspect plants and remove pests. If you can’t fight, then you can find it in nurseries or flower shops planting material of resistant varieties. Slugs prefer soft tissue and are less likely to attack hosts with leathery foliage. Another option is to mulch the soil around the hosta with small gravel or crushed shell rock. At good care the plant remains healthy and attractive for 10 years.
A shade-tolerant plant with beautiful leaves helps out in cases where it is necessary to decorate the corners of the garden, the entrance to the gazebo. Against the backdrop of lush greenery, hostas look great flowering annuals and perennials: bluebells, primroses, phloxes. Varieties with bicolor and tricolor leaves are especially valued in landscape design. It is desirable to place such plants singly on the lawns, in small groups along the paths.
Growing hostas is best to start with varieties that have green foliage. They are less demanding on conditions and care, they tolerate bright lighting and transplanting more easily.
The host is great for mobile gardening of the entrance to the house, terraces, gazebos. Plants in flowerpots and containers are watered more often because the soil heats up and dries out faster. In autumn, old leaves are removed and the container is covered. At the beginning of spring protective layer remove, install the container against the wall of the house.
Any use of hosta in landscape design should be considered in terms of the conditions that will be created for the plant. With proper care, the "queen" of the shadow will not disappoint its fans, it will attract attention with a magnificent view of leaves and bell-shaped flowers.
Funkia or Hosta is a decorative and beautiful plant. Distinctive feature: large and fleshy leaves with different shapes and sizes, depending on the variety. The plant adapts well to new growing conditions, so funkia can be grown on depleted and moisture-depleted soils. It tolerates a short-term drop in temperature well and fits perfectly into the general landscape.
If we look at a function that grows in natural conditions, then we can say that this is a giant plant. The leaves are very large and thick, spreading. The hosta looks somewhat mysterious. In only one place you can see several types of plants, because they quickly interbreed and new variations form as a result.
The plant is not large, so the host can be grown at home. There are many varieties of this plant, adapted varieties that can be grown outdoors and plants that are intended for growing in pots.
There are more than 60 species of herbaceous perennials. They belong to the "asparagus" family, but earlier this type of plant was assigned to another family: "Lily".
The name of the host is unusual, thanks to the name of a botanist from Austria, who paid much attention to the reproduction and development of this plant. Previously, the flower was called funkia. The country is considered the birthplace of this plant East Asia, as well as the southwestern part Far East, Kurile Islands and Sakhalin. Despite excellent survival even in conditions of lack of liquid, the hosta can be found more on soils rich in moisture. The plant feels great near the banks of reservoirs and on the slopes of mountains. Hosta also grows on the edges.
In Japan, this plant is revered and even considered sacred; the Japanese use some parts of the plant in cooking to prepare delicacies.
The plant is low, rosette type, grows in the form of small, but rather dense bushes with basal large and fleshy leaves. Rhizomes thickened with branches - roots-threads.
Since in nature there are more than 60 varieties of this plant and more than 4 thousand varieties (!), The leaves can differ not only in size, but also in shape. You can find miniature samples, with small leaves, no larger than 5 cm in size, with different shapes and colors. The color of the leaves can be either light green or dark with a transition to a grayish-blue hue.
In some species, the leaves may not be of a uniform color, but with patterns: with white stripes, light stripes or strokes. Patterns can be varied in shape and length. Interestingly, depending on the plant variety and growing conditions, the shape of the leaves can change: the edge can be smooth, sharply defined, or vice versa, wavy.
Hosta flowers are beautiful, somewhat reminiscent of lilies, various colors. Despite the attractiveness of the flowers, hostas are more eye-catching with their dense rosettes. In diameter, they can reach up to a meter!
The plant is unpretentious and hardy, it is stable - from the moment the leaves unfold (this happens in late spring) until the end of October, the plant pleases with its unusual beauty.

In landscape design, plants are very popular, there are more than 4 thousand hybrid varieties, but only a few deserve special attention, since they served as the basis for the creation of new plant varieties.
Host types:

All varieties are classified by type:
If we consider the first group separately, then it includes 5 types of plants that differ in leaf color: blue, yellow, green, variegated (with a border along the edge of the leaves of a light shade) and vice versa, the leaves are light, and the border is dark green.
Plant sizes by group:

Homemade hosta is an unpretentious plant, adapts well to any conditions, and this flower can be called a plant for the lazy.
Breeding methods:
If you seriously decide to start breeding this plant and grow hostas from seeds at home, you need to Special attention devote to seed preparation.
Preparing seeds and growing hosta at home:

One of the most common and simple ways propagation of this plant is the method of cuttings and dividing the bush. If this is an adult plant, over the age of 4 years, it tolerates division perfectly and this procedure will not affect the development and growth. If manipulation is performed at an early age, growth rates may be inhibited. But it all depends on the type of plant and climate. Some hosts will tolerate division very well, and some will need a long recovery period of 1-2 years.
Features of propagation of hosts by cuttings:

In order to plant a seedling or cutting separated from an adult plant, it is necessary to prepare the soil and the pot. The container should be spacious and suitable for the size of the plant. Therefore, at the initial stage, you need to know which variety you are dealing with. Not all varieties of hosta can be grown at home in pots and flowerpots. There are special varieties adapted for growing indoors.
Landing preparation:

In fact, caring for a flower at home is not difficult, but here the opinions of experts and flower growers differ, since some believe that the host will wither over time, as it is more suitable for growing in open ground, while other experts believe that with all favorable conditions, the plant can please for 10-15 years.
Hosta flower - how to care:
Since the plant is grown at home, hosta pests are not terrible. But this plant is susceptible to diseases not only when grown in open ground, but also in pots. The host is very susceptible to the X virus - small yellow dots or spots appear on the leaves. If the plant becomes sick, it will have to be thrown away, because neighboring hosts in pots can become infected. It is also necessary to get rid of gloves and all the tools that were used in the work. Disinfect the tool, but it is better to replace the pots with new ones.
Another disease of the host is follistictosis, when large brown spots appear on the leaves. yellow spots. Over time, they will begin to merge with each other, a plaque forms on the surface. Spores affect the entire plant, including flower stalks. The soil also becomes infected, so you need to completely get rid of such a plant and throw away the pot.

Spraying with fungicides will help protect the plant from infection.
Before you grow hosta from seed, you need to know that it's a tricky business. Success depends on what kind of substrate you use.
The substrate for germinating hosta seeds must be sterile, if fungi or other microbes are present in it, then hosta seeds will immediately become infected and young seedlings will be sick. It is recommended to use a store-bought substrate.

seed container hosts also need to be processed. To do this, you can use medical alcohol or a solution of manganese. The most suitable container is with cells or compartments. Drainage should be laid out at the bottom of each cell, and then the substrate. Water the soil well, because the hosta plant is moisture-loving.
If the container has a lid, it will be easy for you to maintain the required humidity. If there is no lid, use clear glass.

Hosta seeds should be planted at a depth of no more than 5 mm. After planting, the soil needs to be compacted a little, this is necessary so that the hosta seeds quickly absorb moisture, and this is possible only when the seeds come into contact with the ground.
With good humidity and air temperature above +20 degrees, hosta seeds germinate in two weeks. You need to dive plants after the appearance of a few pairs of leaves. Hosta is planted outside in the spring, when the soil warms up to +10.

Then collect the seeds from the hosta if it blooms for you this year. Practice shows for landscape design hosta is perfect. Its spreading foliage goes well with stone, with other plants, with flowering and non-flowering.
Since it is not very difficult to grow hosta from seeds, you will have the opportunity to test yourself in this matter. Don't plant hosta seeds this year. Dry the seeds in a cloth bag in partial shade, and next year the seeds will be ready for their germination.
Do you love hosts? I just love it! This flower is called the queen of shadow, and this is no doubt a well-deserved title - these plants have completely luxurious large leaves of a wide variety of colors, which retains the brightness of color only in dense shade. In full sun, the leaves of the hosta take on the most common green color.
Hostas are so diverse that flower beds and flower arrangements you can form one of them by planting nearby different plants- hostas differ not only in the shape of the leaves and their colors, but also in size.
There are truly gigantic specimens more than a meter high, and there are small compact forms no higher than 30-40 cm. This circumstance allows you to combine them in a variety of compositions.
Until recently, I planted my beauties by dividing the bush. A light wave of a shovel in the spring - and a small piece is separated from the large hosta, which takes root in a new place without any problems.
This plant, in my opinion, has only one drawback - its seedlings are expensive. If you are the owner of a shady area, then you will need enough a large number of these flowers that hit the pocket.
Growing hosta from seeds will solve this problem. It has a number of advantages:
As you can see, there are quite a few advantages in growing seedlings from seeds. And we will now tell you how to do it right.

You need to take into account right away that you have quite laborious work ahead of you, which will not lead to good results immediately - hosta grown from seeds will reach relative decorativeness only in the fourth year after planting, while the acquired seedling will ear almost immediately. However, the result is worth it.
So what you need to remember first:

As mentioned above, it is imperative to prepare the soil for planting seeds, otherwise they simply will not germinate. And soil preparation is not only about calcining or freezing it.
Hosta seeds require a substrate that consists of three parts:
These components must be mixed together and filled with this nutrient mixture container for seed germination. You can simply purchase each of these components separately, and then combine them in equal proportions.
The finished nutrient mixture should be calcined in the oven or placed in the freezer for a day.

Immediately after the first small shoots have appeared, the container must be rearranged to where more light, then illuminate it with lamps for correct formation sprouts.
After some time, after the first leaves appeared on the seedlings, the seedlings must be dived - in other words, plant them in small pots. They can be put on the balcony or even on the street, as soon as you are sure that there will be no more night frosts.
At the same time, it is desirable to provide bottom watering to your plants by placing pots with seedlings (or a container with seedlings, if you are too lazy to make a pick) in a pan with water. With the help of small holes in the bottom of the containers, the plants will absorb the optimal amount of moisture for them and will never dry out.
It will be possible to plant small hostas directly into the ground only at the beginning of July, when they finally get stronger and harden. After that, the plants need to be carefully monitored, weeded and carefully loosened so that they quickly take root and feel good in your garden.

Please note that seed hosta will grow very slowly. By the end of summer, she will have no more than 3-4 leaves, and this is absolutely normal. So be prepared for your hosts to acquire decorative look not earlier than two or even three years later. In the meantime, waiting for July, do the following:

Hosta is hardy plant and it easily endures our harsh winters. However, young plants that you have grown from seeds and have just rooted in your area must be covered for at least the first year.
It is not difficult to do this, the host does not require any special shelters - just pour dry foliage or peat on top, this is more than enough.
In the spring, as soon as the snow has melted and the frosts have receded slightly, simply rake shelter from your plants and let them get enough sunlight and fresh air for them. Very soon the hosts will begin to produce young shoots. In the second year, the hosta will already begin to produce its beautiful leaves.
You need to take care of young plants in the same way as last year - weeding, watering and loosening are loved by all garden flowers without exception.
As you can see, there are no difficulties when growing hostas from seeds, although you will have to be patient - a plant planted in this way grows very slowly. But this is perhaps the only drawback. Everything else relates exclusively to the merits:
Therefore, growing hostas from seeds is wonderful.
If you adhere to proper nutrition, then avocados are probably in ...


Pizza can be cooked not only with meat products - sausage, sausages and ...