Quite often, the population is interested in how to find out if an apartment has been privatized or ...


As you know, there are no houses without a roof. The roof structure is a kind of layered cake, which is enough complex system, which includes rafters, beam ceilings, Mauerlat, hydro and vapor barrier layers. Mauerlat is called thick timber, which is laid around the entire perimeter of the roof and carries the function uniform distribution roof loads. It is attached to the walls of the building and serves as a foundation for the roof. Rafters are commonly called inclined beams. The structure of each individual species is not the same. They differ in the complexity of the configuration.
The shape of the roof can be absolutely any, therefore, milestone roof construction is a clear and precise design of all the nuances of the future roof.
Therefore, the question of how to properly make a roof includes more than one factor, and not even several. Before you start studying the installation technology and its device, you need to figure out what types of roofs are, what function they should perform, and also have an idea of how roofing material is counted and what types it is divided into. In addition, you will have to study the properties of the selected coating. Even if it is planned to hire specialists for this, nevertheless, knowledge of all the nuances in this matter and useful information useful to all those who decide to start building a house.
In addition, the roof should be an architectural continuation of the house, which is the final and defining overall appearance element. Therefore, you need to choose the right roof. There is more than one type of roof, so it is important to decide at the very beginning of construction what form, in accordance with the design of the estate as a whole, it will be. Consider the most common and popular types of roofs.

When installing a flat roof appears unique opportunity make it an open space for recreation.
It should be noted that this type of roof is not often used in the construction of private houses, since their construction does not withstand the load in the form of snow in winter periods. The only exception is when she has small area and its rafter system is not made of wooden beams, but is based on reinforced concrete or metal structures. Their slope angle is about 3 degrees, which is the reason for the low self-cleaning flat roof. In them, as well as in pitched roofs, there are rafters and a crate, but their design is much simpler, which allows you to make such a roof with minimal cost. Valleys, ridges and inclined stiffeners in this type missing.
From the point of view of aesthetics, this type of roof is attracted by the fact that such a roof can be used as an additional area. For example, you can make a garden on it, equip it with a terrace. Also on her summer time you can put an inflatable pool. In other words, do it on a flat roof comfortable place for a perfect holiday for your family. In the cold regions of our country, experts do not recommend doing flat roof on their homes.

The use of a single-sided roof will ensure the use of the internal area to the maximum.
This type of roof is more suitable for outbuildings, garages and shops than for residential buildings. Unlike other roofs, a special truss system is made in this type, in which the beams, resting directly on the walls of the building, are smooth guides and hold all the roofing material on themselves. The installation technology of this type of construction is very simple, and it will not be difficult to do it correctly even for a non-professional in this field. Typically, the angle of inclination of such structures is from 5 to 60 degrees.

The gable roof consists of two planes that rest on the walls and are located on the same level.
Gable roofs are the most common and are used in construction almost everywhere. This type implies the presence of two slopes that rest on the walls of the building with the same height. If the walls are of unequal height, then the roof will look asymmetrical, which will spoil the overall appearance of the building. Therefore, it is correct when the walls are identical to each other.
In connection with the existing fronts, which resemble triangles, a gable roof is also called a gable roof. The device of this type of roof is very different from shed structures. They do not use straight beams, and usually the gable roof truss system is in the shape of the same triangle as the gable of the house. It is important to note that the angle of inclination of such a roof will directly depend on what roofing material is planned to be used. Tiles look best on these structures.
Due to their shape, gable roofs are very practical and easy to use. As a rule, they have the opportunity to make an attic space that can be insulated and used as usable area in the form of an attic, in which you can equip, for example, a children's room, bathroom, bedroom or office.

A feature of the mansard roof is broken slopes, thanks to which the functionality of the attic space increases.
The mansard roof implies a structure that has two planes on each slope, which are interconnected under obtuse angle. It belongs to the variety gable roof. The broken shape has a considerable advantage over the usual gable, because thanks to its design, the area and volume of the attic in this case there will be much more, which is great solution for small private houses. Because of this broken roof today at the peak of popularity in our country. Often on mansard roofs various slopes are used: the lower ones are steeper, and the upper ones are gentle.
Due to the fact that various fractures and bends increase the load on the main elements of the roof, and this happens for such a reason as the accumulation of dirt, snow or water in the joints, as a result, leaks may appear in the structure and the roof will eventually sag. Therefore, the right material for this option and a well-made truss system will also play an important role in the durability of the roof and its functionality. In other words, when choosing such a form for a house, it is necessary to approach this issue very seriously.

The hip roof is a kind of hybrid of gable and hipped roofs.
This design consists of two triangular slopes and two trapezoidal, which are located on both long sides of the building. Triangles are called hips, and this is where the design got its name from. This variety also includes hipped roof, in which all 4 slopes have a triangular configuration. They converge at one point. These are suitable for rectangular or square buildings. Due to their design, they are very convenient, since snow and dirt are practically blown off such roofs, and therefore there is no need to install snow retainers and complex drainage structures on them.

A metal-tiled coating will help the owners of the house forget about repairing the roof for 35-50 years.
Most likely, no one will be able to give an unambiguous answer to this question, since the choice of roofing material will depend on many factors: architectural style and the type of building as a whole, aesthetic and economic aspects, requirements for the quality of the roof (service life, appearance and other characteristics). So, for example, if you cover the roof with corrugated board or metal tiles, its service life will be approximately 25 to 50 years. If the coating is installed from ondulin, then the minimum warranty period starts from 15 years. In any case, experts argue that the durability of the roof depends to a greater extent not on its type, but on correct installation roofs.
As a rule, in the construction of a house, except for interior decoration, the final stage is covering the roof with roofing material, which requires a lot of money. Therefore, from the point of view financial side the choice should be individual and it is better if, at the very beginning of construction, the owner of the house decides on the choice of the type of coating and sets aside the necessary amount for the installation of the roof. The question of how to properly make a roof should arise immediately before necessary material In stock. In addition, if you plan to cover the roof with your own hands, you will need to purchase a set of tools, which should include:
It should be noted that such heavy roofing materials how cement-sand and ceramic tiles are much more expensive than shingles, corrugated board or metal tile. If, nevertheless, the choice fell on heavy coatings, then it is important to know: they require a more powerful and costly truss system.
Reading time ≈ 10 minutes
The most common option in the construction of private houses is gable roof, assembled with your own hands from the Mauerlat to the ridge. Below in this article you will find drawings and photos, and a detailed step-by-step instruction will help you figure them out. You will also learn about how high the skate should be and how it depends on the functionality. attic space, learn how to calculate thickness and pitch truss system.
Classic gable roof

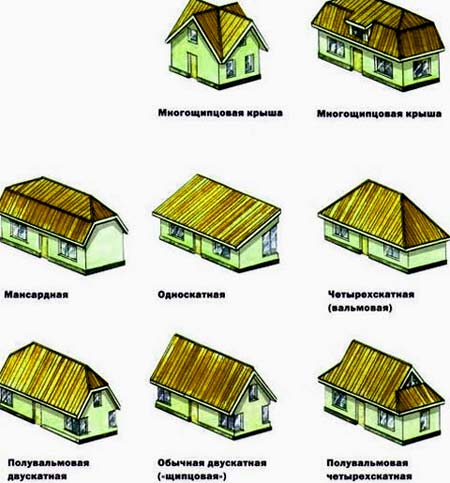
The main types of roofs of private houses
In order to clearly imagine what a gable roof is, look at what other options are used in the construction of private houses. And this is not all, but the most popular:
For a rectangular house with an area of 60 to 100 m2, the two-slope option can be called the most suitable - it is easy to perform and inexpensive to implement. In addition, there you can equip not only the attic, but also the attic.
Now let's figure out how to build gable system roofs in a private house. There are several stages in this process, and we will consider each of them separately.
You can not use the formulas for the calculation if you do not make roofs in the future and just download the program (http://srub-banya.by/programs/raschet_stropil.exe). By opening the downloaded file, you will be taken to a page with a menu - it is located in the horizontal line at the top.
Main operating loads:
In addition to the main loads, there are also secondary or “default” ones, these are:
Values:
The slope of the slope is expressed in degrees and is denoted by the symbol α (alpha). To determine the value of α, you need to divide the height H by half the span L. Below is a table with the results of determining the main slopes.
In cases where:

Distribution of snow loads in Russia
The map shows eight snow regions, and the Sg value for each is calculated in kPa converted to kg/m2:
For the map above, Appendix 5 of SNiP 2.01.07-85 "Loads and Impacts" is mandatory. And now let's make a trial calculation for Ivanovo (this is the IV district on the map), the value is 240 kg / m².
So: H/L=2.5/3.5=0.714
According to the table α=35⁰. Given that 30°<α<60°, вычисление µ делаем по формуле µ = 0,033·(60-α)=0,033*(50-35)=0,825. Следовательно, S=Sg*µ=240*0,825=198 кг/м², что и есть максимально возможной снеговой нагрузкой.
At steep roofs, where α > 30 °, then the slopes have a large windage. For flat roofs, where α< 30° увеличена турбулентность.
The average value of the wind load Wm at a height Z above the ground is calculated by the formula Wm=Wo*K*C.
In this formula, the value;

Wind loads on the territory of the former USSR
Wind pressure standards by region
Coefficient value
Let's make a conditional calculation . The aerodynamic coefficient C can be from -8 when the wind undermines the roof to +0.8 with a large windage (the wind presses on the slope). Considering the conditionality of the calculation, we take C = 0.8.
In the same Ivanovsky district, we take a house where h=6m (α=35⁰). This is region II, where Wo= 30 kg/m², the coefficient is less than 10, which means K=1.0. Therefore: Wm=Wo*K*C=30*1*0.8=24 kg/m².
The mass of the roof varies depending on material
Mass of all components
The conditional calculation for the same house on cement-sand tiles will be:
And here is the calculation for the lightest roofing material, metal tiles:
In this case, we will be guided by GOST 24454-80 for conifers.
| Section width (according to the thickness of the board), B | Section height (along the width of the board), H | ||||||||
| 16 | 75 | 100 | 125 | 150 | — | — | — | — | — |
| 19 | 75 | 100 | 125 | 150 | 175 | — | — | — | — |
| 22 | 75 | 100 | 125 | 150 | 175 | 200 | 225 | — | — |
| 25 | 75 | 100 | 125 | 150 | 175 | 200 | 225 | 250 | 275 |
| 32 | 75 | 100 | 125 | 150 | 175 | 200 | 225 | 250 | 275 |
| 40 | 75 | 100 | 125 | 150 | 175 | 200 | 225 | 250 | 275 |
| 44 | 75 | 100 | 125 | 150 | 175 | 200 | 225 | 250 | 275 |
| 50 | 75 | 100 | 125 | 150 | 175 | 200 | 225 | 250 | 275 |
| 60 | 75 | 100 | 125 | 150 | 175 | 200 | 225 | 250 | 275 |
| 75 | 75 | 100 | 125 | 150 | 175 | 200 | 225 | 250 | 275 |
| 100 | — | 100 | 125 | 150 | 175 | 200 | 225 | 250 | 275 |
| 125 | — | — | 125 | 150 | 175 | 200 | 225 | 250 | — |
| 150 | — | — | — | 150 | 175 | 200 | 225 | 250 | — |
| 175 | — | — | — | — | 175 | 200 | 225 | 250 | — |
| 200 | — | — | — | — | — | 200 | 225 | 250 | — |
| 250 | — | — | — | — | — | — | — | 250 | — |
We take an arbitrary section width and determine the height:
H ≥ 8.6*Lmax*√(Qr/(B* Rbend)), where slope α< 30°,
H ≥ 9.5*Lmax*√(Qr/(B*Rbend)), where Rbend e slope α > 30°.
Values:
For softwood sawn timber Rbend:
Now let's check whether the deflection will fit into the standard, which for all materials under load should not exceed the value L / 200 (L is the length of the working section of the leg). The indicator must correspond to the inequality: 3.125*Qr*(Lmax)³/(B H³) ≤ 1.
Meaning:
We count on the same house in Ivanovo, taking into account the conditions where:
In the table above we have calculated that with these materials the total load is Q=303 kg/m².
As a result, we got a cross section of rafters for erecting a roof of 50 × 175 mm with a step of 80 cm.

Mauerlat on a brick wall
To build a gable roof on your own, you can’t do without a Mauerlat, which is the basis of the truss system. If we are talking about a residential building, then a bar with a section from 50 × 150 mm to 150 × 200 mm is usually used for it (the thicker the wall, the larger the section of the bar in width). A board or beam is mounted on load-bearing walls and fixed with anchors. Given that the Mauerlat will withstand the entire truss system with associated loads, then its installation will directly affect the mechanical strength of the entire roof. Below is a video showing how a Mauerlat is installed on the walls of a block house.
Video: Installing the Mauerlat

Rafter legs are easier to assemble on the ground
It is most convenient to assemble a structure such as rafters (2 legs plus additional elements) on the ground, as in the photo above, and not on the roof, so that later it can be lifted with blocks or just ropes, but this is not a requirement. Above, you could learn how to make calculations for such a system, taking into account all the loads, therefore, you already know what section of the boards you will need, what the height of the ridge and the step size will be. At the top, the boards are joined “on the mustache”, and the ridge beam is installed only after the installation of the extreme rafters.

A system without an overhang, where the legs are fixed with different fasteners

Systems with an overhang also have different fasteners.
At the top you see two diagrams showing truss systems without overhang and with overhang, but the most important thing is to pay attention to the method of fastening, or rather, to the fastener itself. This can be a steel corner (preferably reinforced), short stacks, tightening boards, nails, self-tapping screws and staples. This is a very important point, since during turbulence the roof can be blown up, and overturned with a side load, although the result in both cases will be equally deplorable. After installing the side rafters, the ridge beam is fixed, checking the vertical level of each leg.
Watch the video, which explains some of the nuances of editing, but do not forget that each artist may have their own methods, and if you hear or see inconsistencies with your ideas, then this is quite normal.
Video: Installation of the truss system

Installation of ceramic tiles
Further work on the installation of the truss system depends on what is provided in the attic and what roofing material will be used. For example, if you want to equip an attic there, then it is quite natural that you cannot do without insulation and waterproofing. Also, a certain role will be played by the heating system, or rather, the presence or absence of a chimney, as well as ventilation.
Depending on the choice of roofing material, a crate is made. That is, it can be intermittent, as in the top photo, or solid if you decide to make a roof from shingles. Also, roofs sometimes provide for the installation of a heating cable from icing, and it can be mounted not only from the outside, but also from the inside, laying under the roof.
I hope you understand how to make a gable roof with your own hands - the most important thing is the correct calculations of the pitch, section of the rafter legs and slope. If you are interested in certain points, such as mounting the Mauerlat, rafters or roofing, then these are topics for separate articles, which you can also find on our website.
Any building consists of three main parts - the supporting structure, the box and the upper structure. It is the upper structure that determines the functionality of the building, its reliability and comfort of living. However, it may well be done by hand, if you study the features and principles of building the roof of the house.
Depending on the shape of the structure of the box of the building and its size, various roof structures are used, many of which can be made by hand.
The most common house roof structures that are easy to calculate and do it yourself.

The angle of inclination of the rafter legs varies in the range of 20 - 50 °, it is selected depending on the magnitude of wind and snow loads acting in the construction region. Making such a roof with your own hands is not difficult. The simplicity of the design allows you to correctly calculate the need for materials, avoiding overspending.
Such structures differ from gable structures - the presence of additional side planes with a certain slope.


Danish hip - the roof of the house is formed in such a way that only part of the pediment is cut off. This is done in the case when it is necessary to increase the volume of the attic room.


The rounding of the roof in its lower part is an atypical case, usually all slopes are straight.
Norwegian hip - the roof is made with an overlap in the upper part of the pediment, which makes it possible, in particular, to arrange a canopy over the balcony or loggia elements of the building.

Multi-pitched roofs - such a roof is arranged for purely design reasons, without sacrificing its functional qualities. At the same time, truss systems are designed using computer programs, and execution is hardly possible with your own hands without special skills. Such roofs can only be properly made by qualified specialists.

For the final coating of such roofs, small-format materials in the form of tiles are used as the final outer coating. Large format materials can be used inefficiently.
The upper structure of the building is a complex structure, which consists of a number of elements:

Before proceeding with it, you need to properly organize the workplace:
As a preparatory measure, it is imperative to make a draft design of the truss system, which will allow you to correctly calculate the need for materials depending on the angle of inclination of the slopes, using graph paper, a pencil and a ruler, you can prepare drawings of the main elements of details on the roof of the house with your own hands.

With a symmetrical installation of slopes, the axis of the ridge beam will pass strictly along the longitudinal axis of the building:
Continuation of work depends on the prevailing weather conditions. If the weather is stable and the forecast is favorable, you can begin to form a roofing pie. Otherwise, this operation can be performed after installing the roof finish, from the inside.
The purpose of this element is heat saving in the house. It is calculated that in houses with insulated attics, heating costs are reduced by 20 - 25%. Thus, the cost of insulation will return in the form of savings due to energy consumption.


The order of work is as follows:
This element is the bearing surface for the final roofing, in addition, it holds together the entire structure of the upper structure of the house.
The crate happens:
A continuous crate is used when using small-format materials such as tiles as a finishing coating.
The material for the lathing is usually a cut or unedged board with a thickness of 25 mm. Do not use boards with a width of more than 15 cm, constantly exposed to moisture, the boards of the crate are warped. The result may be swelling of individual elements of the roof with a violation of its continuity. The crate on the roof of the house, due to the ease of execution, can be done with your own hands.

Depending on the complexity, the roof of the house can be entrusted to specialists, and a simple gable roof can be properly covered with your own hands. In the process of framing and installing the finishing coat, it is necessary to observe the order in which additional elements are installed on the roof, to do individual work out of turn, sometimes it is simply impossible without violating the mating elements.
When attaching additional verandas or rooms to the house, it must be borne in mind that the foundation in the extension will live an independent life for at least another five years. The roof will behave accordingly. Therefore, on the extension, it is necessary to provide for the possibility of free movement of its elements without losing the basic qualities.
Completion of construction is a crucial stage, however, even before starting work, it must be remembered that all wood used in structures must undergo antiseptic and fire-fighting treatment. Otherwise, all costs may be in vain.
When starting to do the work with your own hands, you need to understand that each step needs to be considered and analyzed. I wish you success!
Before we talk about how the roof of a house is built with our own hands, let's dwell a little on the existing types of roofs.
Scheme of the construction of a gable roof for a house
All roofs of private buildings are divided into two large groups: and pitched. The latter, in turn, are divided into one-, two- and four-slope, as well as broken and multi-gable. Let's take a look at each separately.
Its undeniable advantages include:
However, despite all the advantages of flat roofs, there are several significant disadvantages. Firstly, precipitation in the form of snow accumulates on such roofs, which require regular cleaning.
 Existing roof options for a private house
 And, secondly, moisture from precipitation accumulated on the roof often finds cracks in the roof and forms leaks, so the coating of such roofs should be flawless.
This is the simplest option for arranging the roof of a private house. Although this type of roof is used extremely rarely for residential buildings, it is more often in demand to cover outbuildings.
A shed roof has such advantages as simplicity of construction, as well as cost-effectiveness during construction. But the not particularly attractive appearance of the roof, as well as the fact that the slope here is directed in one direction, which requires the construction of a reliable drainage system, makes such roofs not in demand for residential buildings.
 The design and construction of a shed roof for a cottage
 In addition, it is almost impossible to make an attic on such roofs.
Very often used to cover private houses. It is especially relevant for small country houses. This is due to its advantages, which include the following:

Among the disadvantages of such roofs, one can single out the need to equip a ridge, as well as two drainage lines. In addition, if we compare gable roofs with shed roofs, then their weight will be greater, which requires adjustment. In addition, making such a roof with your own hands is much more difficult than a shed roof.
It is not found as often as a gable, although it has a more attractive appearance. This is due to the fact that such a roof structure is very difficult to perform and its weight is very large.
But such roofs make it possible to make a more spacious and bright attic inside, which will always be warm due to the fact that it will be heated from four sides.
 Roof truss system
 Broken roofs - the most popular type of roofing in private construction. This is due to the fact that, if it is built correctly, then such a roof is practically devoid of flaws. But it has a lot of advantages:
Read also
Repair of the roof of a multi-storey building
There are also disadvantages that are easily eliminated with the proper arrangement of the roof. These "cons" include:

Houses with a multi-gable roof are original in their design and suitable for private houses of any architectural form. But besides this, they also have the following advantages:
However, such a roof also has disadvantages, which boil down to the difficulty of erecting a truss system under a plucked roof, an increased amount of building material, as well as the complexity of arranging drainage systems.
 Ready-made project of a two-story house with a multi-gable roof
 You are unlikely to be able to build this type of roof on your own, and therefore in our article we will not dwell on it, as, in fact, on the rarely demanded - hipped one.
Let us consider in detail the technology of erecting such roofs as single-pitched and gable, since they are the most popular in private construction.
Before proceeding with the construction of a pitched roof, it is necessary to decide on a few points.
First, you need to understand where the only roof slope will be directed. Experts recommend that the non-windy side be considered a guideline for the direction of the roof slope. Secondly, you need to decide on the angle of the roof. Here it is worth adhering to the following pattern: the more precipitation falls in your area, the steeper you need to make a pitched roof.
 Installation of a single-pitched roof frame log
 But do not overdo it, because by increasing the angle of the roof, you increase the windage of the structure. Thirdly, depending on the chosen angle of inclination of the roof, it is necessary to determine the type of roofing material. So, for different angles of inclination of the roof, a variety of roofing materials are recommended:
Having decided on all the above parameters, you can begin to build a pitched roof.
The construction of a shed roof will require you to purchase the following building materials. First, you need to stock up on wooden beams for the truss system, boards and nails for mounting the structure. 
Secondly, do not forget to purchase a wood preservative that protects it from insects, moisture, mold and mildew. Thirdly, purchase the required number of rolls of steam, hydro and thermal insulation, roofing material, as well as fasteners in order to install the roof.
As for tools, here you will not need any specialized tool, it is enough to have a hammer, a hacksaw, an ax, a stapler, a measuring tape, and a building level. In addition, you will need a knife, a pencil and a brush for working wood.
The construction of a shed roof comes down to several stages.
Mauerlat is a beam, which is the lowest part of the roof structure. It is mounted on the wall of the house and acts as a support for the rafters.
 An example of fastening a shed roof Mauerlat
 It can be made from a 10 x 15 cm timber, which is attached to the wall in one of the following ways: using wire, using construction studs or anchors. The installation sequence of the Mauerlat is as follows. First of all, to ensure the durability of the roof, the Mauerlat must be waterproofed from the wall of the house using a sheet of roofing material or polyethylene, which is laid between them.
Further actions will vary depending on the fastener method you choose. If you decide to use anchors or studs, then you need to make holes in the wall and in the Mauerlat, matching each other in step.
To facilitate this process, use a board with marks for the holes. Alternatively, the studs can be fixed in the wall during the laying of the last row of bricks (block).
It is necessary to insert bolts into the holes in the wall, and subsequently simply put the Mauerlat on them.
 The name of the structural elements of a pitched roof
 It remains only to tighten with nuts and with the use of Mauerlat fastening washers.
If the Mauerlat is planned to be mounted using a wire, prudently mounted in the top row of the wall masonry, then the process is greatly facilitated. Then in the Mauerlat at a distance of at least 25 mm from the edge, it is necessary to drill a through hole parallel to the edge of the beam. The ends of the wire are passed through it and tightened tightly.
Shed roof has a fairly simple design truss system.
 Shed roof truss system
 As rafters, either a beam of a smaller section (up to 50 mm) or a board (5 x 15 cm) is used. It is necessary to take into account the nuance that the rafters should protrude at least 30 cm beyond the level of the wall. This is necessary in order to protect the walls of a private house from rain and other precipitation.
For a snug fit of the rafter legs to the Mauerlat, it is necessary to make cutouts in the rafters for the base beam. The step for placing the rafters is chosen based on the width of the heat insulator roll. The rafters are fastened with nails (10 cm).
Now it is necessary to fill the boards of the crate across the rafter legs. For it, as a rule, bars of a small section (up to 5 cm) are used. The step of the crate depends on. For example, when using rolled roofing materials, it is recommended to make the crate solid. The installation of the crate is also carried out using nails (10 cm).
At this stage, the main thing is to correctly follow the sequence of laying hydro-, steam- and heat-insulating materials. So, a waterproofing layer is laid on the crate, and steam and heat insulators are mounted on the inside of the roof (thermal insulation is adjacent to the crate, which is covered with a waterproofing material on top). It turns out that the thermal insulation is closed between the layers of vapor and water insulators.
 Scheme of waterproofing and insulation of a pitched roof
 The following sequence of work is recommended. First of all, a heater is laid, which is most often used as mineral wool. The insulation is laid between the rafters. Sometimes it is advisable to use a two-layer insulation bookmark, while creating a heat-insulating layer about 10 cm thick. This will make the degree of heat and sound insulation of the attic space greater. At the second stage, the vapor barrier film is installed.
They place it from the side of the interior and, pulling it, fasten it with construction brackets using a stapler to the rafters.
Such a layer will prevent the penetration of steam on the heat-insulating layer, while keeping it always dry. This will help extend the life of the insulation and will not change its thermal insulation characteristics. Further, all roofing work will be carried out from the outside of a private house.
 Installation of corrugated board on a shed roof
 Let's start laying the waterproofing membrane. The features of its structure are such that it will not allow moisture from the outside to get onto the insulation layer, but at the same time, vapors from the heat-insulating layer will come out. The waterproofing is attached in the same way as a vapor barrier film. In conclusion, a shed roof requires the installation of a finish coating and a drain.
1.
2.
3.
4.
5.
Often, the developer is faced with a very acute question related to how to properly build the roof of a house, and to do it so that there are no problems during operation, and the roof itself turns out to be reliable and durable.
Further, we will talk about how to properly build a roof with your own hands, what structure this important element of the house has, as well as what stages of work should be affected directly during the installation process. Of course, it is impossible to mention all possible types of roof construction at once, since there are a lot of device options. Therefore, as a basis, you can take the structure of the roof of a gable type house, which is one of the most popular among all types of structures. Let's figure out how to build a roof of this type of house.
It should be noted that it is recommended to start arranging the roof immediately after the construction of the main frame of the house, that is, its walls, otherwise there is a possibility that the uncoated building will collapse from the inside.
Since creating a roof from scratch is a very difficult process, it is imperative to create the desired projectusing the services of a specialist for this. Here you should consider the future shape of the roof structure, taking into account the parameters of the entire building as a whole, and also choose the roofing material.
To figure out how to build a roof, you need to know what functions it carries. Mauerlat is a support beam made of wood and measuring approximately 150x150 millimeters. It is laid around the perimeter of the entire area of the building on the tops of the walls, that is, in those places where the rafter legs will be attached. It's important to understand. The installation of the Mauerlat is extremely important, because it is thanks to this element that the entire load on the walls will be distributed evenly. The beam must be tightly fixed. This can be done with a wire, but this option is only suitable for roofs with a small windage.

Provided that the roof area is more than 250 m², then fixing the Mauerlat requires installing a stud with a thread equal to 12 millimeters to a depth of at least two bricks in the wall (read also: ""). The step with which they should be located is 2 meters. A stud is an object on which a beam is put on and secured with a nut having a wide washer. As a rule, the Mauerlat is closed from the outside of the wall with masonry.
It is extremely important to remember that all structural elements consisting of wood must be treated with an antiseptic to prevent their possible decay, and those places where wood comes into contact with concrete or brick must be equipped with waterproofing.
When thinking about how to properly build a roof, you need to know that the most important load-bearing element of the roof frame is the rafter. It is a beam measuring 150x70 millimeters. However, the parameters may differ depending on how much weight the roof has, and also with what step the rafter legs are located.

It is very important to properly fix the rafters to the Mauerlat. To do this, having previously made the necessary incision, you need to rest the rafter leg against the support beam. Further, the corners are fastened together with the help of a metal corner (in more detail: "").
You can also fix the rafters by driving in three nails.
This is done as follows:
This method of strengthening can protect the entire structure from unforeseen displacement under the influence of loads. Another important point: the wood used for the construction of the frame must have a moisture index not exceeding 20%.

Construction of a combined roof, see the video:
It must be remembered that, regarding the issue related to how to properly build a roof, one cannot fail to mention its such an important element, located at the very top, as a ridge. The structure of the ridge directly depends on the design features of the roof.
So, it is customary to distinguish the following methods for arranging a skate:

Parameters such as the crate step or the size of the board used directly depend on what type of roof is being built and what indicator the roof slope has. When laying a soft roof, the crate should be mounted closely, and for a sheet roof, the step should be from 40 to 60 centimeters. Often there is a double crate, the essence of which is to stuff bars on the rafter legs in compliance with a certain step (counter-crate), and then directly to the crate. This type of device is typical for a soft roof.
Very often today, the roofing material is a popular metal tile, since its cost is quite affordable, in addition, it is easy to install and has a long service life, and thanks to a wide range of color shades, any design solution can be realized. In this case, the use of waterproofing under the roof is mandatory, it is also necessary to equip the roof with insulation, which is placed under the waterproofing, and vapor barrier, laid directly above the living space.

It is important to provide ventilation holes along the entire length of the roof so that moisture can escape unhindered.
One way or another, if you have questions regarding the roof device, information with detailed photos and videos of installation can always be found on the Internet, but you should also not neglect the help of specialists in order to avoid further problems during operation.
Quite often, the population is interested in how to find out if an apartment has been privatized or ...

In all organizations, as a rule, sooner or later there is a change ...

A lot of people are thinking about how to find out whether an apartment has been privatized or not...