So I bring to your attention a simple, but very long recipe for cooking ...

Making stencils with your own hands will allow you to decorate any kind of surface with images that will emphasize your personality. Whether you want to learn how to make stencils as a hobby, or just want to create a one-time design for a specific project, the steps below will make it easy for you to select, make, and cut your own stencils.
Decide on a design. Since you are making a stencil for yourself, you can create anything. Think about the size of the surface you plan to stencil on (T-shirt, wall, bookmark), who the design is intended for (child, girl's birthday, best friend) and where the stenciled image will be placed (bathroom wall, kitchen worktop, skateboard deck).
Create a drawing. So, inspiration has come to you and you have decided on a pattern. Now it's time to capture it as the next step in creating the stencil.
Print a graphic or template from the internet. Exists a large number of websites that offer free stencils that you can download to your computer and print.
Use a stamp (seal) as an outline. If you have a stamp that you like the design of, use it as a stencil outline. Press the stamp against the black ink pad, and then firmly press it onto a piece of white paper. Make sure the lines are precise and clear. With a photocopier, you can increase or decrease the size of the stamped sample to match the size required for the stencil.
A single-layer stencil is a single sheet of paper or plastic on which the finished image is drawn and cut.
Copy the image onto thin tracing paper. Outline the boundaries and divide the image into separate segments. Separate areas should have clear boundaries, so that bridges will appear around the holes where the paint is applied.
Multilayer stencil. To apply a more detailed or multi-colored image, you will need to create a layered stencil. In other words, you need to create several stencils, each of which will contain a part of the image, and then apply them in turn to the surface, apply paint / ink and create a finished drawing.
Choose a material. To create a stencil, you do not need to buy expensive paper at all. It is likely that your kitchen, office or workshop already has what you need.
Seal the stencil. It is important to make the stencil as durable as possible so that it will serve your project well and be reusable in the future.
Draw or copy your stencil design. If you are drawing, you should start working with a pencil. When the drawing is the way you want it, repeat the pencil lines with a fine or medium-tipped marker. If you are copying a design, you can use a marker from the beginning.
Cut out the stencil. This work is delicate, so you will need a sharp clerical knife and a lot of patience. If you move too fast, you can allow cuts and breaks in the stencil, as a result of which you will have to redraw the drawing and start all over again.
A stencil is a special device that is used to apply the same letters and numbers to a large number of surfaces. The stencil can be plain sheet from paper, film or other material convenient for cutting, in which through holes of the desired shape are cut. The coloring matter passes through these holes and makes up the overall picture.
The simplest stencil used to be available at any stationery store. It was intended to create inscriptions or just letters and numbers in a specific font. Now, the easiest way to make your own stencil is to print on the printer and cut out the desired holes. In this article, we will look at the process of creating a stencil using Microsoft Word.
As you may have guessed, in our example, the material for the stencil will be plain paper. Also, the material can be film or cardboard, if your printer is able to work with such material.
First, you need to choose a font for the stencil. Basically, you can use any font for your stencil. However, keep in mind that in this case, when cutting out the stencil, you will need to think over the design itself, which should include jumpers. It is desirable to do this for letters that have closed contours. Letters such as O, A, D, etc., must be made with jumpers, otherwise their internal parts will be filled with a solid color. Sometimes this is not critical, but for the overall picture, it is advisable to do with internal voids.
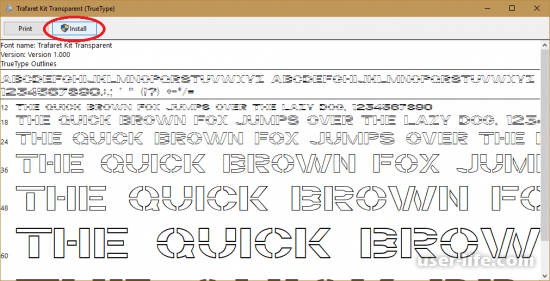
Here, for example, is one of the fonts, the Latin letters of which do not have closed loops. The name of the font is "Bauhaus 93". But in the example, I will not use this font. I would like to remember what the old Soviet stencils looked like. Finding a font for such a stencil on the Internet is not difficult. For those who don't want once again strain, here is the download link. The font itself is called "Trafaret Kit Transparent". Apparently the creator of this font himself comes from the CIS or Russia. A nice bonus is the presence in this font of both Latin and Cyrillic.
![]()
Now you need to install this font in your operating system. Before doing this, it is advisable to close the Word window so that the font can integrate normally during installation. Open the archive and extract the given font file. Then open this file by double clicking on it. And click the "Install" or "Install" button:
Now this font is installed on your system. Open the Word and write the desired phrase or the whole alphabet for the stencil. Change the font to the previously installed one. Edit the page orientation and font size as needed. The page orientation can be changed on the "Page Layout" → "Orientation" tab. After completing all the operations, your stencil is ready:

Now you just have to print your stencil with a printer and cut out the internal parts. If your printer does not work with cardboard, you can copy your stencil using carbon paper. To do this, place a carbon paper between the stencil and cardboard. Next, you need to circle all the contours using a pen or pencil. Then cut out a cardboard stencil along the contour and use it.
You can also decorate the surface with the help of stencils, and you will get any pattern - from the simplest to the very complex. It can be both single drawings and stripes, borders and friezes.
applied to an already painted base. It is recommended to use light colors for the background, in this case the image will look brighter and more spectacular.
As a basis, you can use water-based and water-based dispersion paint, and for the stencil drawing itself, oil and acrylic paints are suitable.
Ready-made stencils can be purchased at a specialized store. They are ornamental strips that are glued to the walls.
Stencils are very diverse, and everyone can choose a pattern to their liking. Motifs can be combined to best decorate the interior of the room.
Before you start applying the stencil to the wall, you need to consider how the pattern will be placed on the wall. Angular marks are applied to the surface that correspond to the size of the stencil, or a horizontal line is drawn along which the stencil will be located. The stencil is glued with adhesive tape, and the self-adhesive strips are attached to the wall with the adhesive side. The stencil must hold firmly and not move, since it will be difficult to correct flaws.
![]()
Painting begins with large details, for which you can use a foam roller. For small drawings, it is better to prepare a special stencil brush. When using a brush, the paint is applied with light strokes, gaining it little by little so that streaks do not form. The main thing is to make sure that the paint does not flow under the stencil.
After the drawing is applied, the stencil can be peeled off. If this is not done, it may stick to fresh paint or the edges of the drawing will turn out uneven.
Ready-made stencils are usually used several times. Before using the stencil again, it must be well washed and dried.
The pattern order may need to be changed around window frames and doors. To make it look harmonious, sometimes you have to reduce or increase the interval between patterns.
You can make a stencil with your own hands. This will require a transparent or translucent film. The drawing you like is transferred to paper, enlarged if desired, and then redrawn on film. Holes according to the pattern are cut with scissors, a clerical knife or a scalpel. Small elements can be cut with a blade or nail scissors.


A stencil can be made for a pattern consisting of several colors. In this case, a separate template is made for each shade.
Stuffing a pattern with a homemade stencil is easier together. At the same time, one of the partners presses the stencil, and the second applies paint to it with a handbrake. In order for the pattern to be even, the lines are first beaten off with a chalked cord. Special marks in the form of triangles are applied to the end sections of the stencil. When moving the stencil, they will act as a guide. Marks are combined with previously broken lines. When applying multi-color drawings, the same technique is used.


If the stencil is planned to be used repeatedly (the pattern is repeated several times), it should be washed after every 2-3 paint applications.
If applied Oil paint, for purification is taken suitable solvent, and for washing off acrylic the usual one will do water.
At applying a multi-color pattern several stencils are used and the following technique is applied. First you need to apply the background paint and wait for it to dry completely. Then, in turn, different parts of the stencil are applied and stained with certain colors. Colors must not overlap. A slight overlap is allowed, which often looks ugly, so the combination of colors is tried in advance on plywood or plasterboard. It is not necessary to transfer the entire drawing - it is enough to see how the places of overlapping colors will look.


Paint of each color is typed with a separate brush. You can use one tool, but then it will have to be thoroughly cleaned each time. Do not start applying the next color until the previous one dries. If, when applying a pattern through a stencil, there are unfilled areas, they can be corrected separately using a thin brush.
After the work is completed, the stencil is thoroughly washed and dried. If it has been stored for a long time, it must be cleaned of paint residues, dried and placed under the load in expanded form.—
Liked? Subscribe to the blog and get new articles!
The first thing we want to tell you is in a nutshell - how to make a stencil yourself. To do this, you need to stock up on a suitable film (for example, use a folder for documents or a file for papers) as well as a printout of the pattern you like in the desired size.
Before cutting the stencil, you need to transfer the pattern to the film. This is very easy to do. Print the pattern you want and place it under the screen film. Then redraw with an indelible marker (alcohol marker no thicker than 1 mm).
1. Place a rigid pad under the stencil or sheet of glass. Take a scalpel or shoe knife as you would a pencil. Cut the film smoothly and without interruption. Unless absolutely necessary, do not lift the knife from the film and always try to move the knife towards you. In this case, you need to turn the sheet of film, not the knife. Imagine that you are sewing on sewing machine- the fabric moves relative to the needle, and not vice versa. The knife should always be available directed at you, and the hand - to be located behind the knife and move the sheet.
2. Cut out all the details of the stencil, as well as the alignment marks. As you cut, the film sheet will become less and less rigid. Therefore, always start with small parts and cut out the center pieces first and then move to the edges.
If you accidentally torn one of the bridges, then simply glue it over it with transparent tape and cut through the part again.
3. Film stencils can be cut burner or soldering iron with a thin sharp sting. But in this case, the edges will turn out uneven, with bulges. Don't forget about alignment marks! If you are using a soldering iron or a burner, place a sheet of glass under the stencil.
The most simple and convenient way fix the stencil on any surface - this is a special aerosol adhesive. If you apply it in a thin layer on the reverse side of the stencil and let it dry for a minute or two, then the stencil will hold well on almost any smooth surface and will not leave the slightest trace on it.
However, when using spray adhesive for stencils. You must exercise reasonable care and observe the following rules:
Need to apply glue only for stencil, by no means on your surface.
Glue is simple keeps the stencil on the surface, so it needs quite a bit. Glue will not prevent paint from leaking, so you should not pour it for nothing. In order for the paint not to leak, you must adhere to completely different rules.
Before as stick a stencil, it is advisable to wait a couple of minutes for the glue to dry.
If a your surface is rough textured or dusty, the adhesive will hold the stencil very poorly or not at all.
If needed roll the stencil well to the surface, cover it with newspaper or a sheet of paper, and smooth through it. Use a rubber roller for maximum effect.
If you want to clean the adhesive from the stencil or surface (well, you overdid it a bit, who doesn’t!), then use alcohol, gasoline or special wash for glue. There are also water-washable adhesives, but they stick worse.
Another, cheaper way to attach the stencil to the surface is masking tape. If the stencil is simple, then this is quite enough. Remember that adhesive tape cannot be left stuck for a long time - if you bought a cheap adhesive tape, then after two or three hours it can stick strongly and leave traces.
Stencil drawing can be done in many different ways and tools. Here is a partial list of eligible items: a piece of a dish sponge, a stencil brush, a foam roller, a regular rag... It doesn't matter what you draw with, it is important to follow only two main rules:
Remember? Good. Now let's move on to the most common screen painting technique called "dry brush". Except excellent result, this method is also convenient because acrylic or latex paints will dry almost instantly. For each color, take a separate DRY brush.
1. well shake a closed can of paint so that a miniature palette forms on the inside of its lid. Dip just the tips of the brush hairs into the paint.
Then on a paper towel or piece of paper do a few circles with this brush. Vigorous rotations of the brush will lift the paint up the bristles. Take one last turn on a clean towel surface to remove paint from the tips of the bristles. All this sounds strange at first glance. But just try to blindly repeat our advice - and the result will surprise you!
2. Before proceeding to the stencil, do a test run on a piece of paper and immediately run your finger over it. Lubricated? Then go back to the paper towel! It's amazing how little paint you need and how long it lasts. In the picture below - too little paint (top), too much paint (left), almost just right (right).
Tamping or padding occurs by tapping the flat part of your brush against the drawing surface. In this case, the brush should always be strictly at an angle of 90 degrees to the surface. Only in this case, the bristles of the brush will not crawl under the bridges on the stencil.
3. Another method other than stuffing is rotational movements brush according to your drawing. Start in a circular motion from a larger radius to a smaller one, that is, right into the stencil itself inside the pattern. This method is often and very aptly called "tickling". The result is a very natural and voluminous color transition from dark to light.
Application results each of the two stencil drawing techniques you can see in the example below. The bird and the branch on the left are drawn using the "tickling" method of rotation. And the prichka on the right - by the method of stuffing (tapping, tamponing). The difference is clearly visible.
Well, that's all, you are already a screen painting professional! Jokes are jokes, but even this brief instructions enough. so that the result will pleasantly surprise and delight your loved ones, relatives and guests.
The last instruction certainly allowed you to believe in yourself and get a wonderful stencil drawing. Now you can continue to develop your skills as a decorator. Let's show how to give a stencil drawing volume.
When you are painting with a stencil and want to give volume to your drawing, add halftones and shadows to it, start painting with the lightest paint and gradually move to the darkest paint. Remember this simple rule, and the sequence of colors will be clear to you. You will have to be especially careful only with the last color, since to correct errors in light colors- simple, but in the dark - almost impossible. Use a separate and always DRY brush or sponge for each color.
1. Start painting behind the edge of the holes in a stencil, straight from the film, and move over the edge to the center of the cut out shapes. You can use padding or tickling (circular movements), the main thing is not to stray from the sequence - start on one side to get a color transition.
2. Round elements, like fruits or luminaries, will get a visible volume in the drawing thanks to our technique if you move from the edges to the center. On fruits you will get a blush of ripeness, on balls - shadow and light, and on leaves - sunbeams. In the examples in this instruction, yellow was added to the leaves, which, mixed with green and red, made the picture more colorful and saturated.
3. If planned, you can now move to next color. Yellow leaves cover in green, and leave the center of the fruit almost untouched.
4. At the final stage, go to the darkest color, which will emphasize and highlight the necessary details in your drawing. Run the darkest paint around the edges of all the elements of the picture to make them more visible. If you tap or brush around the edges so that only a few bristles fall into open areas, you will get very accurate contouring of image details. We use dark red, remember that it should be more outside than inside the composition.
5. Repeating this motif several times, do not torture yourself by trying to repeat exactly the effect just made. Believe and remember - A SIMILAR drawing looks much more attractive than EXACTLY THE SAME.
In this short tutorial, you will learn how to use a screen painting roller. Please note that the roller should be the cheapest, foam rubber. This is not done out of penny savings, but just coincidentally - it is the foam roller that gives the best results. Do you want to know why? Explanations are at the bottom of the page.
To demonstrate the work of the roller, we will take FENNEL stencil, he is sweet dill from the EXCLUSIVE section. We will draw this dill in various colors and compositions. to give you a couple of design ideas at the same time. Can't wait for summer? Here is a fennel in country style, in beige tones. This variation is our favorite:
But let's continue about the roller. Since we have taken on large stencils, we will need large cans of paint, a fairly large roller, a roller bath (often cheap rollers are sold directly with it in the kit). A brush or sponge will not be superfluous either - we will add volume to the drawing, as explained in the previous instructions. Be sure to stock up paper towel. Well, aerosol to lei will not hurt us.
Pour the paint into the lower section of the bath, wet the roller in it and roll it well on the ribbed slope of the bath. Thus, the paint is well distributed over the roller and the excess is squeezed out. Next, you should roll the roller on a piece of cardboard or a sheet of paper to check the amount of paint. The roller should be just wet, there should not be too much paint.
Apply on the back of the stencil some spray adhesive. This will help us manage the stencil. Since the dill is a huge mutant, in fact, we will also need masking tape to keep this weight on the wall. Do not forget that when painting, the weight of the stencil will increase due to adhering paint.
Having fixed the stencil on the wall, we take a step back to check the location. And start painting. We roll the roller well starting from the edges of the stencil to the center of the holes. Pay attention - the edges of the parts of the picture do not fit snugly against the wall. With a roller, there is nothing to worry about.
We remind you again and again - do not try to pick up more paint to make the color more saturated. In this case, everything will be ruined by paint leaking under the stencil! Do you want darker? Do it with several coats of paint, roll with an almost dry roller in one place several times. The paint will dry instantly and no smudges.
We used several of the same stencils, but different size. On the wall, we applied several repetitions one after the other, one drawing on top of the other. Little trick - To give the painting volume, we started with a darker color and then poured just white into the original paint to get a lighter shade, and painted subsequent repetitions lighter and lighter. So, time after time, we applied several drawings of different sizes. Here's what happened in different color schemes:The dill pattern design is good because you can draw it almost anywhere and in almost any color. On the door, on the wall, on the fabric, on the glass - everywhere this pattern will be appropriate and look good. Here are three more examples of a dill interior made for your attention:
And finally, we will reveal a huge secret to those who did not guess why a cheap roller gives better results than an expensive professional one. What do they want from a professional roller? Absorb more and hold more paint and give it well! And what do we need? Less paint and less smearing! That's all - the cheaper the better.
Often there is a need to rotate the straight pattern of the stencil-border by 90 degrees. For example, for drawing a frame on a wall or an edging on a tabletop. Of course, there are special corner designs. But what if the same type of angle is not made for the pattern you have chosen? Or just don't want to buy an extra stencil?
To make a 90-degree turn of the stencil-border so that the drawing looks harmonious and neat, a simple device will help, which you will find in the PROPERTIES section of our website. The device is called - ANGLE. It is very easy to use it.
We draw the border straight to the last repetition before the turn. We apply the last repetition and take our square in our hands.
We put the square on top of the stencil, with the base in the direction of the future rotation of the pattern. The square can be lightly sprinkled with spray glue for convenience.
We finish the border, put the paint right on top of the square. The square masks part of the pattern for us and we get an ornament cut at an angle of 45 degrees.
We shift the border at a right angle and move it a little so that the cut of the picture coincides better with the one already drawn.
Paint the rest of the border to the end or to the next 90 degree turn.
That's the whole trick! Enjoy!
Screen painting is a popular and easy way decorating a wide variety of surfaces. The latter include walls, windows, interior items, clothing, dishes, furniture, and even nails. Before proceeding with the decoration of the selected product, it is necessary to prepare the actual stencil - a template for applying this or that motive. Of course, you can purchase a ready-made stencil, but it will be much more interesting to create your own, individual layout.
Before you start creating your little masterpiece, prepare the materials necessary for work:
An alternative stencil base can be thick, but not too thick cardboard, as well as parchment or tracing paper. If you are using an opaque paper base to prepare the template, you must also stock up on carbon paper. After making the layout, it should be laminated. Otherwise, in the process of work under the influence of paints, it will deteriorate and will be unsuitable for further use.


In cases where the use of carbon paper is required, the sequence of actions is as follows:


Simple techniques for making a template allow you to create not only flat, but also three-dimensional plots.


So I bring to your attention a simple, but very long recipe for cooking ...

Trout in cream - general principles of preparationBefore cooking trout ...

Alexander Gushchin I can't vouch for the taste, but it will be hot :) Contents The usual...