Proverbs and sayings about May HORIZONTALLY: 2. May will deceive - in ... will leave.4 ....

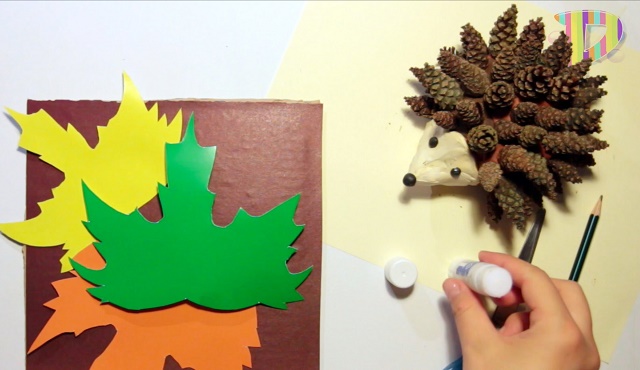
DIY hedgehog - original idea for creativity in the piggy bank of a real craftswoman who not only loves to try new needlework techniques, but also constantly wants to unleash the creative potential of her children. The smallest ones can make a forest animal using soft plasticine, and older children will enthusiastically make a hedgehog from pine cones collected in the park during a walk. Our hedgehog will not turn out to be prickly at all, it will be kind, with a sweet smile. Such a craft will surely become a fun pastime for the whole family, and creativity will leave vivid memories behind.
Hedgehog from natural material do it yourself- it interesting idea for creativity, which will interest not only adults, but also children, because participating in the creative process is always exciting, and in this case it is also very simple, because we will work with the simplest materials and tools.
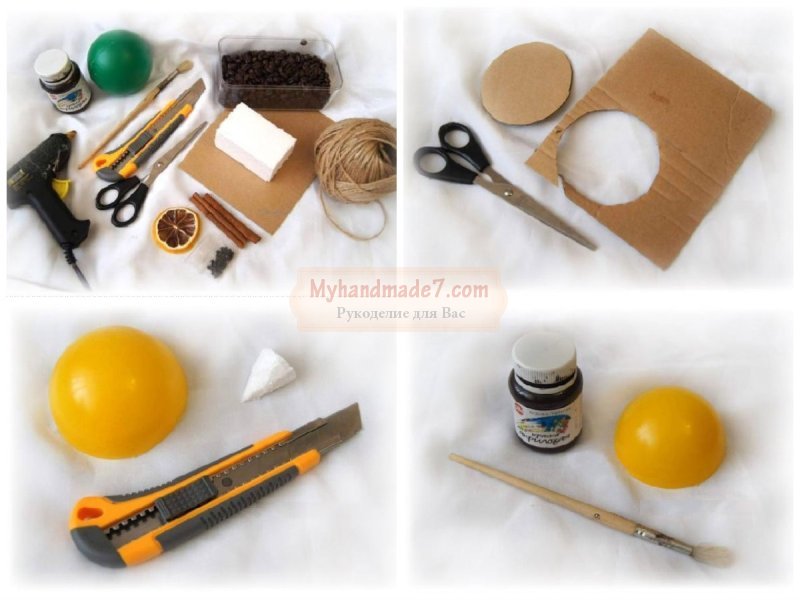
For work, we need scissors and a stationery sharp knife, a foam ball (we need a half, so you can use any spherical shape, for example, a plastic container from children's toys). For decoration, we will use twine and coffee grains, and we also need brown paint.
To make the hedgehog have shiny beady eyes, we will use black beads or buttons. To make the craft stable, you need cardboard. And we will also take various decorative elements, they will also be borrowed from nature, to decorate our fragrant crafts we will take cinnamon sticks, star anise stars, dried slices of lemon and orange. Such a cute hedgehog will not only fill the house with a unique aroma, but will also become part of the Christmas composition, a pleasant souvenir for your friends.
To make you neat and cute do-it-yourself hedgehog, photo we recommend that you follow the lesson, the photo shows how to make the basis for crafts and how to decorate it.
Let's start with the basics: a foam ball or plastic (whichever you have at hand) must be cut into two halves. For one hedgehog, we need only one half, so you will get two crafts from such a ball, you can do one yourself, and invite your children to complete the second. We also need a small piece of foam (you can take packing foam from any household appliances): from this piece it is necessary to carefully cut out the sharp muzzle of our handsome forest with a knife.
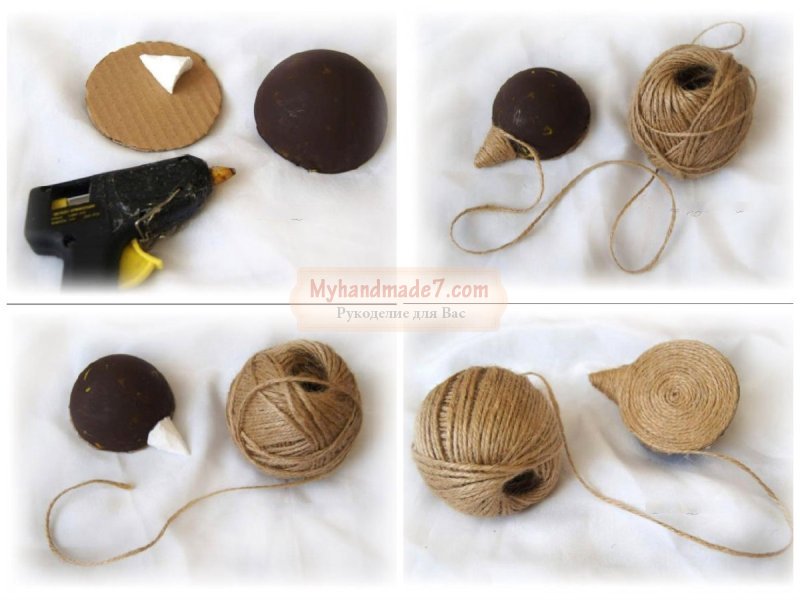
From cardboard it is necessary to cut a circle in diameter the same as the section of the base ball. The foam base-ball and the blank for the muzzle must be glued with silicone glue, glued cardboard from below. Next, you need to decorate the resulting base: wrap the muzzle with twine, and paint over the ball with brown paint. The bottom cardboard base also needs to be decorated with twine, gluing it in a circle.
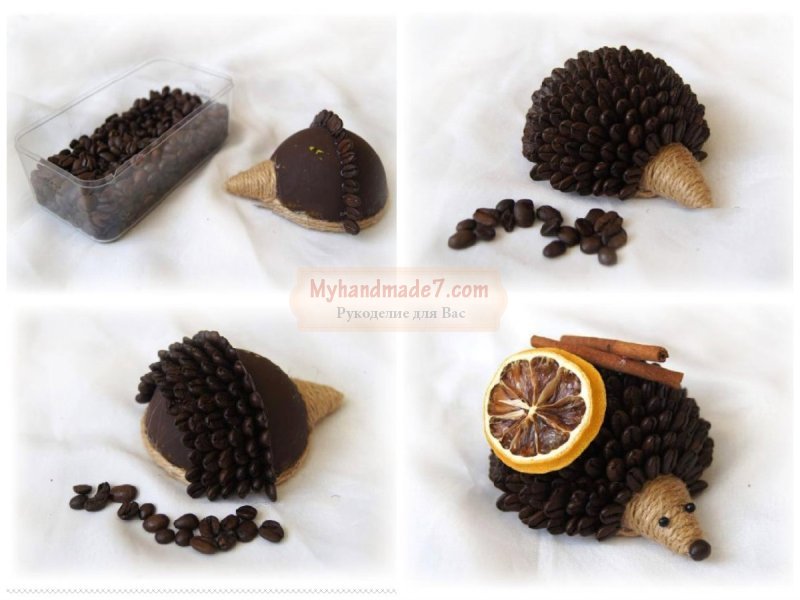
Now you can start decorating crafts with coffee beans that will resemble needles. The coffee beans will be fixed with glue, and the first row will go in the middle of our workpiece, as shown in the master class, so it will be easier for you to glue the beans symmetrically so that the figure is neat.
So, row after row, it is necessary to completely cover the workpiece with coffee beans, carefully gluing them to silicone glue, which will ensure a secure fit. At the end, you can glue the bead eyes.
On the needles, you can glue a star anise star and a cinnamon stick wrapped with twine. as a result, in a few minutes you got a charming do-it-yourself hedgehog made literally from improvised materials.
If you decide to give a friend for an anniversary, then such a hedgehog will be a great addition to a cash gift, and you can arrange them in a single composition.
Cute do-it-yourself hedgehog from cones can become a real work of art if done carefully, following our advice. The craft will also interest the child, since the main material for creativity in this case will be plasticine. Adult needlewomen can take and polymer clay to make the figurine durable, please you for many years.
We chose plasticine to embody the creative idea of black and beige (light brown) colors. For one hedgehog - one pine cone, opened up to make the animal fluffy. To decorate the eyes, prepare a pair of black beads. Also in the process of work, we need glue, toothpicks, a brush and blush.
Light brown plasticine should be thoroughly kneaded in your hands so that the material becomes plastic and pliable for deformation. First of all, it is necessary to roll a ball out of plastic, then make a cone and press it against the flat side of the cone, so the cone will become the body of our animal, and from plasticine we will form a sharp muzzle. The tip of the cone should be slightly raised up to make a snub-nosed nose.
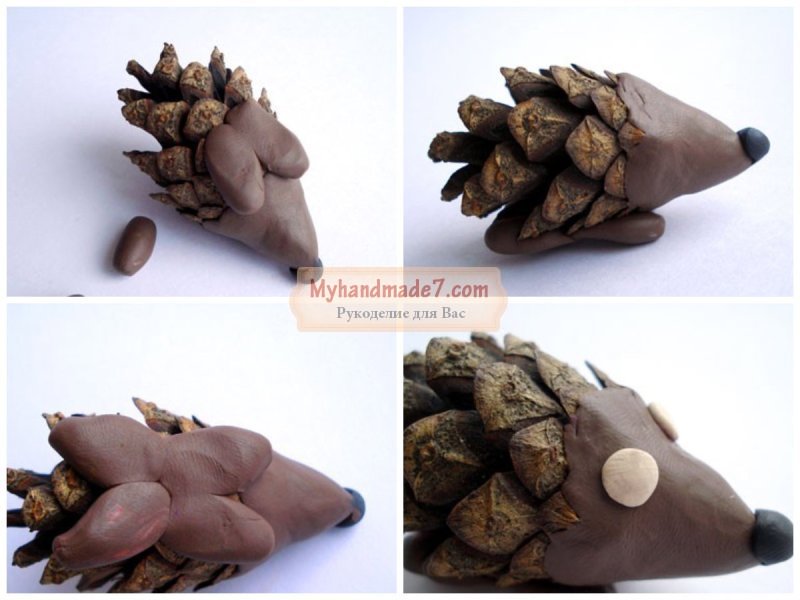
All stages of execution do-it-yourself hedgehog cones involve working with plasticine, because our body is already ready. At the end, it can only be decorated with a decorative mushroom or apple, an autumn leaf that fell on pins and needles while the animal traveled through the forest.
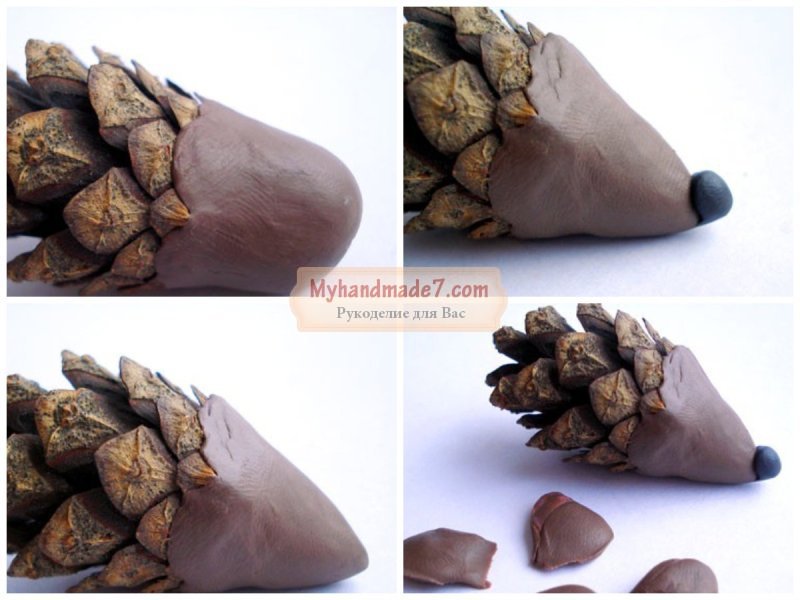
The nose must be made using black plasticine, for the ears we will use brown plasticine, as for the paws, and to make the paws and ears realistic, grooves should be made on them using a toothpick. Our paws will perform not only a decorative function, our animal must be stable, so fasten the paws carefully, checking the craft for stability.
On the muzzle, you need to make a smiling mouth, for this you can make a recess on the plasticine with a toothpick, or use a cocktail tube, with which you can make a mouth to the “U” shape. Cheeks and ears should be shaded with blush to add realism to the forest dweller.
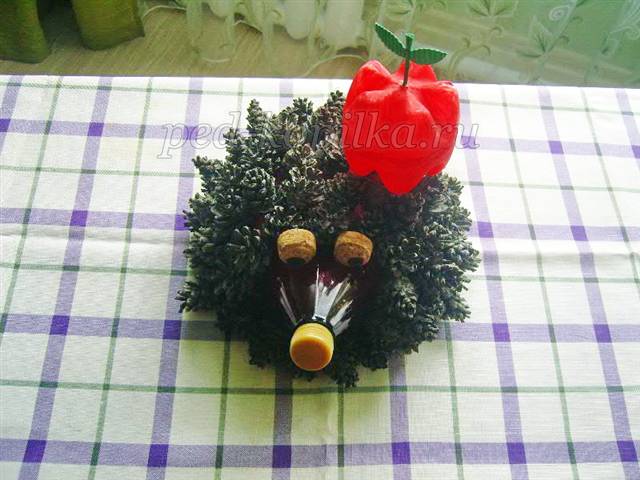
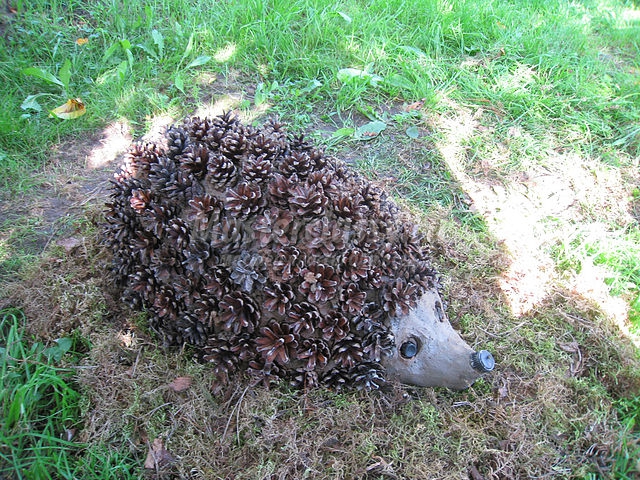
Garden figurines can decorate your household plot, both in winter and in summer they look great and cheer up, but their high cost often repels hostesses, so they come up with interesting home-made solutions. That's do-it-yourself hedgehog for the garden you will like it, because such a cheerful animal, peeking out of the greenery or fallen leaves, will definitely not be left without attention.
Since we will use natural materials for its implementation, the service life is garden figurine will be short-lived, most likely, during the harsh winter, he will lose his neat appearance. But there are also pluses - in the spring you will be able to settle a new handsome hedgehog on your site.
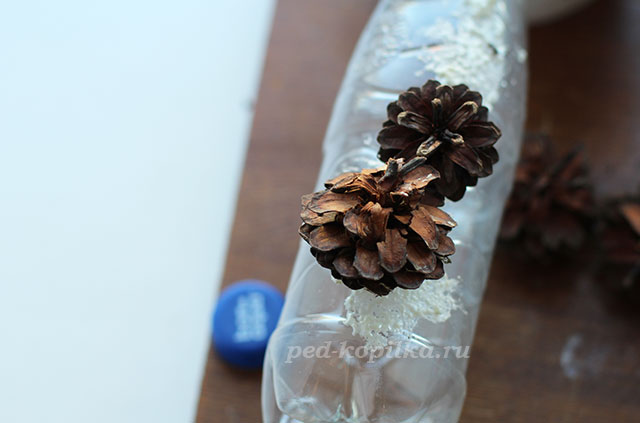
Depending on the size of yours, you need to take the appropriate number of cones, they can be collected in the park. Cones choose different sizes, you will need both small and large.
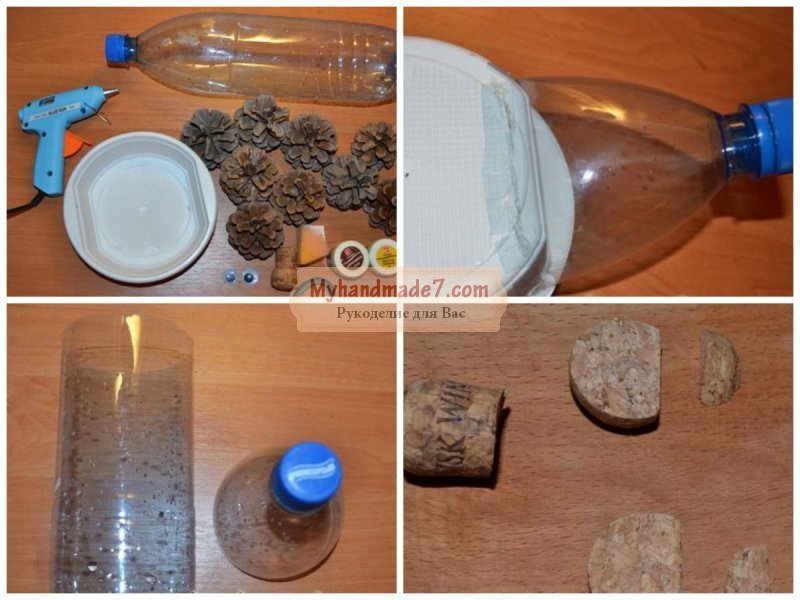
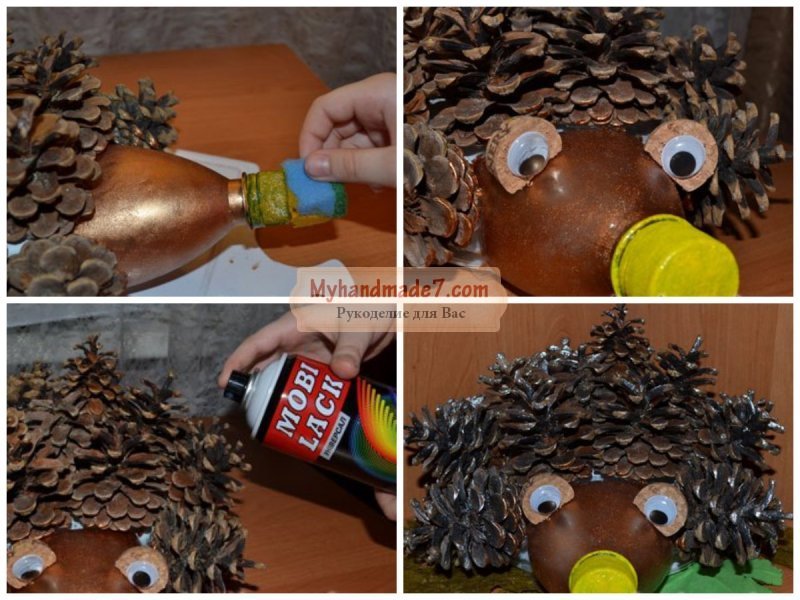
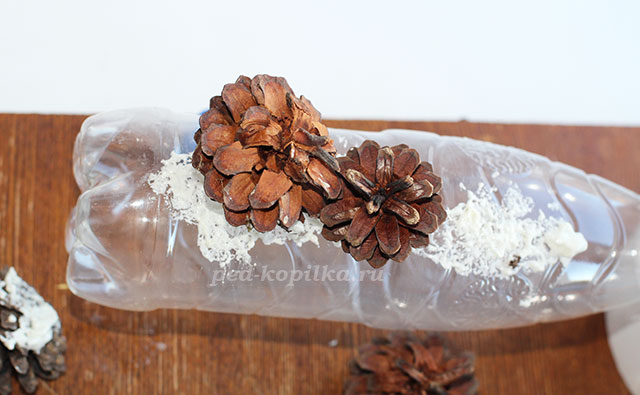
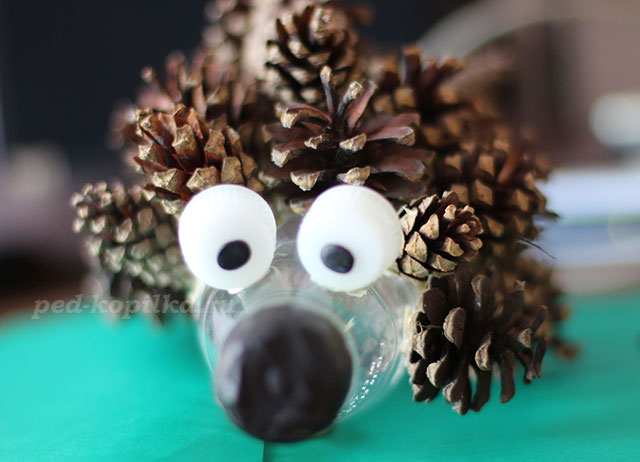
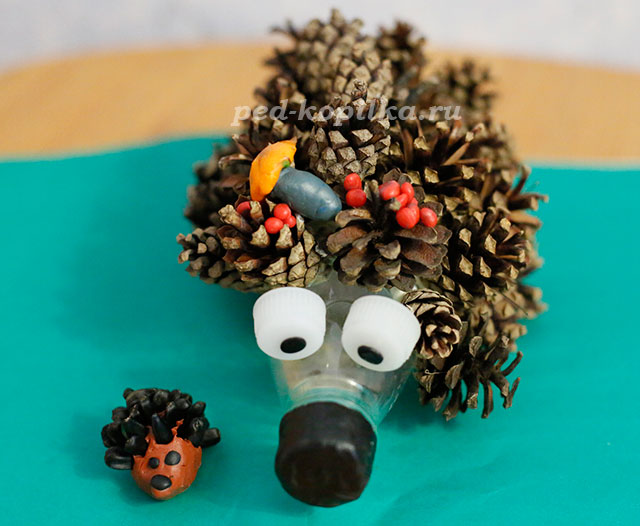
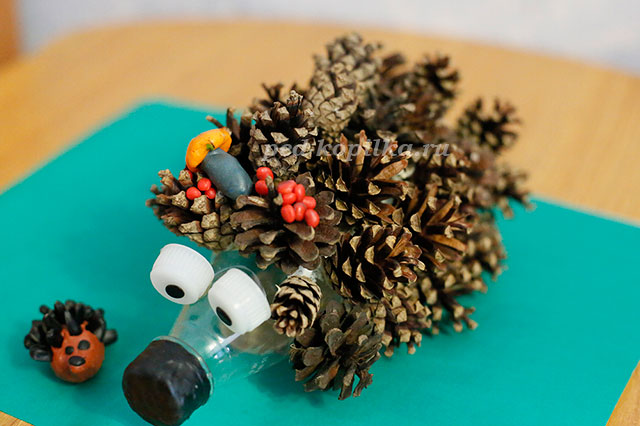
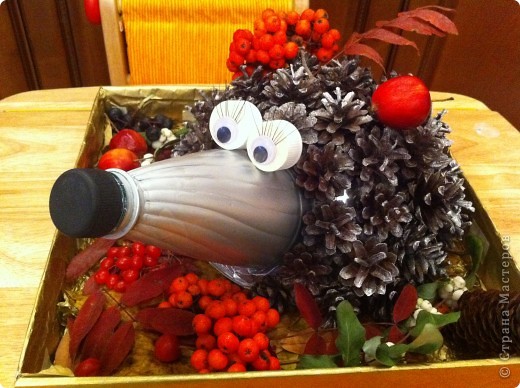
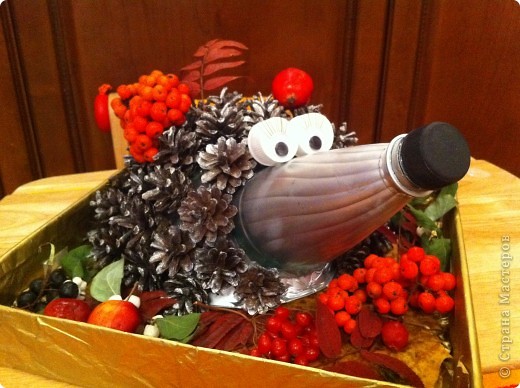
To form the base, we need one plastic bottle and an iron bowl (which is not a pity), the size of the bowl should not be large so that together with the spout of the bottle we get a blank for the future hedgehog. You need to cut off the neck from the bottle (you need to choose a plastic bottle that tapers towards the neck), we will use this part to form the spout, and we will no longer need the rest.
The plastic neck can be heated a little over a fire to make the plastic soft, and bent a little, so you get a curious snub nose. The resulting part must be connected (glued) with an iron bowl, which will serve as a calf.
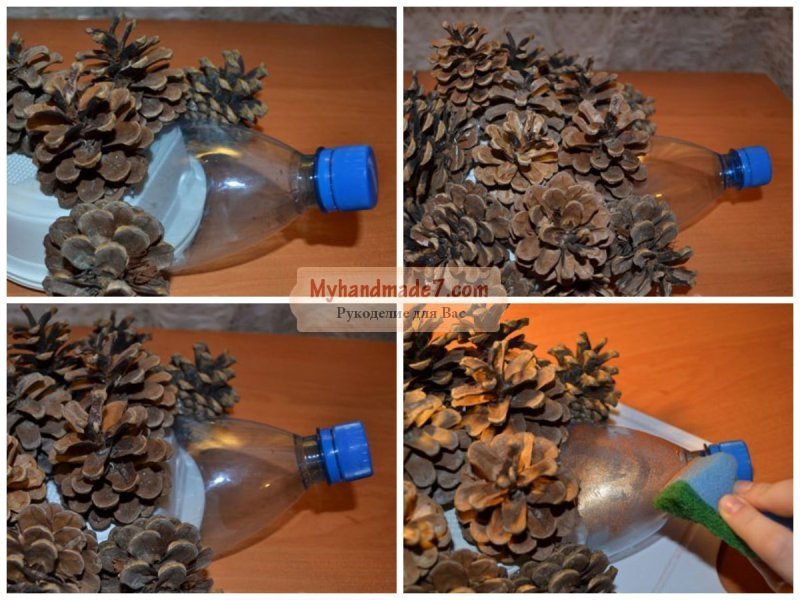
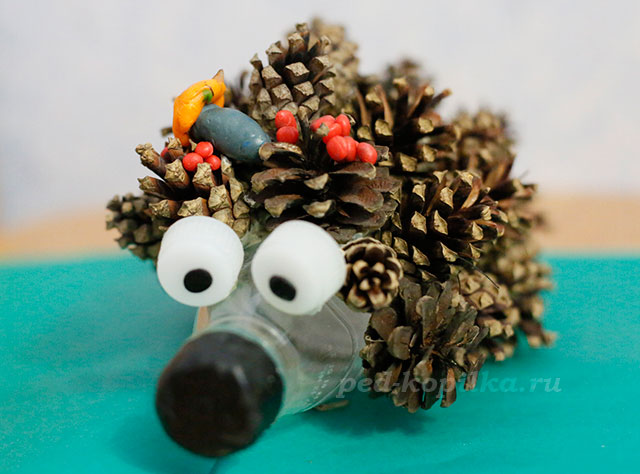
The bowl must be glued with cones so that they completely cover it. And wrap the muzzle with twine. Eyes for a hedgehog can be bought at the store and glued to the muzzle, and a black cork will serve as a spout (you can paint white with black paint).
In just half an hour you have made a sweetheart who will now live in your garden.
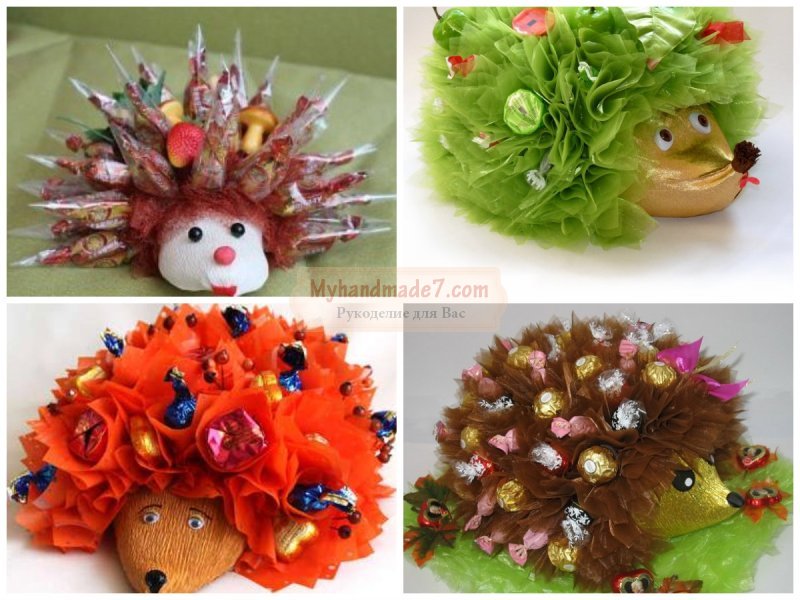
There are many more options how to make a hedgehog with your own hands using materials that are at hand. Sometimes these creative ideas will help you decorate a gift in an original way. loved one. For example, for a best friend or mother on March 8, you can make it in the form of a fluffy hedgehog.
To make a candy hedgehog, you will first need to carefully shape the base using foil. With its help, you can make a sharp nose and a thick body, moreover, you can then easily fix sweet elements into such a base.
For work, you will need sweets - these can be truffles or any other sweets. To form with needles, you will need a packaging film - brown, yellow, transparent, so that the craft turns out to be textured. For each needle, you need to take a wooden skewer.
To form a needle, you need to take several squares of wrapping paper: you can cut it in different sizes, then the corners will different lengths, and the hedgehog will turn out fluffy and very beautiful. Wrap the sweets in a transparent square, taping them with tape to a wooden skewer, then also tape the wrapping paper folded four times with tape so that only its corners stick up.
It is problematic to stick a wooden skewer into a dense foil base, so you can first make holes with an awl, and then “plant” the skewer into the hole, fixing it on a drop of glue. Together with candy elements, live or artificial flowers can be fixed on the body. autumn hedgehog do it yourself can be supplemented with multi-colored fallen leaves.
A hedgehog is a cute and kind animal, a real joy for a child, so it is not surprising that your kid will want to transform into such a character. New Year or to the autumn ball at school, and you will urgently need to cook on your own do-it-yourself hedgehog costume.
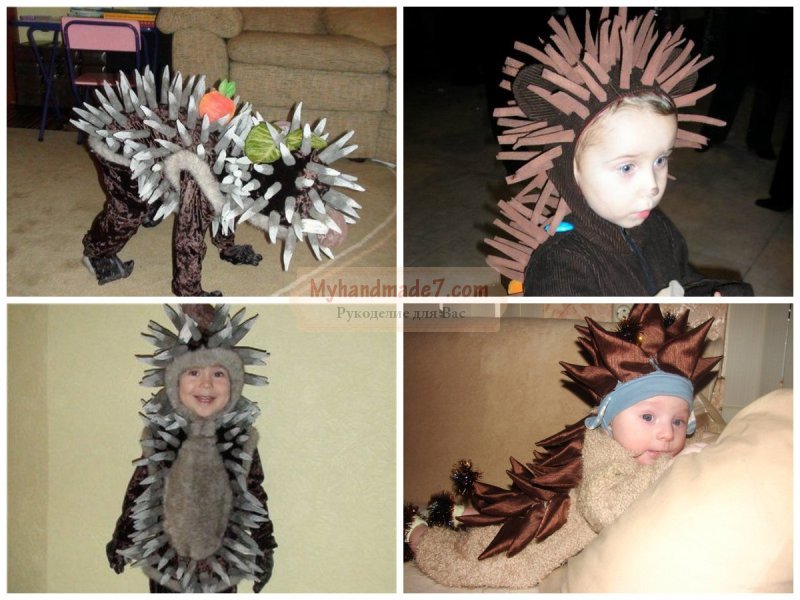
The task is not easy - to make needles on our costume, for this the craftswomen suggest using foam rubber. You will need 2 cm thick foam rubber, which must be cut into strips with a square base, and then carefully sharpened with scissors. To give the needles a realistic color, you need to paint them with gouache, mixing it with PVA glue. When the needles are dry, they can be sewn to the vest.
The mask can be cut out of cardboard or also made using foam rubber, decorating the hood with foam rubber needles.
Craft from waste material "Hedgehogs"
Master class for older children preschool age, educators, parents.
Target: The development of children's artistic and creative abilities, manual skill, imagination, to support the manifestations of the imagination and independence of children in the manufacture of crafts.
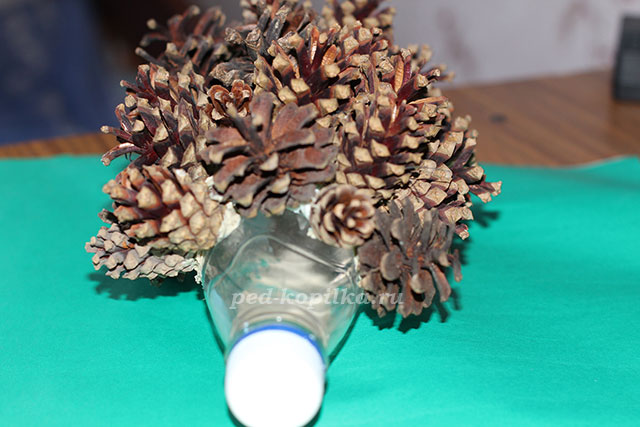
Required material: a plastic bottle, two caps from plastic bottles, pine cones, Moment glue or polyurethane foam, plasticine.
1. On a plastic bottle with glue or polyurethane foam glue cones (hedgehog needles). We glue each cone separately, firmly pressing it to the bottle.
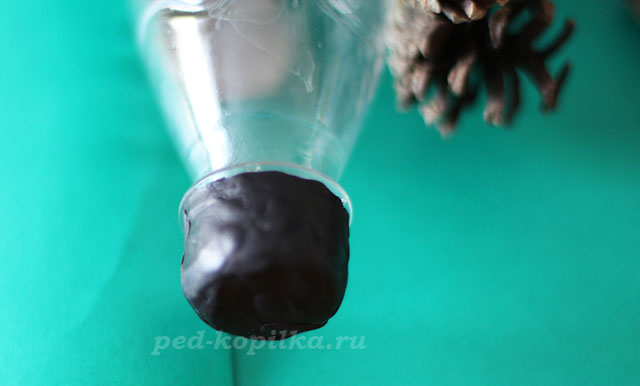
2. Then we glue the bottle cap (hedgehog nose) with black plasticine.
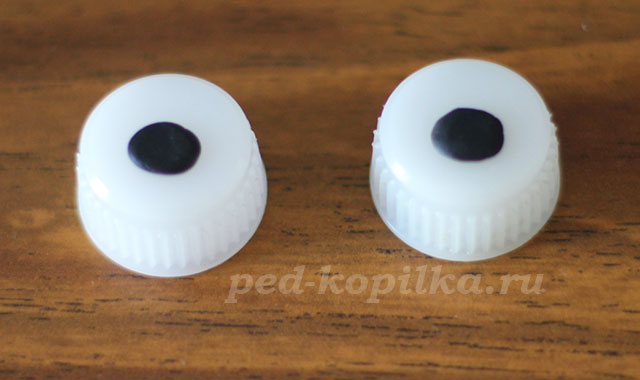
3. For 2 covers white color glue pieces of black plasticine, we get eyes.
4. Glue them to the bottle with glue (foam).
5. Then put berries, mushrooms molded from plasticine on the “needles”.
6. So that the hedgehog is not bored, we will make a hedgehog. We need plasticine, seeds.
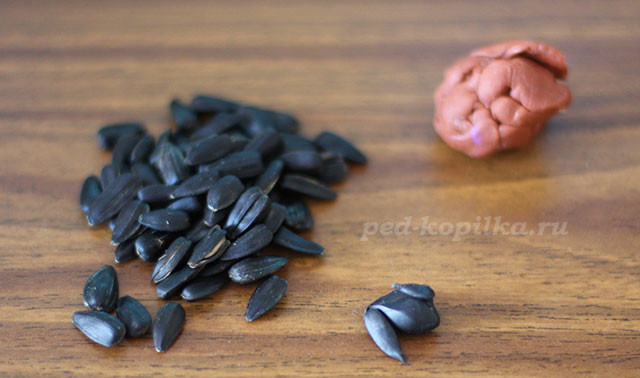
7. We sculpt a small hedgehog from plasticine, we make needles from seeds, eyes and a nose from black plasticine.
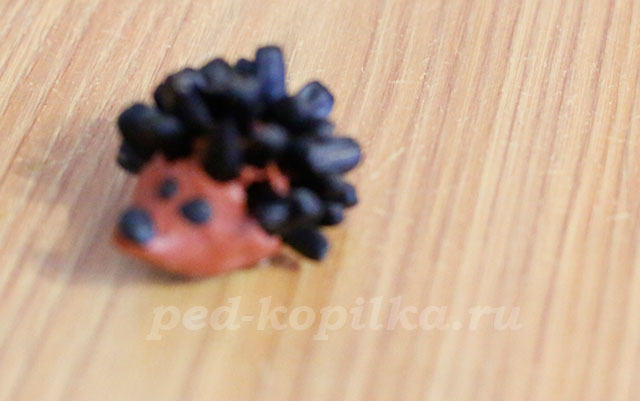
8. Our hedgehogs are ready.
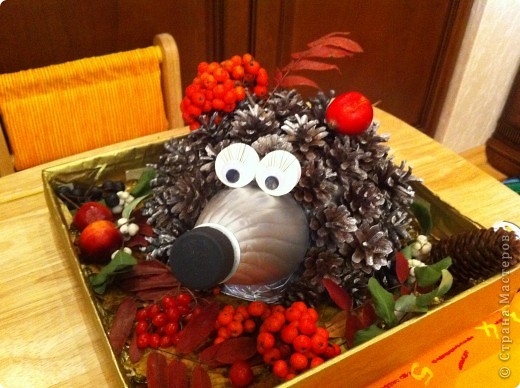
A hedgehog made of cones and plastic bottles can be like that.
Technique: Modeling 1.
Autumn craft in Kindergarten.
I have not been on the site for a long time, I did not post anything, I can say I was in a creative crisis. She didn't do anything, but she didn't want to either. First, family problems, then the summer vacation period. But everything passes and again I start to do something. Yes, and in kindergarten they began to give assignments. And you just have to start and desires appear. For the autumn holiday in kindergarten, it was necessary to make crafts. Thanks to Tanya4ka_T ~ for the hedgehog master class. I just fell in love with him. The most difficult thing was to find the bumps, there are very few of them now and they are already becoming scary. When collected, they were all closed, wet, gray, and even many already rotten. But my grandson and I collected the most beautiful ones, dried them in a bathhouse, and, fortunately for us, they opened up from the heat, but we had to tint a little.
http://stranamasterov.ru/node/93582?c=favorite
This is a hedgehog master class.
The hedgehog was a success, it was a success in kindergarten, they went from other groups to watch. And Romka's granddaughters did not want to leave him, he said, let's drag him back and forth, i.e. in the morning to the garden, and in the evening back home.
READ ALSO
A micro master class because I didn’t start taking photos from the beginning, I got carried away a little. Well, yes, I’ll try to explain in words ...) I call this hedgehog a two-layer hedgehog (and my husband is a hedgehog under a fur coat)) which is also true). We need two types of wool: light gray wool (combed tape) and dark gray (
We couldn’t limit ourselves to pendants alone, since I really infected the teacher with quilling ... The children and I made such postcards and they congratulated the kindergarten staff. I didn’t think that they would really like this work and, most importantly, that it would be so easy for them to do it. Of course motives
That's what we did with the little set))) Photo - under the cut) We have 3 plasticine mushrooms, they were then put on the "clearing". They immediately decided to make hedgehogs from curled up sunflowers, they turned out to be very similar) This is a hedgehog - baby: muzzle, paws, mushroom, leaves, apple - from plasticine, plus
Technique: Application 1. OOOOOOO!!! My Dears, what did I do today .... Today I am with the Children from Pushkin Orphanage I made Christmas cards! How! I still can't get over it, to be honest. When we agreed with the administration, we decided that the children
Technique: Modeling 1. did crafts for school inspired by the work of Dakota phttp://stranamasterov.ru/node/236471?c=favorite but we got such a duck ... 2. reeds closer Please do not judge strictly we are not masters yet just learning...
Technique: Modeling 1. Craft "Visiting a forester" 2. Beet hedgehog ... 3. Forester from a real mushroom ... We performed this craft with our daughter, using numerous natural materials: spruce branches, different leaves, watermelon seeds , cranberries, moss, mushroom, acorns, cones and even a hedgehog
DIY hedgehog can be made from a wide variety of materials and in the most various techniques. Both kids and adults really like this animal, which is why we have put together an excellent selection of master classes on making such a funny character.
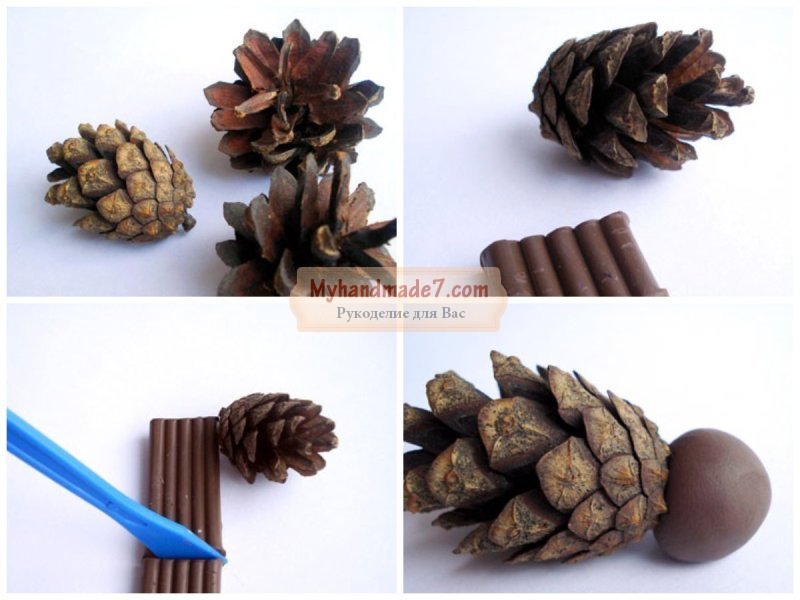
To make such a craft, you will need to prepare a chestnut in a green spiked "peel" - about a third should be cut off from it so that the chestnut itself can be seen. Then blind a pointed muzzle from brown plasticine and attach it to the chestnut tree, blind the eyes from black and white plastic mass. To complete the picture, you can lay rowan branches and autumn leaves on needles.
Roll the beige plasticine into balls - one large, two medium and two small. The largest one is useful for forming the cone-shaped head of the animal, while bending the tip of the figure slightly upwards, so that in the end the animal has a more playful look. From medium balls make hind legs, from small balls - front. On the paws, make notches-fingers using a toothpick.
Attach all these details to an ordinary pine cone, then do not forget to make the eyes, mouth and nose of the animal.
You can decorate your backyard with a simple craft. Need to cook cement mortar and smear them with a plastic bottle. Stick around the neck so that it looks like a hedgehog's muzzle. Until the solution has completely solidified, it is necessary to stick the entire body with pine or spruce cones. Draw eyes and a mouth on the muzzle, you can put a small pebble in place of the nose.
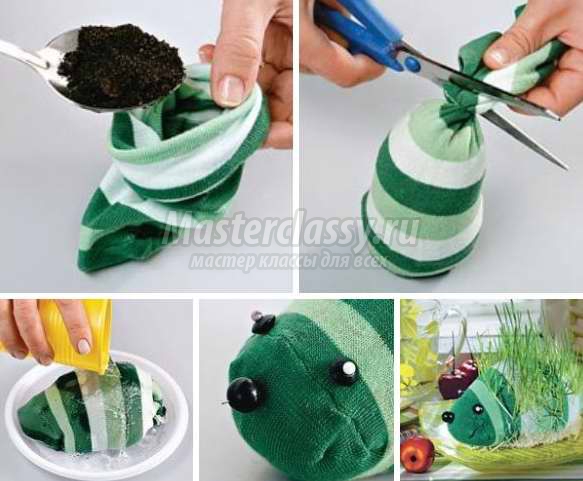
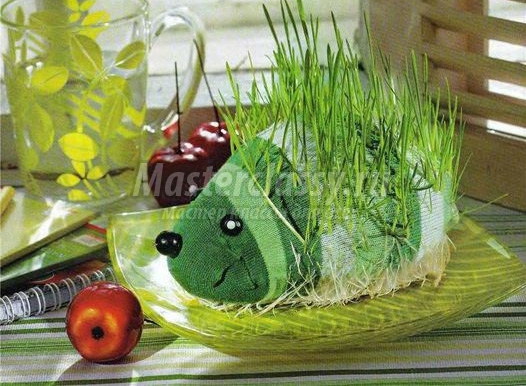
Take a thick sock of bright colors (of course, new, without holes or scuffs), pour a small amount of soil inside. As a result, you will get the lower part of the hedgehog craft. Then mix the soil with oat seeds or lawn grass, fill the rest of the sock with this mixture (the result will be the head and back of a hedgehog-floric).
Tie the sock with an elastic band or a thick thread, cut off the excess fabric. Lay the "homemade" on a plastic plate, while the tied part should "look" down. Stretch the muzzle a little with your hands, slightly round the sides. Well, then just pour the florist with water - try not to overdo it with the liquid.
Of course, the craft will look more attractive if you additionally decorate it with eyes and a nose - for this purpose, you can take buttons or tailor's pins.
In order for the grass to germinate, you need to put the craft in a warm and bright place, do not forget about timely watering. When the sprouts make their way through the fabric, the florica will need to be turned one side or the other towards the sun so that the grass grows evenly.
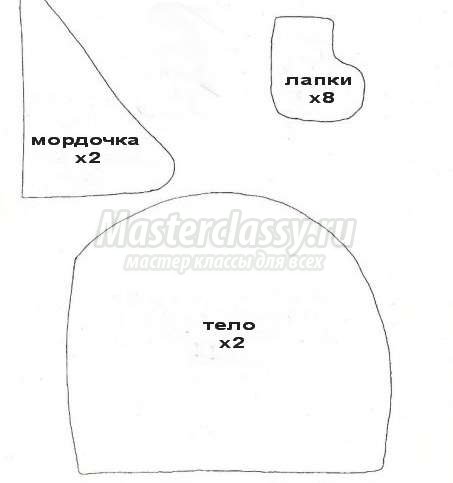
First of all, you should make a pattern on paper, while the size of the parts can be any, it all depends on what size you want to sew the toy. Transfer the details of the pattern to the fabric and cut out. First stitch the body and muzzle of the hedgehog.
Prepare several ribbons of different colors, which will play the role of needles. It is very good if the color of the ribbons will be combined not only with each other, but also with the fabric of the toy itself.
Put the halves of the toy inside with the front sides, put the pieces of ribbons inside, folded in such a way as to make loops. Baste with thread or secure with pins. Sew the halves together along the back, while the tummy area should remain unsewn.
Sew the paws, turn out the details, iron and stuff with some kind of filler, for example, holofiber. Then insert the parts inside the tummy and baste. Now it's the turn to sew up the abdomen (do not forget to leave a hole between the legs). Turn the product out, iron. Through the hole that you left, stuff the toy with holofiber.
Sew on buttons that will play the role of a peephole. Well, if you want the toy hedgehog to be absolutely safe for the baby, then you should embroider the eyes, like the nose.
The final step will be sewing up the hole on the tummy with a hidden seam. So you have a wonderful toy with educational elements!
You can sew another one, also very cute.

The costume of this funny forest animal will be in demand at any masquerade, be it the New Year or the autumn holiday. We suggest you master a very easy version of the costume, which even a novice craftswoman will submit to.
The basis for the masquerade attire will be a jumpsuit with a hood suitable color. It is to him that the thorns and ears will be attached.
It is very meticulous to approach the selection of fabric for sewing, you can give preference to any material, but nevertheless, fleece will be optimal for such needlework, because it perfectly holds its shape, but at the same time is quite soft, pleasant to the body.
First of all, you need to make the details of the ears, for the inner ear you will need two parts, for the outer - four. Sew darts on the base pieces. Stitch the inner ear to the outer, to its front. Fold inside out, topstitch and turn inside out, then sew the ear to the hood.
When the ears are ready, you can go to the thorns. For them, you should take three strips different color- they should be long enough, but at the same time have a different width. One triple stripe will play the role of a row of spines and will extend from the head to about the waist. The length of the strips you need will need to be pre-measured using a centimeter tape. From each ribbon, make a stylized fringe, cutting off each thorn obliquely.
Sew three strips together, and then sew to the jumpsuit. Continue these steps until the entire hood is covered with fleece "thorns".
As you can see, sewing such a fancy dress is quite simple, and the child looks simply unsurpassed in it.
Do it with your baby.

Such a sweet craft is sure to please every child. The first step is to take a sheet of penoplex and cut a rectangle out of it with sides of 10 and 20 cm. The body of the animal will have a length of 12.5 cm, the rest of 7.5 cm is its head.
Draw the body with a pencil or pen so that you can easily cut off excess material. Round off the corners using a utility knife. Irregularities will need to be sanded - for this purpose, you can use such a non-trivial tool as a nail file. Of course, if you have sandpaper, then it is better to take it.
In order to form a spout, you should glue a piece of foam. It also needs to be polished. sandpaper or with a nail file.
Glue the body of the animal with golden corrugated paper (naturally, you can take the material of the color you like). Stick sweets into it - you can take sucking ones like lollipops, or you can attach regular ones to wooden skewers in advance. Fill the gaps between the sweets with organza or similar fabric. To decorate the "masterilka" use everything that is at hand - apples, mushrooms, berries, etc.
The very last step will be gluing the eye, as well as drawing the eyebrows and nose with black acrylic paint.
Dump - this is a very exciting activity.
fruit variant
A candy composition will surely attract the attention of children, but a fruit composition will not only be very tasty, but also healthy. So fruit urchin you can decorate a festive children's table.

Take a pear and, using kitchen scissors, cut off its tail. Having already taken a knife, cut off part of the peel on the fruit - this place will play the role of the animal's nose. The pear should also be cut from the bottom - this will help the fruit not to roll.
String quiche-mish grapes on wooden toothpicks (you can take other varieties of grapes, but this one is seedless and the kids really like it).
Now, starting from the central row and moving to the side rows, you should stick all the toothpicks into the pulp of the pear, while leaving the cleaned area untouched.
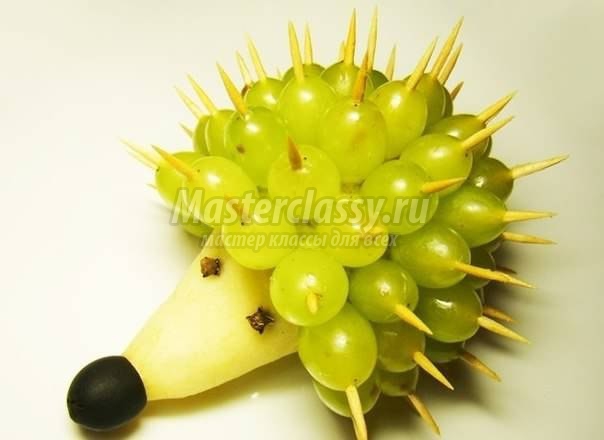
Cut a piece from a black olive and stick it on the tip of a pear - this will be the nose, but the eyes can be made with a dry clove.
Make a great gift.
DIY autumn hedgehog
Autumn is the time for exhibitions in kindergartens and schools. We offer you the simplest master class for the production of squash hedgehog.
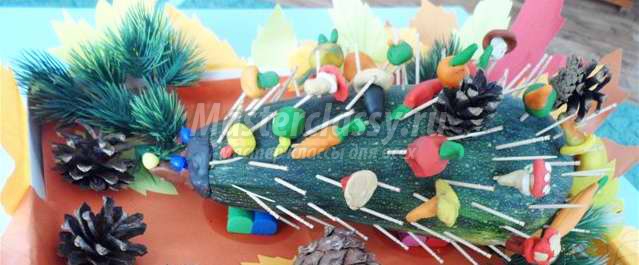
Put an oblong zucchini on a stand (a pair of plasticine sticks will play its role), stick a lot of toothpicks - needles into it. Now it remains only to make the muzzle of the animal from the plastic mass, use buttons as eyes and nose.
How about you?
Application
This type of creativity is very popular with children, in addition, they like and preparatory stage- collection of leaves. Then the natural material will need to be dried - this can be done as the old fashioned way, placing foliage between book pages, and with the help of ironing.
On a paper sheet of a beige or yellow tint, draw your main character, of course, especially highlight the nose and eyes, but you don’t need to draw needles - let the body remain “naked”. Cut out the drawing and stick it on a cardboard sheet.

Apply glue to the image of the torso - adhesive composition should be evenly distributed. Well, now cover the body with "needles" - the leaves of the different shapes and size, glue them one at a time, so that the result is beautiful composition. At the end, it remains only to paint over the details of the muzzle with a black felt-tip pen.
Autumn is a great time for creativity. Your child needs to prepare for school or kindergarten interesting craft from natural materials? Then it will be nice for you to learn how to make an autumn hedgehog craft. Next, you will learn step by step how to make a miracle hedgehog from available materials. Photos will help you in creating a little animal from cones and a bottle.
Are you interested in the autumn hedgehog craft, do you want to bring it to life? Do not doubt your abilities, as you can easily make a hedgehog out of cones with your children. Then you will need the following materials:
Plastic bottle
Pine cones
Plasticine
A hedgehog made of natural material will be an excellent craft for the garden. Now you will learn how to make a hedgehog out of cones with your baby. To do this, do the following:
1. The easiest way to make the basis for a hedgehog is from plastic bottle. Take any plastic bottle, carefully remove all labels. The neck with the cork will be the muzzle of the hedgehog, and the wide part will become the body.
2. To make the hedgehog as natural as possible with your own hands, use light-colored plasticine (beige, for example) to close up the part of the bottle that will be the muzzle, that is, from the lid to the wide part. With dark plasticine (for example, brown), close up the body of the future hedgehog.
3. Now we imitate needles with the help of cones. Carefully stick a little plasticine on the base of the cone. And then attach it to the plastic bottle where the torso is. So you make several cone rows. Attach the cones only on top and on the sides, leave the bottom empty, so the craft will stand stably.
4. The cone hedgehog is almost ready. It remains to modify the muzzle. Make eyes out of plasticine. You can make plasticine berries that you put in needles. To complete the composition, take a tray, make a bedding out of the leaves and put the newly created hedgehog on it.
An interesting autumn hedgehog craft made of cones will surely attract the attention of all the kids, and your child will be able to win a creative contest. Do not be afraid to create, show your imagination and please your child!

Be sure to read the article on the topic of what you can do with your own hands. Work wonders with the whole family, share this article with friends in a couple of clicks, rate it high and write below in the comments, what did you end up with?
Proverbs and sayings about May HORIZONTALLY: 2. May will deceive - in ... will leave.4 ....

Popova V.N. primary school teacher MBOU "Kishertskaya secondary school" Rebus is ...

To learn how to compose and understand puzzles, you should figure out what they are from ...