Reading time: 3 minutes In moments of crises, unexpected changes and sincere ...


After these products appeared on the current market, the installation of window sills on plastic windows immediately gained distribution among the owners modern apartments and private houses, while they still do not lose their popularity. After all, a plastic profile is a safe and at the same time environmentally friendly material, and all products for the manufacture of which it was used undergo extremely careful control. However, today many do not know whether it is possible to install a window sill after installing a window, how such structures are installed and what is needed for this.
Such window sills have a number of advantages. First of all, it is worth noting that they have a small mass, which is why they have become so popular, since almost everyone can correctly install a window sill on plastic windows. It should also be said that they are extremely easy to use, do not require painting, are resistant to mechanical damage, and are also resistant to exposure to light and high temperatures.
Today, plastic window sills can be found in enough large assortment, thanks to which there is nothing difficult in choosing the right product for any window in the room. However, when choosing such a design, you will also have to decide on how exactly the installation of window sills on plastic windows will be carried out - with your own hands or with the help of qualified specialists. Of course, the second option is simpler, but at the same time it is much more costly, as a result of which, many owners prefer to do everything exclusively on their own.
There are several technologies by which the installation can be carried out plastic window sill... The first technology provides for fixing the product using a specialized compound. It is worth noting that this method has been used for a long time, but recently it has lost its relevance, since it came out a large number of new technologies that are more modern and convenient to use.
Most quick way is the use of specialized self-tapping screws. IN this case installation of window sills on plastic windows can be carried out without problems with your own hands, since you just need to drill a hole in the frame, into which you can then screw these parts. After this, the joint is additionally processed by a specialized silicone sealant, and the edge of the window sill is wound under the frame and attracted with self-tapping screws.
In order to ensure the rigidity of the plastic window sill, special linings are used, and the area under the product is additionally foamed.
Another method is to install window sills on plastic windows using metal spring brackets, which are also screwed to the profile using specialized self-tapping screws. In the groove that is formed between the bracket and the frame, this product will be installed.
The latest technology, in general, does not provide for the use of any additional components like staples or self-tapping screws. Of course, this method is the most time-consuming, but at the same time, experts use it as the most reliable. The essence of this technology lies in the fact that for installation under the sill of a plastic window, special linings are placed, which will remain there until the edge of the product fits tightly under the window frame.
The last three methods have become very, very common in their use, because each of them has advantages and disadvantages that make them relevant in certain situations. To do right choice, you should consider the features and benefits of each method in order to choose the one that you think is relevant for yourself.
Installation of window sills and slopes on plastic windows does not have any difficulties, especially when it comes to plastic products. Any specialized skills or skills are not required here, it is only important to be extremely careful when cutting PVC, when it is necessary to exclude strong pressing in order to avoid the appearance of chips or scratches at the cutting site.
The installation itself is carried out as follows:
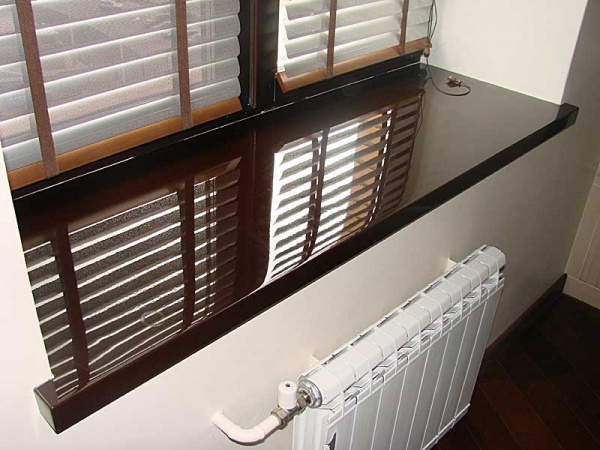
Such a window sill is fixed with glue or mortar, but if necessary, you can also use screws on mechanical supports. In addition, if you want battery power warm air rose normally and spread throughout the room, you will need to leave a protrusion of up to 60 mm. In length, the plastic window sill should not be more than 20 cm wider than the window opening.
The installation of a wooden window sill is more complicated, as a result of which, over time, everyone gradually began to forget about high-quality fitted boards. However, many continue to order and use such products, because they have an attractive appearance and are also environmentally friendly. In order to spend correct installation a window sill of this type, you will need to initially pay attention to the source material, because there should be no knots or defects on the board.
Installation is also carried out in several steps:
Today on the market there is a fairly large number of different window sills, which are made of plastic, wood and other materials. The installation of such structures by specialists will be expensive, therefore many want to know how to properly install a window sill with their own hands.
The plastic profile is environmentally friendly pure material, and all structures that are made from it are carefully checked.

Such windowsills have many advantages:
Such structures can be installed even by a person who does not have the relevant work experience, while special tools will not be needed. The plastic window sill can be installed on any window in the room or on the balcony.
In order to properly mount such a window sill with your own hands, you need to know the sequence of actions.
Back to the table of contents

To install a plastic structure, it is necessary to measure the parameters of the window.
There are several options for installing such structures. In the first case, the window sill is fixed with a special compound. This method is outdated and is rarely used today, as other, more modern and convenient ways installation.
In order to be able to quickly, self-tapping screws should be used. In this case, it will be necessary to drill a hole in the frame into which the fasteners are installed. The joint should be sealed with a silicone-based sealant. The extreme part of the window sill is wound under the frame and attracted with self-tapping screws. The rigidity of the structure can be made with special pads. The place under the windowsill must be treated with polyurethane foam.
During the installation of such structures, you can also use metal spring brackets. They should be screwed to the profile with self-tapping screws. The product is installed in the groove that is formed between the frame and the fastening element.

In the last method, such additional devices as self-tapping screws or staples will not be used. This method is labor intensive, but the most reliable. The principle of installation is that special linings are installed under the structure so that its edge fits snugly under the window frame.
The last 3 methods are used quite often. Each of them has its own advantages and disadvantages. For example, it is impossible to fix a plastic window sill on self-tapping screws if the sash opens. All methods differ only in the method of inserting PVC window sills into the frame, all other stages of work are identical.
Back to the table of contents
The first step is to purchase all the necessary tools and materials. The quality of the work performed will depend on the quality of the tools used.

Items you need:
In order to correctly install the structure for PVC windows, measurements should be taken. Strength and how well the structure will cope with its functions depends on measurements. With incorrect measurements, the design will not have the best appearance.
You should know that it will not work to fix the installed plastic or wood sill in case of incorrect measurements. In this case, all installation work will need to be done again.

In the process of measurements, it is necessary to take into account the properties and characteristics of the plastic, as well as a number of some other parameters. These parameters include the height of the batteries located under the windows. If the distance between the two structures is small, then air circulation will be disrupted, as a result, the microclimate will deteriorate.
When measuring the installed window sill, you need to take into account the fact that its length should be several centimeters larger than the width of the window. The width of the structure can be chosen based on your own preferences, but the distance between the wall and the window sill should not be more than 8 cm. If the window sill has a large width, this may affect the functions of the radiators. In the process of sizing the structure, it is necessary to check the air circulation that forms in this area.
Products are installed end-to-end against a plastic window, therefore a special profile must be attached to them, which will be used to fix the ebb.
Back to the table of contents

The design can be purchased at finished form or cut out of plastic yourself. If the window sill is cut from PVC, then the profile must be purchased with a margin of about 5 cm.
The first step is to check the product for defects, as they can spoil the appearance. In some cases, it may be necessary to trim the structure to fit the size of the opening. To do this, first of all, you need to correctly mark the window sill. This can be done with a simple pencil.
The maximum length of a plastic structure is 3 m. The width of the product varies between 25-70 cm. If the width of the structure is too large, then the excess can be cut off from the part from which it is fixed to the wall. Cutting lines need to be given Special attention... It should run 0.5-1 cm behind the stiffeners, which are located inside the product. In this case, the window sill will be able to tightly dock with the window frame. Back the structure should go under the window and be firmly supported by wedges and construction foam... If the extreme part of the product loses its stiffeners, then the inner base will not be able to maintain required form at the junction, as a result of which it will bend inward.
The sill can be cut with a saw or electric jigsaw... You can also use a hacksaw for plastic. You need to cut carefully, do not press hard on the tool, so that scratches or other defects do not appear on the structure. Small pieces of plastic can get into the eyes. To avoid this, you should know the safety rules. You need to cut the plastic with goggles and work gloves.
Back to the table of contents

Use sticks to install the backing. They will take on the load from the windowsill. If there are potholes or crevices, then you should use polyurethane foam. At this stage, it is important to check the tightness of the product to the frame, since this indicator will guarantee the strength and reliability of the structure.
Slopes are installed. The lower part of them must be cut down to the wall, after which the installation site must be cleaned of debris. The bars on which the window sill will be held should not go beyond the wall. The blades are best secured immediately. Thus, it will be possible to form a groove into which the structure for the windows will be installed. The sill must be adjacent to the window frame. The gap between the structure and the walls must be less than 4 mm.
The part of the window sill that protrudes beyond the slopes should fit tightly to the wall, since it is not allowed to leave gaps.
So that the structure does not deform, metal strips must be mounted under it. These products must fit into the bottom plug of the product.
Renovation of an apartment or house includes the installation of window sills and slopes on plastic windows. It is known that the window sill, in addition to the aesthetic role, also plays a protective role.
In addition to mechanical stress and the influence of temperature, wooden, stone and plastic window sills are affected by moisture and sunlight.
All these factors predetermine the lifespan of the windows.
Installing or replacing them with your own hands on plastic or wooden windows is a simple process and does not require any professional construction skills.
Before making repairs and replacing window sills and slopes, it is worth buying all the necessary tools that are needed to install the window sill under the window.
After all, correctly selected and good materials, the tools are pleasant to work with, as they increase the efficiency and quality of work.

In addition, the products and tools will come in handy in the future, given that the repair and replacement of windows will take place more than once, and the installation of plates will be done under each window.
All of them are purchased in specialized stores or window companies.
If the installation of windows will be done by hand, you will need the following tools:
Installation of a window sill begins, first of all, with measurements. First you need to find out the dimensions of the workpiece.
It should be remembered that the quality of all work depends on how correctly the required dimensions are determined.
The length of the workpiece should be chosen more than necessary, because then it will not be difficult to adjust the dimensions using conventional tools.
The width of the workpiece must be such that the structure does not interfere with the air circulation from the battery upwards.
If this condition is neglected, condensation will appear on the windows, and the flow of cold air will move into the room and it will be necessary to change the windows.
That is why determining the dimensions correctly in advance is very important stage preparatory work.
Sometimes a situation arises when you need to correctly fit the window sills to the corresponding window sizes. First, markings should be made on the product using a marker.
Do not forget that the excess is cut from the part that is fixed to the wall.
In this case, the cutting lines should also be noted. They must go 0.5 - 1 centimeter so that the plate is rigidly and tightly joined with window frame.

If the edges of the products do not retain the stiffeners, the inner sections will lose their desired shape at the joint and bend inward.
Do-it-yourself pruning using a jigsaw, saw or a special hacksaw, and stone window sills are trimmed with a special diamond disc.
The main thing here is not to forget about accuracy and not to press with great force on the tool in order to prevent scratches or chips from appearing, otherwise you will have to change the workpiece.
Also, do not forget about safety measures: avoid contact with eyes small particles and use gloves.
The workpiece is now completely ready for installation in place. The window sill must be washed and proceeded to the next stage.
When the measurements and trimming of the window sill have been carried out, it is necessary to continue the repair and start preparing the linings.
This is important to create small outward slopes so that the water can drain outward.

In this case, the pads should not protrude, so that later they do not have to once again trim.
If there are gaps, they are usually covered with polyurethane foam.
When laying, do not forget to put slopes of plastic or wooden windows... The lower slopes are cut to the wall, and the installation site is cleared of unnecessary material.
It is assumed that the gap between the window sill and the wall does not exceed 4 millimeters and quite tightly and correctly adjoins the windows.
It is also necessary to install metal strips and insert the ends of these strips into the lower plugs under the windowsills to avoid their deformation.
Repair involves the installation of window sills and slopes different ways... The first one is outdated and rarely used.
It implies that the window sills are fixed with a special adhesive solution. The fastest way is to do it yourself using self-tapping screws.
First, holes are drilled in the frame, into which these very parts are then screwed.
The joint section is filled with silicone sealant, and the edge of the window sill is brought under the frame, attracting with self-tapping screws.
According to the second method, the installation is carried out using aluminum spring brackets screwed in with self-tapping screws.

And the final method, which is the most reliable and involves the use of necessary materials, consists in the use of special linings that are installed under various window sills.
There is different ways installation of various window sills, before use, the positive and negative sides of each of them are assessed and only after that - you need to choose the most optimal one, because the replacement of windows will depend on this.
The methods differ only in how various window sills, including wooden ones, are placed under the frame.

If the window sill has irregularities, then during installation there may be a gap between it top and frame. It is carefully filled with silicone.
After that, you need to wash everything.
Upon completion of the installation of the window sill, it is required to install the same (wooden or plastic) slopes.
To do this, both horizontally and vertically, you need to align the window opening with your own hands.
This process is carried out using polyurethane foam, which protects them from the influence of temperature. Next, the quality of the poured foam is checked.
If there are surpluses, they should be removed, and if deficiencies are found, it is necessary to refill them.
First - you should install the top panel, which stretches along the entire length window installation and only then secure the side panel.
There are different approaches. Installation can be carried out using slatted frames, while securing the panel with nails or staples.
It is necessary to do everything as correctly and accurately as possible, while not allowing damage to the window sill, window and its slopes.
The second approach, the simplest and most convenient, is the use of polyurethane foams for installing windows, as well as masking tape.

An important condition for beautifully made slopes is the perfect vertical anchorage of the yards.
For the purpose of leveling, use wooden blocks and use a level to achieve a perfect vertical.
When all necessary materials installed, cut off excessive amounts of foam, outside and inside the room, before washing everything, it is necessary to apply rotband on the foam.
As soon as it hardens, the various external slopes should be painted with water-based paint.
Then you need to remove protective layer from the slopes, window sill, plastic window, wash off the spots and dirt, and at the end, smear all the cracks with liquid plastic.
At this stage, the repair is completed.

Alexander Dragun, Ph.D., site expert
When installing plastic windows, installers are regularly faced with a situation when customers do not know what a window sill is for - they perceive it as a standard element of a window structure. In fact, the window sill has many functions, depending on which the material for the window sill is chosen. Let's fill the gap in knowledge and tell you about the functionality of the window sill, its types, the advantages and disadvantages of the material from which it is made, as well as how the window sill is installed on plastic windows with our own hands.
The windowsill originally had four functions:
Over time, the role of the window sill has expanded. He became:
 Window sill table.
 Based on how the owners see their windowsill, the material from which it is made is selected.
The construction industry offers a base for a window sill from:
Window sill from natural stone- one of the few interior elements that very clearly demonstrates the wealth in the house, status and good taste of the owners. Him:

Natural stone also has disadvantages:
An alternative option for a marble or granite window sill is an artificial stone made on the basis of acrylic or quartz agglomerate. The product has a lot of advantages:

Flaws artificial stone related to its nature:
For your information: the above damage can be easily removed by specialists on site, without dismantling the window sill. But it costs money.
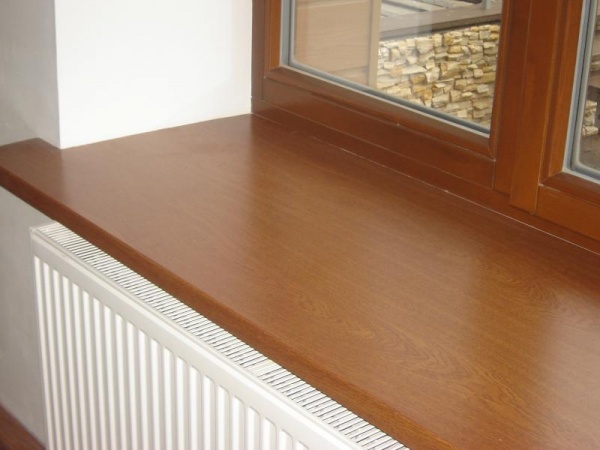
Like granite with marble, wood belongs to natural materials and has the same centuries-old history of application in window construction. With the advent of the construction industry on the market artificial materials, the position of wooden window sills fell sharply, but still retained their admirers and connoisseurs.

Wooden window sills have their pros and cons.
On the price factor, experts have no consensus: some consider it a plus because of the democratic price, others - a minus, because, on the contrary, the very high cost of wooden window sills. Here, oddly enough, both sides are right. The cost of a pine sill board is not too different from plastic, an oak board costs about the same as a natural stone.
Composites - chipboard and MDF are called upon to replace natural wood. However, alternative window sills are very inferior not only to wooden ones, which they are intended to replace, but also to all other types of window sills. The main problem is their ability to swell on contact with water.
The protection of wood-based material with a waterproof film is not very reliable. The film is easily damaged sharp objects and is afraid of high temperatures. In this respect, laminated MDF is a more reliable material, but also more expensive.
A plastic window sill is a hollow panel with a thickness of at least 2.0 cm made of two thin sheets (the top one is at least 3 mm thick, the bottom one is at least 2.5 mm), connected by stiffening ribs. The more ribs or thicker the sheets, the stronger the product.
Installing a plastic window sill allows you to:

Among the disadvantages of PVC window sills, it should be noted:
With proper operation, these shortcomings, as a rule, do not appear.
Note that all types of window sills lend themselves to installation independently. Using the example of how to install a plastic window sill with your own hands, consider general principle organization of work and we will describe step by step the entire technology, noting at the end the nuances of attaching this window element from other materials.
The efficiency of the construction process depends on correct selection materials and necessary tools... To install a window sill in one window, you will need:
Of the tools required:
Before installing the window sill, it is necessary to carry out a number of preparatory work:
Quality installed window sill is determined by several parameters. Among them, an important place is occupied by the accuracy of the measurements carried out and the calculation on their basis of the dimensions of the window sill. In the case of a plastic plate, the size of the window sill is carried out at home.
Other types of windowsill are ordered ready-made. Therefore, errors in calculations, if they are made downward, cannot be corrected. At large sizes you will have to increase the grooves and install brackets for additional support of the window sill.
The measurement is carried out in the following order:

1. The distance from the frame to the edge of the wall on both sides of the window is measured, i.e. the depth of the window opening is measured. To determine the real width of the window sill, 2 cm is added to the result obtained to go under the window structure and 4-6 cm to go beyond the wall into the room.
On many sites, you can find a recommendation to release 10 cm outside the wall. Only the aesthetic perception of the window sill is taken into account here. Technologically, a large protrusion prevents warm air currents from heating radiators from spreading around the room (the air convention is violated);
2. Measure the distance between the walls next to the window (in Fig. Line B), and then the length of the wall edge at the base of the window opening, if the slopes are not made at right angles (in Fig. Line C). To the results obtained, 2-3 cm are added on each side, to enter the window sill into the grooves on the wall (stone and wood are hidden in the slopes by 1.5-2 cm). In addition, 3-5 cm are added for the lugs.

The plastic window sill has standard sizes:
Therefore the choice required size does not present any difficulties - you can always cut off the excess. More difficulties arise when choosing a specific plastic model. Here you need to follow the advice of experts.
The sill board should go 2-3 cm into the slope. To do this, a 50x50 mm groove is knocked out at the level of the base of the window opening in the wall with a puncher. If you do not have such a tool at hand, you can select a hole in the brick with a hammer and chisel.
If the slope is concrete, a grinder with a special cutting wheel makes 2-3 cuts in the place where the groove will be. In order not to accidentally damage the frame, a spatula is pressed against it. It is easier to knock out cut concrete than monolithic one.

The polyurethane foam must come into direct contact with wall material... Therefore, the base of the opening is cleared of construction debris and foam that has excessively come out when foaming the space between the frame and the walls. The foam is also cut from under the bottom window profile to a depth of 2-3 cm for partial pinching of the window sill sheet by the window structure.
If the distance between the lower plane of the installed window sill and the base of the wall is less than 1 cm, a groove up to 70 mm wide and 20-30 mm deep is grooved in the wall to form a foam seam on which the plastic panel will lie.
Plastic window sill for sale rectangular... But you need to insert a panel in the form of the letter "T" with a wide leg (often put in the form of a rectangle or trapezoid). Therefore, the dimensions of the real window sill are transferred to the plastic and the cut lines are drawn with a construction pencil. The required shape is cut along the lines.
Important: when installing windows, very often they are displaced along the vertical axis, when the distance from the edge of the wall to the frame on different slopes is different. In these cases, the rear side of the panel is trimmed obliquely so that the parallel is maintained between the wall and the ledge of the window sill.
Instructions on how to properly install a window sill on plastic windows, simple and easy to understand for beginners in the construction business. Let's analyze all the operations step by step.
Step 1. A protective film is removed from the bottom side of the window sill, as well as from the sides at a distance of 3-4 cm.
Step 2. The window sill is tried on - inserted into the place of permanent fixation. If an undercut area is found, the inaccuracy is corrected.
Step 3. A vapor barrier tape is attached under the frame.
Step 4. The pre-purchased wedges (bars) are installed. Here it is necessary to take into account several important points:

Step 5. A protective film 3-4 cm wide is removed from the plastic surface from the window side. Plugs are placed at the ends.
Step 6. The last, control fitting is carried out, during which the following tasks are solved:
Step 7. The assembly seam is foaming at the base of the opening.
 The assembly seam is foaming.
Step 10. A small load is placed on the window sill closer to the room - in this way, a tight fit of the window sill to the frame is achieved due to the expanding foam.
Step 11. After half an hour, an additional 10 kg of cargo is placed on the windowsill, after which you can foam the remaining space.
Step 12. The grooves are sealed with putty, after which the slopes can be sheathed with plastic panels.
Step 13. The joints of the window sill with the slope panels and the frame are sealed with a plastic sealant - silicone.
Step 14. After a day, the load is removed, the protective film is removed.
Now you can install the plugs from the ends, and remove the protective film.
For information: on balconies and in loggias, the window sill is installed according to the same algorithm.
How to attach a window sill to a plastic window made of other materials? A window sill made of natural and artificial stone must be fixed with glue. For this, the base of the window opening is leveled cement-sand mortar... The ends of the stone are protected with felt.
A wooden window sill can be installed in various ways:
On sale you can choose a window sill for every taste and at any price:
Installation instructions are simple. Provides the following types of work:
For balcony windows, the installation of window sills is carried out according to the same scheme.
Photo 1 - Plastic window sill photo
Practical, attractive and inexpensive plastic window sills are most often installed together with the same windows, although others are possible. design solutions... Installation of window sills does not require special skills, but you need to follow the technology exactly and perform all actions carefully.
List of materials required for installing a PVC window sill

Before starting any work, you need to carefully study the accompanying documents for all materials and tools used, if you have not previously used them. This fully applies to the installation of a plastic window sill.
For example, it is very important to know at what temperature you can work with polyurethane foam. This information is on the product label. When choosing this material, you should give preference to products with the lowest coefficient of expansion, which will prevent the window sill from rising. Perfect option- use a gun for polyurethane foam. In this case, as a rule, professional material is used, which does not expand significantly.
If you have to install a window sill in a window over 3 meters long, then you will have to use additional parts that need to be carefully adjusted and glued, or special fillers for joints.
In order for the window sill to serve for a long time, it is important to correctly determine its dimensions. The width is calculated taking into account the following components:
Window sill width :
To determine the length you need to measure the window opening with a tape measure and add another 10 cm to this value. This is necessary so that the cut edges of the window sill are not visible.
Important!
After taking all measurements, check them again. Better to stick to the rule: measure seven times, cut once. Thus, it will be possible to avoid annoying mistakes, which are difficult to fix, and sometimes impossible.
It remains only to cut off all unnecessary and you can proceed with the installation.
First you need to clean the surface of the window opening from debris and dust. This must be done carefully so that the subsequent foaming is successful. The next step is to try on the already prepared window sill. If necessary, it is trimmed in the right places.

Photo 3 - DIY PVC window sill installation
Next step- installation of a window sill. To do this, it is inserted into a special support profile located under the window frame by 2 cm.Using a level, the surface of the window sill is exposed and substituted wooden supports, which are necessary to ensure the design stiffness during the operation of the window sill.
The window sill sheet is installed with a slight slope directed towards the inside of the room. This is necessary so that when condensation forms or watering flowers, excess moisture does not stagnate, but rolls off the windowsill.

Photo 4 - DIY PVC window sill installation
The next step is foaming. It is important enough and must be done with great care. Before proceeding directly to the process itself, the surface of the window opening must be moistened. This technique improves grip and more even distribution polyurethane foam.
First, the inner surface of the window sill and the junction with the staging profile are covered with foam. This avoids the appearance of such an unpleasant phenomenon as cold bridges.

Photo 5 - DIY PVC window sill installation
After this operation, experts recommend installing a small weight on the windowsill, which is removed after the foam has completely hardened.
Polyurethane foam is afraid of ultraviolet radiation, so you must not allow anyone to get on it Sun rays... Even a thin layer of plaster or other material can protect it.
It remains to install the plug, cutting off the required length from the workpiece and lubricate it with a cosmophene, press it against the ends of the window sill. And at the final stage, you need to remove the protective film and fill all the joints with silicone sealant, doing this very carefully.

Photo 6 - DIY PVC window sill installation
From the above, it becomes clear that even those who have a minimum of knowledge and skills in this area can cope with the installation of a plastic window sill. It is only important not to violate the technology and not to rush.
Reading time: 3 minutes In moments of crises, unexpected changes and sincere ...

Cork - what is this material? Everyone knows that it is used for capping ...

You are what (and how) you eat. Folk wisdom Any car owner ...