Physicist and astronomer Stefan Feeney of University College London, one of the...


Everyone sooner or later faces the need for repairs in a house or apartment. It can be capital works or simple cosmetic trim. In any case, it may be necessary to plaster the walls or ceiling. This operation is necessary for leveling surfaces, forming external and internal corners, providing fire protection, heat and sound insulation, as well as for decorating rooms or creating an original exterior. There are several implementation technologies plastering works, the choice of which depends on the characteristics of the material used.
Modern construction market offers great amount various products that are used for plastering. They are divided into two large groups: for external and internal works.
It is more of a decorative role than a functional one. Much lower requirements are imposed on it in terms of resistance to mechanical stress, the influence of moisture and water, temperature regime, reliability and so on. This makes interior mixes more accessible. In addition, they can be used to create high-quality, perfectly smooth surfaces that can later be tiled, painted, wallpapered or left without a decorative layer. There are several groups of materials for internal plastering.
Includes three main types: gypsum, cement and. The technologies for performing plaster work using these mixtures are similar, the differences are only in the method of preparing the composition and the time it dries.
Simple plaster is applied according to the following instructions:
It's important to know! At each of the above stages, it is necessary to check the evenness of the surface building level. It is also important to follow all the recommendations indicated by the manufacturer on the packaging.
Represents gypsum boards. The basis of the material is gypsum, the share of which is 93%. General products of this type covered with cardboard or paper, but for difficult conditions (fire hazard, high humidity) special materials are used. There are two options for applying this coating.
The technology for performing plaster work using glue includes the following steps:

Important! Hanging furniture or appliances should not be installed on drywall.
Installation of the plate on profiles:

Decorative plaster is a finishing material with which you can create really original interior. After drying, such solutions acquire a certain texture, for example, wood, stone and even fruit.
Do-it-yourself plastering work is carried out in the following order:

To save time and effort, you can use a figured roller. First, all the main steps that are indicated above are performed, after which the roller is rolled in a container with a solution and applied to the wall. The result is a surface with a relief pattern. In the end, it will be necessary to treat the wall with acrylic wax.
Usage decorative plaster for covering plasterboard surfaces is not always advisable. Using this material, it is recommended to correct only small defects or to equip the so-called "color zones" in the premises. The application technology is similar to the treatment of concrete surfaces, but has the following features:
Should know! Most decorative mixes dry fairly quickly, so it's best to mix small amounts of the mix to keep it from setting in the container.
The external walls of residential buildings are constantly exposed to atmospheric influences, various mechanical loads, exposure to natural radiation, and so on. To protect your home from the above negative factors, use facade plasters.
Modern Construction Materials of this type are made on the basis of cement or lime with the addition of various additional components that are necessary to improve the performance of the resulting surface.

They must have the following properties:
First of all, the surface must be leveled and cleaned of possible contaminants. Then follow actions that are similar to applying conventional plaster(see above). A spray is applied, after two days the primer, and after 2 weeks the coating. The thickness of the layers is 0.5, 2 and 0.5 cm, respectively.

During the finishing works on the outer walls must be taken into account weather. If it started to rain, then the work should be postponed, and also add 1-2 days to the drying time of the plaster.
Technology features:
All types of plastering work are carried out quite simply, while they do not require expensive construction equipment. Therefore, most home craftsmen prefer to do them themselves.
If you have confidence in your abilities and a desire to do the work yourself, then following the application technology and following the above rules, as well as the manufacturer's recommendations, will allow you to perform plaster on highest level. Otherwise, it is better not to tempt fate, but immediately turn to specialists in order to avoid unpleasant consequences.
Starting repairs in an apartment, it should be understood that you cannot do without plastering the walls, since they are never even. This is not an easy task and requires certain skills, so you must first familiarize yourself with the rules and technology for this type of work.
Plastering is an important process that is necessary not only for leveling walls, but also has a number of other functions:
With proper plastering, the walls will look aesthetically pleasing and neat.

Before plastering, it is worth preparing essential tool and material. Need to decide on the look plaster mixture because today they a large number of, happens:
When choosing, it is necessary to build on the type of wall, durability, and when finishing an apartment, do not forget about environmental safety(better to take water based). In the presence of concrete, aerated concrete or brick walls, a cement-lime mixture is suitable. There is universal view- cement-sand, it is applicable for plastering different walls. Currently the most popular gypsum mixture. It is easy to work with and the quality of the walls is excellent. But it is expensive, and it cannot be used in a room where there is high humidity.

For work, stock up:
After preparing everything you need, you can get to work.

Cement-sand mixture - universal and can be used for walls different type(concrete, brick, wood). It has been used as a repair material for a long time. This mixture is cheap, and the process itself is quite simple and you can do it yourself. In addition, only this solution is suitable for wet rooms. Composed of cement, sand and various additives for a fortress.
Despite its simplicity, it is heavy and not easy to work with. In addition, when using this mixture, it is impossible to make a perfectly flat surface, so it is not suitable for painting. More often it is used when it is planned to finish with ceramic tiles in the future.
If you decide to make the solution yourself, then the proportions are as follows: 3-4 parts of sand are added to 1 part of cement (depending on the brand of cement). Water should be poured little by little until a homogeneous mass is obtained.

Spray - the first layer of coating. It is applied with a thickness of 5-10 mm. The thickness depends on the smoothness of the wall, the smoother it is, the thinner the layer. If plastering occurs on a grid, then the thickness is 1 cm.
The mixture is applied using two spatulas, wide and narrow. The solution is applied to a wide spatula, from which we take the mixture narrow and applied to the wall with pressing movements. The spray is applied from the bottom up. Since the layer is considered preparatory, it is not leveled and should be laid immediately without major irregularities.

The primer is a plaster coating that is covered with a second layer. Its composition is denser and has a pasty consistency. Application thickness - 1 cm, this layer must be well leveled. If this does not work in one layer, a second layer is applied. Make sure the first layer is completely dry before applying the next one.
The soil can be thrown with a trowel or smeared with a spatula. After application, it should be leveled with a plaster rule. It should be noted that without the use of guide beacons, it is difficult to perfectly align the plaster.

The last layer is the lining. The solution for this layer is required to be semi-liquid, applied with a thickness of 5 mm with a wide spatula, the surface must be leveled in advance.
When applying the mixture and smoothing it, plaster is collected on the tool, it must be removed in time and mixed with a fresh composition.

Dry gypsum mix is simple and easy to apply. Unlike cement mortars, gypsum mortars have some advantages:

Plastering walls with a gypsum mixture includes several stages:
Now you can start finishing work.

In order for the plaster to lay down better and last longer, you should prepare the wall. The surface is cleaned to the ground - old wallpaper and trim are removed. If cracks are found on the walls, they must be covered up, as the plaster applied to them will also crack.

There are several ways to close cracks, which one to choose depends on its thickness and their number:
Now, everything is ready for the next stage of work.

If Brick wall has old plaster, it should be moistened with water with a sponge, then it will lag behind more easily. With a spatula and a hammer, carefully remove the old finish. After that, using an iron brush or grinder, it is necessary to process the wall.
At the next stage, recesses are made between the bricks up to 7 mm. They are necessary, as the plaster will go into them and be stronger. The recesses are cleaned with a brush and a damp sponge. The process ends with the treatment of the wall with a primer, it should be applied in 2 layers.

concrete wall it is easier to clean from the old finish than brick, because it is smooth. You can use the following methods:
When the surface is cleaned, small notches need to be made on it, this is quite difficult, but necessary. If you do not want to make notches, you can use another method - priming the walls with a deep penetration composition, to which fine quartz sand. If you feel a roughness on the wall, then the plaster will hold tight.

Old plaster from a wooden surface is removed very easily. The wall is tapped with a hammer, and the finish crumbles. Therefore, to make it easier to remove garbage, lay an oilcloth under the wall.
To, plaster mortar held better, you should fill the slats of wood (shingles). They are stuffed diagonally. In addition, they play the role of beacons when leveling the surface.
If there are old slats on the wall, they must be removed, as they could rot or have insects in them. Therefore, before stuffing a new shingle, wooden surface should be treated with an antiseptic, this will protect against mold and insects. Having stuffed the slats, you need to do the processing with this composition again. Instead of shingles, you can use a chain-link mesh, which is attached not to the wall itself, but to the slats. Apply the solution only on dried walls.

The work associated with the preparation of this type of wall is quite long. At the first stage, the wall is cleaned, this requires a metal brush. Cleaning should be done thoroughly and pay attention to the presence of grease stains on the surface. Grease spots must be removed, for this clay is taken. It is applied to the oily area, and then removed. If this does not help and the stain remains, it is cut down, and the hole is sealed with a solution.
The cleaned surface is primed in several stages. After applying the first layer, it is leveled with a spatula and allowed to dry. Then, the second layer is applied. Regardless of the unevenness of the wall, the primer should not exceed 2 mm. If there are large differences, they must be eliminated by mounting drywall in these areas.
The next step is to install a reinforcing mesh, it is fixed with dowels. Now you can start plastering.

Plaster is a material that lends itself perfectly to alignment. There are two ways to level walls when plastering.

This method is more economical, as the consumption of the solution is reduced. When leveling without beacons:

Alignment in this way ensures uniform application of the solution. Beacons from each other are installed at a distance slightly less than the length of the rule. Start making the first two markings should step back from the angle of 15-20 cm. A vertical line is drawn and holes for dowels are made on it. They are installed on self-tapping screws in the same plane. A small amount of mortar is applied to the line between the fasteners, beacons are fixed on it. This is done by pressing the rule, the beacons are attached to the caps of the screws. The excess solution that has come out is removed. After placing the beacons, the evenness of the installation should be checked and, if necessary, their location is adjusted.
Lighthouses are of several types:

After installing the beacons, you can start plastering.
It should be noted that when applying a thick layer, the solution must be thick. If the surface strongly absorbs moisture, then it must be moistened.
Plaster is applied by throwing it on the wall. It aligns from bottom to top. Then, leading the rule from below and holding it at an angle, the excess mixture is removed. If bubbles appear on the surface, then these areas need to be redone. So, it should be done until the ceiling is reached. Areas near the floor and ceiling are made after the wall has dried.
To check the result, the rule is applied from different angles. If there are metal beacons, they are removed, and the holes from them are sealed.
If the wall has large irregularities, then the plaster is done in two layers. First rough, without alignment, and after 2 days the second, finishing.
After applying the plaster, grouting is done. At the same time, the plaster is used more liquid and it is better if the wall is not completely dry. The solution is applied to the malka and smeared with a thin layer. When the wall is dry, you should walk with a wooden trowel and finally sand the surface by attaching felt to the grater.
If you decide to plaster the walls yourself, then you should familiarize yourself with the technology and the sequence of work. Examine the available compositions and choose the best one. In the manufacture of the solution, you must strictly follow the instructions.
In addition, when starting work, it is necessary to provide appropriate conditions, there should not be: drafts, high temperatures. To avoid cracks, do not apply the solution to a poorly dried previous layer. Do not dilute too much solution, it dries quickly, and you will work slowly, because you do not have experience.

The services of a qualified decorator are quite expensive, although with the availability of funds the quality will be better, and in time repair work complete faster.
However, if you want to save money and test your strength in this field, then go for it. Of course, the process will take a lot of time and effort, but this species really do the work yourself. In addition, you will gain new skills and be proud of the result of your work.
In any case, you can’t do without plastering the walls when repairing an apartment. And it is important to do it right so that the invested money and labor are not in vain. And the result did not disappoint, but delighted you with a new interior.

Hello my dear students!
I am pleased to inform you that we will now work with the application innovative technologies(i.e. this blog). I think that this word is already familiar to you! And it will not be difficult for you and me to work 100 thousand times better and more productively and, most importantly, MORE INTERESTING!!
Our course is designed for 59 academic hours. (48 theoretical and 9 practical hours, 2 hours credit lesson). At the end of the course, you will be required to take a test.
The course instructor is DmitriRiev Evgeny Yurievich.
At the end of each day, you will have to answer the reflection questions on this blog. Nothing complicated!
So, let's start working!
Today we are going to learn about:
plaster layers.
It is impossible to make plastering in the usual ways immediately for the entire thickness, since the solution that has not set will float away, so it is applied to the surface in layers.
Simple plaster consists of two layers:
splatter and soil.
Improved and high quality of three layers:
splatter, soil and coating.
The average total thickness of all layers of simple plaster is 12, improved - 15 and high-quality - 20 mm.
Plaster layers are applied to the surface different methods- Throwing and spreading. The spray solution and the first layer of soil are thrown in so that it penetrates all the roughness better and thereby adheres to the surface more firmly. The second and subsequent layers of soil can be spread. Covering is thrown or spread. The solution is also leveled in different ways.
Spray - the first layer of plaster coating.
He intendedfor connecting plaster to the base by filling voids and cracks in the finished surface.
Spraying is carried out with a solution of a liquid consistency.
Thicknessthis layer is:
Densitythe solution applied by hand should correspond to the immersion of a standard cone by 8-12 cm.
Before spraying, stone and concrete surfaces are moistened with water in warm weather. The more correctly the spray solution is prepared and applied, the better it will fill all the roughness, the stronger it will adhere to the surface and the stronger the plaster will hold, the spray layer is not smoothed, its roughness promotes adhesion to the soil layer.
The primer is the second layer of plastering.
The solution for the soil is prepared somewhat thicker than for spraying.
The mobility of strained plaster solutions at the time of their application should correspond to the immersion of a standard cone:
Coating technique
The quality of the finished surface largely depends on the quality of the prepared coating solution. A good mortar is easily, quickly and cleanly rubbed or smoothed.
To prepare the coating solution, fine-grained sand is used. Coarse-grained sand is of little use, as it gives a rough, rough texture. The homogeneity of the mortar plays an important role both in the process of its application and in the grout. If in some places the coating solution is fatter or vice versa, then the grout will have a different purity. Therefore, cooked or ready solutions before application, sift through a fine sieve and mix again. The coating is performed with a solution of the same composition as the previously applied layers of plaster. Grease solutions give a rougher surface, with more nataska and unrubbed streaks. These solutions are more suitable for smoothing. Lean mortars are not strong enough and rub poorly.
12-20 minutes before applying the coating, the surface of the applied solution is moistened with water. With moistened soil, the coating adheres more strongly, due to which the solidity of the plaster layer is achieved. The solution is applied to the surface of walls and ceilings in thin layers and leveled with trowels. Nakryvka can also be applied from the falcon by spreading. The cleaner and more thoroughly leveled the solution, the easier it will be to rub it.
To avoid puttying and to paint directly on the plaster, a sandless coating is used. It is made from lime paste and gypsum. Lime dough is taken with a draft of a standard cone of 12 cm. Gypsum and lime dough are passed through a sieve with holes no larger than 1x1 mm. When preparing a new portion of the coating, the lime dough is well mixed so that it has a uniform density. The solution is prepared in small portions without gypsum setting retarders. Slightly set or rejuvenated solution is not used.
The soil before applying the coating is leveled and moistened with water. The solution is leveled and smoothed with metal trowels. When joining the covering, the edge of the previously applied solution is cut off by cutting at an angle of 30 ° and a new portion of the solution is applied to the cut part.
Grouting is done with graters round and round. Razgonka grout gives a cleaner surface, it is most often done with high-quality plaster.
Round grouting is performed as follows. With one hand they take a grater, press the canvas against the surface of the plaster and make circular movements counterclockwise. Tubercles and irregularities are cut off with the ribs of a grater. The solution moving over the surface fills individual depressions and rubs the coating. The grater should be pressed with different force: where the surface has a convexity, it is stronger, where the concavity is weaker.
In the process of grouting, the cut solution is collected on the edges of the grater. Periodically, it is cleaned and used for lubrication of protirin and shells.
Over time, the coating dries up and rubs off with difficulty. To make it softer, the rubbed surface of the plaster is moistened with water using a brush.
When grouting the plaster in a circle, slightly noticeable circular traces remain on its surface without shells and grouting. Therefore, with high-quality finishes, round-round grout is supplemented with overrunning grout. Overclocking grouting is done like this. The grater, well cleaned of the solution, is pressed tightly against the surface and begins to produce rectilinear movements-swipes with it. This eliminates all traces of grout around.
Overclocking grouting is best done after round grouting. Having wiped a small surface (0.5-1 m) in a circle, it is immediately overwritten in a run. If the surface of the plaster, rubbed in a circle, has dried up, then it is moistened with water, and then rubbed off. The greatest purity of worn plaster is achieved when the work is done first with a wooden grater, and then with a grater, the canvas of which is upholstered with felt and felt.
The quality of the worn surfaces must meet the following requirements. When grouting in a circle, the circular traces left by the grater should be of the same size without grouting, unrubbed places, gaps, shells, protirin, tubercles.
After grouting, there should be no scratches, shells, rubbing, notches, bumps and other defects on the surface of the plaster. When grouting walls 4 m high, they should have only one joint, for which the grout is carried out in two strokes: one from the top from the ceiling to the scaffolds, the other from the scaffolds to the floor. The cleaner the plaster surface is rubbed, the less it requires corrections during painting work.
After grouting proceed to smoothing. The process of smoothing the covering with trowels differs little from the work of a trowel when leveling the mortar with it. Smoothing is done in two ways. In the first case, the applied coating is first leveled with a wooden trowel, and then smoothed with a trowel in one or two directions. The pressing force on the trowel is adjusted so that after its passage along the cover, no traces remain. On the walls, the lining is first smoothed in the vertical direction (from the floor to the ceiling), and then in the horizontal direction (along the length or the width of the floor). On the ceiling, smoothing is first performed across the rays of light coming from the windows, and then in their direction.
In the second case, the covering solution is smeared and leveled at the same time, and then it is smoothed down. When smoothing, work is best done by two people. One applies the solution and levels it, the other smoothes it.
When smoothing down with a trowel upholstered in rubber, the surfaces look like fine sandy textures. It is better to paint such a surface with glue paints. When smoothing with metal trowels, the surface of the plaster becomes as if iron. It is better to paint with oil paints.
Since the sandless coating is applied in a thin layer, there should be no shells, potholes or other defects on its surface. A well-worn coating has a fine-grained smooth texture that does not require puttying with a simple color. This increases the productivity of painters, reduces the cost of finishing work.
The plaster bait consists of 3 layers, which are applied sequentially:
- spray;
- soil;
- cover.
The purpose of the first layer is to fill cracks and irregularities on the wall. The spray is applied to the wall without leveling, using a more liquid solution, like kefir. Drying, it forms a rough surface, which improves the adhesion of the base layer. Thickness of the first layer - from 2 to 5 mm
To apply the second layer, use a solution of a thicker consistency. The soil levels the surface. It is applied in several layers, and each layer should be no more than 7 mm.
Third, upper layer it is carried out with a thickness of 2 to 5 mm with a more liquid solution based on finer sand. The total thickness of the plaster layer is:
- 12 mm - simple:
- 15 mm - improved;
- 20 mm - high quality.
The evenness of the surface is checked by a long rail - the rule. Improved plaster can have 1-2 gaps 3mm deep for the length of the superimposed rail (2m), and high-quality plaster - no more than 2mm.
The first layer of plaster (spray) is applied to the wall in a continuous layer without gaps. It is necessary to throw the solution on the wall in such a way that it does not splatter, but sticks to the surface. It is not necessary to level this layer. It is important that the spray fills all the irregularities of the wall, penetrates under the shreds wooden walls. It should cling well to the wall, then the entire layer of plaster will not come off.
The next, main, layer of plaster, primer, is applied with a trowel from a falcon or a ladle from a bucket on the first layer after it has partially dried and set with the wall surface. The consistency of the soil resembles good sour cream or dough. It must be applied in several layers until the required thickness is reached, with each layer being leveled, and the last one being especially careful.
Soil technology.
1. With the help of a trowel, a portion (2-4 l) of the solution is applied to the falcon, resting one end of the falcon on the box with the solution and raising the other at an angle of 25-30 degrees.
2. Send the collected portion of the solution, removing the excess with a trowel.
3. Spread the solution or throw it on the wall. Tilt the falcon away from you. Take the solution from the falcon with the end or edge of the trowel, bring it to the wall and with a sharp, but not too strong movement of the brush, throw the solution onto the wall.
If you are plastering over a metal mesh or shingles, then the soil should not be thrown, but smeared with a steel trowel. The same applies to the case of using a mortar without sand for coating. Holding the falcon horizontally in one hand, separate a small layer of mortar with a trowel. Then, slightly tilting the falcon to the wall, remove and smear part of the soil with a trowel and, moving it up, spread the solution over the wall section. Continue priming the wall, turning the falcon a quarter each time to keep it centered.
When applying the solution to the wall, you can use directly a falcon or a trowel. There is another way. Take the falcon in one hand and the trowel in the other. Type a mortar on the falcon, put it close to the wall with its lower edge, while the upper one should be 5-10 cm away from it. Place the end of the trowel under the shield key and move the falcon up the wall. Moving along the surface, gradually press the top edge of the falcon against the wall.

If you work with a trowel, then apply the solution on it with a bed. Approach the wall, put the tool against the surface and, by pressing, lead it up the wall. At the same time, make sure that no air bubbles remain, and the solution fits snugly against the wall. Choose a trowel with a web width within 120 cm, then you can keep it on large quantity soil. The trajectory of the trowel can be either zigzag (short left-right movements) or a long upward-oblique arc at a slight angle.

Leveling the solution.
There are two types of leveling: smoothing and clipping. Smoothing is carried out using a trowel with a web length of up to 120 cm - for large surfaces or 80 and 35 cm for small areas. If you cut off the corner chamfers at the trowel and process roofing steel one longitudinal and one end edge, then it will become much easier to work. Make sure that the thickness of the coating is the same over the entire surface. You can level the ground with a falcon without mortar on it. If, when leveling, a solution stretches behind the tool, then you should wait a bit until the soil seizes.
The cutting of the bastard is carried out using the rule, malkov and planar templates. After applying the soil, a rule is applied to the wall and, resting it on the beacons and moving up, cut off the excess mortar, which is removed from the rail with a trowel and returned to the total mass of the soil. From time to time, the solution in the container must be mixed without adding water. Since the mortar dries quickly, it is not necessary to prepare too much of it, but just enough so that it is enough for the time it sets.

Application of the finishing layer - nakryvka.
Its thickness ranges from 2 to 4 mm, depending on the evenness of the ground and the required quality of the plaster. It is applied on level ground, which must still be damp. If it has time to dry, then you need to moisten it with a wet brush. The coating solution should be the same consistency as the soil, or a little thinner.
If you plan to paint over the coating, then you should use finer sand, sifting it through a sieve with cells of 1.5x1.5 mm; then the grout will turn out clean, it will not be necessary to putty. If it is necessary to increase the thickness of the covering by more than 5 mm, then grooves in the form of waves should be preliminarily cut on the soil surface.
Grout.
After setting the covering, you can start grouting, which eliminates the traces and roughness left from the trowel. Cover must be damp. If it's dry, lightly dampen it, but don't overdo it: wet plaster not amenable to grouting.

For grouting, a well-moistened sponge grater is used, which is moved in two ways:
"round"- pressed to the plaster with a grater cloth, circular movements are made, first clockwise, then in reverse direction. At the same time, the solution is compacted, small irregularities disappear. By adjusting the degree of pressure on the grater, you can remove the existing protrusions on the surface of the covering. Do not forget to clean the grater with a trowel from time to time and wash it. The accumulated solution removed from the edge of the grater must be transferred to its canvas and cover the pits on the surface of the plaster (if any). Masters advise keeping a bucket of water somewhere nearby to periodically moisten the grater and wash off excess solution from it.
"on the run"- translational movements of the grater up and down and from side to side are made to remove traces of circular grout. The grouting of the surface is done as follows: on an area of about 1 sq.m, circular movements are made with a grater over a wet coating, then immediately - in dispersal. The surface should become smooth without tubercles and pits, without gaps.
To obtain a smooth wall, it is advisable to repeat the entire grouting process after a few hours, after slightly wetting the surface. As a result of repeated grouting, the surface of the plaster will become glossy, and subsequent painting will be of the highest quality.
Plaster spray- this is a special composition used before the main layer of plaster. Applied in a thickness of approximately 5 mm to 9 mm. When spraying on surfaces made of brick, concrete or stone, a layer of 5 mm should be used. A layer of 9 mm is possible if a plaster mesh is used. The mixture for spraying must be kneaded until a mixture of the type of liquid sour cream is formed.
Direct spraying is carried out both manually and by machine, which involves the use of plastering stations.
The use of this solution provides an opportunity to significantly save on the costs that go to finishing the walls with plaster. The fact is that special compositions for spraying are much cheaper than the plaster itself.
Plaster spraying will significantly improve the level of adhesion of the finished base in addition, this material has excellent adhesion to plaster various kinds. In particular, pre-treatment of the substrate with a spray is recommended before applying cementitious plaster for leveling.
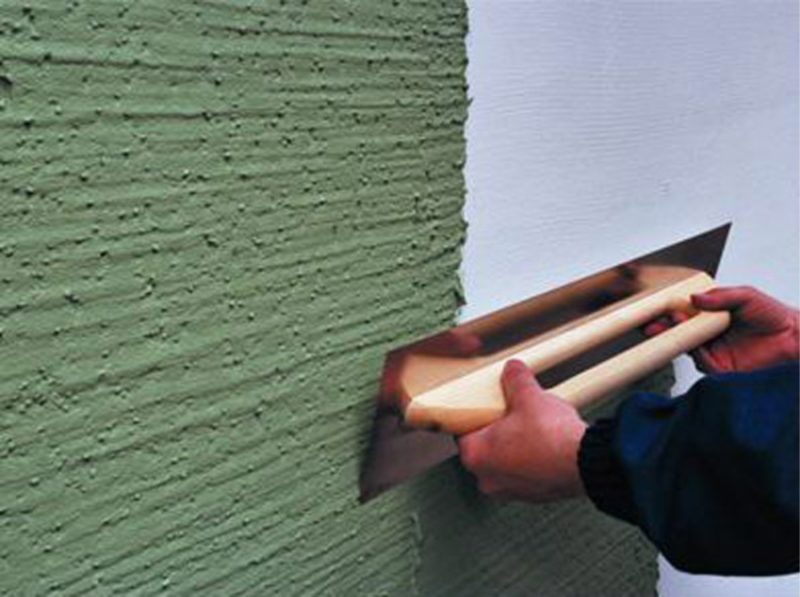
Spraying is carried out by throwing the solution onto the surface to be treated. this work carried out using a trowel or a special board (falcon). Required amount the mixed solution must be put on the falcon, using a trowel.
As a result, from one end the falcon rests on a container in which the solution is mixed, and the other end of the plank must be raised to a level of 25 degrees from the container, after which the solution is gradually collected. During the application to the surface of the spray, the falcon leans towards the wall.
The tip of the trowel or its right edge ready mix should be typed from the plank, and then gradually leveled over the base by the method of throwing. The solution is applied at different levels, both from left to right and from right to left. This is not an easy procedure that requires some preparation. As soon as the plaster mortar is applied to the base, the surface should be leveled.
Our online store has excellent prices for plaster spraying in Moscow. To buy this material, simply add the item to your shopping cart.
Physicist and astronomer Stefan Feeney of University College London, one of the...

Introduction Military monastic orders, orders of chivalry, orders of meritIn 1120...
