


If you adhere to proper nutrition, then avocados are probably in ...


The Ghostbusters remake is coming out very soon, and this is a great excuse to revisit an old movie and explore non-Newtonian fluids. One of the characters in the film, the goofy ghost Lizun, is a good visualization. This is a character who loves to eat very much, and he also knows how to penetrate walls.
Very finely (can be chopped in a food processor), cut the potatoes and pour hot water. After 10-15 minutes, drain the water through a sieve into a clean bowl and set aside. A sediment will appear at the bottom - starch. Drain the water, the starch will remain in the bowl. In principle, you will already get a non-Newtonian fluid. You can play with it and watch how it hardens under your hands, and becomes liquid by itself. You can also add food coloring for a vibrant color.
Trevor Cox/Flickr.comNow let's add some magic.
The starch needs to be dried (leave for a couple of days). And then add tonic to it and make a kind of dough that is easy to take in your hand. In the palms, it will retain its consistency, and if you stop and stop kneading it, it will begin to spread.
If you turn on the ultraviolet lamp, then you and your child will see how the dough begins to glow. This is due to quinine, which is contained in the tonic. It looks magical: a luminous substance that behaves as if it violates all the laws of physics.
Comic book heroes are especially popular right now, so your child will love feeling like a powerful Magneto who can manipulate metals.
From the very beginning, get ready for the fact that after conducting this experiment you will need a lot of napkins or rags - it will be quite dirty.
Pour about 50 ml of laser toner into a small container. Add two tablespoons vegetable oil and mix very well. Done - you have a liquid in your hands that will react to the magnet.
 Jerald San Hose/Flickr.com
 You can attach a magnet to the container and watch how the liquid literally sticks to the wall, forming a funny "hedgehog". It will be even more interesting if you find a board on which it is not a pity to pour a little black mixture, and invite the child to use a magnet to control a drop of toner.
Encourage your child to make a liquid solid without resorting to freezing. This is a very simple and impressive experience, although you have to wait a couple of days to get the result. But what an effect!
Heat up a glass of milk microwave oven or on the stove. We don't boil. Then you need to add a tablespoon of vinegar to it. And now we start to interfere. Actively move the spoon in the glass to see how white clots appear. This is casein, a protein found in milk.
When there are a lot of clots, drain the mixture through a sieve. All that remains in the colander must be shaken, and then laid out on a paper towel and dried a little. Then start kneading the material with your hands. It will look like dough or clay. At this stage, you can add food coloring or glitter to make the white mass brighter and more interesting for the baby.
Invite the child to mold something from this material - a figurine of an animal (for example, a cow) or some other object. But you can just lay out the mass in plastic mold. Leave to dry for a day or two.
When the mass dries, you will have a figurine made of a very hard hypoallergenic material. Such "homemade plastic" was used until the 1930s. Jewelry, accessories, buttons were made from casein.
Getting a vinegar and soda reaction is just about the most boring experience imaginable. "Volcanoes" and "pops" will not be of interest to modern children. But you can invite the child to become a “master of snakes” and show how acid and alkali still react.
We take two large transparent glasses. Pour water into one and pour soda. We mix. Open the package of jelly worms. It is better to cut each of them lengthwise, to make thinner. Then the experience will be more spectacular.
Thin worms should be put in a mixture of water and soda and mixed. Set aside for 5 minutes.
Pour vinegar into another glass. And now we add to this vessel the worms that have been in a glass of soda. Because of the soda, bubbles will be visible on their surface. So there is a reaction. The more worms you add to the glass, the more gas will be released. And after some time, the bubbles will raise the worms to the surface. Add more soda - the reaction will be more active and the worms themselves will begin to crawl out of the glass. Cool!
Of course, it is difficult to create a real hologram at home. But its likeness is quite real and not even very difficult. You will learn how to use the properties of light and turn 2D images into 3D images.
Draw a trapezoid on paper. The drawing can be seen in the photo: the length of the lower side of the trapezoid is 6 cm, the upper side is 1 cm.
 BoredPanda.com
 Carefully cut out a paper trapezoid and take out the CD box. We need a transparent part of it. Attach the pattern to the plastic and use a clerical knife to cut a trapezoid out of the plastic. Repeat three more times - we need four identical transparent elements.
Now they need to be glued together with adhesive tape so that it looks like a funnel or a truncated pyramid.
Take a smartphone and run one of the such videos. Place the plastic pyramid, narrow side down, in the center of the screen. Inside you will see a "hologram".
 Giphy.com
 You can run a video with characters from " Star Wars' and, for example, recreate famous recording of Princess Leia, or admire own miniature BB-8.
Every child can build a sand castle on the seashore. How about building it under water? Along the way, you can learn the concept of "hydrophobic".
Carefully pour the sand onto a large plate or baking sheet. We apply a hydrophobic spray on it. We do this very carefully: spray, mix, repeat several times. The task is simple - to make sure that a protective layer envelops each grain of sand.
 University of Exeter/Flickr.com
 When the sand dries, collect it in a bottle or bag. Take a large container for water (for example, a jar with a wide mouth or an aquarium). Show your child how hydrophobic sand "works". If you pour it in a thin stream into water, it will sink to the bottom, but remain dry. This is easy to check: let the baby take some sand from the bottom of the container. As soon as the sand rises from the water, it will crumble in the palm of your hand.
Write secret messages with lemon juice - last century. Is there another way to get invisible ink, which also allows you to learn a little more about the reaction of iodine and starch.
First we cook rice. Porridge can be eaten later, but we need a decoction - it has a lot of starch. Dip a brush into it and write a secret message on paper, such as "I know who ate all the cookies yesterday." Wait for the paper to dry. The starch letters will be invisible. To decipher the message, you need to moisten another brush or cotton swab in a solution of iodine and water and draw it over what is written. Due to the chemical reaction, blue letters will begin to appear on the paper. Voila!
Who didn't believe in miracles as a child? To have fun and informative time with your baby, you can try to carry out experiments from entertaining chemistry. They are safe, interesting and educational. These experiments will answer many children's "why" and arouse interest in science and knowledge of the world. And today I want to tell you what experiments for children at home can be organized by parents.

This experiment is based on increasing the volume of the mixed reagents. In the process of burning, they transform and, wriggling, resemble a snake. The experiment got its name thanks to the biblical miracle, when Moses, who came to the pharaoh with a request, turned his rod into a snake.
For the experience you will need the following ingredients:
We impregnate the sand with alcohol, after that we form a small hill out of it and make a recess at the top. After that, mix a small spoonful of powdered sugar and a pinch of soda, then pour everything into an impromptu "crater". We set fire to our volcano, the alcohol in the sand begins to burn out, and black balls form. They are a decomposition product of soda and caramelized sugar.
After all the alcohol has burned out, the sand slide will turn black and a writhing "black pharaoh's snake" will form. This experience looks more impressive with the use of real reagents and strong acids, which can only be used in a chemical laboratory.
You can do it a little easier and buy a calcium gluconate tablet at the pharmacy. Set it on fire at home, the effect will be almost the same, only the “snake” will quickly collapse.

In stores, you can often see lamps, inside which a beautiful illuminated liquid moves and shimmers. Such lamps were invented in the early 60s. They work on the basis of paraffin and oil. At the bottom of the device is a built-in conventional incandescent lamp that heats the descending molten wax. Part of it reaches the top and falls, the other part heats up and rises, so we see a kind of “dance” of paraffin inside the container.
In order to carry out a similar experience at home with a child, we need:
We take a container and fill it with juice more than half. Add vegetable oil on top and throw a pop-up tablet there. It begins to “work”, the bubbles rising from the bottom of the glass capture the juice in themselves and form a beautiful seething in the oil layer. Then the bubbles that reach the edge of the glass burst, and the juice falls down. It turns out a kind of "cycle" of juice in a glass. Such magic lamps are absolutely harmless, unlike paraffin lamps, which a child can accidentally break and burn himself.

What will happen to a balloon if you drop orange or lemon juice on it? It will burst as soon as drops of citrus touch it. And then you can eat an orange with your baby. It's very entertaining and fun. For the experience, we need a couple of balloons and citrus. We inflate them and let the baby drip fruit juice on each and see what happens.
Why does the ball burst? It's all about the special chemical substance- limonene. It is found in citrus fruits and is often used in the cosmetics industry. When the juice comes into contact with the rubber of the balloon, a reaction occurs, limonene dissolves the rubber and the balloon bursts.
Amazing things can be made from caramelized sugar. In the early days of cinema, most fight scenes used this edible sweet glass. This is because it is less traumatic for actors during filming and is inexpensive. Its fragments can then be collected, melted down and made into props for the film.
Many in childhood made sugar cockerels or fudge, glass should be made according to the same principle. Pour water into a saucepan, heat a little, the water should not be cold. After that, pour sugar into it and bring to a boil. When the liquid boils, cook until the mass begins to gradually thicken and bubble strongly. The melted sugar in the container should turn into a viscous caramel, which, if lowered into cold water, will turn into glass.
Pour the prepared liquid onto a baking sheet previously prepared and greased with vegetable oil, cool and the sweet glass is ready.
During the cooking process, you can add dye to it and pour it into some interesting shape, and then treat and surprise everyone around.

This entertaining experience based on the principle of iron coppering. Named by analogy with a substance that, according to legend, could turn everything into gold, and was called the philosopher's stone. To conduct the experiment, we will need:
We take glass jar and pour acid, salt there and stir well. Be careful, vinegar is harsh bad smell. It can burn tender Airways child. Then we put the copper wire into the resulting solution for 10-15 minutes, after a while we lower the iron nail previously cleaned with soda into the solution. After some time, we can see that a copper coating has appeared on it, and the wire has become shiny as new. How could this happen?
Copper reacts with acetic acid, copper salt is formed, then copper ions on the surface of the nail change places with iron ions and form a plaque on its surface. And the concentration of iron salts increases in the solution.
Copper coins are not suitable for the experiment, since this metal itself is very soft, and to make the money stronger, its alloys with brass and aluminum are used.
Copper products do not rust over time, they are covered with a special green coating - patina, which prevents it from further corrosion.
Who didn't love blowing bubbles as a child? How beautifully they shimmer and burst merrily. You can just buy them at the store, but it will be much more interesting to create your own solution with your child and then blow bubbles.
It should immediately be said that the usual mixture of laundry soap and water won't work. It produces bubbles that quickly disappear and are poorly blown. Most affordable way to prepare such a substance, mix two glasses of water with a glass of dish detergent. If sugar is added to the solution, then the bubbles become stronger. They will fly for a long time and will not burst. And the huge bubbles that can be seen on stage with professional artists are obtained by mixing glycerin, water and detergent.
For beauty and mood, you can mix food paint into the solution. Then the bubbles will glow beautifully in the sun. You can create several different solutions and take turns using them with your child. It is interesting to experiment with color, and create your own, new shade soap bubbles.
You can also try mixing the soap solution with other substances and see how they affect the blisters. Maybe you will invent and patent some new kind of your own.

This legendary invisible ink. What are they made from? Now there are so many films about spies and interesting intellectual investigations. You can invite your child to play a little secret agents.
The meaning of such ink is that they cannot be seen on paper with the naked eye. Only by applying a special effect, for example, heating or chemical reagents, can a secret message be seen. Unfortunately, most recipes for making them are ineffective and such ink leaves marks.
We will make special ones that are difficult to see without special identification. For this you will need:
Pour warm liquid into any container, then, stirring, pour it in baking soda until it stops dissolving, i.e. the mixture will reach a high concentration. We put a stick with cotton on the end there and write something on paper with it. Let's wait until it dries, then bring the leaf to a lit candle or gas stove. After a while, you can see how the yellow letters of the written word appear on the paper. Make sure that during the development of the letters the leaf does not catch fire.
This is a well-known and old experiment. For it you will need:
Take a deep glass container and pour water into it, then add alcohol and salt, stir well so that all the ingredients are dissolved. For ignition, you can take ordinary pieces of paper, if you don’t mind, then you can take a bill. Just take a small denomination, otherwise something may go wrong in the experience and the money will be spoiled.
Put strips of paper or money in a water-salt solution, after a while they can be removed from the liquid and set on fire. You can see that the flame covers the entire banknote, but it does not light up. This effect is explained by the fact that the alcohol in the solution evaporates, and the wet paper itself does not light up.

The process of growing crystals is very exciting, but time consuming. However, what you get as a result will be worth the time spent. The most popular is the creation of crystals from table salt or sugar.
Consider growing a "wish stone" from refined sugar. For this you will need:
Let's make a preparation first. To do this, we need to prepare a sugar mixture. Pour some water and sugar into a small container. We wait until the mixture boils, and boil until a syrupy state is formed. Then we lower the wooden stick there and sprinkle it with sugar, you need to do this evenly, in this case the resulting crystal will become more beautiful and even. Leave the base for the crystal overnight to dry and harden.
Let's prepare the syrup solution. Pour water into a large container and fall asleep, slowly stirring, sugar there. Then, when the mixture boils, boil it to the state of a viscous syrup. Remove from fire and let cool.
Cut out circles from paper and fasten them to the end wooden stick. It will become a lid on which a wand with crystals is attached. We fill the glass with a solution and lower the workpiece there. We wait for a week, and the "stone of desires" is ready. If you put a dye in the syrup when cooking, it will turn out even more beautiful.
The process of creating crystals from salt is somewhat simpler. Here it will only be necessary to monitor the mixture and periodically change it in order to increase the concentration.
First of all, we create a blank. Pour warm water into a glass container, and gradually stir, pour salt until it stops dissolving. We leave the container for a day. After this time, you can find many small crystals in the glass, choose the largest one and tie it to a thread. Make a new salt solution and put a crystal there, it must not touch the bottom or the edges of the glass. This can lead to unwanted deformations.
After a couple of days, you can see that he has grown. The more often you change the mixture, increasing the concentration of salt content, the faster you can grow your wish stone.

This experiment should be strictly under the supervision of adults, as it uses harmful substances. The glowing tomato that will be created during this experiment is strictly forbidden to eat, it can lead to death or severe poisoning. We will need:
We take a small container, put the previously prepared match sulfur there and pour in the bleach. We leave all this for a while, after which we collect the mixture into a syringe and introduce it into the tomato from different sides, so that it glows evenly. For start chemical process hydrogen peroxide is needed, which we introduce through the trace from the petiole from above. We turn off the light in the room, and we can enjoy the process.
This is a simple and interesting ordinary acetic acid. For its implementation, you will need boiled egg and vinegar. Take a transparent glass container and lower the egg in the shell into it, then fill it to the top with acetic acid. You can see how bubbles rise from its surface, this is a chemical reaction. After three days, we can observe that the shell has become soft, and the egg is elastic, like a ball. If you point a flashlight at it, you can see that it glows. It is not recommended to conduct an experiment with a raw egg, since the soft shell may break when squeezed.

This is a fairly common strange toy of our childhood. Currently, it is quite difficult to find it. Let's try to make slime at home. Its classic color is green, but you can use whatever you like. Try mixing several shades and create your own unique color.
For the experiment we need:
Let's prepare three identical glasses with solutions that we will mix. Pour PVA glue into the first, water into the second, and starch into the third. First, pour water into the jar, then add glue and dye, mix everything thoroughly and then add starch. The mixture must be quickly mixed so that it does not thicken, and you can play with the finished slime.
Soon the holiday and you need to inflate a lot of balloons? What to do? This unusual experience will help to facilitate the task. For it we need a rubber ball, acetic acid and ordinary soda. It must be carried out carefully in the presence of adults.
Pour a pinch of baking soda into Balloon ik and put it on the neck of the bottle of acetic acid so that the soda does not spill out, straighten the ball and let its contents fall into the vinegar. You will see how the chemical reaction will take place, it will begin to foam, releasing carbon dioxide and inflating the balloon.
That's all for today. Do not forget that it is better to conduct experiments for children at home under supervision, it will be both safer and more interesting. See you soon!
If you want to arouse interest in science in your children, and the teacher at school can’t cope with this (but in fact he just doesn’t care), then it’s not necessary to hit the child on the head with a book or hire tutors. You, as a responsible parent, can conduct interesting and colorful scientific experiments right at home with the help of improvised means.
A little fantasy, and entertainment for the children who came to your child's birthday is ready.

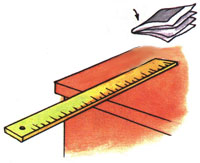
Even though eggs look very fragile, their shells are stronger than they appear. If the pressure is evenly distributed on the shell, then it can withstand very large loads. This can be used to show the kids a fun ball-walking trick and explain to them how it works.
Although we assume that experience will pass well, it doesn’t hurt to make sure, so it’s better to cover the floor with oilcloth or spread out garbage bags. Place a couple of trays of eggs on top, making sure none of them are defective or cracked. Also make sure that the eggs are evenly spaced, otherwise the load will not be evenly distributed.
Now you can gently stand on the eggs with bare feet, trying to distribute your weight evenly. The same principle is used in walking on nails or glass, but this should not be repeated with children. Don't repeat at all.

Most liquids on the planet practically do not change their viscosity with a change in the force that is applied to them. However, there are liquids that become almost solid when the force increases, and they are called non-Newtonian. You can make them right at home from improvised means. Show this experience to your child and he will be happy.
To make a non-Newtonian fluid, pour a glass of starch into a deep bowl, fill it with water in a ratio of 1:1. You can add food coloring for beauty. Start all this slowly mix until the mixture turns into a homogeneous mass.
If you slowly scoop up such a liquid with your hand, then it will simply drain through your fingers. But as soon as you apply force to it at speed or hit it hard, it immediately becomes hard. A great toy will come out for the next few hours for your child.

Highly interesting experience, as well as focus, if you want to convince others of your paranormal abilities. For this experiment at home, we need a regular bottle, as well as a coin that is slightly larger in diameter than the neck.
Chill the bottle in the refrigerator, or even better in freezer. After that, moisten its neck with water and put a coin on top. For effect, you can put your hands on the bottle, warming it. The air inside the bottle will begin to expand and exit through the neck, tossing a coin into the air.

The combination of baking soda and vinegar is a win-win option if you want to impress the kids. Just mold a small volcano out of plasticine or clay on a plate, and pour a few teaspoons of soda into its hole, pour some warm water and add red food coloring for entourage. After that, pour a small amount of vinegar into the vent and observe the reaction.

A very effective and simple scientific experiment that allows children to demonstrate the principle of the interaction of liquids with different masses and densities.
Take a tall, narrow container (a flower vase or just plastic bottle). Pour several glasses of water and a glass of vegetable oil into the vessel. Add bright food coloring to make the experience more visual and prepare a tablespoon of salt.
At first, the oil will float on the surface of the vessel, since it has a lower density. Start slowly pouring the salt into the vessel. The oil will begin to sink to the bottom, but when it reaches it, the salt will be freed from the viscous liquid, and the oil particles will begin to rise again, like grains of red-hot lava.

This experience is suitable for wealthy people who only have to burn money. A great trick to surprise kids and adults alike. Of course, there is a risk of failing the performance, so respect the time frame.
Take any bill (depending on your capabilities) and soak it in a salted solution of alcohol and water in a 1: 1 ratio. Make sure that the bill is completely soaked, after which you can remove it from the liquid. Fix the bill in some holder and set it on fire.
Alcohol boils at a fairly low temperature and begins to evaporate much faster than water. Therefore, all the fuel will evaporate before the bill itself lights up.

For this fun experience we need full fat milk, some food coloring different colors and detergent.
Pour the milk into a bowl and add a few drops of food coloring in different parts of the container. Take a drop of detergent on the tip of your finger or soak a cotton swab with it and touch the surface of the milk right in the center of the plate. Watch how effectively the dyes begin to mix.
As you may have guessed, detergent and grease are incompatible things, and when you touch the surface, a reaction will begin that will make the molecules move.
Summary: Chemical Experience- invisible ink. Experiments with citric acid and soda. Experiments with surface tension on water. Mighty shell. Teach an egg to swim. Animation. Experiments with optical illusions.
Does your kid love everything mysterious, mysterious and unusual? Then be sure to conduct with him the simple, but very interesting experiments described in this article. Most of them will surprise and even puzzle the child, give him the opportunity to see for himself in practice the unusual properties of ordinary objects, phenomena, their interaction with each other, understand the cause of what is happening and thereby gain practical experience.
Your son or daughter will certainly earn the respect of their peers by showing them experiences as tricks. For example, they can make cold water "boil" or use a lemon to launch a homemade rocket. Such entertainment can be included in the birthday program for children of preschool and primary school age.
|
|
|
|
|
|
|
|
|
|
|
|
|
|
|
|
In school physics lessons, teachers always say that physical phenomena everywhere in our lives. We just often forget about it. Meanwhile, the amazing is near! Do not think that you will need something supernatural to organize physical experiments at home. And here's some evidence for you ;)
What needs to be prepared?
Conducting experience
Wind the wire tightly turn to turn on the pencil, not reaching its edges by 1 cm. One row has ended - wind the other one from above in the opposite direction. And so on, until all the wire is finished. Do not forget to leave two ends of the wire 8–10 cm each free. To prevent the turns from unwinding after winding, secure them with tape. Strip the free ends of the wire and connect them to the battery contacts.
What happened?
Got a magnet! Try to bring small iron objects to it - a paper clip, a hairpin. Are attracted!

What needs to be prepared?
Conducting experience
Open the faucet so that a thin stream of water flows. Rub the stick or comb vigorously on the prepared cloth. Quickly bring the wand close to the stream of water without touching it.
What will happen?
A jet of water will be bent by an arc, being attracted to the stick. Try the same with two sticks and see what happens.

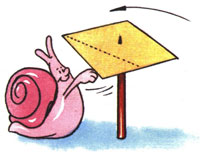
What needs to be prepared?
Conducting experience
You can manage not only water! Cut a strip of paper 1-2 cm wide and 10-15 cm long, bend along the edges and in the middle, as shown in the figure. Insert the needle with the pointed end into the eraser. Balance the workpiece-top on the needle. Prepare a “magic wand”, rub it on a dry cloth and bring it to one of the ends of the paper strip from the side or top, without touching it.
What will happen?
The strip will swing up and down like a swing, or it will spin like a carousel. And if you can cut a butterfly out of thin paper, then the experience will be even more interesting.

(the experiment is carried out on a sunny day)
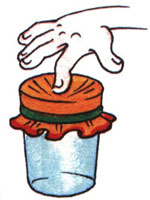
What needs to be prepared?
Conducting experience
Pour into a cup of water and place in the freezer. When the water turns to ice, remove the cup and place it in a bowl of hot water. After a while, the ice will separate from the cup. Now go out to the balcony, put a piece of paper on the stone floor of the balcony. With a piece of ice, focus the sun on a piece of paper.
What will happen?
The paper should be charred, because in the hands it is no longer just ice ... Did you guess that you made a magnifying glass?

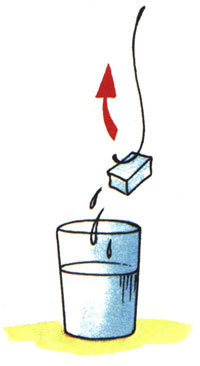
What needs to be prepared?
Conducting experience
Pour excess water into a jar and close the lid to prevent air bubbles from getting inside. Place the jar upside down on a mirror. Now you can look in the mirror.
Zoom in on your face and look inside. There will be a thumbnail. Now start tilting the jar to the side without lifting it from the mirror.
What will happen?
The reflection of your head in the jar, of course, will also tilt until it is turned upside down, while the legs will not be visible. Pick up the jar and the reflection will flip again.

What needs to be prepared?
Conducting experience
Clean the ends of the wire with fine sandpaper. Connect one end of the wires to each pole of the battery. Dip the free ends of the wires into a glass of solution.
What happened?
Bubbles will rise near the lowered ends of the wire.

What needs to be prepared?
Conducting experience
Strip the opposite ends of both wires at a distance of 2-3 cm. Insert a paper clip into the lemon, screw the end of one of the wires to it. Insert the end of the second wire into the lemon 1-1.5 cm from the paper clip. To do this, first pierce the lemon in this place with a needle. Take the two free ends of the wires and attach the bulbs to the contacts.
What will happen?
The lamp will light up!

If you adhere to proper nutrition, then avocados are probably in ...


Pizza can be cooked not only with meat products - sausage, sausages and ...