INSTRUCTIONS AND PROPHECIES OF THE Blessed MOTHER ALIPIA GOLOSEEVSKY, Kyiv...


03.09.2016 28272
It is a frame structure, which is attached to the wall, and inside which is hung door leaf. More recently - 20-25 years ago, even the entrances were exclusively wooden or plywood. In the 1990s, metal entrance doors, and accordingly, their door frame is made of steel. About 10 years ago, aluminum and plastic interior doors came into use, which are made with a finished box, from the same material.
Made of chipboard, MDF, plywood-dict and even fiberboard, then the box, trim and are made of solid wood, more often conifers, or from MDF. At woodworking enterprises, the production of beams and extensions from laminated MDF has been established.
Can be made from MDF - medium density fibreboard, made by hot pressing. All are made from this material. necessary elements. You just have to size them up. Especially relevant for arched openings. Assembly from MDF is performed in the same way as from ordinary tree, but working with this material is much easier. Fastening of all parts to each other is carried out using glue or self-tapping screws.
To install interior doors, you will need the following tools:
Dismantling of the old interior door produced in the following order:
In the process of repair, this option is also possible: a new door in an old box. If you are planning to change a damaged old door, then you do not need to dismantle a strong box. You only need to remove the door by unscrewing the hinges. You can take measurements for a new door on the old canvas. To prepare the doorway for installing a new leaf, inspect the box and hinges. Pay attention to whether there are gaps between the extensions and the bars of the main structure. It may be necessary to remove the trim. At the same time, check the fastening of the extensions. If the planks are nailed, knock them out and tighten an additional couple of self-tapping screws. Put the platbands back in place.
You can screw the door with old hinges, or you can install new ones. Then hammer wooden chopsticks coated with glue into the old screw holes. Because the new hinges may partially coincide with the old holes, or the screws for them will be thinner. In any case, the chopsticks will seal the holes, and the hinge will not loosen under the weight of the door leaf.
You can hang a door. Examine the lock (if there was one on the door). If you leave the old one, then when installing the lock, fit the latch of the lock under the striker.
Sometimes apartment owners, wanting to change the interior of the room, constructively change interior doors. The expansion of the doorway is justified by the desire to install double-leaf hinged or folding doors (book, accordion).
In houses with high ceilings, sometimes they increase the height of the doorway, change the shape of the opening, making the top semicircular, arched.
The methods of this work depend on the material from which it is made. interior wall. The easiest way to work with brick or wooden walls.
But the doorway brick wall structurally complex, because it has more irregularities than other walls. This gives measurement errors. And this must be foreseen when changing the size of the opening. The edges of the wall must be leveled by plastering, then the installation of the door big problems won't make up.
To expand a doorway in a brick wall, it is enough to brickwork take out a row of whole bricks at the edge of the opening, align its line with halves of bricks and a cement-sand mixture. To do this, you first need a chisel and a hammer, and then a level, trowel and spatulas.
AT wooden wall you can expand the opening with a circular electric saw or grinder.
It is much more difficult to expand the opening in a reinforced concrete panel. In this case, you will have to arm yourself with a puncher and a grinder. The puncher will drill and beat off 6 concrete, cut the metal bars of the frame with a grinder. The edge of the opening at the expansion point must be leveled and plastered as much as possible.
Sometimes, doorways are unnecessarily wide, which makes it difficult to arrange furniture, and there is a desire to make it smaller. To reduce the opening by 8-12 cm, can be inserted between the wall and the box thick timber, fix it with long self-tapping screws (by the way, self-tapping screws can be deepened in the beam up to 4 cm by drilling a hole for the cap with a No. 8 drill), foam it and fix it with plaster. The box will be attached to the beam. Installing thick beams will allow you to reduce the opening to 24 cm. To reduce a brick doorway by 25 cm or more, you will need drywall, or bricks, cement and sand. Drywall can be used to reduce thin walls covered with a thick layer of plaster. In this case, the plaster must be knocked off the wall and the drywall must be overlapped. The added part of the wall must also be plastered and finished so that it merges with the main one.
Preparing a doorway for installing an interior door begins with a box. It is recommended to install it before the floor is laid (flooded). The box is 7 × 4 cm bars connected by the letter P. This is if you do not intend to set a threshold. Assembly door frame with a threshold has a closed shape. It is necessary to correctly calculate the height of the threshold so that it does not fall below the floor level, and is not too high. 3-4 cm is enough for him.
The details of the box and the threshold must be made in such a way that a protrusion is cut into the bars, which does not allow the door to overlap and close to the other side. Stops help to increase noise and heat insulation of doors.
The corners of the box and extensions should be sawn off on the miter box at an angle of 45 ° and fastened together with self-tapping screws, lubricating the cut with glue. The door frame can also be assembled using the studding method, since the frame is still a one-piece structure. The assembly of the door is carried out on a flat surface so that there are no distortions.
Install the box like this
Fastening of the door frame in the opening is carried out with self-tapping screws.
A stable box will not place a lot of stress on the fasteners that you use to screw it to the wall.
If the wall thickness is more than 7 cm, then additional boards will be required - boards that will mask the wall of the opening. They are attached later, when the box is installed, they do not need to be connected to each other in advance. But sawing off the upper edges of the racks and the top bar should also be at an angle of 45 °
The box is displayed and sealed. Now you need to hang the door. For this
The installation of interior doors should be carried out taking into account all the "ifs", then it will be freely closed, without resting on the bars either from above or on the sides. The door should be freely located in the box. On the sides and top, the gap should be 2 mm, from the bottom - taking into account the above "if". Make sure all conditions are met. You can also insert matches between the box and the doors. Everything is fine? If somewhere the door rests, mark with a pencil - in this place you will have to work with a planer - remove the excess.
Dobors are installed if the opening is thicker than the box. In width, they should correspond to the distance from the box to the edge of the wall. Attachment of extensions to the main beams is carried out with self-tapping screws. For greater strength, before twisting, the end of the extension can be lubricated with glue. The void between the wall of the opening and the extension must be filled with mounting foam.
The width of the platbands should be such that on one side it is flush with the box, and its other edge goes 1-1.5 cm onto the edge of the wall. This is the final stage of the box installation. They constitute a design element and therefore should look attractive. Cashing should be installed before the baseboards are nailed. Sawing should be at an angle of 45 o. The fastening of the cashing should be done so that no fasteners are visible. It could be liquid nails.
Platbands can be
The main condition when choosing cashing is the appearance and compliance with the design of the door or the interior of the room.
If you accidentally kicked interior door leaf, then you should get something similar to the photo below. It worked out very neatly. Accurately calculated blow under door handle broke the latch and opened the door.
I would like to add that the door frame was not damaged and withstood the blow with honor. And this despite the fact that it was fixed only on mounting foam. No additional fastening was used. This is to the question of “whether it is necessary to additionally fasten the door frame to the doorway”.
Everything is in order with the box, but door panel needs to be replaced. Canvas width 80 cm.

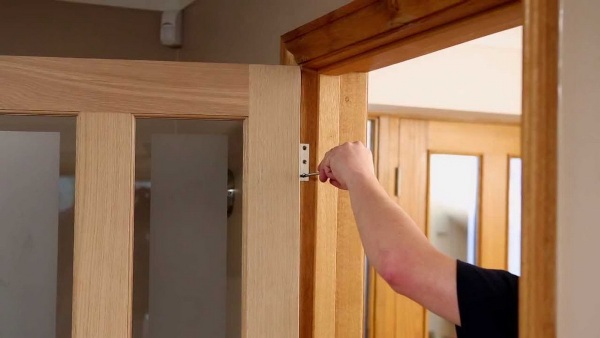
First, remove the crippled canvas from the door frame. We take a new canvas and make markings for the loops. The hinges were mortise, not overhead. Therefore, you will have to work with a chisel. We remove the distance of the loops from the old canvas and transfer to the new one. Usually the loops are placed 20 cm from the edge of the canvas, but it will be useful to check.
Unfortunately, I did not find among my tools the template according to which I previously cut the grooves for the hinges using a manual milling machine. Recently, overhead loops are being used more and more. They do not require tie-in, and it is a pleasure to work with them.
We make the markup and get to work. The canvas is dyed, so first we remove the top thin layer of paint, and then we go deeper. The end of the door is made of pressed sawdust, so it is easy to work with a chisel. You can even do without a hammer.


Having made grooves for the loops, we proceed to the sidebar of the handle. In the same way, we transfer the distance from the previous canvas, otherwise the latch will not match the striker. Having made the markup for the handle, we cut out a large hole for the mechanism with a crown. Next we take a feather drill 23 mm. and cut a hole in the end of the door for the latch.


The latch bar must be sunk “flush”. For ease of marking, turn the bar over and circle with a pencil. We select the resulting rectangle with a chisel and check the position of the latch.


Attach loops to door leaf and carry the canvas to the door frame. Using wedges, we expose the canvas so that the loops on it coincide with the grooves on door frame. Since the screws will have to be screwed into the box a second time, it will be better to seal the holes a little. I use matches or toothpicks. Just insert a toothpick into the hole and break off. Having thus sealed all eight holes for two hinges, screw the hinges to the box. If you accurately made the markup, then the loops on the canvas will clearly coincide with the attachment point on the box.
Close the door and check the gaps. And here we are in for a surprise. The door fits too tightly against the frame post on which the latch striker is located. Why did it happen? We measure the width of both door panels and compare. And there is. New blade 2 mm. wider than before.

In order to slightly increase the gap, it is necessary to drown the striker and make it “flush” with the plane of the box. If this does not help, more serious measures will have to be taken. For example, you can remove it from the opposite end of the door, where the hinges are, 2-3 mm. using a manual milling machine. The butt will have to be painted over. The same can be done with the upper end, if suddenly, when cutting and assembling the box, you made a mistake by making it shorter than necessary. By using manual router you can easily and most importantly, very accurately and accurately remove a few millimeters. Nobody will notice.
AT this case it wasn't needed. Measures to sink the reciprocal bar turned out to be enough. The door closes and opens perfectly. Let's move on to the next step.
During repairs, it sometimes becomes necessary to update interior opening, keeping the well-established box. It is connected with the fact that removing the frame from the wall risks provoking damage to the wallpaper, destruction of tiles, and the formation of cracks in the floor when the threshold is removed. Therefore, the owners change all other components of the structure, and the box is cleaned, treated with putty and painted in the color of the sash. Replacing door panels does not require such labor-intensive work as dismantling and installing an entire unit, and it is cheaper.
Features of the procedure
In addition, it is useful to make sure that:
the opening has an ideal geometry, old frame not skewed, not deformed and ready for further service;
the new product will not overload the carrier - it is better to purchase a product from the same materials and the same mass as the previous version.
In order for the replacement of the door leaf of the interior door to be successful and not cause additional trouble, you should:
pick up loops that will fit into ready-made grooves, without requiring new ones to be cut;
adjust the sash correctly.
A simpler, albeit rather time-consuming method of installing fittings involves sealing old grooves with putty and subsequent painting. The result of such work depends on the skill of the installers.
Where to order a professional service?
Masters who have the necessary knowledge, experience and tools at their disposal solve the following tasks:
installation or replacement of a glass insert;
insertion of hinges and locks using high-precision equipment;
replacement of platbands and dobors if necessary;
hanging the sash and adjusting its position in the opening;
installation of additional mechanisms and accessories if necessary - for example, connecting a door closer, inserting an automatic threshold, etc.
Benefits of a qualified approach
Professional replacement of the door leaf in the old box will please:
the coherence of the functioning of all elements of the system, the comfort of operation;
maintaining good insulating abilities of the block;
presentable appearance of the opening;
the service life of the structure.
What is important, the customer gets rid of a lot of trouble and gets a guaranteed high-quality result.
Decided to change the interior door? There is not enough money for a set with a box, or do you think that the old box is still in good condition? Do not under any circumstances install new door in an old box. Why? Cases of installing new doors in an old box will be discussed in this article.
Replacing the door and frame kit. A photo: www.tgorlovka.com
In the process cosmetic repairs you can also find situations where the owners are trying to install a new door leaf in a box from under the old door. In what cases is this option allowed:

Old and new set of door frames with canvases. A photo: www.tgorlovka.com
And in these cases, there may be problems, since in production the same doors can differ in size by 1-2 mm, and this is detrimental to fight in the gap between the frame and the canvas.
The new door may have smaller size than the old one and it will form a gap. The appearance of such a door is not very aesthetic.

New door in an old box. A photo: www.tgorlovka.com
With gaps in the box, thermal insulation and sound insulation may be disturbed. Spontaneous opening of the door is also possible, in this case the lock in the door does not fit snugly into the box due to the gap.
The new door is larger than the old door frame, then such a door cannot be installed at all. Many try to fit the door to the size of the box by cutting along the inner edge. Don't you dare to do that! In this way, the coating of the door can be damaged and it can be thrown away.

All interior doors of the same company and from the same batch look aesthetically pleasing. A photo: www.tgorlovka.com
Not the most important, but the argument why you shouldn't put a new door in an old opening is the discrepancy between the color of the door and the frame. The ridiculous look will scare you and sooner or later you will still decide to install full set. Do not forget that size discrepancies can also meet you if you buy one box separately. Do not waste money, but buy and install the kit right away.
Fittings on all doors are located differently. A photo: www.tgorlovka.com
The location of the hinges depends on which direction the door will open; the fittings may simply not match in the new door. Hinges and locks in old doors are significantly different from new models, so a 100% new door will not fit a frame installed in the 90s.
Summarize
All professionals will agree that replacing the door leaf without replacing the frame would be an unjustified step. Instead of a quality door in terms of functions and appearance you will get a ridiculously designed doorway that will not fit any interior at all.
 Today we will discuss such a topic as the restoration of an old door frame (loot), as well as the installation of a new door in this already restored frame. Immediately, many have a reasonable question: “Why do this at all?” Indeed, now in the era of developed modern, construction technologies this is resolved very quickly and well. It's simple - buy a new one door block, removed the old one and that's it. But, as practice shows, this is not always the case. Moreover, it is far from uncommon due to different reasons. And the reasons are very different. Some do not have any desire to arrange a pogrom in the apartment. Others would like to keep the facing tiles on the wall around the doors. Still others just want to save money, etc.
But in any case, this often happens in our lives, and therefore I want to talk about it. Moreover, the topic of the restoration of joinery (doors and windows) is very familiar to me. For eight years I have been closely engaged in this. Restored what should have long been thrown into the dustbin of history. Some products still serve faithfully to their owners.
So, if you need any advice on this topic, then refer to the page ".
For restoration work, we need a tool:
So, if you do use this paint stripper, don't forget it's in your best interest.
You can also use gas burner. But again, it's dangerous because open fire. If you do it on the street, then another matter.
And one more production moment. This method is only suitable for subsequent painting, because the burner gives burnt black marks on the surface of the wood. And we will restore under the varnish.

note that cycle should be spicy. Then it will be much easier to scrape off the paint. You can sharpen with a grinder with a cutting wheel for metal.

So, our work is as follows:
1.1. We shorten the door leaf by 35 mm. 
1.2. We insert the rail, because the door turned out to be hollow. 

The rail should be no thinner than 15 mm.
1.3. We measure the location of the canopies at the end and use a milling cutter to cut them.
note, which will be better if the new location of the loops matches the old one. To do this, you just need to transfer the dimensions of the used door to the new door and then there will be no need to make new grooves for the canopies on the box (loot).
The entire door leaf is ready for installation. There will be no lock on this door, just a handle.
And so, let's continue.

Another trailer restored the window in the same way. Although, as a rule, many of these windows are simply simply disposed of as unnecessary. 
 In this case, we were lucky in terms of the normal condition of the old box (loot) and we did not mess around for long. Usually Soviet carpentry products were, to put it mildly, of poor quality. And so it was necessary to mill out entire fragments, insert inserts on glue and putty, which took a lot of time.
In general, I believe that it is practically impossible to restore old doors and windows under varnish with a high quality mark. Under painting is another matter. Laborious, but real.
If you liked it - share it on networks and not only.
Dali be.
INSTRUCTIONS AND PROPHECIES OF THE Blessed MOTHER ALIPIA GOLOSEEVSKY, Kyiv...

Eufillin dropper in ampoules is used to treat pathologies that ...

Among all ointments for the treatment and prevention of joint diseases, the most ...