INSTRUCTIONS AND PROPHECIES OF THE Blessed MOTHER ALIPIA GOLOSEEVSKY, Kyiv...


Have you begun to hear extraneous squeaks in the system unit? The performance of the system somehow completely unacceptably decreased, although the processor and memory should not allow this? Well, it's time to check hard drive. How to do this - in our article.
This is quite an important matter. In addition to performance degradation, although this is also certainly important, we are talking about your data. You don't want to one day be left without all your data just because your drive decides to fail, do you? Here. Therefore, it is important to check the condition of the disk and its health level more often.
Timely error correction also helps to extend the life of the drive. Whether it's ordinary HDD or SSD, file system errors force it to wear out, so it's important to keep it in good condition. Otherwise, the data will be lost even faster.
If you understand the importance of this event, then let's get started.
This is the easiest way and can give you quite a lot of hard drive information and even try to fix some errors.

Read interesting information and reliable tips in the article -
If the previous scenario of using standard Windows tools is not very efficient, then the command line method can try to supplement it. Its essence is that it starts from the bootable installation media of the system, that is, the system itself is not running and cannot block some of the requirements of the verification program.
Important! This method has one minus: you need installation media, and it is desirable that it be with exactly the version of Windows that is installed on your computer.


Let's take a look at a few programs that will help you identify most of the problems in your hard drive, without going too much into the details of this process.
With the help of this program, you can understand in which sectors the write and read speeds are high, and in which they are not. The program is completely universal, with its help you can diagnose anything, as long as it is a store of information.

The principle of working with her is extremely simple: you start scanning and wait for her report on the work done, from which it is quite possible to draw some conclusions.


A more narrowly focused utility, although it monitors, in fact, also the speed. The program can’t do anything else, but based on the speed of writing and reading, you can fully understand what is happening with the disk and how long it will take.
Important! It is strictly forbidden to use this program if you want to check the SSD drive. His death when using this software will be even closer: this program fills the entire space with some data, and although they are weightless and deleted without a trace, this is also wear and tear for the SSD.

If neither the standard check tools nor simple programs satisfy you, then you can move on to more complex check programs. So, let's begin.
The most common hard drive troubleshooting program.

Its advantages are that there is both a quick and a deep check of the disk, and also that it monitors its temperature. This is also an important indicator, but it does not affect wear so much.
Pro tool in our article. Fixes everything it finds in its path. Its huge competitive advantage is Russification. Using it, therefore, is very simple, despite the impressive set of functions.

The principle of its operation is much more complicated than that of other programs, and these differences clearly benefited the program. She manages to restore what others could not. Also, unlike other programs, it does not destroy your files that were in the sectors it corrects, but preserves them culturally. Well, not life, but a fairy tale.
The program has two versions - graphical and console. If you are not very versed in this topic, use the graphic with the Russian language, everything is intuitively clear there. In the console, its capabilities are much wider, because pressure and prohibitions from operating system less.
Consider a graphical user interface.

On a note! However, this program has one significant drawback - it is paid, and the trial only allows you to check. Well, that's good too.
Who, besides the manufacturers themselves, can know better how to work with hard drives? Some of these programs work only with discs of a certain brand, some - with all. Experiment.
Let's start.

Basically a simple program:

This is the name of the verification program from the manufacturer WD. In terms of functionality, it is approximately similar to the previous program, but it has a number of advantages.

All options are in context menus. That is, to start scanning a specific disk, you just need to right-click on it (of course, in the program interface) and select the desired action. That's all the work.

We hope these methods have helped you deal with your problems, fix it or prevent damage. Good luck!
If the HDD is making strange noises or there are problems writing and reading information, you should use one of the programs to check the hard disk for errors. Depending on the task (checking the disk surface for damage, searching for bad sectors, fixing errors, etc.), different software may come in handy.
You can quickly check the disk for errors using standard system tools, but to restore the hard drive, you will need special third-party programs. By learning how to check the health of a hard drive using various utilities, a user of any level will be able to cope with the problems that have arisen.
The CheckDisk system service is the simplest hard drive diagnostic program that is not able to find complex errors and fix bad sectors, but is useful for fixing basic problems. It is available on all versions of Windows and can be used to check drives of any type. All users need to know how to check hard drive for errors with this tool.
The GUI version of the utility is the most convenient for novice users. You can start it through the disk management menu, which can be accessed in two ways:
In the window that opens, select the device that needs analysis, right-click on it and select "Properties" from the drop-down menu. Going to the "Service" tab, you need to run the hard drive diagnostic program.
The system will check and automatically correct errors if the disk is in this moment not busy with read or write processes. Otherwise, the program will offer to test after restarting the PC. If necessary, you can see detailed information about the state of the HDD in the test results window.
The GUI version does not always save, since sometimes it is required to check the status of the hard drive from safe mode or without starting the operating system at all. In such cases, the console comes to the rescue, which can be started before the system starts using the boot disk.
After opening the recovery console, you need to run the chkdsk / f command, which will check all connected drives. In some cases, this will help fix the error. However, in most situations, if the failure of the HDD has led to the inability to start the system, a deeper check of the condition of the hard drive will be required.
To take advantage console command from inside the system:
Checking the HDD via the command line will be a little faster than using the GUI version of the program, the results will be shown right here in the console.
Linux also has standard tools- hdparm and smartctl, run from the console.
If standard utilities are not suitable, hard drive diagnostics can be carried out using simple third-party programs. They allow you to get more information about the health of the HDD, but in case of serious problems they will not work, since you cannot fix the breakdowns with their help.
HDDScan is a free program that performs analysis in two modes:
The tool evaluates the speed of reading and writing in various sectors, marking "slow" cells. In the course of the analysis, the program makes sure that the tested hard drives do not overheat; at the end of processing, the user is presented with a complete report.
HDDScan good versatility. The utility allows you to check disks for errors regardless of the type of device: it can both check an external hard drive and analyze a RAID array, SSD drive or memory card.
Crystal Disk Mark has only one function - it evaluates the speed of reading and writing. Despite this, it is often used, since it is still possible to check the hard drive for serviceability with just two indicators.
For the test, different algorithms are used, one of which is the sequential recording mode. The program gradually fills all the space on the drive with blocks of the size specified by the user, after which it cleans the HDD. The same technique is used by hard drive manufacturers to check product quality. Its disadvantage is that it accelerates the wear of SSD drives.
CrystalDiskInfo and DiskCheckup similar in function set, differ only in interface. They check the state of the hard drive using S.M.A.R.T. algorithms and compile a history of checks, which allows you to track the dynamics of changes. CrystalDiskInfo has more options for visualizing history. For example, you can build a graph, not just get a written report.
Another feature of these programs is a convenient notification system. Deep hard tests disk usually take a long time. If the user needs to move away from the computer, he can turn on notifications of critical HDD errors by E-Mail.
Some HDD manufacturers have developed their own utilities for analyzing the state of the hard drive. They are intended for use with devices of the same name, it is possible to diagnose a hard drive from another company with their help, but this must be done carefully. Unlike simpler programs, these utilities have versions in different languages, including in Russian. What program is better to analyze the state of the HDD?
Seagate's proprietary program exists in two versions: a standard version for running under Windows and a DOS version in iso-image format, from which you can make a bootable USB flash drive. It is recommended to use the second option, since the check in this case will be more accurate and efficient.
SeaTools uses part of the S.M.A.R.T. to test the hard drive without giving details about each item. Three tests can be done:
During the check, the program automatically corrects the errors it finds.
Owners of hard drives from WD should be aware of how to check the performance of hard drives using proprietary software from this manufacturer. Its set of features is similar to that of the program from Seagate, but somewhat expanded and allows for deeper work with the affected device.
There are two additional functions:
Unlike SeaTools, this HDD diagnostic program can be freely used with devices from any manufacturer to check the hard drive for errors - no problems have been identified with this.
If you need not only to check the hard disk for errors, but also to fix bad sectors, you cannot do without sophisticated software that performs the most in-depth analysis of the state of the HDD.
According to many users, Victoria HDD is the best hard drive troubleshooting software. The program has received such a reputation due to its wide range of functions.
Victoria exists in two versions:
It is better to use the second version. Diagnosing the HDD outside the system allows you to achieve the best results, so it is always recommended to follow the principle - "if possible, test the disk from the boot disk." As a last resort, you can use a LiveCD of another OS, such as a Linux distribution like Ubuntu.
Victoria HDD has a variety of functions:
When checking, you need to pay attention to the access time to sectors. It should not exceed 200-600 ms. You can also see the temperature of the disk during operation, but this is not so important.
HDD Regenerator is a professional hard drive recovery software. She not only marks bad sectors as unused, but also tries to reanimate them. For this, it is not used standard method deep formatting, and own algorithm, based on the transmission of signals of different levels to the sector. Despite the professional level, inexperienced users can also use this software, since it is not difficult to test a hard drive with its help thanks to a convenient Russian-language interface.
Program features:
The program is not suitable for everyone, since you can check the hard drive for operability with it for free, but you will have to pay $90 for the sector recovery function.
If you do not want to pay, you can use TestDisk - free program, which can restore the partition table, boot sectors and MFT. It also detects bad sectors, can recover deleted information and fix file system errors. The only drawback is the lack of a graphical interface, you have to work from the console.
If after checking the HDD and fixing all the problems, the computer does not stop working incorrectly, it is worth checking the registry. Perhaps the failures are not caused by hardware failure, but by internal system errors.
Hello friends. Hard disk check or how to check the hard drive for errors and bad sectors, we will talk about this in detail today.
In a previous article, I showed . Today you will learn about programs for testing hard drives and other storage media. At the end of the review, I posted a short video tutorial.
It is useful for anyone who has a computer to know about the status of the hard disk or disks, if there are several. After all, the hard drive stores information that is important for someone, but not so much for someone. So, in order not to lose it, I recommend making backup copies at least once a month.
You can purchase a portable disk or flash drive for storage important information You can also use regular CDs and DVDs. If you do not know how to save information to optical plastic discs, then I recommend reading.
You can test computer disks different ways and special programs. In this article, we will look at:
Of course, there are many other useful and worthy programs and utilities, but in this publication we will only talk about these 4 methods.
Any hard drive or flash drive can be checked for performance using Windows tools. I wrote more about this here. Here is a simple algorithm of the necessary actions.
We go to My Computer, select the desired hard drive or flash drive, right-click on it and go to Properties.


Put the necessary or all the checkboxes and click Start.

This procedure may take a long time, everything will depend on the amount of storage media that you want to check for errors and bad sectors.
Victoria one of the main programs that I personally use to check the hard drive through Windows, or if the operating system does not start at all, then through the boot disk with this utility.
After downloading Victoria version 4.3, you need to go into the archive, unpack it or run the file with a green cross called Victoria43.

We launch the program, it is in English, if you do not know this language, do not be afraid, I will help you figure it out.
The Standard window describes the main characteristics of the storage medium: its model, serial number, disk size, how many cylinders, sectors, and so on.

In the Smart tab, you can view the status of the hard drive. Click on the Get Smart button and look at the indicators that appear. Since I have a new hard drive, my performance is normal, SMART status = Good. You may have a different meaning and information.

Smart is a technology of analysis, self-control and reporting. With it, you can view and evaluate the condition of the hard drive, its built-in self-diagnostic equipment, as well as predict the possible time of its failure.
To test the storage medium, go to the Test tab and click on the Start button. If you have a lot of green, orange, red and blue rectangles (sectors) - this is not good. Ideally, all sectors should be light gray and gray.

If you have damaged sectors with the designation "Err X", then after the test is completed, check the box next to the word Remap and start the test again. The Victoria program will try to repair these sectors and fix errors on the hard drive.
Checking the hard drive can take a long time, so be patient, it all depends on the amount of information on the media. In the meantime, testing is underway, I recommend reading the article on how to set up your computer yourself or.
HDDScan is a program for diagnosing and testing hard drives in English.
After downloading, you need to run the file named HDDScan.

We select the desired Select Drive device, on the right there will be basic information about it.

Click on the blue round button and select the desired action. We go to Surfase Test - select and run the test.

Put checkmarks next to Verify or Read and click the Add Test button (add a test). I do not recommend choosing Erase - this is data erasure.

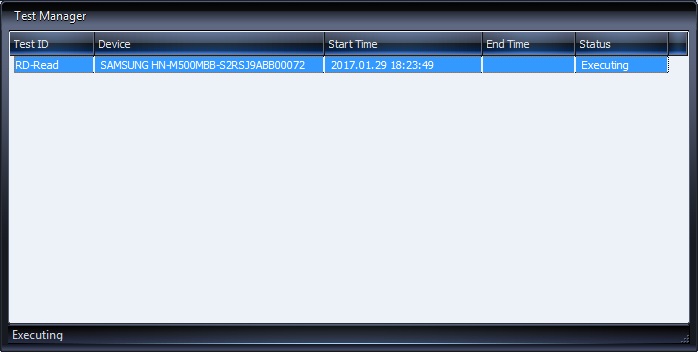
After you click add a test, it will start automatically, information about this will appear in the lower window of the Test Manager (Test Manager).

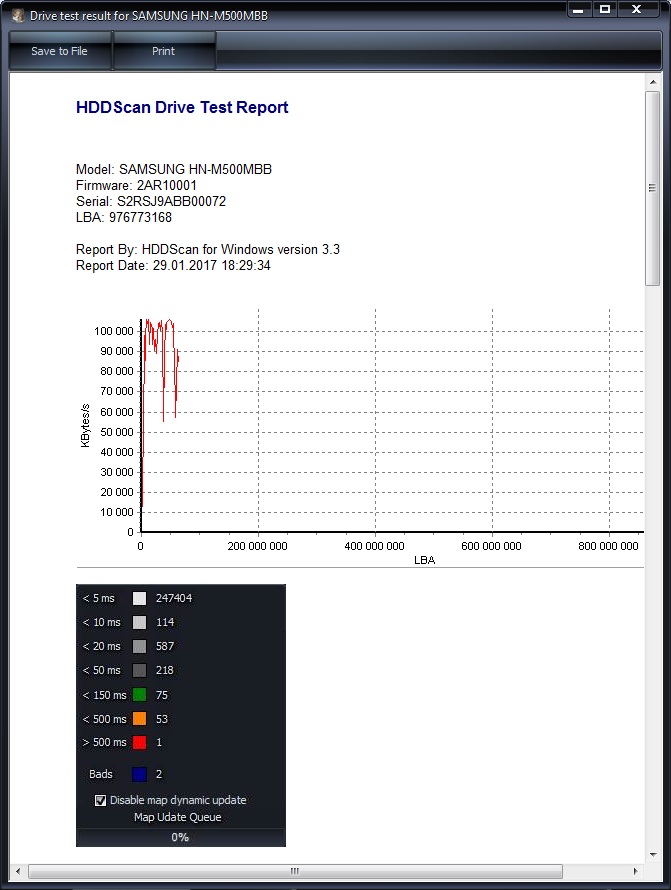
Double-click on RD-Read, go to the test that has begun and look at its process, you can on the Graph chart.

Map view. At the top there are navigation buttons for controlling the Pause, Stop and Report test process, cluster and testing speed in KB / s, and on the right is the sector scan time in numbers from< 5 до >500 milliseconds.

In the third column Report, you can see the scanned clusters and sectors of the storage medium, and at the very bottom, the progress of the test process is shown in percent.

Upon completion of the test, a corresponding message will appear in the task manager window.
If for some reason you did not like the first three methods, then I suggest for review a powerful and useful utility for diagnosing hard drives and storage media from Ashampoo.
I have already worked with this utility for diagnosing and monitoring hard drives from Ashampoo. I really liked this program, so I decided to mention it in this article.

After you download and install Ashampoo HDD Control 2. Depending on the language pack, the program can be in both Russian and English.
It has a simple and accessible interface that anyone can understand.
Here you can probably see almost all the information about the hard drive or flash drive that you want: model, partitions, size, status, performance, temperature and a lot of other useful information.

This program has extensive features and many settings, at the top there are seven navigation tabs:
You can walk through all seven tabs and learn useful information.
We are interested in checking the hard drive, go to the Testing tab, click Scan hard drives, select the one you need and click on the magnifying glass that says Start. This test can measure the speed of your hard drive.

In order to check the disk surface, you need to return to the Control tab and click Surface Test.

After that, the Testing hard disk surface window will appear, in which there are symbols: a blue square - has not yet been tested, green - excellent, red (already bad) - at least one bad sector.

Scanning time will again depend on the size and speed of the hard drive or flash drive.
Today we have discussed in detail the topic of checking a hard drive or how to check a hard drive for errors and bad sectors. To do this, we used four methods: standard Windows tools, useful Victoria, the HDDScan utility, and the cool Ashampoo HDD Control 2 program.
And now let's watch a short video tutorial on how to check your hard drive.
Hard disk check | website
Perhaps you have questions related to checking the hard drive. You can ask them below in the comments to this article, as well as use the form with me.
Thank you for reading me
The program is designed to check hard drives and SSDs for bad sectors, view S.M.A.R.T. attributes, changing special settings, such as power management, spindle start/stop, acoustic mode adjustment, etc. Drive temperature value can be displayed on the taskbar.
Rice. 1 Main view of the program
Main window controls:
When you press the TESTS button, a pop-up menu will offer you one of the tests. If you select any test, the test dialog will open (see Figure 4).
Rice. 2 Test menu

When you press the TOOLS button, a pop-up menu will prompt you to select one of the following options:
Rice. 3 Function menu

Rice. 4 Test dialog box
Controls:
Rice. 5 Task Manager

This window contains the task queue. This includes all the tests that the program runs, as well as the temperature monitor. The manager allows you to remove tests from the queue. Some tasks can be paused or stopped.
Double clicking on an entry in the queue brings up a window with information about the current task.
The window contains information about the test, allows you to pause or stop the test, and also generates a report.
Graph tab:
Contains information about the dependence of the testing speed on the block number, which is presented in the form of a graph.
Rice. 6 Graph tab

Map tab:
Contains information about the dependence of the testing time on the block number, which is presented as a map.
Rice. 7 Map tab

You can select "Block Processing Time" in milliseconds. Each tested block that took longer than the "Block Processing Time" will be logged in the "Report" tab.
Report tab:
Contains information about the test and all blocks whose testing time is greater than "Block Processing Time".
Rice. 8 Report tab
The report contains information about the main physical and logical parameters of the drive.
The report can be printed and saved to an MHT file.
Rice. 9 Example of an identification information window

The report contains information about the performance and "health" of the drive in the form of attributes. If, according to the program, the attribute is normal, then next to it is a green icon. Yellow indicates attributes that you should pay special attention to, as a rule, they indicate some kind of drive malfunction. Red indicates attributes that are outside the norm.
Reports can be printed or saved to an MHT file.
Rice. 10 Sample S.M.A.R.T.

Allows you to estimate the temperature of the drive. Information is displayed in the taskbar, as well as in a special test information window. Rice. 11 contains readings for two drives.
Rice. 11 Temperature monitor in the taskbar

For ATA/SATA/USB/FireWire drives, the information window contains 2 values. The second value is displayed in the taskbar.
The first value is taken from the Airflow Temperature attribute, the second value is taken from the HDA Temperature attribute.
Rice. 12 Temperature monitor for ATA/SATA drive

For SCSI drives, the information window contains 2 values. The second value is displayed in the taskbar.
The first value contains the maximum allowable temperature for the drive, the second shows the current temperature.
Rice. 13 Temperature monitor for SCSI disk

The program allows you to run three types of S.M.A.R.T. tests:
A SMART test can be selected from the SMART Tests dialog, accessed by pressing the SMART TESTS button.
Rice. 14 SMART Tests dialog box

Once selected, the test will be added to the Tasks queue. Information window S.M.A.R.T. test can display the progress and completion status of a task.
Rice. 15 Information window S.M.A.R.T. test

For ATA/SATA/USB/FireWire drives, the program allows you to change some parameters.
Rice. 16 Information window for additional features of the ATA/SATA drive

For SCSI drives, the program allows you to view defect lists and start/stop the spindle.
Rice. 17 SCSI drive advanced features information window

The program can build a command line to control some of the drive's settings and save this line to a .bat or .cmd file. When such a file is launched, the program is called in the background, changes the drive settings in accordance with the specified ones, and closes automatically.
Rice. 18 Command line build window

If the drive is supported by the program, then tests are available for it, S.M.A.R.T. features and additional features.
If the drive is not supported by the program, then only tests are available for it.
| Storage device | Controller chip |
| StarTeck IDECase35U2 | Cypress CY7C68001 |
| WD Passpopt | unknown |
| Iomega PB-10391 | unknown |
| Seagate ST9000U2 (PN: 9W3638-556) | Cypress CY7C68300B |
| Seagate External Drive (PN: 9W286D) | Cypress CY7C68300B |
| Seagate FreeAgentPro | Oxford |
| CASE SWEXX ST010 | Cypress AT2LP RC7 |
| Vantec CB-ISATAU2 (adapter) | Micron JM20337 |
| Beyond Micro Mobile Disk 3.5" 120GB | Prolific PL3507 (USB only) |
| Maxtor Personal Storage 3100 | Prolific PL2507 |
| In-System ISD300A | |
| SunPlus SPIF215A | |
| Toshiba USB Mini Hard Drive | unknown |
| USB Teac HD-15 PUK-B-S | unknown |
| Transcend StoreJet 35 Ultra (TS1TSJ35U-EU) | unknown |
| AGEStar FUBCP | Micron JM20337 |
| USB Teac HD-15 PUK-B-S | unknown |
| Prolific 2571 | |
| All Drives That Support SAT Protocol | Majority of Modern USB controllers |
| Storage device | Controller chip |
| AGEStar IUB3A | Cypress |
| AGEStar ICB3RA | Cypress |
| AGEStar IUB3A4 | Cypress |
| AGEStar IUB5A | Cypress |
| AGEStar IUB5P | Cypress |
| AGEStar IUB5S | Cypress |
| AGEStar NUB3AR | Cypress |
| AGEStar IBP2A2 | Cypress |
| AGEStar SCB3AH | Micron JM2033x |
| AGEStar SCB3AHR | Micron JM2033x |
| AGEStar CCB3A | Micron JM2033x |
| AGEStar CCB3AT | Micron JM2033x |
| AGEStar IUB2A3 | Micron JM2033x |
| AGEStar SCBP | Micron JM2033x |
| AGEStar FUBCP | Micron JM2033x |
| Noontec SU25 | Prolific PL2507 |
| Transcend TS80GHDC2 | Prolific PL2507 |
| Transcend TS40GHDC2 | Prolific PL2507 |
| I-O Data HDP-U series | unknown |
| I-O Data HDC-U series | unknown |
| Enermax Vanguard EB206U-B | unknown |
| Thermaltake Max4 A2295 | unknown |
| Spire GigaPod SP222 | unknown |
| CoolerMaster-RX-3SB | unknown |
| MegaDrive200 | unknown |
| RaidSonic Icy Box IB-250U | unknown |
| Logitech USB | unknown |
| Storage device | Controller chip |
| matrix | Genesis Logic GL811E |
| Pine | Genesis Logic GL811E |
| Iomega LDHD250-U | Cypress CY7C68300A |
| Iomega DHD160-U | Prolific PL-2507 (modified firmware) |
| Iomega | |
| Maxtor Personal Storage 3200 | Prolific PL-3507 (modified firmware) |
| Maxtor One Touch | Cypress CY7C68013 |
| Seagate External Drive (PN-9W2063) | Cypress CY7C68013 |
| Seagate Pocket HDD | unknown |
| SympleTech SympleDrive 9000-40479-002 | CY7C68300A |
| Myson Century CS8818 | |
| Myson Century CS8813 |
Support for a particular drive largely depends on the controller installed on it.
| Storage device | Controller chip |
| OCZ Vertex, Vertex Turbo, Agility, Solid 2 | Indilinx IDX110M00 |
| Super Talent STT_FTM28GX25H | Indilinx IDX110M00 |
| Corsair Extreme Series | Indilinx IDX110M00 |
| Kingston SSDNow M-Series | Intel PC29AS21AA0 G1 |
| Intel X25-M G2 | Intel PC29AS21BA0 G2 |
| OCZ Throttle | JMicron JMF601 |
| Corsair Performance Series | Samsung S3C29RBB01 |
| Samsung SSDs | Samsung Controllers |
| Crucial and Micron SSDs | Some Marvell Controllers |
HDDScan version 3.3 can be downloaded version 2.8
| Support: |
Hard disk drive (HDD) - essential element computer that stores all necessary information, user programs and files. Like any other component, over time, the hard drive wears out, its normal operation is disrupted, and failures begin to occur. Along with physical wear and tear, leading to the appearance of so-called bad sectors (bad blocks), there are often logical errors associated with the file system, indexes, and the main file table.
For the time being, you may not observe problems in work hard disk, but this does not guarantee that one day the hard drive will not die. Therefore, it is important to periodically (once or twice a year) check the hard drive for errors and bad sectors that need to be fixed. Regular monitoring will allow you to track the state of the carrier and respond in time to changes in its state. Of course, you should not neglect such a proven method of protecting information as backup. The most valuable data must necessarily be duplicated on a spare custodian.
In most cases, HDDs operate uninterruptedly for several years without requiring special attention. However, in case of improper operation (physical impact, lack of proper cooling), the resource of the information carrier is significantly reduced. In rare situations, there is a factory defect or a sudden failure.
Hard disk failures can be indicated by an operating system that takes too long to load, files and folders disappear for no reason, or applications launch slowly. Obvious symptoms of a loss of performance by a hard drive are program slowdowns and long file copying. If the computer constantly “hangs”, and nothing but restarting helps, then in the process of identifying the causes, checking the hard drive should be the first item.
You can test the media using standard Windows tools. The easiest way is to select the desired hard drive in Explorer, right-click on it and go to the "Service" tab.
Next, click the "Perform verification" button and set the verification parameters in the window that opens. If both checkboxes are checked, then Windows will automatically fix all system errors and restore bad sectors during diagnostics.

The results of the audit can be found in the report.

You can also audit the hard drive using the utility chkdsk called from the command line. In fact, such a check will not differ much from the above option.
So, we launch the command line by selecting the necessary item on the Start menu. Then in the window enter the command: chkdsk G: /f /r
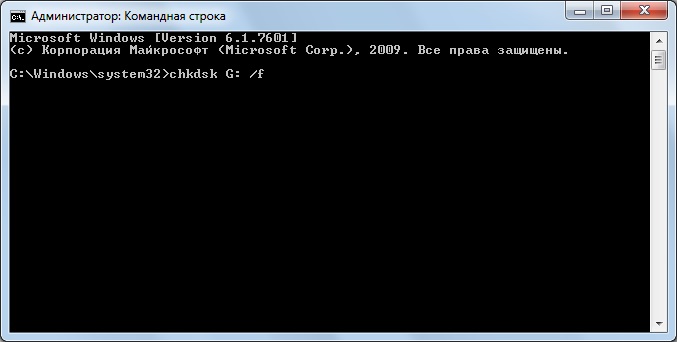
All information about found errors and bad sectors will be displayed as diagnostics are carried out.

There are many programs and utilities for finding bad sectors and fixing HDD errors. We present only the most famous.
Perhaps the most popular tool for checking hard drives. The program can be run both in the Windows environment and in DOS mode from a bootable flash drive.
The interface provides five tabs: Standard, SMART, Tests, Advanced, and Setup. First of all, go to the section standard, where in the list of devices we select the hard drive we are interested in. The Drive passport area will display basic information about the HDD.
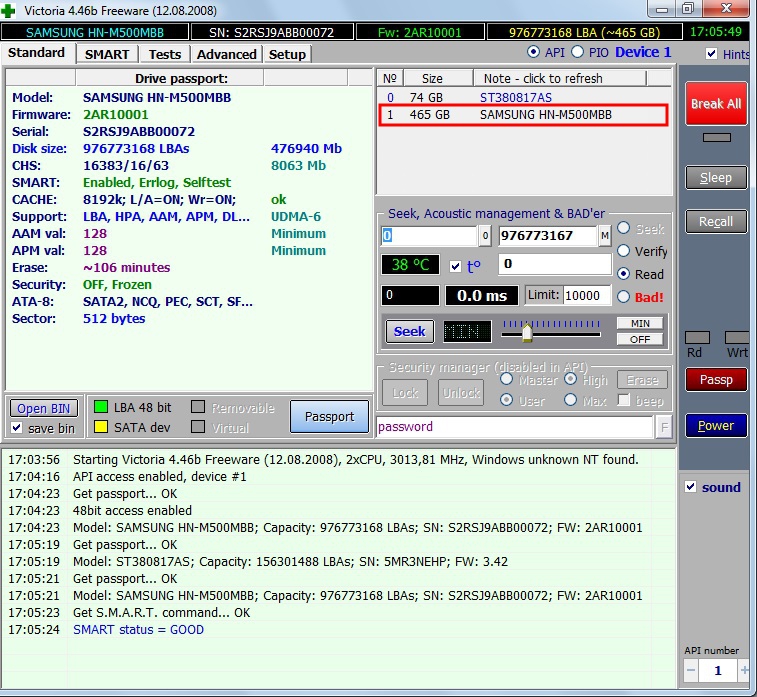
Next, select the tab SMART and press the "Get SMART" button. SMART (Self-Monitoring, Analisys and Reporting Technology) is a hard drive self-monitoring technology. Those. the hard drive monitors its work during operation, recording information on a set of parameters that allow assessing the state of the media. It is this service information that we are trying to obtain.
After pressing “Get SMART”, either the inscription GOOD on a green background or the inscription BAD! will appear to the right of the button. on red. The second option will indicate that the media is in poor condition and will most likely have to be changed. For a more detailed study of SMART statistics, let's pay attention to the list of parameters on the left. Here we are primarily interested in the attribute 5 Reallocated sector count A indicating the number of remapped sectors. If there are too many of them, then the disk began to “crumble”, that is, its surface quickly degrades and it is urgent to make a copy of all data. In this case, there is no point in restoring the hard drive.

Chapter Tests makes it possible to check the hard drive for bad sectors, as well as try to "cure" or reassign unreadable blocks. For simple testing of the hard drive, set the switch to Ignore and start the test with the Start button. The assessment of the state of the sectors is made by measuring the response time. The smaller it is, the better. Each range of response time values has its own color designation. The "slowest" blocks are marked with green, orange and red colors. Sectors that could not be read at all are marked blue. In the presence of a large number"slow" and unreadable blocks of the hard drive should be changed.

The Victoria program allows you to restore bad sectors, but we will not consider all the nuances of the procedure. Moreover, "treatment" often contributes only to a slight extension of the service life of the information carrier. To reassign bad blocks, check with the mode enabled Remap. If the recovery was successful, do not rush to rejoice. Re-diagnose the disk after a certain period of operation. The appearance of new bad blocks will indicate that the degradation of the hard drive is irreversible, and it is time for him to find a replacement.
This is another handy program to troubleshoot hard drives. After launching the application, select the drive that needs to be checked in the Select Drive list.
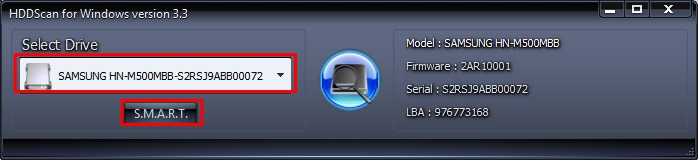
At the bottom, click on the button "S.M.A.R.T." and get acquainted with the submitted report.

Now we will diagnose the surface of the disk. Click on the round button to the right of the drop-down list of media and select Surface Tests from the menu that opens.
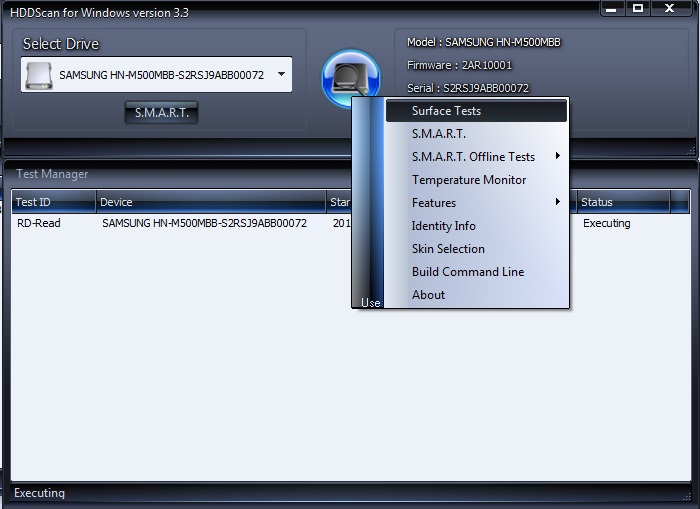

Click on the Add Test button, thereby adding a test to the list and starting its execution.
You can get information about the progress of testing in the graph (Graph), map (Map) and report (Report) mode. All blocks are also, depending on the access time, divided into groups with the corresponding color marking.


At the end, a final report is generated.
Perhaps this is all that we wanted to talk about methods for checking the hard drive of a computer for operability. We hope that the information provided will be useful to you and help you save important data.
INSTRUCTIONS AND PROPHECIES OF THE Blessed MOTHER ALIPIA GOLOSEEVSKY, Kyiv...

Eufillin dropper in ampoules is used to treat pathologies that ...

Among all ointments for the treatment and prevention of joint diseases, the most ...