Proverbs and sayings about May HORIZONTALLY: 2. May will deceive - in ... will leave.4 ....


As you know, all computer data is stored on a small, but often very capacious drive - a hard disk, or hard drive, HDD (Hard Disk Drive). So, like any device, the hard drive gradually wears out, which affects its performance and performance. You can notice this: if your PC (laptop, netbook) is an “experienced” comrade who has been working for more than a year, he may start to freeze, “think” for a long time when accessing certain folders, etc. These are sure signs of the appearance of "broken" sectors on the hard drive. In this case, he just needs your help in the form of checking and, if possible, correcting errors in his work. You can do this in several ways, I'll tell you about everything in order. If you decide to figure out how to check your hard drive for errors, then my recommendation is to read this article to the end, and only then start following the steps that are described in this article.
In order to properly maintain your hard drive, extend its life for many years, you need to understand some of the basics of the drive. Therefore, at first I will try to tell in the simplest possible language what happens inside the hard drive, and because of what it loses its “former grip” over time, and after that I will mention which programs will help you maintain and fix the hard drive. If you do not have the desire to delve into the problem literally from the inside, but plan to simply go over the instructions like “click here - click here” - move to the second part of the article describing the methods and programs for checking the hard drive. The first section of the material will be devoted to theory, and I will try to make it as interesting and understandable as possible. Go!
A hard drive is a device that consists of several glass/aluminum plates coated with a ferromagnetic material. Above the surface of each plate (disk) at a distance of about ten nm there are magnetic heads that read and write information to the disk.
In the production of hard drives, at the final stage, tracks, sectors and marks are applied to the magnetic surface of the disc. This process is called low-level formatting. Thus, service information is applied to the disk. In simple terms, the “magnetization” of service information is higher than that with which we will subsequently fill the disk. That is why user data, files can be written and erased many times, but service information cannot.
IMPORTANT: if you read / heard somewhere that low-level formatting will help fix hard drive errors, and you can do it using any program, remember: this operation is performed once and only at the factory using expensive equipment. It is impossible to perform low-level formatting using software at home! Of course, you can format it, but this will not be the formatting that we would like.
Sometimes I resort to such formatting (there are special utilities), but I do this procedure to format the disk when other programs refuse to do so. Ask why is this happening? Because some programs, if they cannot format the disk, write a message, for example, “Formatting the hard disk could not be completed”, and if you use special programs that format several times in the same area, then sometimes this option works - when the disk does not lend itself to simple formatting.
The hard drive is equipped with some kind of operating system (not Windows, which we all know and use). With the help of labels and OS commands applied to the disk, the drive “understands” where exactly the magnetic head needs to be delivered at the current time for reading / writing. The table of tracks, sectors and marks, as well as the OS of the disk - Firmware, firmware - is stored in a special section, closed from the BIOS and the operating systems familiar to us, zone. Therefore, if you suddenly wonder if you need to update the hard drive firmware, you should know: you don’t need to do this. After all, a hard drive is not an iPhone, and it does not need updates for the normal operation of a modern hard drive.
We are getting closer and closer to the problem - the loss of performance by the hard drive.
So, the disks are marked into tracks and the tracks are divided into sectors. By the way, the minimum size of a hard disk sector available to a user is 512 bytes. What happens if a sector suddenly becomes unreadable? The hard drive controller gives the command to make a few more attempts to read (at this moment, on the other side of the monitor, we can notice how the PC is slightly "stupid"), and if the operation was unsuccessful, the system marks the sector as faulty (bad block ), and the information that should have been written to this sector is written to another working sector in the backup partition. At the same time, information is entered into the label table that now this sector is considered non-working. The process of redirecting from bad sectors to spare ones is called "Remapping", or in slang "remap".
Note: imagine: the magnetic head cannot always move continuously along the tracks sector by sector - due to bad sectors, it has to jump to the backup track and back again and again. For this reason, by the way, you can hear extraneous sounds, crackles from the HDD. Naturally, the more bad sectors on the disk, the slower the hard drive works.
There are several types of bad sectors:
IMPORTANT: I'm sure you all know this very well, but just in case, I'll say it: formatting will destroy all your data on the disk. Therefore, before formatting a disk, make sure that all the necessary information from it is copied to another medium. Otherwise, you will simply lose it.
With the theory sorted out, let's move on to practice. There are several applications for working with "problem" hard drives that have proven to be powerful and reliable tools. About all in order.
By tradition, I will say a few words about standard Windows tools. The functionality, of course, leaves much to be desired, but for the prevention of disk errors it will do. To check the disk using the OS, open "Explorer", right-click on any of the disks and select the "Properties" line from the menu.
In the window that opens, go to the "Service" tab and see that we have few options - you can check for file system errors or run defragmentation. We will not stop at the check (we press the button and check), but I will say a few words about defragmentation. As the name implies, this process is the reverse of the process of disk fragmentation as a result of a remap (this was discussed in the theoretical part of the article above). Simply put, defragmentation is the ordering of the disk table and spare sectors for faster access to the latter and speed up the response of the hard disk as a whole. It is recommended to run a disk defragmenter occasionally. However, remember: any operation of checking or repairing a hard drive is a lengthy process, so you need to stock up on time.
Conclusion: you need to check the disk for errors in the file system and you can also defragment the disk.
Another way to check the disk using standard means is through the command line. Run it - press "Win" + "R" on the keyboard, then enter "cmd" and click "OK". Next, we write the command “chkdsk C: / f / r”, where “C:” is the letter of the drive being checked, “/ F” and “/ R” are parameters indicating that it is necessary to automatically fix errors, as well as check for bad sectors and try recover information.
Attention! If you fail to use this command, namely, you do not have enough privileges to use this command, then a little lower I will tell you what to do in this situation.
Note: the method that I described above rarely saves, so I highly recommend the chkdsk utility, which saved me more than once.
Also keep in mind that if your physical disk is divided into logical disks, for example, C, D, etc., then you need to check all your logical disks.
If the disk you are checking is currently in use, the system will prompt you to schedule a disk check the next time you restart your PC, you need to press the Y key: "Y" - "Yes" ("Yes"), and "N" - "No" ("No" ). After that, you must reboot your device.
If the disk is free, then a check will be carried out, the results of which the program will display on the screen. Perhaps the program will ask you to disable the volume (local disk), in this case, just press the "Y" key on the keyboard. Below is an example of this message:

If you run the “chkdsk /?” command, the program will display a complete list of options that can be used with this utility, but in most cases, the method described above is enough for diagnostics.
If the utility writes that you do not have privileges to execute the command, then you need to run it as an administrator. Make it simple. For users who have Windows 8 or 10 installed, press the "Win" + "X" keys, a menu will open where you need to select "Command Prompt (Administrator)". After that, you can safely enter the command you need. If Windows 7 or XP is installed on your computer, then you need to find “cmd” or “command prompt” through the search, right-click on it and select run as administrator.

By the way, you can return to the disk check results later, even after closing the command line and restarting the PC. For this:

Well, we figured out the standard verification tools, now let's go through the software from third-party manufacturers.
If your Windows does not boot, then connect the hard drive to be tested to another computer. Thus, you will boot from another hard drive, and you will check your own (which may have errors).
This program, as the name implies, was released by the manufacturer of the HDD of the same name - Seagate, but this does not prevent it from being "omnivorous" and working with any disks. You can download from the official site, the software is free:. At the time of this writing, you need to click on the link "Diagnostic software SeaTools for Windows", which is located on the left. After downloading and installing the program, you need to run it.
Next, select the drive that you are trying to restore to normal operation (checking the box on the left) and click "Basic Tests". Here you can select options for working with the hard drive. In the picture below, I showed what verification options this utility has. You can use all the options that this program offers. You can click on the picture below to view the program interface:
Like any self-respecting utility, there is a boot disk image (Seagate for DOS), launching from which will allow you to use the check functions before loading the OS. For example, when the system does not boot. It is advisable to check the hard drive in this mode. Because in this way you will not have problems when checking.
In addition, the program has a "Help" section, which is completely in Russian.
The next utility is more narrowly focused and is designed to work exclusively with Western Digital HDDs. Her name is Western Digital Data Lifeguard Diagnostic. To download the program, go to the manufacturer's website http://support.wdc.com/downloads.aspx?lang=en , find the program in the list and download it. Next, run the program, right-click on the desired disk and select "Run Diagnostics".
Traditionally, there is a version of the bootable iso-image and the capabilities are similar to the previous software, the interface is elementary.
I will mention another worthy representative of the "army" of fighters with hard drive errors. Here, it is worth noting the function of checking in the linear recording mode - “Test” - “Erase”. When launched, the program forcibly writes data sector by sector, thereby returning most of the bad sectors to work (this was also mentioned above). By the way, if it is possible to disconnect the hard drive from your PC and connect it to another with HDDScan installed on board, then use this verification option. This way you will achieve the maximum efficiency of the check. You can download the program on the website. After downloading, you need to unpack the archive, go to the unpacked folder and run the HDDScan.exe file.
To run the test, select your hard drive on the left, then click on the picture of your hard drive and select "Surface Tests".
In the window that opens, leave everything by default - "Read" and click "Add Test". So, we launched the scan, now we can double-click on the “RD-Read” entry to open a window where there will be detailed information about working with the hard drive.
If you have a lot of delays - from 20ms and above, then this means that your disk is already very bad and you need to think where to copy all the important data that is on hire. In the future, you need to replace the bad hard drive with a new one. It is advisable to use the program on another computer so that no processes interfere with checking your disk.
So we got to, perhaps, the most popular tool for "revitalizing" magnetic data storage devices. This program is sometimes very problematic to download from the official site and therefore I will give you a link to another site where you can download this program http://www.softportal.com/software-3824-victoria.html. I always try to give links only to official sites, but sometimes developer sites do not open for some reason and therefore I had to link to a third-party resource. This site is popular and therefore you don't have to worry about viruses.
After downloading the archive, unpack it and run the program as administrator. Be sure to take this step!

At the beginning of work, select the “Standard” tab, and in the window on the right, select the desired disk, and then click on the “Passport” button. In the log window below you will see how your HDD was determined. If an entry appears in the log, it means that the program was able to read information from this hard disk.
If this did not happen, and you saw "Get S.M.A.R.T. command... Error reading S.M.A.R.T!" - probably, the HDD controller is not working in the mode that we need. To change it, you will have to go into the BIOS and go through the following path: "Config" - "Serial ATA (SATA)" - "SATA Controller Mode Option" - change from "AHCI" to "Compatibility" (IDE). Save the BIOS changes and continue working with the program.
Note: do not forget to return everything to its place after finishing work with Victoria.
So we got to the disk test: go to the "Test" tab, click "Start".
In the course of the check, the cells in the left window will be filled with multi-colored rectangles. It is in our interest that they all be gray - this is the color of a healthy sector. But the blue and red ones are an indication of the bad sector of the disk. If, after the check, there are especially many blue cells, then you need to run the check again, first turning on the “Remap” option (located at the bottom right). As a result of such a check, the program will try to isolate broken blocks (I also talked about this in theory), hiding them. It is also worth noting that the orange and green rectangles mean that there are sectors on your disk where there are very large delays. If they are present, then this is also very bad.
IMPORTANT: if the disk check results are disappointing, I recommend copying the information to a backup disk, or be ready to replace it. Since the disk began to “lose” sectors, then most likely this process will continue. How long the disc will last you is impossible to predict. If there are no necessary files on this hard drive, and you use it only for working on the Internet, then of course you can not buy a new storage medium. If next time you have problems with this hard drive, it means that it is already unstable, and you will need to buy a hard drive.
I have tried to describe theory and practice as simply as possible. Of course, it will be difficult for an ordinary user to study the material in 5 minutes, and therefore give your disk enough time to resolve the issue of its unstable operation.
In this article, I gave as an example the utilities used by computer wizards, and if you use other programs, then there is nothing to worry about. After all, the most important thing in your case is the result. Namely, to understand what to do with your media - to restore or it's time to buy a new hard drive.
I hope this article has been helpful to you. Good luck in testing and only high-quality hard drives!
Video that will help you work with Victoria:
Sometimes when using a computer, you may notice problems with the hard drive. This can manifest itself in slowing down the speed of opening files, in increasing the volume of the HDD itself, in the periodic occurrence of BSOD or other errors. Ultimately, this situation can lead to the loss of valuable data or to a complete crash of the operating system. Let's analyze the main ways to diagnose problems connected to a PC with Windows 7 OS disk drive.
There are several ways to diagnose a hard drive in Windows 7. There are specialized software solutions; you can also check using standard operating system tools. We will talk about specific methods of action to solve the problem below.
SeaTools is a free program from Seagate that allows you to scan your storage device for problems and fix them if possible. Its installation on a computer is standard and intuitive, and therefore does not require additional description.


Click on the first of these positions.


The name of the current stage is displayed in the column "Drive Status". In column "Test Status" the progress of the current operation is shown graphically and as a percentage.


As you can see, Seagate SeaTools is a fairly convenient and, most importantly, free tool for diagnosing a computer hard drive. It offers several options for checking by depth level at once. The time spent on the test will depend on the thoroughness of the scan.
The Western Digital Data Lifeguard Diagnostic program will be most relevant for checking hard drives manufactured by Western Digital, but it can also be used to diagnose drives from other manufacturers. The functionality of this tool makes it possible to view information about the HDD and scan its sectors. As a bonus, the program can permanently erase any information from the hard drive without the possibility of recovering it.


HDD Scan is a simple and free software that copes with all its tasks: checking sectors and performing hard drive tests. True, its purpose is not to correct errors - only to search for them on the device. But the program supports not only standard hard drives, but also SSDs, and even flash drives.


This method has the advantage over using the previous program in that it does not require the mandatory termination of running applications, although this is also recommended for greater diagnostic accuracy.
As you can see, in Windows 7 it is possible to diagnose the hard drive both using third-party programs and using the built-in system utility. Of course, the use of third-party software provides a more in-depth and diverse picture of the state of the hard drive than the use of standard technologies that can only detect errors. But to use Check Disk, you do not need to download or install anything, and in addition, the in-system utility will try to fix errors if they are found.
Or removable hard drives are almost the most important to ensure the operability of the entire computer system and proper storage of information without losing data in unforeseen situations. HDD performance should be monitored regularly. Consider what programs for diagnosing a hard drive exist today and what they are capable of.
Let's start with some of the most important aspects. Monitoring and diagnostics of a hard drive includes several basic processes. The most significant here are the following: preliminary collection of information about the state of the hard drive (monitoring), checking the hard drive (scanning), error correction and data recovery (if errors cannot be corrected programmatically).
In principle, the utility programs themselves for diagnosing a hard drive must be divided according to their direct functions (informers, scanners, "doctors" and restorers). More about them will be discussed a little later, although today there are many software packages that combine all these functions.
In considering the question of what are the best programs for diagnosing a hard drive, it is worth dwelling on the most common problems and the errors that they are able to fix.
First of all, the most common are system errors that can occur when Windows itself malfunctions, applications shut down incorrectly, files and folders are copied or moved to other areas incorrectly, power is suddenly turned off, etc. In principle, most such problems are identified and eliminated by programs for diagnosing a hard drive.

Another thing is when the user is faced with a situation of physical damage to the surface of the hard drive. Here the problem is much more complicated. It is sometimes possible to transfer information to another area and section programmatically, but, alas, damaged areas cannot be restored. If there are too many of them, in the worst case, you will have to change the hard drive. Of course, you can try to restore some of the information yourself, but in especially difficult cases, say, after a temperature jump, when the hard drive has melted, such a procedure will simply be impossible without the intervention of specialists.
Now let's focus on specialized utilities that allow you to collect and view complete information about the status, operation and main characteristics of the hard drive. According to experts and users, the most popular are utilities like Everest, CPU-Z, CrystalDiscInfo, etc.

Any hard drive diagnostic program of this kind allows you to view the full report, and it will contain much more information than standard Windows OS reports, although you can still see something with the use of such tools.
By the way, it is wrong to assume that monitoring applications fix some errors or malfunctions. They were originally created only to view all the parameters of the equipment, and certainly not to influence their settings. In this regard, only the CrystalDiscInfo utility can manage some HDD parameters.

However, some parameters can be viewed and adjusted even when accessing the BIOS before the system starts directly. But even there the information is far from complete, and changing the parameters will affect, say, a fan or something else. But here are some settings for hard drive controllers that sometimes have to be applied.
As for the "OSes" of the Windows family, there is a minimum set for checking the hard drive for errors, as well as for fixing them. But this only applies to system errors.
In the monitoring plan, information can be viewed by calling the "Properties" menu from the context menu by right-clicking on the "My Computer" icon. More complete information is contained in the DirectX dialog box, which is called from or the Run menu by entering the dxdiag command. In any case, the information contained in these reports is nothing compared to what free utilities offer.

In Windows, the "native" program for diagnosing hard drives is called very simply. To do this, in the standard "Explorer" on the letter of the disk or partition, right-click, and the line "Properties" is again selected from the drop-down menu. On the tab "General" (or "Service") there is a special button "Perform verification".
In the menu that appears, you can check the box next to the automatic line. If this is not done, the system will simply display a message stating that errors have been found and they need to be corrected. In some cases, it will not be possible to fix problems even with automatic error correction, and with each subsequent boot of the “OS”, an obsessive message will appear stating that one of the disks needs to be checked. Agree, it is quite inconvenient, especially since even a given test of the hard drive surface takes a lot of time. Here it is better to use special programs for diagnosing a hard drive with advanced features. By the way, and the effect of their application will affect immediately. Any user will be able to see the result even, so to speak, with an inexperienced look.

Naturally, among the software for monitoring the operation or the main parameters of hard drives of any type, you can find a lot of paid, shareware or completely free utilities. What is most interesting, as practice shows, free applications are often not inferior to licensed software and cope with the functions assigned to them quite effectively.
Among all the variety, it is worth highlighting utilities like Norton Disc Doctor, HDD Scan, Hard Disc Sentinel, the same CrystalDiscInfo application, as well as CheckDisc or something like that. For Western Digital hard drives, a special utility called Data Lifeguard Diagnostics, developed specifically for WD hard drives, is perfect.

Interestingly, some utilities are even supplied as portable versions and take up only a few megabytes of space.
All utilities of this type have a fairly simple and understandable interface for any user, in which you just need to select the desired disk and set several scanning and error correction options. In principle, the same Disc Doctor of "grandfather" Norton allows you to specify a disk or partition, as well as use the parameters for checking the hard drive for bad sectors and automatic error correction. Separately, in the advanced settings, you can set the Surface surface of the HDD).
Unfortunately, physical damage to the surface of an HDD or a removable hard drive is a very common problem. This may be due to dust ingress, overheating, short circuits in electrical circuits, etc.
Checking the physical condition of the hard drive is quite simple. You just need to ask for help from the relevant programs and applications, which within a few minutes will detect problems, if any.
In principle, testing the surface of disks can be performed by some standard HDD utility or an external hard disk diagnostic program. That's not the point. The main thing is that such utilities can rewrite information (checksums) from bad sectors to spare areas of the disk. Thus, an interesting effect is achieved. In fact, the logical address of the sector does not change, although in fact the physical location on the hard drive is completely different. In general, almost all applications of this type use this principle. In addition, most of them are designed for completely different file systems and partition table formats.
Separately, it is worth dwelling on the unique Victoria program. It has truly the most powerful capabilities in its field. True, some experts recommend using a version that works based on DOS. Well, in some cases this is a justified step.

The application itself was developed by the Belarusian programmer S. O. Kazantsev and has proven itself in the computer world at a very high level. It is not surprising that in the West it is now used very often. I must say that this utility is a multifunctional package that combines the ability to monitor and test hard drives of any type and any manufacturer, the ability to automatically correct errors and restore data even with very significant damage to hard drives.
Although for an uninitiated user this software package may seem somewhat overloaded with features and settings, but professionals appreciate it. Perhaps nothing better has yet been created today, since the program itself can be classified as All-In-One (“all-in-one”).
Of course, you can recover data using the Victoria utility, but few ordinary users will deal with it. In this case, you should advise something simpler.
For example, the best hard drive data recovery programs include many powerful utilities. You can use applications like HDD Regenerator.

As the developers of this package themselves say, they have found a unique way to use some signal sequence algorithms that allow you to literally restore physically damaged sectors of hard drives not just by rewriting information to other sections, but using the remagnetization technique for this. This is how the effect is achieved when the information from the damaged area does not go anywhere, but is read after restoration.
Naturally, if reading heads or a spindle flew off on a hard drive, no even the most modern programs will help. However, in most cases, software and, as we see, even physical problems can be fixed.
As for additional settings, many programs for diagnosing hard drives can sometimes give errors during the analysis of a hard drive or simply not see it.
In this case, you need to change the SATA controller parameter in the BIOS, most often just change from AHCI to IDE. This should help.

Very often, inexperienced users who use diagnostic programs or look at the parameters of a hard drive or fan in the BIOS for the first time panic, they say, the temperature is too high (for example, 40 degrees), the hard drive will “fly” in this mode of operation. Nothing like this! For almost all hard drives, the optimal operating temperature range is between 35 and 45 degrees Celsius. Even a value of 50 degrees is not critical for many hard drives. Worse, when the temperature drops below 25 degrees, then the probability of a hard drive failure is much higher. However, this is extremely rare, except perhaps when working in the cold (I think that hardly anyone has the mind to do this).
So, although briefly, we have considered the question of what is hard drive diagnostics. The program (which is better - the user decides) designed for analysis, testing and error correction, in principle, can be any. What to use - a specialized or narrowly focused product? The answer to this question depends on what exactly this or that application should be able to do. Some prefer separate programs, some tend to use packages that combine all the features for working with the HDD.
For inexperienced users, simple free utilities are suitable, especially since even portable versions do not weigh that much and have S.M.A.R.T. without damaging the system. But for professionals, the best in their field, of course, is the Victoria program. This is not discussed.
In general, if you deal with testing hard drives and monitoring their condition, in the end, only one thing can be added: in order to prevent the occurrence of catastrophic situations, at least some kind of hard drive diagnostic program should be used regularly. In some cases, even a simple one from dust with a conventional vacuum cleaner will help (naturally, without fanaticism). As statistics show, for those who check the hard drive at least once a month and monitor the general condition of their computer or laptop, the percentage of HDD failure is much lower than for users who never think about it, but try to correct the situation when everything will go almost to the extreme.
Many PC users hardly think about checking the status of their HDD. Checking the hard drive, first of all, is needed for early detection of errors.
If you manage to identify problems with the hard drive in advance, then you can save all the important information stored on it until it finally fails.
In this article, we will describe, using specific examples, the procedure for checking the status of the HDD, and also tell you what to do in a situation if your hard drive is faulty.
You can check the status of your hard drive using various utilities that read the status of your hard drive from its self-diagnosis system. SMART. SMART technology is now installed on every manufactured hard drive. SMART technology was developed back in 1992 and is still being improved to this day. The main task of SMART is logging of the hard drive aging process. That is, information such as the number of HDD activations, the number of spindle rotations and many others is being collected. More SMART looking for errors"screws", both software and mechanical, and as far as possible corrects them. During the monitoring process, SMART performs various tests such as short and long to identify those same faults. In this article, we will consider such programs that can read information from SMART:
Each program from the list, in addition to reading SMART readings, offers a number of functions, tests, which in one way or another extend the life of the hard drive. But the most interesting is the program Victoria. The Victoria program, in addition to determining the state of the HDD, also knows how to produce REMAP bad sectors. That is, she can hide bad sectors by replacing them with spare ones if they exist. In essence, the REMAP procedure can restore hard drive. It is also worth noting the possibility of fixing the hard drive thanks to the console application " chkdsk". The console program "chkdsk" can fix file system errors, which will allow you not to reinstall Windows.
We will first look at the program Ashampoo HDD Control 3. Let's run this utility on a computer running Windows 10.
The Ashampoo HDD Control 3 window shows the message " ✓ OK", as well as the inscription " This hard drive has no problems". This information means that the hard drive in question is in perfect order. If you see the message " Error", as well as the inscription " This hard drive has a problem”, then this means that it has bad sectors or overheats. To view full information about the health of the "screw" taken from smart, you need to click on the footnote "" located in the central block.

In addition to viewing information from smart, Ashampoo HDD Control 3 can run self-test test S.M.A.R.T. and surface check test. You can test these tests in the "" block.

By performing these tests, you can also identify problems with the HDD. In addition to taking readings from smart and tests, Ashampoo HDD Control 3 can:
The presence of such functionality of Ashampoo HDD Control 3 in monitoring the health of the screw and additional functions puts the utility in the first place.
Utility Defraggler primarily intended for defragmentation, but besides that, she can read SMART readings. The utility is free and any user can download it from www.piriform.com. After starting the utility, you need to go to the tab " State».

The window shows that the utility displays a message about the state of the screw, as " GOOD' means he's fine. If you see the message " Error” in the status, this will mean that there are bad sectors on the hard drive and it is time to change it. The utility is quite simple and is suitable, first of all, for novice PC users who want to monitor the health of the HDD and defragment it. I would also like to note that the utility supports all current operating systems, from Windows XP to Windows 10.
Utility HDD life has a nice interface and immediately gives us the information we need, which is responsible for the serviceability and breakage of the screw.

From the image above, you can see that in the block health is " OK!", which means that everything is in order with the HDD. To see the details of smart, you just need to click on the link " click to view S.M.A.R.T. attributes».

If you see a message in the health block " DANGER!”, then this means that your HDD will soon become unusable.

In this case, you need to replace the old hard drive with a new one. The HDDlife utility, first of all, is suitable for novice PC users, as its simplicity will make it easy to monitor the health of the “screw”. In addition to the standard utility, the developer also releases HDDlife for Notebooks which is designed for laptops. The laptop version has the same functionality as the standard version, but can also HDD noise control. It is also worth noting that the program supports all current operating systems, from Windows XP to Windows 10.
Program Victoria is being developed under DOS and by Windows. For our example, we will use the Windows version of Victoria, which can be downloaded from http://hdd-911.com. Victoria is currently available in version 4.47. By running the Victoria utility, we will get into such a window.

Victoria does not have a beautiful interface, as in previous utilities, and is written in such old languages as Delphi and assembler.
In the first tab of Victoria " standard» is all information about installed hard drives into the computer.
Second tab " SMART» needed for smart reading. To display smart results, you must click the Get SMART button and the results will be displayed.

In the hard drive under consideration, Victoria found 1212 bad sectors. Such a number of BAD sectors is critical, so in this case it is necessary to carry out full backup all data from the HDD. To repair the hard drive with the REMAP test in Victoria, go to the tab " Tests» and select the mode « Remap". After these steps, you can start the procedure for reassigning bad sectors to backup ones with the Start button.

The REMAP test at Victoria can take a very long time. The test time depends on the number of bad sectors. This test of the Victoria utility does not always help, since there might not be any spare sectors left in the "screw".
Please note that using Victoria tests, you can damage the health of the HDD and the information on it.
It may happen that by checking the S.M.A.R.T. using the utilities described above, you did not find any problems, but the system still behaves unstable. Instability can be manifested by blue screens of death, freezes in programs. This behavior of the Windows operating system is caused by file system errors. In this case, the console command will help us " chkdsk". By running the "chkdsk" command, you can fully restore functionality Windows OS. For this example, we will take a computer with the new Windows 10 operating system. First of all, we will open the console in Windows 10 as an administrator. This can be easily done by right-clicking on the " Start” and selecting the item we need.

In the running console, execute the following command CHKDSK F: / F / R After checking using the “chkdsk” command application, the result of the check will be displayed in the console.

Now consider the command " CHKDSK F: /F /R» more. Immediately after the "chkdsk" command comes the letter " F"- this letter local disk where we correct errors. Keys " /F" and " /R» fix errors in the file system, as well as fix bad sectors. These keys are used almost always, unlike the others. You can view the rest of the keys with the chkdsk /?

It is also worth noting that in Windows 10, the capabilities of the “chkdsk” application have been significantly expanded thanks to new keys.
Abbreviation DST stands for Disk Self Test, that is self-test disk. Manufacturers specifically build this method into the HDD, so that later, using special software, they can perform DST self-diagnosis, which will identify problems. By testing the “screw” using DST, you can get information about the likely failure of the hard drive. It is especially convenient to use DST on servers and computers of enterprises, where reliable storage of information plays a big role. Now consider the use of DST on the example of HP laptops. For new HP notebooks with support UEFI BIOS there is a special diagnostic menu " Startup Menu". This menu is launched with power key and key combinations ESC.

To run system tests, press the F2 button.

In the window that appears, DST is called Hard Disk Test. After selecting it, a self-test will start.

Other manufacturers also have a DST method, only running on a PC from other manufacturers is different from the above.
For example, let's take a computer based on the Ubuntu 16.04 operating system. To do this, launch the terminal in Ubuntu. In the terminal, type the following command sudo apt-get install smartmontools This command should install console utility smartmontools.

Now that the Smartmontools utility is installed, you can use the command sudo smartctl -a /dev/sda which will display in the console all the information of the smart hard drive.

If you don't like working in console mode, you can install a graphical utility gnome-disk-utility. In it you can see everything you need about the HDD and its status.

In the reviewed article, we described how you can monitor the status of the HDD, as well as how to fix its sectors and file system, if possible. From the material it becomes clear that monitoring the status of hard drives is very important, as it allows predict HDD failure.
If you find that your hard drive is problematic, then do not postpone its replacement for later. A problematic "screw" can fail at any time, and you will lose all the information stored on your computer.
We hope that our material will be useful to our readers, and will fully help to solve the problem of checking the hard drive.
Hello.
Forewarned is forearmed! This rule comes in very handy when working with hard drives. If you know in advance that such and such a hard drive is likely to fail, then the risk of data loss will be minimal.
Of course, no one will give a 100% guarantee, but with a high degree of probability, some programs can analyze the readings of S.M.A.R.T. (a set of software and hardware that monitors the condition of the hard drive) and draw conclusions on how long it will last.
In general, there are dozens of programs for performing such a hard disk check, but in this article I wanted to focus on some of the most visual and easy to use. So…
How to check the status of a hard drive
HDD life
(By the way, in addition to HDD, it also supports SSD drives)
One of the best programs to constantly monitor the status of the hard drive. It will help to recognize the threat in time and replace the hard drive. Most of all, it captivates with its clarity: after launch and analysis, HDDlife presents a report in a very convenient form: you are shown a percentage of the "health" of the disk and its performance (the best indicator, of course, is 100%).
If your readings are above 70%, this means that your disks are in good condition. For example, after a couple of years of work (quite active, by the way), the program analyzed and concluded: that this hard drive is about 92% healthy (which means that it should last, if there is no force majeure, at least the same amount) .

After starting, the program minimizes to tray next to the clock and you can always control the status of your hard drive. If any problem is detected (for example, the disk temperature is high, or there is too little space left on the hard drive), the program will notify you with a pop-up window. An example is below.

HDDLIFE notification that the hard drive is running out of space. Windows 8.1.
If the program analyzes and gives you a window as in the screenshot below, I advise you not to hesitate with the backup (and replacing the HDD).

HDDLIFE - data on the hard drive is in danger, the faster you copy it to other media - the better!
Hard Disk Sentinel
This utility can compete with HDDlife - it monitors the disk status just as well. What is most captivating in this program is its informativeness, at the same time as its simplicity for work. Those. it will be useful for both a novice user and an already experienced enough one.
After starting Hard Disk Sentinel and analyzing the system, you will see the main program window: hard drives (including external HDDs) will be presented on the left, and their status will be displayed on the right in the window.
By the way, a rather interesting function is to predict the health of the disk, according to how long it will serve you: for example, in the screenshot below, the forecast is more than 1000 days (that's about 3 years!).
The condition of the hard drive is EXCELLENT. Problematic or weak sectors were not found. No revving or data transfer errors detected.
No action needs to be taken.
By the way, the program has a rather useful function: you can set the threshold for the critical temperature of the hard disk, upon reaching which, Hard Disk Sentinel will notify you of the excess!

Hard Disk Sentinel: disk temperature (including the maximum for the entire time the disk was used).
Ashampoo HDD Control

An excellent utility for monitoring the status of hard drives. The monitor built into the program allows you to know in advance about the appearance of the first problems with the disk (by the way, the program can notify you about this even by e-mail).
Also, in addition to the main functions, a number of auxiliary ones are built into the program:
Disk Defragmenter;
Testing;
Cleaning the disk from garbage and temporary files (always up to date);
Deleting the history of visiting sites on the Internet (useful if you are not alone at the computer and do not want anyone to know what you are doing);
There are also built-in utilities for reducing disk noise, power settings, etc.
Screenshot of the Ashampoo HDD Control 2 window: everything is in order with the hard drive, the state is 99%, the performance is 100%, the temperature is 41 degrees. (it is desirable that the temperature be less than 40 degrees, but the program considers that everything is in order for this disk model).
By the way, the program is completely in Russian, intuitively thought out - even a novice PC user will figure it out. Pay special attention to the temperature and status indicators in the main program window. If the program generates errors or the status is assessed as extremely low (+ besides, there is a rattle or noise from the HDD), I recommend that you first copy all the data to other media, and then start dealing with the disk.
Hard Drive Inspector
The salient features of this program are:
1. Minimalism and simplicity: there is nothing superfluous in the program. It gives three indicators in percentage terms: reliability, performance and absence of errors;
Hard Drive Inspector - monitoring the state of the hard drive.
CrystalDiskInfo
A simple but reliable utility for monitoring the status of hard drives. Moreover, it works even in cases where many other utilities fail, crashing with errors.
The program supports several languages, is not replete with settings, and is made in a minimalist style. At the same time, it has rather rare functions, for example, disk noise reduction, temperature control, etc.
What is also very convenient is the graphical display of the situation:
Blue color (as in the screenshot below): everything is in order;
Yellow color: alarm, action needs to be taken;
Red: urgent action needs to be taken (if you still have time);
Gray: the program was unable to determine the readings.
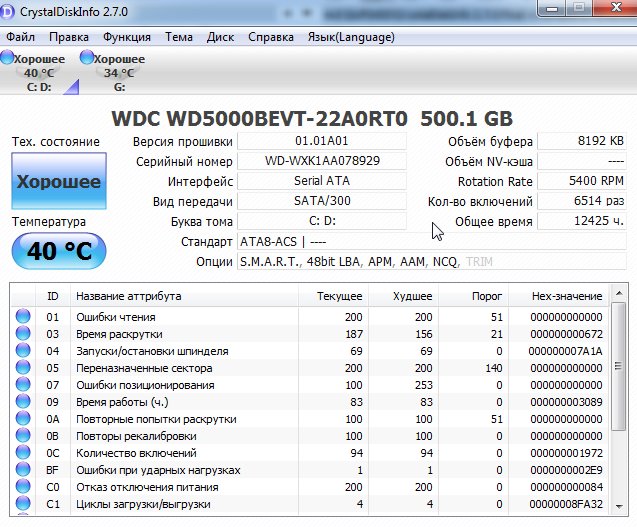
CrystalDiskInfo 2.7.0 - screenshot of the main program window.
HD Tune
This program will be useful for more experienced users: in addition to graphical display of the "health" of the disk, they also need high-quality disk tests, in which you can get acquainted with all the characteristics and parameters in detail. It should also be noted that the program, in addition to HDD, also supports newfangled SSD drives.
HD Tune offers a rather interesting feature to quickly check the disk for errors: a 500 GB disk is checked in about 2-3 minutes!
HD TUNE: quick search for disk errors. Red "squares" are not allowed on the new disk.
Also very necessary information is a check of the read and write speed of the disk.
HD Tune - check disk speed.
Well, it is impossible not to note the tab with detailed information about the HDD. This is useful when you need to know, for example, supported features, buffer/cluster size or disk rotation speed, etc.
HD Tune - detailed information about the hard drive.
In general, at least the same number of such utilities can be cited. I think that most of these will be more than enough ...
And the last thing: don't forget to make backups, even if the condition of the disk is rated as excellent at 100% (at least the most important and valuable data)!
Good job…
Proverbs and sayings about May HORIZONTALLY: 2. May will deceive - in ... will leave.4 ....

Popova V.N. primary school teacher MBOU "Kishertskaya secondary school" Rebus is ...

To learn how to compose and understand puzzles, you should figure out what they are from ...