Proverbs and sayings about May HORIZONTALLY: 2. May will deceive - in ... will leave.4 ....


Often, the standard tools offered by the system are not enough to work with the hard drive. Therefore, you have to resort to more efficient solutions that allow you to get detailed information about the HDD and its partitions. The solutions discussed in this article will help you familiarize yourself with the operations that apply to the drive and its volumes.
With its toolkit, AOMEI Partition Assistant is one of the best programs of its kind. Wide functionality will allow you to effectively configure hard disk volumes. In addition, the program makes it possible to check a specific section for errors. One of the interesting features is the transfer of the OS with all installed software to another hard drive or SSD.
It also supports writing an image file to a USB device. The interface is endowed with a pleasant graphical shell. Despite the large number of useful features, the program is available for free use, which makes it even more in demand. At the same time, it is possible to download the Russian-language version.
This software has powerful functionality that allows you to merge, split, copy partitions, and a number of other functions. MiniTool Partition Wizard is completely free and available for non-commercial use only. The program provides the ability to change the disk label, and when creating a partition, the cluster size.

The surface test operation allows you to detect bad sectors on the HDD. The ability to convert is limited to only two formats: FAT and NTFS. All tools for working with disk volumes are placed in a very convenient way, so even an inexperienced user will not get confused.
A program that opens up many possibilities when working with a hard drive. Among the main ones: disk cloning and OS import from HDD to SSD or vice versa. Partition Master allows you to copy an entire partition - this feature is suitable for the need to create a backup copy of one partition to another.

The program has a user-friendly interface, in which all operations are located in the left block - this allows you to quickly find the desired function. The peculiarity of EaseUS Partition Master is that it can be used to hide a specific volume by deleting a letter on it. Creating a bootable OS is another interesting and useful tool.
The convenience of working with Eassos PartitionGuru is achieved primarily due to the simple design. All tools are located on the top panel. A distinctive feature is the ability to build a virtual RAID array. To do this, the user only needs to connect drives to the PC, from which the program itself will construct a RAID.

The existing sector editor allows you to search for the desired sectors, and hexadecimal values are displayed in the right block of the panel. Unfortunately, the software comes in an English-language trial version.
A nice interface displays functionality that is divided into sections. The program allows you to scan your PC for bad sectors, and you can configure the checked disk space. Available conversion formats NTFS and FAT.

Macrorit Disk Partition Expert is free to use, but only in English version. The software is suitable for people who need to quickly set up a hard drive, but for more efficient work it is recommended to use analogues.
A program for performing various operations with a hard disk, which allows high-quality data recovery. Compared to other similar software, Macrorit Disk Partition Expert allows you to perform a deep partition scan for lost information.

You can trim and merge hard disk volumes without losing the files stored on it. Other tools will allow you to hide the partition if necessary, or to convert the file system.
Acronis Disk Director is one of the most powerful programs with a set of functions and operations for managing hard disk partitions and more. Thanks to the capabilities of this software from Acronis, users can recover lost or deleted data. Among other things, it is possible to defragment the volume, as well as check it for file system errors.

The use of mirror technology allows you to save a backup copy of the partition selected by the user. Acronis Disk Director offers to use the disk editor, which makes it possible to find a lost cluster, taking into account that the execution environment for this operation displays hexadecimal values. The program can be safely used in order to carry out the most efficient work with the HDD.
A program that allows you to carry out basic operations with a hard drive. The interface in many ways resembles the standard Windows Explorer application. At the same time, among the tools located in the graphical shell, it is easy to find the one you need. The advantage of Partition Magic is that it allows you to select multiple active partitions, each with its own separate OS.
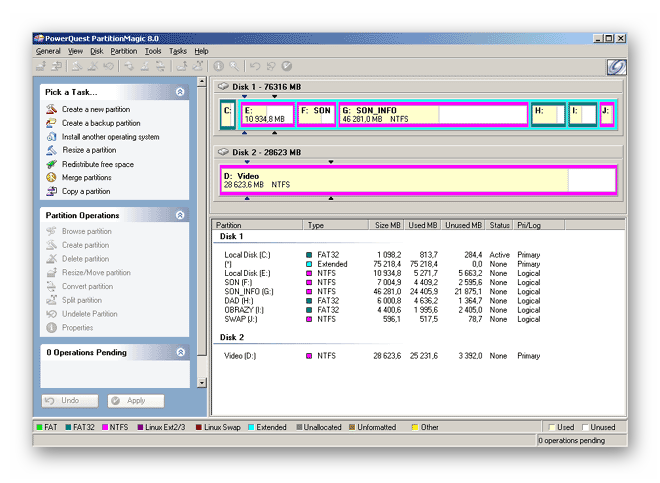
You can also use the services of converting file systems, among them two are supported: NTFS and FAT. You can resize the volume and merge partitions without losing data.
Paragon Partition Manager delights users with an interesting set of features and their uses. One of them is mounting a virtual disk image. Among them, image files, VMware and other virtual machines are supported.

Noteworthy is the function that allows you to convert HFS + file system formats to NTFS and vice versa. Other operations are basic for partitions: cropping and expanding. A large number of settings provided by the program will allow you to customize all the functionality to your liking.
The considered software solutions have a unique potential, each in its own way. The powerful toolkit of the developed software makes it possible to save disk space and extend the working capacity of the hard disk. And the function of checking the HDD for errors allows you to prevent critical errors in the operation of the drive.
Creating, deleting and formatting computer disk partitions is only part of the possibilities hard drive management applications. Today, they allow you to securely carry out operations that previously required deletion of data or other dizzying combinations.
Many tasks implemented through the partition manager can, in theory, be performed using the built-in Windows disk management tool. However, it is not as intuitive as the programs discussed here.
A good disk management application consists of several modules. They are used to create, delete and format partitions. Apart from these functions, they also have functions for copying and moving partitions, creating images and backups.
Additional modules support system migration, merging and splitting partitions. Various partition schemes, dynamic disks, RAID configurations, various file systems and boot records are supported.
Attention! Whenever you work with hard disk partitions, you need to plan carefully, back up your data, and make sure you select the correct hard disk or partition before pressing Enter .
Attention! All operations carried out on partitions are burdened with risks. The editors recommend that you exercise extreme caution and are not responsible for possible loss of data or other damage suffered by readers.
One of the most popular programs for managing hard disk partitions in Windows. Provides allocation of new partitions without data loss.
Benefits of EaseUS Partition Master
Flaws
License: freeware
Price: free
Also popular. Creates, splits, joins, copies partitions of hard drives, changing their size, while saving files. It is possible to transfer the system.
Benefits of AOMEI Partition Assistant
License: freeware
Price: free
A tool for managing computer hard disk partitions. Distributed as an ISO file. Install it on a USB flash drive or burn it to a CD and start your computer from it.

Benefits of GParted
Flaws
License: freeware
Price: free
Carries out all operations with hard disk partitions, also hides it. Copying the contents of the disk and changing the file system.

Benefits of MiniTool Partition Wizard
License: freeware
Price: free
Performs operations on disk partitions. Formats a flash drive in FAT32 and NTFS. Fixes MBR disks. Converts MBR to GPT and vice versa.
Advantages [email protected] Partition Manager
Flaws
License: freeware
Price: free
Like
Like
tweet
A hard drive in a computer and the drive icon in My Computer are two different things. For example, a computer may have one hard drive installed, while My Computer may have several. The reason for such a strange discrepancy is that the hard disk can be divided into so-called partitions. This is called logical disk partitioning.
I will talk about why such markup is needed, how to do it correctly (and whether it should be done at all), and also talk about free programs for such a delicate procedure.
There are several reasons for dividing a hard drive into partitions:
So, The main reasons for dividing a hard drive into partitions are: for the convenience of storing information, for installing several operating systems, for the operation of the recovery system, for storing the Windows 7/8 bootloader.
Information about partitions (i.e. logical drives) is stored in a "partition table". Each logical drive can have its own file system. You can read more about all this in the Wikipedia articles: Disk partition, Logical disk, File system. It is enough for a novice user to know the bare minimum:
Windows has a standard partitioning tool - " Disk Management". Depending on the version of Windows, the capabilities of this program change a little, but in general over the past years (if we talk about Windows Vista, 7, 8) there have been no major changes. Windows XP looks more modest in this regard - apart from formatting and changing the drive letter, there is little you can do there.
As an example, I will take " Disk Management» Windows 7. There are several ways to open this program:
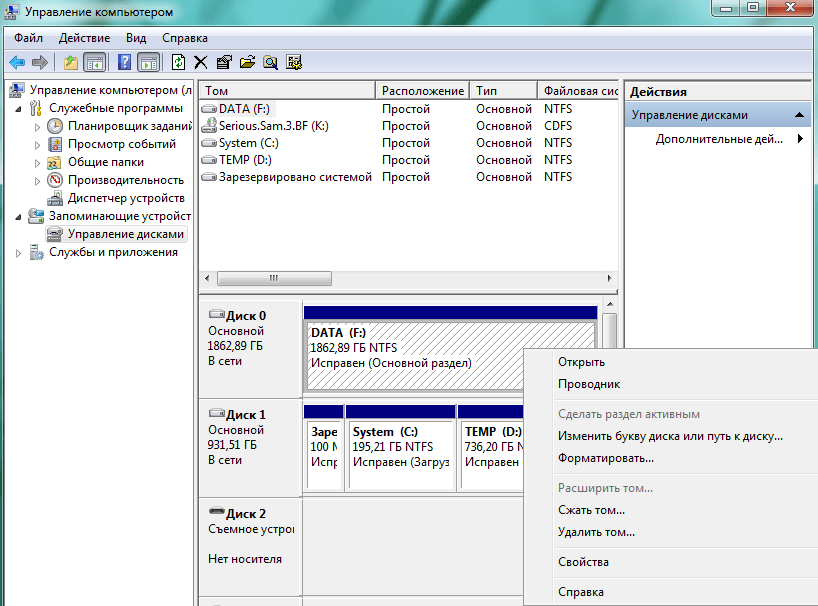
Disk Management looks like that:
Here you can see both physical disks (including DVD drives, flash drives and other storage devices) and logical ones, i.e. virtual - hidden Windows 7 bootloader partition, disks C and D. Your computer may have a different number of disks.
The main actions are available by right-clicking on the desired section:

The list of actions is rather sparse:
Of course, this is not a complete list of possibilities. Disk Management. One can create dynamic disks, for example. However, novice users do not need this, this article is designed just for them.
So, to create, delete, resize partitions through Disk Management, you only need three menu items: Extend Volume, Shrink Volume, Delete Volume.
All operations take place in real time, i.e. after pressing the desired item and an affirmative answer to the question - do we want to do this - the actual action takes place.
Do not forget that there is a risk of failure, due to which we can lose one partition or all. This applies primarily to computers with a large number of unnecessary programs - each of them may be the culprit in deleting all data. Moreover, the scenario when you need to change the partition from which Windows is started (usually this is a disk C), is the worst - most often, users have problems when they try to change the system partition.
To minimize the risk of failure, there are three methods:
The third option is the easiest, because the user does not actually need to do anything - just restart the computer and wait a few minutes. The following two review programs can do this.
A free hard disk partitioning program for home use.
surface test- checking the surface of the disk (physical). Allows you to detect bad sectors (the so-called "bads", "bad blocks").
view properties- display information about the disk.
Yes, knowledge of English is clearly required here, especially considering that almost every item calls up a window with the settings for the action to be performed. After you make the necessary manipulations, you need to apply the changes by pressing the button apply(Apply):

Only then will partitioning begin. This process can take some time - from a couple of minutes to several hours.
Depending on whether the system partition is affected or not, operations are carried out either immediately in the window, or you will need to restart the computer and start changing the partition in Native mode:


The program has a lot of functions, it's impossible to list them all. I recommend that you read the help for EaseUS Partition Master. It is in English, unfortunately, but you can use Google translator. The translation is quite understandable.
Pros of EaseUS Partition Master Home Edition:
Cons of EaseUS Partition Master Home Edition:
Conclusion: the program is good. You can and should use it, there are no alternatives among free programs.
Free partition changer from a company based in Russia. Unfortunately, the program is in English. What made the developers take such a step is unclear. Moreover, the paid version of the program is in Russian.
The main window of the program is no different from the window of the hero of the previous review, except that the buttons have changed their order:

Worthy of special mention Express Mode(Simplified mode). By clicking on this button, we will get a window with a list of the most frequent actions:

One could say that this is an ideal mode for beginners, if not for one "but": everything here is in English. Moreover, I had a suspicion that the English here was somehow wrong, as if it were not a person who translated, but a machine.
Pros of Paragon Partition Manager 11 Free:
Cons of Paragon Partition Manager 11 Free:
Conclusion: The program works, but is somehow unpredictable. I do not recommend using this program, since there is an alternative in the form of EaseUS Partition Master Home.
This tool also deserves a mention.
We take any installation disk with Windows Vista, Windows 7, 8 or 10, start the installation of the disk, go to the partition selection and click Disk setup:

Everything seems to be simple: you need to click on the section in the list, then the action button. Unfortunately, there is little action here: delete, format, partition and expand.
You can, for example, delete a partition and use the freed space to increase the size of another partition or partitions (while selecting the necessary partitions, press the Delete and Extend buttons in turn).
Alas, a very popular operation - reducing the size of partitions - is not here. It is possible to delete a partition, then re-create a new one with a smaller partition, but, unfortunately, we will lose data in this case.
All operations take place in real time, i.e. after the button is pressed, an action occurs.
Outcome: editing partitions during Windows installation is an extremely primitive tool. It works, but performs only a limited list of actions, among which the only one that saves data is increasing (expanding) the size of the partition. If you need to install Windows and do not need to save data on partitions, then the tool will come in handy.
If suddenly you accidentally deleted a partition during Windows installation or through any program, do not despair - the partition recovery feature is included in EaseUS Partition Master Home Edition.
To recover a deleted hard drive partition, do not touch sections, immediately boot into Windows (or insert a hard drive into another computer if you have deleted the system partition and Windows cannot be loaded), then run the above program, click on the line with the word in the list Unallocated("Unassigned"), then click the button Partition Recovery.
The rest, as they say, is a matter of technique - the action wizard will tell you where to click, where to check the boxes, then restore your deleted disk.
All that is needed for this - several sections. If the hard drive already has a second partition that is visible in the " Computer"- make sure that there is at least 20 GB of free space (more is better), then during the Windows installation, simply specify this second (third, fourth, etc.) drive. After installation, you will be able to select Windows using the menu that will appear when you turn on your computer.
If you have only one disk C), I propose the simplest option: Through Disk Management give section first WITH command Compress, reducing at least 20 gigabytes (or better, more, because in addition to Windows, you will also install programs):

Right click on drive C...

After pressing the button Compress disk size C decreases, unallocated (free) space appears in the partition map:

Specify unallocated space. The partition will be created by the installer itself.
After installation, you will have two operating systems. You can make more unallocated spaces or empty disks, specify them for installation.
Thanks to reader Vladimir for bringing this topic up.
You may have noticed that in the screenshots of the Disk Management window, all partitions are marked with a blue bar. You may have sections with green stripes. What is the difference between blue and green sections?
The green bar in Disk Management is a sign of an extended (additional) partition. As I wrote above, there may be "nested" sections inside, which from the user's point of view are no different from the main (primary). Nested partitions have one feature - if you reduce their size, then due to the free space that has appeared, it will not be possible to expand the main partition just like that. You must first compress the extended partition itself (which stores free space and a reduced partition) to create free space outside of any partitions, only then you can expand the disks.
Like
Like
Partitioning a hard drive is the process of dividing a single drive into multiple logical drives. In this article, we will look at popular hard drive partitioning programs.
The Windows 7 operating system is equipped with a built-in disk partitioning utility. In order to launch it, follow the path: Start - Control Panel - System - Administrative Tools - Computer Management - Disk Management.
By launching the disk management utility, you will have access to all the necessary functions. For already existing disks, you can perform: delete, format, change letter, shrink and delete the disk. If a new, unpartitioned hard drive is connected to your computer, you will be able to partition the drive.
If the capabilities of the built-in disk partitioning utility are not enough for you, you can use third-party programs.
Wondershare Disk Manager Free
There are not so many high-quality free disk partitioning programs. One such program is Wondershare Disk Manager Free. This program allows you to create, delete, copy, and convert partitions. The program has a very simple and intuitive interface. Thanks to this, even the absence of the Russian language will not complicate the process of working with the program, even for not very experienced users. To install this program, you will have to go through a free and extremely simple registration on the manufacturer's website.

One of the most popular and well-known programs of this kind is Partition Magic from Symantec. This program can work from a boot disk, which greatly simplifies the breakdown before installing the operating system. Partition Magic supports NTFS and FAT file systems. In addition to basic operations such as creating and formatting, Partition Magic allows you to convert file systems, resize partitions, merge partitions.

Paragon Partition Manager
Paragon Partition Manager is a powerful hard drive partitioning, backup, and operating system management software. Unlike the previous program, Paragon Partition Manager has a wider range of features and functions. So, this program is one of the few that allows you to work with disks for virtual machines (MS Virtual PC, VMware Workstation, VMware Fusion and Sun VirtualBox).

Acronis Disk Manager
Acronis Disk Director is another advanced hard drive partitioning and disk management software. Acronis Disk Director consists of three parts: a disk management module, an Acronis Recovery Expert module for recovering lost data, and an Acronis OS Selector module for managing multiple operating systems. Acronis Disk Director is equipped with all the necessary features for managing disks, while the program supports all modern file operating systems.

This article explains how to create, modify or delete hard disk partitions using Windows 7.
To work with hard disk partitions in Windows 7, there is a tool called "Disk Management": Control Panel → System and Security → Administrative Tools → Computer Management → Disk Management OR Start → in the search bar enter: diskmgmt.msc and press Enter.
1. Section creation
Right-click on a free, not occupied by other partitions, place of the desired hard disk → Create a simple volume... The "Simple Volume Wizard" window will open, click the "Next" button. Then specify the size of the partition to be created, assign a drive letter, select the required file system and formatting options, once again make sure that you did everything correctly and click "Finish"
2. Partition compression
Right click on the desired section → Shrink Volume... A message box will appear asking for a place to compress, wait until the end of the survey. Then in the window that appears in the line "size of compressed space" specify the amount of free space and click "Compress"
3. Partition extension
Extend Volume... The "Extend Volume Wizard" window will appear, click the "Next" button. Then select the desired free area in the list, click "Add", then specify the size of the free space allocated to the partition, click the "Next" button, check the information and click "Finish"
4. Deleting a section
Right click on the desired section → Delete volume... Before continuing the operation, copy all the necessary files and folders to another drive, because. After deleting a volume, all data on it will be lost.
5. Change drive letter
Right click on the desired section → Change Drive Letter or Drive Path... Click on the Change button, select the desired drive letter and click OK. Next, we will take a closer look at ways to expand disks and not harm the information stored on them.
In order to divide the hard disk into partitions, you need to go to the "Start" menu → right-click on "Computer" and click on "Management".

In the window that appears, go to the "Disk Management" section.

Select the hard drive and partition you want to partition and right-click on it.

In the drop-down menu, you need to select "Shrink volume" and then select the size to which you want to reduce the existing partition. The space freed up after compression will be the new hard disk partition.

To create a new partition, you need to right-click on the free space and select "create volume". Then specify the size of the new partition and wait for the operation to complete. Sooner or later, any computer user is faced with such a problem as lack of free space on the system partition of the hard drive. This is where the question arises: How to expand C drive?
First we need to go to the "Computer Management" tab (see above).
When this tab opens, you will see in the window all the media that is currently connected to the computer. Each hard disk can be divided into several logical ones. The very first one will be "Disk 0". The space reserved by the system and the logical partitions (C, D, E, F, etc.) will be displayed on the right. If you have only one C drive and it is full, then you can try "Compress Volume" (see above). If you have several logical partitions, then go ahead.
Windows 8 provides the same tools for increasing space. Therefore, this method is also applicable on this operating system.
Partitioning a hard drive into partitions in the Windows 7 operating system is a very simple thing. You can see for yourself if you partition and create a new partition according to the described algorithm.
*MBR (Master Boot Record) in a PC is a table in the first sector of the boot disk that stores data about the physical and logical organization of the disk. If this entry is corrupted, booting the OS becomes impossible.
That's all. Thanks for reading the article. I hope it was helpful to you.
Proverbs and sayings about May HORIZONTALLY: 2. May will deceive - in ... will leave.4 ....

Popova V.N. primary school teacher MBOU "Kishertskaya secondary school" Rebus is ...

To learn how to compose and understand puzzles, you should figure out what they are from ...