INSTRUCTIONS AND PROPHECIES OF THE Blessed MOTHER ALIPIA GOLOSEEVSKY, Kyiv...


Making a children's play wigwam with your own hands is not difficult. This will require a dense fabric (for example, cloth), a fabric with a pattern for decorative finishes wigwam, 4 long, strong, but light sticks and sewing machine.
You can make a wigwam of any size, with three, four, five walls. We offer MK for manufacturing children's wigwam with 4 walls.
See another MK "Teepee that does not need to be sewn".
Materials for work:
—
4 light wooden sticks, round in cross section, 180 cm long and 4-5 cm in diameter;
—
thick cotton fabric (for example, cloth);
—
1.5 m of cotton fabric with a pattern (for decorating the entrance to the wigwam, strings and decorations);
—
tape "contact" ("Velcro");
—
3.5 m of ribbon with pom-poms for decorative trim (optional).
Pattern details:
—
3 large triangles of dense fabric (skun);
—
1 small triangle of dense fabric (skuna);
—
2 large rectangles of fabric with a pattern ("entrance" to the wigwam);
—
2 rectangles each made of fabric with a pattern measuring 12X15 cm and 12X7 cm;
Work description
Cut out three large triangles from cloth and one small triangle for the front of the tepee, then cut out two large and two small rectangles from patterned cotton.
Better than drawing triangles directly on the fabric, first make a pattern on thick paper and then transfer it to the fabric. Be careful and cut out triangles from the fabric, leaving a few centimeters for seam allowances, as well as for hem hem.

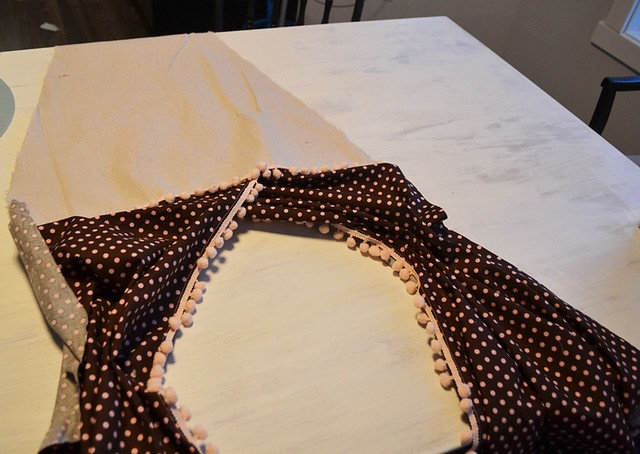
Cut out the details from the patterned fabric, fold and hem the fabric from the bottom, sew the ribbon with pom-poms on the left part from the top, right and bottom, and on the right part from the top, left and bottom. So you will issue an entrance to the wigwam.

On top of one of the large cloth triangles, place two rectangular pieces of patterned cloth right sides up. Lay the details of the fabric with the pattern with the edges decorated with braid facing each other. Trim the edges of the rectangular pieces that extend beyond the edge of the felt triangle diagonally, flush with the edges of the triangular felt piece. The rectangular details of the “entrance” to the wigwam will overlap.

Sew to each other the details of the "entrance" to the wigwam from fabric with a pattern in the place of overlap.
Tiebacks for the details of the "entrance" to the wigwam. Take 1 rectangular piece measuring 12x15 cm, fold in half lengthwise right side inward and sew first along (along the long side of the rectangle), then across only on one side. Turn the part right side out, straighten and iron. Overcast the raw edge of the part. Repeat the same steps with one more piece 12x15 and two pieces 12x7 cm. Sew 1 long piece of pickup on the right side of the left part of the “entrance” to the tepee, and sew a short piece of the pickup at the same level from the wrong side of the part of the “entrance to the tepee. Also sew the details of the pickup to the right part of the "entrance" to the wigwam. Sew pieces of Velcro tape (tape "contact") along the edges of the parts of the clamps.

A small triangle of cloth must be sewn to the details of the "entrance" to the wigwam. This triangle, if desired, can be decorated with appliqué or embroidery. AT this case such a triangle is decorated with an applique in the form of a simple circle, to which a crocheted heart is sewn.

Sew all 4 sides of the wigwam together to form a pyramid. Treat the upper edges of the details of the walls of the wigwam with overcasting, oblique trim, or fold them inside the future wigwam and sew.

The last thing to do is to sew the "covers" for the sticks, which will be the frame of the entire wigwam. To do this, you need to cut out 4 rectangular parts from dense fabric (cloth), equal to the length of the inner seam connecting the “walls” of the wigwam. Measure it with a measuring tape, turning the pieces of the wigwam sewn together inside out. The width of these parts is equal to the diameter of the sticks you have chosen for the wigwam, plus 2 cm seam allowances on each side of the “cover” part. Sew each of the four parts of the "cover" to the seams connecting the walls of the wigwam in the same way as sewing a bias trim when processing the edges of the products. How can this be done.
All that remains for you to do is insert the sticks into the "covers" and tie them on top with tape or rope. To securely fasten the structure, you can drill holes in the sticks, retreating about 20 cm from the top edge of each stick and tie them together by threading the rope through these holes.
Does your child like to build houses using chairs, stools, empty boxes, blankets in his game? And you are tired of raking the rubble of such construction every day? Then make a bright wigwam, which will not only provide your child with interesting leisure time, but also enliven the interior of the children's room.
Tepee - a domed hut of the Indians North America. Simply put, this is a hut on a frame with a chimney hole in the ceiling. It was made from thin trunks and covered with bark, branches, mats.
Making a wigwam for a child is as easy as shelling pears, and no special skill is needed, only materials, time, desire. Prepare:
Let's start building a wigwam.
You can make a removable cover for the house, but this will take more time.
With the onset of spring days, we go to the dacha, and the question always arises, what to do with the children there in order to have time to dig up, sow, whitewash? The same wigwam house will come to the rescue. Having erected it from improvised materials, you will keep the child busy and free up time for planting work.
Stretch a clothesline between the trees and hang a blanket over it. Drive in pegs with ties and fix the edges of the fabric on four sides. Throw a blanket and some pillows inside the hut. Such a building will give children many hours interesting game yes and stay on fresh air good for a growing body.


Take an ordinary sports hoop, attach a light fabric to it with pins. Tie two long twine crosswise, and fasten their ends to opposite sides circle. Tie a strong rope to a knot. Hang the resulting house from a tree branch so that the ends of the canvas reach the ground. For weight, sew heavy round pebbles to the bottom edge of the fabric, and then the wind will not inflate the walls of the wigwam. The summer residence is ready and waiting for its little owners.

If you still have flexible branches after pruning trees, start making a green hut. In the proposed parking lot, draw a circle and thickly stick the branches, intertwining them. Tie the tops of the twigs with twine in a ponytail.
And in the fall, make a frame of sticks, plant fast-growing climbing plants between the future walls of the hut. Then by the middle of summer you will get a living wigwam, where you can hide from the sun and light rain.


A wigwam is not only a toy that won't get bored. it children's space where the child will play, fantasize, dream about the future, invite their parents to visit and fall asleep in a secluded house to the quiet voice of their mother's fairy tale.
Every child wants to have his own cozy corner in which he will feel like a master. Gone are the days when such a house was made of chairs and a blanket. Modern children can play comfortably in a cozy wigwam. This design is a fabric house, similar to the dwelling of the Indians. This makes the game even more interesting and exciting. You can make a wigwam on your own if you prepare a pattern, materials and tools, as well as decide on a design.
A wigwam for children is a symbiosis of a home hut and a tent. This design immediately fell in love with the children: it is interesting, unusual and very cozy. Parents will also appreciate this addition to the interior, because the room will immediately become much more aesthetic.
Teepees first appeared in America and have since become very popular around the world. Such a house has a number of significant advantages:
There are several types of children's wigwams. All of them are based on the same manufacturing principle: you need to make a frame, sew a fabric cover and think over the design. Models may differ in shape, size and design decoration. There are five options with a photo.
This model is the most common. It has a standard wigwam shape. Additionally, the design may have accessories - matching pillows, pompoms, textile garlands, etc.
The advantage of this option is that it will fit any interior.
This model has an additional one or two windows. This will add special colors to the child's game. Can be sewn beautiful curtains and attach them so that they move. Then it will be doubly interesting for the baby to spend time in his secluded place.
Such a wigwam is made according to the same principle as classic version, only additionally you need to cut windows on the canvas.

When there is no time or talent to make a familiar wigwam, you can limit yourself to a more simplified version. On the wooden frame the fabric web is simply attached and evenly distributed, forming a wigwam.
Visually, such a model may be inferior due to its simplicity and conciseness, but it will not take much time to make it. This view will also be relevant to those children who quickly lose interest in new toys.

This design is suitable for toddlers and small children. You can enter the house through a round hole. Plus, this model is comfortable and interesting appearance. There is one significant disadvantage - over time, the child will grow up and will not be able to climb into the wigwam.

Another interesting option wigwam. It will look especially beautiful in a children's room with high ceilings. A distinctive feature of this design is that in addition to the frame, it is also attached to the ceiling with a metal chain.

Making a wigwam can be an economical business if it is rational to calculate in advance what you need to buy. Materials and tools for work are available to everyone and may even be at home with a novice designer.
For the manufacture you will need the following materials:
Of the tools, you only need scissors, a drill and a sewing machine, if you have one, to sew a cover.
In addition, you will need a little imagination, inspiration and the talent of a seamstress.

Depending on the shape of the wigwam patterns for children, they can be modified. The design can have 5, 6, 9 shelves, but the most simple and understandable for implementation will be the option of a square frame.
To rationally use the material, you need to correctly position the details of the pattern on the fabric. To do this, you must first display on paper the "walls" of the wigwam.

This pattern will make 4 pieces. The side elements should be sewn to the middle, this is how the entrance to the house is formed. The pattern implies the presence of a window and a pocket for toys and other small things. The third party will be deaf.
The next step is to make a cover pattern. You should start from the front side, where the entrance will be. Then the remaining elements are gradually stitched together and supplemented with special pockets for sticks.

Product sizes may vary. The main thing is to observe proportions and not go beyond a single idea.

When the cover pattern is drawn, it should be carefully cut out and attached to the fabric. Due to the fact that the cover has rounded shapes, it should be carefully cut out so that in the end the workpiece fits perfectly with the wooden structure.

When you first start sewing a wigwam, it is important to gain the necessary knowledge, highlight for yourself the main points, what should be avoided, and what, on the contrary, it is important not to miss.
The master class “How to sew a wigwam for children” can help with this. It will detail where to start, phased implementation work and final design touches.
You should start with the preparation of materials. All of them should be at hand. Wooden sticks, which will act as the basis of the frame, should be approximately 180 cm high. They can also be replaced with metal pipes.
Holes need to be drilled in the sticks in order to thread the cord through them. So the design will come together. It is important to lay the top correctly: the ends of the sticks should form the “cap” of the wigwam and be well pulled together.
Now you need to pay attention to the bottom of the sticks. They must be equally spaced and stable. To achieve this, you can equip the structure below with an additional frame by connecting the wooden "legs" of the wigwam with a plank.
The next step will be the creation of a fabric cover. You can use a ready-made pattern or draw it yourself. The size of the parts of the wigwam can be different. It is important to maintain proportions in order to maintain aesthetic appeal.
The cover can be one-piece or sewn from several halves. Each part of the fabric cover should have a pocket to thread the stick through. The diameter must be suitable, otherwise the stick will not enter.
All edges need to be processed, make a cut in the middle and form an entrance. "Walls" can be supplemented with a window or a pocket.
Now it is important to connect all the details and try them on each other. A mattress or blanket should be laid on the floor inside the wigwam.
The last step is decorating the house. Here you can give free rein to your imagination and come up with a lot of original ideas.
The video allows you to better understand how to make a wigwam for children with your own hands. The master will be able to pay attention to important nuances, choose the appropriate technique by comparing several videos, and evaluate the scale of the task.
There is no shortage of video materials on this issue on the Internet, so you can look at a lot of information and choose the key one for yourself.
There are many wigwam ideas for kids. It all depends on the preferences of the child and the skills of the master who will do it. There are 5 variants of the original houses.
Pompom mattresses have become very popular. Also, the baby will be very comfortable to lie on it. Such a wigwam will become a real decoration of a children's room. You can make your own pom-poms and then sew them together.

For older children, it is rational to make a wigwam with backlight. Then they will be able to read in their secluded corner, look at pictures or draw.

This type of wigwam is different from the above. Its design is based on the fact that the frame must be in limbo. So the wigwam can also become a swing. This is especially convenient when you need to rock the baby.

This option is for girls only. Would need more costs on the design, but it will be justified by the end result.

If you hide the ends of the wooden sticks in a fabric cover, and make the wigwam itself in several sections, then it will take the form of a tent.

When starting to sew a nook for your child, it is important to follow the step-by-step instructions.
The algorithm of actions on how to sew a wigwam for children with your own hands will consist of the steps indicated below.
You need to take wooden sticks with a circular cross section (4 pieces) and drill a hole in them at a distance of 30 cm from the beginning.
Pass the cord through the holes and distribute the structure evenly. It is important to pull the sticks firmly and place the "legs" steadily.

Now you should cut out the fabric cover. First you need to measure the wigwam and make a pattern.

The template can be taken from the Internet or made in-house. Now you need to cut out the blanks and transfer them to the fabric.

All edges must be stitched.

Decorating a wigwam with your own hands is very simple. You can use all the materials at hand - rhinestones, ribbons, fabric appliqué, toys, etc. The main thing is that the elements are in harmony with each other.
Can decorate children's house decorative flowers.

For boys, it is better to choose a concise style. It will never go out of fashion, therefore it will be useful for future generations.

Or make an ethnic style wigwam and decorate it appropriately.

A wigwam for a child will become a real refuge, its cozy “nest”, the first living space. It is important that he is comfortable in it, appearance did not fall out of the general style of the room, and the materials were natural and pleasant to the touch.
On the aliexpress website, I found a bunch of all sorts of cool things for the children's room. Since I decided to make it in such a rather nautical style, I needed to find elements of a nautical theme.
I "added" the whole thing to the basket, and oh horror, there were purchases for such an amount that it was even inconvenient to say. And I just looked at some kind of pillows, wooden seahorses, a decorative fishing net and something else there - in general, as my husband would say, all unnecessary garbage. Of course, I didn't buy this. But another such thing sunk into my soul, which by no means got out of my head, namely, a children's wigwam. This is a house that is placed in the children's room. The children play in it, read, in general - the dream of my childhood.
After a good search, I found several VKontakte groups that sell wigwams for children. Bright, beautiful - directly a symbol of comfort. In general, I fell in love. But the prices for those wigwams for children that I liked were frankly biting. If you take a wigwam of good bright colors and a soft mattress for it, it comes out to about 10,000 rubles. I thought about it and decided that I could quite sew such a wigwam for children myself, make it with my own hands.
I bought 4 sticks from the Metro store, 180 cm high, they were well sanded, had the right height and were great for a children's wigwam, and it's also 100% natural material Besides!
Each stick cost me 200 rubles, all 4 sticks totaled 800 rubles - not cheap for sticks, but "no hitch, no hitch".
Then it was necessary to buy fabric for a wigwam for children. The fabric needed was dense and preferably natural. I remembered that somehow my husband and I stumbled upon an assortment of different fabrics that were intended for interior solutions in IKEA. And the fabric was dense, bright - just what you need.
I made an order on the site, choosing a beautiful blue and white striped fabric for the bedspread with pillows and blue and white in ethnic style for our children's wigwam.
There are 4 meters of striped fabric on the bedspread with pillows, but we are not talking about that now.
The wigwam has 7 meters of fabric in ethnic style.
In total, materials for the wigwam, along with sticks, cost me 3,530 rubles.

To make a pattern, I made a wigwam from sticks without fabric, constructive, so to speak, and measured its sides.
Next, I drew a miniature pattern on paper.


This is how I got the pattern, as you can see, there is nothing complicated here.
Then we take cloth, crayon or pencil and draw a pattern on the fabric. Everything must be done carefully, since such a fabric allows you to cut and cut without much difficulty. For example, with a fabric for a Roman blind made of naked synthetics, I got dirty at one time and compared to it, it was a pleasure to cut a children's wigwam.
Having cut out 3 sides of our wigwam, we begin to cut the last frontal one.
In fact, everyone does it differently. Someone overlaps the floor-doors, sewing them to the upper part - a triangle. I did it differently. I just took and cut the same triangle, only half, and then sewed it with a curly stitch cross to cross.
So what's important. My sticks have a round cut with a diameter of 5cm. Therefore, I made allowances for stick covers 5 cm + 2 cm per seam, it turned out 7 cm.


I haven't gotten my hands on the flags yet. You can make decorative flags from leftover fabric and stick them on the ends of the wigwam sticks.
Well, it remains to sew a mattress inside the wigwam from the remnants.

And Everyone!
Teepees for children "came" to us from the USA, there are very common children's houses of various designs and types. if you have a desire and a sewing machine, then sewing a wigwam for children with your own hands should not be difficult for you, and this miracle of the sea will bring joy.
Click Class
Tell VK
The wigwam for children replaced the home-made tents in the children's rooms and at the same time became a decoration and a bright highlight of the room.
Did you want your own private corner as a child? Who had huts and even tents, but often the matter ended with two connected chairs covered with a blanket. And by the night, my mother asked me to remove this whole structure so that no one stumbled over it. I don’t know about you, but for me, disassembling my brainchild always evoked emotions associated with tears ... then I don’t want to build it. And then one wonderful young mother came up with the design of a children's wigwam and began to sew such houses to order. Many parents liked the prospect of a collapsible, beautiful and affordable building. Of course, there were also craftsmen who were able to make patterns themselves and assemble the whole house.
And today we will build this simple, but such a desirable structure in the nursery.
Sewing such a house yourself is very simple. The main thing is to understand the general system.
We take sticks about 180 cm in height (can be replaced with pipes). We retreat thirty centimeters from the beginning and drill all four sticks.


It is important to firmly connect the frame.

There should be the same distance between all lower ends.
For strength, you can tie an additional frame of sticks along the bottom, as in the photo. It will not be convenient to disassemble such a design, ordinary fabric holds the base and so on.


You can take your measurements, or you can use ready-made patterns, as in the photo.

The dimensions of the parts can also vary greatly, here are the standard ones.

Cutting the fabric is best done as shown in the photo.

You can make a solid side, or you can connect two parts from different material as in the diagram above.
On each part, you need to step back 5-7 cm and turn these indents inward to insert a stick into it and sew. Be sure to check if it will fit in this pocket. Everyone has a different diameter of the sticks, so you step back from the edge of your size, equal to the diameter.
There are two more options to make the fabric hold.
Sew all the details completely without allowances, and sew on a long strip to each side into which the stick will be inserted. The photo shows examples of such stripes.

Or sew on a few small stripes, as in the photo.

We process all edges. In front, we make a cut in the middle to make an entrance. Be sure to make a side window for ventilation and free access of air, especially if the fabric is very dense.

We make a fitting of sewn parts.

Put a blanket inside. Loops are sewn to its edges, into which the lower ends of the sticks are inserted.

The fabric loop can be replaced with an elastic band!
You can decorate a wigwam with sequins, appliqués, flags, beads, stickers, pompoms, a garland.

In general, let your imagination run wild.
When choosing a fabric, give preference to two types of matter that are combined with each other. Then you get a very beautiful and stylish house.

Teepees with a removable cover are easy to use: they can be disassembled if the child has lost interest in them, or you can remove the fabric and wash.
Watch the video on how to sew a wigwam with your own hands.
A wigwam may not consist of four, but of five, six or even nine sticks. But we will consider the option for a square frame.
You can sew whole sidewalls without the upper part, which was dismantled above.
On the pattern, we see how you can arrange the details on the fabric in order to save material.

Cutting the details on the fabric. Here, four details are obtained. Side cutting parts are sewn to the middle and an entrance is formed. On the pattern there is a variant with a window and a pocket for small things. One side remains blank.
Below is step by step diagram cover manufacturing.

Here the work begins with the front side, into which the zipper is sewn. Then the rest of the details are sewn, pockets for sticks are sewn to each seam.
It is always difficult to choose fabric options that will be combined with each other. So I decided to make a selection of beautiful ready-made options to make it easier for you.
The photo shows a wigwam for a boy. Stylish colors and soft pillows different forms will delight all friends and the baby himself.

A bright version of the cover, the fabric at the entrance adheres to the ribbons.

The photo below uses a decor in the form of pompoms.

A calm combination of colors attracts attention, but acts calmly. In the photo we see an open window.

Decoration of the composition with flags.
An interesting option for a princess.

INSTRUCTIONS AND PROPHECIES OF THE Blessed MOTHER ALIPIA GOLOSEEVSKY, Kyiv...

Eufillin dropper in ampoules is used to treat pathologies that ...

Among all ointments for the treatment and prevention of joint diseases, the most ...