How I got cancer. Rami Blekt Intro to number four...


Perhaps one of the most frequently asked questions from beginner photographers: "How to make a blurry background?" .
Why do we need a blurry background in the photo? First, it allows the viewer to focus on the main subject. Secondly, blurring the background can mask an unpleasant background, remove unnecessary details from the frame.
Blurring the background is a fashionable feature of mirror images. digital cameras. This is the easiest and easiest way. In order to get a blurry background, you just need to shoot at the maximum aperture.
Find the aperture designation “A” or “Av” on the camera roller and set required number aperture (depending on lens type), then aim the lens at your subject and press the shutter button. Look at the result. If the background is too blurry, then reduce the aperture value. Using ideas for a summer outdoor photo shoot, you can use various techniques to achieve this effect.
What to do if not reflex camera, but there is only a simple "soap box"? You can, of course, find out How to choose a digital camera. Here, of course, everything is much more complicated, because such cameras are already set to sharpen the background and foreground. But if there are creative shooting modes in the “soap box”, then you can try to shoot in the “portrait” or “macro” mode. These modes allow you to focus on the foreground while slightly blurring the background.
Photoshop is ours indispensable assistant in this difficult matter.
 Disk 1. Course on the basics of the program Adobe Photoshop CS3
Duration: 28 lessons - 6 hours 2 minutes
In this course, we will study the basic elements, concepts and principles of Photoshop. Together with you, we will go through all the tools, and see how each of them behaves in work, learn how to navigate in all the palettes of the program, and also safely dispose of the commands from the main menu.
After you feel confident in the theoretical base, we will move on to practical exercises, where all your imagination and creativity, thanks to the knowledge of all the tools, are finally realized in finished high-quality works!

Duration: 57 lessons - 9 hours 11 minutes
Here you will begin to apply the knowledge gained in the previous course in practice and by the end of the course you will receive about 60 finished works, if, of course, you take a responsible approach to the lessons and repeat all the actions after the author of the course.
The course included 28 lessons with a total duration of 6 hours 2 minutes.
13.08.2016 27.01.2018
Detailed lesson, instruction about blurring in Photoshop. You will learn how to create a blur of any objects and images.
Group filters blur has existed in Adobe Photoshop for a long time, even from early versions, the group includes many options for blurring - Gaussian Blur, Motion Blur, Surface Blur and many others, located this group filters in the menu Filter-Blur (filter-blur). Starting with version CS6, new blur types have appeared, with a wider range of settings, you can open a subgroup with new filters by going to the menu Blur Gallery Filter (filter-Gallery Blur).
In the lesson, we will get acquainted with the most popular type of blur and learn how to blur in Photoshop using an example.
Gaussian Blur gives a blur effect throughout the image, you can access this filter through the menu Filter-Blur-Gaussian Blur (filter-Blur-Gaussian Blur).
Let's open a photo with a girl (https://cloud.mail.ru/public/C9Q6/jDda1wyej), the background and the girl in this image have the same degree of clarity, which is why the girl is lost in the background. According to one of the rules of aerial perspective, the main object should be clearer and more contrast, then our eye will immediately catch where the main things are in the composition, and where are the secondary ones. File-Open (File open):

Duplicate the layer (ctrl + J) or double-click on the layer in Layers panel-Create a duplicate layer (Duplicate Layer). Opening the filter Gaussian Blur, Filter-Blur-Gaussian Blur (filter-Blur-Gaussian Blur). The following window will open:
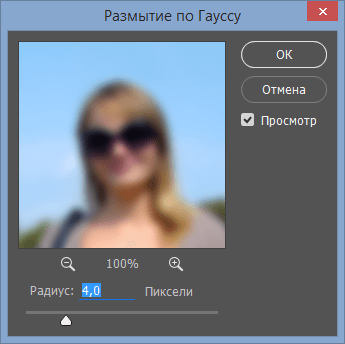
Radius Blurring directly depends on the size and resolution of the image, as well as on the desired result. Let's choose a radius in 5 pixels- so the effect will be clearly visible. For this image, this value of the blur radius is a little too much, but we chose it so that the difference was more obvious.

Add to blur layer layer mask, click on the icon layer mask in layer panel:

Choose brush tool (Brush), tool call hotkey AT(in English layout):
Colour foreground - black:
Making sure that mask layer active, delete black brush on layer mask blur with girl. If you accidentally erased the excess, change Colour tassels on white and return the removed fragment. Black color on layer mask- erases white- restores the visibility of the image.
Here's what it looks like mask layer after processing black brush:

And the image as a whole:

Usage masks layer has one negative point - a halo appears at the junction of the main object and the background, this can be easily avoided if, before blurring with stamp tool (Clone Stamp Tool) , functions Content-Aware Fill or any other tool convenient for you to clone the background at the junction with the object, inside the object itself. In the case of our photo, it looks like this (may this cute girl forgive me!):

Briefly about work tool Stamp (Clone Stamp Tool).
Tool shortcut key - S. Using the tool, you can clone parts of an image into other areas. To select a sample to transfer, click left keymice clamped keyalt, then let go alt and move a piece of the selected image to the desired area, click again left mouse button- and the piece "takes root" in a new place.
I repeat, at the junction of the object and the background, we take a sample from the background and transfer it to the object, and so on along the entire outline of the main object.
And here's what the image looks like if you blur not the original layer, but the processed one along the contour tool Stamp (Clone Stamp Tool) and then erase again layer mask blur from girl:

There is no halo, the boundaries are clear, the focus is on the girl, the background does not distract attention.
So we learned how to make a blur in Photoshop.
This Photoshop tutorial will show you how to add a blur effect to the background of a photo.
In this tutorial, we will use such a type of blur as radial or radiant. And we will apply it only to the background.
So, open your photo in photoshop:
First we need to separate the main image from the background.
1. To make the selection better use the quick mask tool (Quick Mask Mode)
Make sure the colors are set to this position black/white

Take the brush tool and start painting over the part you want to separate from the background (in our case it's the girl)


After you have completely selected the girl, click on the button to the left of the button with " quick mask" - it will return you to normal mode. You will see that there is a selection.

2. Press the combination Ctrl + J to copy the selected background to a separate layer.
The panel with layers will look like this:

3. Now apply the "radial blur" filter to the new background layer.
Filter > Blur > Radial Blur .
Install following options in the window that appears:
Amount: 20 (set this parameter at your discretion)
Method: Zoom

Once all the settings are in place, click OK to see the result!

Hello friends! 🙋🏻
The AppStore and Google Play stores are just teeming huge amount applications for every taste and color, and programs that allow are especially popular.
Not everyone has SLR cameras, and it’s not always convenient to use them, but mobile phone- always at hand. Sometimes you will take a picture or a selfie where it turned out well, but the background ruins everything. But that won't be a problem anymore! In this article, I will share with you the best, in my opinion, applications that will make even the most uncomplicated portrait irresistible - as if it was taken by a professional photographer with a cool camera. With the help of these mobile programs, you can easily and simply blur background on any photo, and add beautiful bokeh effect.
So, the applications that will be discussed below are absolute must-have for lovers of mobile photography.
Please note that some iOS apps are only designed for dual camera phones. If your phone is over old model, then immediately download the last application in the list!
Price: 299 rubles.
It is possible that bokeh technique is not a familiar word to you. However, it is an indispensable tool for creating professional portraits. Technological advances don't stand still, so you don't need a professional camera anymore and you don't need to be a Photoshop expert to create a bokeh effect. What's more, you don't even need a latest mobile phone with a super camera, because you can take a beautiful portrait with a perfect background thanks to the application Slor.
When photography lovers talk about bokeh, they mean blurry background in the picture. If you take a photo with this effect, then the focus remains only on the main element of the photo, whether it be a person or some object. Using the Portrait feature on your iPhone, you can also achieve that same bokeh effect without resorting to a professional DSLR camera, but it won't be enough to get a really cool shot. This is where the app comes in handy. Slor! This program will improve any portrait and allow you to take your mobile shooting to the next level!
When you take a photo on your iPhone in Portrait mode, the phone's camera saves not only the image itself, but also information about the distance between the objects captured in the picture. It is this information that the Slør application will take into account, which will allow you to maximize the improvement of your portraits.
If you want to make the background of the photo more blurry, then just use the slider. Move the slider on the ruler with a droplet until you get best effect. If you want to move the focus from one object to another, then just click on the desired object/face/person with your finger.
The application also has two other effects. The Macro effect gives the impression that your subject was small and you used the zoom to get closer to it. And here is the effect "Tilt", on the contrary, will "move" the main subject of the portrait "into" the photo.
Something like this blurred background effect you can achieve using the application Slor.
Price: Free, but there are in-app purchases
This is where I will end my list. mobile applications to blur the background of the photo. In case you missed something good app let me know in the comments.
Great photos for you! 📷
You can blur the background in photos in specialized graphic editors without any restrictions. But if you need to blur "on hastily”, then it is not necessary to install any additional software, since you can use online services.
Because it's not professional. software to work with graphics, here you can find various restrictions on the photo. For example, it should not be larger than any size. The online service also does not guarantee high-quality background blur. However, if there is nothing complicated in the picture, then you should not have any problems.
It should be understood that using online services, you will not be able to get the perfect background blur, most likely, those details that should be clear will also suffer. For professional image processing, it is recommended to use professional software such as .
This online service is completely in Russian, has a simple and intuitive interface. In addition to applying blur, you can add sharpness to the photo, make primitive color correction, and also use various additional tools. The site has both paid and free functionality, but most features are free. Canva requires registration or social media login.
To make adjustments to the image, use this instruction:


This service is more suitable for quickly blurring a photo and then editing it. For example, put some text or element on the background of a blurry photo. In this case, Canva will please many users with its functionality and an extensive free library of various effects, fonts, frames and other objects that can be applied.
Here, the interface is much simpler, but the functionality is also less than that of the previous service. All the features of this site are completely free, and in order to start using them you do not need to register. Croper has a fairly fast processing and loading of images even with a slow Internet connection. Changes can be seen only after clicking on the button "Apply", and this is a significant minus of the service.
Step-by-step instruction for blurring photos on this resource is as follows:

AT this case you may be able to make enough high-quality blurring of the background of a photo online. However, working in such an editor will be a little more difficult than in Photoshop, due to the lack of some selection tools, as well as editor lags when the Internet is weak. Therefore, such a resource is not suitable for professional photo processing and users without a normal connection.
The service is fully translated into Russian and, compared to the PC version of Photoshop, the interface is quite simple, making it easier for inexperienced users to work with it. All functions are free and no registration is required to work.
The instruction for use looks like this:


Many Internet users are familiar with the functional online editor Avatan, which allows you to process photos with high quality due to a large number built-in tools and settings. However, the standard version of Avatan does not have the ability to apply a blur effect, but it is available in the advanced version of the editor.
This way of applying the blur effect is remarkable in that you have full control over its application, but if you do not apply due diligence, the transitions between the subject of the photo and the background will be worked out poorly, and you may not get a beautiful result.


The final online service from our review is notable for the fact that it allows you to blur the background in photos completely automatically, and the entire conversion process will take just a few seconds.
The downside is that the result of blurring the background does not depend on you, since there are no settings at all in the online service.


The services given in this article are not the only online editors that allow you to create a blur effect, but they are the most popular, convenient and safe.
How I got cancer. Rami Blekt Intro to number four...

Luck is one of the most unpredictable phenomena in a person's life. Its impossible...

The other world is a very interesting topic that everyone thinks about at least ...