


Proverbs and sayings about May HORIZONTALLY: 2. May will deceive - in ... will leave.4 ....


In the era of new technologies, inconvenient and bulky gas and electric stoves are being replaced by completely the new kind kitchen equipment. These are cooktops. Such devices harmoniously fit into the design kitchen furniture, convenient to use. Installing the hob in the countertop with your own hands is a fairly simple process. If you have even small skills when working with a power tool, such a task is within the reach of a beginner. This can save you money on installation fees.
These kitchen appliances practically devoid of flaws. All devices can be divided into categories:
According to the material of manufacture:
In this case, the panel may different number burners and their various arrangement on the surface. At the first stage, you need to choose the most convenient and suitable device. When ordering kitchen furniture, it is necessary to think over the place of installation in the furniture in advance. It is possible that an oven will be installed with the panel. Need to think first about connecting to the network: to the gas pipe when choosing a gas panel and to the mains if an electrical device is preferred.
For installation of the electrical network in without fail provide for the cross-section of the supply cable and the power of the socket, taking into account the current consumption of the panel and the possible oven specified in the instructions. Do not forget about grounding or protective grounding of metal parts electrical appliance. After preparation, you can get to work.
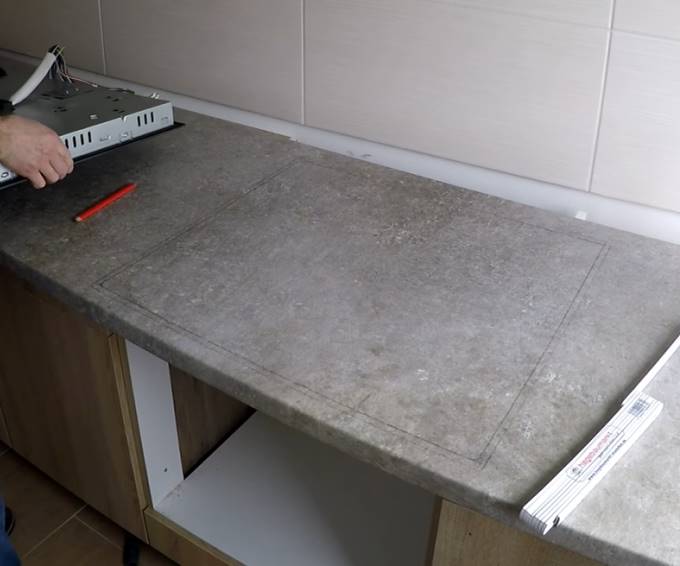
Installation hob into the countertop with your own hands - the process is simple, accessible to a beginner . First you need to prepare all necessary materials and tools. Inserting the hob into the countertop begins with sizing. Further installation depends on how correctly and accurately the markup is performed. First you need to remove from the panel all the parts that may fall out during installation (these are the protective grill, burners, regulators).
 The dimensions for the technological hole in the countertop can be specified by the manufacturer in the instructions. If not, you will have to take measurements yourself. This is not difficult. To do this, you need to turn the panel over and take its dimensions, given that it should lie on the countertop around the entire perimeter. For convenience, you can make a template by cutting it out of a piece of cardboard according to the respective sizes. Then transfer the dimensions to the countertop using a long ruler, a square, or a prepared template. With maximum precision, to avoid curvature, draw a contour on the table top with a pencil or marker.
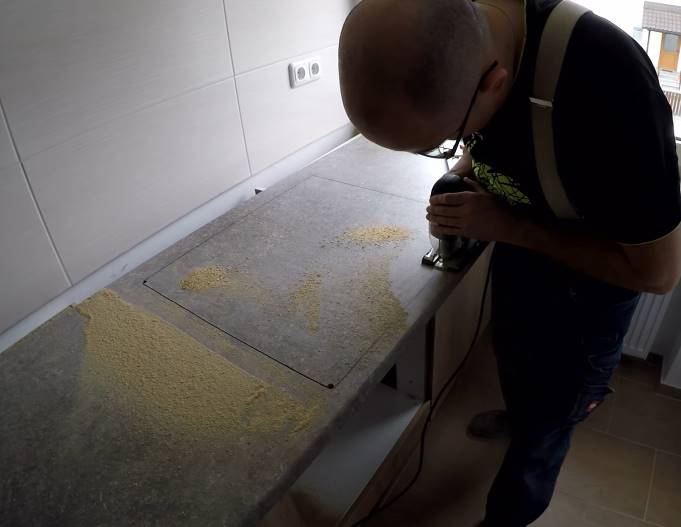
 After making sure that the markup is correct, you can proceed to cut the hole. Using a drill with a diameter greater than the width of the saw blade of the used jigsaw by 2 mm, drill 4 holes inside corners drawn outline. Insert the jigsaw blade into one of the holes and make a cutout in the countertop along the entire contour. To prevent large chips, you need to use a file with fine teeth or manual frezer.
Try on the panel to be installed into the resulting niche, align it. See from the side that everything is done smoothly. If everything is done correctly, proceed to the next the stage of cutting into the countertop. Now process the cut points sandpaper, file, rasp. If the worktop used is made of wood, be sure to exclude the possibility of moisture penetration. To do this, carefully treat the cut point with a moisture-proof material:
If the tabletop is made of plastic materials, such processing can be skipped. Plastic will not swell and swell from the presence of moisture. Can be covered in several layers for reliability. After the last layer has dried, glue the cut with a self-adhesive sealant. Preparation completed. You can do the installation.
 Installing the hob in the prepared window is not difficult. To do this, lower the panel into the hole. Using a measuring tool, align its position. After making sure that it is correct, fix it from below with special brackets and self-tapping screws to the countertop. Staples and self-tapping screws are supplied by the manufacturer as a set. It would be useful to use a seal around the perimeter of the installed device. Such a step will also prevent debris and moisture from getting under the surface to be installed. Usually, it comes with the product.
It remains to install in place all the previously removed parts and proceed to connect the energy carrier. If the panel is gas - it must be cut into the gas line. If an electrical one was installed, then it is correct to connect it to a previously prepared electrical network. It remains only to test it in work and use it comfortably. How to properly install the hob, you can see on the video.
Do-it-yourself installation of a hob is a test of strength for both a beginner and a seasoned master. The hob is an alternative to the overall kitchen stove. It performs the same functions, but takes less space. Today we figure out how not to go crazy during the installation process.
As a rule, the product is mounted above the oven. A hole of suitable dimensions is made in the countertop and the device is placed on top. When every meter counts, can they be installed above the dishwasher or without a countertop?
The panel can be:
Each of them can be:
The first include appliances that can only function in combination with an oven.
The control is carried out using a panel mounted on the cabinet - very rarely it is located on the hob.
IMPORTANT! Not all hobs and ovens can be used together. Sometimes even products from the same manufacturer are incompatible.
The second includes hobs, which require their own control panel. They are completely independent from the oven: this means complete comfort and placement in any corner of the kitchen.
This allows them to be placed separately, as opposed to being dependent.
Popular brands
The principle of installation from different manufacturers remains the same. Below we list the brands that will not let you down.
Model Description Electrolux EHG 96341 FK
Material: glass ceramic. Dimensions: 59 x 52 cm. Rated power: 6.6 kW. Material: glass ceramic. Dimensions: 60 x 51 cm. Rated power: 7.2 kW. Material: strained glass. Dimensions: 10.2 x 73.3 x 50 cm. Rated power: 5.9 kW. Material: glass ceramic. Dimensions: 60 x 51 cm. Rated power: 6 kW. Material: glass ceramic. Dimensions: 59.5 x 51 cm. Rated power: 6.8 kW. Material: glass ceramic. Dimensions: 59 x 52 cm. Rated power: 6.5 kW. Material: glass ceramic. Dimensions: 58.3 x 51.3 cm. Rated power: 7.6 kW. Midea MC-HF602 Material: glass ceramic. Dimensions: 59.0 x 52.0 x 5.5 cm. Rated power: 6 kW. Proper installation: steps
electrical panel
Models with electric ignition made of glass ceramics delight with convenience. If the assembly is good, then the product will not require repair for a long time. However, if the surface breaks, detachment will be as simple as possible. It is quite possible to remove the electric cooker yourself and take it in for repair.
Let's start embedding. General algorithm:
- Place the electrical panel on the countertop, turn over and connect according to the diagram. For convenience, manufacturers place instructions on the back of the product. Connection requires care - in the event of an error, control of the burners and the heating temperature will be impossible.
- After that, you can turn the panel over and mount it in the hole. Check the operation of the inclusion and heating. The panel is completely ready to work.
The installation process on your own is not difficult. Especially for those who have ever done repairs or performed construction works. Detailed algorithm:
Step 1 - We mark on the countertop the place where the hob will be located
- Determine the dimensions. Please read the instructions before installation. It has a schematic drawing showing the dimensions of the installation and how to properly install the panel. This speeds up the process and minimizes possible mistakes during measurements and installation.
- Measurements can be made independently. To do this, you need to turn the panel with the back side and, using a tape measure, measure the necessary parameters. Be careful: the installation depth is determined by the installation site.
- Decide on indents. The instructions indicate the minimum indentation from the edges of the countertop, so we do not recommend making them smaller. This can cause damage to the edge and require repair. You can only increase the size.
- Make markings on the countertop based on the measurements of the hob. To make installation accurate and easy, make sure the markings are stable. If you draw it with chalk, the lines will be erased, and this will create inconvenience during installation. We recommend sticking strips of paper tape, and already mark it on it.
- Make a cut. At this stage, you need to drill a hole in the place where the cutout will begin. Using an electric jigsaw, cut along the contour upper part countertops. For a smooth cut, use a sharp file with fine teeth. Ideally, it is recommended to use a manual milling cutter, and rounding off the corners should be done with a milling cutter. In this case, the cuts need to be polished. After the procedure, sawdust is formed, which is better to immediately collect with a vacuum cleaner.
- Try on the hob. Check the cutout and try on the panel. This will make sure that you can proceed to the next steps.
Sawing a hole
For installation, you will need an electric drill and a jigsaw. If they are not, then you will have to purchase or rent, because you cannot do without them.
IMPORTANT! The structure of the glass-ceramic surface is quite fragile, therefore, during installation, you need to be as careful and attentive as possible, as well as objectively assess whether it is worth doing the installation yourself or is it better to hand it over experienced craftsmen. If you still decide to do everything with your own hands, then move on.
When buying a hob, it will be convenient to make an individual order for the manufacture of furniture in parallel. You can simply tell the furniture makers the measurements of the device and they will make the cutout themselves. This is the simplest and convenient way installation (then you can immediately go to the point of sealing / sealing).
Step 2 - Cut a Hole in the Countertop Step 4 - Place the Panel on the HoleSealing and proper sealing
To extend operational period countertops and protect it from premature wear, you must use silicone sealant or nitrolac. This treatment prevents the ingress of moisture and dirt. Self-adhesive sealant (sealing tape) is also perfect for these purposes.
It is glued on top so that the edges of the built-in model lie on it. Aluminum tape is one alternative for sealing and sealing. This the best way, as it protects the countertop from temperature extremes. Thanks to a high-quality seal, the product will last for many years without repair.
Step 7 - Connect the hob to the gas pipe. Depending on the type of built-in panel, the connection method changes.gas hob
The instructions contain information on how the product is attached. Place the panel on the countertop, align it with the edge, then secure. As a rule, special brackets are included in the kit, with the help of which fastening is made. Then turn on electrical wire into an outlet.
It remains only to connect the gas. First turn off the gas, and then connect the hob to the pipe using a flexible hose. Equip the nuts with paronite gaskets. You can turn on the gas. Make sure there are no leaky areas at the connection points. To test this, lather them with soap. There is no leak if the foam is not bubbling and vice versa.
In the presence of gas analyzer you can use it.
Socket for the hob: where to install?
Before installing the equipment, it is better to move the outlet under the countertop. This will provide maximum usability and add aesthetics. appearance- neither the socket nor the plug will be noticeable. It is also necessary to make a hole through which the wire will pass on the way to the electrical network.
IMPORTANT! If nevertheless marked out under the hob and oven, it is recommended to get a hood.
Step 9 - This is what the installed hob looks like
Installing the hob in the countertop: 6 steps
You can install the hob yourself if you first read the instructions Many years ago, kitchen sets did not represent the possibility of mounting a hob in them. Today, this is a common phenomenon, which saves space in the kitchen, and also makes cooking more convenient and comfortable. Installing the hob in the countertop can be done independently. The main thing is to correctly determine the sequence of actions and follow it. It is very important to correctly determine the size of the future opening.
Modern technologies do not stand still. Today it has become possible to integrate hobs into kitchen sets, which qualitatively affects the interior of the kitchen and its functionality. Inserting the hob does not take much time.
You can read more about the features of electric hobs in the article “3 types of hob”.
First of all, on the countertop, you need to make a markup that will fit the size of the hob.
Next to each side of the niche, you need to drill a hole, the diameter of each should be from 8 to 10 mm. The next step is to cut out the niche and treat it internally with silicone. The tabletop is installed on the lower level of the headset. The inside of the panel is attached with double-sided tape or a little plasticine. The tabletop is covered with silicone.
 In order to properly install the hob, you should follow the step-by-step instructions
Step by step installation:
The inside of the cut is treated with silicone. After installing the panel, you can additionally coat it with silicone from the outside. This is done in order to create an additional hydro-barrier, since the fasteners may not be pressed against the countertop enough.
The gas hob must be chosen very responsibly, because it should last for many years. After the choice is made, the panel must be installed so that it is convenient and safe to use. You can embed the panel yourself, but you should not do this if you are not confident in your abilities. In any case, you can contact a specialist for help.
When installing it yourself, it is important to prepare all the necessary materials: panel, measuring instruments, pencils, sealant, adjustable wrench, saw, gas winding, steel hose.
All work related to gas is unsafe to carry out. It is best to perform the installation together with a wizard or someone who thoroughly knows the entire installation process. One of the most milestones settings - hose selection.
 If you need to install a gas hob, it is better to seek help from specialists
Hose Selection Tips:
When installing the panel, the calculation of dimensions must be given Special attention. Sometimes in the kit for the hob you can find a template that you need to use in order to properly saw through the countertop. It is important to remember that water should not get on the surface of the panel. The gas countertop must be placed at a safe distance from furniture and textiles.
Built-in electric stove handy device for installation in the kitchen. It works just as efficiently as a stationary stove, but does not take up as much space. Installing such a panel can be quick and easy, without resorting to the help of specialists. The surface can be combined with an oven, which will make cooking even more convenient.
If the master conducts self repair not the first time, then installing the hob will not cause difficulties.
Before installing the panel, you need to properly cut a hole in the countertop. To facilitate the installation work, manufacturers indicate required dimensions in the instructions for the device. Pre-marking greatly simplifies and speeds up the installation process.
 Before installing the hob, special markings must be made on the countertop
Installation steps:
The electric tabletop is connected, focusing on the diagram. It can be found on the back of the panel. It is important to connect the wires correctly in order to be able to control the activation of the burners and their temperature.
The installation process of the hob is simple, but requires careful preparation. First of all, it’s tedious to choose the right hob, check its passport data, prepare the tools and decide on the installation location. The installation of a gas and electric hob is practically the same.
You need to mount the panel on the countertop, in which you need to make the appropriate cutout.
It should be noted that in order to install electrical panel need more installation electrical outlet. For a gas panel, care must be taken to carry out gas communication. The built-in panel must be installed so that the maximum gap between it and the worktop is 1-2 mm.
 When installing the hob, special attention will need to be paid to attaching it to the countertop.
What to look for:
It is important to remember that the mortise panel should not enter the gap with force. If there is a backlash, the location of the countertop must be aligned, focusing on the front edge. Fastening the seal over the entire surface of the countertop will avoid contamination of the panel.
The sealing gasket must be attached to the hob. If the panel is removed after some time of use, you will notice that the seal will be covered in dirt and grease. The gasket needs to be replaced from time to time.
If there is a gap between the panel and the countertop, then the plate can be fixed in the plane, but this must be done so that debris does not fall into the vertical gap.
You can buy a special tape, or you can use a glass seal. The table and cutout can be pretreated with a transparent sealant. Sealant residues must be wiped off or carefully removed with a spatula.
 Many prefer to use sealing tape because it is safe and environmentally friendly.
Benefits of sealing tape:
Bosch seals are known for their high quality. Just placing a panel is not enough. It must be protected from moisture, grease and debris. If the panel is installed in a large opening, and a gap is formed, then the tape and the treatment of gaps with sealant will help save the situation.
The built-in hob is a convenient device that saves space in the kitchen and provides comfortable cooking. The rules for installing the panel are simple, so you can install it yourself. It is possible to embed a panel qualitatively only when the dimensions of the panel are measured correctly. After cutting a hole in the countertop, it must be well treated with sealant to protect the panel from water and dirt. All actions should be phased and coordinated.
Similar content


Idea self installation the hob can be somewhat intimidating. After all, you will have to deal with either electricity or gas and at the same time work with fairly expensive kitchen equipment. However, none of the steps for installing a hob are particularly difficult. It just needs to be done carefully and correct sequence from the very beginning to the end.
Remove the old hob, if any. If you are replacing an old hob, you will need to remove it first. Turn off the electricity in the distribution box. Remove any attachments from the hob and clean off any sealant. Disconnect the wires, remembering how the old hob was connected, and remove the hob from the hole it sat in.
Make sure you have enough space in the location you have chosen for the hob. Ideally, you should have a gap of 76 cm above the hob, and on the sides of it there should be about 30-60 cm of free space. You should also make sure that there is enough space under the worktop to accommodate your new model hob.
Make sure that there is a junction box near the place you have chosen to connect the hob to the mains. Most electric hobs require a direct connection to the mains through a 220V junction box. If you are replacing a hobs, you probably already have a junction box.
Measure the dimensions of the hob and make sure it fits into the old hole. If you are replacing a hob, the countertop should already have a hole, and you just need to make sure it fits the new hob.
Adjust the hole for the hob so that it can fit into it. The hole should be on each side 1.5-2.5 cm smaller than the dimensions of the hob. If you do not already have a hole for the hob, or it is too small, then you will need to cut it along the right size. If the existing hole is too large, then sheets of metal can be screwed on the sides to reduce it.
Remove all removable parts from the hob to make it easier for you to put it back in place. The hob may have removable burners, protective screens and other parts that should be temporarily put aside. You also need to remember to remove all packaging materials from the hob.
Install clamps. They are designed to fix the hob. You should hang them from the top edge of the slot and then screw them on.
Lower the hob into the hole. Lower the new hob into the hole, remembering to put the wires through it first. Press down on the hob until you hear the locking clips click.
Connect the wires of the hob to the mains. Electricity must still be turned off when you do this so as not to get an electric shock. Connect the hob wires to the corresponding wires in the junction box.
Install the previously removed detachable parts on the hob. Replace the burners, protective screens and other removable parts.
Turn on the electricity and check the operation of the hob. Turn on the power supply to the hob to check that everything is working properly.
Open all hotplates for a few minutes. Even though you have turned off the gas, there may still be gas in the hose. Open all burners to release the gas. Don't set it on fire. All the gas will come out in a few minutes.
Disconnect the flexible gas supply hose from the fixed gas line using two wrenches. Take one wrench and install it on the hose nut, and the second wrench on the fixed gas line nut.
Remove all removable parts from the hob. Remove burners, protective screens and other removable parts before moving on. This will make it easier to move the hob.
Remove the clips holding the existing hob in place. Unscrew the clips from the underside of the old hob.
Push the hob from below to lift it up. Remove the hob from the countertop and put it in a safe place. Don't forget that the gas hose is still attached to it.
Disconnect the gas hose from the old hob. If you will be using the old gas hose to connect the new hob, you will need to disconnect it from the old hob. Use two wrenches for this, one on the hob and one on the hose nut.
Connect the gas hose to the new hob. Use a gas joint sealant by applying it to the threads at the junction of the hose and the hob. Apply sealant generously to the threads, but be careful not to get it inside the hose. Screw the nut with a wrench gas hose to the hob.
Place the new hob in its place. Carefully lower the hob into the opening so as not to damage any of the connections at the bottom of the hob. Before lowering the hob into the opening, you must lead the gas hose forward into it.
Connect the gas hose to the fixed gas pipe. Apply sealant to fitting threads gas pipe. Then spin wrench gas hose nut. Be sure to tighten the nut tightly.
Prepare a soapy solution. Prepare a solution of 1 part dish soap and 1 part water to check for possible gas leaks. Stir the solution thoroughly and then either spray it on the gas connections or apply with a brush. Turn on the gas supply valve by placing it in a position in which its handle indicates the direction of gas supply.
Turn on the burners and check their operation. If the soapy water test reveals no leaks, try lighting the burners. It may take a few seconds for the gas to come up and ignite, because normal air must first exit the hose.
Attach the hob mounting brackets to the worktop. When you are sure that the hob is working, attach it with mounting brackets to the countertop. Your hob is now fully installed.
Get a hob when you want to have a separate oven and hob. Cooktops are very convenient when they need to be installed on free-standing islands. Also, separate hobs are required when you want to have a built-in oven (which is more convenient than a conventional gas stove with an oven).
An integral attribute of the kitchen is a gas stove, behind which ideal A husband is standing and preparing breakfast for his wife. Increasingly popular are not classic gas or electric stoves, but hobs. Their convenience lies in their compactness and the possibility of a separate installation of the oven. But their installation on the countertop will make an inexperienced craftsman sweat. Is it possible to fix such a module on my own and what is needed for this? About it we will talk in the article.
All cooking surfaces can be divided into two large groups. The power source unites these groups, its role can be played by:

In appearance, hobs that are connected to the gas line are practically no different from ordinary stoves. An option for such modules may be an automatic start system, which may be self-contained or dependent on electricity. In the first case, it is represented by a piezoelectric element, which delivers a spark at the right time. Burners on gas surfaces may vary in size for greater ease of use.

Electric hobs can be of two types:

In a classic hob, the role of a burner is performed by a heating element or another a heating element. Such a module is cheaper and does not differ in particular profitability. Induction hobs are everyone's dream modern hostess. The essence of the operation of the product is to heat the product due to electromagnetic field. At the same time, if you put your hand on a working burner, you will not feel anything. For the normal functioning of the product, a metal pan with a thick bottom is required. In this case, the material from which the dishes are made must necessarily be magnetized. The installation process for each of these surfaces is very similar. The difference lies only in the need to connect the gas hose for the first version of the stove.

The whole installation process does not take much time and requires a tool that you may already have in your arsenal home master. The main tools include:
Additionally, you may need a level or a long metal ruler to make it easier to draw straight lines.

If we are talking about a hob that is powered by an electrical network, then preparatory stage will be in the power supply. The average power consumption of such modules is within 3.2 kW. This means that a regular but good outlet will suffice for connection. If the outlet was not installed in advance, then you can purchase an overhead version, since it will be easier to mount it and will not be needed additional tool in the form of a puncher or drill with a crown. The cable for such an outlet must go directly from the switchboard.

Such a step is being taken in order to provide such a powerful device with a separate circuit breaker who would control his work. The rated current for which the machine must be designed is 16 amperes. The best solution there will be an installation of a differential machine that is able to catch the slightest leaks. The socket is mounted slightly below the countertop. This is done not for greater ease of connection, but so that moisture and fats do not get on it when cooking. The outlet must be grounded in case of a short circuit.
Note! It is worth noting that a standard outlet can withstand a load of 3.5 kW and a current of 16 amperes.
An important step during the installation of the hob in the countertop is the markup. Usually the manufacturer technical documentation, which comes with the hob, indicates what the dimensions of the installation hole should be. One option would be to make a cardboard swatch that can be used to draw the outline of the future hole. There is another option, how you can markup, it is visible in the photo below.

It is necessary to place the hob on the countertop, but turn it upside down. She will be a model. It must be located in the place where direct installation will be carried out. The photo clearly shows that it is important to make a small gap from the edge of the countertop to the hob. Usually it is about 5 cm. It is done so that the edge of the cooking surface is not damaged from constant interaction with it.

The next step, as shown in the photo, is to apply the markup. To do this, the hob is simply outlined in a circle with a pencil. The lines must be accurate so that they do not have to be redrawn several times, because this will only confuse them later.

The photo shows that the hob has a small protrusion, thanks to which it is fixed in the hole. This protrusion has a certain size that must be taken into account. It is also important to mark it on the contour of the future hole, as shown in the photo below.
In this case, it is necessary to make a small gap. If the protrusion has a length of 15 mm, then the size of the hob must be deviated from the main line by only 10 mm. A gap of 5 mm is required to ensure that the hob can be easily installed in the prepared hole.

After marking for the hob, it is necessary to prepare holes to make it easier to cut out the necessary part. Holes are drilled with a drill or screwdriver at four corners. In this case, it is necessary to ensure that the drill does not cause damage to the facade or other elements. kitchen set. The diameter of the drill should be such that the nail file freely enters the hole.

To continue the process of mounting the hob, you will need a jigsaw. His file is inserted into the prepared hole and the cut is made. It is important to remember that it is necessary to cut along the inner, and not along the outer line. If a mistake is made, then the surface will simply fall into the hole without fixation.
In the process of work, it is necessary to remove sawdust in a timely manner so that they do not overlap the cutting line, since you can easily get off it and damage the countertop. During the cut, it is necessary to ensure that the nail file does not damage the walls of the cabinets or their surface. Before going through the last side, it is necessary to give the tabletop sufficient support so that the nail file does not bite, and also so that part of the tabletop does not fall on the leg.

After the hole is ready, you can try on the hob to make sure it fits the way you want it to.

The process does not end there. The tabletop is most often made of chipboard. If moisture gets on it, it swells and deforms. When cooking on the hob, this scenario is inevitable, so it is important to protect the place that has lost the laminated layer. To do this, a special sealant is applied to it, which is used when installing panels. It also acts as a fixing basis for the entire structure. The layer should be sufficient to cover all places accessible to moisture.

An adhesive-sealant is applied to the reverse side of the hob rim, which additionally fixes the product on the countertop. After that, the panel is inserted into its place and gently pressed down until contact with the surface of the countertop is felt. The sealant that has come out must be removed immediately, because after drying it will be more difficult to do. It is important to check that the abutment is the same on the entire surface. If this is not done, then under pressure from a heavy pan, the glass may burst.
Advice! If the hob is glass, then it is important to be careful when applying pressure so that it does not burst.
This fixation does not end there. Special metal plates are supplied with the surface, as seen in the photo above. They must be screwed in such a way that they provide a stop and prevent the panel from rising above the worktop. You can watch a video on installing the hob below.

Upon completion of the installation process, you can proceed to the connection of the electrical part. Most often, hobs are supplied in a single-phase version, but they can also be three-phase, which will be useful if three phases come to a house or apartment. Usually the hob has a built-in power cable. But if it is not, then you will need to buy it separately. To connect, you need a wire marked PVA 3 × 4. Each strand of this cable is rated for a rated continuous load of 8 kW.

This is necessary for a small margin, which will prevent overheating of the conductor. The wires are stripped from both sides. A plug is mounted on one, which in terms of current strength must correspond to that specified for the hob. If this is not observed, then it can simply melt. The wire is non-monolithic, so you will need to crimp the cores with tips. Near the terminal block, where the connection to the hob will be made, markings are usually applied.

The Latin letter L indicates the cable through which the phase comes, the letter N indicates zero, maybe the third letter E, which indicates the place where the ground wire is connected. Most often, instead of the third letter, a drawing is applied that indicates grounding. It is important to firmly fix each core that is crimped with a lug with a bolt. The service life will depend on the quality of the contact. If an oven will be installed under the hob, then a separate outlet must be provided for it. general power consumption of the surface and the cabinet is two times higher than that allowed for a single-phase socket.
As you can see, the installation of the surface can be done independently without significant skills. During operation, all precautions and safety precautions must be observed. During drilling and operation electric jigsaw Safety goggles must be worn on the eyes to protect against flying sawdust. During the installation of the socket and the connection of the electrical part, it is necessary to use tools that have dielectric handles that protect against breakdown electric shock. Before starting work, it is necessary to de-energize the machine, which is attached to the prepared wire in the kitchen.
Proverbs and sayings about May HORIZONTALLY: 2. May will deceive - in ... will leave.4 ....

Popova V.N. primary school teacher MBOU "Kishertskaya secondary school" Rebus is ...

To learn how to compose and understand puzzles, you should figure out what they are from ...