INSTRUCTIONS AND PROPHECIES OF THE Blessed MOTHER ALIPIA GOLOSEEVSKY, Kyiv...


With the advent of the new calendar year every lover of growing vegetables on own garden again preoccupied with the search for containers for sowing. Almost all gardeners have abandoned the habit of growing seedlings on the windowsill in bulky wooden boxes- they are too inconvenient when transporting to the country. In addition, the tender young seedlings have time to grow into the roots of neighboring plants. The optimal solution in the choice of containers for sowing is a glass for seedlings.
Of course production technologies do not stand still, and every hypermarket that respects its customers keeps in its assortment a convenient container for peat seedlings, which not only does not harm root system of a young plant, but also simply dissolves in the soil. Why build your own cups when you can buy ready-made ones? The answer to this question is extremely simple. Experienced gardeners are accustomed to planting more than a dozen and even more than one hundred seeds of various vegetable and flower crops. Can you imagine how much it will take to invest in order to stock up on containers for all the seeds? Therefore, we will save and make peat cups for seedlings on our own. In the meantime, let's determine if there are any improvised materials that could become a container for seedlings.
Even during the winter, gardeners collect plastic bottles, juice boxes, milk bags, and sour cream containers. Literally everything is used: from paper to a dense greenhouse film. And the fantasy of gardeners knows no bounds. The film is sewn together with threads, chopped off with a stapler, wound in several layers. There is another simplest way to design containers. Two-liter bottles of drinks are cut at the right height and turned into a container for planting. Plastic cups for seedlings, made in such a way in a simple way, have one small minus. Nevertheless, when transplanting, the root system will have to be disturbed a little. Painlessly, only the excavation of those plants that, during the time spent on the windowsill, did not have time to acquire long and strong roots, occurs.
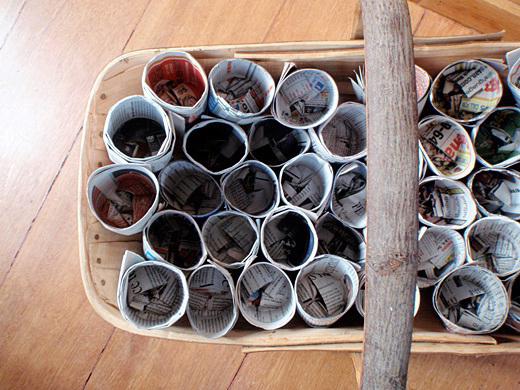
Some plants are so capricious that they do not withstand transplantation, they get sick for a long time and do not take root well. As a result, while the seedling is acclimatizing in a new place, the precious time allotted for growth will be lost. Therefore, we will make cups for seedlings from paper. During the winter, you can collect unnecessary newspapers. Pressed pulp obtained from recycled materials is used for printing publications. It will easily rot in the garden, serving as food for omnivores.
We cut the newspapers into pieces of 10x30 cm. Newspaper sheets are quite thin, and in order for the process to go faster, you can fold them in half or three times. We take an ordinary glass and wrap it with the resulting blanks in several layers. We leave a small protrusion, which will later be needed to form the bottom. Now we dip the bottom edge of the paper in a small amount of glue and wrinkle it well, forming the bottom and fixing it tightly at the bottom of the glass. We press down the newspaper blank with a glass and let the glue dry. We repeat this simple manipulation as many times as we plan to receive blanks. Paper cups for seedlings are ready! Now they can be put away in the pantry until the sowing time.

If we are not sure about the density of newspaper sheets, then we can use a more sophisticated technology for manufacturing a landing container. A peat cup will bring even more benefits to a painlessly transplanted plant. After all, it, dissolving in the soil, actually becomes good fertilizer. You can make peat containers under your own order. We will determine the right dimensions cups and fit a conical steel billet under them. We take into account the fact that in order to obtain an earlier harvest, it is necessary to sow the seeds in a spacious spacious container. The root system will develop well in it, the transplant will be painless, and the plant will immediately be able to proceed to fruiting.
To make a peat cup for seedlings, we need:
Having found all the components of the form for the design of future cups, we proceed to the manufacture of a peat base. We will need the following proportions: 50% peat, 40% cow manure and 10% black soil. Instead of black soil, you can use any other fatty soil. Mix well and add azotobacterin, phosphorobacterin and water to the composition. The mixture should be quite thick in consistency.
To begin with, we lower a circle with a pin to the bottom of the steel glass and fill it with the prepared peat mixture to a thickness of 2 cm. We thoroughly tamp the future bottom with a blank. Now, without removing it, we will fill the solution along the edges, filling the entire gap between the steel glass and the blank. A glass for seedlings will not dry out if the mixture is immediately carefully tamped when pouring. The blank can be immediately removed as soon as the peat composition fills the voids up to the very top. It is not scary if the liner is difficult to remove, it can be slightly rocked from side to side. Now it remains to carefully pull the rod and remove the finished glass.

Not all peat cups for seedlings are of perfect quality the first time. Sometimes home-made containers are able to disintegrate and dry out - perhaps the point is the insufficient density of the mixture. Sometimes too dense and hard products are obtained, which are difficult to dissolve in the ground during planting. The necessary skill and flair will definitely come, even if it requires multiple repetitions.

To make a container with a height of 10 cm and a diameter of 7 cm, you will need a piece of dense film measuring 33x15 cm. We find or cut out a rectangular bar to fit the size of the future cup. In two faces of the bar responsible for the bottom, we make grooves in such a way that a stapler is placed in them. We cut polyethylene blanks and proceed to the design of the landing container. Then we wrap the blank from the film around and fix it with a stapler and 5 staples. With two of them from above and below we fix the side face, and with the rest we form the bottom, folding the ends of the film with an envelope. It's okay if more staples go to the bottom. In this way, cups of various sizes can be modeled.

We learned a lot about how to make seedling cups. Of course, peat or paper containers are seen best solution compared to homemade polyethylene glasses. The idea of planting plants in the ground along with a natural glass that dissolves with water in the soil was revolutionary at one time. But it is up to gardeners to decide which of the presented methods for making containers for seedlings is the most acceptable for them. After all, not everyone will be able to find steel blanks for peat cups, and not everyone will have enough time and patience for painstaking work with glue and paper. Therefore, the manufacture of cups for seedlings is a purely individual matter.
Perhaps you will use the proven method and sow the seeds in disposable plastic containers, besides, they perfectly show the condition of the root system and the degree of soil shedding. Also, this container can be used multiple times. Whatever container you choose for sowing seeds, we wish you a rich harvest!
Tanks intended for growing seedlings are presented by manufacturers in huge assortment. But why spend money if you can use the containers that we usually throw away. Today we’ll talk about how to make cups for seedlings yourself.
Disposable plastic cups
They are ideal for growing seedlings. The main thing is to provide drainage so that the water does not stagnate. To do this, it is enough to make several punctures in the bottom of the container with a thick needle. It is also important to consider the needs of the plant's root system.
Cans
Cans of beer and lemonade - another one good option. Just carefully cut off the top and make drainage holes in the bottom. In order not to cut yourself during transplantation, process the edges with sandpaper.
Milk or juice bags

Containers lined with foil are best.
-
Take the box and cut it around the perimeter on three sides. Fold back the top. In this case, a kind of box with a reflective surface will turn out. The foil will reflect Sun rays transferring heat to young plants.
-
You will need two-liter bags. Cut off about ¼ of the entire height. In such a container, the plant will develop very quickly.
-
Take a milk or juice carton. The volume does not matter (small ones will not work) and again make a “box” out of it. Fill the ground for seedlings, and with the help of the side part cut into strips, divide it into small squares. Plant one plant in each, deepening them into the ground. Later, as it develops, the root system will braid the earth. And the plant is very easy to transplant without damaging the fragile roots.
Soda bottles
Plastic bottles from under any drinks should also not be thrown away.
-
In small containers, a little more than 1/4 of the entire height is cut off, and drainage holes are made in the bottom. So excess water can flow into the pan. After the time comes to plant the plant in a permanent place, the cup is simply carefully removed.
-
But 6 -liter bottles cut lengthwise. It is best to use rectangular canisters. The resulting containers can be used both for growing seedlings and for transplanting plants that already need picking.
Next consumable- plastic containers. Here you can use cake lids, ice cream cups or sour cream. They are used as separate containers for plants.
-
Small containers can be used for planting small seeds, or growing seedlings until picking.
-
In deep, if you follow the recommendations, you can grow plants until planting in a permanent place.
The cake lid can be used as a cover. So you get a homemade mini greenhouse.
Toilet paper cups
Enough interesting solution. You will need:
-
toilet paper roll;
-
plastic cup;
-
spray;
-
scotch.
Wrap the glass with several layers of toilet paper. The more, the denser the container will be.
Then we move the paper down, about 4 cm, and carefully moisten it with water. After that, manually form the bottom of the glass and leave it to dry completely.
After that, we fix the bottom with adhesive tape.
shoe box
If the inner surface is covered with polyethylene, then the container can serve for:
-
germination of dahlia tubers;
-
planting plants that subsequently do not need picking.
In addition, it can simply serve as a container for plastic cups.
Plastic bottle pots
We have already considered options for their use. But in this case, you will get square containers.
-
Cut out the central part of the bottle (the neck and bottom go to waste).
-
We fold the resulting cylinder twice so that it looks like a box without a bottom.
-
The next step - on each side we make cuts in depth equal to ½ of its length and fold the box.
As you can see, a little imagination and patience, and seedling containers will be ready.
TaggedEvery real summer resident knows that good harvest starts with seeds and seedlings.
We plant seedlings, dive and transplant into separate containers. We can plant in peat pots, plastic containers or newfangled peat tablets.
And we can also make pots for seedlings with our own hands and make them as many as you need in quantity. Fascinating gardeners are able to fill literally everything with green sprouts, you can’t stock up on any purchased containers.

The original way of growing seedlings in used tea bags can compete in efficiency with growing in peat tablets, since tea has a beneficial effect on the development of the plant.
Cut off each bag upper part, then put soil for seedlings inside with a spoon and sow the seeds. Such "pots" are best placed in a pallet, for example, a container with low sides. When disembarking at open ground do not remove the package.

Egg shells are an excellent homemade container for small seedlings or for growing seedlings before transferring them to larger containers.
Take the shell and make a hole in the bottom. To do this, you can use a pushpin or a thick needle. Fill each shell halfway with soil and sow the seeds.
Place egg "pots" with seedlings in a plastic egg container. For creating greenhouse effect close the lid of the container. When the time comes for transplanting or transshipment, plant the grown seedlings along with the shell.

Probably one of the most popular options among hand-made seedling containers is Tetra Pak bags. This multi-component material is distinguished from paper and cardboard bags by increased strength and durability.
Tetra Pak is used for packaging juice, dairy products; in addition to cardboard, it includes foil and polyethylene. Preparing such bags for sowing seedlings is very simple - cut them into 2 parts and the cups are ready! You can also make a seedling tray by cutting the package not across, but along.
Be sure to wash containers thoroughly before use.

Old newspapers can be an excellent material for making seedling containers. To do this, you will need newspaper sheets (it is better to give preference to black and white pages), a cylindrical object (bottle, narrow tin can), flour and water.
We invite you to visit the page with our master class on making cups for seedlings from old newspapers or paper.
You can plant seedlings in a greenhouse or open ground directly in cups, but if you wish, you can cut or break the "pot".

From a plastic bottle, you can make not just a container for seedlings, but a functional pot with an automatic watering system and a greenhouse effect.
Pure plastic bottle cut in half, do not remove the lid, but make several holes in it using the same heated awl, needle or nail. Pull a synthetic cord through the bottom hole (this will be the wick).
Turn the top with the neck over and insert into the second half of the bottle. Pour the soil, sow the seeds. Take the half bottle of potting soil out of the tray, pour water into the bottom of the pot, then push the plant half back into the tray.
Take another bottle of the same size, cut off half of it and use it as a lid for such a seedling "pot".
You can do it differently: from a bottle (a square-shaped plastic bottle with a capacity of 5 liters is perfect, for example, from drinking water) cutting down side part, and the rest most use as a container for seedlings.

Excellent seedling containers are obtained from yogurt or sour cream cups, disposable plastic and paper coffee cups. To make pots, first wash these containers thoroughly, and then cut a hole in their bottom to drain excess water.
If the hole is too large, place a cardboard circle on the bottom of the glass. For convenience, you can write on the cup with a felt-tip pen or marker the name of the crop and variety that you are going to grow.
Place containers with seeds sown in them in a box or on a tray - it is more convenient to store them. The advantage of such home-made pots is the convenient extraction of an earthen clod when planting seedlings in open ground - just lightly press on the bottom of the cup and the clod can be easily removed, remaining intact.

If you're brewing coffee in a coffee maker, don't throw away used paper filters—they can make great seedling cups.
Half fill each filter bag with soil and place in a plastic box or tray with high sides to give the "glasses" stability. They will stand tightly to each other, which means they will not fall. Sow the seeds and place the crate of coffee "pots" on the windowsill.

The cardboard tubes left over from toilet paper rolls are easily converted into biodegradable seedling cups. You can also use paper towel rolls.
If you need a low cup, cut the sleeve across into two parts. Next, do the following with each part: fold it lengthwise and make cuts with scissors about 1/3 of the height of the tube so that you get 4 blades.
Then straighten the workpiece and fold the blades one on top of the other, bending them, as is done with cardboard boxes to make the bottom.
Seedlings can be planted in a permanent place without removing them from cups, since paper and cardboard are biodegradable materials.
To make such pots, you need to mentally return to school years and remember the familiar, but slightly forgotten papier-mâché technology. So, you will need paper or cardboard, water and a form.
Glass cups can be used as a mold, but it is most convenient if you have a metal mold for cupcakes with several cells.
Tear the paper into small pieces and put in a container of water, leave to soak. Then wrap the mold with the resulting mass: if you have glasses, then from the outside, if the baking dish is from the inside.
The blank must be left to dry for a day, and then used as a regular cup for seedlings.

An unnecessary tray (form) for ice can be an excellent container for growing seedlings before picking and serve in this role for more than one year. Make a drainage hole in each cell (if the plastic is strong, use a drill), take a suitable pallet and place the container in it.
Next, fill the cells with soil and sow the seeds. After a while, spread the seedlings in a container bigger size. Just as in the case of eggshells, it is better to grow plants with a small root system in such a container, since they can become crowded in small cells.
The egg tray is also used as a container for seedlings. Such containers are conveniently placed on the windowsills. To begin with, a hole is made in the bottom of each cell of the container (if the tray is plastic, you can heat the awl and pierce it with it). Then the cells are filled with soil and seeds are sown.
After some time, the roots of the plant will be braided with an earthen clod, and for further picking, it will be enough to carefully remove the seedling with a clod with a fork.
If you like to squeeze juice from citrus fruits (orange, grapefruit, lemon, pomelo, etc.) with a juicer, then you probably have many halves of the peel of these fruits. Why not use them as seedling cups?
In a half of the fruit peeled from the pulp (in the bottom), make a small hole for the outflow of moisture, then fill the peel with soil for seedlings and sow 1-2 seeds per "pot" depending on the "dimensions" of the future plant and the size of the citrus peel. Subsequently, the seedling can be planted from open ground directly with a "pot".
Peat pots for seedlings
Peat pots are considered the best containers for growing seedlings. They have a number of advantages.
The grown cuttings are planted in the ground along with the pot.
Plant roots can easily grow through the walls and bottom.
The pot itself will serve as fertilizer for plants.
Such containers provide one hundred percent survival of seedlings.
Pots for seedlings are an empty glass in the shape of a cone. They are made from dry-formed, pressed peat products. But these pots have their own peculiarity: the plants that grow in them require frequent watering, since peat evaporates water very quickly.

Seedling potsdo it yourself
Not all plants tolerate transplanting well. Therefore, classic plastic cups from sour cream or yogurt can destroy a significant part of the seedlings. In addition to peat pots, quite often gardeners send seeds for seedlings to home-made containers that decompose in the soil and do not injure the fragile root system. Eco-friendly seedling cups can be made very quickly and easily, and the costs will be minimal. There are several ways to make them.

Method number 1
Seeds for seedlings can be sown in eggshell. This method is especially good for acidified soils. It's simple: fry the scrambled eggs and collect the shells. It is better to break the eggs not in the center, but near the spout - then the “glass” will turn out to be larger. So that the seedlings do not roll, put it in an egg container. When planting in the ground, the shell should be squeezed a little with your fingers so that it cracks. In this way, we will help the root system "break through" through the shell.

Method number 2
You will need: a bottle of the desired diameter, scissors, newspaper, sticky paper tape. First you need to cut the newspaper into strips of such length that they can go around the stock bottle. Wrap and secure with adhesive tape. It is important to leave a few centimeters of newspaper with a ledge in order to make the bottom. We also fix it with tape. After that, carefully pull out the bottle and admire the resulting glass.

Method number 3
We will use toilet paper, a glass and a spray bottle. We wrap a fairly thick layer of paper on the cup. Then we shift the paper a little down (literally 1 cm) and begin to spray abundantly with water. After the paper is completely wet, we form a paper cup for seedlings along the contour of the glass. We give it time to dry. Then, in a circular motion, release the glass from there.
DIY seedling box

In order not to carry each cup separately when transporting to the garden, you will need special boxes for seedlings. They are also not at all difficult to make with your own hands. And to be more precise, not to do it, but to transform an ordinary box into a highly specialized one. You will need any box, scissors and film. Having measured the length and width of the box, add 20 cm to each side. We put the film in the box on the right sides. You can fix this design with tape for reliability. The seedling box is ready. The film in this case plays the role of a water tray.
Gardeners prefer to use peat pots. The main element in the composition peat pots is peat, auxiliary elements are cardboard, wood.
The highest quality pots are those that are at least 70% peat. The right pots are very loose, so they perfectly pass air to the root system of plants, which contributes to the active growth of strong seedlings.
The loose structure of the products allows the roots to break through their walls with minimal effort. After planting the seedlings in the ground, the pots dissolve quite quickly - 33-38 days.
The density of cups, in which a lot of cellulose (cardboard) is added, does not have such advantages, so there is a big risk that the plants will develop poorly, and after planting in the soil they may even die.

A quality peat pot should contain at least 70% peat
Before as buy peat pots Be sure to familiarize yourself with their composition, so as not to spend money on low-quality goods.
Advantages of peat pots
Absolute environmental friendliness of products - they do not contain toxic substances harmful to humans and the environment.
The composition of the material used for the manufacture of cups does not contain pathogenic microflora that contributes to the development of various diseases. Also in the mixture for the manufacture of peat products there are no weed seeds.
Seedlings planted in this way are more likely to quickly take root in a new place.
Accelerated survival process guarantees early and high yield. Harvest dates come earlier by 14-21 days, and the amount of the crop increases by about a third.
When the pot is completely dissolved in the ground, it turns out to be beautiful, which feeds the plants for less than three months.

Disadvantages of peat pots
Despite a significant number of advantages, peat products have some disadvantages.
The soil often dries out due to the fact that the loose structure of the cup absorbs all the water and it quickly evaporates from it. The plant "freezes" due to the fact that, during evaporation, the soil cools. If you do not make timely watering, the seedlings will grow poorly or may even die.
To prevent the soil from drying out, the pot is watered excessively, which provokes the development of mold.
There are frequent cases when, after the pot is planted in the ground, it does not dissolve, thereby capturing the roots - later they cannot get all the necessary substances from the soil and slowly die.

Excessive watering can lead to the formation of mold on pots
How to use peat pots?
A gardener who first decided to try a similar container for growing seedlings has a very obvious question - how to plant in peat pots?
Peat cups must first be soaked in a mixture of organic and mineral dressings, and then dried thoroughly. In order for the roots to surely be able to break through the walls of the container, it is recommended to make small holes over the entire surface of the pot. An ordinary clerical hole punch will do an excellent job with this task.
Purchased soil or soil mix made by yourself, you need to fall asleep in cups. Please note that the soil should be loose and airy, so you can not carefully compact it.
Seeds are planted in pots according to the required timing, as well as the depth recommended for planting the selected plant. Watering is best done with a spray bottle or a small watering can.

In order for the plants to enter quickly and amicably, the container is covered with a polyethylene film and placed in a warm place, while the temperature ranges from 20 to 25C. Two days before planting the seedlings on the site, the pots should be watered abundantly in order to speed up the process of their dissolution in the soil.
Before moving young plants to the site, they must certainly be hardened, otherwise they will react painfully to sudden changes in environment. Five days before planting, the seedlings are taken out into the street and gradually increase the time they are in the fresh air.
Most gardeners grow in peat pots tomatoes and pepper. In cups, you can grow chestnut crops, or even bushes (raspberries, gooseberries, roses).

In the photo, tomato seedlings in peat pots
According to peat pot reviews in order to successfully grow seedlings in such a container, you need to get used to it a little: often, but in small quantities.
Most amateur gardeners praise the cultivation of seedlings cucumbers in peat pots, because in this way it is possible to sow seeds earlier than usual and as a result to get a harvest in the shortest possible time.
Types of peat pots
peat pots may be square or round. Pots are made individually or in the form of sections (a certain number of cups interconnected).
In diameter, the pots can have various sizes: 5cm, 6cm, 7cm, 8cm, 9cm,10cm. The height of the container coincides with its diameter - for example, 5 cm wide and 5 cm high.

The photo shows a variety of peat pots
The size peat pots is selected depending on which plants are planned to be planted. The wall thickness varies in the range of 1.5-2.5 mm. Packed peat containers must have a label with the composition.
peat pots it is advisable to buy in specialized stores in order to secure yourself from the purchase of low-quality goods. Price of peat pots depends on the size and on their type (pieces, blocks). The minimum cost is from 10-15 rubles apiece.
How to make a peat pot?
For creating peat pots for seedlings First of all, you need to prepare a solution with the correct consistency. Here are a few recipes for the mixture: mix peat, soddy soil and mullein in a ratio of 7: 2: 1, combine 60 peat and 20% humus soil, 15% sod land and 5% mullein. The components are diluted with water to a relatively thick state.

After preparing the mixture, it is best to use a container made of of stainless steel, which during reusable use will not succumb to corrosion.
You need to take a glass with a removable bottom and pour a little mixture into it, then with the help of the second part of the equipment - a crusher of a slightly smaller diameter than the container, displace the excess mixture from the mold.
The contents are carefully rammed with a pusher, after which it is removed, and the glass is left for a while so that the contents dry out a little. At the end of production, peat cups are dried outdoors under the sun or in a heated oven.
To make good pots, it may take some time to correct mistakes: add certain components, increase the drying time of finished products.
INSTRUCTIONS AND PROPHECIES OF THE Blessed MOTHER ALIPIA GOLOSEEVSKY, Kyiv...

Eufillin dropper in ampoules is used to treat pathologies that ...

Among all ointments for the treatment and prevention of joint diseases, the most ...