Proverbs and sayings about May HORIZONTALLY: 2. May will deceive - in ... will leave.4 ....

Many mistakenly believe that painted walls do not look as bright as wallpapered walls. Paint has its advantages, you can make the walls any color you want. In the case of wallpaper, you have to trust the tastes and skill of the designers. What they have done is what they have to use. Unusual wall painting can be achieved by combining different colors, using stencils.
Combined painting will give the room color, bright design, an unusual look.
If you apply maximum imagination, you can achieve amazing results.
How to paint the walls so that they look exclusive and at the same time decorate the design of your room? Remember that you need to work carefully and slowly. Get a quality masking tape that protects the wall well from paint. It should also be easy to remove from it without disturbing the created finish.
Painting in several colors requires competent calculations, accurate markings and measurements. Speed of execution is not the main thing here, but you will need patience.
Combined painting may take several days.
How to paint the walls in many colors? There are several options. When choosing one of them, you should consider the interior of your room and your personal liking.
There are 3 color combination options:
Colors can make up a lot color scheme, or 3 primary colors of the same shades are used.
Using a different gamut of colors, select shades of the same saturation.
It is very difficult to make the border between the colors even and neat. Don't worry too much about this. The joint can be made using molding, wooden lath, just a paper border. It always looks spectacular.
You can choose shades according to a special catalog, but if you decide to use your imagination, then tint the paint with a certain margin. The paint may run out before the end of the work, and it is not always possible to do the same.
Back to index
Various stencils help to unusually paint the walls very well. With minimal skills, you can make them yourself in a short period of time. Cliche stencils are divided into several types:
![]()
Painting stencils allow walls to take on the shape of patterns.
In specialized stores you can buy a variety of clichés. They are made from film, metal, vinyl, PVC.
The process of decorating with a stencil begins with inventing a pattern. This is the most important part of it. Compositions transferred using stencils look great near windows, doors, beds and tables.
How to work with a stencil:
Walls can be painted in such a way that they will attract the attention of people present in the room. The wall may look like an exclusive panel. But for this you need to be patient, apply all your imagination, and also apply unusual, original painting techniques.
There are several simple ones. They can be easily mastered by anyone, including you. To see how the wall will look when using these methods, try applying one of the painting methods on a piece of old wallpaper, cardboard.
Back to index

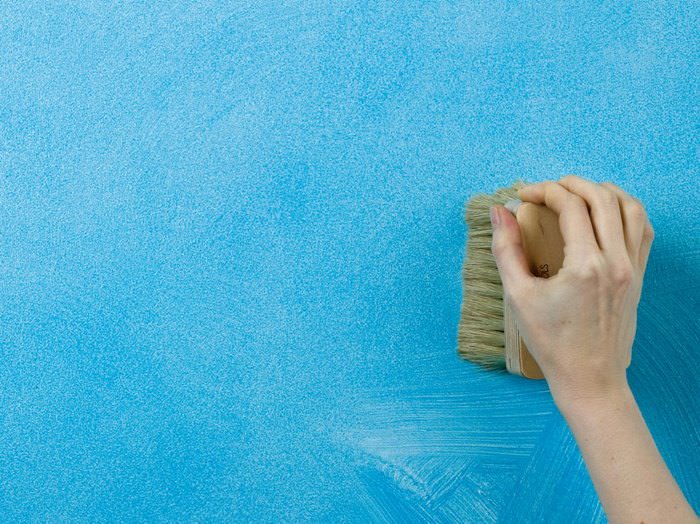
When painting with a sponge, you need to use a sponge made from natural materials.
An interesting result and effect is given by painting with a sponge. It is better to use natural, marine, but you can use a sponge that is used to wash the car. You should not paint with foam rubber, it leaves its particles on the surface that you paint.
The invoicing consists in the fact that the painted surface should be lightly hit with a brush.
As a result, you will get a unique pattern that cannot be predicted; textile drawings from a rag roller will be visible on it. In this way, you can paint a separate area or the entire wall.
Don't be afraid to experiment. You can try to rub the paint with a semi-dry brush with bristles of different stiffness. Try until you get a result that is pleasing to the eye.
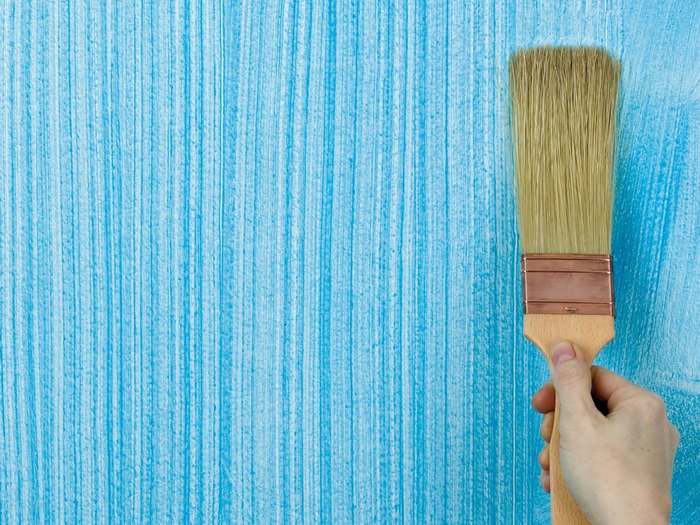
Invoicing is another original way wall colours. Apply base layer paint on the wall and wait for it to dry completely. Then, with a 10 cm wide brush, apply stripes in different directions with paint of a different color.
Take a brush with hard bristles measuring 10x10 cm, you can use a simple shoe. Apply light strokes to the freshly painted surface, constantly removing excess paint from the brush.
Now you know a few simple ways how to paint an original wall with your own hands.
Painting remains the most accessible and easy-to-implement way to decorate walls. The problem is that a plain surface often looks boring. But we do not suggest trying to imitate the texture of marble on your own or draw intricate patterns. A compromise between the desire to decorate walls with minimal cost time and obtaining an impressive result exists. It is enough just to put into practice one of the democratic ideas of coloring that we have proposed.
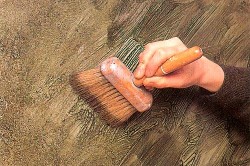
The decorative effect is achieved by surface treatment with objects that have a complex texture. It can be a sponge for washing a car (ordinary foam rubber will not work, as it will crumble), a crumpled piece of textile, a brush with hard bristles, a construction roller. To understand exactly what effect will be achieved, first test your abilities on a small area of cardboard.
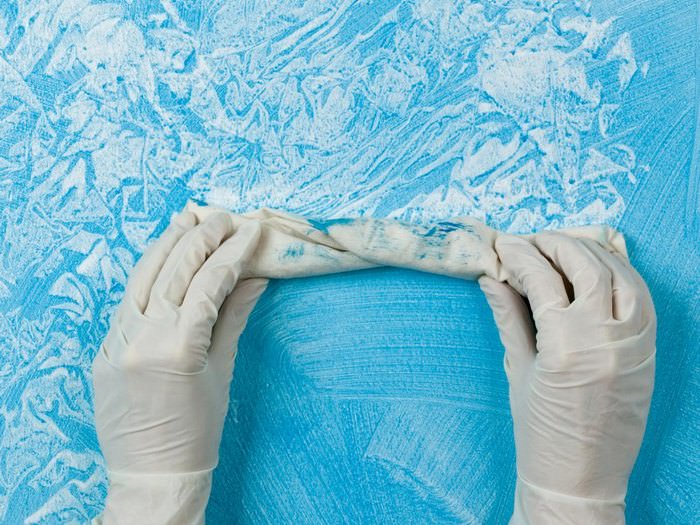
The first stage is painting the wall with paint - the base, preferably glue or glazed. After it is completely dry, you can start decorating. Moisten the object whose texture you want to reflect on the painted surface water-based paint and press. For decoration, choose a paint that contrasts with the tone of the base. You should not invest all your energy in the decoration process: the surface is processed without strong pressure, with soft tangential or blotting movements. After the layer has completely dried, you can repeat the application, but it is better locally, and not over the entire surface of the wall. Besides decorative effect, due to this method of staining, one more important result can be achieved - to hide the unevenness of the wall.
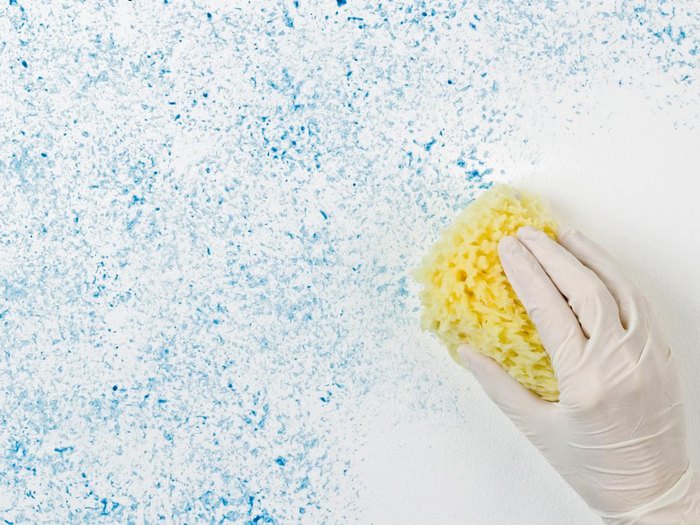
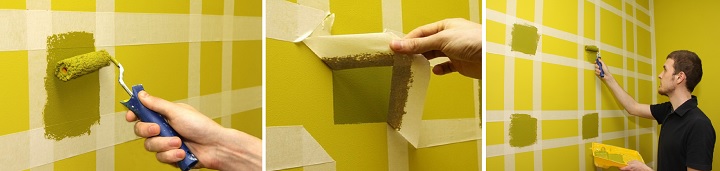
In this way, one can simulate brickwork. Stick masking tape on the wall in the form of a grid that repeats the location free space between bricks. Then decorate the wall with a sponge soaked in red-brown paint.
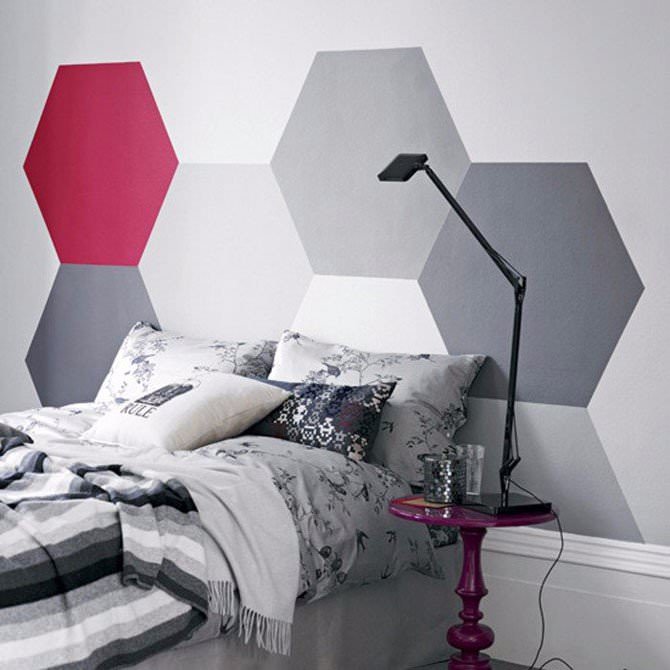
It will take a little more time to paint the wall using the patchwork patchwork technique. The essence of this decor method is that the surface is divided into squares of the same size, which are painted in different colors. Choose contrasting tones or several shades of the same color - you choose. In order to create a coherent interior, do not forget to repeat the patchwork motif on bedspreads, furniture covers or other items.
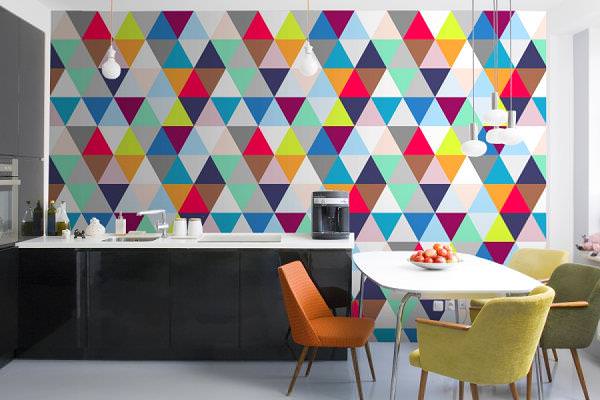
The painting technique is simple: using a pencil and a ruler, divide the wall into squares about 30 × 30 cm in size, and then decorate them. Of course, risk is a noble cause, but first it is better to make a color scheme to scale on a piece of paper. Try different variants, evaluate which ones look better. There should be no cropped squares on the wall, so when calculating the dimensions of one element, proceed from the dimensions of the entire wall. For example: the length of the wall must be divided by the length of the square without a remainder.
Another option for patchwork decor is to divide the wall not into squares, but into rhombuses or triangles. To keep the borders of the colors from mixing, use masking tape to separate one square from the other.
If you are not sure that you can draw the squares evenly, feel free to put the ruler with a pencil to the side. Now your task is to create deliberately sloppy walls with the effect of underpainting. The easiest way within this style is to paint over a section of the wall so that its edges are uneven.
You can also make an uneven border between sections of the wall painted in different colors. Wait until the surface is completely dry. Then lightly dip the roller or brush in one of the colors and finish the transition with careless strokes. Please note that the roller or brush must be practically dry! Otherwise, there is a risk of creating unnecessary relief, which is not included in our wall decor plan, due to too thick a layer of paint.
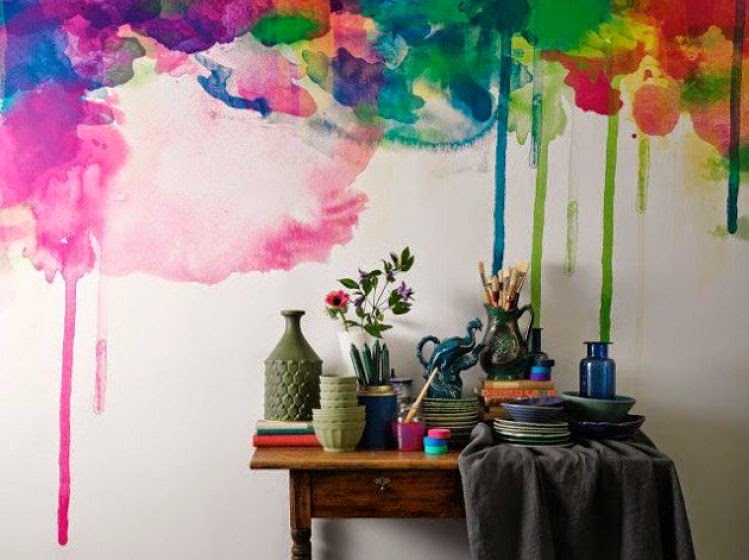
The pinnacle of careless painting is paint streaks on the wall. They can be depicted on purpose, having previously outlined the contours. An easier option is to paint the wall in the base tone and let the contrasting paint flow freely from top to bottom.
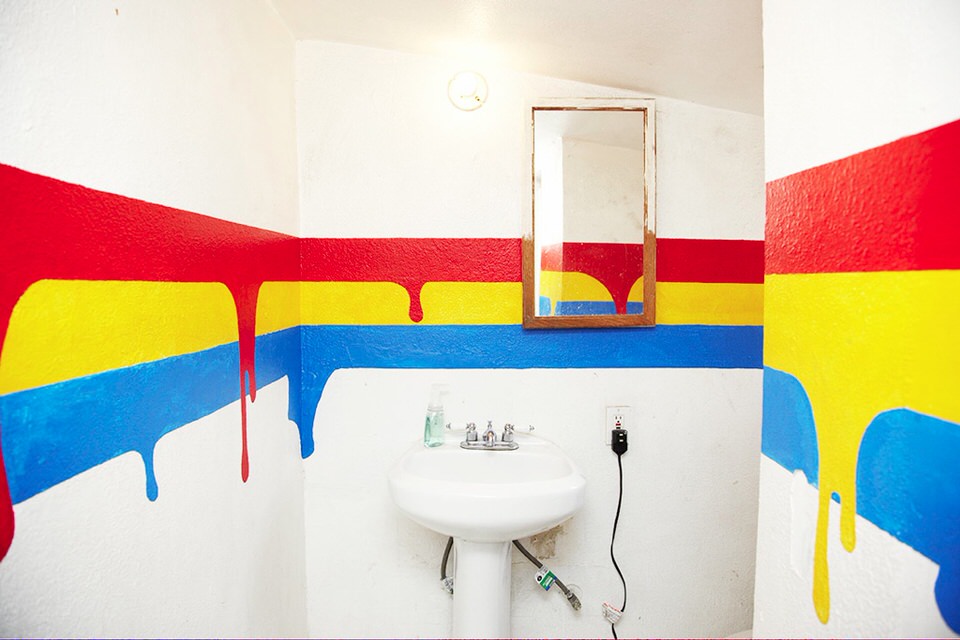
A wall with streaks is a bright interior accent, so we recommend painting not all vertical surfaces in the room in this way. One wall will be enough to create an art environment. Paintings and others wall types decor will be superfluous due to the unconditional self-sufficiency of the "leaky" wall. To create a brutal interior, use black streaks on a white wall: an unforgettable effect is guaranteed.
Another simple way to decorate painted walls is to depict several large geometric shapes on their surface. You should not draw tetrahedra and hexahedra: ordinary circles, triangles and squares will do. In order not to go beyond good taste, it is advisable to choose pastel shades that combine with each other.
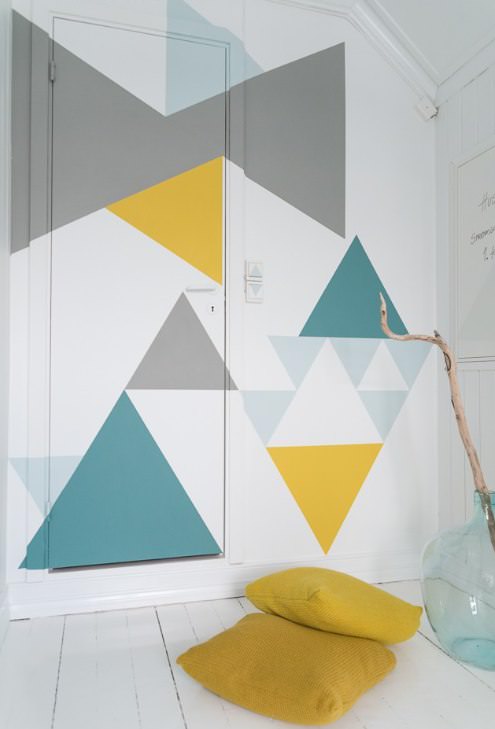
As in the previous methods, the wall must first be marked out. Whether or not to apply a layer of base paint depends on the area occupied by geometric shapes. Very large figures are easier to draw on a wall prepared for painting, and then fill the remaining space on the wall with the base color. This will avoid the appearance of thick layers prone to cracking.
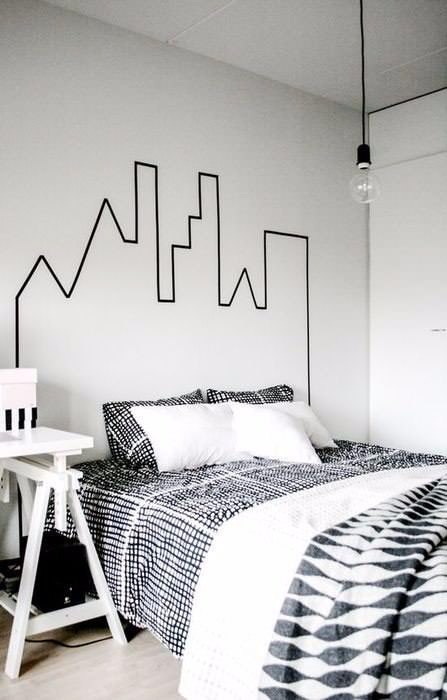
To depict a landscape or a portrait on the wall is the lot of the elite. We will not focus on them, but we will try to implement the existing artistic skills in simplest form. Our task: to draw the outlines of the selected object on the wall. For instance, geometric figure, houses, plants. Check that the outline is easily recognizable. Best of all, dark lines, repeating the outlines of a real object, look on light walls. The easiest way to draw a contour consisting of straight lines. In addition, such geometric outlines look more effective than a simple pattern of smooth lines.
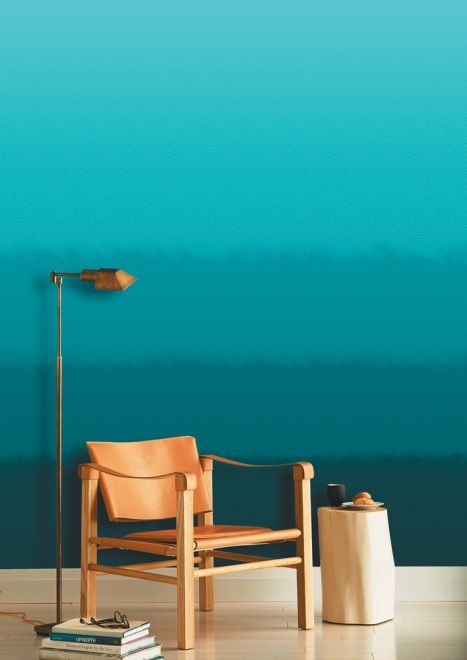
As practice shows, not every specialist can recreate on the wall a smooth transition between several colors on the wall, which is characteristic of the “gradient” technique.
A simplified version that can be implemented independently is a gradient with visible contours. Choose three or four shades of the same color, and paint the wall with stripes, the bottom of which is the darkest. The transition between the stripes can be perfectly smooth or slightly blurry.
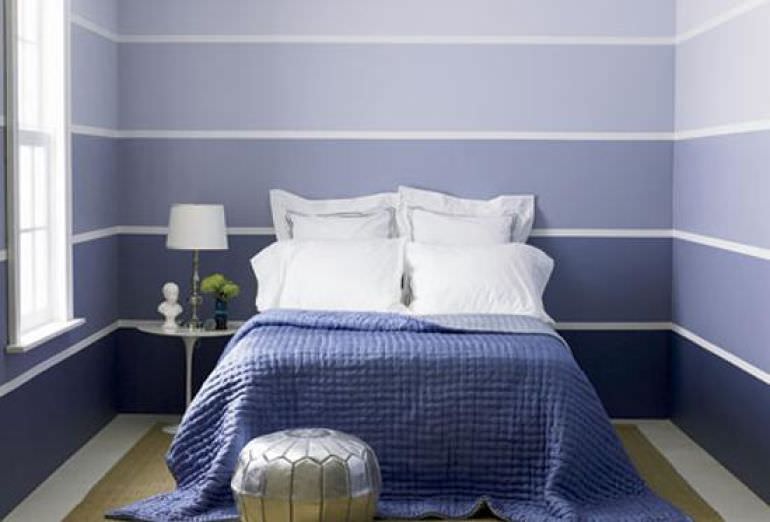
V Soviet times oil paint covered the bottom half of the walls. To avoid unpleasant associations, we recommend dividing the walls not into two, but into three parts. Moreover, it is not at all necessary to observe symmetry - let the stripes be different widths. Pick up two colors of paint (one of them should be neutral), and paint the middle strip with a more saturated color. An unusual look of the walls is guaranteed!

As design solution wall painting is regaining an already forgotten popularity.
This is one of the least expensive and easiest ways to update the interior.
In terms of aesthetics, painted surfaces are not always inferior various wallpapers and other types of wall coverings. But in terms of the degree of reliability of the result, as well as in terms of service life, it is difficult to find an equivalent alternative to them.
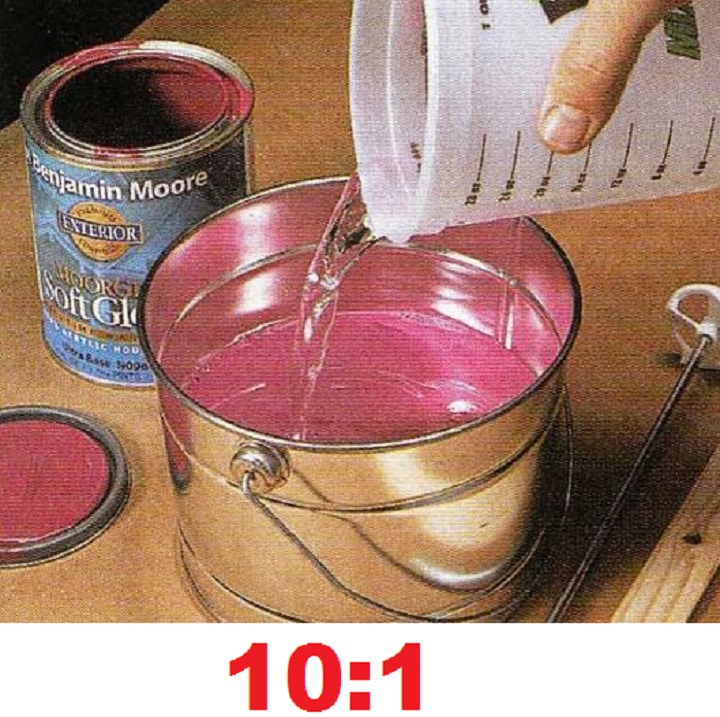
The paint for the first layer of application can be slightly diluted. The right amount the product is poured into a separate container, then water is added there in a ratio of ten to one. can be pre-calculated.
If you do not want to stick tape on ceiling plinth, use long spatula, which is attached to the bottom of the baguette so that it becomes an obstacle to paint splashes.
When the spatula is removed, you will see an even layer of paint just under the baguette, which will not be affected and will remain clean. Of course, before the next application of the spatula, it must be well cleaned.
If work surfaces are adjacent to other surfaces that do not need to be painted, the junction is protected by unnecessary newspapers or masking tape. It is undesirable to leave the latter in place for a long time, it is better to remove it within thirty minutes after finishing work.
Painted walls in the corners flute brush, and everything else can be safely processed with a roller. Except for various difficult places where you also have to use a brush.
A small amount of coloring emulsion is poured into the bath. We lower the roller there, wait until it picks up the paint. We take it to the ribbed layer of the cuvette and roll it several times, removing excess paint and distributing it evenly over the pile.
Then the roller is pressed against the wall, and the paint rolls out on its surface with smooth movements. Then, in the same area, the direction of applying the paint and rolling it out must be changed (up and down, then right and left). So the composition is distributed more evenly.

Can be painted on small areas, chosen arbitrarily: while it has not yet begun to dry out, neighboring zones are painted over, trying to achieve uniformity, especially at the junctions. So you will be able to make the transition between individual zones almost imperceptible, and the surface will look homogeneous and monolithic.
When using water-based products, painting should be done at least twice.
Usually the second layer can be covered after one to two hours. Do not worry if it suddenly seems to you that the paint is not too dense and translucent. Such is the peculiarity of the composition of this type. Gradually, as it dries, it will gain color and density.
After applying the final coat of paint, you need to wait somewhere around a day before you can evaluate the result of your work.
Proverbs and sayings about May HORIZONTALLY: 2. May will deceive - in ... will leave.4 ....

Popova V.N. primary school teacher MBOU "Kishertskaya secondary school" Rebus is ...

To learn how to compose and understand puzzles, you should figure out what they are from ...