INSTRUCTIONS AND PROPHECIES OF THE Blessed MOTHER ALIPIA GOLOSEEVSKY, Kyiv...


The weather in Colorado has been suspiciously beautiful lately, which has plunged me prematurely into summer (and the most pleasant, warm part of spring). Since the anticipation of a wonderful time of the year seems endless to me, I decided right now to surround myself with wonderful summer roses of a completely unusual variety ... illustrated. If you have a similar opinion or just want to finally learn how to draw roses, then you are on the right track!
The first drawing option that I would like to offer you is quite simple and does not require any special artistic tools. All you need is something with a thin lead: it can be sharpened pencils, colored pencils, markers, pens, watercolor with a thin brush, acrylic paint… anything! I use colored pencils that I sharpened beforehand.
First draw a small circle in the middle. (Yes, flowers with a brown/black center are not roses, but since these plants look like roses, they are quite appropriate in this article)
Color it.

Now start drawing in a circle small crescents that will kind of “hug” the center. These figures will serve as petals for our flowers.


Keep doing the same, layer by layer!

You can draw as many roses as the composition requires. Use different colors to achieve great contrast! In the pictures you can see that I changed the pencil to pink.

This is what the finished flowers look like in this style:

Although I settled on two roses, these flowers will look great in patterns, especially if you use pencils of different colors.
Such roses will look great as:
Ready! Create your own pattern, upload it to a print website like Zazzle or Society 6, and have your floral design printed as a pillow or bag pattern.
The next version of the rose image that I want to showcase is an unintentional copy of the flower from Disney's Beauty and the Beast, a rose in a glass jar.

As in the previous case, you will need absolutely any artistic tools that you have in your arsenal to bring this wonderful flower. I found a Sakura Glaze pen and that's what I use!
First of all, take a pen or marker that you know won't smudge (I use a Micron thin pen) and draw an intricate shape like the one below.

The photos below speak for themselves, so take a look at the drawing sequence. Explanations will only complicate the process, which is already easier than a steamed turnip.


Once you get to this stage, add some shadows to create contrast.

In fact, there is no sequence or reason for obscuring here; I just add thick black spots along some of the petals. The goal is not to have your rose super realistic; our goal is simply to create contrast.

Now your rose can be called finished; or you can start coloring.

When I introduce color, I like to leave some areas unpainted to indicate dew or rose shine. To do this, I sketch out the figure with a colored pen and then color in whatever remains around it. Make sure the shape matches the outline of the petal it's in!

These white areas can be anywhere on the flower, leave them where you see fit. I made them in random areas of the petals and I must say they came out great!

This is what the finished rose looks like:

Now I want to show you why I love Glaze pens so much for this kind of stuff. When you draw with such a pen, its ink leaves a marvelous caramel reflection. Plus, these pens are super bright! See how they reflect light?

Of course, with such a sheen it will be quite difficult to scan this rose, but it is perfect for a lot of other things!
For example:
The following roses are probably the lightest, so they have a special place in my heart. As in the first case, they can't be specifically called roses... I mean, they could be any flower you want. However, I call them roses, which is very reasonable!

To draw flowers, you should start with a droplet. I'm not kidding, all you have to do is put a drop of watercolor and twist the sheet a little to give it the shape of a flower.

Then, as quickly as possible, add another color to our wet drop. Just draw them in different parts wet spot. If the drop is still wet enough, the other color will blend into it very easily.

Do the same for new flowers, try to use different colors.

At the end, you will see on your sheet a whole bunch of flowers that look like pom-poms.

We will also add green stems to your flowers.


For convenience, at this stage it is better to use a thin brush.

Now you can add leaves, or leave it and consider it complete! These roses are my favorite, because the process of drawing them is extremely simple, but they look great. If you finish the banner, then the resulting bouquet can serve excellent design for logo:

You can also use them for:
And I continue the lesson. The next option is not only incredibly easy, but also fast. It will only take a couple of minutes for a sketch and no more than one for coloring.

Don't believe? I even made a video... More like roses are easy to draw, but they seem surprisingly difficult to photograph step by step.
Once your sketch is complete, use a medium size brush to add the watercolor.

I love going beyond the pencil lines!

If you're painting roses for no particular purpose (like me), you can also add leaves. I decided to leave them in black and white to give an unusual contrast!

This version of the image is very versatile and can be used everywhere. I would suggest:
The last version of the image of roses that I added to this collection can safely be called my favorite because of their vintage look, but it requires a little perseverance and time.

First you need to sketch. You need to repeat the same steps that I did in the following photos.


After, circle the sketch with ink. Of course, you can use a regular pen (ballpoint pen, gel pen, etc.), but I prefer pen and ink. The Nikko G nib pen is great for these types of projects because of its medium flex!


Then add contrast, just like you did with the rose from Beauty and the Beast. Again, it is better not to overdo it with blackouts; You just need to add visual interest.

And now, my favorite part: adding hatching! I add short, close lines to most of the edges of my petals, as well as the bottom. To be honest, these strokes don't have a specific location, so feel free to add them wherever you see fit and be inspired by the photos I've shared in this post.
The only thing you have to remember is that the lines must follow the contours of the individual petal you are working on. If the petal has a curve, the line should curve accordingly.

Once you've traced the whole sketch, don't forget to erase the pencil lines.

I know you've seen this drawing before in Vintage Photos: Decorated Postcards. Therefore, I suggest using that design in this drawing as well!

I also want to use these roses to add some style to the Arc de Triomphe drawing. They give absolutely the new kind old things! Roses will also look good on black paper (using a white Sakura Gellyroll pen or calligraphy ink). I used a color version of this design on the "Congrats New Mommy" card below.

I hope this post has given you valuable knowledge about drawing roses! If you have any questions or suggestions regarding these roses, please feel free to comment! Thanks again for reading!
Variety of roses Watercolor: description
Rose petals look like a watercolor painting. The color of the petals smoothly flows from the pale pink edge to the milky or peach shade of the middle. The variety is one of the most popular due to its beautiful color and long period flowering.
The variety is resistant to powdery mildew and black spot disease, but does not tolerate frost. Needs shelter for the winter.
Source: Depositphotos
Rose Aquarelle bred for cutting and growing in flower beds
Roses are good for decoration landscape design. After cutting, they stand in vases for about a week.
Appearance:
On the stem grows both one and several flowers.
Choose a planting site that is flat and protected from drafts. It should be 3-4 hours, in the morning or evening, illuminated by the sun. At noon, direct rays leave burns on delicate petals. Moisture should not stagnate, this leads to rotting of the roots.
The soil should be nutritious, neutral or slightly acidic, with good drainage.
Inspect the bushes, cut off damaged, withered shoots and leaves. For the winter, cut the bush so that the stems are 10 cm high. Spud with earth, cover with sawdust, dry needles, foliage. You can build arcs of thick wire and cover them with geotextiles. It is important that there is no moisture inside the shelter, otherwise the bush will die.
Roses need pruning. In cold climates, prune in the fall to avoid frostbite. If winters are quite warm, remove old, weak, damaged stems in the spring, in early March.
Rose Aquarelle was bred for cutting in bouquets, the length of the peduncle can reach 1 meter. It is also grown to decorate flower beds. It goes well with climbing flowers and shrubs.
In 1999, Tantau expanded its rose collection with a variety with the colorful name Aquarell. Synonymous names - Perfect Harmony, St. Margaret's Gold, TANellqua. Really colorful flower, with soft watercolor overflows. Bred by Hans Jürgen Evers.
Group – hybrid tea
flower size – 10-12 cm in full release
Aroma – strong citrus fruity
Height - from 70 cm to 1-1.2 m
Resistance to powdery mildew - above average
Black spot resistance - high
Cold resistance - before - 22°C in dry cold areas without shelter
Bloom - permanent
The indescribable colors of Aquarell hybrid tea bloom, the size of the classic flower shape with a cone-shaped center and the speed of building mass, plus a rich smell, make this variety of roses from Tantau an excellent plant that can take over great amount attention from guests. The first thing that catches the attention of the viewer of the Aquarelle rose is its smooth transitions of colors from creamy yellow to reddish orange against a background of shiny dark green dense foliage. The flowers are huge, densely doubled, and when fully opened, they show a large shock of golden brown stamens. They rise regally on strong erect shoots and are collected in small inflorescences of 3-7 pieces.
A modern hybrid tea rose from Tantau Aquarell prefers neutral to slightly acidic soil, rich in nutrients and with good drainage. Before you start decorating the site with flower and leafy compositions, they do a test for the composition of the soil, which can be bought at garden centers. The best landing site- this is a sunny area or partial shade (at least 3-4 hours sun rays should definitely fall on a rose). In partial shade, the flowers will be more saturated in color, but there will be fewer of them in cold weather.
The Aquarell rose needs to be cared for just like any plant in the garden. First, it needs water. For 1 bush, you will need up to 10 liters of warm settled water, which is poured under the base of the plant in small portions as needed, but at least 2 times a week. In dry times, this is done more often, and she will also be pleased if she is sprayed. Evening hours are the best time for this. During the night, the soil will be saturated with moisture as much as possible and the flower will receive liquid from it for a longer time. Very good if mulch is used. It not only prevents the rapid evaporation of moisture, but also significantly reduces the likelihood of "raids" of weeds.
 top dressing minerals, vitamins and organics make the plant more resistant to diseases, pests and cold weather. If you do not feed the Aquarelle rose at least once every two weeks, then during the growing season the plant will not “give out all its charms with a bang” in the amount in which it can, and half as much. AT winter time a weak rose is prone to frostbite not only in the upper part, but also in the root system. It follows from this that there is a risk of losing half, if not the whole rose. You can fertilize the soil near the plant by pouring granules of complex dressings around the plant, or diluting them in water and alternating with watering. Vitamins are best given through spraying. Only well-rotted organic matter is used. As an option, this is a mulch bedding from a mixture of manure and soil (1: 2). In this case, with each watering, a fresh portion of useful substances “fits” the plant.
loosening soil is a must - it helps the root system of the rose to get not only oxygen, but also get useful substances from the soil faster. In the "clogged" soil, the plants "suffer". During loosening, weeds are also removed. If mulch is used, then this technique is done less frequently.
Aquarell rose variety needs pruning. Hybrid tea roses bloom on the branches of the new year. How and when to prune them depends on the climate in which they grow. In warm areas, autumn-winter pruning is not needed, only in spring Aquarell corrective pruning is carried out - removal of old, damaged, diseased shoots (but this does not mean that if you prune for the winter and you get an excellent result, you need to stop doing this. Do and share with us). In cold places, it is still better to do pruning - this will help to avoid winter frost. Also, this type of pruning is done where winters are not stable - unstable weather is even worse: prolonged thaws and sharp frosts immediately following them are a scourge for roses. Roses quickly respond to warming and start the growing process. First of all, the buds, launched by the rose in growth, “leave”. As a result, the number of flowering shoots is less.
 Rose variety from Tantau Aquarell was bred as a cut plant (for bouquets - the length of peduncles can reach more than 1 m). She is beautiful in all flower beds: mixborders, borders, hedges, on high stems, near stone retaining walls... Her partners in the flower bed can be any decorative leafy, coniferous plants. By color scheme it will be in harmony with monochromatic colored flowers. They are either matched to the tone of its color (pink, apricot, yellow tones are more or less saturated), or monophonic with a clearly understandable color - red, white, purple, blue ... In the neighbors of a rose, long-flowering climbing plants: clematis, honeysuckle, kampsis, other roses, sweet peas, kobe, morning glory, wisteria for background decoration or in a mixborder.
Thai artist- not the most prominent figure in contemporary art. However, lovers of modern watercolor, he is well known for his paintings with roses.  It seems that there is no woman who would not admire his watercolor roses. And I am no exception.
Therefore, I could not miss the opportunity to visit master class La Fe in Moscow.
The master class took place over three days. Every day we wrote one rose. Every day the master showed new way drawing.
With pleasure I will share with you secrets and chips, which I managed to learn from the artist La Fe.

La Fe is a commercially successful artist. He mainly sells his paintings in Thailand and China, although there are also orders from Europe. He says he took the theme of roses because this niche was free, he achieved technical perfection in their depiction, and roses as a symbol of love are in great demand.
Viewers are amazed by the fact that the master paints roses with a brush, no pencil drawing, and in one go, not multi-layered.
“Really?” experts ask.
Yes, it is, I confirm!
La Fe pre-wet the paper on both sides or immerse it for 3 minutes in the bath.
According to him, this evens out the paper, making it more porous and delicate, receptive to watercolor.
“Paper from the store is completely dry, hard and uneven. Soaking the paper changes its internal moisture and makes its texture more uniform,” he says.
After wetting, the paper is attached to the tablet. Its reverse surface remains wet, the upper one dries. Around the perimeter, the paper is fixed with paper tape.
Mainly Arches grain fin 100% cotton.
(I fully felt the meaning of this when on the last day I had to draw on Moulen du Roy instead of Arshes. The paper dried much faster and did not give such a beautiful graininess of the image)

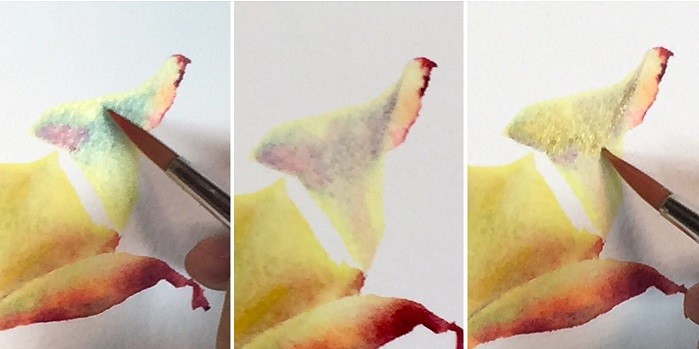
The master selects one petal in the widest part of the rose and begins to draw it.
Depending on the desired effect, it does this one of three ways
shown to us on different days of the master class.

The La Fe technique is very technically difficult. It requires a good feel for the moisture content of the paper and ink solution. The master literally drives paint pigments into each other. At the same time, he mixes colors right on the sheet.
“I can paint any rose with three primary colors: blue, yellow and red”, says La Fe.
Indeed, the master paints a rose only three colors, letting paint on the moistened paper sequentially, one on top of the other. As a result, oddly enough, there is an effect of optical mixing, similar to typographic printing.

These three paints, thrown into a puddle of water, fall out into small particles pigment, interspersed with each other. On closer inspection, it really does look like a seal.
And a similar way of depicting, we know from impressionism, gives rise to a special glow and airiness of painting.
In the La Fey technique, the texture of the paper and the paints used play a very important role. The master writes on Arshes paper with grain fin embossing. She uses Daniel Smith paints: cerruleum and ultramarine, which fall well into pigment, opera rose and brilliant pink, which have a certain whitishness.
Therefore, as a result, his watercolors look so soft pastel, slightly dusted.

Learn the basics of watercolor paintingwith a popular course
In the palette, master paints from Daniel Smith and Japanese HWC Holbein.
Here is the one in the lower right corner, and there is a brilliant rose.

Drawing roses in white and pink shades is very difficult. Subtle color nuances require skill. Therefore, on the second day of the master class, when drawing pink rose, all participants failed. It turned out to be much easier to draw a two-color yellow rose!
La Fe paints in a single-layer technique, pouring color into color. Interestingly, he gets the complex color of the shade from pure colors: medium yellow, blue, red-pink opera rose, purple from pink and ultramarine.
So, how does a complex shadow color turn out:

And, voila, the shadow is alive, shimmering with complex and at the same time pure shades!

La Fe paints with synthetic brushes! He has several Escoda Perla and Versatil brushes in his arsenal. It looks like this Barcelona-based firm is successfully marketing itself! From my experience with Escoda brushes, they are very good. But our Russian Roubleff may well replace them.
Another “trick” that I peeped from La Fey is an angled brush.
It turned out to be very handy for painting the small petals of the top of the rose and the leaves.

Here, perhaps, are all the secrets of the artist. At the heart of his brilliant roses - good paper, painstaking work technique and excellent understanding of watercolor.
“Some people, when they start painting with watercolors, despair that they don’t succeed. They blame themselves for being stupid. In fact, inappropriate materials can be a problem.”
Remember this phrase of the master when painting with watercolors, tell yourself that you have “hands - hooks”.
Take quality cotton paper, be patient and harness the elements of watercolor! You will definitely succeed. Especially, if you paint a thousand roses like master La Fe…

My rose from the master class La Fe
 If you want to “understand” the shape of a rose, learn how to draw it easily, freely, freshly,
pay attention to
it a good option I started my acquaintance with roses in watercolor.
Thank you for your attention! I would be glad if you write in the comments, was this article useful to you? Have you discovered something new for yourself?
Do you want to master all the tricks and subtleties of writing flowers?
You can
View description and order
INSTRUCTIONS AND PROPHECIES OF THE Blessed MOTHER ALIPIA GOLOSEEVSKY, Kyiv...

Eufillin dropper in ampoules is used to treat pathologies that ...

Among all ointments for the treatment and prevention of joint diseases, the most ...