INSTRUCTIONS AND PROPHECIES OF THE Blessed MOTHER ALIPIA GOLOSEEVSKY, Kyiv...


In this article, we suggest you make crafts from plastic bottles in the form of a beehive. For what? In this case, the waste is not sent to the landfill, but gets its second life as decorations for the home and garden. Plastic hives will give a highlight to your site. And original do-it-yourself bees will only complement such a house.
To make the composition inimitable and unique, small decorative bees can be made from plastic. You can make bees from capsules from Kinder surprises or from rubber gloves.
Ready! Choose a place in your apiary where our bees will live. Now your backyard will be cozy and joyful.
How else can you make bees that fit perfectly into a plastic bottle hive? Look at us!
Once you have decided to become a beekeeper and bought a couple of families, it's time for new hives. Families grow and swarm, and they need to be planted in new houses. You can, of course, buy ready-made ones, but buying used ones is dangerous. It is not known what diseases you can buy with them, but the new prices bite. One thing remains - to make beehives for bees with your own hands according to the drawings. If you know all the manufacturing rules, then it is not difficult at all.
In this article, we will just talk about making hives with our own hands, correct sizes and drawings for them. We learn what a hive lounger is and how to make it.
In ancient times, beekeepers extracted honey in the hollows of trees, then they began to hollow out logs for bees. With the development of beekeeping, they began to make evidence for bees with their own hands. different designs, and the material on them is different.
The classic option for making hives for bees. In such houses, the bees feel in vivo close to natural. best breed wood for manufacturing will be cedar, although you can also linden, aspen. These hives breathe better, smell good and are dry.
Aspen and linden beehives in winter require additional insulation. And these are expensive materials.
Some beekeepers are engaged in making hives with their own hands from cheaper materials. This is pine, spruce, fir. But in such evidence, the bees are not comfortable. They collect moisture and resins, especially in new ones.. Pine smell. There is only one good thing about them, they are warm and require minimal insulation for the winter.
Durable and environmental material. A house made of it must be covered with paints and insulated from the inside with polystyrene foam, then it will be dry and warm in it. But plywood is afraid of moisture and requires constant and proper care.
A modern material used by beekeepers to make hives. It has a low cost and does not require additional insulation in winter time.
The disadvantage of this material is fragility and brittleness. If poor quality is chosen, then the deterioration of honey is possible.
The most economical option. It is possible to use packaging from household appliances. The advantage of this material is its lightness even with filled frames. Excellent thermal insulation. The disadvantage of this material is its fragility and permanent coloration, so that from exposure sun rays did not crumble.
Excellent thermal insulation properties. Does not rot, does not decompose. It does not develop fungus and bacteria. It does not allow moisture to pass through and it does not accumulate inside. Bees, mice and birds do not like to gnaw it.
A slight disadvantage is its combustibility and ventilation is required, because it does not allow air to pass through.
Having carefully studied the characteristics of the material, you can begin to build a hive. Consider options for the construction of wooden and foam houses.
Houses for bees are divided by design:
Almost no one uses the latter because of the complexity of care.. All beekeepers use frame hives, where the number of frames can vary. A do-it-yourself beehive sunbed for 24 frames is popular. However, there are options for 16 and 20 frames.
In turn, frame hives are divided into:
Horizontal or "bed" consists of one body. The expansion goes to the sides. It is easy to work with such evidence, change the number of frames, but they have a drawback - they are bulky and heavy.
Vertical ones consist of several buildings. This form is lightweight and portable.
Both forms use multiple sections. They are separated by partitions, which allows you to change the volume in any direction.
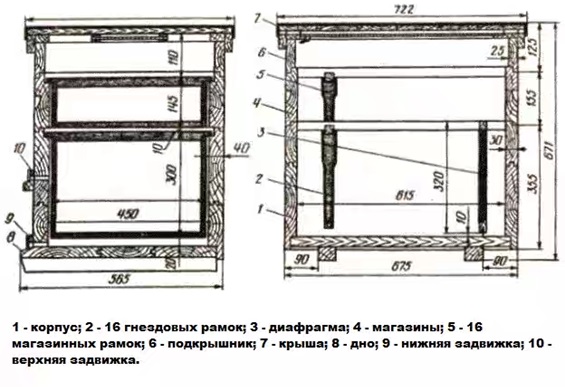
It is used in almost all apiaries. It is made of wood (cedar, spruce, pine, linden, aspen). Differs in simplicity and spaciousness. Consists of 12 frames and can be supplemented, as the family grows, with shops or buildings. In winter, bees are kept in the nest box. With the onset of heat and an increase in the family, they are placed in corps.

Multihull hive. Created by French beekeeper Roger Delon. Made according to the principle of a hollow. That is, created and taken into account natural conditions residence of bees.
Compact design is convenient for limited places . It has no partitions and ventilation holes. Air naturally enters through the notch.

This do-it-yourself bee house designed for keeping bees in the southern regions, because due to the constant rearrangements of the buildings, hypothermia of the house occurs. Consists of 6 cases on 10 frames.
In connection with the increase in the incidence of bees among beekeepers, cluster hives have become popular. Such evidence have thin partitions, so the bees create their own microclimate.
It is made only from wood and impregnated with wax, so the bees in them are less susceptible to diseases.

This design of the hive in size is the most suitable for beginners. They are easy to service. Easy to build, which will allow you to master the skills of beekeeping. Usually such a hive for 20 frames. The sides of the house are insulated, so the bees winter well in them.

There are many designs of evidence, but let's dwell in more detail on the classic, sunbed with a different number of frames and a multi-hull bezelless. AT this case there are beehives loungers for 16, 20 and 24 frames.
Due to the ease of manufacture, classic version considered Dadanovsky hive.
For the manufacture of hives, it is better to use natural materials.
The classic design for the production of hives consists of:

And now let's talk about how to make a beehive with your own hands step by step. The size of the hive for bees can be very different, but we will focus on one option. For this you will need:

The lid and liner require a board 15 mm thick. Collect and cover with tin so that water does not get in. Paint. Make ventilation holes with a diameter of 1.4 cm.

In order to place the frames in the case, it is required to make folds.
Dimensions 1.1 * 2 cm.
If there is a multi-hull bee hive, then the dimensions will be different: 1 * 1.4 cm.

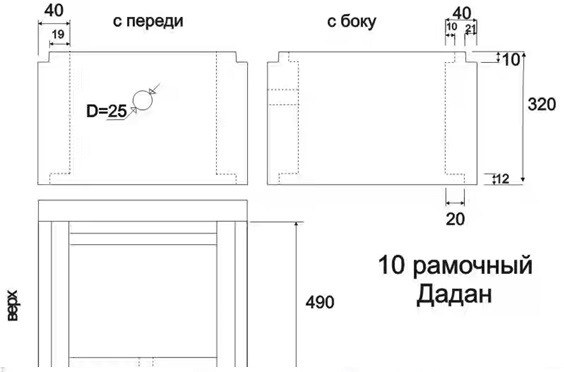
Frame located in the nest - 43.5 * 30 cm;
Store frame - 43.5 * 14.5 cm;
The distance from the walls of the case to the side rails is 0.07 cm;
Space under the frame - 2.5 cm;
Frame side width - 3.7 cm.
 Hive-lounger for 16, 20 and 24 frames
 What tools and material will be needed?
Hive dimensions:
Accurately observe the dimensions so that the construction of the evidence for bees with your own hands is even and without large gaps.
 Instructions for making a beehive lounger
 Should be painted white. This color is remembered better by bees. White color repels the sun's rays.
It is made according to the same principle with a difference in size.

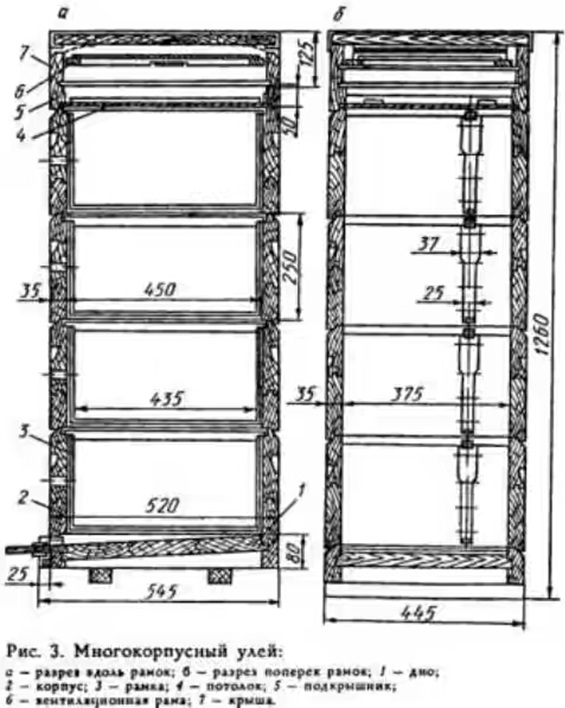
Multi-hull bessaltsevy beehive: dimensions and drawings.

Over the years, this hive has not lost its popularity in use. Convenient design allows them to be used everywhere. And yes, it is easy to make.
In order to properly build a hive, you need to know what the structure consists of:

The box looks like a box. Its inside size (cm): 37.5 wide; length 45; height 24.
It includes 10 - 12 frames measuring 43.5 * 23 cm.
Such sizes are more suitable for regions with a warm climate, and for the Russian climate, the width is made half a centimeter larger.
Reducing the size leads to inconvenience in working with frames. They are impossible to get when they are heavily propolised or swollen from moisture. Therefore, some increase the width of the case to 38 cm.
For the manufacture of cases, you need to take carefully dried boards. They should dry out within a year. When cutting out parts, the boards should be with a small margin (3-5 mm). The stock is left for further fitting parts. For trimming, it is recommended to leave an overlap of 1 cm.
On the front and rear parts case to make folds to put frames on them. Size 1.1 and 1.7 cm. This depth allows you to freely place the upper case.
On the side walls you need to attach handles or small recesses.
A hole of 25 mm is drilled from the end of the hive under the roof for ventilation of the house.
Boxes with frames are tightly connected to each other. In this case, folds are not used. Such constructive solution more convenient to operate and easier to build.
In cases with the use of folds, during transportation or movement, the bees most often clog in the lower part and hide in the folded recesses, subsequently dying. Most often, the uterus dies in them and beekeepers abandoned such hives in favor of a non-folded design.
A plate 2 cm thick is taken for the manufacture of the roof. A shield is knocked out of it, which is covered with galvanized tin.
The bottom is better to make removable, double-sided.
Make grooves in them. Width 3.5 and depth 1 cm. Assemble a p-shaped structure. The grooves are designed to install a floor plate.

It is necessary to provide a protrusion of the front by 50 mm. It serves as a landing board.
Roof lining (ceiling) - a solid shield assembled from dies, 52 * 44 cm in size. Around it is a rim made of rails. Their width is 3.5 cm and thickness is 1.5 cm. A hole is made in the center. It is necessary for ventilation between the buildings or a feeder is placed on it.
The liner is placed on the body with a smooth side without a rim which allows the bees to move freely. It can also serve as a dividing grid, in which case a mesh is stuffed onto the hole.
Stand. It is made from bars according to the size of the bottom. In the front part, a wide die is nailed at an angle of 45 °. This will be the landing board.

A recess 2.5 * 9 cm in size is cut out in the side bars. They are designed for convenience when you need to raise the hive or secure it when moving.
To increase the life of the bars, impregnate them with liquid bitumen. Dissolve it with gasoline. This procedure will make the tree waterproof.
Dividing grid dimensions. Designed to isolate the temporary isolation of the uterus. To separate the body with brood from honey.
The size of the grille must match the size of the inner case. She is put on bars. Made from wire mesh.
Frame sizes. Case and store frames, you can also do it yourself. They must match the drawings.

Drawings of multi-hull hives.


Frames are an important part in hives and most of the work is done with them. From constant use, they become unusable and need to be added. Therefore, the beekeeper should always have a large supply. To save money, it is better to make them yourself than to constantly buy them.

For the manufacture of frames, we will use the following tools:


For manufacturing, use natural materials. It is better if these are boards dried during the year. To make a frame, you need to know what parts it consists of:
Upper bar.
Grooved or uniform.
Bottom bar.
Plain, grooved or with a through cut.
Side bars.
They have holes for pulling the wire under the foundation.
The dimensions of the frames depend on the design of your hive. standard sizes are considered:
After we have chosen the material and decided on the dimensions, we proceed to the direct manufacture of the frame.
Foundation is fixed on the frames prepared in this way.
Now you know how to make do-it-yourself beehives for bees with drawings. Using the drawings and dimensions, you can easily build it yourself, thereby saving the budget and providing the bees comfortable conditions residence.
The article discusses the main questions regarding how to make a beehive for bees with your own hands; clarified key points and tips for creating decorative beehives with your own hands, which (that is, the hive) should perform a larger number of functions compared to ordinary bee nests.
Bees are very well organized insects that survive only in colonies with a functional division of labor. Each such family needs its own home or nest, without which good organization becomes useless. The nest is used by bees as a nursery for new brood, a shelter from rains, winds and cold weather, food storage, a place for laying eggs by the queen, etc.
That is, the bee nest performs many important functions, so its parameters should correspond to their more efficient implementation. In apiaries, the role of bee nests is performed by beehives, which can be combined into mobile mobile pavilions. But sometimes in different places you can find funny, bizarre and peculiar decorative hives.
The main purpose of decorative hives is not to accommodate the maximum number of bees and contribute to their vital activity, but to be a decoration of the surrounding interior.
As a rule, decorative hives are installed for people who are not beekeepers and who do not have a particular desire to dig into them and take care of the bees.
The main need for decorative beehives arises to decorate gardens and summer cottages, where the family can drink tea on the summer playground on weekends and admire the flowering of fruit trees. Such an idyll can be supplemented decorative beehive(with a small number of good bees), the appearance of which harmoniously fits into landscape design garden.
Such a do-it-yourself beehive for bees can be made from ordinary and common materials. The most popular are decorative hives in the form of wooden decks covered with straw hats.
A decorative hive should at least fulfill two functions: to be more or less suitable for the life of bees and harmoniously fit into the surrounding landscape, decorating it with itself.
In order for a wooden deck to be used by bees, it is necessary to make it hollow inside. To do this, on one of its sides, which will be the top, you should remove the core using a chisel and a hammer. You can also use a drill with a long drill bit to make many holes in the core from the top side of the deck. Such evidence needs a notch, a hole for the bees to fly in, which should be located on the side of the deck. Moreover, such a hole is located on the visible side. If there is a protruding knot on the deck, then for beauty the hole is made with a drill over such a knot. The diameter of this hole should ensure the entry of bees, but exclude the possibility of getting other living creatures. Inside a little lower drilled hole attach a small board, which should serve as a flight board. From above, such a deck is covered with a waterproof coating (a round wooden or tin plate), which is covered with a thatched roof for masking (a bunch of straw that is tied at the top and diverges evenly along the edges). Top cover: both thatch roof and waterproof cover - should be easily removed for carrying out necessary work in the hive.
To improve the decorative effect, such a deck can be varnished to match the color of the tree or tinted to taste to match the color of the surrounding trees in the garden. Often such a one-eyed house is placed on “legs”, the role of which is played by wooden blocks of small sizes. different shapes(the deck must be level). This is done both to insulate the hive and eliminate the dampness of the earth, but also to improve the decorative effect, when the result is a one-eyed stump with legs. The edges of the notch (holes for the entry of bees) in the form of an eye are often tinted with paint. Also possible additional elements this hive to the taste of the designer.
In addition to making a decorative hive with your own hands beautiful, you need to populate it with bees. You can call on the help of experienced beekeepers to share their wards, or you can try to catch swarming bees in it yourself. This is easier to achieve when there is bait in the decorative hive: empty combs and honey.
To exclude the disease of bees, it is better to use a deck of freshly cut wood, as well as disinfect the hive made both from the outside and from the inside. Before you make a decorative beehive with your own hands, you should look on the Internet for its possible variations. After that, the original plans can be significantly supplemented and improved.

I'll tell you how to decorate your garden plot, namely, let's talk about a decorative hive.
Many dream of their own home. A house, a garden, a lawn or a meadow, flowers around, beehives, bees buzz over flowers, birds sing in the air ... An ideal rural picture.
In this idyll, there is one very serious and difficult factor - bees, they need to be looked after, and not everyone is given this. In addition, these insects do not tolerate loud sounds. The lawn mower is also often questionable, because the bees are far from unambiguously reacting to this super-useful device. bee stings many people are allergic. And if you have small children, then they and bees are two incompatible elements.
But you really want the perfect picture. And there is a way out! If you want to create a fabulously pastoral garden on your site, a beehive will come to the rescue, but without bees.
It is not difficult to buy a decorative beehive, both ordinary and stylized, since today there is no shortage of offers. Even finding a hive that looks like a deck with a thatched roof is not difficult. But if you want to show your creativity, then feel free to buy the most common one and decorate it yourself.
As the first decor option, the hive can be painted with bright paint, you can with patterns, it's all about your imagination, and decorate the roof with the same straw. But this option is not suitable for every site, although it will be an attractive center. overall composition.
The second option for decorating the hive is to glue small sticks around its perimeter. In the same way, you can decorate the roof, and instead of the standard wooden box a real beehive will come out, which seems to belong to a fabulous bear.
As soon as I have my own house, I will definitely install a decorative beehive in the garden! And how do you like this idea?
Live
Ingredients:
- salt;
- a little flour;
- seasonings for meat;
- 3 cloves of garlic;
- 2 eggs;
- refined oil.
Cooking:
There is one recipe for very tasty pork chops in an egg. Ready in about an hour and a half.
Ingredients:
- 500 g pork tenderloin or loin;
- salt;
- a little flour;
- seasonings for meat;
- 3 cloves of garlic;
- 2 eggs;
- refined oil.
Cooking:
1. Cut the meat across the fibers into circles or strips. We beat each piece well and rub it with a mixture of salt and spices.
2. Break the eggs into a bowl and mix them with chopped garlic. Beat a little with a regular fork or whisk.
3. Pour the flour into any container.
4. Warm up the pan with oil well.
5. Take one chop. Dip it completely in flour, then dip it in the egg with garlic and immediately put it in the pan.
6. Fry over moderate heat for about 3 minutes on each side.
For those who are just learning, it will be interesting to learn how to make the face of a nylon toy.
The most important part in the process of work is sewing the face of the future doll. It depends on him how good the finished craft will look. Naturally, this process must be approached as responsibly as possible.
What you need: tights; synthetic winterizer; needle; threads. The most important part in the process of work is sewing the face of the future doll
Progress of work: Put the synthetic winterizer into the prepared nylon. Pull it off from above and stab it with a pin. pressing these areas with your fingers. Pin the places where the tightening will be done (the area of the bridge of the nose and the middle of the nose) with pins. Insert a needle with a doubled thread where the first of the pins is fixed and bring it out at the second mark. Pass the thread through the loop that has formed. Pass each segment at least three times. Make nostrils in the nose area, initially marking these places with pins. Pull the lower edge of the workpiece at the base, stretch the needle through the entire head and bring it out at the back of the head. lips. Sew the nose bridge additionally. Break off the upper edge and add a little more sintepon to the workpiece a. Form cheeks. Twist small rollers and form eyebrows from them. Pull out ears. Bend the workpiece from above and flash it.
My favorite pea porridge, I recently found a recipe with meat. so delicious, you must try it.
You will need:
dry peas - 2 cups;
water - 4 glasses;
onions - 2 large heads;
meat (pork) - 300 g;
Cooking
Boil the peas until tender over low heat.
Salt, mix to obtain a puree. If it is uneven, mash with a potato masher.
Cut the meat into slices.
Peel the onion, cut into half rings.
Fry the onion until cooked, put the pieces of pork on top, cover with a lid.
Stew over low heat, add spices, salt.
Put the frying on mashed potatoes, pour over the juice.
Preheat the oven to 180°, place the dish for 10 minutes.
Beekeeping is a laborious but very interesting occupation. Hive performs an indispensable attribute apiaries, but usually it's just a house for bees and about no decorative effect speech is not being made. However, there are hives that will definitely decorate the adjoining or country cottage area while performing its main function.
This is what a hive usually looks like - just a plain wooden box with honeycomb frames inside. The bees, in fact, are satisfied, but the beekeeper does not need more, especially since you can build and repair such a hive yourself.

Just a thatched roof and a DIY bee from a plastic bottle. Minimal decor, and a small hive has already changed and began to attract the attention of guests. illustrative example realization of the fantasy of the owner of the apiary, who decided to make a little more effort.
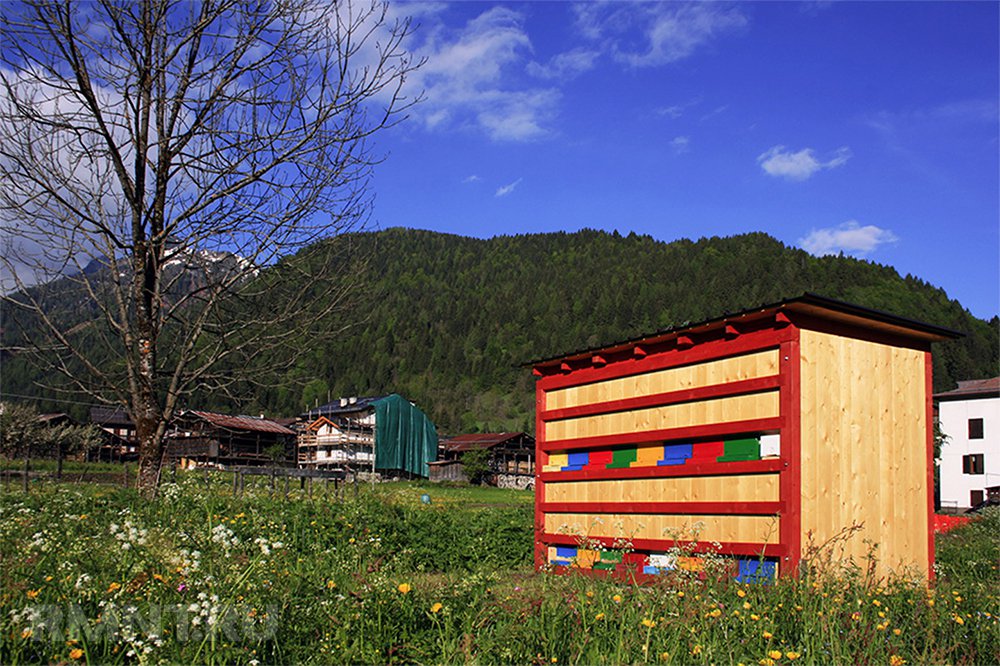

This bright beehive was designed and assembled by designer Massimiliano del Olivo. The design was named Bienenhaus ("House for bees" in German) and is now widely used in the Alps, where bees collect honey in mountain meadows. The area of each such hive is 6.5 square meters.

In general, an ordinary hive, but neat, painted in an attractive turquoise Yes, even with a real roof. And the bees are warm and comfortable, and the site has become more attractive. Roof in without fail should be removable, because the beekeeper will have to look in quite often and keep track of how his pets are doing there, how much honey has already been collected.

Bright wooden houses for bees look especially attractive against the backdrop of a green lawn. One hive even received carved balconies and windows. In such an apiary, you can sit for hours, watching the activities of tireless workers-honey plants.

Of course, the hives are always made of wood, a natural material that provides the bees with maximum comfort. If you are fond of wood carving, nothing will stop you from creating such attractive and functional masterpieces - carved hive towers.

Such small houses for bees it is advisable to hang on fruit trees and next to lush flower beds to attract insects and increase yields, such as apples, which will be actively pollinated. An unusual option, but experts insist that there are fewer and fewer bees on the planet, people should think about their comfort and help find shelter for the night.

Hive-mill. The option is not new, but always very attractive. Homemade mini mills are quite often used as decorative elements on household plots. In this case, they simply decided to combine beauty with a practical function by creating a small apiary.

Tall house for bees and other insects that collect and carry pollen. Such houses are assembled from improvised materials, the main thing is that there are enough holes where wild bees can live. Of course, such structures should be installed away from recreation areas so that insects do not disturb people.

Do you think that this is just an abstract installation from natural materials suspended on wooden wall? Meanwhile, this is a very unusual beehive designed by Urban Hedgerow and handcrafted.

Beehive temple. Someone will say that this is too much, why spend so much effort and wood on creating a decor that the bees themselves will definitely not appreciate. But how beautiful and unusual! It is also worth noting the skill of the creator of this unusual hive.

And finally - the dream of every beekeeper. This is a modern hive equipped with a system that allows you to collect honey without pulling out the frame and without making any effort. We are sure that it will be very pleasant to watch how day after day the jars are filled with fragrant, fresh and very healthy honey.
INSTRUCTIONS AND PROPHECIES OF THE Blessed MOTHER ALIPIA GOLOSEEVSKY, Kyiv...

Eufillin dropper in ampoules is used to treat pathologies that ...

Among all ointments for the treatment and prevention of joint diseases, the most ...