Bell pepper is a wonderful tasty and healthy vegetable that you can ...


Unfortunately, there is nothing eternal in this world, and a bathtub, even a cast-iron one, is no exception. Over time, its surface fades, becomes covered with limescale and rust spots. As such, these contaminants are not a problem - as long as there are no chipped enamel and deep scratches in it, then it is enough to simply fix them and return the bath to its former shine. How to do it?? Moreover, we will tell you not about one method of such a mini restoration, but about two.
How to paint a bath
The question of whether it is possible to paint a bathtub with paint is asked by many people. Unfortunately, a new high-quality bathtub costs a lot of money, and we cannot afford to buy consumer goods - you must admit that it is cheaper to buy a high-quality product once than to buy cheap ones with regularity in several years. So the question arises among people, is it possible to somehow update it? She can still serve and serve, if not for the yellow spots, which cannot be removed.
The answer to this question is simple - you can update any item, and the bathtub is no exception in this regard. You just need to know how to do it correctly, because you don't think what to paint cast iron bath can you use ordinary paint with a brush? The result is the same - the paint will peel off in a month, if not earlier. In general, the issue of the durability of the restored coatings is quite controversial - for some people it lasts 3-5 years, while for others it will climb after a couple of years of operation. It all depends on the quality and correctness of the work. In general, I say this to the fact that you need to be ready to carry out restoration work with enviable regularity.
How to paint a bath with your own hands photo
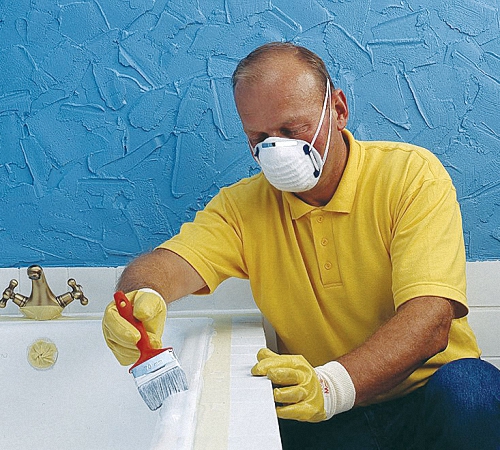
Preparing the surface of an old bathtub for painting is the most important stage restoration work, it depends on him how long the updated bath will last. This should be understood, and before you paint the bath, you need to carry out a whole complex preparatory work, which includes degreasing the surface and cleaning, without which it is not worth relying on the fact that the paint will adhere to the bathtub. In general, the whole process of preparing a bath for painting can be represented as follows.

The whole process of painting a bathtub at home is clearly demonstrated in the video.
So, first, let's deal with the enamel itself. I want to immediately warn you against a rash step. The stores sell enamel for the bath, packaged in aerosol cans - it is not worth buying it, as practice has shown its inconsistency to serve for more than one year. I do not know what this is connected with, and there is no desire to deal with this issue. One thing is clear that no matter how you prepare the bath, no matter how hard you try, the result is the same - after 10-12 months. this coating starts to peel off. To get a high-quality new coating, you will have to buy a two-component polyurethane enamel and acquire (or rent) a spray gun with a compressor.
The process of painting with this enamel is carried out in two, or better in three layers - a separate portion of paint is prepared for each of them. After mixing its components, the enamel begins to harden and after a couple of hours it will be unusable. This moment must be taken into account and the necessary portion must be prepared in the right amount, since such enamel is not cheap. Before applying the next layer, the previous one must be dried (read the instructions for the enamel), and then degreased.

What paint to paint the bath
The question of how to paint the bathtub inside is quite simply solved with the help of acrylic or Stakril enamel. Before application, thoroughly prepare the surface as described above. This material is simply poured onto the sides of the bathtub, and then it flows down them on its own, filling all possible flaws in the old bathtub.
This way of painting a bathtub with acrylic is very simple and is best suited for independent implementation. But it has one significant drawback. By itself, acrylic adheres poorly to old enamel - it adheres due to the roughness of the surface old enamel and its holistic design. It is worth scratching the acrylic layer, and then the process of its destruction cannot be stopped - the water will gradually undermine the acrylic and tear it off in layers. It is possible to slightly extend the service life of such a surface, and at the same time to protect the bath from such consequences, by applying a second layer of acrylic - the thicker the surface, the more difficult it will be to scratch through.
This is how the question of how to paint the bathtub with your own hands is solved? Whether it is difficult for you or easy, judge for yourself - in any case, if we are talking about an old, obsolete bathtub, then worse than it was, you are unlikely to do it. So it's worth a try in any case - at least, regardless of the final result, you will gain additional useful experience.
Over time, even the most expensive and high-quality bathtubs lose their visual appeal. This is due to the thinning of the outer layer of paint, the appearance of various darkening, yellow spots and other surface defects. The occurrence of these problems significantly reduces the visual appeal of the bathroom as a whole.
In order to eliminate this problem, you can either completely replace the bathtub, or carry out its restoration or surface painting. In this regard, the question often arises: "What paint should I paint the bathtub with?" In order for you to be able to do with complete confidence right choice, we recommend reading this article.
The photos presented in it will help you visually assess the attractiveness, advantages and disadvantages of a particular coloring composition.
Not knowing what paint to paint the bath with, it is necessary to choose the most stable one, since the painted surface will constantly come into contact with water, and be in a room with high humidity... Just choose the color of the paint you like without going into more detailed details, and without examining performance characteristics Is a big mistake.
Operational features of the dye base:
Advice: if you decide to opt for enamel, pay attention to the quality of the composition. A spray method is not suitable for staining cast iron bath, since it is of low quality - such a coating will not last long.
For your information! If you do not know what paint can be used to paint a bathtub, we advise you to pay attention to the following products: "Dulux", "Jobi", "Tikkurila".
In order for the paint for the restoration of bathtubs to lay down evenly and form required thickness the final layer, it is necessary to apply several layers in succession. As a rule, no more than three coats are needed, each of which hardens quickly enough.
Tip: Since the base color hardens very quickly, do not cook it in large portions. In order for the consistency to completely harden, it will take no more than two hours. Therefore, staining must be done quickly, and the composition must be mixed in one layer.

Bath paint must be selected separately, according to the type of surface to be painted. In order to paint the outer surface, you must use alkyd enamel... It contains pentaphthalic.
Tip: In order to paint the outer surface, you can either simply prepare, clean and degrease the surface, or pre-prime it with an alkyd primer. In the second case, the adhesion to the surface and the quality of the paint will be higher.

There is no definite answer to the question: "How much does a bath paint cost?" The price depends on the manufacturer, quality and composition of a particular product.
In order to paint the inner surface of the bath with your own hands, you can use both acrylic and multicomponent enamels:
You can learn more about the advantages and disadvantages of each paint by watching the following video.
Tip: If you do not have enough experience in painting, we advise you to choose easier-to-use acrylic pouring compounds, which, due to their optimal consistency, allow you to apply layers of the same thickness, and at the end create an even and smooth coating.
If you do not know how to clean the paint from the bathtub and carry out its restoration, we suggest that you familiarize yourself with a small step-by-step guide:
Important: Since grinding equipment is quite expensive, and not everyone wants to buy it for rather rare use, we advise you to rent such a tool from a specialized company.
Important: Finally, let the paint dry completely. To do this, leave the coating to dry for a day. In this case, all doors and windows in the room must be tightly closed so as not to create drafts. Such insulation will prevent dust and dirt from settling on the surface of the product. Try not to bathe in the bath for 5-7 days - this will allow the paint to completely harden and adhere well to the surface.
Unscented bathroom paint, most often has acrylic base... It is very convenient to use such a composition, since staining and restoration can be performed not only at the stage of global repair of the entire apartment, but also at the moment when the family already lives in the apartment.


Paint for pipes in the bathroom, allows you to hide all defects and unaesthetic nuances, such as rust, darkening, stains.
The choice of the composition depends primarily on the material for the manufacture of the pipe structure:


Tip: If the pipe is hot, give preference to special heat-resistant compounds. But it is better that the pipe is not hot at the time of painting, since the paint on such a surface dries very quickly. This will not allow, if necessary and lack of experience, to correct all the shortcomings.


Tip: If you want to save your time and effort, and paint in just a few steps, we suggest paying attention to special coatings that combine not only paint, but also a primer.
Now you know exactly what paint to paint the bathtub and pipes. This will allow you to make this process as simple and straightforward as possible at every stage. If you follow all instructions exactly, the coating will look beautiful and will last for many years.
Even if you wash and dry your bathtub thoroughly after each use, the enamel of this sanitary fixture will not remain pristine white and shiny like when you bought it. Over time, the inner surface of the bowl turns yellow, becomes covered with small cracks, chips due to constant contact with water and mechanical stress.
Only re-enameling the bathtub with your own hands can return the whiteness and gloss. High-quality enamel for the bathroom, applied to the prepared surface, can extend the service life of the product by 1.5-5 times at relatively low cost. In this article we will tell you what types of opaque compositions are used for this and how they differ.
Each container for washing during the production process undergoes an enameling procedure, that is, it is covered with a layer of resistant paint, which gives the surface color, glossy shine and smoothness. V modern models enamel for the bathroom in the form of powder is applied electrostatically, and then "baked" at a high temperature, so the coating is durable, strong. You can paint the bowl at home with acrylic or epoxy enamel using a roller, brush or pouring method.

These compounds are used because they have the following qualities:
Please note that home enamel coating is very different from the factory one, so it is more fragile. The service life of an epoxy paint composition is 5-7 years, an acrylic paint - 8-15 years, and enamel in spray cans used for local repair cracks - only 1-2 years.
To paint the bath yourself to restore the whiteness, shine and smoothness of the product, use different kinds specialized enamel, which is developed taking into account the conditions of use. The quality of re-enameling of plumbing fixtures depends on 3 factors: the correct choice of the coloring composition, the quality of the enamel and the correct preparation of the surface for application.

Bath enamels differ according to the following criteria:

Important! To facilitate the application of the enamel, it is necessary to properly prepare the surface of the bathtub for staining. Before painting a product at home, it must be cleaned of dirt, old enamel removed, degreased and dried thoroughly. The quality and durability of the effect depends on the observance of the enameling technology.
Bathroom enamel based epoxy resins- effective and available remedy to restore the whiteness, shine and smoothness of the product. It is a two or three component mixture consisting of a base, a hardener and a plasticizer, with a thick, viscous consistency. The enamel is applied with a natural brush or roller in several layers. This type includes the popular brands Epoxin-51, Epoxin-51C and Reaflex-50 from the well-known Finnish company Tikkurila.

The advantages of epoxy enamel are:
Note! Before painting the plumbing fixture with epoxy enamel, keep in mind that the drying time of this composition is 5-7 days. For the first 2-3 days after application, you should not even enter the room so that dust does not settle on the bath, and then the use of water should be limited. There is a simple rule: the more time it takes for the enamel to dry, the stronger and more resistant the coating.
Acrylic based enamel - more modern and effective remedy for coloring plumbing equipment... It creates a 6mm thick, durable, smooth and glossy finish. Acrylic enamel is a two-component mixture of base and hardener. Compared to epoxy enamel, liquid acrylic is more fluid and plastic. This coloring composition is applied by pouring or with a brush... The most popular acrylic compound used for bath repairs is Stacril.

Acrylic based enamels have the following advantages:

Liquid acrylic for painting bathtubs is more demanding in terms of surface preparation. In order for the coating to be smooth and durable, it is necessary to clean the product, remove upper layer old enamel with sandpaper or a grinder with a sanding disc, seal up chips and cracks with a putty, degrease, and then dry thoroughly with a construction hairdryer. Only if these conditions are met, the result will be stable and of high quality.
A bathtub is an integral part of every home. However, in the course of its operation, it loses its original given view... In this case, the bathtub needs either replacement or restoration. The second option is less expensive, but for its implementation, it is necessary to study the technology of painting the bathtub. We will consider how to paint a bath with enamel further.
There are several methods that can be applied to restore old bath... Before proceeding to study them, we suggest that you familiarize yourself with the types of bathtubs that are most popular among buyers:
1. Cast iron bath - traditional option. Among their advantages are:

2. The bathtub, made of steel, is distinguished by its advantages. Among them are:

Among the disadvantages of steel baths are:
There are several ways to apply enamel to the bathroom surface. The choice of a particular staining method depends on the type and characteristics of the materials used in the process of carrying out the work.
We suggest that you familiarize yourself with the first option for bathroom restoration, which is called conventional enameling. After ten to twelve years from the date of purchase of an enamel bath, they need additional enamel coating.
The factory conditions in which a bath with an enamel coating is made simplify the process of applying enamel to a bath made of steel or cast iron. The incandescence is performed first outer surface until the bath turns red. Next, an enamel-based powder is sieved on the inner surface, after a certain time, the powder is combined with metal surface... Thus, the factory coating is characterized by evenness, uniformity, the presence of a glossy sheen and an attractive appearance... However, for home conditions, this method is unacceptable.
Damage to the enamel layer occurs for the following reasons:
Thus, if these two factors constantly, over the course of many years, affect the bath, its enamel gradually loses its strength and begins to flake off, crack and contaminate.
In order to restore the enamel coating of the bathroom, you must first prepare the surface for applying the enamel, and then paint it.
To perform these actions, you will need:

The first stage of working on a bathroom involves preparing its surface for work. The final result of the work and the duration of its further operation depend on the thoroughness of cleaning the bathroom. In order to prepare the bath for staining, follow a series of steps:
1. Sprinkle the surface of the bath with an abrasive powder. After a certain time, use sandpaper and a grinding wheel to remove the old enamel.
2. Treat rusty areas on the bathroom with converting agents. Wait about 30 minutes and continue working.
4. Then the enamel layer and all the crumbs are washed off.
5. Using a fat splitter and a napkin, it is necessary to clean the bathroom from foreign particles.
6. Let into the bath hot water and warm it up for 15 minutes.
7. Drain the water and wait for the bathroom to dry, to speed up the process use the same lint-free napkins.
8. The surface must be perfectly clean without foreign inclusions or enamel residue.

Bath enamel is the next stage of work. For correct application enamel use the instructions below:
1. If you plan to use enamel, which contains two components, then first they are connected, and then the bath is covered with enamel.
2. For the first coat of paint, use a brush or spray.
4. Then the bath is covered with another layer of enamel.

This method of restoring the bath is not as popular as the previous one. This is due to the fact that the material used in its implementation appeared on the market several years ago. This substance is called starakril. It appears as a two-component substance used exclusively for the restoration of bathtubs.
The material consists of the acrylic itself and the component that cures it. In the process of combining these two components, polymerization occurs, after covering it with a bathtub, it acquires a uniform texture in the form of a film, with a thickness of 0.4 to 0.6 cm.
Among the advantages of painting with enamel in the form of starakril it should be noted:

How to enamel your bathtub with starakril:
1. The first stage also involves preparing the bathroom for applying the composition. It consists of the same actions as in the previous version. However, after heating the bathroom and drying it, it is necessary to disconnect the siphon, and instead of a stack, you should install some kind of reservoir, into which excess enamel will fall.
2. The second stage is the direct application of paint to the surface of the bathroom. To begin with, you should study the instructions from the manufacturer, in it you will find detailed description enamel preparation process. Next, you have to paint. However, its implementation is very different from the previous version. This method is also called bulk, since the paint is gradually poured onto the surface, starting from the edge and moving to the middle.
3. After closing the circle, repeat the process of pouring the enamel again. Please note that the whole process must be continuous, therefore, when preparing the paint, you should use a container large enough to paint the entire bath.
4. Do not skimp on paint, splashing out a little more material rather than underpainting the surface. If the bath is not covered with a uniform and monolithic layer, then the process of its operation will be significantly reduced.
5. Wait 3 to 5 days for acrylic to cure. The longer it takes for the acrylic to dry, the longer your bathtub will last. It is on this basis that you should choose paint in the store.
After dyeing the bathtub using this method, it will serve you for at least 15 years.

To perform this method, use the instructions:
1. Use pemolux to wash the bath well. Replace this substance any composition with aggressive properties can. First of all, after completing this process, the bath must be absolutely fat-free.
2. Next, the surface is polished using a grinder. Please note that in the absence of experience with this tool, it is better to give preference sandpaper, as there is a risk of damage to the surface of the bath.
4. Using a regular hair dryer, dry the bath. Please note that the drain part needs additional drying. Do not heat the bathtub with a building hair dryer, as it works at a high enough temperature, which can also damage the surface.
5. Remove the drain from the bath, place any container under it. Use a vacuum cleaner to completely remove dust from the tub.

The next stage involves enameling. Divide the paint in two. The first part will be applied to apply the base coat, Using a stiff bristled brush, begin work. Please note that Special attention it is necessary to pay to the bottom of the bath, as it is most susceptible to mechanical stress.
Immediately after applying the first coat, start applying the second. This technology called “wet on wet”. After that, the surface is left at rest for 10 minutes. If there are smudges on the bathtub, you should get rid of them; for these purposes, use a brush. After the bath has dried, it is connected to the sewerage system and its operation begins.
The process of staining the bath is preceded by the selection of materials for the work. We propose to dwell on expensive compositions, since they have higher performance characteristics.
In addition, you should pay attention to the drying time of the composition, the higher it is, the stronger the acrylic layer will be on the surface. Acrylic-based compositions do not differ in a variety of colors; in this matter, individual preferences should be guided. Try not to choose bathroom enamel that differs from the old layer by more than one shade. Otherwise, there is a risk of transillumination old surface and the appearance of heterogeneous blotches on the surface of the bathroom.
If, nevertheless, you decide to repaint the yellow bath in snow-white White color, we recommend buying a little more paint and applying it in several coats. Also, when choosing enamel, be sure to read the instruction manual and compare it with your capabilities.

Tip: Prepare the two-component composition for work only after the bath has been cleaned of old enamel, washed and dried.
The option of using aerosols for the bathroom is possible, but the duration of operation of such a coating does not exceed five years. Therefore, it is better to spend a little more money and effort so that the enamelled bath will serve you for at least 10 years.
To paint a bath with enamel with your own hands video:
Each manufacturer has in its arsenal moisture-resistant, specialized paints for wet rooms. Water-dispersion paints that are resistant to constant exposure to water are widely used. They don't wear off pretty long time, dry very quickly, do not have a strong odor.
A very important feature paints and varnishes for the bathroom, it is the ability to repel steam. Pay attention to the composition so that it must contain fungicides and algicides. They prevent mold or mildew from spreading.
An important point: so that cracks do not form on the painted walls later, and the surface has an effective and attractive appearance, apply dyes on completely dry walls. Otherwise, condensation will form under the coating, which will lead to a deterioration decorative properties coloring.
If you apply decorative plaster, it is better to focus on those types in which wax or water dispersion varnish is used - they will provide protection from water drops and from a humid environment.
Bell pepper is a wonderful tasty and healthy vegetable that you can ...

A rather specific injury is a fracture of the fifth metacarpal bone with ...

Translation from English: Cand. honey. Sciences Gorelov V.G., Dobrodeev A.S., Candidate of ...