Physicist and astronomer Stefan Feeney of University College London, one of the...


There are many reasons for electrical wiring problems, and everyone can do all the removal work. In this article, we will look at ways to determine damage and the process of their elimination.
A break in the wiring can happen at any moment, as well as at a time when the wires are energized. Damage can be caused by any malfunction, for example, wire marriage, poor-quality wiring, and so on. In places where the cable is damaged, the wires will constantly heat up, and in case of increased voltage, a wire break occurs.
The causes of malfunctions can be mechanical damage, which is preceded by hammering nails or inaccurate drilling of holes in the wall. Also, other reasons may be the lack of light or electricity in the wall, which means that all the plugs in the system have burned out, due to an increase in the voltage in the network. This happens when one phase or all are overloaded. An increase in voltage in the electrical network can also cause a wire break.
If there is a break in the wiring in the electrical network, then it can be of two types:
In the case of a hidden system, you need to find the location of the problem in the wall. Finding a cable line is easy with the help of an ordinary transistor receiver. To start the procedure, you first need to connect any device to the outlet, for example, an electric shaver. In this case, your receiver must be restored to the medium wave range, and move it over the entire surface until you find the location of the problem. Determining a wire break at a particular point will be accompanied by noise and crackling when you pass a certain area.

In the absence of electricity within the apartment, it is necessary to determine whether the voltage is supplied to the meter. To do this, it is necessary to touch the contacts of the meter with an indicator tester, before turning off the machines in the electrical panel. If there is no voltage when pointing the tester at the meter, it means that the place of damage is in front of the meter. Otherwise, when the voltage is shown on the meter, this means that a break has occurred in the apartment. In some cases, all faults can be eliminated by replacing the fuses. In more difficult cases, it is necessary to troubleshoot the system, which we will discuss later.
The process of detecting a broken wire within the home can sometimes be difficult to find, especially if the cause is an overload of the system or mechanical problems in the wire. The place where most often there is a break in the wiring is movable boxes. This is due to the fact that at moments of high resistance, the wires can burn out.
Of course, in the case of open wiring, it is easier to find the point of damage, and in the case of hidden wiring, it is possible to rip off the entire circle of plaster in an apartment or house. This is necessary because the wires have two-core plastic insulation, which makes it quite difficult to find the point of failure. In such cases, it is recommended to seek support from specialists, because the amount of work is very large.
Before everything starts electric installation work you need to prepare and find the following tools:
In many cases, the proximity indicator is screwed into an indicator screwdriver. But, in order to determine the efficiency and accuracy of the work, it is necessary to double-check the wall for the absence of metal elements that can interfere with finding a broken wire.

1. First you need to determine the type of damaged wire, for example, phase or zero.
2. This is done with the assistance of an indicator screwdriver, which determines all contacts of switches or sockets for their serviceability.
3. If it is determined that the socket is under electric voltage, then it contains only one of the contacts. In the case of a circuit breaker, at the moment of power amplification, only a single contact will be open or all will be closed.
4. If this screwdriver detects that the phase is operational, it means that the damage has occurred on the neutral wire.
In the case of hidden wiring, the point of damage to the wire can only be determined or repaired by electricians. Otherwise, when the fault is in an open system, finding a broken wire is easy using an electrical tester.
5. To determine the break point, it is necessary to turn off the voltage for the base in the junction box, as well as on the wire.
6. At the point where the wire is connected to the junction box, the main incision is made, that is, the waterproofing is notched. This is carried out in order to expose the cable to its metal base.
7. After, after about a meter, a new incision is made. On the marked area between the two notches, the electrical resistance is determined by the tester. If the indicators are too small, then the gap is not located here.
8. Next, after the second cut, after a meter, you need to work out another notch, and on new area measure the voltage level. A similar procedure is carried out until you find the wire break point, and the resistance is displayed on the tester. Within this meter, there will be a break in the wiring.
9. The next step involves limiting the line of the damaged area. Further, in the same way, it is necessary to make cuts on the wiring, but with a smaller distance between them. For starters, an interval of half a meter is suitable. This will determine which part is showing resistance. When determining the area, it is necessary to carry out the procedure again with incisions already with a smaller distance. Using an electrical tester in the given case, a wire break can be determined with considerable accuracy, even measuring the damage distance to the millimeter. In many cases, the need for accurate measurement is not necessary, because the damaged area is located earlier.
10. After the stage of determining a wire break, the repair is eliminated, and all open areas are insulated back.
Breakage of hidden wiring has more difficulties than open system. Troubleshooting can be done in two ways:
Finding damage to cables can be done using the acoustic option. To complete this procedure, the presence of these elements is required:
The process occurs by listening to the damaged area using the above devices. At the point of searching for a break in hidden wiring, characteristic clicks will be heard in the headphones. It is important that the generator can be tuned to the required frequency.
In the case of the induction cable break method, the generator is connected to power cable. The situation of connection to the system can be different, as evidenced by the type of damage. The load level is set, after which a specialized sensor and headphones are used for listening. In the moment high load, the specialist will hear a certain signal at the point where the wiring in the wall broke.

There is a certain order for searching for a broken wiring, regardless of the type of damage and search breaks.
So, the search process is carried out as follows:
1. Before starting to search for the place of damage, it is necessary to disconnect the electrical cable power from any sources.
2. In some cases, cable insulation is burned to reduce the level of resistance;
4. In some electrical work, locators are used. With their assistance, you can easily and quickly determine cable line, and also find all conductive wires that have a certain voltage level or not. V this case, can be used for best effect generator, which can be purchased with individual models of locators.
V modern world, especially in European countries, began to use new technology conducting cable networks. It lies in the fact that some beacons or markers are installed in the wires. By using locators when searching for a cliff, these elements help pinpoint the location of the problem. This is very efficient and convenient for electrical work, although such a system has not been installed in our country.

To determine the point of failure in a concrete or brick base, it is worth using a non-contact indicator to detect hidden wiring. Before starting work, you need to know the fact that all cables in such buildings are installed in a horizontal and vertical position. In this case, all turns in the arrangement are made at right angles. On the one hand, this helps to determine the layout of wires and cables from the box to the outlet as correctly as possible.
To the question: how to find a wire break in the wall in the delivered episode, you need to use the indicator. Along the network of cables, it is moved along the wall, and in the area where the break happened, be sure to hear a characteristic signal. As a rule, the device stops beeping at the points of broken wiring.
To detect faults in a concrete or brick base, other methods can be used: an oscillatory discharge, a capacitive method, and a step voltage method. In these episodes, the determination of the point of damage and its correction is carried out with the assistance of companies that are engaged in electrical work and are licensed to carry out these procedures.
Special companies, as a rule, have not only experience in work, but also necessary tools, materials, and equipment that is designed to eliminate all problems. In situations where you yourself carry out electrical work, you must remember safety precautions, as well as follow clear instructions. The main thing is to make sure that you turn off the electricity in the entire apartment or house several times.

With the question: how to find a break in the wiring, we figured it out. It's pretty milestone, which requires care and accuracy in the work. The process for fixing a broken wire is as follows:
1. Before starting work, turn off the phase wire.
2. Using a hammer, it is necessary to remove all plaster from the surface, including the right and left sides from the center of damage. Approximately, you need to release about 10 - 15 centimeters.
3. Separate the two ends of the interrupted wire to different ends.
4. Using a hammer drill and special hole saw, make a hole in the wall to fit the junction box.
5. After that, it is necessary to place a box in the opening and fix it with alabaster.
6. Place the wires carefully into the box.
7. If there is a reserve, damaged wires must be combined by color and wrapped with electrical tape.
8. After that, the box with the restored wires must be closed with a lid. Now the repair place can be covered with plaster. In a situation where the wiring is in special tubes, the broken wires are carefully pulled out. Instead, you need to insert new wires using a pulling tool.
We covered the phase wire troubleshooting process. To carry out the repair of the neutral wire, all steps remain the same, except for the first. At the beginning of work, you need to disconnect the neutral wire from the bus and attach the phase wire to it. Further, all troubleshooting steps remain the same.

In fact, all work with devices for breaking wires and troubleshooting has been completed, after which you can turn on the electricity in the room.
The process of finding a wire break, as well as its elimination, requires certain knowledge. In a situation with open wiring, everyone will be able to complete all the procedures, and in moments with hidden wiring, it is better to contact specialists. We hope that this article will help determine the location of the cliff, as well as eliminate them using special devices.
Electricity is a source of energy, and is useful until it gets out of hand. Having escaped to freedom, it can create many troubles, the main of which is a fire.
The main cause of fire hazards is, of course, faulty electrical wiring. It is necessary to monitor the condition of the insulation of wires and cables, in time to replace the damaged ones. Also, the old wiring, made "under Tsar Pea", is a great danger in the fire plan. Over time, the insulation of such wires simply dries out, cracks and crumbles, which can lead to a short circuit and fire in the premises.
The old wiring was carried out with wires, the insulation quality of which was much lower than that of modern ones. It is worth remembering at least the cords of old electrical appliances in filament insulation or external open wiring on ceramic rollers.
 The reason for the increased fire hazard may be the insufficient cross section of the conductive conductors (TPZh). A wire with a cross section of TPZH 0.75mm2 is quite sufficient to connect a light bulb or even a chandelier. But if you connect a modern washing machine, iron or kettle, then it will get very hot, which will lead to melting of the insulation, and then to a short circuit. Strictly speaking, the TPG section is selected from the expected load either according to calculations or using ready-made tables at the stage of electrical wiring design.
Electricity leak
Damage to the wire insulation may cause a malfunction such as leakage. This is the probability that, under certain conditions, some of the energy may go in the wrong direction. A simple example. The wires are laid under the plaster.
In the dry state, it is an excellent insulator, so damage to the insulation of the TPG is not detected in any way. But if, under some conditions, the plaster gets wet, for example, heating or plumbing leaks, it immediately becomes conductive, not even a source of electricity. If a person comes into contact with such a wall, an electric shock is quite possible.
Short circuit and his reasons
It is known that faulty electrical wiring leads to a short circuit, which most often causes a fire. This is often mentioned in fire reports. What is a short circuit, why is it dangerous?
 In normal operation, the current in the wiring between the phase and neutral wires flows through the load, which limits this current to a level that is safe for wiring. When the insulation is destroyed, the current flows, bypassing the load, immediately between the wires. Such a contact is called short, since it occurs in addition to the electrical appliance.
But yes, if everything is done correctly, it is necessary to periodically carry out at least once every few years Maintenance and checking all contacts and connections electrical wires or cables.
Often, electrical wiring requires repair as a result of its improper operation. Periodically, there is a need to replace electrical wiring in a city apartment. In any case, during a malfunction occurs:
In order to avoid problems with the electrical network of your home, you need to know the causes of damage to it. Let's look at the types of faults in electrical wiring, indicating their causes.
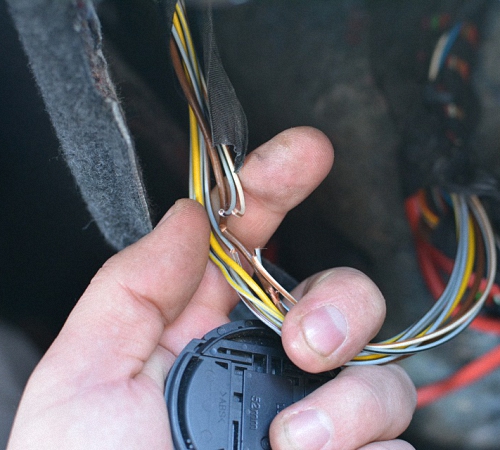
 Often the wire breaks and in places of its multiple bends in one place in distribution or mounting boxes or socket boxes designed to install switches and sockets in them. Often the wires leading to the chandelier or lamp from the ceiling are broken.
 The only way out is to replace the power line a larger cable from the consumer to the electrical panel. Attention, often old machines do not always work properly and provide effective protection for home electrical wiring.
 be careful and do not pinch the insulation part. In especially neglected cases, the contact burns out, the socket housing is destroyed, the insulation and the cores themselves are damaged. Always watch and tighten all electrical wiring contacts. Sometimes twisted wires in junction boxes that are installed under the ceiling burn out. Periodically check and tighten the twists, but do not use electrical tape for insulation, but only
If the wiring is properly designed and installed in accordance with PUE requirements, malfunctions in it rarely occur.
However, if the power supply to any part of the circuit is interrupted, the problem should be found and corrected. In this article, we will tell you how to find a break in hidden wiring in the wall.
Let's see how to find a malfunction in the wiring? Malfunctions occur due to incorrect or careless installation, violation of the integrity of the insulation, wire breakage, poor contact between circuit elements or network overload. The fault is indicated by:
Indirectly, a malfunction is indicated by too frequent operation of protective automation.
Most often, malfunctions occur at the junctions of wires at, at the points of connection to the contacts of automatic machines or switches of the lighting network. Such malfunctions belong to the first class, they account for more than half of the cases of electrical network failures. All of them are relatively easy to detect and eliminate.
Second class of faults- damage to hidden wiring during repairs during drilling, chiselling and other work related to the need to penetrate into the thickness concrete structure. Due to repairs, a screw or a nail may be driven into the wiring. In such cases, there is a high probability of a short circuit in the wall.
Minor damage to the insulation does not always show up immediately, the problem may occur after several months or even years.
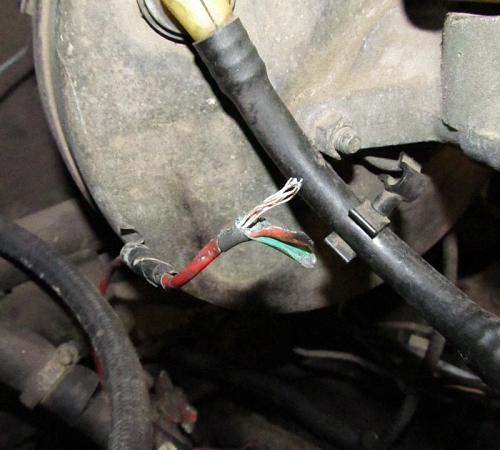
Third class- a wire break directly in the wall without outside intervention. This is a fairly rare occurrence, and class 3 failures account for about 20% of failure cases. A break may occur due to heavy wear wiring made of aluminum wire, network overload or malfunction.
The cause of the break may also be violations of the installation technology., for example, twisted connections, mechanical damage to the insulation or incorrect calculation of the wire cross section for a specific connection group.
The most “harmless” consequence of a wire break is the lack of voltage at a single connection point, the entire connection group, or the whole apartment. In the event of a break in the neutral conductor, in addition to de-energizing a single branch or apartment as a whole there is a threat of overloading the healthy part of the network. Sparking wiring or a short circuit can lead to more serious consequences, including a fire.
 To search for a break you will need:
First of all, you need to define an emergency connection group. If you have, there is nothing complicated about it. If there is a phase on the damaged outlet, then turning the machines on and off, you can find the wire you are looking for. The presence of a phase is checked by an indicator. The connection group in which the problem has been identified should be completely disconnected from the machine, disconnecting all cable cores.
After that, you need to sequentially ring all the connections, starting from the cable in the shield until you find the place where the sockets are connected by one core. If there is access to junction boxes, they must be opened. If there are no problems inside, the damaged core is called from the connection.
If the boxes are not available or the wiring is done without them, you need to remove the sockets along the entire length of the damaged area and ring through them. Most often, problems occur in the first outlet, since it accounts for the maximum load. If the damage is still not found, then it is inside the wall.
Most fast way detection of a phase conductor break - search with locator. The device consists of a receiver and a generator. The generator is connected to a damaged wire: the negative terminal of the device is attached to the whole core and grounded at the access shield, the positive terminal is connected to the damaged core.
 After that, the generator is turned on and into the whole core, impulses are supplied from it. The locator receiver must be moved along the wiring route.
The receiver responds to pulses from the generator and emits an audible signal. Above the gap, the sound signal stops.
To clarify the localization of the gap, the generator is connected to the other end of the damaged area and the search procedure is repeated. Ultimately, the audio signal disappears at the previously detected point.
Counter search for the accident site- a necessary condition, since the accuracy of determining gaps is usually about 10-15 cm. The more accurately the location of the damage is detected, the less work will have to be done.
Sometimes problems arise with the neutral wire. In such cases, when checking the contacts on the indicator screwdriver, a faint glow is observed when it comes into contact with the zero contact. People who do not have experience in troubleshooting the electrical network interpret this as "two phases". When checking with a multimeter, any voltage can be fixed on the contact in the range from 0 to 220 V.
It should be remembered that when zero breaks, a faulty outlet can shock because it has a phase. The search for a zero break is performed in exactly the same way as the search for damage to a phase conductor.
If there is no locator at hand, you can find the place of the cliff using a radio receiver. The receiver is tuned to any channel of the medium wave range, an electrical appliance of small power, for example, an electric razor, is plugged into the emergency outlet. The included receiver is slowly moved along the route.
The integrity of the wire is indicated by noise, crackling or other interference.. Over damage, the nature of the interference changes or they disappear altogether. What other devices can determine the breakage of hidden wiring, find out from this.
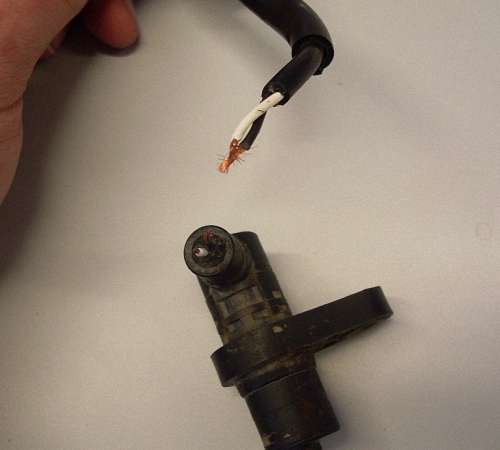
In the place of violation of the integrity of the cable, the strobe is opened with a perforator or with a hammer.
If the problem occurs in new wiring, the ends of the wire must be connected. The connection is made as follows:

In some cases, the damaged area must be completely replaced by pulling it through with a pulling device.
The procedure for repairing a damaged neutral conductor is slightly different from repairing a phase. The neutral wire is disconnected from the bus and a phase wire is attached to it.. After that, all other actions are performed in the same way as when eliminating a phase break.
Detect and eliminate hidden defects wiring is extremely difficult, but some troubles can be avoided. Before embarking on any repair work associated with penetration into the thickness of the walls, you should find hidden wiring using a locator or any other available device.
If we are talking about old-style wiring made of aluminum wire, it is advisable to replace it completely as soon as possible.
The main measure to prevent power failures is proper design and strict adherence to installation rules.
Electrical wiring damage, although infrequent, does happen, and any owner in his house or apartment should be able to find the causes and place of damage. In order to help you in this simple matter, this article was written.
In it, we will look at troubleshooting methods, the most likely damage and, of course, how to eliminate them.
The reasons for the short circuit of the electrical wiring are quite diverse, but most of them are associated with its improper operation and non-compliance with the rules during installation.
We list only the most common causes of damage:

Finding the location of the damage will greatly facilitate the wiring plan, if you have one. This will not only significantly reduce the search area, but also eliminate unnecessary actions in the undamaged section of the power grid. But usually there is no such plan and you have to search in the hope of observing generally accepted norms and rules.
Before proceeding with the search for the place of damage, we should determine the nature of the damage. We will consider damage to a single-phase 220V network, since it is used in most houses and apartments.
For a three-phase circuit, there can be much more damage options, and only determining the nature of the damage will require much more effort.
So:

Note! When checking the presence of a phase at the connection point of the ceiling or chandelier, the lighting switch must be turned on. If the phase is present, then open the switch and make sure that it is gone. If the phase is still present, then the connection of your lighting network does not comply with the PUE standards. This will greatly complicate the further search with your own hands.
So:
Having determined the nature of the damage, you can proceed directly to the search for its location. In more than 50% of cases, the site of damage is one of the contact connections.
After all, this is the weakest point. Therefore, we begin the search by inspecting the contact connections of the socket, switch or ceiling.

Note! In order not to make a mistake, check that there is no socket or switch in the adjacent room. In addition, before proceeding with the repair of damage, check everything a few more times.

Separately, we will consider the question of how to find the place of damage during a short circuit. Indeed, with this damage, it is not possible to apply voltage to the damaged area.
When voltage is applied, the machine turns off or the plugs burn out:
Note! During the execution of these operations, no electrical appliances should be powered from the sockets or the lighting network of this group. All of them must be removed from the sockets, otherwise it may damage them.

Repairing a damaged area is quite simple (see). Although ideally a new wire should be laid, temporary repairs can be made to this section as well. To do this, it is important to use a wire with a cross section not less than the existing one and from the same material.
So:

As you can see, finding the location of the wiring damage and troubleshooting is not so difficult task. The main thing is to observe safety measures and have minimum set knowledge.
After all, there are videos that are best example what happens to those who, not understanding electricity, try to fix it.
Physicist and astronomer Stefan Feeney of University College London, one of the...

Introduction Military monastic orders, orders of chivalry, orders of meritIn 1120...
