INSTRUCTIONS AND PROPHECIES OF THE Blessed MOTHER ALIPIA GOLOSEEVSKY, Kyiv...


7 Mar 2016
How to choose roller skis
Roller skis are traditionally divided into two types: roller skis for classic skiing and roller skis for skating. The classics and the skate, in turn, are divided into training rollers and racing roller skis (high-speed).
What are the main differences  What are the main differences
 Roller skis for training usually have rubber (rubber) wheels and do not make it so easy to develop high speed, which primarily provides confidence for a novice athlete, and for experienced athletes this is an opportunity to get an additional load. Roller skis with rubber wheels, among other things, absorb all the bumps in the road surface, which is so important for our roads. Rubber gives good grip pavement. Roller skis with rubber wheels of small diameter, this is a great opportunity to learn skiing for beginners and improve your skills for experienced athletes. In our online store you can buy skating roller skis for training. The most budgetary and most suitable model for training Shamov 02-1.
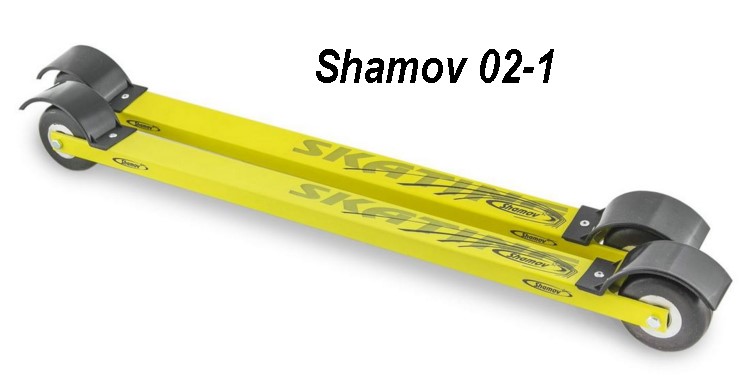 shamov02-1
 Allows for high speeds. To do this, their design has either a rigid straight or upward curved platform to increase stability. Roller wheels have a larger diameter - for the free passage of cracks and unevenness on the road, and a smaller width - for speed. The wheels are usually made of polyurethane or rubber, but with a large diameter.
You can buy racing roller skis in our online store. We provide two roller ski manufacturers Shamov and Elva both have excellent roller ski models for racing. These are not all models, but the fastest in the Shamov and Elva lines with a maximum wheel diameter of 100mm and corresponding speed characteristics.
 Elva sk100
First of all, you need to decide what style you would like to skate.
Skating is speed, classic is a measured and smooth ride. When choosing, you can be guided by the following indicators: your balance, if you have problems with this item or you do not want to subject your muscles and limbs to intense stress and just be afraid high speed, then your choice is unambiguous - rollerskis for the classic course.
 Ski rollers
  Ski rollers
 Skating roller skis have narrower wheels and shorter frames than classic roller skis.
If you are just starting out and have not even stood on ordinary skis until now, then we advise you to take rollerskis with rubber wheels with a diameter of 70-80 mm. Rubber will not allow much acceleration and will absorb all road bumps. Sports online store Yoway recommends the Shamov 03-1 model.
 shamov03-1
 If you have great smooth asphalt and want to fly faster than the Norwegian team, then polyurethane wheels may be your choice. And here you can offer a cool option on polyurethane wheels of 80 diameter, Shamov 01-1 roller skis.
 shamov01-1
 The main difference between classic rollerskis and skating ones is a ratchet (braking) mechanism installed on one of the pairs of wheels, which blocks the rolling back. The platform length of the classic roller skates is longer (more than 68 cm) to stabilize the course when moving, and the rubber wheels are wider for increased stability (more than 4 cm). The wheels have a small diameter so that the height of the roller ski platform above the surface is insignificant, then it will be easier for the athlete to maintain his balance when riding. This configuration of roller skis provides the athlete with a comfortable ride during training in the classic course.
Our store recommends 2 main models of roller skis for classic skiing: These are the Shamov 05 and Shamov 06 models. The fundamental difference between the models is that the 06 models have thicker wheels and the rollers can withstand greater loads compared to the 05 rollers.

There are 2 modifications of bindings for roller skis type SNS and type NNN for each of these types there are boots that fit these bindings. The bindings for rollerskis, which are presented in our online store, are universal and are suitable for both classic and skating skis.
 NNN
NNN  SNS
SNS If you are a beginner and not familiar with these technologies, but you have ski boots, then with the help of the picture below, you will be able to determine which bindings you need NNN or SNS.
Newbie tip: NNN bindings are the most common and boots for them are much easier and cheaper to buy!
Any bindings for ski boots, both imported and domestic, are installed by adhering to the following rule: the ski binding assembly is applied to the rollerski platform end-to-end with the rear mudguard. Only after that make a mark for the screw of the front body of the ski mount on the platform. To drill all mounting holes, it is recommended to use a jig for installing ski bindings on roller skis.
 Mounts
 Let's say right away that if you want to save money, then you can use your old ski boots that you ski in the winter, but if you want comfort, then we advise you to purchase boots specifically for roller skis.
Rollerski boots also suggest that you ski in the summer and slightly different loads than traditional winter ones.
Since we are talking about a domestic manufacturer of rollerskis, we advise you to purchase budget, but at the same time, no matter how inferior to foreign manufacturers Alpine, boots for SPINE rollerskis. Boots are available for both NNN and SNS bindings. Prices range from 2500 to 6500 rubles.
 How to choose shoes
  How to choose sticks
 Everything is extremely simple here. For skating roller skis, the poles are 15-20 cm below you, about to your earlobe. For classic rollerblading, sticks are 30 cm below your height.
You can use any sticks, but be sure to use stick attachments - paws. Since standard tips ski poles not intended for asphalt.
Available in 2 size types 10.0 mm and 12.3
 Tips
Tips You can watch a video, read special literature on the Internet, or purchase a lesson from a roller ski coach in St. Petersburg. In one lesson, you can get the necessary skills for further comfortable riding, or continue classes, reach a new sports level and take part in competitions.
If you purchase any ski rollers from us, you will receive a 15% discount on a lesson with a trainer. When you purchase roller skates from us, you get a discount coupon that you can present to the coach and get a discount on the lesson. And you can train for 850 rubles per session, instead of 1000 rubles.
Classes are conducted by a professional cross-country skiing coach Rumyantsev Yury Valentinovich. Formation of AFKiS Lesgaft. Coaching experience since 1996, Candidate Master of Sports in athletics. Winners of St. Petersburg, Champion of Russia, Prize-winner of the World Cup stages in roller skiing. Location of classes: Pargolovo Vyborgskoye sh. 369, Kavgolovo UTK Lesgafta (the route is paid separately) and other places are possible. The content of the classes: technical (training in skating, classic and other ways of moving on roller skis), physical (general and special), and other areas of training.
Since the skiing is not on snow, which can forgive almost any fall, here we have asphalt, and falls are not uncommon even for the most advanced athletes. We suggest you protect the most important thing, namely the head. Here, a regular bicycle helmet, which can be bought at any specialized sports store, will do. To protect the elbows, knees, any elbow and knee pads are suitable, which are sold in almost all sports stores, such as Sportmaster, Decathlon and others.
Frame
The frame transfers power from the leg to the wheels. The main characteristics of the frame are length, stiffness and weight. The longer the frame, the more stable the roller ski keeps the course during the rental, but at the same time, controllability is reduced. Also, long frames dampen vibration better. As a rule, roller skate skis have a frame length of about 60-65 cm, and classic roller skis are more than 70 cm. Frame length or wheelbase (the distance between the axles of the front and rear wheels) also affects control and balance. The longer the base, the more rectilinear the movement, therefore it is easier to keep balance and vibrations are more damped. The frame can be rigid or flexible.
Flexible frames
are calculated in such a way that during the push and roll, they correspond as closely as possible to the operation of a real ski. These rollerskis are designed for ski training. An additional property of the flexible frame is the ability to dampen wheel vibrations well, so riding on such rollers is the most comfortable and they are suitable for long workouts. But flexible frames are less reliable. When choosing roller skis with a flexible frame, it should be taken into account that, unlike skis, the rigidity of all roller skis is calculated for a certain average weight skier corresponding to 60-70kg. A skier with a large weight can push through or break such a frame. If the frame is made of plastic or composite material, when the frame contacts the asphalt, scuffs and scratches appear, which can lead to breakage over time.
rigid frame
is the exact opposite of flexible. Made from aluminum alloy these frames have almost absolute reliability, a rigid frame is better controlled, but at the same time, during the movement, the athlete's foot is subjected to large vibration loads. Rigid frames are used in racing and high-speed models of rollerskis.
wheels
Wheels are one of the key components of roller skis. Two types of materials are used to make wheels: polyurethane and rubber.
Rubber It has good elasticity, which ensures driving comfort, as it effectively reduces vibration and vibrations transmitted from road bumps. Rubber wheels have good grip on asphalt, but can significantly reduce speed. Therefore, rubber wheels are best used on roller skis for classic skiing. When mounted on skate rollers, rubber wheels can deform too much sideways when pushed hard, resulting in unnatural deceleration and sometimes damage to the wheels. High wear of rubber during skating also limits its use.
Polyurethane wheels, as a rule, have greater rigidity than rubber. Polyurethane wheels are more sensitive to side impact and are less prone to wear. Good quality polyurethane guarantees excellent handling and grip on asphalt.
Bearings
Both professional and amateur level - perhaps one of the most popular winter pastimes huge amount of people. Someone prefers to actively relax at the nearest rental office for this sports equipment, but someone purposefully goes to famous ski resorts, in principle, for the same.
You can even get paper jigs or universal jigs to help with self-tuning. Make sure you know what you're doing or you could ruin your new big skis. Technicians also use special drill bits to prevent drilling all the way through the skis. Drill bit sizes vary for ski types: wood, composite, metal cores and children's skis. After the technicians clear the chips from the holes, they put in some glue to help secure the screws.
Of course, one of the main roles in high-quality and enjoyable skiing is played directly by the equipment itself. The range of skis today is very large, and they differ both in brands of manufacturers and in their purpose (cross-country, mountain, jumping). The price range is also wide, so you should immediately decide on the amount planned for the purchase.
They then screw the bindings onto the skis. After the glue dries, they adjust the bindings and test them for the appropriate release. The binding straps need to make two adjustments to suit your load in length and pressure. The length of your sole, in millimeter measurement, is usually imprinted on the heel or side. Using a screwdriver, the technician adjusts the finger to this length.
The height or pressure of the legs should be appropriate for your load. Some bindings automatically adjust toe height prior to loading; others require a certified technician to make a minimum adjustment of less than half a millimeter. This allows your boot to work with the anti-friction device that is under the toe.
Sometimes fans of winter skiing face a very serious problem. How to properly install ski bindings? You can entrust the installation process to specialists, but if you want to save some financial resources and just to gain additional experience it is worth understanding the technology of this work on your own.
The design of this element, which is designed to ensure safety, includes the heel and front head, which must be adjusted in accordance with the parameters specific person(weight, boot size, etc.).
To strengthen the binding heel to the boot, it is necessary to move the binding to the heel of the boot. Using a screwdriver, the technician will slide the lock into place and then check it. If stuck too hard, the boot will not release; if it's too loose, the download will just slip out.
The technician will also check the ski brakes to make sure they are the correct width for your skis and that they are working properly. The brake levers must lie flat or parallel with the skis when the carrier is in the binding. When the lock is released, the brakes should swing down and back.
On the mount itself there are special pins, the function of which is to fix the boot. There are also special braces and bends that allow the foot to move freely inside, but do not allow it to slip off. Usually these elements are in the form of a boot toe, which cannot but have a positive effect on the comfort of riding.
The heel of the binding is designed to provide the skier with safety during falls. In modern designs, this ability is called vertical elasticity. In addition, with the help of this part of the mount, the level of vibrations entering the boot is significantly reduced.
It refers to the force required to bind to release a boot in order to reduce the likelihood or severity of injury. Remember those embarrassing questions the ski technician asked when you brought in your gear? That's where they come into play. On your binding, this number is set on the toe and on the heels.
The lower the parameter value or number, the less force is required for your binding to be released. This is especially important when your body is moving in one direction while skiing in another. Bindings that release can prevent knees from rotating in the wrong direction.
So, the correct mounting of skis is carried out partly with the help of proper drilling. You need to do this not by eye and not with the use of labels. Often, a special jig can be purchased from the manufacturer, thanks to which a good result will be guaranteed.
For making holes there is big choice drills, each of which is suitable for a particular type of ski: a section of 4.1x9.5 mm for metal coatings, 3.5x9.5 for wood, and 3.5x7 mm will be a good solution for junior sports equipment, the thickness of which is less, than adult models.
Therefore, the bindings will be easier to release. For adult senior or intermediate skiers, the number can be increased to accommodate the increased weight, somewhere between 3. Otherwise, their weight would just make them pop out of their bindings at every turn.
Skiers who like speed and parking jumps may need to go with a higher setting of 6. Racers, professional skiers and alpine skiers use the highest setting, around 8. The higher the setting, the greater the risk and the more you must rely on your skills to free you from the twisting fall.
After drilling all the necessary holes in the ski canvas, a small amount of glue is added to each of them, and then the mount itself is already mounted. The screws must fit snugly, without shifting.
This information can be helpful when thinking about how to mount your ski binding.

It is these elements that make it possible to clearly transfer forces and set the direction of sliding when moving, both in classical style, and in skating. It is very important to focus on how to properly install ski bindings for running, because without this knowledge, even well-chosen equipment will not only bring absolutely no joy from skiing, but can also put the owner in serious danger.
However, this should not be considered. Your certified ski technician will check the release of the boots from the bindings. Since toe-lock releases with a twisting motion and heel release with a sharp forward force, experts mimic these actions to ensure release of the ligaments.
You should also check your bindings. With your boots on your feet, go to binding and click to install them. Then take to put pressure on your back to free yourself. If it is too easy to remove, you may need a higher setting.
One of them is the outdated Nordic Norm 75mm, called "welted" by the masses. Its main advantage is relatively low price, but otherwise its technical characteristics leave much to be desired. It fixes the foot poorly and, despite the rigid fastening of the toe of the boot, the entire sole slides due to insufficient lateral and longitudinal stability. The skating style of running in this case is almost impossible, and the classic one comes out a little better. This installation of bindings on will not bring the owner pleasure from riding, so you should pay attention to the other two types of clamps.
Experienced skiers get their bindings checked every year by certified professionals. This way, if something has changed, like in weight or height, the technician can make the necessary adjustments to keep you safer on the slopes. Measure twice, cut once - Carpenter's Rule.
Mounting ties are a fairly simple operation if you are dealing with the popular tying that your local store has a fixture on. Save yourself time and hassle and pay them for it. The only exception is if you know they don't sweat parts. In this case, you need to make sure your bindings are set correctly; Find another store or do it yourself.

These samples belong to the models of a new, innovative generation. These include the SNS system and the NNN system.
It will be quite difficult to compare these two mounts, since each of them is an extremely high performance device.
Figure out where you want your foot to be on the ski. In general, the manufacturer's recommendation is for a loading center sign to match the corresponding loading center sign on skis. The only option for this is usually to snap the snap forward. If you are in a park area and switch to the ground, you can move the anchor as much as 3cm forward. For use as a dedicated powder ski, moving the attachment point about 1 cm is quite common.
The operation of these two systems is based on the technology of using flexors and guides, which greatly simplifies the task of how to put the fasteners. On skis with such clamps, the sole of the boot lies firmly and comfortably, and additional stabilization when skiing and classic, and gives a feeling of confidence and greatly facilitates the process of movement.
Once you know where to mount, if at all possible, borrow a clip to secure your binding. If there is no jig, remember that without a mounting jig, the rules of the carpenter's rules. Printing errors can occur due to resizing and uncontrolled shifts in the positions that ink pixels fall into. Therefore, a reasonable fitter should question the accuracy of any paper clip.
It's much easier to just cover the ski platform with duct tape in critical areas and then make marks on the duct tape with a pencil. If you make a mistake, rip it off and start again. How do you know if it's wrong? You used Carpenter's rule and caught it when you measured again, just to be sure. The masking tape is too easy to write on to rewrite locations and perimeter parts for alignment.

The level of fixation of each of these two samples is touring, sometimes even equipped with an automatic fastening. This option is perfect for amateur skiers whose skiing skills are not yet too well developed.
Make sure you have a ski boot center mark on your boot and ski. If you do, line them up, then set the camouflage strip in front of the boot to a little behind the heel with a longitudinal stripe down the center of the ski. You don't have to be perfect here, you will draw the line later, the exact center line.
Then place horizontal bands of tape where the rough parts of the heel and heel will be about the same. Now you are ready to start marking. Don't have one or the other ski boot line? With an alpine boot, simply measure the distance between toe and heel and mark half a point. For a dolly, measure from the 3-pin line to the heel, then mark half the distance forward from the heel.
The SNS system appeared a little earlier, and its main difference is that the fastening design includes only one longitudinal component, while the NNN type has two.
It's no secret that the main difference between cross-country and alpine skis is the connection between the boots of the former and one or another type of binding. And since the differences between the two above-mentioned systems are quite insignificant, here the emphasis should be placed solely on the choice of shoes. Having decided on how to correctly install ski bindings, you should choose boots that will match your skiing style and differ in unique comfort and design, and only then figure out the standard of their fixation.
For skis, you either have to find where the center of the ski boot is, according to the manufacturer's knowledge, or use the old-fashioned guess of using a balance point or chord center, and then adjusting to your whim. The balance point is what it sounds like, the point where the skis suspended in one place will balance and lay level. The center of the chord is the center point in a straight line between the raised tip and the tail of the ski. In the days when telephoto lenses were mounted with contacts on the center of the chords, we found that 1-2 cm forward almost always gave the best results.
This type of sports equipment is suitable, as the name implies, only for skiing on the slopes. Such skis are not suitable for running, as they have different length and width parameters, and also differ from other samples in their technical characteristics. But, one way or another, it is extremely important to know how to put bindings on skis of this type, since descents from the peaks require an increased level of safety, which can only be ensured by securely fixing the entire structure on the leg.
It also tended to align, within 5mm, with the same attachment point as the center of the ski boots as recommended by the ski companies. So now you can interpret in your heart how to implement it. This is an important part of doing any good binding work. The advantage of the clamping device when correct use is that it easily finds the center line. Just make sure the clip is snug against the top of the ski, then tighten the self-centering arms around the skis.
The center holes will now align with the centerline of the ski. Don't have a center hole fixture? Use a compass to determine the center line. From the ski boot line, on both sides, draw a line at the tip and back of the ski. Where the scribe line intersects on each side, it will be the center point of the ski at that position. Now connect the dots and you have a longitudinal centerline to align the anchors.
In order to avoid a poor-quality result of work, all actions for equipment of this type must be performed strictly according to the following instructions:

1. In the center of gravity of the ski, which you can find with your own hands, a line is drawn.
Use a paper clip for critical measurements, such as the distance between connected pieces or the alignment of each piece to the length and width of the ski. The key part of this tip is drilling straight down, perfectly perpendicular top sheet. The best way to insure this is with a fixture. A drill press is another stellar option if you have one. Or you can understand it - if you are good and feel happy. Double check the size and thread pitch of the screws you are using.
Pressing is one of the keys to a firm hold on skis. Thread cutting cuts the cylindrical surface of the hole to match the thread of the screw, which, in combination with the adhesive, maximizes retention to prevent loosening of the screws.
2. The fastener is laid so that its front edge reaches just up to the drawn mark. A boot is carefully inserted into the latch, which is corrected so that its entire base is located in the center, since only in this case the installation of the bindings on the skis will be correct.
3. Then the boot is removed, and at its location, small holes are made through the holes in the latch, which can be made with an awl or drill with a cross section of 1.5-2 mm in diameter. Then, using a screwdriver or a screwdriver, the screws included in the kit are wrapped.
It never feels well dispensed, like splashing glue, but when these steps are followed, I've never had a single setback. It lubricates the screw as you tighten it, so it doesn't tear the core or bind when dry, sealing in moisture. To be honest, if you want real holding power that keeps the repetitive nature of the telecoat under control, or just keeps on breaking a 30-foot landing, use epoxy. It is absolutely stronger, all other parts of the mountain are equal.
Use a slow curing epoxy at room temperature. Get those skis out of your frozen garage for the night. The guys from Veil turned me on Gorilla's glue. It foams, but this gives it the pressure to spread out and cover every square nanometer of surface between the screw and the ski core.
4. The boot is tightly fixed in the holes made. At the same time, it is important to follow the entire algorithm of actions so that at the end of the whole work the latch is moderately rigid, comfortably fits the leg and meets all the requirements of safety standards when riding.
This manual will help you figure out how to properly install ski bindings designed for riding in the mountains and steep slopes.
Today, as a rule, two competing binding systems are used for cross-country skis of all categories - SNS(the developer is the company SALOMON) and NNN(developer - ROTTEFELLA), as well as their modifications.
Mounting Methods various designs on skis can vary significantly, but when installing any type of mounts, the requirements remain unchanged: to ensure ski control and maneuverability, to ensure the reliability of the connection of the ski boot and ski, to maintain the strength of the ski at the mount installation site.
It must also be taken into account that the working properties of the ski depend on the position installed mount and on the quality and reliability of the installation of the binding on the ski.
Both of the above systems have a wide range of different binding models aimed at a wide variety of user groups - from Olympic-level ski racers, to children, walkers and ski tourists.
Depending on the purpose of the binding, they differ in weight, strength, rigidity of the boot fixation. But for all types of fasteners, the requirements remain unchanged - ensuring:
Almost all modern systems ski bindings for cross-country and touring skis provide articulation of the boot and fastening with a brace in the sole of the boot, which is captured by the binding. For traditional types fastenings of all systems - both Salomon SNS and Rottefella NNN, the standard is to install the fastening in such a way that the axis of the fastening of the boot bracket coincides with the axis of the center of gravity of the ski.
Ski manufacturers strive to provide optimal ski properties specifically for the case of mounting the mount at the center of gravity. This ensures maximum strength of the ski, optimal "work" - the ratio of rigidity and elasticity of the ski, the best balance and controllability of the ski. Unfortunately, in the streaming production of skis, especially when using natural materials, it is almost impossible to achieve the absolute identity of skis. Therefore, a big step was the creation of the NIS system, which not only greatly simplifies the process of installing the binding on the ski, but also allows you to find the optimal position of the binding on the ski.
As a rule, modern skis in the binding installation area have a special platform that provides the necessary strength and reliability of fixing the binding on the ski. But inept actions when installing mounts can disrupt the internal structure of the ski, which will lead to a decrease in its strength and to sad breakdowns.
To install the mount on the ski, it is advisable to use a special tool that provides convenience and reliability.
To install the mounts you will need:


Using a ruler, we find the center of gravity of the ski and mark it with a marker.
To mark the holes, it is best to use a special "jig", which allows you to accurately position the position of the drill.

We install a conductor that matches the type of fastening - Salomon SNS or Rottefella NNN, so that the marked center of gravity on the ski and the corresponding label - SKI BALANCE on the conductor would coincide.

If there is no such conductor, then you can use a paper template. As a rule, fasteners are equipped with such paper template.
If there is no paper template, then you can simply attach the mount to be installed on the ski in such a way that the marking of the center of gravity on the ski and the axis of fixation of the boot bracket coincide. The holes indicated on the template are marked with a pencil or a slight pressure of the awl through the mounting holes. But this markup method has a very low accuracy, so we strongly do not recommend doing this. At the same time, it should be taken into account that modern fasteners have moving parts and the marking of holes for screws fixing the platform should be done with closed and assembled mount, otherwise you will get 1-2 cm displacement of the holes.
When installing, be sure to use a template or jig that matches the type of fasteners. Please note - the picture clearly shows that for the system mounts Rottefella NNN all mounting holes are drilled in front of the center of gravity axis, and on the system mountings Salomon SNS- the axis of the center of gravity passes under the mount.


 To drill holes, it is advisable to use a drill with speed control and special drills that provide the required diameter and depth of the hole.
When using specialized equipment:
a special drill has an extension that will center the drill in the hole of the jig and stop the drill at the required depth. Drilling is done with light pressure at medium speed.
When drilling with standard drills, a drill is used to install Rottefella fasteners 3.4mm, for installation of fasteners Salomon drill 3.6mm. Drilling depth - 10mm.
Before installing the fasteners, the holes must be filled with glue to install the fasteners, the glue fills the cracks left after the screw is screwed in and provides waterproofing and additional strength. If the hole is not waterproofed, then when using skis, water will enter the cavity of the ski and lead to rotting of the internal structures of the ski and breakage, this is especially true for skis with a honeycomb structure and made using natural materials.
AT service centers special branded adhesives Salomon and Rottefella are used. It is possible to use PVA glue, it provides the necessary tightness and additional strength.
The use of epoxy resins is highly undesirable, because. Resin solvents can damage ski components, especially skis with foam cores.
The mount to the ski is screwed with full fixation, backlash is completely unacceptable.
After installation, it is necessary to allow the glue to dry for 10-12 hours.

The use of the Rottefella NIS system mounts greatly simplifies the process of mounting the mounts, and also allows you to adjust the position of the mount on the ski relative to the center of gravity.
To use NIS bindings, you need special skis with an appropriate platform. To date, the same skis are produced by Madshus and Rossignol.
To install the mount on the ski, the mount starts along the guides until it “clicks”.
A thrust bearing is also installed along the guides. The thrust bearing is fixed in the desired position using a special key that is included with each pair of mounts.

For cheaper models of mounts, the installation of a thrust bearing does not require special tools.

The NIS system allows you to find the optimal ski binding position for each pair of skis, taking into account the current state of the tracks and weather conditions. The binding position can be adjusted before every workout or even during a workout. Adjustment is carried out with the same special key - the mount is shifted by a given number of "clicks" and fixed in a new position.

The speed and ease of installation of fasteners thus reach a new level. In addition, you can change bindings without any damage to the skis.
Sports Line stores employ specialists who, using special equipment, will help you quickly and efficiently install fasteners. When buying skis and bindings in our stores, installation of bindings is free of charge.
In this article we will talk about installing mounts on ski rollers. What set of tools do you need to have for all this action?
There is a little trick. The screw is problematically screwed into the metal (into the rollerski platform). We lubricate it with some viscous substance (for example, I always use ski wax), and everything will go like clockwork.
If you do not go into details - it works general rule to install bindings (both for classic rollerskis and skate skis): the ski binding assembly is applied to the platform of the rollerski against the rear mudguard and a mark is made for drilling the screw of the front of the bindings. Next, we make marks for the screws in accordance with the holes of the fasteners (if there is a jig, then along its holes).
Use a drill with a diameter of 4-4.5 mm.
For "SNS" (Atomic, Salomon) Mounts - The front mounting screw must be 14.5 cm away from the front fender rivet.

For “NNN” fasteners (Rottefella, Fischer) – The front screw is drilled at a distance of 17 cm from the front mudguard rivet.

SWENOR have their own table for mounting bindings on roller skis. The table shows that for metal platforms use a 4mm drill, for fiberglass platforms a 3.6mm drill. Depending on the model of roller skis and the type of bindings, the distance from the beginning of the platform (the starting point of measurement is different for metal and fiberglass platforms) to the groove of the bindings (the place where the boot is clamped into the binding) is indicated. Take measurements from the back of the platform!

If you have any questions, I'll be happy to help!
A little reminder on the care of roller skis.
After use in wet weather, rinse with clean water and apply a sufficient amount of grease to the bearings, rotate the wheels so that the grease is evenly distributed, then dry. Roller skis must be stored in a dry place, avoiding direct contact with sun rays on wheels, because some tend to deform. Always check the integrity of the wheels, fasteners and the reliability of the nuts on the axle before training.
Roller skis are roller skis. By analogy with roller skates, they are designed for skating on asphalt, for summer training of skiers, for competitions. Among fans of rollerskis there are both novice amateurs and professional athletes.
Some models of roller skis are sold already marked for mounting bindings. As a rule, they contain two sets of marks for screws. The first is for large shoes (greater than 40), the second is for small shoes (less than 40). Mounting of fasteners is best done using a special template to ensure maximum accuracy.
For fastening, use the self-tapping screws that come with the fasteners. Although they twist with difficulty, they hold securely and firmly. Before screwing in, the screws can be moistened with machine oil to reduce the force applied to the screwdriver. Unlike skis, drilling holes in rollers must be done with the utmost care. If an erroneous hole in the skis can be closed with a plug, this cannot be done on roller skates. Screwdrivers with PH 3 or PZ 3 bits can be used for driving screws.
Many athletes use an alternative method of screwing on bindings using M4x25 countersunk screws. The screwing points are marked with a stencil, the lower part is drilled out for steel hollow T-shaped caps. The caps are inserted from below and countersunk screws are screwed into them. Unlike self-tapping screws, this method, although more laborious, is much more accurate and reliable with intensive use of rollers. Also, this option is ideal for those who have already unsuccessfully drilled holes for self-tapping screws.
All interesting
Often it becomes necessary to screw a screw into concrete wall. In this case, you need to know that the screws are fixed in the dowels. The work is laborious, but doable, so do not be afraid of its complexity. Concrete and reinforced concrete is the most popular…
When performing various repairs and construction works often it becomes necessary to make a large diameter hole in metal or plastic. When drilling large holes, a number of difficulties arise. If you buy enough...
Slate has become an integral part of modern construction. This easy-to-install, fairly durable and inexpensive material has taken its place on the market. roofing materials. But for all positive qualities and popularity, it is quite fragile and with ...
Self-installation of the sink does not require special knowledge and skills, and almost anyone who knows how to use a hammer drill and a screwdriver can do it. Even though the installation details depend on the washbasin model,…
Screws are quite often used in housework and construction. The popularity of this type of fastening is associated with the convenience of fastening parts to a wooden base. A special type of screw is a self-tapping screw or self-tapping screw, which differs from ...
screw is fastener which is used to connect various surfaces. Structurally, the screw consists of a head with a slot, a threaded rod and a threaded tip. Screws are made from low carbon steel...
As a rule, most sports stores provide a service professional installation fasteners. But if, for one reason or another, you do not want to resort to the help of specialists, you can try installing ski mounts ...
For young skiers, the most optimal is the installation of semi-rigid ski bindings. A child who has just started skiing moves slowly and unsteadily and, as a result, often freezes in the process. ski trips. Semi-rigid mounts…
When buying new skis, you have to deal with installing mounts on them. In stores, of course, they offer to install bindings on purchased skis, but this is associated with additional costs. Installing the mounts yourself is not so difficult ...
Ski bindings can be divided into two categories: rigid and semi-rigid. Hard shoes require special boots. By installing semi-rigid shoes, you can ski in regular shoes. You will need - skis; - a set of semi-rigid ...
INSTRUCTIONS AND PROPHECIES OF THE Blessed MOTHER ALIPIA GOLOSEEVSKY, Kyiv...

Eufillin dropper in ampoules is used to treat pathologies that ...

Among all ointments for the treatment and prevention of joint diseases, the most ...