Once upon a time there was an old man and an old woman, they had a daughter, Alyonushka, and a son, Ivanushka. An old man...

Everyone remembers one of the entertainments of childhood - wood burning pictures or portraits. And the smell of a burnt tree remained in my memory forever. Everything returns to normal. Today it's called pyrography, and it's back in vogue. Computers are computers, and many children want to express their individuality in a different way. Not just for kids, to say the least. Let's remember how this is done and what is needed for this. Below is all the information for beginners and more.
Everyone remembers one of the entertainments of childhood - wood burning
The burning apparatus (pyrograph) is the main equipment. Previously, it was a plastic box (usually yellow) with a small soldering iron inside, in which the tip looked like a paper clip in appearance and thickness. Today, when this art is returning, the burner is a more serious device. There are also devices of the old type, but, nevertheless, it is better to purchase a burner with hard feathers. It will last a long time because it is different high strength, and he has a lot of different nozzles.
There are also cons:
Wire burners have more serious disadvantages:
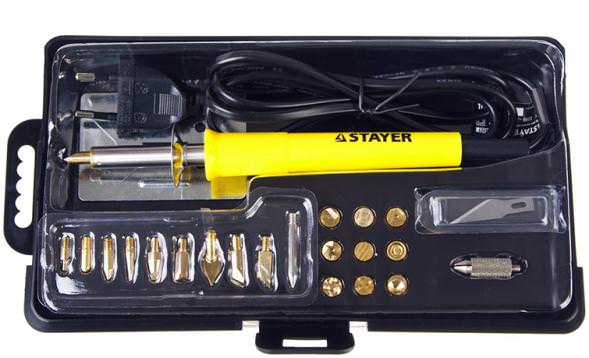
The choice of burner is a purely individual decision. But most choose the first option. You can recommend a Stayer pyrograph. Excellent burner suitable for all materials.
How to use the device? This burning device is conveniently located in a plastic box, which is convenient for transportation. The kit includes a stand for a soldering iron (which is very important), a set of nozzles of 20 pieces (constantly necessary and curly ones). In general, a great gift for both a novice pyrographer and a professional one. Next, you need a wood burning kit. It will be cheaper and easier than doing an independent search for the necessary improvised means. There is enough material for the first time. The sets look like this:

There are several boards in a good set, some with ready-made sketches. Still need pictures that are not a problem to find. For starters, they are again in the burning kit.


Having prepared the right equipment, decide on the material. It is better to stay on soft woods.
Good fit:

Having prepared the necessary equipment, decide on the material
You need to let the device warm up on the stand. Then take a properly sanded material. Remember:
When you start work, forget about haste: no one sets the task of execution on speed. This is not a fast process. Like any art, it requires thoroughness and gives great pleasure from the work done.
Always be careful and remember: you are working with a hot tool. Keep it always on a stand: better once again blow on the water, but don't get burned.
As mentioned, this will require the following tool:

Depending on the need and features of the pattern, change the nozzles that you always keep at hand
Depending on the need and features of the pattern, change the nozzles that you always keep at hand. This technology for beginners allows you to quickly learn the art of pyrography.
The process of burning on plywood is not much different from pyrography on a thick board. It is easy to buy plywood sheets at any construction market. You can ask, and they will cut it into pieces, right size. Plywood weighs less and costs less than other materials. It lacks harmful resins. You need to choose plywood from birch, pine, beech, no more than 2 centimeters thick.
After choosing plywood, the process follows the already given scheme.

The process of burning on plywood is not much different from pyrography on a thick board.
By observing this simple technology yourself, you can burn out anything: from a simple inscription to a real picture. Doing this is easier than it looks.
It is enough to purchase a set of nozzles to start. This is what a great set, tested empirically, looks like:

All nozzles are unlikely to be used. The main ones, most often used, are usually nozzles for burning lines (which vary in their thickness). Wedge-shaped, conical, thin needle-shaped - must be required. The brass seals included in the set can be used to make ornaments - an interesting result is guaranteed.
Pyrography is an art accessible to everyone. By purchasing a burner, you introduce the child to the beautiful and join yourself. Is it bad to spend a day with a child creating a beautiful picture that can be hung in the most prominent place in the house? Guests at home will be surprised by the new paintings. And there is no doubt that more than once they will be interested, but where can one buy one? Such moments are precious.
Nikolai Gladenko
I decided to somehow make a home-made burner on the model of the Soviet Vyaz burner. In the distant 90s they gave me wood burner "VYAZ" for a birthday . As I remember now - the orange case is exactly like in the photo below (photo from the Internet). But at that time my interest was not in myself. burner but rather how it is arranged. In short, over time, I ruined it to "kanzura" in childhood, now I myself do not understand why. As they say, horns and legs remained from the goat - only one transformer has survived to this day. And now, after eleven years, I decided to correct what I had done and collect a remake of this wonderful burner. I wanted make a burner with my own hands almost from scratch. Only here is the power regulator - it was not possible to get a wire potentiometer and instead of it I used a lighting dimmer - a simple Chinese dimmer on a triac.
Cautery on wood assembled according to a simple dimmer circuit, in the load of which there is a step-down transformer 220/4 volt.
In principle, you can buy a regular dimmer - a regulator of incandescent lamps for lighting rooms. Its scheme is identical to that shown here.
The transformer is taken from the original old burner ELIMATE- 220/4 volts. However, you can use a similar transformer or wind it yourself, taking a wire about 1.5 mm in diameter for the secondary winding. Select the number of turns experimentally so that the output is 4 volts.
Installation is carried out by a hinged method, without the use of any board. Front panel homemade burner a power switch and a variable power adjustment resistor are fixed (in our case, the temperature of the burner tip). The installation is actually made on the terminals of the switch and the variable resistor.
The triac is installed on the minimum heatsink.
Sting handle burner made of a marker body, into which a rectangular piece of foil textolite with two tracks is tightly inserted. You can use double-sided textolite. Brass pins with bolts from a conventional 220V plug are soldered to these two tracks on one side, to the bolts of which a sting of nichrome wire. On the other hand, the ends of the wire leading to the secondary winding of the transformer are soldered to the textolite tracks. And all this construction is inside the body of the marker. The pins from the body of the marker should protrude for some distance to distance the nichrome tip and the body of the marker to prevent it from melting. That is, the tip should not be located directly close to the plastic of the marker body.
Frame burner Made from 10mm plywood. The necessary parts of the body were cut with an electric jigsaw, the ends were polished with a tape grinder in the size required for assembly, smeared with PVA glue and pulled together self-tapping screws with hidden heads. Drying for about a day. After drying the case, grinding was performed with a surface grinder of the plane of the connector of the two halves - the cover and the case. The body and lid are planted on miniature canopies. This entire structure is also assembled with a belt grinder under a single form - a factor with the removal of a certain amount of chips. As a result, we have an excellent homemade case for burner with a well-fitted parting plane and smooth sides.
Burner housing open stain several times until the desired shade is obtained.
We dry the body. When the stain dries, the wood fibers rise, forming a velvety surface. Such a surface cannot be varnished. The expanded wood fibers will have terrible view. The body needs to be polished. To do this, we take a small wooden block, convenient to hold in your hand, as if crushing its corner against another piece of wood and then rub it wooden case. That is, we rub the body with a rounded corner of the bar - as if we crush the swollen fibers raised by the stain. Polishing should be carried out along the direction of the wood fibers using a uniform moderate force over the entire surface of the body. The process is long and painstaking, but the result is worth it. It is also recommended that you first practice on a sample to prevent damage to the hull. burner in the absence of experience.
After finishing polishing, we cover the case with varnish. I recommend semi-gloss parquet varnish. He attaches great view and scratches will not be so noticeable in the future.
Me and Diode. © site.


Wood burning is an art form of pyrography that allows you to create a variety of images on the material. Artistic processing wood has been known since prehistoric times. The first analogues, representing a wood burner, were inconvenient and worked on fuel. Burning quickly gained popularity. Later, a modern homemade burner appeared.
Pyrography expressed in classical ways and woodworking equipment. Craftsmen practice an open jet of flame, evenly treating the entire surface of the front side of the product. This creates the desired, deeper background for the painting.
It is effective to use a layer of clay, which allows you to burn a bare, pre-cut pattern on the applied material. This method allows you to apply a light picture on a dark background and vice versa.
The method of processing wood with hot sand is practiced. The master immerses the workpiece in the mass, if it is necessary to give a shade to the light material, determining the experimentally necessary exposure time.
The device of a butane cutter is independently considered as a wood burner. The main characteristics of this technique are suitable for creating inhomogeneous elements with irregular shape(waves, clouds). There are ways to burn sunbeam focusing energy with a lens.
Friction burnout is known lathe hot objects. Relief burning is used, performing boundary cuts. Miniature pyrography with the smallest specimens of feathers is also in use.
A classic wood burning device can perform different kinds drawing objects based on the general idea of \u200b\u200bthe future picture.
A popular option is contour burning, where only the boundary lines of objects are processed. In the case of silhouette burning, some of the figures or the background are completely burned out. Sophisticated craftsmen can resort to decorative burning, which allows you to convey shadows.
Mastering the method of chiaroscuro will allow a sophisticated creator to draw pictures with the transfer of volume and dynamics using a homemade burner.
A modern electric burner will allow even beginners to practice. The burner consists of a step-down transformer whose main characteristics must be at least 5 V and 2A. You need a handle with nozzles and an electric cord, which are connected into a single circuit. In the role of nozzles, various feathers and filaments can be used, which can be given the desired shape. Often factory instruments are converted by changing the native rheostat to a laboratory transformer. Such an addition will allow you to control the intensity of incandescence, which allows you to diversify color scheme at work.
There are two types of burners:
The main characteristics of an electric burner with a hard pen are distinguished by the rapid heating and cooling of the tool. A few seconds after switching on, the electric burner is ready for use. Thermal mode allows you to control the power value. A nichrome wire tip allows you to achieve precise movements and a better work result. It is attached to a special holder-fork. The sting heats up to red in a few moments. The tip of the device can be adjusted to the desired shape. Wire feathers can be attached different ways: either with two bolts, or use interchangeable nozzles.
The wire pen machine has the following main features:
The poor qualities of the device include the high cost and complexity of repairs, the difficulty of finding components.


Electric burners using a hard tip, has general form soldering iron. The difference is sets with interchangeable nozzles for more convenient work with wood. The advantage of such a unit can be attributed to a small price (3 times less), a large number of nozzles.
Models are easy to use and durable. However, such a tool will heat up and cool down for about 5 minutes, and the shape often does not allow the use of painstaking, small work. The handle of the equipment also heats up during operation and requires a regular stop of work.
Such a device is suitable for creating bold lines, shadows on a large area of the picture.
Any tree burner scheme consists of the same elements:
Devices are usually powered from a standard 220V network using a transformer. Appeared on the market modern appliances with built-in wood burning laser.

Do-it-yourself operation of a manual wood burning scheme and subsequent tuning are always relevant for burning lovers. To create all elements homemade apparatus knowledge of radio electronics is required. There are already invented schemes that are perfect for a home-made mechanism.
If you wish, you can assemble a wood burner with your own hands. This will require a small set of tools and some improvised means, commonly used household items. To assemble a homemade burner, the following materials are needed:
Other materials can be added to the list, such as sewing threads, rubber thermotubes.
After preparing all the components, the creation of a holder for the device begins. As a blank, to assemble a home-made simple wood burner, you can use a wooden glazing bead, with a usual length of no more than 10 cm. You can also use handles from paint brushes as a holder.
The course of the required actions:
There are more complex examples creating a burning apparatus with your own hands.
If all the elements are well connected and the tip materials good quality, you can use such a device without a long-term replacement of components.
A portable electronic burner is a device for drawing a pattern on a certain type of material (wood, cardboard, paper, plywood, fabric). The product is widely used in the field of amateur pyrography, so this device is very popular not only among professional artists, but also among private fans of burning pictures.
To make a homemade burner with your own hands you will need minimum set components and tools that can be used from home tools or purchased at your local hardware store.
To make a home burner, you must have a minimum set of tools and accessories.
In order to make a pyrograph you will need:
The manufacturing process begins with the preparation of all tools and the right materials. First you need to find a nichrome thread, which can be sold at any hardware store. In the absence of a thread on sale, the material can be obtained from an old electric soldering iron.
You will need to disassemble the heating part of the appliance. The nichrome filament is located on the "sting" of the soldering iron under the metal casing and is easily removed by winding without the use of third-party tools.
1. Making a holder where the burning needle is inserted.
The holder can be made from an ordinary wooden glazing bead, the length of which is selected individually. On average, 10 sentiments are enough. Inside the handle you will need to make a hole for the wire. It is possible to carry out the procedure using an electric drill or a screwdriver.
The drill should be selected strictly according to the thickness of the wire. At the end of the bead, it is necessary to make a small extension for the leads of the ends of the wires to which the needle of their nichrome wire will be fixed.
2. Connecting the electronic unit to the needle

A homemade burner is powered by an electronic unit of 5 volts with a power of at least 2 amperes. As an electrical box the usual one will do phone charger with desired characteristics. To connect, make a branching of a two-wire wire, divide it into 2 separate ones. The ends are passed through a previously made hole in the handle and brought out.
3. Soldering the needle to the wires

The nichrome needle must be soldered at the ends to the output wires. Each separate end is soldered to a separate wire. For solder, flux should be used, as nichrome material is rather difficult to solder. The size of the needle must be at least 5 centimeters, otherwise the burner will not warm up the thread enough and, accordingly, its performance will deteriorate.
4. Insulating the holder with electrical tape

You can make insulation with electrical tape or adhesive tape. The holder of the burner is wrapped in 3-5 layers and is tightly crimped in the hands so that the tape sticks to the tape with the highest quality. wooden base. During gluing, make sure that the tape does not get on the needle.
5. Testing the burner

To test the burner, you must connect the electronic unit to a 220 volt network, after which you can observe reddening of the needle thread within a few seconds. The device should be tested on any wooden surface.
Video: how to make a mini burner with your own hands?
Probably each of us has seen pictures made with the help of burners. Today you will learn how you can make a simple metal burner yourself. Sometimes it becomes necessary to leave a sign or autograph on metal surface. Many methods have been devised for this, ranging from labor-intensive engraving that requires special talent to fully automated chemical etching. But there is a way available to everyone - metal burning. 
The device circuit is quite simple and consists of two elements: a transformer and a diode bridge. It is better to use an autotransformer - it will be easier to adjust the thickness (“pressure”) of the line. A television transformer is quite suitable for this purpose, they faithfully served Soviet people up until the 90s. 
Unfortunately, I didn’t have this for the burner either, I used a transformer from an old player, a BR 1010 diode bridge, a ballpoint pen case and a couple of the smallest “crocodiles” 
I passed the electric wire through the fountain pen and equipped it with a "crocodile". This will be the pencil for burning on metal. 
The free end of the wire will need to be connected to the “+” of the bridge. And "-", subsequently, will need to be equipped with another "crocodile". 
The whole device looks very simple, but, nevertheless, greatly expands the possibilities for creativity.

An ordinary lead can be used as an electrode, copper wire or any other conductor. Each of them leaves its own shade on the surface of the metal. 
The first test of the pen I carried out using a regular nail. Of course, far from a work of art, but the method is quite working.
Once upon a time there was an old man and an old woman, they had a daughter, Alyonushka, and a son, Ivanushka. An old man...

Gods - Olympians (myth of ancient Greece) The most powerful of all sons ...

To see torn shoes on their feet in a dream can be people who have a big ...