How I got cancer. Rami Blekt Intro to number four...


Anyone who was not too lazy and read the instructions for the camera may not read further. But for those who are too lazy to do this, perhaps the “explanation on the fingers” will be informative.
In any camera, there is such a thing as an aperture. Photographers in jargon also call it a hole or a relative hole. The diaphragm is a kind of mechanism that is most often located in the lens and can have the property of narrowing and expanding.
As this hole narrows, less light reaches the camera's sensor. Thus, it is possible to regulate - if there is a lot of light, then due to the narrowing of the aperture, its amount is reduced, and the frame is exposed normally. The reverse action is also true - the larger the relative aperture, the more light will hit the camera sensor and, accordingly, you can shoot in fairly dark conditions.
But that's not the only useful property diaphragm. Aperture has a strong effect on the final result - the photograph.

There are two ways to influence an image with aperture. Firstly, the effect on the depth of field, and secondly, on the bokeh pattern. Since the article is intended for amateurs, of course, below we will definitely explain the meaning of these words, but for now we will make a small remark about aperture numbers - that is, about aperture designations.
The aperture is not measured in any units, that is, it is not a millimeter and not a second. It's just a number! And the larger the number, the smaller the hole.
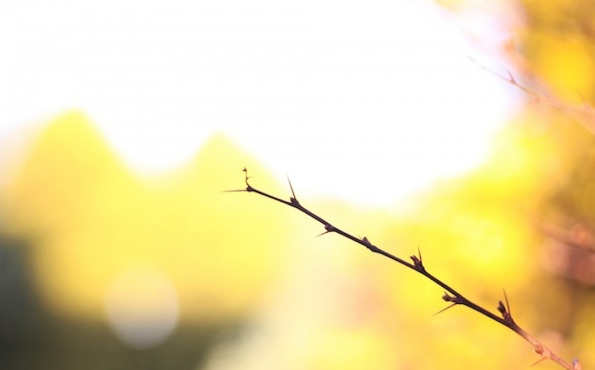
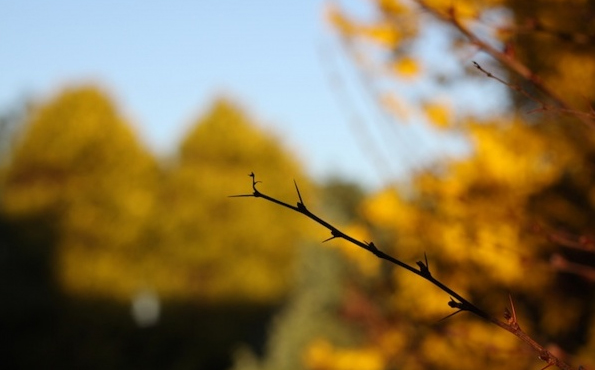
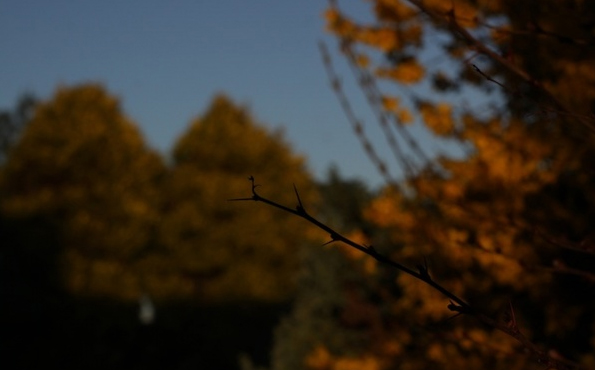
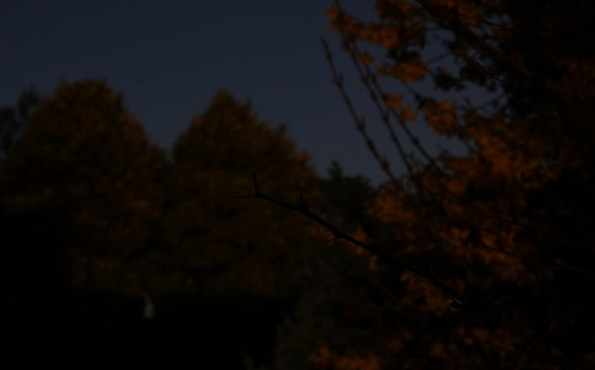
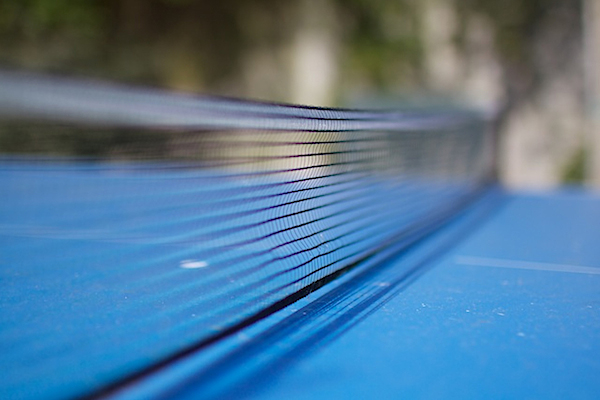
The example below shows how the exposure of the image changes depending on the size of the aperture.

Another important fact about the diaphragm that you need to know is relative value, it does not depend on the type of camera you are using. That is, if you measured (for example,) that, other things being equal, the aperture should be 5.6, then this parameter will be true for both a compact soap dish and a medium format camera.
DOF stands for Depth of Field, or simply Depth of Field. If you are photographing an object and focusing on it, then how sharp it will be and how far the space behind this object will be sharp depends primarily on the aperture. An example will demonstrate this best. Here the cakes are shot with different shutter speeds and apertures.

The pictures show how blurred the extreme cakes are to a greater or lesser extent, depending on how the aperture was opened. The depth of field can be calculated using simple formulas that are available on the Internet, but in reality, the depth of field is calculated on purpose very rarely, more often they use the accumulated experience.
In addition to the aperture, the focal length of the lens also affects the depth of field. We will not go into the physics of the process in this article, we recommend just remembering - the larger the focal length of the lens used, the more the background will be blurred. That is, the telephoto blurs the background better than the width.

For example, in the photos above, the model was shot with the same aperture on lenses with different focal lengths.
First of all, let's define what is bokeh? Bokeh is blurry, fuzzy. Most often the name refers to blurred background in the Foto. We have already mentioned that the aperture is precisely responsible for the blurring of the background, what else to talk about then? The fact is that, along with optics, the shape of the aperture - the number of petals and so on, affects the bokeh pattern.


Modern manufacturers try to make the shape of the diaphragm opening as round as possible. But you can still find photos where the shape of the aperture appears in the bokeh.

The shape of the aperture is most clearly visible if there are bright dots in the background. For example, glowing light bulbs. Now you can often find pictures in which bokeh is artificially shaped in a special way. How to do this, we wrote in the article
We tried very hard not to overload the information with terms. We will be glad if, after reading, you finally get the instructions and read them. Much will become clearer to you. It is important for photographers to know and understand substances like aperture and ISO. These are the tools that every photographer needs and everyone should definitely try to shoot at the maximum open aperture and maximum closed aperture in order to understand the limits of their camera. And maybe your shots will become more expressive when the background is blurred and the main subject of the shooting becomes even better as a result, or when shooting a landscape you will no longer trust the automation, but clamp the hole all the way so that the foreground is worked out clearly and , and back.
If you bought your first DSLR, mirrorless or any other camera that supports the so-called manual settings , then, definitely, our today's article will be useful to you. So, today we will talk about the three main shooting parameters - shutter speed, aperture and ISO.
Photography is light painting. Therefore, both aperture and shutter speed affect the amount of light that hits the matrix after pressing the shutter button.
Aperture is one of the main shooting parameters. Strictly speaking, aperture is a parameter related not to the camera itself (carcass), but to the lens. Therefore, it would be more correct to ask what is the aperture of the lens?
So here it is lens aperture is a mechanical adjustment that allows you to adjust the amount of light passing through the lens. Roughly speaking, a diaphragm is a hole through which light passes. If you dig deeper, you can find out that the aperture of the lens is a few petals that change their position, thereby reducing or increasing the hole through which light passes. 
What do you need to take away from this first? First, the larger the aperture, the more light passes through the lens. Second, you also need to know what LESS aperture value, the wider the “hole” is open, which means the MORE aperture. Thus, on modern lenses, the maximum aperture opening is achieved at f/1.2 and f/1.4. Even larger apertures, like f/1.0 and f/0.95, are available on expensive exclusive glasses that even professionals usually don't use.
So, let's take a couple of specific lenses as an example. Let's say Nikon 18-105mm f/3.5-5.6G and Nikon 50mm f/1.4D . Their maximum aperture is indicated in the title. For the first lens, it is f / 3.5 at 18mm and f / 5.6 at 105mm, for the second - f / 1.4. This option is also called luminosity. Note that only the maximum aperture is indicated. cover the diaphragm up to values like f / 7.1, f / 11 is possible on any lens. The extreme value is usually f / 22 for zooms (18-105mm) and f / 16 for primes (50mm). We talked about zooms and fixes in a separate article.
Just like aperture, shutter speed affects the amount of light that eventually hits the camera's sensor (or film). If the aperture regulates the amount of light using the diameter of the hole in the lens, then shutter speed is a parameter of the carcass itself.
Excerpt- this is the time during which the light exposes the light-sensitive element, which today is the matrix of the camera. Exposure is measured in fractions of a second. For example, 1/60, 1/800. The shutter speed can be longer than a second, usually it is indicated 1 '' (1 second), 10 '' (10 seconds), etc. In shutter speeds less than a second, the unit can be omitted for convenience, and thus the shutter speed can be denoted as 60, 800, etc.
Currently ISO is the sensitivity of the camera matrix. This is the third parameter that can affect the exposure of the image. The base ISO on modern cameras is 100-200 units. The maximum can be ISO 6400, 12800 or more. The physically larger and better the camera matrix, the more opportunity ISO.
In general, roughly speaking, ISO is the parameter that affects noise snapshot. The higher the ISO, the more so-called noise in the photo. Accordingly, low-noise matrices are very much appreciated today, because they allow you to shoot at bad conditions illumination with hands and receive good shots. Here are the cameras that are leading in terms of ISO today: Sony A7s, Nikon D800e, Nikon D800, Nikon Df, Nikon D4s, Nikon D4, Nikon D600, Nikon D610. As you can see, Nikon cameras, which mainly use Sony matrices, are the best at coping with noise so far. Here is such a paradox. However, the Sony A7s is still the leader, which at the time of this writing has just appeared. 
This shot was taken at ISO 900. Below are enlarged fragments (crops) of this frame at different ISOs. Enlarged right top part candlestick

We looked at three parameters that affect the exposure of the image. Now let's see how these parameters interact with each other and what each of them affects.
So let's say we're in a situation where ISO 400, f/4, and shutter speed 1/400 give us a perfect exposure, which we'll denote as 0. But then an additional light source appeared (the sun came out, an additional illuminator was installed, etc.) .). The exposure shifts from 0 towards +, say, by 1 stop (the frame becomes brighter, "overexposure"). What is one stop and how can we make the frame a little darker so that there is no overexposure? Roughly speaking, for ISO and exposure 1 stop is an increase or decrease in a value by 2 times. For an aperture of 1.4 times. So to darken the frame we have the following options:
Now let's see what this will ultimately affect:
Thus, if we are shooting a portrait, then the first option is best for us, because there will be less noise. If we shoot a landscape, then again, good decision will choose the first option, but the third option, under certain conditions, can improve the picture (it will become sharper). If we are shooting sports, then the second option will be preferable, since the faster the shutter speed, the easier it is to catch the movement.
What we described above can be used when taking pictures, working with all the parameters manually. That is, set the camera to manual mode (M) and follow each parameter. And now I will tell you a secret. Most of even professional photographers do not shoot in manual mode.
Every camera that supports manual settings has shutter-priority and aperture-priority modes. We talked about this in the article "How to take pictures with a SLR camera".
Aperture priority mode allows you to control only the aperture, and leave the shutter speed at the mercy of the camera's automation. Shutter priority mode works the same way, only in it you are responsible for exposure.
Add to this the excellent working Auto ISO system in modern cameras, which selects the light sensitivity based on the specific situation, and it turns out that you have control over only 1 selected parameter. 
Nikon Mode Dial: M - Manual, A - Aperture Priority, S - Shutter Priority
For example, you choose aperture priority for a portrait shot on a sunny day. Set your aperture to 2.8. Automation selects the required shutter speed, and ISO under such conditions is set to 100 units (that is, to the minimum value). In general, the camera always tries to set the lowest possible ISO value. Thus, you get, for example, an aperture of f / 2.8 (which you set), a shutter speed of 1/1600 and ISO 100 (these two values were picked up by automatics). In case the resulting frame is too light or vice versa, too dark, you can influence the exposure directly by increasing or decreasing its value. How one exposure step affects the change in parameters is described above. In case Aperture Priority mode is selected, changing the exposure by 1 plus will cause the auto to lower the shutter speed to 1/800 to brighten the frame. AT this case the aperture value is a constant, and the change in exposure occurs only due to two parameters, ISO and shutter speed. By the way, pay attention to the fact that the exposure step in modern cameras is usually set to 1/3 steps. That is, it usually looks like this: 0, +1/3, +2/3, +1, etc. A change of 1/3 will reduce the shutter speed not to 1/800, but to 1/1250.
Thus, the aperture priority mode allows you to concentrate on only one parameter and not be distracted by others. In this case, the photographer controls exactly the parameter that is of interest to him. With the shutter priority mode, everything is about the same, however, based on personal experience, I can say that it is usually less in demand.
As you already understood, dealing with all these settings is not so difficult. Within the framework of one article, in general, I tried to explain on my fingers what parameters and what they influence. You just need to read about it once, and then play a little with your camera settings and see what happens when you change this or that parameter. I hope this article helped you understand a little better how your camera works. See you soon and good luck!
Greetings, dear readers of my blog. I'm in touch with you, Timur Mustaev. Yesterday I stumbled upon a series of photographs by a so-called "professional" photographer, and it seems that many simply do not understand the aperture of the camera.
Therefore, I decided to write a detailed article about this factor so that people at least understand the main points and how to use it. Do you know that aperture affects the quality of photos? Are you wondering how? We will talk about this in this article.
Before continuing to read the article, first read and. The quality of your photo depends on these parameters.
After reading the material, you will understand the basic principle of the aperture, as well as learn how to set various parameters for shooting your scenes. Well, is it time to get started?
When buying a camera, many immediately begin to practice, without affecting the theoretical part. After some time, the ardor and mood of photographers becomes weaker and weaker, many leave their “cars” to gather dust on the shelves, because, after digging a little in the settings, they get pictures that do not satisfy their ambitions.
To prevent this from happening to you, you must first understand the theory in order to get better work, to please yourself and your loved ones, and in the future, partners!
What is the aperture in the camera, a similar question is often asked by beginners in photography, and after a little acquaintance with the aperture device, they immediately start shooting without understanding the essence and nuances of using the “hole”, thereby obtaining very typical photos without plot and highlights.
You are probably wondering "hole"? And what about her? In the vocabulary of photographers, the diaphragm is also called a hole, a hole. So, this is a special mechanism in the form of a ring, consisting of petals, regulating the passage of a given amount of light to the camera matrix.
The more open the petals, the more light enters the matrix, and vice versa, the less open the petals, the less light.
For beginners, this designation of the term may seem very complicated, and in order to enlighten what it is and how the hole mechanism works, you can simply imagine the eye, namely, the wider the pupil is ajar, the more light falls on the retina and vice versa. The light determines the level of exposure.
After getting acquainted with the mechanism of action, it is necessary to understand how it works, is defined and changed. Everyone who has worked with a camera has come across the value of f and a number of numbers, this is the definition of aperture, which can be changed and adjusted to different scenes.
The aperture row is a certain number of numbers with a value of f, namely: f / 1.4; f/2; f/2.8, etc. Basically, the aperture line ends at f/22. These numbers indicate how open the petals are in the lens, thereby determining depth of field and exposure.
The main feature is that the smaller the value, which, by the way, is expressed in numbers, at the aperture, the wider the aperture. Therefore, it will be maximally open at f/1.4, and at f/22 the "hole" will be minimally open. This mechanism of operation applies to all cameras, Nikon, Senon and others.

Now we come to the question of the effect of the width of the opening of the petals on the exposure. The bottom line is that the wider the open, the lighter the photo will be. Working with light is very important when shooting any scenes. If we talk about practice, then, for example, when shooting in a darkened room, it is better to open the aperture wider (up to f / 5.6), and when shooting on a clear day outside, the aperture should be covered (from f / 8 to f / 16 ), so that there is no so-called "overexposure".
Here you also need to consider what effect you want to achieve. If you want to blur the background, then the hole should be as open as possible, 2.8 or 3.5.
Aperture settings change the depth of field, and this is perhaps one of the main things in photography. This designation is understood as a certain zone in the image, which is sharp, or rather, not an easy zone, but, one might say, a range of distances.
Aperture and depth of field are related. This connection is based on the aperture parameters, namely, if the ring is fully open, f / 1.8, then there can be no talk of great sharpness.
With a wide aperture, the depth of field is very shallow, and the specific subject you are focusing on will be in focus, while the background will be “blurred”, but this method is also “popular”, for example, when shooting portraits, where attention is focused on the eyes of the model and the background is blurry.
For portrait shots, it is desirable to use a width from f / 4 to f / 8, with such a width of the “hole”, the model will be visible in the picture, and at the same time the background from behind will be slightly pleasantly blurred, which will give a beautiful photo effect.

How to choose the right size for shooting? It's pretty easy, the main thing you need to know is how to set the necessary values for shooting. So, aperture (f / 1.8) is suitable for shooting in poorly lit rooms. Such photos should be taken when photographing various miniature objects or if you want to highlight a particular detail, for example, an eye or a button on a shirt.
The width at f/4 is suitable for portrait photography, with an average amount of light in the room. The main thing when shooting with such values is not to "miss", thereby highlighting, for example, the shoulder, and not the desired face of the model.
With a width of f / 5.6, you can safely “click” the model in full height, and at f/8 it's worth shooting a group of people.
In sunlight, f/16 and f/22 should be used as they will blend in beautifully with landscapes.
Today, the market for types and manufacturers of cameras is crowded, these are the well-known Canon and Nikon, and others less famous brands like Fujifilm, Pentax and others. It doesn't matter what kind of camera you have, as long as you know the basics of photography, choose the right light, and understand things like shutter speed, aperture, and ISO.
After reading this article, you clearly need to understand what aperture is, how to use it and how to control it for shooting your own scenes. It remains only to pick up a camera and start such a wonderful art as photography!
My big advice to you. Take as many pictures as possible, practice. Take your camera everywhere with you. And never stop there!
And yet, I would like to recommend you, just a super video course " Digital SLR for beginners 2.0". In great detail, with the help of a video, all the details of obtaining quality photography. Why this particular course? It's simple, I got acquainted with many courses on the Internet, and not one of them surpassed the course recommended by me in terms of quality and volume of information. Some of them even mislead me.
Good luck in creativity! See you soon on my blog.
All the best to you, Timur Mustaev.
Diaphragm- a device in the lens that doses the amount of light. For better understanding, an example from life. When people look at the sun, they squint, that is, they reduce the gap through which the light passes. If people did not squint, the sun would burn the retina with its strong light. Well, at night, on the contrary, you need to open your eyes wider to capture more light. Large eyes are those animals that need to see well at night.
The diaphragm is often referred to as luminosity or aperture. In fact, the aperture is responsible only for the geometric aperture. And not only the aperture is responsible for the overall aperture of the lens, but also the percentage of reflection and transmission of light, the drop in aperture value during focusing, the percentage of light absorption by the filter. Agree, the aperture ratio of a lens with the same aperture will be different with different filters. Aperture (Latin apertura - hole). Aperture is called because aperture angle directly depends on the aperture closing stage.
Usually, aperture is understood as a changing round hole in the lens. The hole opens and closes with petals. Petals in this case are called aperture blades. The number and roundness of the aperture blades determine how round the hole itself will be. The stronger the aperture rounding, the better. Aperture is often referred to simply as a “hole” by professionals, as it is a real, kind of hole.
As it turned out, the aperture affects not only the amount of light, but also the depth of field. How more value aperture, the shallower the depth of field. The smaller the aperture value, the greater the depth of field. This is one of the basic techniques in photography for controlling the point of interest in a photo. It is very important to be able to control the depth of field for portraits, where you need to focus on the person. Macro photographers are well aware of what DOF is, they have to shoot at very tightly closed apertures in order to increase the depth of field. In general, where they write about the depth of field, they also write about a blurry background.
Usually, modern cameras have the ability to focus at full aperture. When a picture is taken, the camera automatically closes the aperture to the set value. To see how images will look when the aperture is closed, you can sometimes use the aperture repeater. This allows you to look through the viewfinder (optical or electronic) without a picture how the picture will look when the camera closes the aperture. On Nikon cameras that have Live View, the Live View function automatically closes the aperture to the specified value before turning on this very Live View.
Aperture is simply a change in aperture value. By controlling the aperture, you can achieve a sharper image from the lens. Basically, the sharpest image is achieved somewhere at the average aperture of a particular lens. Actually great importance aperture lenses suffer from chromatic aberration and vignetting. At very small apertures, lenses suffer from loss of sharpness due to diffraction. Also, when closing (reducing the aperture), not only sharpness increases, but also the contrast of the image. The large aperture allows sighting through the optical viewfinder without any problems, since the lens gives a lot of light and the entire frame is clearly visible through the peephole. It is possible to sight with an aperture below 5.6 through the optical viewfinder only in good lighting. Also, pictures with a larger aperture may appear brighter and more saturated, an effect associated with smoother transitions in pictures of dark areas into bright areas.
Aperture has a very strong effect on the bokeh pattern. The best bokeh for a lens is achieved at its widest aperture. At the same time, the physical hole itself is as round as possible. When the diaphragm is closed, the diaphragm blades form different polyhedra instead of a circle. These polyhedra are clearly visible in the blur zone. Very often such polyhedra are called nuts, washers and circular saws.
Since cheap lenses have a small number of aperture blades, usually no more than 5-6, figures exactly resembling “nuts” appear in the blur zone. Those lenses are valued that, on closed apertures, give the correct round luminous spots in the blur zone, for example, the old Soviet Tair-11A or Jupiter-37A can be attributed to them. In new lenses it is very rare to find a large number of aperture blades, but now they make more rounded petals, which, even with a small number of them, give a beautiful pattern.
The aperture is the mechanical part of the lens, it cannot be done programmatically. Almost all phones don't have an aperture. Many soap dishes also do not have a diaphragm. How to be? Typically, the camera in such devices doses the amount of light only by shutter speed and ISO value variation, and the aperture value itself is constantly fixed at the maximum value. For example, on my Nokia 7610 it is indicated that F2.8, because the camera always shoots at F2.8.
In cameras, it is responsible for the aperture number F. It shows how many times the relative aperture diameter is less than the focal length of the lens, this is written as F1 / 1.4 or F1 / 5.6. Often, only one f-number is indicated on lenses or cameras, for example 1.4 or 16.0, often the letter F is omitted. The easiest way to adjust the aperture is in aperture priority mode. This mode is usually designated as A or AV. To make it easy to remember, you can simply say: aperture - it means you need to turn on mode A. Why A - from the word aperture, which is a synonym for the word aperture.
The maximum aperture value determines how much the lens can be used in poor lighting conditions. Lenses with a large aperture are called light, usually the F value should be below 2.8. That is, lenses with maximum apertures of F1.4, F1.8, F2.0, F2.2, F2.5, F2.8 are called fast or simply bright. Anything below F1.4 is called super fast. The Nikon 50mm F1.2 is a super fast lens.
Since the aperture affects the shutter speed, the lenses are exactly divided into fast and slow lenses. A fast lens refers to the fact that it can be used to capture an image with a short shutter speed. And under slow, the fact that with its help you can take a photo with a long (slow shutter speed). If you fix the ISO value, then the shutter speed depends on the aperture, and the brighter the lens, the faster it is. And the darker the lens, the slower it is.
Usually, the difference in aperture values and other photographic variables is measured in stops. When you change the aperture by one stop, the shutter speed will double. Also, when changing the aperture by one stop, instead of shutter speed, you can change the ISO twice. A very important note is that the difference in aperture values is not linear, but quadratic. Let's take two apertures F5.6 and F2.8, it would seem that the difference in aperture ratio is 5.6 / 2.8 = 2 times, but this is not true. Aperture is affected by the circumference of the aperture, not the diameter. The F number is only related to the diameter. To calculate the difference in area, you need to take the squares of the diameters. Therefore, it turns out that the difference in aperture ratio with apertures F5.6 and F2.8 is (5.6 * 5.6) / (2.8 * 2.8) \u003d 4 times. Here is such a trick.
How to remember it? There are two ways out, either to divide the squares of the numbers F, or first to divide, and then to square. Why am I boring you with calculations - but because amateur photographers often have no idea how many times a lens is “lighter” or “darker” than another lens.
Aperture and shutter speed are related by the golden rule. To maintain the correct exposure at the same ISO, you must either close the aperture and increase the shutter speed. Or, on the contrary, open the aperture and reduce the shutter speed.
Everything is very simple. To close or reduce the aperture means to increase the F number. There was an aperture of F2.8, when it was closed, it became F5.6, it was closed even stronger, it became F16.0, etc. For example, the phrase “covered the hole for two feet” is found, which stands for how he made the number F large and reduced the area of \u200b\u200bthe hole by 4 times. The main thing is not to get confused, when the aperture opens, the F number decreases. And when the aperture closes, the F-number increases. For example, there was an aperture of F32.0, when it was opened, it became F8.0, when it was opened even stronger, it became F5.6.
If you have a DSLR, turn the camera backwards so that you are looking at the lens, press the shutter button (take a picture) and you will see how the hole in the lens closes and opens - that's how aperture works.
Diaphragm is a light flux dispenser that affects exposure, depth of field, brightness and image quality. In general, if you don’t shoot with different apertures, you won’t really know what it is.
The material was kindly provided by the colleagues of the "Radozhiva" site. Thanks to them for this.
Aperture is one of the three main factors that affect. It follows that understanding how the diaphragm works is prerequisite for deep, expressive and properly exposed photographs. There are both negative and creative influences of various apertures on the final result, and this lesson article is intended to acquaint you with what a diaphragm is, what it is and how to use it to your advantage.
The best and, at the same time, the easiest way to understand how the diaphragm works is to imagine it as the pupil of the human eye. The wider the pupil becomes, the more light it lets in.
Aperture, along with shutter speed, are the main exposure parameters. By changing the aperture diameter, you can adjust the amount of light that enters your camera's sensor, depending on the lighting. There are many creative uses for different aperture sizes, which we'll look at in the next section, but when it comes to amount of light and exposure, remember that the wider the aperture, the more light it will let in, and thus the narrower the aperture, the less light.
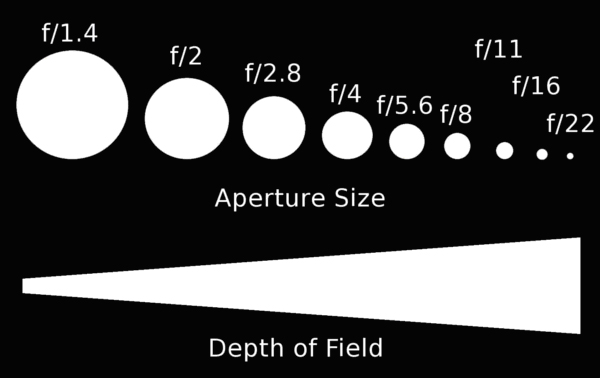
Different aperture values are described by the so-called aperture scale. On the camera display, you can see the aperture value in the form of a denominator of a fraction - “f / number”. This number indicates how wide the aperture opening is, which ultimately affects the exposure itself, and also determines . It is important to remember here: the smaller the numerical value of the aperture, the wider its aperture is open. It may be confusing at first - why small number matches the larger hole? The answer is quite simple and involves mathematics, but first let's get acquainted with the standard aperture scale.
Standard aperture range: f/1.4, f/2, f/2.8, f/4, f/5.6, f/8, f/11, f/16, f/22
The most important thing to know about all of these numbers is that as you move from a smaller number to a larger one, the aperture is halved and therefore lets 50% less light into the lens. On the camera lens, you can see the inscription in the form of ratios of numerical values, for example, 1:2, which means that the diameter of the aperture of your camera lens is half its focal length. Almost all modern cameras have not only standard aperture values, but also intermediate ones. So, if the setting step is 1/3 of a step, then between f / 4 and f / 2.8 there will be other aperture values: f / 3.2 and f / 3.6. Their main purpose is the possibility of even greater accuracy of exposure settings.
Now let's move on to more complex things. If you think that this is too difficult and confusing for you, feel free to move on to the next section. And here we will try to figure out why, when moving from a smaller aperture value to a larger one, exactly twice less light passes through the camera lens.
Let's look at everything with an example. Let's say we have a 50mm f/2 lens. First, we calculate the aperture diameter, for this we need to divide 50 mm by 2, we get 25 mm. Then we find the radius (half the diameter), we have 12.5 mm. And finally, we find out the area of the aperture opening by the formula S = pi * R2(pi times squared radius): 490 sq. mm. Now we will make similar calculations for the same “fifty dollars”, but with a different aperture value - f / 2.8: the diameter will be 17.9 mm, respectively, the radius = 8.95 mm, and the area = 251.6 square meters. mm. It doesn't take a genius to notice that the second area turned out to be almost half the size of the first. You should not pay attention to the fact that the number 2 is approximate, the reason for this is the rounding of the diaphragm number to the first decimal place, but if you carry out calculations without rounding, you will get exactly 2.
Here's what the aperture scale looks like in reality:
With a change in the radius of the aperture hole, the exposure also changes: the wider the aperture is opened, the more light will fall on the matrix and, accordingly, the picture will be brighter. To better understand how exposure depends on aperture, let's take a look at a series of shots that were taken with different apertures. All photos were taken without flash and at constant exposure settings: shutter speed 1/400, ISO 200; only the aperture changed: f/2, f/2.8, f/4, f/5.6, f/8, f/11, f/16, f/22.


It should be noted that, after all, the main creative task of the aperture is to influence not the exposure, but the depth of field.
Depth of field is a fairly voluminous topic and a separate one will be required for its detailed study. As part of this article, we will consider it briefly and generally. The main thing to remember is that when we talk about depth of field, we mean the distance at which all subjects will be transmitted sharply and clearly.
As for the influence of the aperture on the depth of field, everything is simple here: the wider the aperture is open (do not forget that the numerical values will be smaller), the shallower the depth of field will be; with a narrower aperture, the field of sharpness will be larger. Before looking at a series of shots showing the effect of aperture on depth of field, I suggest that you familiarize yourself with the diagram below, which shows how it all works. And if you do not quite understand the whole principle of work, it does not matter - at this stage it is enough to have at least the most elementary representation on the effect of aperture on depth of field.

In the bottom shot, which was taken at f/1.4, it's nice how a wide aperture creates a shallow depth of field:
And finally, a selection of shots that were taken in aperture priority mode, that is, all exposure settings except aperture remained constant. The aperture changed in the following order: f/2, f/2.8, f/4, f/5.6, f/8, f/11, f/16, f/22. Notice how the depth of field increases as the aperture decreases:


First, it should be noted that there are no rules for choosing an aperture. Everything will depend on what goals you are pursuing: to convey the scene as accurately as possible or to apply some kind of artistic technique. To make it easier for you to make decisions, here are some examples of using the most traditional aperture values.
f/1,4 : Suitable for shooting in very low light conditions. I advise you to use this value very carefully, as this is the smallest depth of field. Use to capture small subjects or to create a soft focus effect.
f/2 : has similar f/1.4 performance, but a similar aperture lens will cost slightly less than a 1.4 aperture lens.
f/2.8 : Great for low light conditions. It is best used for, because, due to the greater depth of field, you can highlight or emphasize individual facial features. As a rule, for all good zoom lenses, the aperture range starts from this number.
f/4: The smallest aperture used for portraiture in well-lit conditions, as a wider aperture makes autofocusing more difficult.
f/5.6 : It is considered that this aperture is well suited for shooting 2 people, but in poor lighting it is still better to use a flash.
f/8: this aperture is considered ideal for , as it ensures that all subjects are in focus.
f/11: at this aperture value, most lenses are sharpest, so this aperture is good for portraits.
f/16: suitable for shooting in bright sunlight. Thanks to the narrow aperture opening, a large depth of field is achieved, the foreground and background are as clear as possible.
f/22: with such a diaphragm, they usually shoot that do not require attention to objects in the foreground.
And remember that these are not strict rules, but only recommendations. Well, now that you have a complete understanding of how aperture values affect the final picture, start putting your knowledge into practice and enjoy the process of photography itself.
How I got cancer. Rami Blekt Intro to number four...

Luck is one of the most unpredictable phenomena in a person's life. Its impossible...

The other world is a very interesting topic that everyone thinks about at least ...