"The woman is created for a man, not a man for a woman" - such a postulate ...

Carved candles - a unique and unique decoration of any celebration or. In addition, candles handmade - Unusual and universal gift for holidays, such as New Year's, Easter, wedding. Decorative candles can be bought ready or do at home. Homemade manufacturing decorative candles With their own hands will require special equipment and materials.
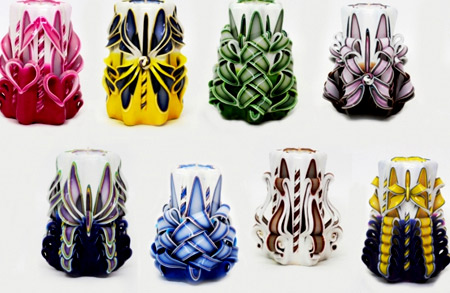
Several designs of homemade carved candles
The next master class will help to understand the intricacies of the manufacture of carved candles.
The creation of carved candles is a complex, but interesting process. At the same time, it is important to prepare equipment that requires great responsibility. To make quality products it is important not to be mistaken with the choice. High-quality paraffin, dyes and machine - the key to the fact that decorative candles will delight the eye, and at the same time will not contain harmful components that can stand out during burning.
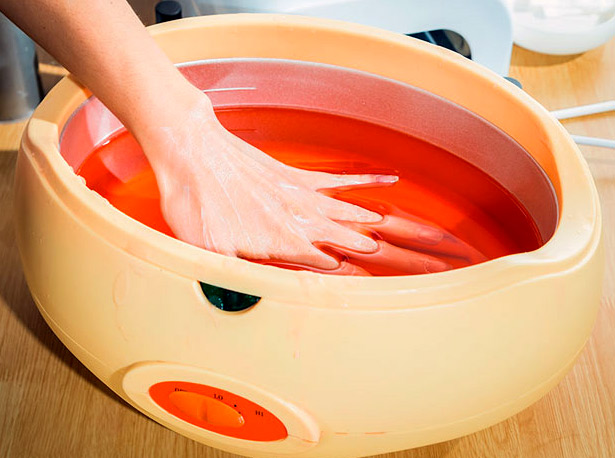
The paraffinotopka or melon is a container of stainless or galvanized steel, divided into several compartments. In order for paraffin in the tanks, the fluid under the bathroom is located electric ten, which should maintain a stable temperature of 80-90 degrees.
It looks like a bath for melting paraffin Specialized firms offer equipment for carved candles of different depths and compartments, for several paraffin colors:
Under the order, the store can make a melting for paraffin on 10 or 12 colors. Equipment can also have a different depth, the height of the finished handmade product will depend on it. Typically, the depth of containers is 20 and 30 cm - for medium and large candles. Equipment for carved candles can be bought on average from 13 to 30 thousand rubles.
But there are also compact options that can be installed directly on the kitchen stove. Such melts occupy little space are easily transferred, and cost cheaper - from 8 to 9 thousand rubles.
To make carved candles at home, and not in production scale - the compact option is quite suitable. Of course, with certain skills, the equipment for melting paraffin can be made with their own hands.
 Example of carved handmade candles
 To do this, need welding machine, Sheet steel, electric ten. The problem of self-made options - it will be necessary to constant control of the temperature of the molten paraffin. More serious production needs special equipment.
Molds for carved candles can be bought in specialized stores. Finished goods Go with a fixture for fixing the wick and have a different configuration. Usually the master class on the manufacture of carved candles offers to use the workpiece, cast in the form of a five or six-pointed star. You can also make the basis of the following form:
Make wedding carved candles thin blank Round or face form.
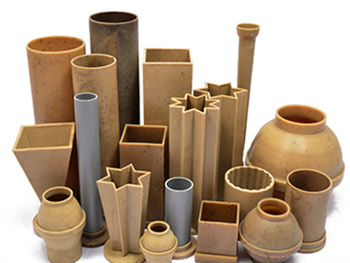 Different patterns for milling candles
 Material for forms is used different: plastic, silicone or metal.

The manufacture of handmade candles is impossible without the following materials:

After all the materials and tools are prepared, you can start making original candles. The master class on the manufacture of carved candles at home includes the following steps:
The master class on the creation of carved candles does not represent much difficulty. Although the artistic taste and fantasy at the carver should definitely be present.
A beginner master or who wants to try strength in the manufacture of carved candles, it is not necessary to make the foundation for the candle alone.
 The process of manufacturing a carved candle
 You can choose a special store, which sells ready-made samples of blanks various shapes and sizes. When choosing finished base For the candle there is no need to do or acquire shapes and philitol. Paraffin billet can be bought from 90 to 200 rubles depending on weight and shape.
Full master class manufacturer of carved candles:

Of course, the first time is hardly a masterpiece, you need some skills and knowledge: at what angle do cuts and how to form one or another pattern. You will have to view not one master class and make not one candle, before the handmade product is obtained, which can be given or even run into production.
Undoubtedly, making carved candles is very exciting - this is the ability to combine an interesting hobby and get an additional source of income. Particularly demanded carved candles on holidays, at weddings or as original gifts. Another positive moment - own production And the store is easy to equip even at home.
Hello, I call me Zarina, today I will tell you and show how to make carved candles, or rather - thin carved candles without workpiece. These candles are suitable for any celebration (wedding, wedding, new year, romantic dinner, etc.)
For the manufacture of such a candle, we will need:


I will tell you one secret: this candle can be done without equipment. You can take a bidonchik, a high bank, anything, the only thing - it is necessary that the height was not lower than 20 cm. Heat the paraffin on the water bath, stearin and white dye, and then do the same thing that I am on the equipment. And so, we take our wick and fasten it on the hook. Fitil we omit not for a long time in the heated white mixture, then into the water. After driving out of the water, with the help of a napkin, we remove the remnants of the water. And thus, dip wick in the paraffin-stearin solution is necessary 30-35 times. During this time, our future candle will type the desired thickness.
After they scored the thickness, we proceed to cutting. The stationery knife is applied not very noticeable tags, try to apply them on the same level from two sides of the future candle. On these tags we will cut our leaves. We make the first cut from Niza to the top and wrap it to the middle, just on the other side. Next threads are done from top to bottom, we try not to cut off the leaf (it is better not to prevent a centimeter) and wrap up to the middle. Also doing and on the other hand. We got a flower. Now we cut longer than the leaves, turn them and attach them to the place. The next cut is not big, we will twist it as a roller. We do from two sides. Next, again leaves, make just as before. And finish our cutting rollers on both sides.
Where the flower has been formed inserting a bead, it is a middle. Over the flower, with the help of a knife-loop, make cut. I pull out the roller (but do not tear off) and begin to twist it, we have a pigtail. We insert this braid back into the cell. This is so thin carved candle is ready.
Well, and those who read before completion - Bonus: Watch the video, as I do thin candles without a workpiece.
Now you know how to make carved candles at home. Rejoice yourself and loved ones!
I will be glad to your comments!
Zebegesti
Zebegesti
Zebegesti
Zebegesti
Zebegesti
Zebegesti
Carved candles can be useful at different occasions: for example, for a wedding, Easter or even New Year. But it does not always get to get necessary quantity These important and beautiful things. Nothing wrong! You can make carved candles with your own hands. Moreover, crafts are able to get even original store products.
The creation of carved candles implies the following steps:
There is nothing complicated in this process. Search required tools Also not work.
To start work, you should be stockpons in the following materials:
Having the above-listed materials, you can safely begin to work on creating carved candles at home. Certain with such an occupation will be done even from newbies.
You should consider Read more Consider actions performed when creating carved candles:
Perhaps those who make such crafts for the first time may not everything work perfectly, but several attempts will help improve skills. Candles, at first, who came out simple, will gradually become more complicated, additional decorative elements will be added to them, change their shape.
It is not surprising that many people begin to make the manufacture of carved candles for their pleasure, that is, they consider this case their own hobby. And then they successfully do small home business (When they see that candles manufactured by them are completely able to have a high demand for buyers).

The candles themselves become beautiful decorative element For many interiors, not only complementing, but also creating a unique style.
Candles - attribute of many holidays and. Candles create the very atmosphere that helps to relax and plunge into the world of harmony. To learn how to make candles with your own hands, the master class will be extremely necessary, this is the easiest way to master the manufacturing technology and create the most real works of art from paraffin.
We will not need special devices or expensive materials. Buy in the store:
Candles cut into small pieces, wick will postpone, it will come in handy to us for the manufacture of our candle.
So that he securely kept, we will do a small hole in the bottom of the cup and shifted the wick to it, we will give a wooden wand to it from the outside. We stretch the wick and on top to fix it with a clothespin.
The basis of the master class on decorative candles with their own hands is the process of cooking wax. To do this, find a saucepan, in which five cans with wax can fit at the same time. We heat the water in it, put the same amount of wax into each jar, add finely chopped pencils into jars. We are waiting when the wax melts, and the masses will become homogeneous.
At the very bottom there are white paraffin, in which we did not add a pencil, then in turn pour wax of different colors, the faster it is to do, the softer the boundaries between the colors. The brightness of the color can be changed by varying the number of added pencils.
Let's wait for the paraffin completely freeze (1.5-2 hours). After that, you can carefully remove it from the glass.
When you have mastered the manufacturing technology, you can proceed to experiments and unusual decoration. We offer you some simple, but original ideas.
You will need a round shape, paraffin, ice, wick, bank and saucepan with water to interleave paraffin, wax chalk for color. All stages of manufacture are the same as described above, but the wax must be one color. In the form, we fix the wick, pour out slices of ice, then pour paraffin so that the surface is smooth. Let's leave the workpiece to completely dry the paraffin, then the water with a salt and get a candle. The more slices of ice, the more massive patterns.
To create such an option, we need special round forms For the manufacture of candles. They can be purchased in the store or order via the Internet. Paraffin melt and fill in the form, after a few minutes with a passing mass in the middle wooden stick, insert the wick and fill the hole with paraffin. When the wax completely freezes, carefully pulling the craft from the form, print the hieroglyph on the computer and applied to the candle, spend several times around it with a hot iron to glue.
If you were invited for a birthday or any other holiday, and you do not know what to give the perpetrator of the celebration, you can create a whole work of art - a candle-aquarium. To do this, we will need a small round capacity similar to aquarium. It should be pouring ornamental petty pebbles, fasten the wick and place as close as possible to the glass of fish figures and jellyfish, seashells. Before the fill, the wick learn to the chopstick so that he stood smoothly and did not go to the side. So that the composition is transparent, it is impossible to add to paraffin.
Recently, gel candles are particularly popular. The manufacturing process is exciting, because you can invent any compositions using shells, figurines, sand, flowers. The gel can be poured into any glass container with thick walls.
We offer you a master class on gel candles with your own hands, with which you can cook gifts for loved ones for the new year.
First prepare materials:
Fit wick in a glass, pour the tank gel, then gently lower all the decorations into it. The liquid is quite viscous, so all items will be on the surface or in the thickness of the gel. If you want part of the jewelry to be on the bottom, then they need to put them in a glass before the fill.
We satisfy in water, add 50 gr. Glycerin, put the mixture on a slow fire and interfere until it becomes homogeneous. Then we prepare the second mass - the remaining 20 gr. Glycerin connect with 4 gr. Tanina, the mixture will be muddy to achieve transparency, it must be boiled for a few seconds. CONNECT BE BE SPECIAL, GEL FOR CUT CUT!
In the home conditions you can cook flavored candles that will please not only beautiful external species, but also soothing or tonic smells. We present to your attention a master class on coffee candles with your own hands.
Required ingredients:
 We put paraffin on water bathAnd at this time prepare a form for fill. To do this, it is better to use a small box from under the juice, cutting off from it top. In our case, the candle will get a square, but at will you can take another form and make a round.
When the form is ready, fed wick. One end is tied to the toothpick, which you need to put on the upper part of the form, and reinforce the wick with a few drops of molten paraffin. Pay attention to the thickness of the wick: the wider and massive candle, the time it should be thicker.
Return to paraffin. When it was completely melted, add vanillin and coffee grains, warm the products on the fire for another 10 minutes - before the appearance of a pleasant fragrance. On the bottom of the form, we put 10 grains of coffee, fill in paraffin half of the form, we are waiting for 2 hours. Then, on top, smear 10 more grains and pour the remaining paraffin. We leave the wax for 12 hours, after carefully cutting the shape and take the finished candle.
Traditionally, two thin candles are used at the wedding, which symbolize the bride and groom, and one big is a family hearth.
You can make your hands wedding candles. The master class will help create real works of art. Prepare materials:
For the manufacture of wedding candles, paraffin should be white. First, prepare a large round candle. To do this, install the wick, pour the paraffin, wait a few hours until it freezes. Candle "Family Framed" is ready.
If you decide to find out how to make carved candles with your own hands, the master class will not be enough. Initially, you need to prepare multi-colored containers where the candle will be dipped, the constant temperature (75-90 degrees) should be maintained using a water bath.
So, for work, we need to prepare materials and tools:
The workpiece can be made independently, the paraffin bay in a round or square shape, the most hard work Starts later. When the candle is ready, it needs to be dipped 30 times in containers with paraffin of various colors, but after 1 time it is necessary to lower in white wax. Then put it for a while in cold water, Cut the flow to align the base and you can proceed to work. Remember that the drawing or pattern should be thought out in advance, as it will have to do everything very quickly - the paraffin will freeze in 15 minutes. The easiest way of thread is a thin knife small sites And bending tips. The first row slopes in one direction, the second to another, etc.
To protect the thread, the finished handy is perching into acrylic varnish.
The manufacture of candles at home is a fascinating occupation that requires care and prettiness. Try to make one simple candle, and you will not notice how to learn how to create carved compositions. We will also open the secrets.
I'll tell you, how to make a carved candle at home.
You will need:

The whole process of creating carved candles can be conditionally divided into 6 stages.
Step 1: Creating a basic blank (core) of a future candle.
For such candles, billets in the form of a 5-finite or 6-end star are usually used, up to 30 cm high. But everything, of course, depends on what you want to get in the end.
Preparing a mixture of paraffin and stearin, in the proportion of 20% stearin, 80% of paraffin. Such a mixture allows you to get more durable candles that do not float too much, and also facilitates removal of candles from forms.
Paraffin is the most inexpensive material, melts at low temperatures. Paraffin candles They burn the least bright and quickly melted. For candles in paraffin, stearin or wax is usually added.
Steearin is a natural product obtained from fats. It makes a candle solid, helps the dye better dissolve and makes the surface of the candles more shiny.
We warm the mixture in the water bath and pour into the forms. Do not forget to pre-stretch the wick, leaving the long tail at first, for which you will later immerse the candle in the bath with molten wax.
Do not rush to pour the whole form right away, otherwise a lot of wax or paraffin can be found through the hole in the bottom. Wax fill with layers, what flowed, re-send to the smelting.
After 4 hours, we take out the workpiece.


Step 2: Preparation of deep baths with molten wax different colors.
There should be such a quantity of how many colors you want to get in the candle layers. Paraffin paint applied special. Important condition: Baths must constantly warm up to have a constant temperature (56-65 degrees).
If the temperature is higher, the layers will be thinner, which will require more costs time and effort. If, the lower, then vice versa, thick layers and their small amount.
Step 3: Multiple dive candles in baths with wax different colors.
The workpiece must be consolidated for the wick, for which you will be convenient to immerse the candle in the bath with molten wax.
Immerse the candle, immediately taking out. The next time the candle is immersed when the previous layer will find a little. But do not wait for the complete pouring of the previous layer, otherwise then you will not be able to cut the candle.
To speed up the process, you can immerse the candle in cold water, after each dive into hot wax (an additional deep bath is also required for this).
Billet Macaus in color paraffin at least 35 - 40 times. Macaem take turns in different colors Paraffin (for this candle, I pushed in white and green color).


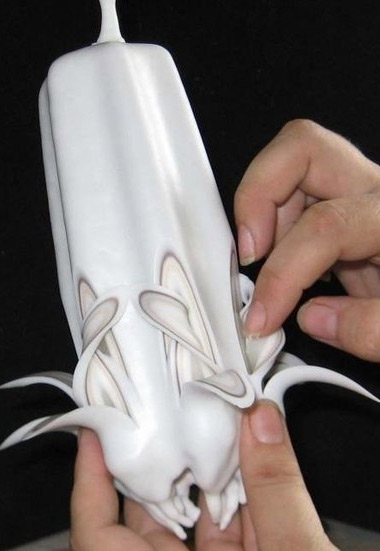
Step 4: Cutting Candles is the shortest process.
You should have no more than 15 minutes. Since the candle should remain in a plastic condition.
You will not have time to experiment, so you need to think over everything in advance. It is advisable to even practice on a monophonic workpiece, heated it with a hairdryer or in a microwave to a plastic state, but the main thing is not to overdo it.
We try that the thickness of the cut is the same. Slices bend to the sides and tighten making drawing.
Carefully explore the photo.


"The woman is created for a man, not a man for a woman" - such a postulate ...

How is HIV on different time segments manifest? The reasons for the development of AIDS is ...

Stomach Cancer: Symptoms, Causes, Treatment of Stomach Cancer is a change in cell type ...