If you adhere to proper nutrition, then avocados are probably in ...


In the presence of a milling machine, work on inserting loops, forming complex holes, recesses, woodcarving, etc. is really simplified. But this does not mean at all that it is necessary to have professional and expensive equipment: it is enough to have a simple manual device.
The only thing you need is to be able to handle wood and use power tools. In addition, you need to have a desire, otherwise there will never be a result without it. Those who have no desire to work simply buy furniture or hire craftsmen to, for example, install a new door and embed locks. Any work, especially with a power tool, requires certain knowledge, and especially safety precautions.
The milling device is intended for processing both wood and metal. With its help, it is possible to form recesses or holes of any configuration. This greatly simplifies tasks such as tapping hinges and tapping locks. To do this with a chisel and an electric drill is not so easy, and it takes a lot of time.
There are stationary milling devices and portable (manual). Manual electric cutters are considered universal devices, with the help of which, in the presence of nozzles, it is possible to perform operations for various purposes, it is enough just to change the position of the part in relation to the device or vice versa.
Stationary devices are used in factories or factories where mass production of wood or metal products is established. Under such conditions, the cutting nozzle is stationary, and the workpiece moves along the desired path. When using a hand tool, on the contrary, the part is fixed motionless and only then it is processed, although there are parts that require fixing a hand tool. This is provided for in the design, therefore, it is considered more universal. This is especially true when you need to process a large number of parts, and it is not possible to use a stationary machine.
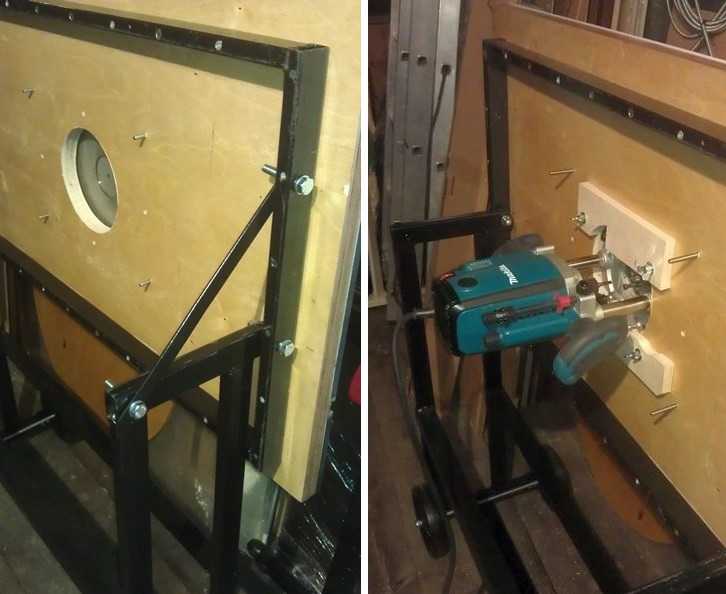 Homemade milling machine - a horizontal platform with a hole in the center, from below to which a manual fixture is attached.
 There are many types of milling machines, but for use at home or for starting a business, universal models are more suitable. As a rule, they are equipped with a set of cutters and various devices for performing various kinds of operations. The only thing is that with a manual router, simple operations can take much more time than with a stationary machine.
With the manual milling device it is possible to:
 Copying parts is one of the functions of any electric milling machine.
 The presence of such functions makes it possible to simplify the production of the same type of furniture or the production of identical parts that are not related to the production of furniture. This is one of the main advantages of this tool. As a rule, for the production of parts of the same type, it is necessary to install copy machines that are designed to perform only one operation, which is not always profitable, especially in small enterprises.
To understand how this device works, you should familiarize yourself with its main parts and their purpose.
The manual milling fixture consists of a metal case and a motor, which is located in the same case. A shaft protrudes from the body, on which various collets are put on, serving as adapters. They allow you to install cutters of various sizes. A cutter is inserted directly into the collet, which is fixed with a special bolt or button, which is provided on some models.
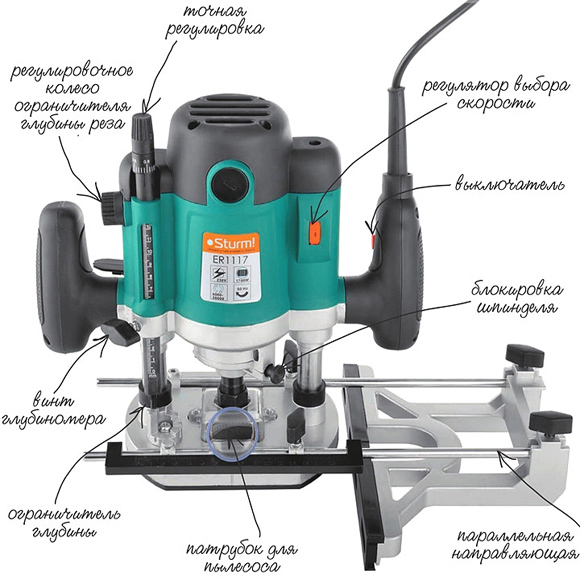 The main elements of a manual milling device and their purpose.
 The design of the milling fixture provides a metal platform, which has a rigid connection with the body. It is attached to the body with two rods. From outside the plate has the smooth covering providing smoothness of the movement in the course of work.
The manual milling fixture has some characteristics that can be adjusted:
At the initial stages, when the tool is mastered, it is better to try to work at low or medium speeds. Although it should always be remembered that the higher the speed, the better work. Especially when it comes to responsible, visible areas that cannot be masked.
In addition to these levers, there is also a button for turning the product on and off, as well as a lock button. These elements are considered the main ones that ensure the quality and safety of work. There is also a parallel stop, which contributes to ease of use. It can be rigidly fixed or with the ability to adjust the shift of the working area, in the direction from the center.

Usually, a factory product falls into the hands of a person tested and lubricated, so no additional measures should be taken. Only in the process of its operation it is necessary to monitor its cleanliness and serviceability. At the same time, it should be regularly cleaned of dust and change the lubricant, if the passport says so. Especially lubrication is needed for moving parts. Alternatively, you can use aerosol lubricants, but you can get by with the usual ones, such as Litol. The use of thick lubricants is not recommended, as chips and dust stick to them. If aerosol lubricants are used, then this factor can be eliminated.
Lubrication also requires a sole - a smooth part of the body. Regular lubrication will ensure the desired smoothness of movement.
Despite this, the purchased item should definitely be checked for build quality and the presence of lubrication.
Unfortunately, not all manufacturers, and especially domestic ones, care about build quality. There are cases when, after the first hours of operation, screws or screws are unscrewed from the product, as they were not tightened properly.
The work of any tool is associated with certain conditions related, first of all, to the nature of the material being processed. It can be plywood, composite material or ordinary wood. Depending on this, the rotation speed on the electrical appliance is set. As a rule, the technical data sheet always indicates the operating parameters of the device, depending on the technical characteristics and characteristics of the surfaces being processed, as well as the cutters used.
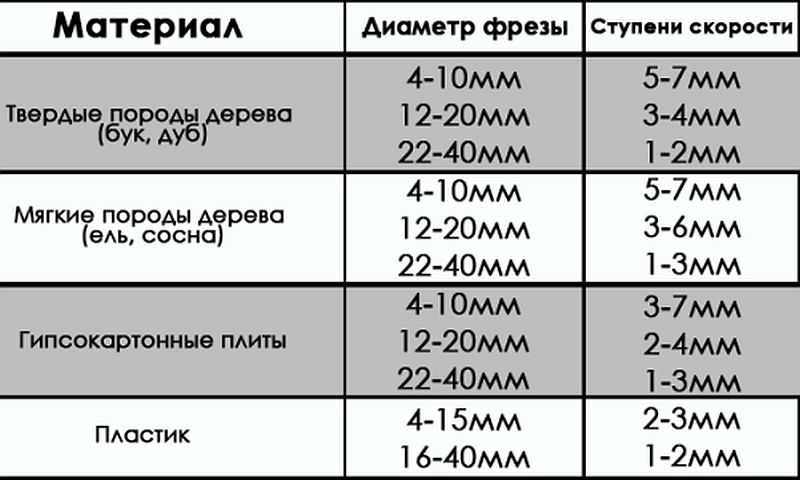 Processing speed indicators when using various cutters.
 The first thing the work begins with is the installation and fixing of the cutter. At the same time, one should adhere to the basic rule - all work is carried out with the cord removed from the outlet.
The cutter is set according to certain marks, and if they are absent, then to a depth not less than ¾ of the length of the cutter itself. How to install the cutter on a specific model, you can find out from the instructions, which must be present in the technical documents for the device. The fact is that each model can have its own design features and it is not possible to talk about this in the article.
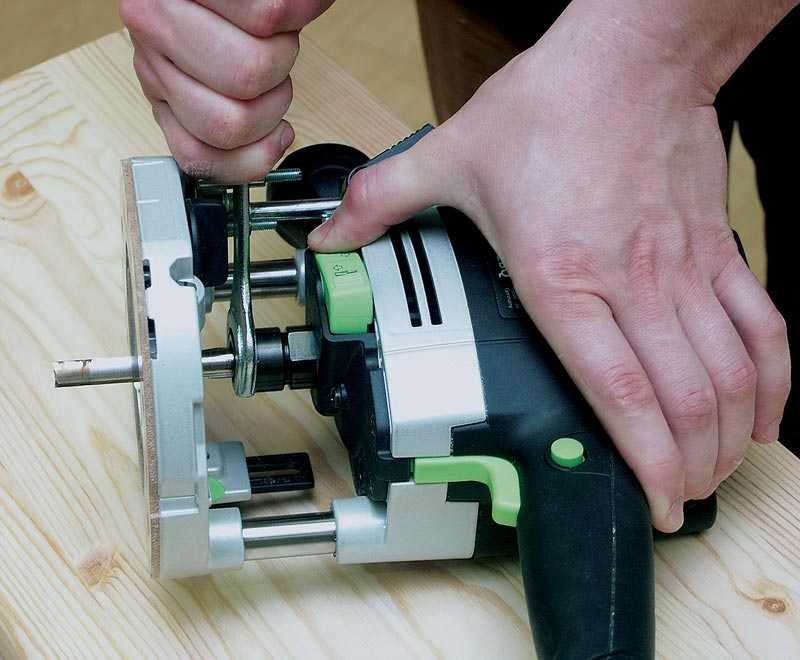 Installing the cutter on the device before starting work.
 There are models both simple and more "advanced", as they say. Some models have a shaft rotation lock button, which makes it easier to install the cutter. Some, especially expensive models, are equipped with ratchets. So it’s impossible to describe specifically the process of installing the cutter, and it doesn’t make sense, since everyone who is familiar with the operation of such devices will figure it out at the moment.
Each model has its own maximum cutting depth. At the same time, it is not always the maximum depth that is required, but a certain depth, which is set before work. Even if the maximum depth is required, then, in order not to overload the device, the milling process is divided into several stages, changing the milling depth in steps. For adjustment, special stops are provided - limiters. Structurally, they are made in the form of a disk located under the bar, on which stops of various lengths are fixed. The number of such legs can be from three to seven, and this does not mean that the more of them, the better. It is better if it is possible to adjust each of the legs, even if their number is minimal. To fix this stop in the optimal position, you should use the lock, in the form of a flag.
The milling depth adjustment process is as follows:

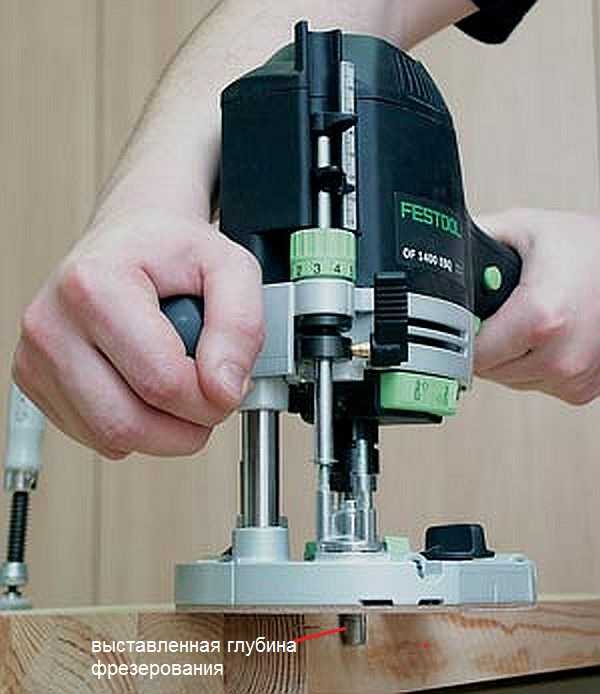
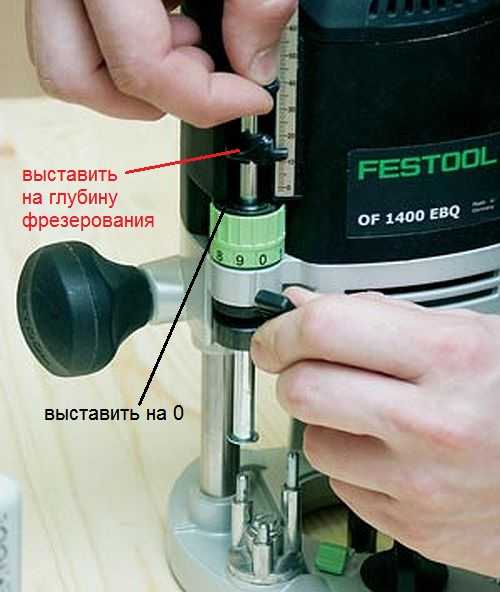 Thus, the workpiece is milled to a predetermined depth.
 On high-quality expensive models, there is a wheel for fine-tuning the depth of milling.
 With this wheel, you can more accurately set the depth without violating the previous setting.
 This wheel (green in the photo above) allows you to adjust the depth in a small way.

A milling cutter is a cutting tool that can have an intricately shaped cutting edge. As a rule, all cutters are designed for rotational movements, therefore they have a cylindrical shape. The shank of the cutter, which is clamped in the collet, has the same shape. Some cutters are equipped with a thrust roller, so that the distance between the cutting surface and the workpiece remains constant.
Milling cutters are made only from high-quality metals and their alloys. If you need to process soft woods, then HSS cutters will fit, and if you need to process hard wood, then it is better to use HM cutters from harder grades.
Each cutter has its own technical characteristics, which provide it with high-quality and long work. The main indicator is the maximum speed of its rotation, which should never be overestimated, otherwise its breakdown is inevitable. If the cutter is dull, then you should not try to sharpen it yourself. Sharpening of cutters is carried out on special, expensive equipment. After all, it is necessary not only to sharpen the cutter, but also to maintain its shape, which is no less important. Therefore, if the cutter, for some reason, has become dull, then it will be cheaper to buy a new one.
There are cutters that are used in the work more often than others. For example:

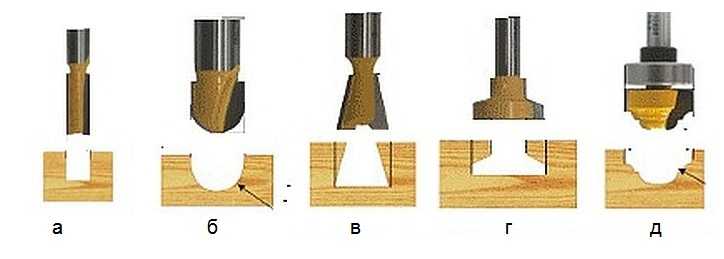 Groove molds are designed to create recesses in an arbitrary place on the workpiece.
 There are simple cutters, monolithic, made from a single piece of metal, and there are type-setting. Type-setting cutters consist of a shank, which serves as the basis for a set of cutting elements. By selecting cutting planes and installing them on the shank, using washers of various thicknesses, it is possible to form an arbitrary relief on the surface of the workpiece.
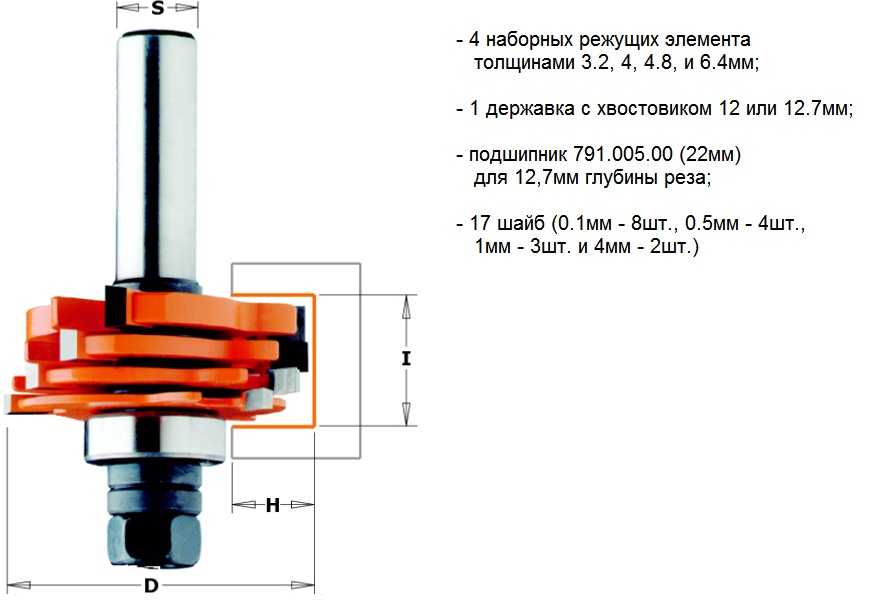 A type-setting cutter is a set of cutting surfaces and washers, which allows you to assemble the cutter of the desired shape.
 In fact, there are a lot of cutters and this is only a small fraction of what is produced. All cutters differ in shank diameter, cutting surface diameter, cutting height, knife position, etc. As for manual milling equipment, it is enough to have a set of five most popular milling cutters. If necessary, they can be purchased at any time.
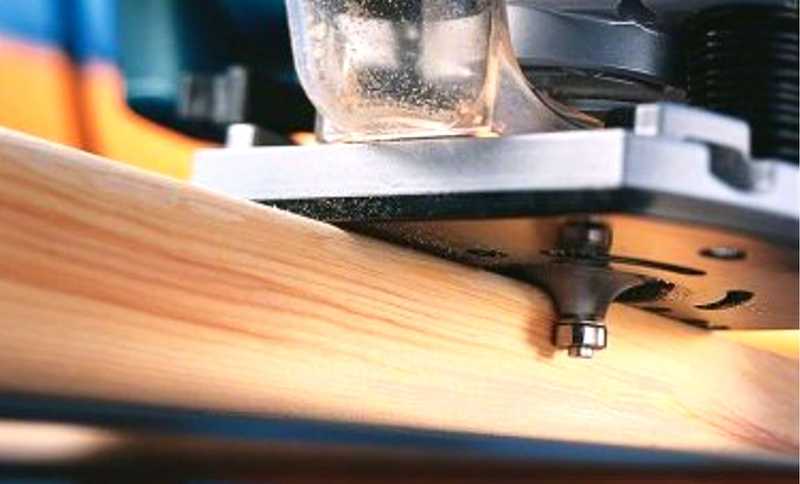
Working with power tools requires special rules, especially when there are rapidly rotating elements. In addition, as a result of the work, chips are formed, which scatter in all directions. Despite the fact that most models are equipped with a protective shield, this does not fully protect against the flow of chips. Therefore, it is better to work with such a tool in protective glasses.
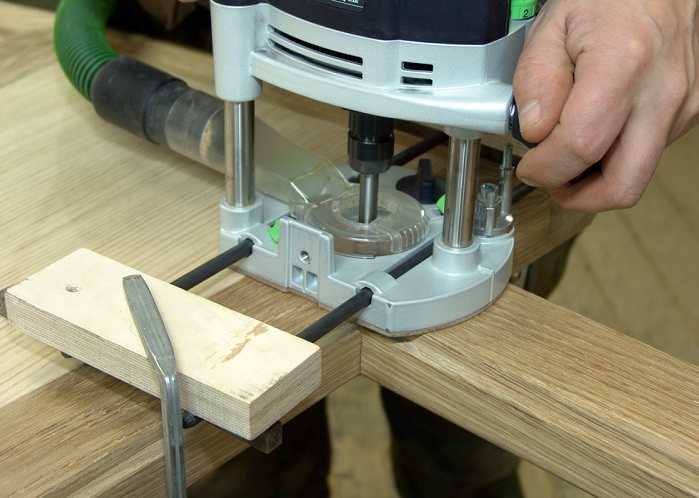 The photo shows a model where a vacuum cleaner is connected to remove chips.
 If you fulfill the basic requirements for safe work with an electric hand router, then the end result will please you with the quality of work and a safe outcome. Here are the conditions:

The requirements are not very difficult and quite feasible, and ignoring them means putting yourself in danger. And one more thing, no less important, is the ability to hold a milling tool in your hands and feel how it works. If serious vibrations are felt, then you need to stop and analyze the reasons. It is possible that the cutter is dull or a knot is caught. Sometimes it is necessary to correctly set the speed of rotation of the cutter. Here you can experiment: either add speed or reduce it.
Processing the edge of a wooden board is best done on a thickness gauge. If this is not possible, then you can use a manual router, although this will take some time. These works are carried out both without a template and with a template. If there are no skills or there are very few of them, then it is better to use a template. For processing edges, straight edge cutters are used, both with one bearing at the end of the cutting part, and with a bearing at the beginning (see photo).
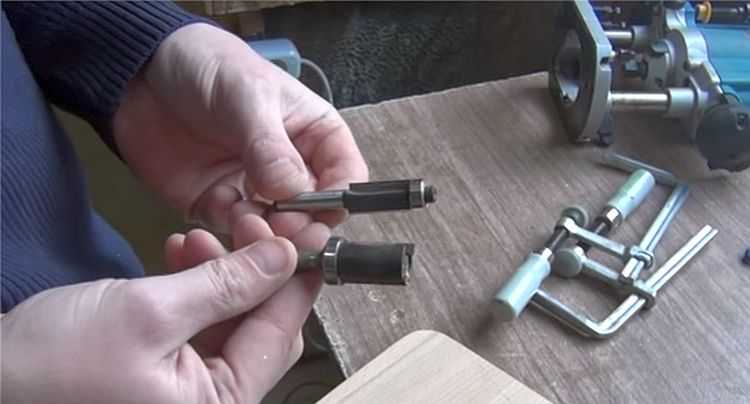 Edge cutters.
 For the template, you can take an already processed board or another, even object. Moreover, the length of the template must be greater than the length of the workpiece, both at the beginning and at the end of the workpiece being processed. This will avoid unevenness at the beginning of the edge and at its end. The most important thing here is that the template or object acting as a template has a smooth and even surface. In addition, its thickness should not be greater than the gap between the bearing and the cutting part.
At the same time, the longer the cutting part, the more difficult it is to work with the tool, since more effort is required. In this regard, it is better to start work with cutters that have an average length of the cutting part. The working principle for edge processing is as follows:
After the first pass, you should stop and evaluate the quality of work. If necessary, another pass can be made by adjusting the position of the tool. If the quality is satisfactory, then the clamps are removed, freeing the workpiece.
With this approach, it is possible to remove a quarter along the edge or in some of its parts. This is done by setting the cutting edge so that it goes to the required depth into the part.
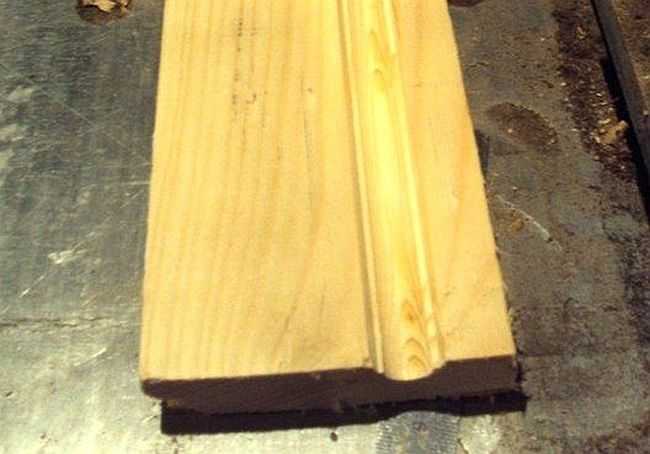
 A quarter taken on a furniture facade.
 If you replace the cutter with a figured one and shift the guide, as well as use the stop, you can actually apply a longitudinal pattern to the part (in the photo below).
 Drawing a longitudinal figured pattern on the workpiece.
 If you use a similar milling technique (with a template), you can easily master the technique of working with wood in general. After some time, you can abandon the templates, as their installation takes a lot of useful time.
 How to make a smooth edge without a template: experience is indispensable here.
 Quite often, the thickness of the workpiece is greater than the length of the cutting part of the cutter. In this case, proceed as follows:
 The bearing is guided over the machined surface while the cutting edge machine the rest of the workpiece.
 In order to master the work of a manual milling tool, you will need a lot of rough workpieces, which you do not mind throwing away later. Nobody got it right the first time. For something to work out, you need to train hard.
If a curly edge is required, which is most likely to be necessary, then first pay attention to the condition of this edge. If it is uneven, then it will have to be leveled and only then proceed to the formation of a curly edge, choosing the appropriate cutter.
 Rounded edge.
 It is necessary to prepare the surface so that the cutter does not copy the curvature along which the roller will move. In this case, a sequence of actions is needed, otherwise a positive result will not work.
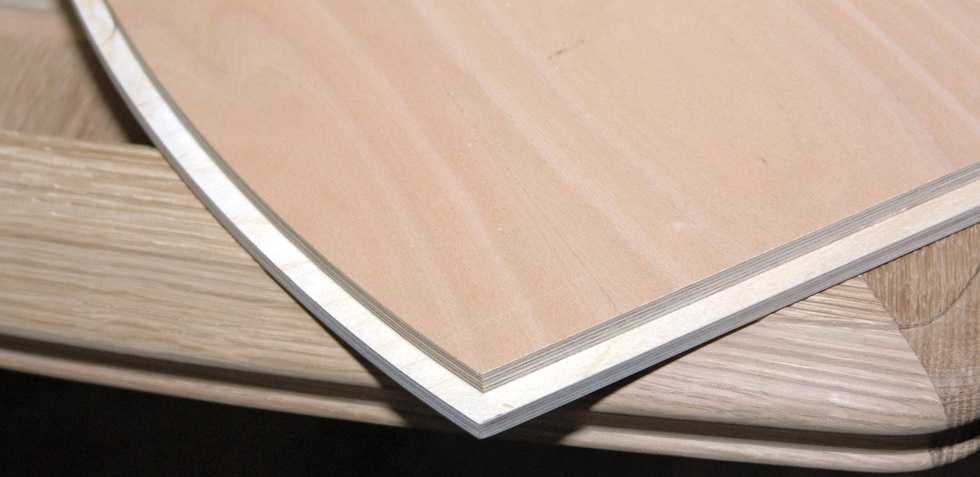
If you want to process a frankly curved surface, then you can’t do without a template. It can be cut out of plywood, about 10 mm thick, having previously applied a drawing and sawed out the template with an electric jigsaw. The edge of the template must be brought to an ideal state with a manual router.
The hero of the film “I am a robot” at the beginning of the film expressed a very scandalous idea for advertising the near future: “We see how a carpenter makes a wonderful chair. And then a robot comes along and makes the chair twice as fast and twice as beautiful.” So the character of Will Smith is fundamentally wrong. More precisely, he is right, but this truth is one-sided. Isn't that why we invented robots to give ourselves time for creativity? Not a single machine in the next hundred years will be able to surpass man in creation - this process is so subjective, so incomprehensible that no algorithms can understand its principle.
It is not very difficult to create a table or a wooden statue. But to create them of high quality and unusual, unique and beautiful is the prerogative of a true master. Yes, after some time the machine will be able to do the same, but only because it already knows how to do it. The superiority of a specialist is that he is able to create new things, break stereotypes and bypass the generally accepted framework. This philosophy closely affects the sphere of carpentry - this art requires not only skill, but also creativity.
We are all destined for a standard fate: to raise a son, plant a tree and build a house. In general, it is not necessary to follow it, but the profit in the form of the ability to handle wooden beams is undoubtedly useful and valuable, even if needed once in a lifetime. This art is already several thousand years old: wooden chairs and statues, as well as images of carpenters, were found at excavations in ancient Egypt and Mesopotamia. In modern times, this profession is no less important: a good carpenter knows how to pick desired material and its decoration, and modern houses still can not do without furniture, doors and windows. So if you were looking for the perks of acquiring woodworking skills, this was it.
Starting to learn something new from scratch is always difficult, so we found for you the Kedr carpentry school, where they conduct training courses where craftsmen learn how to handle hand-held power tools, a manual milling cutter, classic carpentry and so on. The choice of programs is rather big: from basic skills to restoration. And absolutely everyone is welcome here, regardless of age and gender (by the way, for some reason there are more girls there - take a chance!).
Also, this school has a very convenient schedule: there are intensive courses on weekends and those where the student himself chooses the time of attendance - teachers are always on site and are always ready to look after you in a coworking format if you want to work on your project yourself. There are two sites in the Russian capital, and one more in St. Petersburg, so if you do not plan to move from Saratov, wait for the opening of a branch.


There are also requirements, where without them. First of all, this, of course, is the presence of creative and aesthetic thinking. Without these abilities, you can still do such a popular business, but you should not count on something more than standard stools or cabinets. There is no place here for those who do not have the necessary patience - only a balanced person who is ready to try and put his soul into the process can spend from several hours to a week on one thing. And of course, you will need a certain amount of money to purchase the material - if you do not want your kitchen table to look poor, you will have to choose a prettier tree. But in any case, it will be cheaper than a typical ZHUMARVISHUBOZ from IKEA.
However, as with any job, carpentry has its downsides. Here they are especially worth considering: for example, strong odors of processing solutions such as varnish, glue, wax and other substances. Such a cacophony of aromas can lead to dizziness and constant headaches. So you will have to go out into the fresh air more often and wear plugs in your nose. Also, wood dust will constantly hover in the workshop, shavings will continually aim at your eyes, and a circular saw will constantly remind you of the danger of a severe cut, not to mention ordinary splinters. Luckily for you, there are means of protection against all this: masks, goggles, gloves, specialized clothing. Without it, in any way, forgive me, but it's safe. And if you can’t stand the high noise level, then you will also have to purchase soundproof headphones.
Another woodworking expert is the Bosch DIY Academy carpentry co-working space - a modern space for craftsmen and beginners who are ready to learn the basics of carpentry and create exclusive objects from wood. Basic classes for beginners are four days, and immediately after that you will drag home your first chair to the delight of the household.
In total, such a course (with a convenient and flexible schedule) lasts two weeks: marking, sawing, milling, grinding, assembly, finishing - you can learn about all this from the best specialists in Russia and test your knowledge on modern Bosch Green equipment. And after completing the course, you will become an honorary resident of the project and will be able to return there with your own creative ideas. The workshop is also located in Moscow, in the north-west of the city - it has very modern equipment, qualified personnel and affordable prices. Remarkably, you can even book an off-site coworking space or a master class - for example, for a children's birthday or a corporate holiday, where everyone will receive basic carpentry skills.


By the way, skills are one thing, but only with bare hands (even if wearing gloves) the wood cannot be sawn and processed. In short, you will definitely need a circular or miter saw, jointer, thickness gauge, drill, milling cutter, as well as sets of hand tools, that is, chisels, mallets and hacksaws. We advise you not to save on these tools, otherwise one day a sharp piece of iron will bounce into your face, leaving a Tyrion Lannister-style scar. In addition to the inventory, it would be nice to remember school drawing lessons - without a properly organized scheme with all the calculations and footage, there is a big risk of getting crooked legs or even inconsistent parts as a result. Wood is not Lego blocks: when creating any thing from such material, you need to keep in mind that there should be no mistakes.
There is an ancient Taoist parable on this subject. One day, the ruler of Lu ordered a frame for a bell to the carpenter Qi. When the work was completed, the emperor came to the master and saw a real masterpiece, exclaiming: “Qi, this frame seemed to be created by the gods! How did you do that?" To which Qi replied that he was an ordinary artisan and did not know divine skill. “First, I fasted for three days, forgetting about future rewards and people's opinions. By the end of the seventh, I no longer felt anything except the knowledge that I needed to make a frame for the bell. And then I went into the forest and saw a tree that was well suited for this. This is how my creation came about.” This story teaches that any art exists primarily for self-knowledge and peace in own life. Carpentry will always live, bringing peace to its craftsmen. And you too, if you learn.
The most affordable material for self-processing, from which you can make many useful items in the household, is wood. It requires only basic skills in handling some tools. Next, we will tell you how woodworking is done and what is needed for this.
The first and main thing that needs to be mastered is sawing a tree, since the entire logs are used exclusively in construction, and to get at least a bar you need to use a saw. For this purpose, a bow tool or a hacksaw can be used, depending on the amount of work. Sometimes working with wood is more convenient with a two-handed saw, which, accordingly, should be operated by 2 people. Among the two-handed there is a rather interesting string type, without rigid frames. In some cases, cutting wood with an ax and hewing is required, but only in carpentry. You can also divide the log into parts with your own hands by splitting it with wedges.
The next complex of treatments in demand is the leveling of the surfaces of finished lumber. Of course, this is not always necessary, it is often possible to successfully use both slabs cut from logs and unedged boards, but in order to get a quality product, it must be given the correct geometric shape. This is achieved by planing (planer or jointer, as well as a number of similar tools) and grinding, and, if necessary, polishing the surface. On the contrary, it may also be necessary to round the edges; for this purpose, special wood files are used, flat or curly in section (round, semicircular, triangular).
This is followed by gouging grooves and folds, as well as drilling. In the first case, chisels and chisels are usually used, the difference between which is that the former work by pressing, and the latter by tapping the end of the handle with a hammer. Such work with wood is most often necessary for connecting individual parts, inserting hinges and locks, installing glass and fiberboard walls on furniture panels. Drilling is also required for joints, but more for bolted or screwed joints, or for driving in wooden tenons. In some cases, folds are used to fit parts on glue.
And, finally, the connection of lumber into finished structures. The simplest option that does not require effort and special skills is using self-tapping screws, for which you do not need to pre-drill holes. However, in order to make the connecting element easier to screw in, it would be useful to prepare a small channel, its diameter should be half that of the screw. It is also quite easy to put together any product using nails, which can be hammered in at different angles for strength. And, finally, there is a practice to fasten wooden blanks with screws or bolts with nuts, for which holes are pre-drilled to match the diameter of the connecting element.
First of all, let's look at what wood work is done by sawing a log. We previously mentioned slabs, they can turn out from 2 to 4, depending on what kind of lumber you need. In the first case, after cutting the side parts of the log along two longitudinal planes, further sawing will provide you with unedged boards. The second option will allow you to get a bar. If you just cut the log lengthwise into 2 pieces, you will get 2 plates that can be divided into quarters.

Let's talk separately about the beam. If you saw from the edge of the log, separating 3 slabs, you get a three-edge type, one of the sides of which will be with bark or peeled, but not processed. If you just cut 2 slabs from opposite sides of the log, you will get a two-edged beam. Four-edged, that is, in which all sides are even after sawing, it is easy to divide into several thinner bars by longitudinal cuts into 4 or more parts. And, finally, you can simply saw boards of a certain thickness, from deck boards, of which 2-3 will come out of the timber, to thin ones. Moreover, from a four-edged timber you will prepare even edged boards, and from a two-edged timber - unedged. Boards with all straight edges can be further processed to tongue and groove, but this is work with wood of a higher level than that available to beginners.
All of the listed lumber is harvested by sawing along the fibers, for which special saw blades with inclined oblique teeth are used. Moreover, only one edge of such a tooth is sharpened, as a result of which the cut occurs when the blade moves in a certain direction, forward or backward, and when returning in the opposite direction, the chips are not removed. However, a log, beam or board can be shortened, for which a cut is made across the fibers. And for this, a separate saw is needed, with teeth in the form of an isosceles triangle, in which both edges are sharpened. Also, universal blades with rectangular teeth are often used, they are suitable for both longitudinal and transverse cutting.
It should always be remembered that it is always easier to cut along the fibers than across, therefore, in the first case, one movement is enough for the first cut, and in the second, several jerks are made towards oneself. The fact is that with a transverse cut, the saw always jumps during the pushing movement, but moves smoothly if you pull it towards you, so the cuts begin with just a few repeated pulls of the blade towards you. Otherwise, chips may occur on the edge of the lumber. In order for the saw to go exactly along the marking line, consider the thickness of the workpiece, the larger it is, the thinner the blade should be. The teeth should be set as wide as possible to minimize the friction of the saw against the walls of the cut. In some cases, wedges must be inserted into the resulting cut gap as the tool advances.
Adjacent saw teeth should always be sharpened in opposite directions, this is the only way you get the right, even cut in the wood without pulling out the chips.
Regardless of which lumber you need to fasten together, the options will always be the same and quite numerous. The blanks can be connected in length, increasing one another, you can also assemble a shield from them by connecting them with side planes, or assemble complex structures by combining them at different angles. The build-up is carried out end-to-end or by turning grooves or folds and, accordingly, tongues or ridges on another part. If you prefer the "butt" option, you can drill holes in both ends and insert a countersunk tenon into them, or cut grooves and insert a piece of rail, which will serve as a kind of comb. It is also possible to connect with two overlays with through-bolt fasteners.

Also, the assembly of two parts in length is possible by selecting a groove at the end of one and turning the ridge into the other. Also popular is the "quarter" connection, with the turning of the shelf on each part to the middle of the lumber, and the parts can be spliced both with glue and with screws, nails or bolts. The assembly of parts in length is also carried out with a mustache or an oblique cut, that is, a small indent is made at the end of the timber, then an oblique acute-angled cut is made, at the end of which a shelf is machined equal to the width of the initial indent. The adhesive toothed connection will also be strong, when a triangular groove is machined at the end of one product, and the second is crimped in the form of a wedge, corresponding to the groove in shape. There is a more complex gear connection, when several grooves and teeth are made in a row, without a machine, it is difficult to do this.
Butt fasteners are considered the rarest, similar to the "quarter" type, with the difference that the shelf is made 2-thirds of the lumber thick, after which a wide groove is machined at the base of the shelf in each part, and a ledge is obtained at the end. There is a direct overhead lock, described above, as well as a similar straight tension, when the grooves are made a little wider than necessary and a square-section pin is driven into the gap between the protrusions. There is also an oblique overhead lock, which is made according to the "mustache" type, but also with grooves and protrusions on both parts and, accordingly, depending on whether it is a tension or overhead option - with or without a pin insert.
If you want to assemble a shield, the easiest way is to fold the side edges of the boards or move the bars, make a markup along the common end for them, along which a groove is then driven into it then the slats (on glue). A similar option is with a triangular groove undercut and a triangular rail insert. It is considered more time-consuming to work with wood by sampling the dovetail groove with the subsequent insertion of a trapezoidal key. It is possible to connect each element with neighboring tongue-and-groove or by cutting out folds, or only by turning grooves and landing on a rail. At an angle, when assembling structures, they are also connected in half a tree, in a third and a quarter of a tree, using the "thorn in a groove" method. At the same time, spikes are also different: through, non-through, rectangular and triangular (with corresponding grooves), flat and square.
Woodwork
Of course, it’s easy to go to the store and buy a ready-made toy made of wood or any other material you like there. But it is much more interesting and pleasant to do the thing yourself. Wood products have been known to people since time immemorial. For a very, very long time, our ancestors did not know artificial materials (such as plastic, polymers, etc.) and most household items were made from wood. All the furniture in the dwellings of our great-grandfathers was made of wood, dishes, caskets, toys and even jewelry were made from the same material.
The tree is truly unusual material, with which nothing can compare in terms of warmth, pliability of the tool and environmental friendliness. Making products from it with your own hands is a rather painstaking work, which, however, brings a lot of joy. Making a thing with your own hands is not so difficult, there would be a desire and skillful hands. The work itself usually takes some time, but then, evaluating the result, you can say that it was not wasted in vain.
The most interesting thing about woodworking is that you can create an unusual thing that you will not find in a store. In addition, none of your friends and acquaintances will have this. Of course, in addition to the desire to do something with your own hands, you will need tools, drawings, sketches of finished projects and, of course, useful tips. You can come up with a toy yourself, but still, first practice on the samples offered in this book with ready-made sketches.
In addition, you can work on a wooden product not alone, but together with a friend. It will be more fun and you will be able to help each other. Just agree in advance who will do what part of the work. Perhaps not everything will work right away. But do not be upset, because skill comes with experience. The main thing in any work is diligence, and then everything will definitely work out.
How to organize a workplace
For any activity, it is very important to properly organize workplace. In order for you to work with wood and other materials at home, you need a separate corner. Usually at school, a whole room is allocated for this - a workshop. It is convenient to work in it, and also, as a rule, it is equipped with everything you need. Of course, at home it is often not possible to allocate an entire room for a workshop. However, there is a way out: organize a work area in your room. If everything is done correctly, it will not take up much space.
The work area should be well lit during the day. You will also need a table lamp if you decide to make something in the evening. Be sure to ventilate the room before starting work. AT summer time It is best to work with wood outdoors. For example, in the country, you can organize a corner of work on an open veranda.
In order to make toys and crafts yourself, you need a special workbench or table (Fig. 1). Its lid is made of dry dense wood (for example, birch, beech or ash), and the underlayment is best made from pine. In addition, the height of the lid must be adjustable.
Rice. 1. Table for a corner of work
In order to economically use the area of your room, pick up a small workbench: height - 65–70 cm, length - 100–120 cm, and width - 30–40 cm. grandfather or older brother. To fix the workpieces, you will also need a vice that is mounted on a workbench (Fig. 2). In special stores you can buy a children's collapsible workbench. Usually it has drawers and shelves in which you can store tools and materials needed during work.
Work at the workbench should be standing up, with straight shoulders, because you do not need a violation of posture.

Rice. 2. Vise
The light should fall on the left. After work, also be sure to ventilate the room. Do not forget to follow the safety rules at work. But still it is desirable to have a first-aid kit at the corner of work. It should contain hydrogen peroxide, brilliant green, bandage, adhesive plaster, lead lotion and paper napkins.
It is best to craft in a working apron, so you will not ruin your clothes by staining them, for example, with glue, varnish or something else. Clean the workplace after each work, because in the process of work, sawdust, cuttings and other debris usually appear on the table and floor. Make sure it is always clean and tidy.
Tools and materials you will need
Before you start woodworking, you, dear reader, will need to acquire basic tools. They should be stored on separate shelves or in a conventional sectional cabinet. It is very important that you can easily take the right tool, so the height of the shelves should be comfortable.
Pliers are needed to pull out nails (Fig. 3). The length of the tool is 13–15 cm, and the weight should not exceed 100–200 g.

Rice. 3. Ticks
The carpenter's hammer (Fig. 4) consists of a handle and a rectangular steel head. The striker must be even so that it does not slide over the nail head. It is desirable that its area is not very small. The hammer handle should be about 2.5 times the length of the head.

Rice. 4. Carpenter's hammer
A bow saw in a sawing box (fig. 5) will give you the opportunity to saw off and prepare a rail or plank of a certain size without any danger. The sawing box is needed so that the saw does not deviate from the desired direction. Standard sizes this tool should be as follows: blade length - 33 cm, width - 1.5 cm, and thickness 0.1–1 mm, frame - 33 x 28 cm, spacer - 33 cm. The box should be made of durable wood, such as beech or maple.
The saw blade must be fixed into the slots in the handles at an angle of 18°. Under the same slope, cuts are made for spacers and handles. In the machine, a board or rail for sawing is fastened with a special clamping screw 8 cm long.
The stand under the saw box should be made longer (about 26 cm) so that it protrudes 4-5 cm on each side. This makes it possible to attach it to the workbench with clamps diagonally behind the protruding parts.

Rice. 5. Bow saw in saw box
A hacksaw (Fig. 6) is constantly used in the manufacture of wooden products. For work you will need various hacksaws:

Rice. 6. Hacksaw

Rice. 7. Universal hacksaw for wood

Rice. 8. Small hacksaw
Universal wood saw, approx.
cm, the length of the blade should be 21 cm, the length of the teeth should be 3.5 mm, and their number should be 4 per 1 cm (Fig. 7);
A small hacksaw 28 cm long, blade length - 17 cm, teeth length - 4 mm, and their number - 4 by 1 cm (Fig. 8);
Hacksaw with a helical blade 35 cm long, blade length 19 cm and handle length 7 cm.

Rice. 9. Sawing box
During work, you will need to saw through the bars, boards and planks at a certain angle. All this is very convenient to do in a sawing box (Fig. 9). There are several designs of such boxes. Adult carpenters and joiners, using sawing boxes, do not use any special devices to fix workpieces in them. They hold a bar or plank with their free hand. But it is better for you to firmly fix the sawn part or workpiece in a box, which is best also attached to the workbench.
In the manufacture of wooden toys, most often there are parts sawn off at an angle of 90 °. Parts sawn off at an angle of 45 ° are used a little less often. And sometimes there is also a need to saw off at an angle of 22.5 °. In this regard, you should have a set of sawing boxes at home, consisting of a combined box for two angles - 45 and 90 °. In addition, you will need lightweight boxes for sawing at one angle - 45, 90 and 22.5 °. Such a box is very convenient if you need to cut a lot of workpieces at different angles. If you need to cut parts at the same angle, it is better to use a lightweight box that is specially adapted for this angle.
To make a sawing box, you should use strong wood, oak, maple and beech are best suited. The boards must be fixed with screws 6-7 cm long. Then the box should be attached to the lid of the workbench with clamps, so its bottom protrudes 4 cm on both sides.
The thickness of the bottom board of the box is usually 3 cm, and the height and width are 15 and 12 cm, respectively. The length of the product depends on the size of the angle for sawing off which it is needed. You should know that the following are considered constant sizes:
5 cm from the center of the clamping screw (S) hole to the edge of the wall;
7 cm from the center of the clamp screw hole to the center of the cut for straight and obtuse corners;
9 cm from the center of the clamp screw hole to the center of the cut for sharp corners.
In the event that it becomes necessary to manufacture a box with three cuts (90°, 45° right and 45° left), the distance from the clamping screw to the 90° cut and the edge of the wall can be somewhat reduced. In this case, the wall lengths of the saw box set are 24, 26 and 36 cm.
To fix the boxes to the lid of the workbench, the box must be placed at an angle so that its edges coincide with the edges of the lid.
Clamps should be placed on 2 corners diagonally. As a result, the box is fixed in 2 oblique places, which ensures that it is firmly attached to the desktop and gives stability that will not allow it to move or tip over.
Place the jaws of the clamps on the strips attached at the corners of the box in such a way that the entire width of the bottom of the box is completely free. Then you will be able to put a workpiece in it that exceeds its length.
On the processed rail or plank, the cut line is usually marked with a line. Insert the workpiece into the box in such a way that this line is in the cut of the box, and fix it with clamping screws. The length of the clamping screw must be at least 8 cm, the thread diameter - 10 mm, the length of the knob - 6 cm, and its diameter - 6 mm. When sawing a workpiece of small section, and its height or width is insufficient for reliable fastening with clamping screws, you need to put lining between it and the wall of the box right size.
When making a box for screws, plate nuts (6 x 6 cm in size and 6–8 mm thick) should be embedded into its front wall, and then reinforced with screws or bolts. It is necessary to strictly observe the safety regulations during sawing, not only in relation to the saw, but to the clamping bolt knobs, which, if handled carelessly, can be caught. Always keep your free hand in a safe place. To give the clamping screws the desired position under them (that is, between the workpiece to be fixed and the front surface of the screw), pieces of cardboard must be placed. Keep the screws deeply screwed into the box. If they stick out a lot, turn the box on the workbench so that they are on the back wall. You can also first fix the workpiece in the sawing box with clamping screws, and then attach the box itself to the workbench.
You will need an awl (fig. 10) quite often. It is needed to facilitate driving nails into wood, pre-marking, etc. You can use a round or square awl 3 cm long with a handle at least 6–7 cm long.

Rice. 10. Shilo
A file (fig. 11) is used to remove burrs from a wooden surface. Its length is usually 20 cm and the length of the handle is 10 cm. However, you can use sandpaper or a rasp instead.
Rice. 11. File
A wooden hammer, or mallet (Fig. 12), is used when an ordinary hammer can damage the workpiece. The weight of this tool is usually about 200 g, the handle is 20–25 cm long, and the hammer head is 12 cm long.

Rice. 12. Wooden hammer, or mallet
Vices (Fig. 13) you will need to clamp the workpiece. Their length should be 14 cm, the length of the clamping screw - 5 cm, and its head - 6.5 cm.

Rice. 13. Vices
You will need a ratchet (fig. 14) for drilling holes in wooden parts.
Nails are used to fasten wooden parts. They vary in width and length. The length of the nail should be greater than the thickness of the board. It is advisable to take nails of different sizes (from 2 to 4 cm) with a wide hat.

Rice. 14. Rotate
The material that will be used for crafts must be perfectly planed so that there are no splinters and no gaps form during the joints.
For crafts, you will need boards, bars, sawn and planed slats, as well as round timber, mainly from soft woods - linden, pine, aspen, alder, beech, etc. You will also need plywood plates: birch is best, because they are more light and flexible.
Store materials in special sectional cabinets, on shelves according to size. This order will help you navigate better. In addition, tools can also be kept in boxes that you can take with you, for example, to the country house during the summer holidays. For convenience, you can draw on each of them a sample of the material stored in it. In addition, you will need auxiliary material: twine, thin wire, fishing line, brush handles, reels, plasticine, scraps of cloth, tube caps, colored paper, thermometer cases, pieces of foam, leather trimmings, etc.
And now a little about wood, because it is from it that you will make your crafts. Its strength is directly dependent on the rock, hardness and humidity. It is characterized by strength limits in compression, bending, chipping and stretching. Wood can also have the following defects:
Knots - living or dead bases of branches, which reduce strength and make processing much more difficult;
A curvature is one or more bends in a cross section;
Roll - this is an abnormal thickening of the wood of the annual layer with a large increase in its hardness on the narrower side and a displacement of the core;
Oblique - this is the oblique direction of the fibers, leading to warping;
Curl - an irregularity in the structure of wood, when the fibers have a sharply wavy character;
Zasmolok - a section of coniferous wood, abundantly impregnated with resin, which reduces the strength of wood;
Water layer - areas of wood with high humidity, leading to the formation of cracks when dried;
Color abnormality is a change in the color of wood (brown, bluish spots), rot;
Convergence is a rather sharp decrease in the diameter of the trunk from the root of the tree to the top;
Curl - local curvature of annual layers due to the presence of knots and sprouts, reduces the strength of wood;
Double core - the presence of 2 or more cores in one cross section of a tree trunk.
In addition, wood in which insects have settled (bark beetles, house gravediggers, barbels) is practically not suitable for work, since it is significantly destroyed as a result of their vital activity.
Basic techniques for working with wood
Over time, two completely different and at the same time close arts appeared: carpentry and joinery. Both of these crafts involve the processing of material such as wood. Only a carpenter makes various utensils, toys, decorations and furniture, and also restores things. And the carpenter creates a wooden dwelling from large boards, beams and logs. His job is to put up a frame, make ceilings, make floors, put up a roof and install windows. Finishing the house is usually done by a carpenter. In addition, the carpenter and joiner use different tools when working. For a carpenter, heavier ones are needed, designed for rough woodworking. At the same time, you almost never see a saw, chisel or ax in the hands of a carpenter.
The most essential tools you should have are a joint knife, a hammer, an axe, chisels, wrench, a jigsaw, pincers, a nail puller, a hacksaw for wood and metal, as well as an electric drill. In addition, you will need different types of sandpaper and chisels of various types. Next, let's talk about wood processing. To do this, you will need to learn several tricks: hewing, cutting, sawing, drilling, chiselling, planing, sanding and scraping wood. To complete each of them, you will need certain tools and some knowledge. If you have never encountered such work, at the first experiments you may not succeed. There is no need to get upset: all the most famous and skilled craftsmen always started from the basics.
Wood hewing is used only when processing logs, plates and quarters. This processing technique consists in separating the bark from the solid wood. The main tool that is used in this work is an ax. All movements should be directed from the top to the bottom in a circle of the trunk. In this case, the ax blade should not penetrate deep into the bark layer, so as not to damage the wood itself. In the course of work, along with the bark, protruding knots should also be chopped off, thereby thoroughly preparing the wood for further processing.
Sawing wood includes two types of activities at once. Firstly, during the mechanical sawing of logs and plates, boards of various qualities can be obtained. Secondly, using this technique, certain details can be made from finished boards. We will not consider the first type of sawing, since it requires special equipment that is used only in woodworking enterprises. The second sawing method can also be performed on a workbench at home. Depending on how large a piece of wood is selected, you will need one or another saw. How you fix the wood on the desktop also depends on the sawing technique used during the work. For example, if you fix the workpiece horizontally on the workbench, while the saw is perpendicular to the part itself, this technique is called horizontal. At the same time, the cutting place should slightly go beyond the surface of the workbench so that you do not spoil the working board, and then the work itself will be much more convenient.
A feature of the cross cut is that it does not pass along the fibers, but across. This increases the risk of spalling both in the left part and in the sawn off part. Well, if the chipping occurred on the sawn off piece, then you can simply then remove the excess wood from the desired part. However, if the chipping occurs exactly where you want to have a flat and smooth surface, you will either have to restore the wood or cut out another part. A thin hacksaw with a “mouse tooth” will help you avoid this.
If you need to saw off a board or block at an angle of 45 or 90 °, and you already have a sawing box at hand, you will need to put the board in the groove, press it to the side farthest from you and evenly, without moving the workpiece, cut off the unnecessary part.
During sawing, first make a few movements with a hacksaw along the already marked line, so you will strengthen the canvas in the array of the workpiece. In further work with wood, you only need to adjust the movements of the hacksaw if its blade tries to get around a knot or a difficult area. Your efforts are reduced only to observing the uniform penetration of the teeth throughout the wood. Excessive physical effort with proper sawing should not be. You can fully lean on the saw, but not with your whole body, because only a slight uniform pressure on the hacksaw during smooth movements will ensure an even and correct cut.
The board during this work is best positioned so that the sawn off piece is on the left side. At the end of the operation, the free left hand will more easily hold the unnecessary piece and prevent it from falling on your leg. Do all the movements when cutting out the part in a swing, that is, completely guide the saw blade along the cut. When using an electric saw, all operations are performed in the same way as when working with a hand saw.
Planing wood consists in leveling the surface of the material after sawing. Depending on the stages of planing, different types planes. Put the wood prepared for the operation on the desktop and fix it. Start with a rough alignment, for which use a sherhebel. In this case, all movements should be directed across the fibers, but not along them, since sometimes too much material can be removed. If there are knots and irregularities along the way of the sherhebel that make processing difficult, do not focus on them. Otherwise, the wood may break off in this place, and then the workpiece will become unsuitable for further use.
After processing the surface of small parts with a sherhebel, it should be cleaned with a special single plane, and then with a double one. If you are working with long workpieces, such as boards, it is better to use a jointer or semi-joiner. The advancement of the tool on the surface of the part should be directed along the fibers, and not across them. Only in this way can you make the wood smooth and even.
When working with the ends of boards and bars, make several movements with a planer from one edge to the center, and then from the other edge to the center. This will help you avoid removing the tree at the ends of the splits.
Drilling wood is used to make a variety of holes. They can be through and deaf, deep and shallow, wide and narrow. Before proceeding with this, it is necessary to select a drill of the right size, then mark the workpiece with an awl, fix the drill in the chuck and install it exactly in the designated place. If you need to make a blind hole, as the drill moves into the solid wood, gradually loosen the pressure on the drill: this way you will avoid chipping the material and forming a through hole.
Chiselling of wood has also been known since ancient times. Before starting the operation, firmly fix the bar and the workpiece in a vise. Then mark the surface of the wood first with a simple hard pencil, and then make lines with a knife. If you need to make a very deep and wide hole, at the first stage, select the material with a chisel, and then proceed to clean the surface with a chisel. Also remember that, when starting work, you should first select wood near the edges, which are located across the grain direction.
Make blind holes as follows: drive in the blade of the chisel with a mallet, and then slightly tilt it in the opposite direction, from which the chamfer on the canvas was removed, and lift the canvas up. After that, gently break the material and separate several pieces from the main array. Then step back 2-3 mm from the hole made and repeat the same. When finishing the edges of the recess, always retreat from it by 2 mm, and place the chisel with a bevel to it.
If you lift the chisel blade with the chamfered side, you can crush the wood with the raw surface of the blade.
When it is necessary to make a through hole, sample the wood from both sides at the same time, gradually reducing the intermediate layer, and clean the finished hole at the edges with a straight, narrow chisel.
Cutting is always done with chisels or a joint knife. Most often, wood sampling is carried out with chisels, which allow you to make precise holes and recesses of various shapes and depths. A joint knife can only to some extent replace a tool that does not exist.
By using the tool most suited to the job, you will realize that replacement should always remain only a temporary phenomenon. The sooner you pick it up, the easier and faster the work will be done. Chisels can be used in the same way as a chisel, only the impact on wood is made without a hammer.
Cutting wood material is carried out as follows: on the markup, put the blade of the chisel with a chamfer inside the intended recess. Then cut the chisel into the workpiece by 2-3 mm. After the first cut, set the chisel 2 mm deep into the intended hole and make the same cut. As a result, you will get a small notch. Gradually moving deeper and grabbing more and more wood at a time, you will make the desired hole.
In the middle of the recess, an incision can be made to a depth of about 5-6 mm, but near the edges - only 2-3 mm, so as not to damage the sides.
In order to make a through hole, make a cut from the very edges to the full depth. If necessary, trimming can be done in several stages.
After sampling the material, be sure to clean the bottom and sides of the resulting recess with a narrow straight or semicircular chisel.
The scraping of wood allows using a knife to clean the surface of the wood most cleanly and smoothly, where it is not possible to do it with a chisel or planer. In this case, the process itself is more like scraping. The movements of the cycle are directed towards themselves, and the knife itself is set with a chamfer up.
Sanding is also necessary for high-quality wood processing. After finishing work, you will only have to level and clean the treated surface after the planer. For grinding the surface, an emery cloth is used, which is an abrasive coating on a paper, cloth or cardboard base.
Depending on the size of the grains and the type of abrasive, several types of skins are distinguished. On the inner surface of the roll, pay attention to the digital and letter designation. The letters indicate the types of abrasive used in the skin, and the numbers indicate the degree of its grinding. The smaller the number for inside, the smaller the grains applied to the surface of the skin. If you notice the letter C, it means that crushed glass is used here. KB in this case stands for quartz, and KR for silicon. These are one of the most commonly used abrasives. Coarse-grained sandpaper is used for rough surface treatment, and for final grinding it is better to take fine-grained sandpaper, which leaves no traces of grains.
So that your fingers do not get tired of holding it correctly, take a convenient bar and wrap it with sandpaper. This bar will allow you to clean the surface well without the formation of bumps and depressions. A flat surface also depends on the force of pressure on the bar. The harder you press it, the more likely it is that an uneven surface will form. Great importance also has the direction in which you will process the workpiece. If you move across the direction of the fibers, then the strokes will remain more noticeable than when sanding in the direction of the fibers or somewhat obliquely.
Types of connections and fastenings when working with wood
You probably know that it is very difficult to make something completely from solid wood without one fastening and dividing the craft into parts. Now it is quite difficult to find a large solid mass of wood. In addition, there is a risk that, if you make a little mistake, you will spoil the whole bar.
It is very easy to divide the drawing into separate parts, and not cut out each bend or notch, constantly turning the whole product over. In this case, all individual parts must correspond to the dimensions, and when connected, form a single whole. In addition, important factors in the strength of the product are the accuracy and strength of the joints. All connections (both carpentry and joinery) are called landings, since they are based on the method of fitting a part with a spike onto a part with a groove. Depending on how tightly the parts in the mount are in contact, all landings are divided into tense, tight, sliding, loose and very loose. The basis of all connections is the knot, that is, the place of attachment. Depending on what shape the connected parts of the product resemble and how the node is located, such types of connections are distinguished as side, end, corner, T-shaped and cruciform.
Lateral connection is also called "rallying". Very often it is used in the manufacture of doors, floors, shutters or gates. This is a very strong connection. Large arrays, which are obtained as a result of its use, are additionally fastened with transverse boards or shields.
If the parts of the product have a machined surface of the side edges and are easily glued when joined, such a joint is called a side joint for a smooth joint. When each part has a groove along its entire length on the side, and a connecting rail is inserted into it, this type of connection is called side to insert rail. If a quarter is removed on the sides and the parts are attached with their help, then this is a side connection in a quarter.
Another type of this connection is called "side to groove and tongue" and has several types depending on the quality of the comb. This groove can be either triangular or rectangular. The first type is most often used in the construction of parquet, and the second - in the manufacture of leaf for doors. Both of these designs require additional bonding with glue.
When constructing the outer walls of a house or roof, to better remove rain and snow from the surface and to better protect the coating from the damaging effects of the weather, a type of side connection is used, which is called "side lap". In this case, it is necessary to connect the parts of the product in the following way: place a thin rail under the lower bar and fasten the upper side edge of the part with nails, then install the next bar, making a small overlap of a quarter of the thickness of the bar with its lower edge, and also fasten it with several nails.
In addition, to connect several parts at once into one whole with the help of only one, you can use splicing with a tip. This type requires the same recess on the side of a single part and on the front side of the connected parts. Most often it is used in the preparation of parquet.
As a decorative technique, a side connection with an overlap is most often used, which not only decorates the surface, but also contributes to greater sound and heat insulation. Such a connection is made as follows: first, the 1st row is laid through a gap equal to half the width of the bar, and then the 2nd row is installed on top of it, which closes the voids.
The end connection has another definition - "building". It is characterized by the fact that all parts of the craft are fastened together in the end part: in this case, the length of the whole part increases. Depending on the type of attachment, these end connections can withstand significant compressive, tensile, and bending loads. An ordinary whole board here is in many ways inferior to a product obtained by building up.
The compression-resistant end connection of the parts of the product can have a different design. Its main feature is that each piece of wood has an overlay and a groove, which are very often made equal in thickness and length. You can do extensions with straight half-timber and end connection with oblique trim. If you doubt the strength of the future connection, you can additionally strengthen it with spikes or special joints. Of course, such a connection requires additional fastening with glue, nails or screws.
The end connection of the parts of the product that will resist stretching, at the core of its design, contains a lining in the lock. The main thing - you need to draw an overlay. Then make a groove on one part, and a ledge on the other. It is this lock that will help both parts avoid separation. As well as a compression-resistant connection, this type of connection can have straight and oblique linings. As an additional fastener, you can use glue, nails or screws.
The anti-kink end connection uses an overlay with an oblique or stepped joint. A feature of the first type of connection is that the end sides of both parts are cut at an acute angle. When sawing them, you must observe the angle of cut with great accuracy. The second type of connection (step joint) is characterized by the fact that there are small grooves and tires on the end sides of the parts.
Both types of connections must exactly have a straight lining surface. Overlays with an oblique surface are used very rarely, although they are not inferior in strength to straight ones. For additional fastening, you can also use glue, screws or nails.
Additional fastening of large beams used in construction can be metal or wooden. Spikes (both hollowed out and inserted) are used as wooden fasteners. Metal fasteners can be in the form of clamps or winding with thick wire. Bolting can also often be seen. The T-connection is so named because of its appearance. After fixing the parts of the product, the inserted part, as it were, emerges from the array of the other. Most often, this type of connection is used when conjugating the joints of floors and partitions with the building piping. The angle at which the parts are fastened must be 90 °. At other angles, the connection turns out to be fragile and very quickly becomes unusable.
Among the large number of varieties of T-connection, two types are used more often. In the first type, a hidden spike is observed, it has a trapezoidal shape and is inserted from one side of the beam. The second type uses a stepped straight overlay for fastening. In order to make it, you first need to make a regular overlay, choosing wood from one part for half the entire width, and the other part for a third. Then, from the first part, remove the wood on half of the lining by another half, thereby the thickness of the unaffected part of the bar will be a quarter of the width of the whole bar. On the second part of the product, where initially the wood is only half selected, make another small hole so that the whole wood is half the entire thickness of the workpiece.
Such a stepped overlay is considered the most durable. For additional fastening, glue is usually used here. Screws and nails can only damage the integrity of the product.
The cross joint is most commonly used for roof and truss construction. It is very similar to a T-shaped connection. Its varieties differ only in the depth of the mounting plate: from 30 to 50% of the thickness of the bar.
Corner connection is most often used in fastening door or window blocks and greenhouse frames. This connection differs from others in that the cohesive parts are located relative to each other at an angle of 90 °. Depending on the application of fasteners, all corner joints are divided into tenon joints and mustache joints.
Corner spike mounts usually have several varieties. Through connection per stud can use 1-3 studs (or more) in its design. You should also be aware that with a large number of spikes, the strength of the structure also increases. A non-through connection differs from the first in that the spike fastening is made in the middle of the parts and is invisible from the outside. To do this, inside the bars, make small indentations for the spikes, which will be a little deeper than the spikes themselves, so that there is room for glue.
Corner fixings on the mustache are expressed by the fact that the sides of the parts of the product that are connected to each other are sawn at an angle of 45 °. As well as spike connections, mustache fastenings can be through, in which rallying is noticeable, and blind, when the connection itself is fixed inside the parts. Through fastening on a mustache can be fixed with both 1 and 3 spikes at once. The method of fastening in this case remains the same as in the case of an angular non-through stud.
With a non-through fastening on the mustache, it is impossible to see the location of the spike. Here, both round spikes and flat ones can be used equally, but the fastening from this will by no means become weaker. However, when choosing material for the spikes, be sure to make the nests a little larger than the spikes themselves, so that then the workpieces can be easily connected to each other.
Turning from wood
From ancient times, samples of turned wood products have come down to us. Quite often, in excavations, scientists find all kinds of household items:
mugs, cups, bowls, bowls, trays, plates and salt shakers. All of the above products were intended for food and drink. Already in those distant times old masters worked on primitive lathes, the principle of operation of which is used in many modern woodworking installations.
Ancient wooden utensils discovered during archaeological excavations were especially durable. The secret of this lies in the fact that the masters of the past turned the utensils not in the direction of the growth of the fibers, but across them. This helped not only to store things for a long time, but also to most widely demonstrate the entire texture pattern, as well as decorate the product without the use of carvings and mosaics. The ancient art has not been forgotten even today. Modern lathes allow you to produce products much faster and better. But first you need to choose the right material for the future product. Only a well-dried bar is suitable for work, otherwise your craft will warp over time after turning, and when grinding you will not be able to completely get rid of conspicuous pile and burrs.
First, you will need the lathe itself, without which there can be no question of artistic turning (Fig. 15).

Rice. 15. Lathe for working with wood
If you want to make a product of great length, you should give preference to a lathe with a tailstock, which fixes the bar on both sides. In the event that you plan to make a small product, you will need a machine with a tubular chuck. It is he who will make a cavity in the bar. If you want to carve something out of wood, you will need to find a piece of wood that matches the size of the future craft. In addition, depending on what exactly you have planned to do, you need to choose a bar with the appropriate texture.
For the manufacture of household utensils, linden, aspen, oak and birch bars are most suitable. Juniper, walnut, mahogany, pine or cedar are suitable for bark decorations, which have a beautiful texture pattern that does not require any special decoration. Large sloping crafts are machined on a faceplate - a special device in the form of a metal circle with clamps or holes for screws with which the workpiece is attached to the disk.
The procedure for sampling wood should be performed with flat and semicircular cutters. If you don’t have them, you can use ordinary narrow and wide chisels with a one-sided chamfer for this. Semicircular chisels are used for rough removal of wood from a bar, and straight lines will be needed for final surface treatment of the product.
To make a cavity in a bar, you will need two special tools - a hook and a ring. You can give preference to any one tool, but if your locker has both, it will make the task much easier.
First of all, on a sheet of paper in full size, draw what you want to get at the end of the work. Then proceed to prepare the bar. To begin with, work a piece of wood with a hatchet, give it a more or less regular cylindrical shape at one end, to insert it into the cartridge. Then, after the cylinder begins to rotate, with a few movements of the chisel, remove part of the wood, making the correct cylinder.
After pre-treatment, you can already proceed to the actual turning. If your future product should have a cavity inside, first select the wood from the bar. Then, with gentle movements, remove the thin chips, and then - as the cavity emerges - make it larger and deeper. After the wood is selected from the cavity, mark the dimensions of the future product on the workpiece, for this it is more convenient to use a caliper.
On the workpiece, apply only light strokes with a pencil, and then with a cutter or chisel blade, make the outlines of the drawing more noticeable. At the same time, do not press hard with the cutter on the workpiece and do not drive along the wood with the entire blade, but only lightly touch the rotating bar with the tip of the chisel, making distinct and shallow cuts. Then, with a flat wide or narrow chisel (depending on the distance between the risks), with thin chips, remove excess wood from the main part, and then proceed to turning individual parts.
Sand a spinning disc with fine-grained sandpaper and polish with horsehair, dried horsetail or sawdust. Without stopping rotation, the product can be covered with a thin layer of varnish or wax mastic. Only after that cut the resulting product from the remaining piece of wood. Quite in demand among wooden products are household items - dishes, bowls, mugs, glasses and jugs (Fig. 16–18). For the manufacture of turned bowls, old pine bars are most often used, the wood of which from time to time has acquired a bright golden color with clear brown veins.

Rice. 16. Dish
The use of such blanks makes the artistic coating redundant. In addition, in the future, the dishes will not lose their shape, and the natural pattern will appear even more strongly. First, draw the contours of the future product on the workpiece with light lines, and then fix the wood on the faceplate.
Rice. 17. Cup
After that, from a rotating blank, select the wood inside in this way, making a small indentation. Then, with thin shavings, remove excess wood from the workpiece, giving the product the correct shape. On the machine, grind and polish it on all sides, after which it can be varnished or waxed (Fig. 19). Without resorting to the use of dyes, you can create a unique pattern by connecting small pieces of wood. To do this, you saw the bars from one array and glue them with PVA glue. The fibers of each individual workpiece should go across the other bars. All this will ensure the strength of the future thing and create an interesting texture pattern. For a small shallow bowl, pieces of wood can be glued together, laying them in one line. For a deep jug or vase, lay square blanks on top of each other in the form of a small pyramid. When making a wooden mug, it is best to glue a blank from wedge sectors.

Rice. 18. Bowl
Rice. 19. Wooden vase
With the help of a lathe, you will be able to create not only household utensils, but also a variety of toys for your younger brother or sister. Having mastered the turning of simple geometric shapes, you can combine them with figures of people, animals, toy cars and household items for dolls (Fig. 20).
First of all, you need to decide what exactly you want to do, and then put your idea on paper. If the future toy should turn out to be small, choose a convenient scale for the drawing, but it is best if you also make a life-size drawing, because then it will be convenient to transfer dimensions from paper to wood when turning.
One-piece toys, that is, completely made from one solid wood, are quite rare. Basically, you can see glued toys assembled from separate parts and connected with PVA glue.

Rice. 20. Toys carved from wood
In the event that the surface of the parts to be glued is large enough, you will not need additional connections. If the bonding surface is less than the height of the part, small cuts will need to be made in the parts to be joined, smeared with glue and small protruding chips or specially made sticks should be placed in them. This type of fastening is called "tenon connection". After the toy is completely finished, you can cover it with a layer of wood varnish, emphasizing the natural color of the wood.
You can also place the resulting product in a mordant, thus emphasizing the beauty of the natural pattern. After the surface of the product is well sanded and cleaned, apply a primer to it so that the paint does not spread in the future. Starch paste can be used as a primer.
If for coloring you will use oil paints, the entire surface of the product should be covered with 3 layers of wood glue, and if it is not at hand, prepare your primer. To do this, take 1 part of animal gelatin for 5 parts of ordinary tooth powder, mix thoroughly and dilute with warm water to the consistency of thin sour cream. Apply the finished mass to the surface with a thin layer, let it dry, and then process the product in the same way 2 more times.
After the primer dries well, you can decorate your product. The paint is best applied with a special thin brush, which can easily mark a thin contour, and with light pressure - lines of different thicknesses. If you use aniline paints for painting, give preference to lightfast ones.
For the painting itself, several intense colors will come in handy: bright red, bright yellow and bright purple. Among the so-called acid aniline dyes, choose red, green, violet and bright blue. Usually paints are sold in the form of colored powders, which are diluted only in hot water, and no more than 10 g of powder is taken per 1 liter of water.
When painting with aniline paints, a number of rules should be observed. First, you can not brush over the same place twice. Secondly, the aqueous solutions and powders themselves are very toxic, and traces of them cannot be washed off for a long time, so you need to be very careful when using them. And if the paint gets on the skin, remove it very quickly by rinsing with running water.
So, apply a layer of yellow paint on the surface of the toy, where, according to your plans, there should be red or green colors. In order to later get a bright red color, carefully apply a layer of scarlet paint on top of the yellow. To get a bright green color - a layer of blue paint.
After painting, let the paint dry well (about 8 hours), then cover with a layer of varnish and leave for 24 hours. After that, apply a second coat of varnish and again leave to dry for a day. If you used gouache for painting, after it dries, you need to cover the product with 2-3 thin layers of transparent wood varnish.
If you want to cover the toy with tempera, after the paint has dried, you will not need to apply several more layers of varnish, since it adheres firmly to the tree. Quite often, wood painting is used in combination with burning out the contours of the ornament. Any paint is suitable for this: gouache, tempera or oil. If you need to paint bright clothes with a small pattern on the doll, apply a relief carving with the tip of the blade of a joint knife or a narrow chisel, and then cover it with a thin layer of paint. The slots can also then be painted over with a different color or a solid color can be left, the ornament will still be visible.
Earlier in Russia, wood jewelry was very much appreciated. You can also try to make something similar (for example, for your sister). It is best to start with a bracelet (Fig. 21). The technology of its turning is no different from the manufacture of household utensils or toys. You only need to select all the wood from the inside, and make the outside oval. The inner diameter of the bracelet or ring should be equal to the diameter of the wrist or finger. The diameter of the bracelet should not be less than the diameter of the brush, so that it can be easily put on the hand.

Rice. 21. Bracelet carved from wood
Having carved a ring or bracelet, do not rush to cut the jewelry from the blank, as it can be given a wonderful shade with the help of friction. To do this, take a small block of wood of a harder breed and attach it to the rotating decoration with a narrow side. From contact with the bar, the top layer of wood of the product will darken and char. The longer you rub the wood, the more pronounced natural color the surface of the decoration will acquire. In order for the veins of the wood to become brown, attach a piece of sealing wax to the wood.
The same result can be achieved in another way. Immerse the already cut product for several minutes in a solution of copper sulfate, and then burn the top layer of the decoration with a blowtorch. So you will make the natural pattern of the tree more vivid. After that, wipe the surface with a cloth and cover with 2 thin layers of varnish.
Furniture and other items made of wood
Making simple wood items for beginners
Wood has excellent properties and is very easy to process. This is one of the most durable and lightweight materials, which also retains heat for a long time. Specially soaked or raw wood perfectly takes the form that you want to give it. It can be cut and hollowed out for a variety of household items such as spoons, scoops, glasses, mugs, forks and cutting boards.
It would seem that it is very simple to make a small dish, a scoop or an ordinary tablespoon from wood. It is known that our ancestors have been making very beautiful things for the home for many centuries. With the development of progress in industry at the beginning of the last century, almost all wooden utensils were replaced first by metal, and then by plastic, which is considered cheaper and more hygienic. But in recent years, more and more people want to have things made from environmentally friendly materials in their homes. In the course of research, scientists found that wooden utensils fewer bacteria and pathogens are retained various diseases. In addition, it is better to cut food on a wooden board than on a plastic one, and the dish prepared from them will be much tastier and healthier.
It is best to start working with wood by making things that are simple, but at the same time, those that will be useful to you in everyday life. For the manufacture of various products you will need certain materials. For example, to make a cutting board, you need a piece of thick plywood, and for a wooden scoop or bowl, it is better to pick up a block of soft wood or a cut from the trunk. To make a tray, you will need part of a small log. You will need thick bars when making spoons, forks and other kitchen utensils. From the tools you will need a file, a drill, a jigsaw, a joint knife, a semicircular chisel, a cerazik (a thin semicircular chisel) and cranberries (semicircular and curved scoop-shaped chisels).
For the manufacture of wooden products does not require too much skill, the main thing is to show diligence and patience. You also need a little imagination and perseverance, and then a variety of things made by your hands will appear in your house. It is believed that wood does not belong to complex building materials, but some mistakes should not be made when working with it, since it will no longer be possible to extend a few centimeters of an incorrectly sawn board or level a damaged workpiece without prejudice to the future product. When working with wood, you can both distort and emphasize its natural pattern. In the latter case, the resulting product will look much better from this.
To make a wooden cutting board with your own hands, you don’t need much experience (Fig. 22). Just pick up a prepared board or a piece of thick plywood, mark the boundaries of the future product and saw off the extra parts. If you wish, you can make a handle by first marking out a rectangle or rectangular trapezoid for the base, and then a small ledge for the handle. After that, I drilled a hole for a carnation with a drill so that the finished cutting board could hang and dry quickly after washing. File slightly rounded the edges and carefully process the entire surface of the workpiece with sandpaper so that there is not a single burr. One side of the board will be working, and on the other you can lay out a mosaic or cut (burn out) beautiful pattern.

Rice. 22. Cutting board
To make a wooden plate (fig. 23) you will need a large block of wood.
First make a markup for the future product. Divide the surface of the bar into 4 equal parts by drawing 2 median lines, then divide the entire surface into 3 rectangles. The middle rectangle will be the plate itself, and handles will be cut out of the 2 extreme ones, equal to each other. Then, focusing on the center, draw the outer and inner ellipses. Then, from the outer contour, draw the handles of the bowl, which should not be too small and too large so as not to spoil the appearance of the product.

Rice. 23. Wooden plate
Fix the resulting workpiece on the desktop with clamps. Then, with large round and semicircular chisels, select wood from the inner ellipse from the edge, gradually moving towards the center. After a small depression has been outlined over the entire surface of the inner ellipse, for convenience, you can use chisels-cranberries. You can reduce the sampling time by drilling holes with a wide drill in the very center and around it.
It is more convenient to process the walls of the plate bed with the help of a narrow semicircular chisel, which will smooth out the bumps left after a thick chisel and cranberries.
After that, you have to remove all unnecessary wood from the workpiece. For this, it is better to use a jigsaw. This way you can make the lines even and not remove too much. Then, with a hand saw, they sawed off pieces of wood under the handles, after which, with a cranberry, complete the roughing of the handles. On a plate fixed on the table with a straight narrow chisel, process all the bulges and ribs that remain from the roughing. After that, vertically clamp the product with clamps between 2 wooden blocks and sand the outer surface of the bowl. Then manually sand the inner surface as well. You can decorate its handles and outer side with carvings.
In addition, you can make a wooden scoop yourself. At home, it can be useful when working with various bulk products, such as cereals, flour, sugar or pasta. The scoop is made somewhat more complicated. To make it, you will need a small block of soft plastic wood. Well, if there are no knots on it. The dimensions of the bar must correspond to the dimensions of the finished product, and its thickness will determine the depth of the product.
Then you will need to make a life-size drawing of the future scoop on a piece of paper. In the drawing, draw two views: from the side and from above, then transfer them to the plane of the workpiece. Try to do it in such a way that the bulk of the work goes in the direction of the growth of the fibers, and not against. To do this, make two notches on the wood with a chisel-cerazik. If the notch and chips are smooth and even, this means that you have made a recess in the direction of the growth of the fibers. Then, through carbon paper, transfer the drawing to the surface of the workpiece and circle it again with a hard pencil.
At the place of the largest recess, where the sample will be made, make several large holes to facilitate the work. Take a thick drill or a drill with a thick end and carefully drill through a piece of wood. After that, they drank the extra pieces with a jigsaw. Then fasten the workpiece on the workbench with clamps, but not very tight so that there are no traces of them on the wood. Use a joint knife or a thick straight chisel to cut the wood between the holes. In order not to make the recess near the edge of the future scoop larger than in the middle, fasten an additional bar with clamps near the edge of the workpiece.
After that, with a semicircular chisel, carefully select the wood from the recess. Also for this procedure, you will need cranberry chisels, with which you can cleanly remove excess material from the bottom of the recess and walls. Slight irregularities and notches on the surface of the recess should be well leveled with a straight narrow chisel.
After the work on the bottom of the scoop is completed, go to the surface of the walls, the thickness of which, if possible, should be the same. The top of them should also be smooth. To do this, remove excess wood with a straight chisel, which should only go in the direction of fiber growth, and not against. Otherwise, you will not so much straighten the edges as spoil them.
Unscrew the clamps and use a large round chisel to cut off unnecessary wood with thin shavings. Then turn the block over, fix it on the workbench with clamps and carefully select the wood for the scoop handle with a straight chisel. Then, using the same chisel, select the base of the deepening of the scoop bed, constantly checking the thickness of its wall.
Having finished processing the inside of the scoop bed, put it on the desktop and use a straight chisel to remove excess wood from the outside of the scoop. Measure about a quarter of the length of the scoop bed from the edge and make a small cone-shaped cut on this part.
After that, proceed to cutting out the handle of the scoop. Lay it on the workbench and clamp it with clamps. Fasten another bar near the handle with clamps and carefully remove the excess wood with a chisel, after which the edges of the handle are rounded with a cutter knife and sand the surface with a fine-grained sandpaper.
Compared to a plate, a saucer is even easier to make (Fig. 24). You need to choose a wooden board of the right size and draw two circles on it. The outer circle will correspond to the size of the future product, and the inner circle will correspond to the size of the bottom. Depending on the thickness of the workpiece, you can make a deep or shallow saucer. After completing the work, decorate the edges of the craft with carvings or a burnt pattern.

Rice. 24. Saucer
According to the principle of making a plate, you can also make a trough. The differences are in the size and shape of the handles. For a normal trough, you will need half a large log, from which it will be made. The handles are much easier to make, you just need to choose the wood from the inside and do not cut out the curly handles like a plate. You can decorate the finished product with carvings or inserts made of metal (or other wood) on the handles or on the outer surface of the craft.
In the old days in Russia there were no metal spoons or forks. These products were made from wood. You can also make a wooden spoon with your own hands (fig. 25). Depending on the chosen blank, you can make both a large spoon and a small one - a teaspoon. However, for this you will need to find a thicker bar, since the bed of the spoon will have a recess. It is best to choose wood from the bed and gouge a small indentation. Then remove the unwanted wood from the workpiece where the handle will be, then turn the block over and remove the material from the entire workpiece. In a similar way, you will do a prefetch. Then smooth the surface with a straight and semicircular narrow chisel and sand it with a fine-grained sandpaper. You can decorate the handle of a spoon to give it beauty with carvings.

Rice. 25. Wooden spoon
If on the one hand you make a small spout in the box, and the product itself will have big sizes, you will get not just a spoon, but a ladle, which will be convenient to pour, for example, cabbage soup.
The fork can be made from the same block of wood as the spoon. It is done on the principle of a spatula for stirring. The peculiarity of the fork is that you need to make 1 or 3 more cuts in the bed, depending on what you want to get as a result: a large fish fork or an ordinary table fork. Carefully work the edges of the cuts with fine-grained sandpaper, and sharpen the edges of the teeth a little with a knife and also clean with sandpaper. After sanding the entire surface of the fork, the handle of which can also be carved.
A spatula is usually used for mixing food. To make it, you need a long bar. On the surface of the wood, outline the contours of the blade with a pencil. Keep in mind that her handle should expand slightly towards the end. The bed looks like this: near the handle it expands and has a slight slope, which gradually turns into a wide plane. Pick out unwanted wood with a straight wide chisel and clean the surface with a narrow chisel. After grinding the finished product, decorate the blade handle with carvings.
In order to make a glass or a mug (fig. 26), you will need a block of wood with a vertical direction of grain growth. On its upper side, draw 2 circles, which will indicate the outer and inner sides of the future glass.

Rice. 26. Wooden glass
If you want to make a mug, then on the workpiece you will need to leave room for the pen. If this block does not allow this, draw it on a block of wood similar in texture. In the blank of the glass itself, make several holes with a drill, and then carefully select the wood with a narrow semicircular chisel, after which treat the inner surface with fine-grained sandpaper. You can get the same hole with a lathe.
After you have carefully finished the inner surface of the glass, proceed to the processing of the outer side. To do this, with a wide semicircular chisel, remove all excess wood, and then shape it with a thin chisel, after which you can sand the surface and apply some kind of pattern. So you get a simple wooden glass. Glue a handle cut from another bar to the finished glass. If you make a mug completely out of a single piece of wood, after the first cut, you should also remove unnecessary wood and shape the handle itself. To do this, it is convenient to use a jigsaw, which will cut off excess pieces accurately and without jagged. Then sand the surface and decorate it.
Furniture items
Even experienced craftsmen began their activities with the manufacture of simple items from wood. So you can first make, for example, furniture for your sister's dolls. She will surely be very happy, and you will develop your woodworking skills. In the future, you will be able to make real furniture yourself, such as shelves, a chair, a table or a cabinet. Start simple and gradually move on to complex.
It is worth starting with shelves, which, even with all the simplicity of the design, are always needed in the house and can replace all hanging furniture. They can be either open, without a lid, or closed, that is, form a small wall cabinet.
In order to make an open shelf (fig. 27), you will need a strong and thick board, which can also be replaced with chipboard, and 1 plank of wooden lath, equal to the length of the shelf. In addition, you will need to pick up 2 pieces of veneer for gluing all surfaces and 2 metal corners so that you can hang the finished shelf on the wall. You will also need 2 voluminous pieces of the board, which should be equal in width to the width of the product itself, which will allow it to hang firmly on the wall and withstand even significant weights.
First of all, you should make the base of the shelf. To do this, take a board of the length and width you need. First determine the side that will be facing you. It is on it, after preparation on both sides of the veneer, that it will be necessary to fix the rail in order to close the ugly inside of the base. The veneer will also give the impression that only solid wood was used in the manufacture.
Then make fasteners from pieces of wood, which can have a different shape. Here everything completely depends only on your imagination, as well as on taste and creativity. Let us remind you once again that the width of these parts at the junction with the shelf will be equal to the width of the product itself, because they are attached to the end sides of the board or wood board. We drank the contours of the fixing legs of the product, carefully sand them and connect them to the base of the shelf. Using screws, you will get a stronger and more reliable connection than with ordinary nails. All this is primarily due to the structure of the tree itself, which does not hold the nail leg inside itself well.

Rice. 27. Open shelf
Attach the corners to the top of the resulting shelf elements so that the product can be hung. After completing all the work, once again thoroughly walk over all surfaces with sandpaper and varnish them.
Such a shelf can be used anywhere in the house: in your room, in the kitchen or in the loggia. If you install several of these shelves one above the other, and screw several hooks into the bottom shelf from below, you get a convenient hanger for kitchen towels, potholders and cutting boards. In addition, ceramic mugs and cups are well stored in this position, in addition, in this case, extra space on the shelf is freed up.
Having practiced on an open shelf, you can make a shelf-locker (Fig. 28). This is also a very necessary thing in the house. Here, a closed shelf, a drawer and a locker are connected at once into one whole. Only at first it may seem that such a product is very difficult to make. But if you carefully look at everything, it turns out that this is quite possible.

Rice. 28. Shelf-locker
To begin with, make a drawing on which, with great accuracy (up to a millimeter), calculate all dimensions. In order to correctly place all the elements in the complex of one whole (that is, a shelf, a cabinet and a drawer), divide the entire structure along the length into 6 parts: 2 of them will take the shelf, 3 belong to the cabinet, and the last one - for drawers. If you want, you can change the ratio of the parts, placing everything to your liking.
After the drawing is ready, you need to pick up the wood from which the shelf-locker will be made. To do this, you can equally use fiberboard and durable wooden boards. If you decide to use chipboard for work, then you will still need to find a veneer for pasting the product. To install the cabinet door, piano hinges are needed, and in order to be able to open the doors or drawer, you will still need handles.
After that, you can actually get to work. At the first stage, prepare the grooves and fastening sockets on the sides of each part of the product and glue the surface of the parts with veneer. Then leave the wood until the glue dries completely, so that later you get an imitation under good breeds tree. So that the surface does not become blistered or completely peeled off from the chipboard, you will have to wait about 24 hours or a little more: it all depends on the glue that you will use when working. Then connect the details of the base of the shelf-cabinet, which includes the back wall, 2 side walls and the bottom, and leave the structure until the glue dries completely.
Then, at a distance of one sixth from the bottom of the resulting structure, install the bottom of the product, thus fencing off the level of the drawers and the cabinet itself. At the same time, you can install the upper border of the cabinet, the bar of the shelf itself and the cover. To fully fix the structure, you will also have to wait 1 day.
While the glue hardens, you can make boxes that consist of a bottom, 2 side, back and front walls. It is necessary to connect the front wall especially carefully and carefully, because it will always be in sight.
Do not forget to drill holes in it for attaching handles before starting work. It will be much more difficult to do this after joining the parts, and the likelihood of chipping veneer fibers on the front side will increase significantly. To avoid such troubles, first make a hole, then glue the veneer and, after the glue starts to dry (but until it is completely hardened), make a small cut in the form of a cross. Veneer wood under the influence of glue will soften a little, and then you can carefully cut through it.
After the boxes are ready, make the cabinet doors. They should consist of a door frame and a plank. However, instead of a plank, you can take ordinary frosted or colored glass. You can decorate a board or glass in many ways. Against the background of dark veneer, a pattern of copper or brass wire looks very beautiful, which is glued to the surface using epoxy or polyester resin.
Carefully bend the wire according to the pattern, treat it with a special thinner, which can be replaced with ordinary medical or industrial alcohol. Then cover the wire with a thin layer of resin and stick it on the surface. When the surface is ready and the wire sticks well, you can install piano hinges and handles on the doors. After that, you will need to attach the doors to the base of the cabinet and push the drawers. Consider that the shelf-cabinet-chik is almost ready. Finally, gently sand the surface with a fine-grained sandpaper and cover with a thin layer of varnish.
Making a chair is somewhat more difficult than making a shelf. Its design consists of a seat, two front legs equal in height to the level of the seat, 2 rear legs that determine the height of the chair, 3 footrests (2 side and 1 front), three sides (2 side and 1 back) and a backrest, which can consist of 1-2 parts (the upper backrest will be called the top, and the middle one will be called the middle) (Fig. 29).

Rice. 29. Chair
The height of the seat itself generally does not exceed 45 cm from the floor level, and the height of the entire product depends only on your desire. First you need to choose the material for the chair. Most often, all the main parts of the chair are made entirely of wooden boards or bars. But sometimes chipboard is chosen for the seat, then foam rubber or several layers of batting are laid on it, and then sheathed with fabric or any other material.
When an accurate drawing is made, you can proceed directly to work. First, they drank the rear legs of the chair from 2 large bars. From the smaller boards make the front legs. In addition, it will be necessary to cut out 3 steps and 3 drawers so that later the legs of the chair do not move apart. After that, assemble the side of the chair, which consists of the back and front legs, the drawstring and the footboard. Connect all these parts together on a spike with glue. And while it is setting, make the seat of the chair, which should have a smooth surface.
After the sides are completely glued together, you can proceed to the final stage of assembling the chair. You will need to install the front footrest, seat, rear drawstring and back pieces. Having firmly knocked down the prepared fasteners, leave the product until the glue dries completely. After that, you should sand it and cover it with paint or clear carpentry varnish.
Now you understand the basic connections and furniture design. Everything else builds on this base. So, having made an open shelf and a shelf-locker, you can also master the manufacture of other pieces of furniture, such as bedside tables, a small cabinet or a shelving unit. And you can choose a design option, for example, a table, depending on your taste, desire and place, as well as on where you plan to put the finished product. This principle also applies to chairs, and chairs that can be made on the basis of a simple chair.
However, sometimes you don't have to think about anything. The most ordinary chair will look much more attractive if you decorate its legs and back with decorative carvings. An ordinary home table will also look great if a mosaic of veneer pieces is laid out on its surface or inlaid with metal wire or pieces of colored glass.
All tables, from a miniature coffee table to an ordinary dining table, are made according to the same principle and consist of the same parts: tabletops, legs and fasteners, which are fixed to each other by the rest of the structural elements (Fig. 30).
Before starting work, make a standard drawing, on which determine all dimensions. If you want to make a coffee table, its height should be about 50–60 cm, and the height of the computer table will be 65–70 cm. The width and length of the tabletop can be arbitrary.

Rice. 30. Table
In accordance with the dimensions of the future product, select the material. For the countertop, you can use chipboard, and for fasteners and legs, it is better to take wooden blocks.
First you will need to make a countertop. To do this, they drank a plate of the required size and glued the upper surface with veneer.
So that in the future the edges of the latter do not peel off, you can nail a special rail along the edges of the table top. In addition to the fact that it will prevent the edges from peeling off, this rail will significantly decorate the entire product.
As soon as the countertop is ready, and the glue dries, you can begin to install the bars to which the legs will be attached. For tables of small sizes, individual square pieces of wood are most often used, which are located on the inside or in the corners. For large tables, this design is not very suitable, because it is rarely able to withstand significant loads. Therefore, bars are installed around the entire perimeter of the countertop. The legs of the product in this embodiment are attached to the bars using a spike connection.
If you are making a small table, and to connect the legs to the tabletop you have installed separate bars on its inside, in this case the connection goes a little differently. Each leg in this case has a spike that is inserted into a socket made on a bar. For a secure connection, turn the countertop upside down. Then grease the socket and the spike well with glue, connect and leave the structure for 24 hours until completely dry. The finished table will need to be sanded with a fine-grained sandpaper and covered with several layers of carpentry varnish.
Stairs
Very often in the country or in country house I have to update the interior on a regular basis. Either you need to update the stairs, or fix the gazebo. By learning how to work with wood, you can help your father or older brother do carpentry work. This is a very valuable experience for the future. You can make some interior items yourself, having certain skills in working with wood.
So, in the country house between the spans, you can put both a spiral and a straight staircase (Fig. 31). By the way, in the latter case, it can be one-march and two-march. The difference between them is as follows: the first is located between 2 floors and has only 1 direction of steps, and the last, also connecting 2 floors, has an intermediate platform.
Depending on what area you allocate for the construction of the stairs, and where it will be located, you will need to choose one or another of its types.

Rice. 31. Staircase
But first of all, you need to choose a ladder for yourself, that is, it should be comfortable and safe. To ensure the latter when descending or ascending, a strong railing will help you.
In order for your future staircase to be strong and last a considerable time, as building material it is best to use well-dried hardwood or softwood, such as oak, larch or pine.
It is best to connect the details of the stairs with screws, which do not weaken over time and firmly hold the structural elements. Ordinary building nails at first fasten the parts quite firmly, but over time the connections begin to loosen, and then the stairs have to be repaired by driving additional nails into the array.
Now about the design of the staircase itself. Any staircase includes two bearing bowstrings, also called base boards or strings, on which steps and railings are attached. For a bowstring, solid boards up to 30 cm wide and 6–6.5 cm thick are most often chosen. The length of the board is selected in accordance with the length of the march. For the steps themselves, planks 30-35 cm long are selected so that the leg fits completely on the steps, and 5 cm thick so that it can withstand the weight of 1 person.
The height of the step depends on the angle of the bowstring relative to the floor of the lower floor. The greater the angle of inclination, the higher the steps are relative to each other. For example, if the angle of inclination is about 33-37°, the height of the step should be approximately 16 cm. If the staircase is located at an angle of 38-42°, the distance between the steps should be approximately 18 cm. the height of the steps should be 20 cm. However, even using these calculations, you must try everything for yourself. Sometimes steps have to be made above or below the standard, since the stairs must be comfortable for all family members.
For starters, it's best to just make a straight ladder that can rest against the wall. More difficult to implement is a two-flight staircase, which is done only taking into account the support on the right wall. This direction mainly depends on your wishes. If you decide to make a curved staircase (which should be done only with a certain experience), do not forget that the width of the step, even in a narrow place, should not be less than 12 cm.
Starting the construction of the stairs, first of all, install the bowstrings, attaching them to the floor surface with nails or screws, and at the top - to the floor beams, performing a cruciform fastening. The distance between them should be 75-90 cm, so that you can freely walk up the stairs.
After the bowstrings are installed, each of them should be divided into steps, taking into account the amplitude of the step and the thickness of the slats. In any staircase, the number of steps must necessarily be odd. Then, at this level, it is necessary to arrange grooves for fastening the steps, equal to the thickness of the planks. For additional fastening of the strips, which are also called treads, risers are installed between them. To keep them well and not fall out from under the treads, you can use rallying in a quarter or on a plug-in spike.
It is best to place steps from the bottom up so that you can take into account the height of the step and check the stability of the fastening. The railing, which is installed on a bowstring, will decorate the stairs, as well as make it safer. Handrails should be located at a height of 80-85 cm from the level of the bowstring.
You can also set the handrails to the height you need. You can calculate it this way: going down the stairs, stretch your relaxed arm forward a little: at this level and fix the bar. After that, climb up the stairs, holding on to it. The arm should be relaxed and slightly bent at the elbow.
If you are comfortable moving in both directions, this means that the level of the handrails is chosen correctly.
Wooden toys
Making wooden toys is not difficult, especially if you already have some skills. To do this, you will need the same set of tools as for making furniture, as well as standard wood blanks.
Your toy plane (fig. 32) will consist of the following parts: upper wing (5 x 24 x 1.5 cm), lower wing (5 x 15 x 1 cm), fuselage (5 x 30 x 1.5 cm) and rudder. Boards should also be of the appropriate size, so select suitable blanks for this work in advance.


Rice. 32. Airplane
First, make a sketch of the future product. Draw clearly the main parts of the aircraft and its general form. It is best if the pattern matches the size of the intended product. Then think over the sequence of making the toy and how to connect its parts. Try on the main parts and assemble them without nails. In fact, a wooden plane is a simple product, so you will probably prepare all the main details quickly enough.
In order to make tail wings, take a board, measure half and draw a line for sawing, that is, make an accurate markup. Then they sawed off the part and cleaned the cut. After that, you can start fastening the parts of the aircraft with nails. First of all knock off the upper and lower front wings with the base, and then the tail scrapers with the base. Mark in advance with a pencil the places where you will begin to drive nails on the wings, and make sure that the lower and upper wings are at the same level on the base. It is best if they are nailed at a distance of a third of the length from the nose of the aircraft.
Then you will need to nail the steering wheel. Take nails without hats for this. Carefully connect the top to the tail wings. Drive a nail without a hat halfway into the middle of the tail wings and push the rudder part onto the second half of the nail, which is visible above the body of the aircraft. After that, drive a nail into the pre-marked hole. However, you can fix the steering wheel in another way: turn the tail wings over, put on the top and gently nail at an angle with nails. It is better to hammer 2 nails into the middle of the wings.
Place the rudder with tail wings on the base and nail it. After the main parts of the toy are fastened together, you can add a propeller, wheels, etc. Color the product to your liking. For example, you can draw stars or something else on the wings, as well as cover the toy with carpentry varnish.
Television
Making a toy TV out of wood (Fig. 33) is also easy. To do this, you will need the following details: the body of the product - a rectangular bar measuring 20 x 16 x 10 cm, the TV screen - a board measuring 15 x 10 x 1 cm, slats for legs measuring 35 x 1 x 1 cm.
Just like with an airplane, draw the drawing first. Clearly mark all future parts of the toy on a piece of paper. Separately, draw a general view of the TV. Determine the sequence of work and select the right material. Make sure that all wooden blocks are free of cracks, burrs and other defects.
For the TV case, choose a suitable bar or drank it from a larger one. Then we sawed off the screen from the board of the required size, holding it in a vise, and filed the edges with a file. The legs should be the same length, so accurately measure the desired distance on the rail. It should be equal to the width of the body of the toy.

Rice. 33. TV
If all the details are ready, proceed to assemble the TV. Drive nails into the screen first, then nail it to the body. After that, carefully hammer nails into the legs and attach them to the TV. When the product is ready, you can color it and draw buttons on it. In addition, you can also attach an antenna: a piece of wire or a thin metal rod will do for this.
sailboat
Ships and sailboats made of wood have been made by people since ancient times. They were the children's favorite toys. A wooden sailboat can be allowed to “sail” into a pond. Having trained on one boat (Fig. 34), if you wish, you can make a whole flotilla of sailboats.
You will need the following parts: a 10x25x1.5 cm sailboat hull (it should be pointed at both ends) and a 25x1x1 cm rail. In addition, you still need to prepare sail fabric and colored paper.
As in the previous case, first make a drawing, depicting the details and general appearance of the sailboat. Then take a board with a pointed end and mark the sawing lines on the other end with a pencil. Then they carefully saw off the corners, guiding the hacksaw blade along the drawn lines. To make a mast, grind a rail to the desired size, then fix it in a vise and prepare a hole in it with an awl. After that, carefully drive a nail without a hat (up to half) into the center of the hull of the sailboat and put the finished mast on it for better strength, you can pre-lubricate it with glue.

Rice. 34. Sailboat
Any fabric is suitable for a sail (even cardboard can be used). Keep in mind that it should be shorter than the mast. After cutting the sail to the desired size, fix it to the mast with small nails or glue. The finished product you can paint, varnish and decorate with colored paper.
Making a wooden cart is also quite simple (Fig. 35). To do this, you will need the following parts: a trolley body measuring 9 x 15 x 1.5 cm and wheels 1.5 cm thick and 4 cm in diameter.
As in other cases, at the first stage, make a drawing of the future product. The trolley will have few details: a base, 4 wooden wheels, nails and a rope.
In order to make wheels, take a cylindrical bar, measure a distance of 1.5 cm thick on it and mark with a pencil. After that, make 4 more such marks (to get 4 wheels) and these details along the lines. Gently sand the resulting rounds.
You will also need a board from which you will need to saw off the base of the cart to the desired size. Clean the resulting frame from roughness and burrs with sandpaper. After that, mark on it with a pencil the places where the wheels are attached at the same distance from the edges of the frame and make shallow holes in them for driving nails.

Rice. 35. Trolley
The wheels must turn. To make this happen, nail them with wide-head nails, which should protrude 3 mm. Spin the wheels around the axle nail and see how they spin.
Attach the wheels on one side first. When you hammer in the wheels on the other side of the frame, they will rest on the already attached wheels and their axle can go all the way in, then they will become motionless. To prevent this from happening, you need to put studs with a diameter of 2–3 mm between them and the frame, and then the wheels will retain their mobility.
At the end of the work, nail a nail into the center of the front of the frame, bend it with wire cutters so that you get a hook, and tie a rope.
Automobile
By learning how to make a cart on wheels, you can also make a car (Fig. 36). In this case, you will need the following parts: a base measuring 8 x 20 x 1.5 cm, a cabin measuring 8 x 16 x 2.5 cm and wheels 1 cm thick and 4 cm in diameter.
First of all, draw a picture and think over the sequence of work. Pick up the necessary wooden blanks, clean and sand them well with sandpaper.
Make wheels for the future car according to the same principle as for the cart. You already know how to make them. Then you should prepare the base of the car. To do this, use a ruler to measure the required distance on the board and mark it with a pencil. Clamp the workpiece in a vise and drank the base. After that, you need to attach the upper part (cabin). To do this, drive nails from the side of the base, after marking these places with a pencil. Then hammer nails into the wheels until they come out the other side, and nail them to the base in the same way as in the case of the cart.

Rice. 36. Car
When all the parts are connected, the craft should be painted. In addition, you can make headlights on your car, attach a number, etc.
Now try to make a tractor out of wood (Fig. 37). By making this toy, you will learn how to saw off large diameter wheels. The following parts are needed for the tractor: cabin measuring 5.5 x 6.5 x 7 cm, base measuring 14.5 x 6.5 x 1.5 cm, motor measuring 9x4 x 3.5 cm, bar measuring 1.5x6.5x 1.5 cm, front wheel 0.8 cm wide and 4 cm in diameter and rear wheel 1.5 cm wide and 8 cm in diameter.


Rice. 37. Tractor
First make a drawing of a tractor and take a good look at the general view of the toy. Determine the main parts of the product and outline the sequence of its assembly. Then select the necessary material for the parts of the tractor, that is, for the body, cab, base and motor. Use wheels for wheels different size. You already know how to make wheels. However, when sawing off large wheels, do not rush, perform this operation carefully and carefully.
After that, start assembling the tractor. Pick up suitable blocks for parts and sand them with sandpaper. Connect the base to the cab and motor, while carefully hammering in nails. After that, nail a small block in front of the base for attaching the wheels.
Then attach the rear and front wheels using studs and see if they spin properly. When the craft is ready, paint it, let it dry and varnish it. In addition, you can attach a small pipe (for example, from a metal rod).
Truck
If you have already made a car, then you can also make a truck (Fig. 38). To do this, you will need the following parts: a base measuring 24 x 8 x 1.5 cm, a cabin measuring 5x6x8 cm, a motor measuring 6x4x4 cm, a body measuring 13x8x4 cm and wheels 0.8 cm thick and 3.6 cm in diameter.


Rice. 38. Truck
Run on clean slate paper drawing of a truck with a line drawn equal to the height of the cab. Then determine how many parts you need to make the truck. Pick up suitable wooden blocks of the right size and shape. Think about the order in which you will assemble the parts of the product.
First you have to saw off 4 identical wheels for the truck and sand them. After that, we drank the rest of the details of the desired size and also process them with a file and sandpaper.
Attach the base to the motor with 2 nails. Then fix the cab and body in the same way. After that, fix the wheels so that they spin, do not forget about the hairpin. Place the front wheels at a distance of 2 cm from the edge of the base, and the rear wheels at 6.5 cm. When all the parts are connected, proceed to decorate the toy. Paint your truck, let it dry and varnish it. In addition, you can attach a number or flag to it.
Helicopter
Making a helicopter out of wood (Fig. 39) will be somewhat more difficult. But if you successfully coped with the previous toys, then you can make this one. You will need to prepare the following parts: cockpit (its corners cut down to the center line at a distance of 2 cm from the edges at an angle of 22.5 °), gearbox 2 x 2 x 1 cm, motor 8x5x4, lift screw (4 symmetrically arranged blades long 18 cm, width in the center 1.5 cm, ring in the center - 2 cm in diameter). In addition, you will need a tail boom measuring 16 x 3 x 1.5 cm, a tail rotor bar measuring 8 x 1.5 x 1.5 cm, a tail rotor (3 symmetrically arranged blades 5 cm long), bars for fixing wheels measuring 9x2x3 cm and 4 wheels with a diameter of 3 cm and a thickness of 1 cm. You also need to prepare glue, an awl, scissors and thick cardboard.


Rice. 39. Helicopter
First, cut out 4 symmetrically located lifting screw blades with a ring in the center from thick cardboard, piercing a hole in its middle with an awl. Make the tail rotor in the same way. After that, make a detailed drawing of the toy. Clearly draw all parts of the helicopter and the general view. Well, if you have a photo of a real helicopter, then you can imagine what this or that detail is for.
As in other cases, select or make bars of the right size. Saw them off, after holding them in a vise and marking the place of sawing with a pencil. Make the wheels in the way you already know. When all the details are ready, start assembling the toy.
At a distance of 1 cm from the straight line between the corners and 2 cm from the edges of the cabin, drive 4 nails halfway. With a mallet, put the wheel fastening bars on them. After that, attach the tail rotor with a nail to the tail rotor bar. The nail does not need to be driven in completely in the middle of the front side surface of the bar. In the finished helicopter
In summer, the screw should be at a distance of 1 cm from the edge. You can also additionally secure the screw with glue.
Then drive a nail into the tail rotor bar in the middle of the rear surface to the depth of the bar. Previously, first prick a hole in the bar with an awl so as not to split it when hammering. After that, put the tail boom vertically and nail a bar with a tail rotor to the upper cut. For greater strength, the cut of the bar can be smeared with glue. Then, with two nails in the middle of the motor bar, nail the gearbox and pre-mark the hole for the nails with an awl.
Turn the motor bar over and place it on the gearbox attached to it, then half-drive 2 nails without hats at a distance of 1 cm from the edges, turn the part over and nail it to the cab with a mallet. After that, put the cab, together with the parts nailed to it, on its side and nail the wheels on the left and right sides, do not forget to put a hairpin. Nail the tail boom to the cockpit. In order not to damage the wheels, place the cab on a small block and nail the lifting screw to the cab with 2 nails. After all the details are fastened, paint the helicopter and varnish it.
wood carving
For a long time, foreign guests admired the beauty of the wooden carved columns and cornices of Ancient Russia. Churches and houses in Novgorod, Moscow, Chernigov, Pskov, Voronezh and other Russian cities were decorated with carvings. Until now, scientists are surprised by the subtlety and elegance of the works of old masters, when archaeologists discover carved wooden utensils, caskets, chests, household items, children's toys, knife handles, combs, women's jewelry, etc.
Even the ancient Slavs were engaged in decorative woodcarving. So you can imagine how long ago this unusual art appeared. Russian masters were very fond of depicting animals, plants, plots of fairy tales and epics, as well as fantastic creatures (mermaids, water birds, Sirin birds, etc.) in their works. Since ancient times, the Russian peasant, having repaired the house and finished the field work, in endless autumn and winter evenings, took up artistic woodcarving. And today, despite the many polymers created in recent years, wood continues to be one of the main materials.
Wood carving tools
For wood carving, you will need certain tools that you can purchase at a specialized store.
Joint knife. The peculiarity of this knife is its beveled blade. It has another name "shoe knife" because it is also used in shoemaking. The blade can be beveled at different angles: from 30 to 45° (Fig. 40). The width of the knife blade also varies from 4 to 50 mm. In addition, the knives also differ in chamfer: for some, it is removed from both sides of the blade, while for others, only from one. Depending on the side from which the chamfer is removed, the use of single-phase knives is different. They are more convenient for working with left and right hands, depending on the thread, and for relief cutting through wood, taking into account which side the bevel should be on. Blades with two bevels are more versatile and are designed for simple cutting and other specific operations.
Bit. It often happens that straight chisels are confused with this tool, which is very similar to them. Outwardly, they are really similar, but the difference lies in their use. A chisel is a slotting tool and is used only in combination with a wooden hammer (mallet). This is a more massive and large tool, which is designed for more rough work.

Rice. 40. Knives-jambs
Straight chisel (Fig. 41). For wood carving, straight chisels are used, which differ in the width of the canvas. Depending on the purpose, the width of the canvas can be from 3 to 60 mm. The most common chisels do not go beyond 7-30 mm. The thickness of the canvas can also be different - from 1 to 7 mm, depending on the width. The thickness of the chamfer itself varies from 5 to 15 mm. Straight chisels, as a rule, are only single-phase. They are used for cutting recesses of various shapes and leveling the surface plane.

Rice. 41. Straight chisels
Corner chisels (Fig. 42). The differences between the corner chisels are in the width of the canvas and the size of the corner itself. The angle of the chisel can vary from 45 to 90°. Their main use is to select the recesses and draw the outline of the original drawing along the lines of the pencil, which quickly rub off and become invisible during work.

Rice. 42. Corner chisels
Semicircular chisels (Fig. 43). They are more specific to woodcarving and are needed where semi-circular indentations or smooth lines are to be made that cannot be achieved with straight chisels. The main difference between semicircular chisels is the width of the canvas and the radius of its circumference: the smaller it is, the greater the depth of this chisel. Depending on this, semicircular chisels are divided into steep, sloping and deep. For a beginner carver, it is enough to have 2 semicircular chisels with a blade width of about 10–12 mm, one of which should be steep and the other sloping. The first is used to remove wood and select recesses, and the second is necessary to cut the contours of the figures in the ornament.

Rice. 43. Semicircular chisels
Clucarzy chisels (Fig. 44). There is another kind of chisels called cranberries. They are divided into several types: straight, semicircular and coal. They differ from other chisels in their curved shape and width of the canvas. Semicircular cranberries still differ in radius, and corner cranberries - in the size of the angle. The nature and magnitude of the bend are also important. The main use of such chisels is to select wood in hard-to-reach places or at a sufficiently large depth where it is impossible to use a conventional chisel. For wood carving, several narrow cranberries are needed: straight, deep, semicircular and coal.

Rice. 44. Cranberry chisels
Carving tools are very rare in stores, so most craftsmen make everything they need for carving on their own. At home, the easiest way is to make a tool for woodcarving from ordinary industrial chisels.
Semi-circular and corner chisels can be made from standard chisels with a blade width of 4, 6, 8, 10, 12 and 16 mm. To do this, use a gas burner or a blowtorch to anneal the end of the web of a standard chisel, and then slowly cool. After that, firmly clamp the resulting workpiece in a vice and saw off the very tip of the industrial chisel with a hacksaw. With a round file on the workpiece canvas, cut a groove of the desired size, after which, with a regular flat file, grind the canvas on the other side.
A corner chisel at home is made in almost the same way as a semicircular one. The differences concern only the profile. Making a chisel at home is much more difficult, but still possible. To do this, take a simple semicircular or angular chisel, remove the handle, heat the chisel red-hot and make the desired bend on the anvil or tongs. After that, the metal was again hardened and put on the handle.
After the chisel is given the desired shape, it must be sharpened. First, this should be done with a grinding wheel, and then corrected on a whetstone, which is specially selected for the profile of the chisel. After sharpening and straightening the tool, make a test cut, which will allow you to check how correctly the tool is sharpened. Care must be taken when working with sharp tools to avoid accidents. Another rule is that it is necessary to secure the workpiece well during operation, and not use your hand as a latch. In addition, when working, direct the movement of the tool away from you, and not towards yourself.
How to choose and prepare material for woodcarving
In order for the conceived craft to clearly reveal the texture pattern of wood and not contradict it, you need to study it. To do this, the selected wooden block must be cut in 3 directions: at an angle of 45 °, along and across the fibers. An angled cut will give a texture pattern in the form of parallel lines. A section along the fibers will show the vertical lines of the fibers. The cross section gives a cone-shaped arrangement of fibers, which are growth rings. Depending on the texture pattern, you can correctly position the already conceived pattern or come up with a composition that would emphasize the beauty of the texture. The more complex the texture of the wood, the more beautiful the pattern can be created, and then the composition will only look richer.
All tree species It is customary to divide into 2 groups: sound and sapwood (or non-nuclear). Such a characteristic of wood can only be given with a cross section. The heartwood center has a dark color: a softer layer of wood is located here.
The center of the trunk of non-nuclear tree species does not differ in color from the main part of the trunk (sapwood) and has the same density of tree cells. In fact, the core is missing here.
The heartwood group includes all conifers (eg pine, larch, spruce, yew and cedar) and some hardwoods such as oak, ash and poplar. Nuclear-free species include most hardwoods: birch, hornbeam, maple, alder, etc. In addition to the texture pattern, a significant factor influencing the creation of the composition is the macrostructure of the tree. It is mainly represented by growth rings and heart-shaped vessels. This also includes various knots, outgrowths and undeveloped shoots-eyes that deflect annual rings and form twists.
The most interesting are tree species with a pronounced texture, that is, with clearly distinguished growth rings, horizontal and vertical vessels. These include all conifers, hornbeam, oak, beech, elm and some others.
Workplace organization
In order for your product to turn out the way it was intended, it is not enough to have desire, diligence and good tools. You also need a good job. If you used a carpenter's workbench for carving, that's good. If you don’t have one, you can adapt a massive wooden stool, bench or large wooden box for this. The surface of the desktop should not be low (so as not to slouch when working) or high (because of this, hands will get tired too quickly). In addition, you need to take care of the lighting. The light should fall from the left side so that the shadow from the cutter does not prevent you from seeing the pattern or relief of the product, and it should not blind when carving. Medium, soft and diffused lighting is desirable, which will not strain your eyes and will make it possible to see the play of chiaroscuro on the ornament.
Simple threads
You need to start classes with mastering the simplest types of wood carving: contour and geometric (trihedral-notched) (Fig. 45, 46). These types of carvings do not require complex tools and rare materials. A carved composition can practically be performed with one oblique knife on any of the hardwoods, and in geometric carving - on all conifers. Despite the simplicity of execution, the contour and geometric types of carvings have beauty, expressiveness and allow you to acquire the necessary skills and abilities.

Rice. 45. Contour thread
The experience and skills gained during the first lessons will give you the opportunity to successfully cope with more complex types of work in the future: oval carving with a pillow and a selected background, and in the third year with relief carving. In contour carving, the pattern is applied to the wood with deepened lines of various widths, depths and outline shapes. The lines are made with different tools: semicircular chisels, chisels, profile cutters, and an oblique knife. Outwardly, this carving may seem very simple, but it can be done well only by mastering a number of necessary techniques. Contour carving can be combined with other types of flat-relief carving: geometric, nail-like, oval, Yavorovskaya.

Rice. 46. Geometric (trihedral-notched) thread
Contour carving can be performed on both light and tinted wood. Recently, the so-called black lacquer carving has become widespread among schoolchildren involved in arts and crafts circles. This is a very interesting type of work, when an image is created with clear strokes on a black shiny background. It attracts that the result of efforts is immediately visible. Indeed, the black shiny surface suddenly comes to life and transforms from the slight movement of the instruments. Contour carving can even create portraits and complex landscapes. It is worth saying that the contour carving actually somewhat resembles a drawing, but the drawing is not dashed, but linear-decorative, contour, the outline of which is enclosed by decorative patterns. Here it is necessary to work not with engravers, but with an oblique knife and semicircular chisels (to convey circular outlines). If you want your work to be of high quality, look for plots for yourself not in postcards and photographs, but in illustrated albums on folk arts and crafts and special magazines.
For contour carving, hardwoods are suitable: linden, aspen, birch and alder. Conifers in this case are almost never used. Wood of a suitable size and without defects should be prepared for carving. In the event that you use light wood, it is enough to cut it with a planer. If you conceived an image on a dark background, it needs to be toned.
If you want the drawing to be on a shiny surface, you need to cover it with black varnish, and when it dries, polish it with polish. A uniformly toned wooden surface for carving can be prepared in another way: for example, wipe the planed blank with a liquid solution of wood glue or PVA glue. After it dries, sand the surface with fine sandpaper and cover with glue again. After repeated sanding, the surface of the wood is primed enough for the black ink to evenly lie on it. Fix the dried ink with varnish and polish again. For toning, you can use a variety of dyes: ink, gouache, tempera, watercolor, aniline paints, various stains and mordants, as well as potassium permanganate. The surface can be left matte or covered with a light varnish (to fix the paint) and polished.
Fix the prepared board firmly on the surface of the workbench. This can be done in the clamps of the workbench or with the help of special holders - strips with rectangular or angled cutouts. As holders, you can use 4 small bars that clamp the wooden surface from all sides.
When cutting a contour groove, carefully guide the cutter with both hands. Hold the knife in your fist, and use the fingers of the other hand to guide the blade, supporting it, helping the movement, or, conversely, holding it back.
The carving process consists of several stages: drawing a carved composition, transferring it to a board, carving itself and finishing operations. The composition should be made taking into account the peculiarities of the type of thread and the nature of the workpiece that is decorated. The outlines of the patterns should be extremely clear and precise.
The transfer of the image to the workpiece depends on the color of its surface. If the board is light in color, you should take black or purple carbon paper. For a dark blank, it should be light: yellow, green or red. But you can do without carbon paper by using a regular pen with a refill without paste. If you press it a little harder, deepened lines will remain on the wooden surface, which are clearly visible in any light. They are carved on.
If details with small circles are conceived in the drawing, cut them out with a semicircular chisel. If you do not have it, you can do it with a slanting knife. At the same time, remember: the smaller the diameter of the circle, the sharper the sharpening angle of the blade should be (up to 30 °). With this tool (oblique knife) you can cut in all directions: from yourself, towards you, with an inclination to the right, to the left, inside the circle or out.
Contour carving is often performed on a toned and polished surface. If the pattern is carved on light wood, it must be protected from dust, moisture and air with a transparent varnish. Before applying it, treat the carved surface with fine-grained sandpaper. If it is planed, it is better to sand it with sandpaper, put on a wooden block. Sanding along the grain of the wood. If the workpiece is turned, work must be carried out with the rotation of the product in the clamps of the machine. Remember to carefully remove wood dust from all thread recesses. To do this, you can use a clothes brush. Depending on the purpose of the product, an appropriate coating is applied to it. The surface of the wood can be lacquered to a high gloss or a matte finish can be achieved by rubbing the carvings with a special brush with a thinned lacquer. If necessary, before varnishing, you can tint the surface of the carved product (after grinding), and the intensity of the tone can be very different - from light tinting of the surface to a dull dark tone both on top of the plank and in carved recesses.
Geometric or trihedral notched carving. It is also called wedge-shaped, wedge-shaped, etc. It consists of a number of alphabetic patterns, the combination of which gives beautiful and expressive images (to varieties geometric carving sometimes the contour thread is also referred to if it has a rectilinear or circular outline).
This type of carving is very ancient and widespread, due to its simplicity and the ability to perform with one single tool - a cutter with a beveled cutting edge, the so-called joint knife. It is made in the form of various recesses that form geometric shapes on the plane.
The whole variety of geometric carving patterns practically consists of a combination of simple elements known to you: a spike and a triangle, which can be seen in any composition. Any, the most complex geometric pattern can be divided into its constituent elements, and they will be either pegs or triangles.
In search of a decorative image, it is best to turn to works of folk art. Masters in different regions of Russia in the art of geometric carving, of course, have their own preferences, although the basic elements of this carving are the same everywhere. From a combination of triangles and pegs, merging into fancy patterns (rhombuses, snakes, chains, etc.), you can create many beautiful, expressive compositions on a wide variety of products.
All of these individual dihedral, trihedral, tetrahedral and polyhedral elements can be of various sizes with straight and curved sides.
This creates a very large variety of geometric shapes. There are the following common variants of ornaments: "beads" (Fig. 47), "honeycombs" (Fig. 48), "eyes" (Fig. 49), "snake" (Fig. 50), "ladder" (Fig. 51) , "rosettes" (Fig. 52), "viteyka" (Fig. 53), "stars" (Fig. 54), "shine" (Fig. 55), "chain" (Fig. 56), "pebbles" ( fig. 57), "wrinkles" (fig. 58), etc. d.

Rice. 47. "Beads"

Rice. 48. Honeycomb

Rice. 49 - "Eyes"

Rice. 50. "Snake"
To perform geometric carving, you will need a reliable tool - this is the so-called oblique or shoe knife. It should be strong, firmly seated in the hand and very sharply honed. Some craftsmen make their own knives from wide files, old car springs or the outer race of large bearings, and also grind on an electric grinder from fragments of cutter disks for metal. Good incisors are also obtained from the scythe web. Each master uses the opportunities that he has. The simplest, but good knife can be made from an ordinary chisel 20–30 mm wide. It is usually carefully machined on an emery wheel.

Rice. 51. "Ladder"

Rice. 52. "Rosette"

Rice. 53. "Viteyka"

Rice. 54. Stars

Rice. 55. "Shine"

Rice. 56. "Chain"

Rice. 57. "Skolyshi"

Rice. 58. "Wrinkles"
But the easiest way is to buy the right tool in a specialized store.
If you decide to make a knife yourself, make a wooden or plastic handle for it (or, by attaching strips of leather or foam rubber on both sides, wrap it tightly with insulating tape). When making a geometric carving, hold the knife firmly in your fist, resting your thumb against the handle of the knife. With the fingers of the other hand, guide the tip of the knife, setting it on the line of the drawing.
You can easily master each of the carving elements after you learn how to cut a peg and a triangle. In addition, the surface with geometric carvings can be complemented with various finishes that enhance the expressiveness and charm of the product. The finish of a wooden surface with geometric carvings can be very different. It is worth mentioning a few types that you can learn.
Crafts with geometric carvings can be covered with a gray tone using watercolor or liquid diluted black ink. After the surface has dried (within 24 hours), it must be sanded to a light wood.
Dark gray geometric patterns on a light wood background are very expressive. Gray color has a wide range of shades - from gray-brown to cold gray-blue. After grinding the prepared surface, it is possible to cover it lightly (in 1 layer) with liquid diluted varnish.
However, you can do the work in another way: pre-tint the workpiece prepared for carving in a dark color, for example, gray or brown. Then let it dry and carve on this background. Light patterns on a dark background will create a wonderful decorative effect.
At exhibitions of applied arts, you can see wooden things tinted in light purple (like diluted ink) with light carvings on it. You can do this with a pre-varnished or polished board. If the blank is tinted with the natural color of ocher or wood, the carved patterns turn out to be matte and lighter than the shiny surface of the plank. If the surface is first tinted, then varnished (or polished), and a pattern is already cut out on it, then the artistic clarity of the ornament is significantly increased.
In order to tint wood, you can use a solution of potassium permanganate. Its concentration can be different depending on the color you want to give the background. Since ancient times, craftsmen have used the juice of wild berries, boiled onion husks, decoction of chopped tree bark (oak, alder or apple tree), decoction of sawdust of dark wood, etc. as a paint for tinting wood. However, this is not an easy task. Currently, it is best to use ready-made factory dyes for work.
Geometric carving can decorate both flat surfaces and voluminous things. Since this type of carving is the simplest, start learning from it. It is worth considering in more detail the technology for performing geometric threads. So, its simplest element is a dihedral recess. Such recesses can be of various shapes and sizes, they can also be straight and beveled, deep and shallow. Triangular recesses, or simply triangles, are also a commonly used element in geometric carving, depending on which side of the triangle the recess is on. There are basic (that is, the recess is at the base of the triangle), vertex, or corners (the recess is at the top), and central (the recess is reduced to one side of the triangle). Triangles also differ in their shape.
More difficult to perform are tetrahedral recesses. They also differ in their form, depth and execution. Tetrahedral recesses can be in the form of a rectangle, square or rhombus. Often there are various round and semicircular eyes, rays and lanterns, which are not the main elements of geometric carving, but really enliven it. Even with the help of the simplest shapes, you can create a beautiful ornament. For example, from a combination of identical dihedral recesses, the famous “ladder” and “honeycomb” ornaments arise (Fig. 59).

Rice. 59. Tetrahedral notches
You should remember: the more facets in the ornament, the more combinations and types of their connection. Compared to dihedral ornaments, trihedral indentations, or triangles, give more variation. Diamonds, snakes, chains and so-called lights appear here. Top recesses in their connection create pegs, Easter cake and beads. If a combination of different types of triangles appears in the drawing, then the ornament turns out to be even more expressive than when connecting triangles of the same type. Combinations of tetrahedral notches are somewhat less common. In most cases, they are used in conjunction with other elements.
To make the pattern accurate, you need to carefully measure and mark the wooden plane for the future drawing. Geometric threads are convenient in that it is easier to make markings for them than for other types of threads. This is due to the use of geometric shapes, which are applied using a drawing square and a pencil. Calculate the dimensions of the ornament, and then use a hard pencil to draw straight lines on the plane parallel to the edges of the workpiece.
Now you can start marking the internal space of the composition. Break the squares into smaller ones, and then into triangles that can be inscribed in circles or ovals for rosettes.
After the markup is completed, you can proceed to the carving itself. First, make dihedral notches. To do this, drive the edge of the knife-jamb 3 mm into the surface of the workpiece, and then push the entire blade of the knife to the same depth. To cut through the end faces from the already cut midline, make 2 small perpendicular cuts. A simple vertical plunge of the knife blade into the end of the median line gives the desired profile in the depth of the workpiece. Now the planes of the lateral inclined faces must be cut with the tip of the knife, directing its movement along the midline. In order for the plane to turn out with the desired slope, the knife must be held at an angle of 30–40 °, since with a different angle, the notches will turn out to be inexpressive. After that, the trihedral sliver should easily separate. If this did not happen, it means that some edges of the recess were poorly cut and all of them should be additionally cut.
Triangular recesses are more difficult to perform. Cutting each type of triangle has its own characteristics. The carving of the vertex triangles, or the so-called corners, must be performed in 3 steps. First, vertically set the tip of the knife to the point of the apex of the triangle, where there will be a maximum recess. Then, along one of the side edges of the corner, cut the wood to the desired depth. After that, set the tip of the knife to the cut vertex and make a median line to the depth to which the triangle will be cut. Having set the tip of the knife again at the top, along the side cuts, deepen each side of the triangle to the middle of the line.
If you want to make a recess in the center, that is, a central trihedral recess, you will have to make 6 cuts, 3 of which go along the edges of the recess, and the rest along the inclined edges of the triangle. Before you start cutting through the sides of the triangles, mark the center of the figure on the plane. To do this, draw a perpendicular from each vertex to the opposite side. The intersection of these lines will give the center of the triangle. After that, set the knife edge in the center and deepen it by 3-4 mm, and then lower the entire knife blade to the top of the triangle.
In order to get a triangular recess with a recess in the base, that is, the main triangular recess, first mark the middle of the base. Then set the point of the knife at this point and deepen the edge of the knife towards the top. Then cut the base vertically. The sides of the triangle are already cut according to the familiar principle: the knife blade must be deepened at an angle of 30-40 ° from the base to the top of the triangle.
The technology for performing tetrahedral recesses repeats all the techniques that are used when performing dihedral and trihedral recesses. First you need to draw a square and enter it another, with smaller sides. Then make cuts on the sides of the inner triangle to a depth of about 3 mm. Then make cuts from the tops of the inner square to the tops of the outer square. After that, it is necessary to cut through the wood of the bevels of the square. And choose the central part and the inner square with a simple straight chisel.
Before starting work, I should give you some recommendations for carving a geometric ornament. Keep in mind that the recesses to be cut are oriented relative to the wood fibers. First you need to cut the edges going along the fibers, and then against them. If the knife point is at an angle to the grain, turn the workpiece over so that the blade runs along them at a sharp angle. When cutting edges that are along the grain, do not plunge the knife blade all the way, because they can lead the cutter away from a straight line. To do this, it is better to make several cuts, cutting through the wood deeper and deeper each time. It will be more convenient if you use 2 joint knives when performing geometric shapes: with one-sided and two-sided chamfer. The first tool is more convenient to work with when creating recess faces. The second knife will allow you to more accurately cut through the midline or costal strokes. In addition, the blade of the knife should always be on the side of the chip, and not on the side of the machined edge. This will allow you to carve better and more beautifully.
Unlike the types of carving described above, there are no clearly defined figures in the oval carving. Ornament design you can come up with yourself. These can be both interesting garlands of a plant nature, and images of animals or people. We will consider the features of the oval carving using the example of one of the most remarkable - Kudrinskaya (Abramtsevo-Kudrinskaya) (Fig. 60).

Rice. 60. Kudrinskaya carving
The continuity of the pattern of plant shoots, the ornate garlands of branches, flowers, leaves evoke a feeling of “curlyness” of the ornament. The main ornamental role in this type of carving is played by classical garlands of petals, pointed on one side and rounded on the other. They are a continuous, pattern that emphasizes the whole style and structure of the ornament. Various images are usually cut between the garlands: people, birds, animals, berries and flowers.
Drawings of animals, birds and fish surrounded by flowers and leaves are quite common motifs in Kudrinskaya carving. They are found on wooden utensils, round caskets, brush glasses, ink utensils and women's bracelets.
Nowadays, the pictorial motifs of Kudrinsk carving have become much richer. There were plots related to the theme of the holidays (New Year, March 8th, etc.) and memorable dates in the history of Russia. But the main thing is that the images should always be surrounded by a continuous stream of floral patterns, as if framing the main picture.
The preparatory drawing in this type of carving must be done in the size of the future work with tone study (pencil, ink, watercolor or gouache paints). This will help you better visualize the end result of your work.
For the first tasks in mastering this carving, it is recommended to use mainly softwood species of wood - such as linden, alder and aspen. First, it is better to use the samples that are offered in the literature on carving, and then, using the experience gained, you can also come up with independent compositions.
Transfer the drawing to the prepared wooden surface using carbon paper. The cutting process itself is conditionally divided into several stages: pricking, background processing and element modeling. When working, hold the chisel in your fist with the blade vertically down. First, prick the steepest curls of the thread, and then the more gentle ones. Place the sharp edge of the chisel on the contour line, with pressure deepen into the tree by 3-4 mm and turn the brush around the axis. The movement must be carried out as long as the blade of the chisel moves along a contour corresponding to the diameter of the chisel.
Then you should take a flatter chisel and, setting it close to the slot left by the first chisel, make the tattoo further. The cut line should smoothly (without kinks and gaps) move from an arc of one diameter to an arc of another. Make transitions smoothly, and cut through the most gentle parts of the pattern with a cutter knife. All cut lines must be vertical to the plane. The depth of the tattoo may not be the same everywhere: in the arc of twisted curls it is the deepest, and where individual petals converge on the common stem of the plant, the tattoo comes to the surface. It can be done immediately over the entire carved surface, but it can also be done sequentially, in sections, completing each of them completely.
The next stage is the release of the drawing from the surrounding field, that is, cutting off the background around each pinned element. This work can be done with a cutter knife or semi-circular chisels of a larger diameter than those used to tattoo the pattern. From the edge of the pattern, step back towards the background by 2-3 mm and at an angle of about 45 ° with pressure, deepen the blade into the wood along the circular contours around the pattern. The edge between the recess and the background is removed with additional, flatter cuts with a cutter knife. As a result, the ornament becomes, as it were, easily rising from the background. All bumps, burrs, and remaining fibers must be cut and removed from all nooks and crannies around the design. The drawing should clearly and distinctly protrude from the in-depth background. Then you need to start working on each of the elements of the ornament: cut off the sharp edges so that the outlines are rounded. At the end of the work, all threads should be gently rounded, without sharp boundaries, and all contours should be as if gently melting. To remove excess material from the elements of the pattern, use semicircular chisels (turned with the groove down) and a knife-cutter.
Among these softly rounded leaves, petals and stems, Kudrin craftsmen sometimes introduce certain elements for contrast, clearly carved with deep contour strokes (for example, cross-drawn hearts of flowers). Such a notch is the final stage of finishing.
In Kudrinskaya carving, the background is best left softly rounded, being on the same level with the upper points of the pattern. But you can make the ornament appear raised above the background. In this case, the latter is made around the pattern to the depth of the tattoo, and the result is a Kudrin carving with a selected background. To give the carving a special distinctness and expressiveness, the background is often minted. The easiest way to arrange this is with a large nail, previously sharpened and polished. To mint significant planes, you need to do necessary tools- punches with a notch on one part. The notch should be deep and sharp enough to leave clear, evenly deep marks on the tree.
The finishing of the product includes grinding the carved surface, tinting it with dyes and applying a transparent protective coating. Usually Kudrinskaya carving, the material for which is mainly light linden, is tinted in dark brown, varnished, and then the convex places of the patterns and the background are polished. The result is a beautiful sparkle of the pattern with pronounced matte gaps in the deep background. Depending on your desire, you can also keep the natural color of the wood. To protect the craft from dust and moisture, it must be covered with liquid diluted varnish, rubbing it into the wood with a special brush. In this case, the varnish coating does not give shine and retains the color of the wood. Kudrinsky ornaments look equally wonderful on turned, slotted and planed blanks, complementing and emphasizing the shape of the products.
Flat-relief carving (Fig. 61) is one of the most common types of wood processing. This is a carving of a flat, low relief ornament. It must be performed in such a way that the background around the entire pattern is cut off or completely removed to a depth of 5–7 mm.

Rice. 61. Flat carving
In this type of carving, the pattern takes on three-dimensional forms, maintaining the same height of most of the protruding planes or certain faces with the same level of depth of the main background.
The planes of the pattern can be finished with notches, recesses and rounding of the edges, for example, convex, concave or partially straight. Masters of flat-relief carving depict mainly animals, birds, people and plants. This carving can be done on different backgrounds: cushion, selected, oval, undercut and matched.
So, to make a flat-relief carving with an oval contour, grooves must be cut. This is similar to contour carving. The difference lies in the fact that then the contours of the image are rounded both from the side of the pattern and from the side of the background. First you need to make an incision with a joint knife along the contour of the pattern. On the roundings of the ornament, make cuts with semicircular chisels of the desired profile, and with the experience that has appeared, with a blade. If the bending line of the image is steeper than the radius of the chisel, then the work can be done with the corner of a sloping chisel. To do this, you need to rotate it around the axis, and then remove the background with a flat chisel with an inclination to the plane at an angle of 30 ° or with a knife and round it with further passes with a joint knife or chisel.
From the side of the pattern, the contour must be steeper than from the side of the sloping background, in which case the image will look more convex. After rolling with cutters, the product can also be sanded with sandpaper.
Pillow carving is a type of carving with an oval outline. The difference is that the outline does not remain flat anywhere and may be below the plane of the craft pattern. The technique of work is similar to carving with an oval contour.
Staple flat thread (Fig. 62). In a later period, geometric carving appeared new element- bracket. It has become widely used in combination with geometric recesses and in combination with contour threads. The fact that the bracket is an interesting and striking element made it possible to single out bracket thread as an independent direction. However, in practice it is very rarely used alone and is more often found in combinations with other elements.

Rice. 62. Bracket flat notched thread
It is sometimes believed that the bracketed flat notched thread is less laborious than the geometric one, and requires less time. In fact this is not true. A characteristic feature of stapled carving are rounded various shapes and lines of the ornament. They give a more muted play of chiaroscuro, which is softer here, in addition, it is smoother and more evenly distributed in the recesses. In addition to the joint knife, which is impossible to do without when making a flat-shaped ornament, you will also need a fairly large set of semicircular chisels, since this type of carving is simply impossible without them.
From the basic simple elements of stapled carving (eyes, staples, holes and marigolds), you can combine more complex image shapes, such as circles, flowers, leaves, rosettes and waves. The technique for making bracketed flat notched threads is reduced to 2 successive steps - notching and trimming. And the result is a pronounced and aesthetic ornament.
Perform the notch as follows: place the chisel vertically to the workpiece to be processed and, using a slight pressure with its blade, cut the contour of the element to its entire depth. Unlike notching, which produces vertical profiles of elements, undercutting creates all slanted profiles. In this way, it is similar to the technique of geometric carving. To create a sharper notch profile when trimming, position the pattern so that the tool blade moves along the grain rather than across it. Depending on in which part of the recess the largest recess is located, several types of stapled thread elements are distinguished. Wells can be made with a recess at the oval edge or in the center.
In order to get a hole with a recess at the oval edge, you will need a semicircular chisel and a joint knife. First, push the workpiece with a chisel to a depth of 3 mm, and then cut the hole with a knife along an inclined plane to the entire depth of the cut.
A hole with a recess in the center is performed differently. First, draw a center line and make a vertical cut along it with a knife to a depth of 3-4 mm. This notch can also be made with a straight chisel, in which the chamfer is made in a semicircle, this allows you to more accurately complete the notch profile. Then cut with a semicircular chisel. In this case, an oval concave recess will be obtained. The chisel, having reached the center line, should completely separate the chip from one side. Depending on which edge the recess is located on, the inner and outer nails are separated. In order to complete the inner nail, make a notch with a semicircular chisel, and then cut its edges. To make the outer nail, also cut out the contour of the future nail with a semicircular chisel and cut it with a jamb. After that, also trim the inclined plane with a semicircular chisel, turning the chisel with the curved side up.
With the help of a semicircular chisel, you can make a wide variety of patterns. If you turn it all the time in one direction, you get a circle. And if you alternate marigolds or holes, directed either up or down, then you get an ornament in the form of a wave.
Relief carving (Fig. 63). This type of carving is very similar to flat-relief carving. However, there are a number of differences here. Most often it is used to decorate furniture and interiors. It differs from flat-relief carving by a deeper and more pronounced relief of the ornament. In addition, it turns out to be voluminous and protrudes very high above the background plane. Depending on this, bas-relief and high-relief carvings are distinguished, which differ little in terms of execution technique. During work, all tools for wood carving are used.

Rice. 63. Embossed carving
First, draw a pattern on a sheet of paper in full size. If the future relief is quite complex, consisting of more than one level, you can make an image from plasticine. Then transfer the pattern to the workpiece with a hard pencil. After that, cut the contour of the resulting pattern with a knife or chisel. The incision should be vertical so as not to take a few millimeters from the ornament. Then do the cutting. To do this, it is convenient to use flat or semicircular chisels, directing them to the surface at an angle of 45 °. Try not to go beyond the border of the future pattern.
In addition, you must select a background. To do this, it is better to start with large areas, gradually moving to small ones. At the same time, you will need a lot of attention and a good eye to make the background at the same depth. Now that the main contours of the drawing are clearly visible, you can begin to work out the shapes of the image. First of all, the edges need to be filled. This is done in the same way as with flat-relief carving. First, at an angle of 45 °, remove wood from the edges, and then smooth with a round chisel.
Before starting the detailed cut through of the drawing, go back to the background and do one last cleanup. It is necessary to smooth out all small irregularities, small differences in depth and other flaws. To clean up the background, it is convenient to use flat chisels and cranberries. As before, first pay attention large areas, and then gradually move to small ones. After the entire background is cleaned up, level the surface of the image. After that, you can start cutting through thinner and smaller details on the relief and applying a chased pattern of dots to the background.
Volumetric thread (Fig. 64). This type of carving is the most interesting and striking type of traditional woodcarving. There is another name for this art - sculptural carving. During work, a variety of means are used, the main of which is volume. Here you need to be able to think in volume, which is sometimes difficult.

Rice. 64. Volumetric thread
Before proceeding with the carving itself, make a sketch of the future plasticine ornament. This is a fairly convenient material for a novice carver, as it gives great opportunities for experimentation and fantasy. First of all, think over the contours of the product, which should be compact. All parts must be well reinforced on the base, due to the properties of the tree. In addition, pick up a wooden blank of the appropriate size and transfer the contours of the future craft onto it with strokes.
Before you start carving, do a rough roughing. To do this, it is convenient to use an ax and a saw, which can significantly save time and effort. Using a chisel, cut out the main contours and shapes of the future figure. First, use large wide chisels, which are convenient for cutting large enough parts of the product. It is better to remove wood in small layers, because otherwise there is a chance that you will remove the excess and thereby ruin the workpiece. After that, using narrower chisels, cut through small parts. Then give the figure a finished shape, trim and clean all the details, and also cut, if necessary, through holes.
Slotted and laid on thread (Fig. 65, 66). This type of carving differs from others in that the background may or may not be present. Depending on this, a flat-relief slotted thread and an overhead thread are distinguished. Both of them are quite widely used to decorate furniture, only here, for convenience, they use a special device called a pillow. This is a wooden board on which a sheet of paper is glued, and then the blank is cut along the contour. The paper layer is necessary so that later the finished product can be easily separated from the pillow. Thanks to the latter, the fragile openwork workpiece is in a fixed position, which allows for better carving.

Rice. 65. Slotted thread

Rice. 66. Applied thread
From simple to complex
Above, we have already considered the basic principles and techniques of simple geometric carving. This is where you should start honing your skills. When you master the first carving techniques, you can move on to more complex ornaments. But everything has its time, in this matter there is no need to rush, everything needs to be done in stages.
Having mastered the elements of geometric and contour carving, you can try to work on a flat-relief ornament. Russian craftsmen very often use in their work such a pattern element as a flower. This is where we should dwell in more detail. For carving, you will need 35° and 45° bevel knives, semi-flat chisels 12–18 mm wide, and steep semi-circular chisels 5–8 and 10–14 mm in diameter. It is best to use a pre-prepared lime blank 200 by 100 by 20 mm. Then, with a compass on a plane, draw a circle with a diameter of 50 mm, placing it at a distance of at least 20 mm from the edges of the workpiece.
First you need to cut the core of the flower. To do this, take a steep semicircular chisel with a diameter of 10–14 mm. Place it in the center of the circle strictly vertically to the surface of the board, and then press and deepen it by 2 mm, turning around its own axis (Fig. 67).
The operation should be performed carefully so that the core of the flower does not chip. Therefore, do not deepen the chisel by more than 2 mm. With a sloping chisel, remove the wood around the core of the flower. It is best to choose a chisel with a width of 12–18 mm (Fig. 68).
To increase the relief of the core of the flower, a deeper groove should be made around the circumference (Fig. 69).

Rice. 67. The first stage of work on the element "flower"

Rice. 68. Removing wood around the core

Rice. 69. Getting a more convex flower core
In order to cut through the petals of a flower, use a steep semi-circular chisel with a diameter of 7–8 mm. Focusing on the edge of the circle, place it at an angle of 70–85 ° to the plane of the workpiece, directing the chisel blade from the center of the flower circle (Fig. 70).

Rice. 70. Notching the edges of a flower petal
Then sequentially cut through the edges of each petal to a depth of 3-4 mm. This will take time, as there should be no overlaps and gaps in the corners. After that, you can start cutting out the flower petals. For a more accurate implementation of this stage of work, mark them with a pencil. To make a dihedral recess between the petals, take a joint knife with a bevel angle of 35–45 °. This operation is performed with two cuts directed towards each other at an angle of 45–60° to the plane of the workpiece (Fig. 71).

Rice. 71. Dihedral recess between flower petals
You should keep in mind that the dihedral recesses that separate the petals must clearly merge with the rounded edges of the flower at the points of contact of the chisels. Form each petal completely, and finish the surface with 2 passes with a steep semicircular chisel with a diameter of 5-6 mm. For this operation, put a chisel to the outer edge of the petal at an angle of 20–30 ° to the plane of the wood and, grabbing the tree at half the width of the petal, lead it to the core of the flower (Fig. 72).
If all the work is done correctly, the flower should turn out with a pronounced vein in the middle. Its core was rounded with a semi-flat chisel 12–18 mm wide, while holding it with the convex side up (Fig. 73).
Masters often use a flower in their works and combine it with other interesting elements. The result is beautiful ornaments with twigs, leaves, berries, etc.

Rice. 72. Flower Petal Shaping

Rice. 73. Rounding the core of a flower
DIY wood sculpture
Wooden sculpture is a very broad concept that includes decorative sculptures and compositions, arts and crafts, miniatures, small genre sculptures, various decorations and forest finds. Decorative sculpture and compositions also include figurines of birds, animals, people and various fairy-tale characters, which are made of dead wood (Fig. 74). It is not often possible to achieve that the resulting composition looks good from all sides. Here, first of all, it is important how to put it so that the image most clearly appears before the audience. Such figures can either hang on the wall or stand on any surface.

Rice. 74. Wooden figurines
In order to make an interesting work, it is often possible to use not only carefully prepared pieces of wood. An ordinary tree knot can also evoke the image of a wondrous bird, an outlandish animal or some kind of magical creature (Fig. 75). For forest sculpture, you can use various finds (in the forest or in the park): dry rhizomes, old stumps, outgrowths on tree trunks, or intricately curved branches. Your imagination will also play a big role here, which will help you find among the many wooden material exactly the one that, after processing, will turn out original figurine. In this case, not only the shape of the blank will come to your aid, but also the features of its natural pattern, as well as the original texture and pronounced natural color of the wood.

Rice. 75. Forest sculpture
When working with a workpiece, use the same skills as when carving wood, but with only one difference. The master should not change the inner essence of the sculpture, but only help the wood to express itself, display the hidden image, make it more expressive. Here, it is not the ability to hold a tool in the hands that comes to the fore, but patience. It's important to carefully peel off a small layer of wood and see what he can say, feel what he says, what he pushes. The author of forest sculpture is nature itself, and man only helps her, expresses, as it were, a ready-made image. It is important to remember that carving in the manufacture of forest sculpture is only a medium that is used in a rather limited way.
Decorative and applied products include everything that can be used in everyday life, for example, various vases, cutting boards, candlesticks, trays, dishes, sconces, caskets, chests and much more. Unlike decorative sculpture, the manufacture of such things requires more skill and careful processing. Most often, various growths on the trunks and roots of trees are taken for this purpose. If you want to cut a casket or a vase from such a growth, it is much easier and more convenient when working to make a hole on top of the workpiece, from the convex side. With this approach, it is possible to better distinguish the features of the structure of wood, its texture pattern and future ornament. When making a vase, box, planter or tray, make the walls and bottom of the craft thick enough, then you can not think about the thickness of the walls when making external threads.
Miniatures and small figures include all decorative forest sculptures of small sizes. Often their height does not exceed 3-5 cm, and they are made from small elastic branches, birch bark, pieces of tree bark, various cones, acorns and hazelnuts. As a rule, this is not just a sculpture, but a developed genre scene aimed at revealing the character of the figurine.
Wood cuts and cuts, most often fruit trees, have an original pattern. Such drawings are quite well suited for the manufacture of various jewelry - pendants, bracelets, necklaces, hairpins, earrings and pendants. Forest finds include all crafts made from branches of old trees, pia and roots. To reveal the image, you will need a little effort in processing, a lot of imagination and bright creative thinking.
In order to make an original figure out of the blank, you will need a little money. First of all, these are the blanks themselves, which must be well dried. At the first stage, wash the wood brought from the forest well under a stream of warm water to remove adhering clods of earth and exfoliated pieces of the workpiece. After that, inspect the wood. It should not have traces of various woody insects, rotting or mold that has begun. Immediately after the washing procedure, it is undesirable to separate the entire bark from the workpiece, since it can still become an interesting element in the sculpture.
It is best to dry the wood at room temperature in a plastic bag, so you can avoid unnecessary cracks and changes in shape. Find a suitable place (preferably some kind of lockable drawer or bedside table) to store the workpiece and the waste that is obtained during the processing of wood.
Do not rush to throw away various chips, fragments and even sawdust, which can then be used to decorate the composition and refine some elements of the product. Sawdust and thin shavings are good for sealing seams and unwanted holes and cracks. This putty is very easy to do: mix sawdust with varnish until a viscous mass is formed, which should not be too thick. However, very liquid putty is also inconvenient to use.
Finding material for a future product is quite difficult. Often it is not immediately possible to catch the hints of nature, to see the dynamics of movement, the contours and the very image of the future sculpture. In order to find the right wood, you should not go far into the wilderness. You can just walk along the edge of the forest or park, where the trees take on ornate forms. A lot of outlandish tree roots and branches can be found along the banks of rivers and lakes. Long stay in aquatic environment, the wood acquires an unusual beautiful shade and a polished surface. Such a tree does not need high processing costs, you only need to give the workpiece the desired shape.
In peat bogs, unusually curled and polished amber-brown pine roots are quite common, from which anything can be carved: from small miniatures to significant floor compositions. Very interesting material can also be found in the city during the tree pruning season.
As with any woodworking, you will need a regular hacksaw to help separate the desired piece from a large piece of wood. If you want to make an ornament out of wood, then you will need not an ordinary hacksaw, but a hacksaw for metal. It will help to avoid long processing of a cut of a tree, which with its help turns out to be quite smooth, without notches and bumps. Knives are essential tools when working with wood. You will need an ordinary joint knife and a curved knife, the end of which is slightly bent, and the blade is sharpened on 2 sides of the bend. Among the chisels, semicircular chisels and cranberry chisels are the most important for work. Just in case, you also need to have a hand drill, a gimlet, a scraper and a wooden hammer on hand.
There are no special recommendations when working with sculpture. Everything will depend entirely on you. But still there are a few points, without which the manufacture of figures will be impossible. Firstly, it concerns the carving of bent arms and legs from wood. You need to do this in the following way. First, select a branch of the desired diameter and a suitable texture, cut it obliquely at the desired angle and glue it to the workpiece using PVA glue. If an arm or leg should bend in 2-3 places, you will need to make several fragments from this branch and glue them together.
Quite often, the cut is not of very high quality, and then seams appear when the parts are glued together. They can be repaired with a mixture of sifted sawdust from the same material and PVA glue, which, if desired, can be replaced with wood varnish. To make the details better hold, and the seams between them are invisible, you can also make a patch. To do this, finely chop the shavings from the same wood, soak it with PVA and put it on the fold. Try to make the cut completely coincide with the drawing of the details. To fix the patch, fix it with an ordinary medical bandage for 3-4 hours, and after drying, treat with fine sandpaper and varnish.
In the manufacture of sculptures and other wood crafts, chemical compounds are used, you should also be aware of them. First of all, you need to name the adhesives. Typically, craftsmen use epoxy-based glue (EDP) and PVA glue, which holds wood pieces together well. In addition, when processing wood, solutions of chemicals are used: potassium permanganate or potassium chromate, copper or iron vitriol, sodium sulfide, borax and chromium oxides.
Varnishes are used when finishing almost finished crafts. When coated with nitro varnish, you can save time, and after application oil varnish a more beautiful and smooth surface is obtained.
If you do not want to give your figure a glossy shine, after applying the last coat of varnish, sand the dried varnish coating with zero sandpaper. The same result is obtained when using a mixture of sand and turpentine, taken in a ratio of 1: 3 or 1: 4. Apply a warm mixture with a cotton swab and rub with a soft velveteen cloth until a slight sheen appears. But this coating does not protect the wood from environmental influences, so it can darken and deteriorate.
In order for the decorative sculpture to be stored for a long time and please you, put it on a slight elevation away from heating appliances and sunlight. So that you do not have to dust it too often, place it in the closet behind the glass door. This way you can avoid dust buildup and various breakdowns caused by the arrival of friends who always strive to touch and hold everything in their hands.
If you adhere to proper nutrition, then avocados are probably in ...


Pizza can be cooked not only with meat products - sausage, sausages and ...