Hmm, yoda_daro claims that this is a test to determine their sexuality...


Drywall attracts with minimal price indicators, ease of installation and good thermal insulation properties. This variation of the material is easy to process. At the same time, the availability of special tools for solving such an issue is not a vital necessity. Drywall is positioned as sheet material, which can be attached to a wooden or metal base.
By using this variation finishing material you can create different decorative elements. The scope of drywall is limited solely by the imagination of the author.
It can be used to resolve design issues of any complexity.
The use of drywall allows you to create such decorative interior elements:

In addition, with the help of drywall, you can resolve the issue regarding. preset The frame allows you to hide all the irregularities, and also contributes to the most convenient placement of electrical wiring, pipes and other communication elements.

Drywall is quite often used for the purpose of redevelopment work. Through its use, you can easily resolve the issue of space zoning. Considering that the elements load-bearing structures will not be affected, it is not necessary to obtain an appropriate permit for this type of work.

Thanks to the wide technological possibilities, the configuration can be changed depending on the individual preferences of the homeowner. The ceiling surface can take any shape, which allows designers to untie their hands.

Implemented ones can integrate additional lighting elements. This determines the maximum functionality of the material.

The device of the so-called hidden cornice deserves special attention. The essence of this architectural technique is to install false ceiling with a niche in which . This variation of the design can bring a significant variety to the interior design of the room.
In order to proceed with the direct installation of drywall shelves, you first need to decide on their further functional purpose. Provided that this element of the interior is regularly subjected to significant loads, then the level of its strength should be appropriate. In this context, it may be necessary to additionally strengthen the shelf around the entire perimeter.

as a skeleton for this product there is a metal or wooden variation of the profile. Subsequently, it is sheathed with sheets of drywall. In some cases, it may be necessary to additionally strengthen the corners with special metal elements. This will positively affect the increase in the strength of the entire structure.

If drywall shelves perform an exclusively decorative function, then the need for additional reinforcement may disappear. In this case, it is quite possible to get by with a standard profile.

Plasterboard shelf can be an original highlight of the interior. Possibility additional installation spotlights or the implementation of lighting around the entire perimeter contributes to the creation of a romantic atmosphere. At the same time, the laboriousness of the installation process will be minimal, and the effect obtained will be able to exceed all expectations.

Important! A drywall shelf can even be installed in the bathroom. Only in this case it is necessary to resort to the use of a moisture-resistant variety of material.
As the main fastener to connect the entire structure to the wall, it is best to use a dowel-nail.

During the installation work It is not recommended to save on mounting tape. All joints and corners must be sealed. This will prevent cracking of the material in the future. Self-tapping screws, through the use of which various structural elements will be connected, should not stick out of the surface.
To carry out installation work on installing a drywall shelf, you will not need special tools. This greatly facilitates the solution of this issue. To calculate the required amount of material, it may be necessary to use measuring instruments and pencil.

We cut a sheet of drywall on one side
Drywall cutting is carried out using a conventional construction knife. Metal shears are needed in order to cut a piece of profile of the optimal length.

We bend the sheet at the incision
At the final stage of the work, you can resort to painting the surface or wallpapering it. Thanks to this, the drywall shelf will receive an attractive appearance.
| Stage | Peculiarities | Necessary materials and tools |
| 1. Create a project | Plan preparation further action taking into account the desired dimensions of the shelf and the total area of \u200b\u200bthe room. |
|
| 2. Carrying out markup | Marking lines for the purpose of subsequent installation and installation of the shelf. |
|
| 3. Mounting the frame | Installation of the skeleton of the future design. |
|
| 4. Frame sheathing | Shaping the shelf. |
|
| 5. Joint processing | Removing all inaccuracies and creating the most even surface. |
|
| 6. Surface finish | Creating an attractive appearance of the finished structure. Works are carried out taking into account the general design drawing of the room. |
|
Provided that the design will have a curvilinear design, it may be necessary to use a special arched profile. guide rails and vertical racks fastened together with screws and dowels.
You can mount a drywall shelf on a finished wall, or you can solve this issue even at the stage of its construction. In the latter case, the frame is installed so that a niche is formed. Subsequently finished construction sheathed with drywall and the shelf is almost ready for further use.

Frame reinforcement wooden block for fixing shelves
When installing a shelf on a finished wall, you should first make a base. For this, a metal or wooden profile is used. The first option looks more preferable, since the complexity of the procedure is greatly facilitated.


When drawing up a project, it is imperative to take into account the expected load that will be placed on the shelf. It is also necessary to note the thickness and overall size of this element. Please note that the length drywall sheet can vary from 2 to 4.5 m, while the width of such material is 1.2-1.3 m. The thickness of the sheets in most cases is equivalent to 6-24 mm.
Drywall has wide application. They finish walls and ceilings, hide flaws, and various decorative structures are erected from it. For example, they mount shelves, beating corners, window and door openings.
Consider the features and types of shelf designs.


Drywall is a very plastic material. This is a sheet with a base in the form of plastic gypsum, which is glued on both sides with building cardboard. It differs in thickness, it can be wall, ceiling, arched. For shelves, they try to use a material that is more reliable in thickness., although arched is often used (if figured forms are needed). When heated, the GKL is able to bend.
It is easy to cut and mount, which allows you to build various designer designs. This is especially true if the room does not have the usual rectangular shape.
Prominent load-bearing columns, ventilation and heating pipes, walls with a step spoil the appearance and cause difficulties with the arrangement of furniture. All this can be hidden under drywall. And to effective area not lost, mount niches or shelves.


Advantages of shelves from GKL:


There are also disadvantages. Plasterboard shelves can not withstand heavy loads. In this case, two slabs are laid at once or wooden inserts with additional reinforcement are used. Be sure to erect a frame from a metal profile or wooden slats with their fastening to the wall. Drywall does not have sound insulation.
Presence of shelves around window openings and along the walls will not reduce the noise level. GKL designs allow you to save on furniture (racks, open shelves made of other materials, cabinets and TV tables). But there is also a downside to this. To move the structure, dismantling and subsequent repair work will be required.


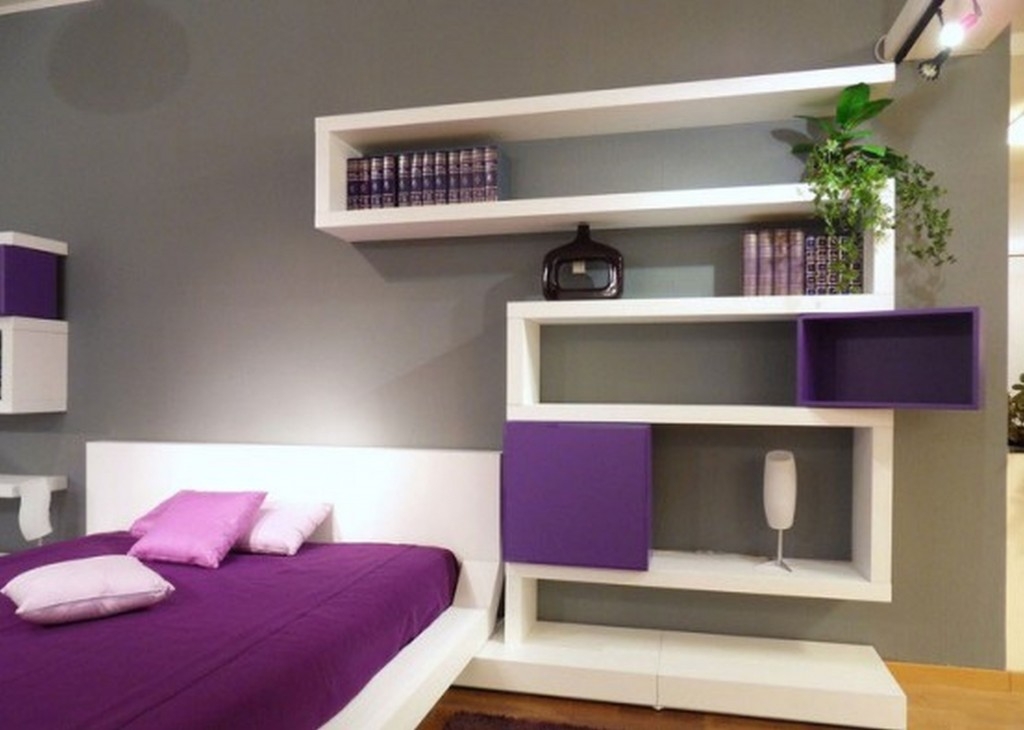
All drywall shelves can be divided into two main groups: decorative and functional. The first are often open, have a lightweight frame. They have various decorative elements of the interior (vases, souvenirs, photographs).
Functional shelves are more durable, have sufficient capacity. They are designed for heavy loads, can be closed or open. Often they are erected for a specific purpose, for example, as a cabinet or niche for a TV.

Shelves can be subdivided according to their location. Center located in the center of the room. Either the design is bright accent interior, made of an ensemble of various shelves and niches. Products are wall, corner and built-in. The latter are the most convenient.. Their placement is especially appropriate in pantries, closets, bathroom niches.
Corner shelves are more durable than straight ones. If the wall is very curved, has outstanding structural elements, you can make a false wall of drywall. So that the usable area does not disappear, you can equip niches with shelves. They can also be decorative or functional.
Looks great with backlight. The configuration of the shelves can be linear or figured, obeying the general style of the interior of a particular room.


Drywall allows you to build structures various forms. The shelves themselves can be of any shape (even asymmetrical and tilted). Everything is limited by the space of the room and the imagination of the designer. GKL is often used to create built-in cabinets and walls. This allows you to build a structure that will replace the furniture wall.
Such furniture has its advantages:

On the other hand, drywall shelves cannot be moved or sold like furniture. Unlike cabinets, designs for TV using shelves made of plasterboard are more functional. You can mount additional wall or spotlights, LED bulbs and ribbons.
The backlight looks beautiful, it is functional:


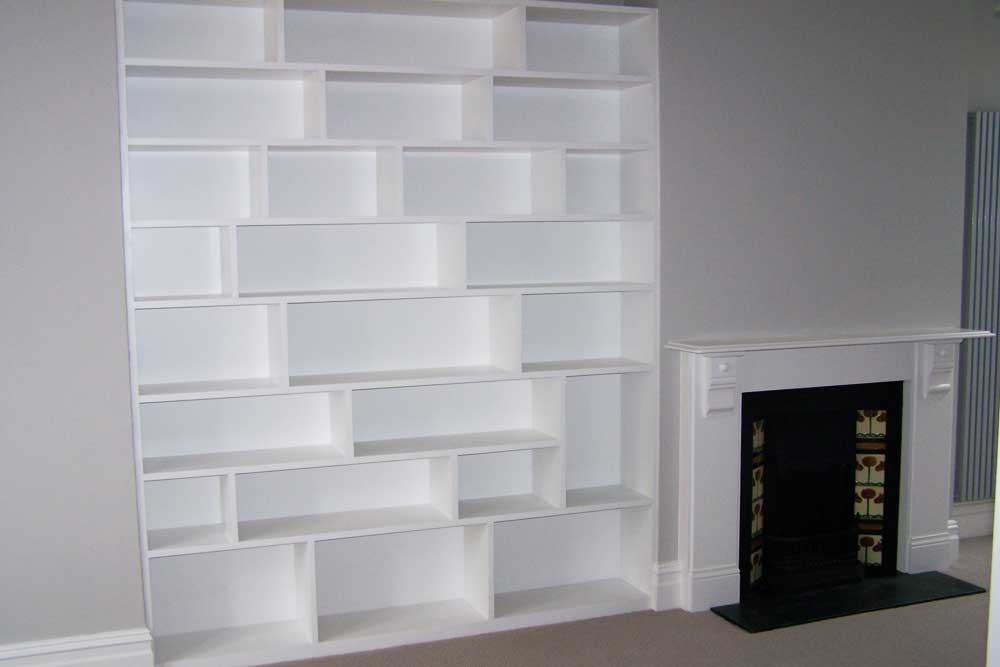
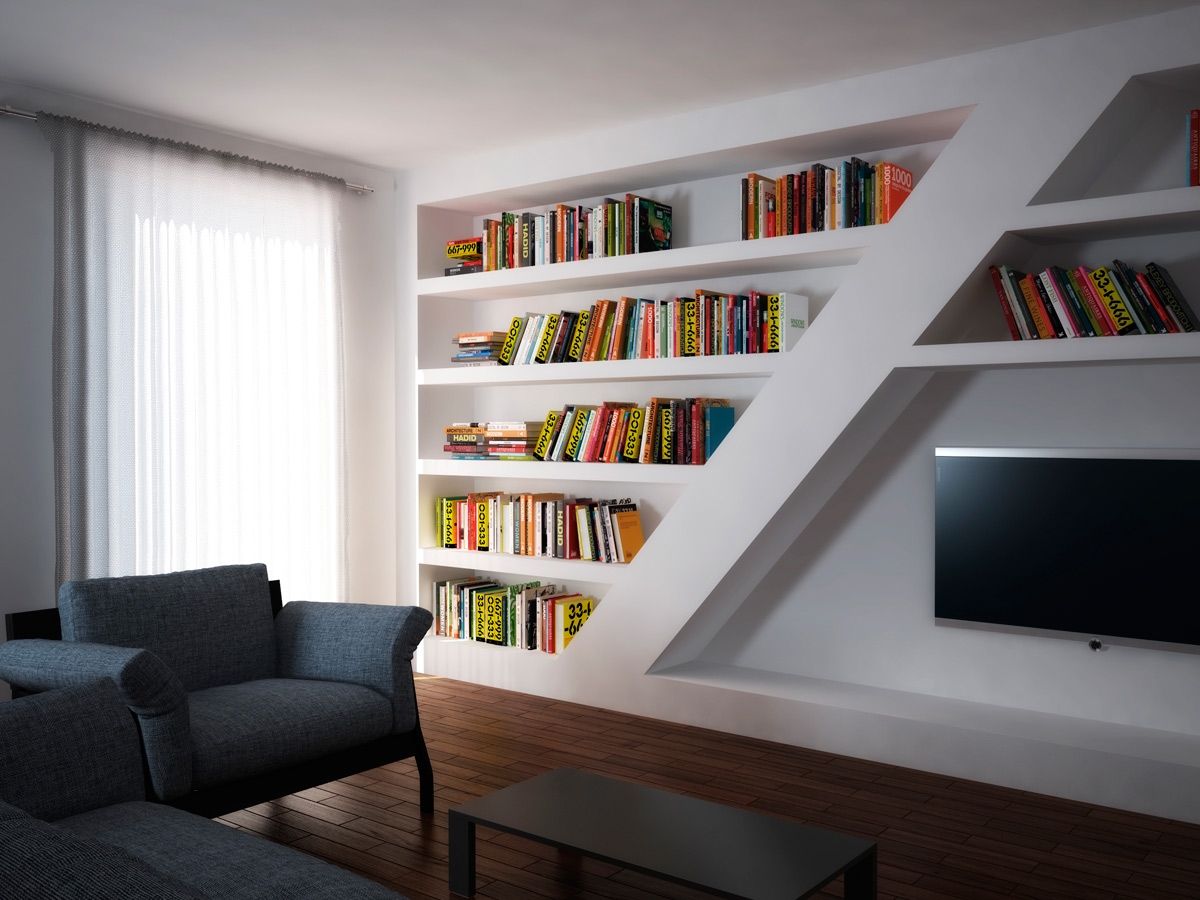
It is not always possible to find a suitable corner rack. Drywall shelves solve this problem perfectly. In this case, you can adjust their size and shape. Open shelves do not reduce the space of the room, organically fitting into the interior. Plasterboard shelves for books require special attention. Printed products weigh a lot, bookshelves must take into account the increased load. Since plasterboard is not as durable as wood, the shelves themselves do not have to be large. They have a maximum of 10 books.
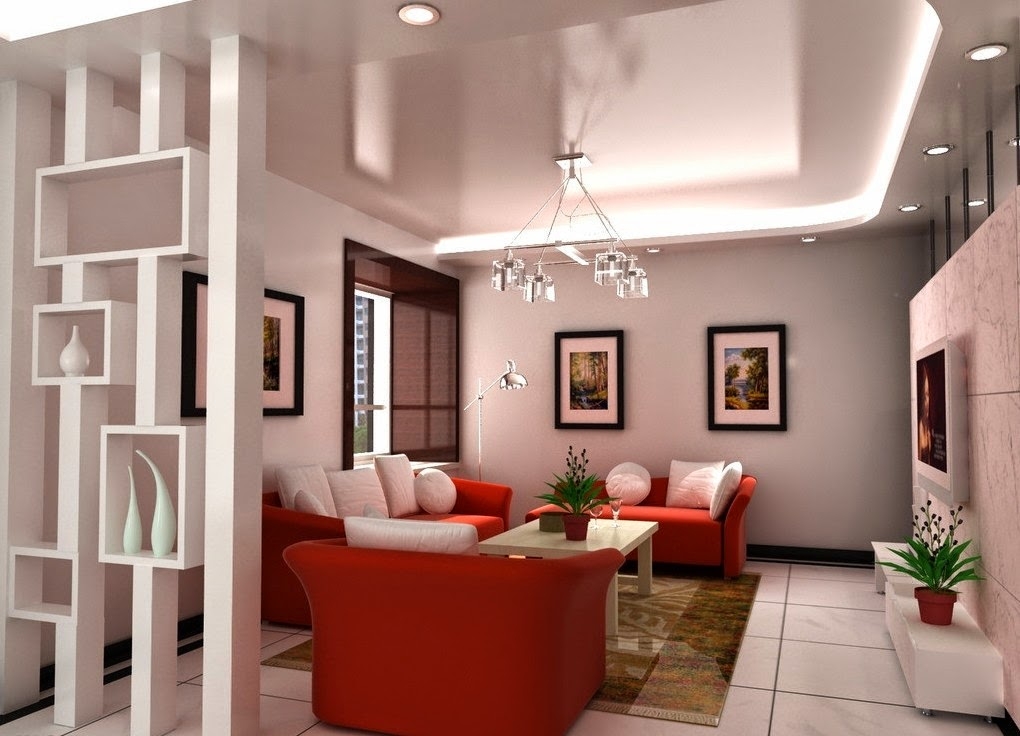
If the premises of the house are multifunctional, for example, it is an open plan or a combination of rooms (bedroom and living room, kitchen and dining room), from drywall, you can build zoning partitions with through shelves. This will allow you to delimit the space. Shelves can be used for storage or decorate decorative vases. This option is also relevant for studio apartments.


You can make shelves from plasterboard around window and doorways. Near the window, you can organize a podium with a niche for storage. When installing, you need to take into account the weight of the person, do not forget about the batteries located. If you do not put ventilated grilles, the room will be poorly heated during the cold period. Shelves can be located from the opening to the wall or in the form of narrow pencil cases to the ceiling. Above the doors, you can organize a mezzanine on which to place voluminous, but light objects.
Shelves do not have to be wide. They can accommodate a lot useful little things. If there is a desktop near the window, gypsum board shelves will replace the rack and cabinet. With them you can organize a comfortable workplace.
Communications can be hidden in drywall box. If these are heating tubes, it is necessary to install ventilation grilles. On the outside, you can place several small decorative shelves.
If this drain pipe in the sanitary room you can make an interesting cabinet-pencil case. This is how it will look on the outside. Inside, it should be spacious enough: you can hide mops and brushes near the pipe, mount several narrow shelves for household chemicals.
A similar technique can be applied to the bathroom, making a box with shelves and niches.

Plasterboard shelves can be mounted in any room. However, its humidity must be taken into account.
GKL does not like water and condensate, so for rooms with high humidity(bathroom or kitchen) it is better to use moisture resistant material.


The construction of any structure begins with the creation of a sketch, which is a view of the shelf after installation. It is important to think over the appearance of the shelves, functionality, calculate the size and weight load. The size and type of drywall affect the development of the appearance of the future structure. For example, for curvilinear execution, a flexible arched plasterboard is used.
If a large load is planned on the shelves, then 2 sheets of material will have to be laid. Perhaps additional reinforcing elements are required. If the thickness of the GLC is more than 12 mm, a reinforced frame will be required because the sheets weigh a lot.
If the shelves are purely decorative, you can take material with a thickness of 6.5 and 9.5 mm. The standard width of drywall is 1.2 m, the length can vary up to 3-4 m.


If the shelves are planned to be long (more than 1 m), vertical jumpers are recommended. Longer shelves may not support the load. If they are exclusively decorative and narrow, you can do without jumpers. The front and side parts of the structure can be finished with arched drywall. It's cheaper. It will not affect the strength of the structure, but it will save. It is interesting to look at the concave shelves, which are erected from the arched plasterboard.
For work you will need:

Materials:

For finishing you need:
Installation begins with the construction of a frame from metal profile, which is attached to the wall with dowel-nails.
If the design is simple, you can use wooden slats. Where the load is planned, the frame is reinforced.
The next step is laying the backlight, if it is planned. All wires are hidden in a plastic corrugated box. After that, drywall is attached to self-tapping screws or liquid nails. The design is ready, you can proceed to the finish.


Finishing work is quite simple, they can be done by hand. The difficulty lies in finishing the end edges. The material may crack in the future, begin to crumble. To avoid this, the joints and ends of the sheets are finished with aluminum and plastic corners . Semicircular models can be trimmed with mounting tape. It is better not to save on it, you need to repair everything carefully.
Joints can be reinforced with reinforcing mesh. It is glued in fragments from above. The caps of the self-tapping screws should not stick out, they are sealed with starting putty. After processing the joints and ends, a finishing putty is applied to the entire structure.
It will take at least a day for it to dry completely. After the material must be sanded, for example, using a fine sandpaper.


Drywall can be decorated with almost any decorative material. It can be wallpaper, plaster, different kinds colors. The structure can be finished with the same material as the walls. Then the shelves will look like part of the wall. You can highlight them with material and color to make a bright accent in the interior, visually divide or adjust the space.
If you plan to paint the structure with colored paint, it is recommended to make the niche lighter. She will be shaded anyway. To do this, you can dilute some of the paint from white of the same brand. Alternatively, you can decorate individual shelves or structural elements. For decoration it is worth using stone, mirrors, colored glass or plastic, stained glass imitation and much more.
Do not use heavy decorative items.


To the choice of material decorative finishes can be approached from a practical point of view. A lot depends on the frequency of cleaning. If the shelves are pasted over with wallpaper, they can quickly become unusable.. In this case, the outer vertical surfaces can be pasted over with wallpaper to match the walls, and the horizontal shelves can be painted.
If the shelves are exclusively decorative, they will have infrequent cleaning with a vacuum cleaner or a special brush, they can be completely pasted over.
If you want to make shelves in the kitchen or in the bathroom, you should choose materials for decorative finishes that are more practical, resistant to moisture and dirt.
For example, you can paint them with paint. Colors can be chosen practical.

How to make drywall shelves in the bathroom, see the following video.
Finally, we can turn to examples showing the harmonious combination of plasterboard shelves with the general concept of interior style.


We read many articles on sites dedicated to the subject of drywall. We were quite surprised by the fact that most of the articles are written simply about decorative elements that do not carry any useful function or it is very small. Therefore, the site decided that it was necessary to talk about the creation of a beautiful, reliable product of their drywall, which will have a practical purpose, and not just stand idle, as it “winds a romantic atmosphere that radiates throughout the apartment from this beautiful arch.” We will tell you how to make drywall shelves on which you can neatly place the necessary things without spoiling the appearance of the interior.
What is this article about
The main advantage of such shelves is that you choose their shape and size yourself, which means that there will be no more problems such as lack of shelf size or its dimensions that do not fit your room. You yourself will come up with the design, size and shape of the shelf, so we advise you to choose these features for the room, and only then start assembling the shelf. And do not do it in such a way that you imagine something, and then “it will go by itself”. If you know how to use 3D studios, it will be very good if you model the shelf there, because in this case it is much easier to choose a design and shape, since it is easier to understand the appearance of the drywall shelf in the program.
If you want, then you can build lamps or lights into the shelf, which will be especially useful at night if you need to take something from it. Also, the shelf can be combined with other drywall products, for example, the shelf can be built into the wall, both products can be made of drywall, so there will be no difficulty in creating. Many immediately imagine a standard rectangular shelf that used to be in my grandmother's apartment. But people who have a more creative imagination can imagine such intricate forms that their implementation will become a rather big problem.
The first thing to start in order to make drywall shelves with your own hands is to draw them. You can just make a sketch to only indicate the shape, or you can approach it more responsibly by creating a detailed drawing, with several design options, a chosen color, perhaps even a texture that you have to create on sheets of drywall. Of course, most people don't draw at all or do it very poorly, but understand that this step is not mandatory, it is just indicated for those who want to approach the creation of such a structure from a creative side. If you do not want to spend time drawing, then you can immediately proceed to the next step.
It is necessary to create a drawing, since not a single repair project can do without it. In the drawing, you need to indicate the dimensions of the structure, the amount of drywall and the length of the profile that will be needed to create it. If you have a good idea of what you will produce, then this should not be a problem. To better calculate the dimensions, measure the space (wall) that is given over to create a shelf with your own hands from drywall, and then subtract the dimensions of the future product from it. This way you can find out the fraction of the wall size that the shelf will occupy and, if necessary, reduce its size while it is still easy to do.
Since we are considering an example of creating a standard shelf, then it will be mounted on a regular wall. That is, the base will be concrete. If you want to know how to combine shelves with other drywall products, then read more articles on our website. This is necessary so that you understand that the shelf is the same drywall product as,. And accordingly, you just need to attach it to these products, as additional element the main structure, but be aware that the frame, such as walls, may not support the shelf.
So, let's start marking. You need to apply the contours of the structure to the surface to which the shelf will be attached, it will not be possible to go beyond them during work, so you have greatly simplified your task by separating working space from the rest. In the event that it is planned to store heavy things on the shelf, then its design will be larger, and the shelves are much wider than those of a standard shelf, this must be taken into account when marking.
To create a plasterboard shelf in the bedroom, living room, hallway, in general, in any room where normal humidity, ordinary drywall and several types of profiles are used.
The shelf can be both in the form of separate racks, and in the form of a solid wall, in which places are cut out for placing various things. If you make a shelf in the form of the second option, then in this case its maximum load will be greater, since the frame for such a design is larger. If you make ordinary thin shelves, then a large frame will not fit into them, so they will withstand much less than wide shelves. 
The creation of the frame begins with the placement of guides, which are attached to the wall with a puncher. By the way, if you are not yet familiar with those devices that are used when working with drywall, then you definitely need to read the article about. When the guides are installed, then you need to attach a profile to them, which will set the volume of the shelf, that is, if it is smooth, then from one end of the guide to the other you need to stretch a profile with a bend, which smoothly passes to the guide. If the shelf is standard, with corners, then the profile is attached to the guide using slightly smaller pieces of the profile.

You should understand that there is no specific instruction for creating a frame for a drywall shelf with your own hands. If you ordered the manufacture of a shelf from a specialist, then he would simply strengthen the frame, depending on the shape of the shelf that you ordered him. You should do the same. That is, you find weak spots in the shape of your shelf, after which, depending on the purpose and expected load on the shelf, you create a frame for it. When making shelves from drywall, you also need to take into account that drywall sheets themselves can break under heavy weight, therefore, the more profile rails under it, the stronger the entire structure will be.
Another tip that will make such a product as a drywall shelf more durable is a step between the screws that attach the profile to the wall and to each other. The smaller it is, the more reliable the mount will be, but it also happens that the mount withstands, but the profile itself does not, so you do not need to take a step between the screws less than 7–9 centimeters.

The penultimate point in our article on how to make a drywall shelf will be the sheathing of the frame with drywall
Now, the frame that you have assembled needs to be sheathed with drywall sheets. There is nothing complicated in this, however, we recall that you are making shelves from drywall, therefore, the less you divide the sheets, respectively, the fewer seams, the stronger the whole structure will be. If somewhere you can put a whole sheet of drywall, then start the sheathing from this place. If there are no such places, then consider how you can sheathe the frame with plasterboard sheets as efficiently and rationally as possible.

In the event that the shelf has a bend, then the drywall will also have to be bent. In this case, when making shelves from drywall, it is better to use the dry bending method, since the size of the shelves is rarely really large, so the wet method will not work. Recall the technology of dry bending.
Take a piece of drywall, which will sheathe the place where there is a bend. Draw marking lines on it (step 5-7 centimeters). Then cut this piece along the lines, but so that the second side of the cardboard remains intact. If you did everything right, then bending the sheet processed by this method will be very easy. Most importantly, do not forget to secure each edge of this part, otherwise it may begin to bulge, and in the future this may result in peeling off the entire layer of cardboard, since moisture can get into this gap.
Now you know how to make shelves out of drywall. If you want to know about other drywall products, you can find articles that describe in detail their manufacture on our website. Do not forget that high-quality work, just like low-quality work, will make itself felt. But if a poorly made shelf can simply fall, then a well-made, well-fastened design will hold for many years. And every time you approach it, you will surely begin to remember how you collected it, and how well you did it.
The direct purpose of drywall is the lining of ceilings and walls. This material is so malleable in work that it is also used for organizing inner space. It is perfect for the construction of partitions, a variety of designs that can successfully replace massive furniture. Today we will try to describe in as much detail as possible how to make drywall shelves with our own hands strong, neat and beautiful, and with their help get a completely exclusive design premises.
Before you start calculating and installing the shelf, you need to focus on several important points.

You can make durable shelves that will delight you for many years only if you take into account these small subtleties.
On the initial stage it is necessary to think over the design of the shelves on the wall, imagine the final result in detail, and only after that proceed with the calculations. Start by drawing up a diagram of the future design. Don't be afraid to let your imagination run wild with arched drywall you can create the most incredible designs and curves, so the shelf can be of any shape. Only after drawing up a detailed project with application exact dimensions you can start doing calculations. For work, you may need the following tools and materials:
After drawing up a sketch and buying everything you need, you can start assembling the frame for plasterboard shelves, which can be mounted in two ways: external (on an already finished wall) or internal (during the assembly of the partition). Here, too, you need to follow some rules. 
Installation of built-in lamps
By making a drywall shelf with your own hands, you can create a unique project. For example, supplement it with backlight. This will give the design an attractive, stylish look and will become an additional source of light in the room.
All you need to mount the lamp is a drill and a special round hole saw.

The wiring must be done in advance, even before sheathing, hiding the wires in a protective corrugation. Instead of spotlights, you can use led strip, which, due to its flexibility, is perfect for curved shelves.
Installation of drywall is much easier than the volumetric work already done on the construction of the shelf frame. Before sheathing, you need to cut the sheets into parts. All dimensions are transferred to the material, an incision is made on one side of it, the sheet is bent, and only after that the second layer of cardboard is cut.

All irregularities at the ends must be processed with sandpaper. After that, you can proceed with the installation of sheets using expansion dowels. The end part can be closed with a single sheet, having previously cut “windows” in it or use separate small parts. The second method is easier, but care must be taken not to form too many joints.
If you want the shelves on the wall, made by yourself, to be perfectly even and neat, then take Special attention joint processing. They need to be sanded, apply a layer of gypsum putty, paste over with a reinforcing mesh and repeat the putty treatment. For strengthening and greater aesthetics of the structure, the corners can be closed with putty corners made of aluminum or plastic.
The final touch - finishing putty. It is made in several layers and rubbed with sandpaper. Before painting or other finishing work, finished shelves must be primed.
With the help of drywall, you can make a shelf for flowers or decor items, as well as for more massive things - books, household utensils, a TV. Depending on the style of the interior, the finished structure can be painted, wallpapered or any other finishing materials can be used.
The shelf can be of any design, but if you have not encountered such work before, then it is better to go “from simple to complex”. To better imagine what drywall shelves can be, we suggest looking at a few photos with examples.


In this article, we tried to explain in detail to you how to make a drywall shelf with your own hands. Shelves and partitions with decorative niches have recently become increasingly popular for two simple reasons - originality and low cost of construction. And all you need is basic drywall skills and a little imagination. Many designers consider shelves made of this material to be the most modern and good decision. What do you think?
The idea of creating drywall shelves arises approximately at the same time as the thought of using this building material for wall cladding. Indeed, why not create several shelves where you could store books, keys, paintings, figurines and other "small things". Although at right approach such shelves may well be used for more bulky things, such as a monitor, microwave or TV. In any case, a plasterboard wall with shelves will help solve the problem of storing many things or simply decorate the apartment.
When the frame is ready and securely attached to the wall, you can proceed to its sheathing. This is done very simply and does not cause such difficulties as in the case of creating a frame. To begin with, a sheet of drywall must be cut to the available dimensions. It is necessary to calculate everything in advance so that the minimum number of sheets for sheathing is taken. Drywall shelves will be perfectly even if the cutting is done carefully so that the edges do not crumble.
To prevent the self-tapping screws from falling into the plaster during fastening due to the large effort on the screwdriver, you can use a special bit. We are talking about a bit with a limiter, which rests against a sheet of drywall just so that the head of the self-tapping screw goes to the desired depth, flush.
For fixing the GKL to the profile, 3.5 mm self-tapping screws are used. In this case, the fastening step can be standard 15-20 cm. As for the length of the fastener, the moment is ambiguous. It is generally believed that the length of the self-tapping screw in this case should not exceed 25 mm. However, for those who work with GKL for the first time, it is better to take longer self-tapping screws (35 mm), although they are more expensive. The fact is that self-tapping screws can bend the profile and move the sheet of gypsum craton away from it. This often happens to inexperienced workers who have not yet gotten the hang of working with drywall. Because of this, the minimum length of the fastener may not be enough.
 By cutting the profile correctly, you can create a frame under the shelf from it alone
  Sheathe the frame from above, below, and then from the sides
  The finished shelf can easily withstand a lot of weight
 By the way, for the same beginners, it is better to screw the screws one after the other, and not in different places, in order to attach the sheet faster. If they are drilled sequentially, then there is less chance that the profile will be pressed through, because there is already a mount in the neighborhood that holds it.
How to finish a plasterboard shelf? For this, the most different materials, but most often use paint and wallpaper. Working with wallpaper is very hard and long. A lot of nerves will go away, and the result may not be achieved. Although if you cut and hide everything correctly, it will turn out very beautifully. Moreover, the wallpaper will also hide drywall cracks, if they occur. Usually wallpaper is used for painting.
 If you paint the shelves immediately, you will need water-based paint. If you take thick paint, you can create stains on the top of the shelf with a brush, creating original patterns. In any case, before painting the drywall shelves, they need to be prepared. To do this, all joints and caps of self-tapping screws are puttied. At the joints of the GKL, you need to create a right angle, because there are often problems with leveling the surface. It is putty that will help make the shelves completely even, and not just top and bottom.
To make the edges more durable, paint corners are used, which are attached with putty. You can grease the edges with putty, and then press the corner. He will stick like that. If the shelves are arched, then the paint corner will not be so easy to hold on, it will have to be fixed with a stapler, and then puttied. This technique will allow you to get absolutely even shelves, ready for a further finishing layer. Their edges will become strong, and will not crumble in the event of an accidental impact. After the putty has dried, it will need to be sanded with sandpaper. The surface will be completely smooth.
Check out some examples of drywall shelves that you can make yourself.


Instruction The frames of the film merge for us into continuous movement due to ...

Pranayama is a breathing practice in yoga. Pranayama literally translates as...