Short. The purpose of ND filters is to reduce the amount of light entering the...


Click! Correctly worked light switch kindly instantly carried out lighting in a private house. You still do not know how to install and connect it yourself? Connecting the switch is so easy!
Perhaps not to find such a house or apartment, where there would be no electric switch. Compact appearance and amazing daily performance inspires respect for the switch-worker. Therefore, it is not without reason that there is an increased interest and the traditional question: “What is inside there and how does it work?”. So, meet all the secrets of a household switch or how to install and connect the switch yourself.
Connecting the switch is easy. To do this, there is no need to contact a specialized workshop at all, do it yourself, having previously studied the connection diagrams and expert recommendations. For example, Stroy-Aqua's advice helped us. com, when arranging suburban area. The result of the "general" work turned out to be an excellent glass greenhouse, which brings good harvest vegetables even in spring and autumn.
The currently existing light switches, according to their design and type of installation, are divided into types:
Single
double
Closed type (switches built-in)
Open type (external switches).
The electronic content of the light switch, the types of which have already been presented, consists of concise systems of fixed and moving contacts, as well as a drive of a strictly defined type. internal system switch control is divided into:
spring
electromagnetic
Pneumatic
Sensory.
The installation of the switch is carried out in strictly standardized places, in accordance with special requirements of the PUE. For household switches in a private house, manual and automatic modes are considered common control methods.
The most common and widely used in electrification country houses such a scheme is considered.

Before installing the switch, it is necessary to determine its type: one-button and two-button. Then you need to carefully examine the junction box. Blondes, beware! The one-button “on-off switch” will have as many as six wires:
Two wires - the device itself,
Two wires - power,
Two for a chandelier, lamp or sconce (underline as appropriate).
In order for the home lamp to give the long-awaited light, it is necessary to bring three conductors to it. The phase is always connected through the switch and goes into a gap. This is necessary for further subsequent replacement of the light bulb when turned off.

Having chosen the type and control system of the circuit breaker, you can safely proceed to its connection
Connecting any switch is done in stages.
Removing the supply voltage
Checking the absence of voltage on the line
Mounting box preparation
Connecting the device to the working line
Fastening the mounting box in a niche
Installing the decorative cover
Restoring the power supply
Checking the functionality of the installed switch.
Having successfully turned off the power supply, prepare the mounting box: clean it from dust or debris.
Do-it-yourself installation of any type of switch begins with the installation of the switch box. It is preferable to use "euro" switch boxes, which are already kindly equipped with the necessary fasteners and a plug for the wire. These boxes have five openings for conductors: four on the side and one on the bottom of the box. This allows you to correct the place of entry of the electric wire.
After the installation work power supply is required.

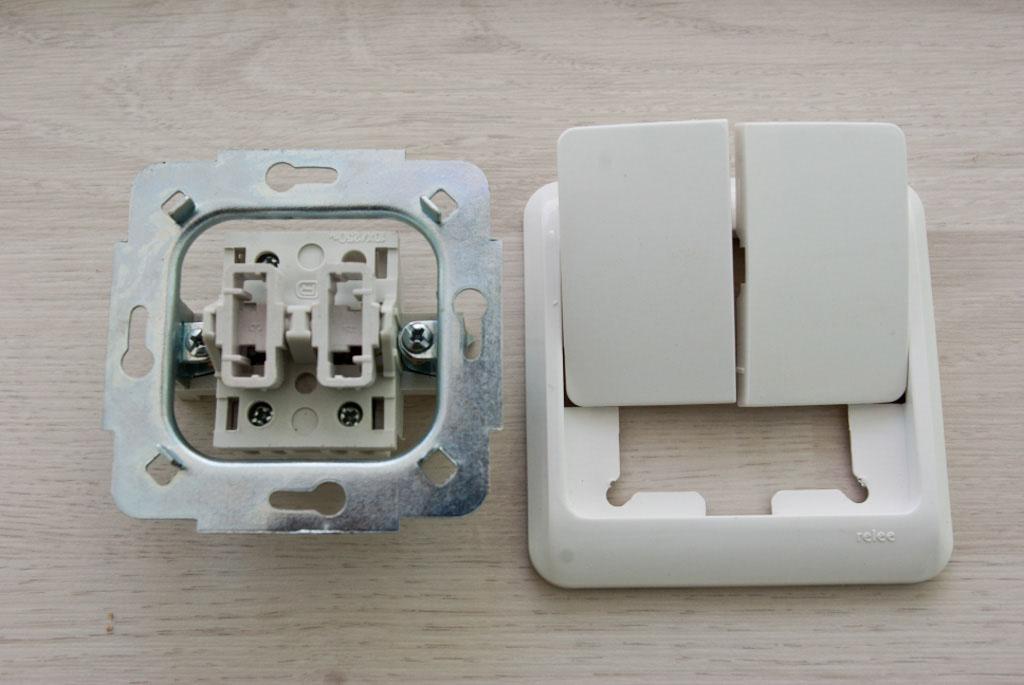
The double switch enjoys the greatest attention among the owners of country or private houses.
The convenience of a double switch is justified when it becomes necessary to control the lighting separately. For example, it can be one switch, where two control buttons produce lighting for the kitchen and a small corridor.

The connection scheme of a double switch is based on the connection of a phase conductor to the common output of the switch. In this case, the other two cores will be the phase interrupted by the contacts, returning to the junction box. The zero phase is common and goes to the lamp holders. How to correctly connect a double switch?
The video will help you learn the rules for connecting a double switch from professionals.
In terms of ease of use, pass-through switches are of particular interest. Pass-through switches are convenient for lighting long corridors or stairs. Moving along the corridor and having such installed system connection, you do not have to return to the beginning of your journey. It will be enough to use the second switch located at the other end of the stairs or corridor in order to turn off the lighting.
The connection diagram of the pass-through switches has a switching mode of "toggle character". This means that each switch has two switching positions: in one position, one is closed, in the other, respectively, the second switch.

The general closure of the three contacts in this case is excluded. The installation of the pass-through switch circuit is carried out from their installation in the intended places. Three-core cables are output from this place. Mounted luminaires connected in parallel will create a two-core cable at the output. This cable is inserted into junction box. The cable connection scheme does not require additional components and elements, and the number of switches in this case unlimited.
It is very simple and accessible to connect a pass-through switch shown in the proposed video.
The euro standard for connecting switches that exists today completely eliminates any errors and the slightest blunders during installation. Of course, the owners of private houses will adopt such a practice. And then you will be happy!
This article is about how to install a light switch. Generally speaking, light switches are used to control electrical lighting in residential and commercial buildings. In most of these cases, the light switches are mounted on the wall at a specific location in the room, the height at which they are mounted, or the shape of the switches is different depending on the desire.
Light switch - has many types: single and multiple, internal and external. The installation of the light switch should be carried out by a person with experience in working with electricity.
To install the switch, you must do the following ...
The first thing you need to do is to turn off the breaker. Some people believe that it is safe to turn off only the meter on which you install the switch, but we strongly recommend that you keep the main power switch turned off.
Turn off the machine
Then, use a voltage tester on each wire to make sure there is no electricity and everything is safe. We emphasize that it is better to check it several times before touching electrical wires.

Switch connection wiring
The next step of the project is to remove paint, residue or dirt from the box using pliers. Make sure that the area under the switch is free of debris and excess materials. This operation is important, especially if you are dealing with a newly built house or a repainted room.
However, even if you are replacing an old switch, you need to make sure that the new electric light switch will be installed and aligned properly.
After you have bought a light switch, you must open it using a screwdriver. This operation is important because you will connect electric wires with the inside of the switch.
The next step of the project, after we opened the light switch, we need to start connecting the switch. Use pliers to cut off excess wires about 15 cm from the wall.

This length should be enough to connect the switch, and it is more convenient to work. Remember that you should not leave long wires, in the future they may not get into the switch box.
After we've made sure the wires are cut to the proper length, we move on to the next step. Use pliers to remove approximately 2.5 cm of wire insulation. Remember, in order to avoid further touching the bare wire, do not chamfer more than the specified length.

Use pliers to bend the end of the wires into an L-shape (depending on attachment to the switch terminals).
Do not forget about the correct connection of wires. It is customary to use the following wire colors:

And general rule: the lightest wire is the phase (white, white-brown, brown).
Use a screwdriver to firmly tighten the screws holding the wires in the switch.

After you have finished connecting the light switch , it is better to check again if all the wires are in place and firmly fixed. At this stage, you should have the following picture:

After you connect all the wires to the switch and check their reliability, carefully insert the wires into the switch box. Insert the switch there and if everything falls into place, fix it with screws.

To align the light switch, you can use laser level, but you can use a stationary level. This will only make the process a little more difficult, especially for beginners. Once you have leveled the switch, finally tighten the screws.

The next step after installing the light switch in the box is to install the switch buttons. It is enough to attach the button and press a little so that it sits in its grooves.

This operation is not difficult, and besides, it represents one of the final steps of the process.

If you have finished connecting and installing the switch, go to the switch and turn on the general light.
The last step, turn on the light using the new mounted switch lights to see if the hard work paid off. If the light turns on without interference, it means that you did everything right.
Light switch connection diagrams
Thank you for reading our article on , how to connect and install a light switch, we recommend that you read our other articles.
Every house has electric switch, who can truly be called a domestic worker. Therefore, each of us at least once in life faced with a problem, how to install a new switch, while not everyone knows how to do it right.
In our traditional section "Useful Tips" we will tell and show how to install the switch.
In order to produce switch wiring, You don't have to be an electrical engineer at all. Let's put it this way: if you follow clear instructions and do not work with the voltage on, then everything will work out for you.
The basis of the principle of operation of the switch is the supply of phase to the contacts of the lamp holder. According to safety standards, zero is connected directly, without interruption, until the lamp. Therefore, you have to work only with the phase wire.
We will need break the phase wire, before it reaches the lamp, which will make it possible to control the power supply (in this case, using a switch).
Accordingly, for this, the phase wire must be "passed" through our switch in order to supply current through it, when we wish, to a conditional electric lamp. An electric lamp means any lamp or chandelier.

Zero in our case goes directly to the lamp, and this cannot be changed.
It should be noted that switches are external and internal. Outdoor switches are safer, while indoor switches are more aesthetic.

During the modern renovation it is customary to place the light switch on the side of the door handle, and at a distance at least 10 cm from the door. The height at which the switch is placed is usually 0.9 m
However, the PUE rules (electrical installation rules) do not indicate the specific distances at which the switch should be located in the house (apartment), except for the minimum standards:
7.1.48 The switch must be located at least 0.6 m from the shower cabin.
7.1.50 From the gas pipeline, the switch must be at a distance of at least 0.5 m.
You will need:
1. First, be sure to disconnect all wires from the power supply using circuit breakers in the control room.

2. We need to mount the socket. This is done in the same way as with the socket. You can read more about this.

3. After the socket box is mounted and the wires are laid, we remove the insulating layer from the end of the phase wire with pliers by about 1 cm.

4. Now you need to connect the incoming wire to the switch (usually indicated by the letter "L" on the socket) and the outgoing wire going to the lamp (usually indicated by an arrow pointing down). The wires are fixed to the switch using auxiliary small bolts.

5. Then we put our switch in the socket. If the design of the switch has the principle of stretching the legs, then we twist them alternately for a uniform entry of the socket into the socket. If the socket is without paws, then simply fasten the existing bolts. In this case, we use the level for a uniform location of the switch.

6. Now we snap or bolt (again, depending on the design) the outer cover of the switch.


The principle of connecting a single switch and a double switch remains the same with the only difference that now we will have one entrance and two exits.
Connection diagrams to different switches can be various due to the fact that the input contact can be located in different ways (left, right, top or bottom).

To determine the input in the switch, you can use multimeter.

1. First, let's set the dialing mode on the multimeter by closing the probes of the device. After that, having heard a sound signal, we determine the input of the switch.
Do not forget! For any work with electrical wiring, be sure to completely disconnect it from the power supply.
2. We set the buttons on our switch to the "on" position.
3. We apply one multimeter probe to the intended input, and the other to the intended output. If you heard a beep, then this means that you are doing everything right, and if not, then we continue to "guess" where the entrance is and where the exit is.
4. When you find an entrance and two exits, it's best to double-check yourself. To do this, with the multimeter probes plugged in, turn on the switch with the keys. If the input and outputs were found correctly, then the signal of the device will be interrupted, and, therefore, the lamp will also turn on and off.

Advice! Of course, not everyone has such a device as a multimeter in their household. In this case, we can advise you to pay attention to the marks on the back of the switch.
As a rule, these marks mean:

In extreme cases, you can consult the seller on this issue when buying a switch.
5. That's all. Install the switch in the socket. We fix. We install a decorative cover.
We restore the power supply and check the work done.
Conventionally, all electricians can be divided into two large groups: "experienced" and "experienced". Experienced people always know everything, they can check the phase with their finger, they were “clicked” by the current more than once, they made short circuits more than once. For them, the PUE is not a decree, they are “smarter than everyone”, they work very quickly and according to the principle “it will do.” Experienced people can only see that they did something wrong after the occurrence of unpleasant situations.
Experienced people will never say that they know everything, they never hesitate to learn, they unquestioningly follow the rules for installing electrical equipment. Their main difference is that they do not see a problem that has already taken place, but foresee the possibility of its occurrence and take all measures to prevent it. We hope that you will listen to the advice and move into the experienced category. Even such a seemingly simple matter as connecting switches requires certain knowledge and skills. In order to reduce the risk of errors, you need to get to know the switches and the rules for their installation, depending on the type.
In total there are several categories of switches, each of them has its own characteristics and can be used for baths.
| Types of switches | Description |
|---|---|
| The strength of the current supplied to the light bulb can be smoothly adjusted. Accordingly, lighting is also smoothly regulated, electrical energy is saved (not always, more on that below). Lighting can be adjusted with a roller knob (old designs) or a touch button (new designs). | |
| From the name it is clear that the switches have built-in electronic circuits controls, can automatically turn on / off the light according to the program set by the consumer. Quite expensive devices, but they perfectly insure forgetful users. | |
| They work with the power of the remote control. The price, of course, is rather big, but the convenience and possible functions are worth it. | |
| The most common and most versatile. Baths are used most often. They can simultaneously turn on / off up to four lighting devices, they are mounted with open and hidden wiring. Simple, safe and reliable. |
For concealed wiring the switches are recessed into the wall, the installation takes place in special Berman boxes, only the keys are visible above the wall surface.

For open wiring, the switches are fixed to the wall; not only the keys, but also the housing are located on the surface.

For wet rooms, switches with a housing protection class of at least IP 34 are used.

The technology for connecting all types is not very different, consider the rules for connecting the most used switch options. Initial data - all electrical wiring is made taking into account the PUE.
RULES FOR THE DESIGN OF ELECTRICAL INSTALLATIONS.PUE.Seventh edition. Download file

Very important. Always and in all cases, before starting any work on the wiring, turn off the main isolator on the input distribution board. And it is also very important - do not be lazy during the production of work to hang a warning on the shield that the installation of electrical wiring is underway. This will prevent accidental power-on by third parties. Such actions have saved more than one life, safety regulations are written by someone's accidents.

Step 1. Remove the switch cover if you have a backlight on the key - it should light up in the off position and go out when it is on. Keys in the on position should be at the top. Some manufacturers make the position of the key the other way around, at the bottom it turns on, at the top it turns off. This is not a problem, turn the switch 180° and everything will be fine. This is a slight violation of the PUE, the rules state that the supply of power to any electrical appliance should always be at the bottom. We believe that so be it, than the keys will turn on in the opposite direction. Better yet, don't buy these switches.


Step 2 Check the functionality of the switch. It is better to do this before installation than after connecting the wires and applying current. To check, you need to have a tester or make an ordinary control from an AA battery and a small light bulb. If you do not know how to do it, do not undertake the installation of electrical wiring.

It is not difficult to test the device with a tester. Switch the tester to the “resistance” position, connect two contacts to the switch terminals and turn it on / off several times. The tester should show short circuit, then the circuit breaks. Thus, by the way, it is checked in which position of the key (upper or lower) it will turn on lighting fixture. Pay attention to this so that you do not have to turn the switch upside down later.

Step 3 Loosen the clamping bolts of the terminal blocks. Connect the lead wire to the input, remember that it must be a phase, not zero. Well-known manufacturers connect LEDs immediately, Chinese and Turkish "masters" leave this operation to us. Therefore, connect one of the LED wires to the input terminal, which one does not matter.
The protective insulation can be removed with a knife. Do not use a sharp knife, do not cut the wire, during bending it may break at the cut point. If the wire in the box has a margin in length, then there will be no problems, you can strip it again. If the length of the wire is made "end-to-end", you will have to lengthen it, and this is undesirable.

Another way to easily remove the insulation is to heat the end of the wire with a lighter and quickly remove the soft coating with your fingertips.

Step 4 Tighten the bolt on the terminal well, check the reliability of the connection, try to pull out the wire with sufficient force. If you succeeded, repeat the connection from the beginning, only more carefully.

Step 5 Connect the wire that goes to the light bulb to the second terminal, here you also need to “shove” the second wire from the LED. Tighten the bolt and in the same way check the tightness of the contacts.
Important. As a rule, the diameter of the power conductor is much larger than the diameter of the LED wire. During their joint connection, the clamp rests only on the large wire, the small one remains not clamped. To fix this problem, you need to wrap the wires from the LED several times around the large one. In this case, the terminal plate will clamp both wires simultaneously and securely.

Insert the remaining wires into the terminal
Step 6 Insert the switch body into the Berman box and fix it securely. The top plane of the box must be in the same plane as the wall. The case is fixed with special squeezing struts, the paws are bred with bolts installed on both sides of the switch.

Step 7 Check the reliability of fixing the case in the box, everything is fine - close it with a lid with a key.


We strongly recommend that you make sure that the live wire is connected to the bottom (inaccessible) contact of the cartridge. This will serve as additional protection against damage. electric shock when replacing a light bulb with the switch turned on.
In the case of flush wiring, the Berman box for the switch with all wires must already be installed in the wall. If it is not there, and only wires are sharpened from the wall - a problem, you will have to do extra work. How to install it?
Step 1. Open the hidden wiring cables about 10 centimeters on each side of the box. Remove the plaster from the cable very carefully. We do not recommend using a grinder, it is better to work carefully with a chisel.
Step 2 Mark and make a hole for the box. It can be done manually, or you can use a drill with a special diamond nozzle. The second option is for professionals, and amateurs will have to hammer the wall with a chisel. The dimensions of the hole should be 1÷2 centimeters larger than the box.


Step 3 Insert the box into the prepared hole, check its position. Everything is fine - tighten the wires inward.

Step 4. Fix the box in the hole with plaster, check its position again. At the same time, make grooves for the cables. Wait for the plaster or alabaster to set and proceed with the installation.


We must say right away that such a situation should not occur in principle, only a frank hack can afford not to install boxes during the installation of hidden wiring.
Two-button switches can also have diodes that make it easier to turn on the light in dark room. The dimensions of the housing and the Berman box are standard, the switch can be installed in holes of the same diameter in the walls with a single-gang switch.


Step 1. Unpack the switch, remove the front cover with keys. In most models, it is attached to the body with latches, and is removed after a slight effort to tear it off.

Most of the parts of the switch are made of plastic, do not apply much force to them, if something does not disconnect - look for the cause, and do not solve the problem through physical force. The keys can be removed with a knife or screwdriver by prying them from the free side.

Step 2 Remove the plastic switch core. It is not available for all models of switches and serves to additionally protect users from electric shock. On the bottom of the housing there is one contact with a screw terminal and one unoccupied hole. This hole is purely technological, used during the manufacture of other types of switches in a standard case. On the other side of the case there are two contacts, one for each key.
Step 3 Connect the incoming phase wire of blue color to the switch on the side where there is only one terminal. The internal connections will supply current to two keys at once.
Step 4 Use two proximity indicators to determine correct position keys. By standards, all switches must include current consumers in the up position of the keys. Close one indicator to the input of the keys, and the second to the output, try to turn them on / off. In the position in which the indicator lamp lit up. The device passes current - remember the position of the keys and observe the correct spatial position when installing the switch in the box.

Step 5. Screw the box wires to the switch. Blue phase from the side of one terminal block, the other two from the side of two terminal blocks. Insert the switch housing into the box, fix its position with screws, reinstall the sub-grid, plastic core and two keys.

Step 6. Connect the wires to mounting box. The connection principle is the same as for a single-gang switch. The only difference is that the output will be, in addition to the phase, two wires to each lighting device separately. Securely insulate the wires and spread them to different corners of the junction box.

Step 7 Check the connections with the keys on and off, everything is fine - you can supply power.

This type of switches are most often used in baths made of logs or logs. They may have various modifications, but the installation algorithm for all types remains the same.

Step 1. Use a flathead screwdriver or a knife to pry the key from the side and remove it. It is held on by plastic latches, don't use too much force, the key should come off easily. plastic cover attached to the case with screws, unscrew them and remove the cover.


Step 2 Remove switch mechanism and mounting membranes for sealing inlet/outlet electrical cables. The membranes are inserted into the housing guides and can be easily removed.
Step 3 Accurately mark the position of the switch housing on the wall. For a guarantee, you can use the level.

The housing wall has special holes for fastening self-tapping screws, with their help the switch is attached. There are times when standard holes for some reason cannot be used - either in these places there are cracks on the wall, or in these places decorative elements wall decoration - it does not matter. Such a situation has arisen - do not be discouraged, carefully make new holes in suitable places with the tip of a knife. Fix the case on the bearing surface.

Step 4 The cable is fed through a protective membrane. Poke it with a screwdriver and thread the cable through the hole. If the cable diameter is much larger than the hole made, cut off the top ledge of the membrane with a sharp knife. Manufacturers specifically make it with protrusions of various diameters, this not only facilitates the installation process, but also increases tightness. Keep in mind that to increase installation versatility, the switch has two membranes - one from each opposite side. You will need only one to connect the lighting, do not touch the second, let it remain intact.


Step 5 Connect the wires to the switch terminals as described above. Outdoor safety switches can also have multiple keys, allowing multiple lights to be controlled from a single device.

Step 6 Check the reliability of the wire connection, try to pull them out. Tighten the fixing bolts again. Everything is in order - insert the switch mechanism into the housing, close the lid and put the key in place.

Carefully screw the switch cover, it has a seal around the entire perimeter. Make sure he lays down on his seat without bends. Some modern models moisture-proof switches provide the opportunity self installation led lamp, for this purpose, a landing slot for a light bulb is provided on the case, and the key has transparent corners that are clearly visible in the dark. The LED can be purchased from the store yourself, as we described above how to connect it.
We have described how the simplest and most common types of switches are connected, a few words need to be said about other types, more complex and more functional.


First you need to know that not all dimmers save electrical energy, manufacturers are silent about this. There are rheostat dimmers, the regulation of the current strength occurs due to the rheostat, it takes on itself part of the current strength, a current of a lower nominal value is supplied to the lighting device. Yes, the lighting power is regulated, but not due to a general decrease in energy consumption, but due to its redistribution between two consumers - a light bulb and a rheostat. Is it worth paying extra money for such an "economical" switch - decide for yourself.

Energy can be saved only by electronic dimmers, they consist of semiconductor triacs and dinistors, the current strength is regulated by stepwise phase cutoff. These switches save energy.
Important. If ordinary switches do not have a power classification, then dimmers do. The power of the circuit breaker is indicated on the case, it is selected taking into account total power all consumers connected to the device. As always, we strongly advise you to purchase dimmers with a power reserve.

The electrical circuit for connecting dimmers does not differ from electrical circuit connection of ordinary switches.

Exist a large assortment timers that allow you to make settings for turning on / off the light with a different time interval. For a bath, it is worth buying the cheapest models, this is not the room that is used daily.
Important. Timers have a rather complex electronic filling, which reacts extremely negatively to an increase in temperature and humidity. The lamps connected to them can be installed in any premises, and the switch itself should be mounted only in the rest room.

Connection of electrical cables is carried out according to the usual pattern, the phase must necessarily go through the key. But there is one significant feature - both phase and zero must be connected to the switch. Electronic stuffing will not work without autonomous electrical circuit, and it must be in a permanently closed state.
Each timer switch is designed for the maximum power of current consumers, it should be taken into account when choosing a specific model. One more warning. The electronic filling of the timer is very sensitive to voltage drops, this can cause not only failures in the functioning settings made, but also cause the complete failure and failure of electronic microchips.
Complex electronic devices, use for baths is not always justified. But those owners who want to create for themselves as much as possible comfortable conditions, they are installed. A positive point is the ability to control the lighting of all bath rooms without getting up. The disadvantage is the high cost. Several consumers of electrical energy can be connected to one switch. Fear of high temperature high humidity. There must be a phase and zero in the box, the microcircuits must be constantly powered to the network.
Electric shock is not a blow to the finger with a hammer, do not be dismissive of existing rules and safety. If you are not sure about the integrity or qualifications of the electrician who did the wiring, we strongly recommend that you check the connections in the wiring junction box.

In the box of a single-gang switch, there should be two cores - blue for zero and brown (or another color) for phase.


In the junction box there must be a cable from a common shield. The blue (neutral) wire must be connected to the wire going to the lighting fixture, the phase wire must be connected to the phase wire going to the switch. From the switch, the other wire returns to the junction box and is connected there to the wire going to the lighting fixture.

For a two-gang switch, the wiring is different. The output cable to the lighting device must have three cores: one blue phase and two without voltage. The phase wire with a three-wire cable must be fed to a two-key switch and connected to a common input for two keys. At the output of each key there are separate wires, which are then connected in the mounting box to the wires of the luminaire cable.

The connection of cables in the junction box can be done with ordinary twisting or using special terminal blocks. If you are twisting, then carefully isolate them and spread the phase and neutral wires at different corners of the box. Never connect copper and aluminum wires together, such a connection quickly oxidizes, overheats and burns out. This is, if you are lucky, if you are not lucky, then the sauna may catch fire.
Distribution boxes should be located above the switches, this is a standard requirement. This arrangement allows you to quickly find the right wires in case of problems with electrical consumers.

Very important. Do not forget to check the absence of voltage before working on electrical equipment, even after turning off the machine. There are times when the disconnector clicks (such a sound is made when it is turned off), but the circuit does not break. To avoid an accident, after turning off the fittings on the shield, additionally check the reliability of its operation with an indicator or tester.
Short. The purpose of ND filters is to reduce the amount of light entering the...

The obligation to pay calculated tax payments arises for various ...

The receipt reflects a lot of useful information: a list of documents that you ...