Fresh pumpkin is ideal for preparing unusual dishes. She can...


A long time ago, when there was no plastic yet, and instead of glass, bull bubbles were pulled into window openings, little girls, just like now, played mother-daughters, and boys played warriors and hunters. Each clan always had its own Lefty, who made not only ralos and cartwheels, but also amusing toys for his children in moments of leisure. The most accessible materials at that time were clay and wood, so most often children's clay whistles and wooden nesting dolls came out of the hands of a craftsman.
Wooden dolls did not always have legs and arms. Often the manufacture of crafts ended with the designation of the eyes and mouth, the rest was added by children's imagination. But sometimes a loving dad made such crafts or mechanical masterpieces that were passed down from generation to generation. For example, almost every kid had a wooden rocking chair in the form of a Sivka Burka.


In order to start making this toy, you will need:
Work order


If he wants to play as a knight or an epic hero, such wooden armor, a sword and an ax will certainly come in handy. They are carved from a single piece of wood, polished and coated with metallic paint. With such weapons, you can even arrange children's New Year's performances.

The very first toy after the rattle is, of course, cubes. In a world dominated by synthetics and plastics, it is so nice to touch natural materials. To make wooden cubes for a baby, it is not necessary to have the skills of a carver. The only indispensable condition is careful surface treatment, cutting sharp corners and edges. Such cubes do not need to be varnished or painted, because the baby will definitely try them by mouth. Put a gift under the Christmas tree, and your child will be busy with an exciting game all New Year's weekend.

Homegrown kulibins were not limited to whistles and horses. Mobile "live" crafts, which are several hundred years old, can be seen today in the Museum "Bogoroditskaya Toy". Without knowing the laws of mechanics, purely on a whim and thanks to their own ingenuity, the masters created these hens pecking grain, hares playing the accordion and blacksmith bears.

Wooden figurines were carved from linden, cut down 3-5 years before. Special knives were made for work in the village of Bogoroditsky. Today's development of technology allows anyone who wants to make original New Year's gifts under the Christmas tree for their children.
Start making crafts with drawings. You can significantly simplify the design, depriving it of volume, and use plywood instead of linden. The most difficult thing in assembling is to determine such a place for attaching legs and paws so that when moving the planks, the bear and the blacksmith hit the anvil with hammers exactly. This is done by experience. But if our ancestors could make wooden mechanical structures, then, probably, modern dads can do it too.


For any kid, the most memorable moments of the holiday are making toys for the Christmas tree with your own hands. It is very easy to make wooden Christmas tree snowflakes from old clothespins. For this:
Helicopter
Airplane 


locomotive whistle 

Great moving toy! 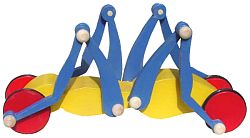
Motion animation http://www.uniqueprojects.com/projects/crawlingbug/crawlingbugintro.htm
Blueprint http://www.uniqueprojects.com/projects/crawlingbug/crawlingbug.pdf
Toy boat with rubber motor

Cut a notch in the back for the paddle wheel. Leave enough wood on the sides of the neckline to support the elastic. Make a cutout 1/2" larger than wide. 
Make a paddle wheel out of 1/4" plywood or whatever thin wood you may come across.
Cut two square pieces about 1/4" in a narrower circle than the cutout at the back of the boat.
Cut notches down the center of each piece as wide as the wood and 1/2 the width of the paddle. 
Put glue on the two parts of the paddle and slide them together.
Catamaran 

Use the chart to cut out all the pieces to your desired sizes. A rudder is not required, but it helps to steer the boat better. If you are making multiple boats, use cardboard, such as 2x4, for the body, then sawing it into several 1/2" thick pieces. Drill a 1/2" deep 1/4" diameter chimney hole, at the top of the cabin, as shown in the picture. Cut the groove into the paddle pieces. It should be a width equal to the thickness of the paddle and go halfway through. Drill four pilot holes (slightly smaller than the nail width) for the nails. Chimney cut from 1/4" dowel.
Now all your Junior Woodcrafter needs are just these six pieces, one rubber band, seven 1" finishing nails (two per part), a hammer, some wood glue, one sheet of 150 sandpaper, and safety goggles.
Assembly.
A. Drive two trim nails, for the cab, to the bottom of the body where the black dots in the pictures indicate.
B. Drive the nails to the point they are going to go right through or "just a little bit through" the wood.
C. Apply glue to the bottom of the cabin and place it on your upper body.
D. Hammer two nails all the way in.
E. Sand the cutting edge of the rudder is tapered, but not quite to sharp edges.
F. Drive two finishing nails, behind the wheel, to the upper body where the black dots in the pictures indicate.
G. Again, drive the nails to the point they are going to go right through or "just a little bit through" the wood.
H. Apply glue to the top of the handlebar and position it to the bottom of the body.
I. Hammer these two nails all the way in.
J. Place a drop of glue into the hole in the top of the cabin and glue the pipe into place.
K. Test fit two pieces of spatula together and sand to match if needed.
J. Assemble and glue the two parts of the shoulder blade together.
K. Sand all corners and round edges.
L. Place a rubber band over the paddle wheel and plug it into the grooves at the back of the body.
M. Allow all glue and paint to dry overnight.
N. Wind paddle wheel (back), then place it in the water and release.
Click on the image above to download a higher resolution image.
monkey
You can easily see how good the monkey rides that the tricycle is. The leg joints are all turned into a monkey.The front wheels are attached together on the dowel axle and both turn together.
Pistol
The gun template you can find at href="http://www.runnerduck.com/images/toy_gun_handle.gif"> www.runnerduck.com 
/ a photo / 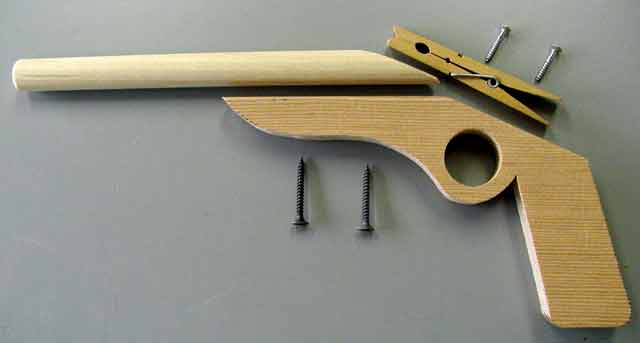 on a piece of 1/2" to 3/4" wood.
Use the scroll saw, saw band or jigsaw to cut out the pattern.
Sand all the edges are smooth.
Drill 1" hole to run.
Cut a 5/8" piece of dowel 8". tapered i one end to fit the handle.
Cut a small notch in front of the dowel under the rubber band to allow the rest of the inch
Drill two holes in the handle, glue and dowel screw on the handle.
Drill two holes in the clothespin, blue, and screw it to the handle.
target;
Cut into 1/2 piece plywood 4" X 10".
drill 5/8" hole in the center of each end.
Cut two 5/8" dowel pieces 6" long. Drill a small hole large enough for a 1/2" wire clothes hanger from top to bottom in each dowel.
Glue dowels in plywood.Run the wire through the holes with small clothespins and balls for the gaps.
Bend the wires at both ends to hold in place.
Cut your targets out of paper.We already have for youwww.runnerduck.com / photo / 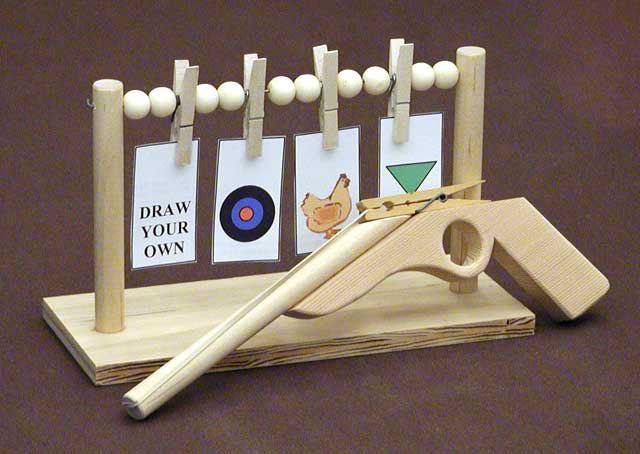 font> Parental controls are always recommended.
All these toys have the same principle of operation: when the Belchat planks are shifted with knobs, and the Goslings and Chickens hit the boards fixed on the upper planks with their beaks. As you can see, a simple mechanism is used here too. Bogorodsk toy "Blacksmiths".
Before making a toy, carefully study the drawing, and only then proceed to marking the characters' figures on plywood. Usually, each figurine has weak points that can break even during the sawing process or during testing. For example, Squirrels have paws, ears; Goslings and Chickens have beaks. When marking, try, if possible, to place these elements along the fibers, and when cutting out, make sure that the jigsaw file moves from the outside of the marking (so that the dimensions and, consequently, strength do not decrease). Be especially careful when marking and cutting out elements that will experience shock loads during operation, for example, the front paws of Squirrels, the beaks of Goslings and Chickens. The result of incorrect marking and sawing can be seen in this photo as an example (Fig. 2.).

An inexperienced student did not take into account the direction of the fibers when marking, and even reduced the size of the beak when sawing. As a result, the gosling (right) broke off its beak during the first test.
Unfortunately, high-quality plywood is not always available. You have to cut out what you have. Sometimes the veneer peels off, small elements fall out. Especially often this is observed from the wrong side. To prevent these cases, it is recommended to stick paper on this side, or apply a layer of PVA glue. These measures will significantly increase the strength of plywood.
To make any of these toys, you will need three-layer plywood, PVA glue, sandpaper, a saw table, a jigsaw, small carnations, an awl, a hammer, an electric burner, and wooden planks.
The sequence of manufacturing the toy "Squirrels" (Fig. 3.)

1. Using the drawing (Fig. 4), mark the Belchat figures and the board on which they will strike with their cones.
2. Cut out the marked parts with a jigsaw.
3. Decorate the figurines with burning or painting with paints.
4. In the paws of the figurines, pierce holes with an awl, into which the carnations should pass freely.
5. Fix the figures on the planks, as shown in Fig. 3. without hammering nails to the end.
6. Test the toy, adjust if necessary. After making sure that it works correctly, finish off the nails without pressing the figurines tightly against the planks.

The rest of the toys (goslings and chickens) are made in a similar sequence, using the appropriate drawings (Fig. 5, Fig. 6.).


In the manufacture of any toy, it is desirable to make your own changes that improve strength, finish, technology, etc. On Fig.7. options for making chicken toys are given.


Here, the figurines of chickens have false wings, eyes made of beads, instead of a plank there is a plate with millet. When finishing, stain and varnish were used.
Literature:
1. A.P. Zhuravleva, L.A. Bolotina. Initial technical modeling, Moscow, Education, 1982
2. Zhukariy mobile. "Boboche fun"
3. Website lobzik.pri.ee

First of all, a few words about the history of this toy.
Back in the 17th century, in the village of Bogorodskoye near Moscow, a woman, a mother of two children, carved a human figure out of a wooden block with a knife. When the children played enough, the father took it to the market and sold it. He ordered a new one. So the wife began to carve toys for sale, and the husband to sell them. This is where Bogorodsk carving began, which to this day is famous for its craftswomen and craftsmen, surprising with its wonderful creativity.
Bogorodsk carving is characterized by a wide variety of genres. These are figurines of animals and birds, and entertaining everyday scenes, and all kinds of toys with movement. Mainly soft, easy-to-work linden is used. The skill and creative imagination of many generations of carvers are passed on in the art of Bogorodsk carving from generation to generation. Here, Bogorodsk skills of working with a chisel and a knife, an artistic system of the plastic structure of figures and features of their decorative cutting were formed. Creating toys where the characters move, the craftsmen also proved to be original designers. Simple tricks - the use of moving bars, moving parts attached to springs or ropes, simple button mechanisms are used in a variety of compositions, enhancing the brightness of the artistic imagery of the toy, making it truly alive.


The Bogorodsk toy "Blacksmiths" is very popular in many countries. When the planks are shifted to one side and the other, the figures of a man and a bear alternately strike with hammers on the anvil. There are many variations of this toy. Each master reflects this story in his own way. An experienced craftsman who has mastered the techniques of Bogorodsk carving can make such a toy, and I offer you a simplified version that retains the principle of the mechanism, but the figures of a man and a bear are cut out of plywood with a jigsaw. Fifth graders, boys and girls make such a toy in my circle. Sketches of drawings for a man and a bear were made by my former student Lev Voloshin when he was in the 7th grade of a gymnasium and at the same time at an art school. A sample of such a toy is shown below in the photo.

To make this toy, we need the following materials: three-layer plywood (approximately half the size of A4), two planks of rectangular section 20x15 mm, 240 mm long, from any type of wood, six carnations 10-15 mm long and PVA glue.
Necessary tools and accessories: sawing table, jigsaw, hammer, awl, electric burner, medium grit sanding paper, soft pencil, carbon paper.

Sequence of work:
1. Print the drawing on the printer. If this is not possible, draw figures of a man and a bear in 10x10 mm cells.
2. Prepare plywood: check for knots, delamination, mechanical damage and other defects; sand the front surface with a sandpaper (you need to grind only along the fibers!).
3. Fix carbon paper on the plywood blank (with the side where the dye is applied - to the surface of the plywood!) And the drawing with two buttons or small studs, hammering their depth of 2-3 mm. Position buttons or studs so that you can lift the carbon paper along with the drawing and check the quality of the markup. Make sure that the thin elements of the pattern (in this case, the hammer handles) are located along the fibers, this will significantly increase the strength of the product.
4. Copy the drawing using a soft pencil or non-writing ballpoint pen.
5. Lifting the carbon paper along with the drawing, make sure the markup is correct and only then remove the buttons or carnations.
6. Using a jigsaw, cut out the figures of a man and a bear. When sawing, make sure that the jigsaw file does not move along the marking line, but next to it from the outside.
7. Sand the side surfaces of the sawn figures, apply a pattern using an electric burner.
8. Mark and saw out the anvil. It can only be sanded, drawing - at will.
9. Fix the anvil, adhering to the dimensions of the drawing, with PVA glue and two nails on one of the planks.
10. Now lay the planks as shown in the drawing, with an offset of 30mm.
11. In the figurines, pierce the holes for the studs so that they enter freely (with a small gap).
12. Fasten the man figure so that the hammer touches the anvil. Do not drive the nails in completely yet, they may have to be pulled out during setup and hammered in another place.
13. Now set the bear figurine so that its hammer is raised above the anvil. Note! The lines mentally drawn through the centers of the carnation caps should be parallel. For control, you can attach two rulers.
14. If you did everything right, when the planks are moved, the bear and the man will strike the anvil with their hammers. And, only after making sure that the toy works correctly, hammer in the nails, but not very tightly so as not to press the figures to the planks.
Literature:
1. Elkin. The tree tells stories. Moscow, Enlightenment, 1978.
2. Artistic crafts of the Moscow region. Moscow worker, 1982.
3. M.G. Chereiskaya. Album "Russian souvenir". Leningrad, "Aurora", 1978.
4. S.G. Rykhlitsky. Making toys in the classroom. Journal "School and production", No. 5, 2005.
Toy "Pecking chickens"
do it yourself
In my carefree childhood, there was such a favorite toy: by pressing the levers, you could set two hens in motion: they "pecked" grain by grain, in turn .... Nothing special, just pampering, but this simple toy fascinated, forced two poor pecking and pecking birds...
I have not seen such fun in children's stores for a long time. This master class will help you make it yourself.
You will need:
- thick cardboard or plywood (DVP) 2 mm thick;
- velvet paper;
copy paper;
two wooden slats 30 cm long, 1 cm wide;
4 self-tapping screws No. 10 (or wooden toothpicks);
as well as tools: scissors or a jigsaw;
drill;
crosshead screwdriver.
If you are already experienced enough, try to make a plywood toy by sawing the figures along the contour with a jigsaw.
From velvet paper, cut out the finishing elements and glue them according to the pattern.
Lay the rails on a flat surface and move them 1 cm relative to each other. Mark the center on each rail. Set aside to the right and left of the center 6 cm.
Place the cockerel detail on the rails in mark A and pierce it with an awl in the places marked with crosses in the figure, while marking the locations of the holes on the rails.
A drill drilled small holes in the rails. Attach the cockerel to the rails and, aligning the holes, screw it on the front side with screws. Tilt the cockerel to the center of the rails. Lay on the slats in mark B the part of the chicken and attach it in the same way. Instead of screws, you can use toothpicks - firmly insert them into the holes. Break off the ends of the toothpicks to 0.5-1 cm on each side. Fix the ends of the toothpicks with suitable beads or pieces of plastic tubes (it is necessary that they fit tightly on the toothpick).
Your chickens they will start pecking if you move the slats left and right relative to each other.
The production of children's products, including toys, has always been a profitable activity. This business is now very attractive and profitable, as many consumers are concerned about choosing not only beautiful, but also high-quality toys for their children.
There are a huge number of Chinese toys on the children's goods market, the quality of which is inferior to wooden toys in terms of quality. Parents are now willing to pay more for toys that are better quality and environmentally friendly. The advantages of wooden toys are also their strength and interesting design.


Process production of wooden toys does not require large investments. Equipment for making toys is not expensive, and the manufacturing process itself is simple. To start a business, you need to rent several premises, as well as purchase the necessary equipment (milling machine, drilling, grinding device and small inventory). Consumables for production will be wood, varnish and paint, as well as packaging. In the future, if there is an intensive workload and orders, additional staff can be hired.

Publication 2017-11-03 Liked 12 Views 17675 Talk...

A well-groomed face is not always a gift from above. It's also healthy food...