The article on the topic: “dream book swearing in a dream with a man” presents current...


Continuing to unravel the mysteries of the Windows 10 operating system, I learned about the following user problem. Some people cannot remove the password that asks us operating system Windows 10 every time you log in or wake up from sleep mode. Having figured it out a little, I decided to write this article and explain to my readers what’s what.
And so, in the Windows 10 operating system there can be two accounts: either a local account or a Microsoft account. If you have a local one, then you can safely start disabling the password now, if you have a Microsoft one, then first you will need to transfer it to local, and only then disable it. If you don’t understand what we’re talking about at all, then finish reading the article, and only then start practicing.
Local account– this is your personally created username and password; they are used when logging into the system.
Microsoft account– this is your registration data on the Microsoft website, where your email address is used as a login.
And so we begin. Press the Win+R key combination and in the window that opens, write netplwiz, click “OK”
In the window that opens, in the “Users” tab, remove the checkbox next to the item "Require username and password". Click "OK"

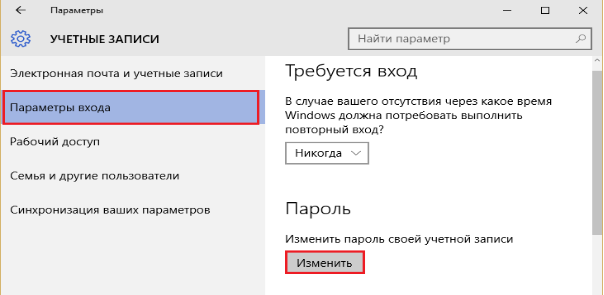
In theory, this should be enough, but just in case, let's move on. Click the “Start” button and select “Settings”

In the window that opens, click on the tab "Accounts"


If this is not the case for you, then disconnect your account from Microsoft by clicking on the “Disable” button. In the window for switching to local, you enter your password and username. Next press "Log out", after all this the system will be transferred to a local account.
Removing the password in the section "Login Options". They write to us here that if we are absent, the system should prompt us to log in again after some time. Next to this item, select the value “Never” from the drop-down list (this means that the operating system will no longer ask us for a password when exiting sleep mode). And next to the “Password” item, click on the “Change” button.

Enter your current password and click on the “Next” button:

In the next window, we leave all the fields empty, which means that now we won’t have any password at all:

That's how it is, for us in the section "Login Options" Now they write that our account does not have a password.

We could end here, although there is another way to disable the password through the registry, but I don’t recommend using it, because you can create the wrong parameters and values and cause trouble.
And also watch a video on the topic:
Rate this article:
Every day more and more PC users are switching to Windows 10. Either they have started to get used to it, or it has become fashionable. For some, Windows 10 is simply teeming with shortcomings. But, do not forget about some of its obvious and important advantages. The latter include fast loading speed. Turning on Windows would be even faster if it weren’t for entering the password.
Of course, a password is a necessary thing when you need to keep information from prying eyes. But, if only you sit at the computer, then by and large you don’t need it. Moreover, some people are annoyed by constantly entering a secret combination. Today I will teach you how you can remove the password when logging into Windows 10.
Before you learn and can remove the password when logging into Windows 10, think about whether it's worth doing it at all. After all, all files will become publicly available to any user who sits down at your computer.
The password should not be removed if:
If you still decide to remove the password when logging into Windows 10, then we will tell you about three simple ways, how to do it.
In order to launch the snap-in, you need to call the “Run” utility. The key combination Win+r will help us with this. After the “Run” window appears, you need to enter the “netplwiz” command in the data entry field and click “OK”.

After this, the “User Accounts” window will open. Click on your account and uncheck the “Require username and password” checkbox. To save the setting, click “ok”.
In the newly appeared window, we again confirm our intentions to refuse to enter a password when logging into the system.

We restart the system to ensure that the procedure was carried out correctly. On subsequent startups, the OS will not prompt you for a password to log in.
Resetting the password.
This method does not remove the password entry form from the authorization window, but after it is completed, logging into the local administrator’s account will be available after pressing the “Enter” key.
Let's move on to zeroing:
Open the Start menu and launch the Settings application.

Now you need to go to the “accounts” section.

Open the “Login Options” subsection and near the “Password” item, click on the “Change” button.
Now, to confirm your actions, enter the current OS password in the password field.

In the window that opens next, leave the first and second fields blank. In the latter, enter a hint for a new, “empty” password.

After saving the settings, reboot the system to check the results of the work done.
This method of disabling a password through the registry is a little more complicated than the previous ones, but still, it should not cause any difficulties. The main thing is to do everything as I say.
This method should only be used if the account management snap-in does not respond for some reason.
Let us remind you once again that you need to follow only the plan that I describe to you. After all, all changes in the registry are responsible for loading Windows. “Taking a wrong turn” will immediately disrupt the loading of the OS and Windows will have to be interrupted.
To start performing this procedure, you need to open the “Run” window, that is, the registry editor. In the “Open” input field, enter the following introductory “regedit” and click “ok”.

You will see a window divided into two parts. On the left side you need to go to the following path “HKEY_LOCAL_MACHINE\SOFTWARE\Microsoft\Windows NT\CurrentVersion\Winlogon”.
In the list of parameters on the right half, find “AutoAdminLogon”. Right-click on it and select “Edit” from the menu.

In the “Value” field of the parameter change window, put one (instead of zero) and save the setting.

You can check whether the above procedure was successful after restarting the computer. If, when loading the OS, you no longer see the window for entering a password, but you already see the desktop, then you are great and did everything correctly.
If you are an inexperienced PC user and are afraid to go into the registry yourself, you can use one of ready-made solutions: console command or reg file. Both solutions perform the same action: change the “AutoAdminLogon” value from 0 to 1.
Since a Microsoft account is also needed to purchase various features in the Windows Store, you must use a password to synchronize data between devices and to access account management through the corporation’s website. You can also activate Windows through your account. Therefore it is impossible to remove it.
If you find it very difficult to enter a password when logging into the OS using a Microsoft account, the corporation suggests replacing it with a PIN code (numeric device identifier) or a graphic password. This will be more comfortable for you.
During the installation of Windows 10 on a computer, you are voluntarily/forced to come up with a PIN code to log into your account. You won't be able to skip or ignore this setup step, but luckily, you can remove the annoying pin code later. Although I would not recommend leaving your computer unprotected if you have any important data stored there. But this is a completely separate topic, and today we will find out how to remove PIN and password in Windows 10.
You can, of course, remove the PIN code in Windows 10 different ways(although not a fact, I just don’t rule it out). But I'll show you how I did it. You should like this method because it is simple and straightforward.
However, it's worth once again I would like to remind you that by removing the PIN code from your computer, you leave it practically defenseless. On the other hand, if you are sure that no one else except you will have access to it, then why not? But you can save a little time by not entering your PIN code every time you turn it on.
Step-by-step instructions on how to remove a PIN code inWindows 10:
We figured out the PIN code, but there is one more small nuance. Now Windows 10 will ask you for your account password at startup. And a password, by the way, is even less pleasant and time-consuming to enter than a PIN code. Therefore, next we will show you how to disable the password when logging in in Windows 10.
Before you disable your password in Windows 10, make sure you have it written down somewhere or remember it well. Because if you rarely use a password, you can easily forget it. And then, when you need it to confirm some settings changes in your Microsoft account, you will not be able to remember the password. Of course, it can be restored, but this is an extra hassle that no one likes.
Disable passwordWindows 10 when logging in:

Next, click OK and restart your computer to make sure everything is applied. Oh yes, I almost forgot, to apply these settings, you will need to enter your password two more times to confirm that you are the one currently controlling the computer.
Personally, everything worked out for me. I'm almost sure you do too. Now Windows 10 will not ask you to enter your password or PIN when you turn on your computer. If something went wrong for you, write in the comments below, we’ll try to figure it out. If you managed to mess up very badly, then use to return your operating system to its previous state.
Did you read to the very end?
Was this article helpful?
Not really
What exactly did you not like? Was the article incomplete or false?
Write in comments and we promise to improve!
leave a comment
Thank you, we tried. Happiness and goodness to you!
What will we do next?
Leave a comment View similar articles
Please help the site. Repost the article somewhere.
If you are the only one using your computer, or you trust those you share it with, then why not remove the password when logging into Windows? This allows the computer to boot faster, straight to the desktop, and can save time. It also removes the extra startup step so Windows can jump to the desktop without your intervention.
Alternatively, if other people have access to your computer, you can enable a login password to keep their data safe.
Password login is enabled by default or when Windows update 10, or at new installation. If you previously disabled it or did not enable it for any reason, follow these steps:
You will need to either log out and log back in or reboot the system for the changes to take effect.
To disable password entry, you are essentially doing the opposite of the above.
You will need to log out and restart your computer for this change to take effect.
If you know more quick way enable or disable password in Windows 10? Please write in the comments.
Please note: To follow most of the instructions in this article, you must use a local Windows account with administrator rights.
If other people have access to your computer, it is wise to protect Windows with a password. This way, your settings and data will be safe: without special knowledge, no one will be able to view or change them. Windows will ask for a password when you turn on the computer, when you change account or after resuming from sleep mode.

If strangers do not have physical access to your computer, it may be better to disable protection. This will eliminate the need to enter a password every time the system starts.
Windows will stop asking for a password only when you turn on the computer. But if you lock the screen ( Windows keys+ L), if you log out or the computer goes into sleep mode, a password request will still appear on the display.
If the “Require username and password” option is not available, or you want to completely remove your Windows password rather than disable it, try another method for more experienced users.
To do this, open the account management section using one of the instructions at the beginning of this article.
If the open section says that you are using a Microsoft online profile (sign in with email and password), disable it. Then use the system prompts to create a local profile, but do not fill out the password fields during the process.
After you disable your Microsoft account, the system will no longer sync your settings and files across different computers. Some applications may refuse to work.
If the local profile is initially active in the account management menu, then simply change the current password, leaving the fields for the new password empty.
If you delete an old password, the system will never prompt you for it until you add a new one.
If you disable the password prompt when Windows starts, the system may still prompt you for it when you wake up. But you can deactivate this feature separately using these instructions.

If you have forgotten your password and cannot log into your local Windows administrator profile, there is no need to reinstall the OS. There is a simpler solution: resetting the password protection. To do this you will need another computer, a USB drive and free utility to reset your password.

If the BIOS is also protected by a password that is unknown to you, then you will not be able to reset Windows password protection using Lazesoft Recover My Password.
Perhaps instead of the classic BIOS you will see a more modern graphical interface. Moreover, even in various older versions BIOS settings may vary. But in any case, the procedure will be approximately the same: go to the Boot menu, select the desired USB drive as the source and save the changes.
After this, the computer should boot from the flash drive on which the Lazesoft Recover My Password utility is recorded.
After these steps, Windows will stop asking for the old password, and you can set a new one according to the instructions at the beginning of the article.
The article on the topic: “dream book swearing in a dream with a man” presents current...

Recipes for cold crumble soup with kvass, classic recipe 25 minutes 80 kcal...

Gratin is a dish with a crispy crust. Translated into Russian, gratin...