Tablets Dexamethasone is a glucocorticosteroid. Indications for...


Upholstered furniture used daily is quickly overwritten and loses its attractiveness. It is not necessary to purchase a new chair right away: when the frame is in good condition, you can replace the upholstery yourself and give the product a “second life”.
Restoration begins with an inspection: the integrity is checked wooden parts and the places of their connection, as well as the condition of the springs or foam rubber filler. As a result of the check, a conclusion is made about the constriction with new material or the complete replacement of the soft parts. In the process of updating the chair, a tool is used:The new fabric is selected according to its density and quality; tapestry, jacquard or velor are suitable.
The old upholstery is carefully removed, which will play the role of templates - the removed pieces are superimposed on the new fabric and outlined with chalk with a margin of 20–30 mm. Worn out springs are replaced with jute cords woven into checkerboard pattern and attached with a stapler to the rear side of the frame. A filler will be placed on top of the shock-absorbing fabric, for which various materials and their combinations:The advantage of do-it-yourself restoration is the ability to choose the most convenient structure of the updated chair.
The substrate is made multi-layered:
Computer chairs are very popular among schoolchildren and students. In addition to accessibility, these pieces of furniture are distinguished, if not by increased reliability, although this cannot be taken away, but also by maintainability.
All replacement parts are offered in shops specializing in trade office furniture. The armrest costs from 120 rubles, for the crosspiece they will ask from 300. There are also control levers, although they rarely break.
But there is one element that is not often changed and this service is not offered everywhere. This is for the seat and back. The materials used here are simple, but resistant to abrasion. And more often chairs are thrown away due to broken mechanisms than because of shabby upholstery.
True, if the chair is in order, you can change the coating material for purely aesthetic reasons. Why not update workplace and not please the eye?
First you need to unscrew all the bolts and screws. You will get several separate parts:
For work you need:
The arrangement of the seat and back of the computer chair is the same. Between the plastic cover and the foam rubber, you need to stick your hand or some object half a meter long and separate one from the other. It is necessary to disconnect the latches, clips, caps.
Remove the lift mechanism from the seat base
There are only 4 of them, located closer to the corners. Whatever it is called, it unfastens, a characteristic click will be heard. In the photo, the holes under them are marked in red.
Remove back cover The result is a cover and seat base upholstered. Staples are visible along its perimeter, they must be pulled out of the plastic, prying with a thin screwdriver and removing with pliers. So you will remove the old coating and foam rubber, it can also be replaced.
 Lid removed
 The foam rubber is cut to the size of the base, a couple of centimeters more can be. It is better to cut out the upholstery material with an allowance of 5-6 cm. It is not necessary to make it wider, otherwise, during the clogging of the staples and the tension of the material, the extra folds will interfere.
 Seat base with new foam
 The most difficult moment during assembly is to evenly stretch the upholstery and “shoot” it to the base. It is important not to overtighten in order to avoid distortions and not to loosen. In the second case, the foam rubber will walk under the skin.
 The process of stretching new upholstery
 Any repair is done not only because the time has come. But also to improve the environment.
Take the same computer chair, you can change the color of the base, usually it is black. You need to buy a can of paint for automotive plastic, any color. It's cheap and dries quickly. Dismantle the chair, paint over all the plastic parts and now you have an updated piece of furniture, good mood and cause for pride.
 The chair is ready!
 After calculating all the costs, you get a new chair for a third of the price. Don't be afraid to start something new and see it through to the end. Good luck!
Reestablish appearance furniture that has fallen into disrepair is not at all difficult.
If the upholstery on the old chair has become unusable, you should not rush to throw it away, just drag it with a new fabric.
You can restore chairs and sofas with your own hands, saving money on buying new interior items.
In addition, hauling furniture is also a good way to earn money, with the help of which it is quite possible to replenish the family budget.
Before pulling the chair, you need to carefully inspect it. Determine which parts need to be replaced and which can still be used. As a rule, foam cushion pads, rubber straps used for screeding, and upholstery are most affected. Therefore, it is wiser to change them. It is also necessary to replace all metal parts: nails, screws and staples.

In order to disassemble the chair, you will need the following tools:
First of all, it is necessary to remove the back wall and the plywood bottom of the chair. They are usually fixed small nails or self-tapping screws. If the plywood is suitable for further use, then it should be removed carefully.
Remove the foam padding that sits on the bottom of the seat and gives the chair a bounce. Twist the nuts that secure the legs to the back of the furniture. If the fasteners are rusted, use a special liquid to remove corrosion from the metal.
Next, you need to remove the old upholstery and remove the softening layer from the back. To do this, use a flathead screwdriver and pliers. Pry off the old brackets with a screwdriver so that one of the mounting legs comes out wooden surface. Then the staple is finally removed with pliers.

By prying several fasteners at once, you will avoid damaging the plywood. Pull them out one by one so as not to get scratched by the staples that have not yet been pulled out. A wound on the skin caused by rusty metal can cause a lot of trouble. Therefore, it is best to disassemble the chair with gloves or mittens.
After removing all fasteners, the old upholstery is removed and the gasket is removed. Old foam rubber can crumble and crumble into pieces. If you are restoring furniture in an apartment, then lay it on the floor polyethylene film or newspapers. And only then remove the worn softening of the chair, otherwise small debris will scatter throughout the room.
The wooden frame of the chair is restored separately. It is necessary to remove a layer of varnish or paint from it, glue loosened elements and paint all parts of the structure.
Back to index

In order to restore the chair with your own hands, you will need a special furniture stapler and attachments to it. Ordinary office braces won't work, as they are made of softer metal and their legs are much shorter. It is best to use 6 mm and 10 mm staples. To reupholster the chair, you will need about 2 packs of fasteners of the first type and 1 pack of the second.
If the tension of the tightening tapes on the back just loosened, then they can be tightened. To do this, fastening tapes are removed from one side, the tightening element itself is pulled up, and its free end is shot with a stapler. Staples need to be driven in, changing their position in relation to each other, and not fastened exactly in a row. This technique will help to avoid delamination of plywood. It is necessary to restore the tension on all elements.
If rubber bands become rough or cracked over time, they must be completely replaced with new ones.
In the design of old chairs, the longitudinal tape is passed between the transverse ties crosswise (alternately above and below the transverse tapes). If the back of the chair is curved, then it is better to put the transverse screed on top of the transverse bands. So the load on the furniture will be distributed more efficiently, and the chair will no longer be sold.
Be sure to cut all the allowances of the tapes along the frame bar or stepping back a little from its edge. Otherwise, bumps and bumps may appear under the new upholstery, spoiling its appearance.
Back to index

Next, you need to remove the old upholstery from the back of the chair. Usually its edge is glued and it is not difficult to remove the fabric. Use a flathead screwdriver to pry off the edge and pry it off the base. If the glue holds the upholstery firmly, then cut it with a clerical knife.
Old fabric can be reused. It is pulled over the back so that the new foam pad does not tear along the tightening tapes. In addition, worn upholstery will become the basis for fixing a new softener. Therefore, it should be removed very carefully.
Now the old upholstery needs to be fixed again. Align the fabric on the back frame, then place the frame on the end. The upholstery is fixed starting from the lower left corner, shooting it with a stapler. After fixing the fabric with 1 fastener, slightly pull the upholstery to the right and place another 1 staple about 1 cm from the previous one.
The fabric must be stretched so that it does not sag, but also does not form diagonal stretched folds. Small waves are acceptable. You will align them when you adjust the tension of the upholstery on the second side. But large creases will be difficult to remove.
We fix the fabric and turn the frame opposite side to yourself. We stretch the upholstery as much as possible and fix it again. Next, we fix it around the entire perimeter of the frame, constantly slightly pulling the fabric.
At the corners, we lay oncoming folds (folding the fabric in an envelope), cutting off the excess so that the upholstery does not stick out. We fasten the staples, capturing both sides of the fold with one fastener. This will prevent the fabric from spreading. Secure all 4 corners by shooting 2-3 staples.
Back to index

As carefully as you did with the back, remove the fabric from the seat and remove the worn foam. Remove all nails, old screws and screws. If the fasteners are not removed, then they must be carefully drilled out. Cut off excess fabric from the attachment points, removing threads and glue residue.
With pliers, grab about 5 mm of the rubber band and pull it on, leading it over the edge of the frame and resting it on the bar. Secure the edge of the tie with a stapler. Staples must be placed, changing their position in relation to each other. Otherwise, the rubber band may break. Re-tension all bands in the same way.
As in the case of the back, we reattach the old upholstery, repeating the previous operations. If the chair foam is not too worn, it can be reused. To do this, lay the foam from the seat across the frame so that it protrudes from three sides, and from the fourth does not reach the edge of the frame by about 10 cm. The gasket is glued, the excess is cut off with a clerical knife.
Take the old foam pad from the back and glue it to the seat. Since it is 2 times thinner, then fold it in half. Don't forget to leave a fold allowance for the frame. It is wiser to glue the gasket first, and only then cut off the excess.
All joints must be securely glued so that subsequently the foam rubber does not disperse along the seam. To do this, the joints of the gaskets are smeared with glue, left for several minutes until the surface becomes viscous. And only then the parts are connected, squeezing with force. Glue the fold last, attaching the foam to the base, and cut off excess allowances.

In the same way, a new gasket is attached if you do not want to use the old foam rubber. To soften the backrest, you will need a new softener anyway. If you do not have foam rubber of the required thickness, then you can glue 2 layers of thinner pads together.
Lay the chair back on the softener sheet. Rear end foam rubber is aligned along the lower edge of the chair frame. Leave a fold allowance on top. The back is outlined with a marker, then a softener is cut out.
Glue the padding to the seat back fabric and cut the edges flush with the frame. Glue all edges carefully. Only after the adhesive has completely dried, cut off a softener strip equal to the width of the bottom bar from the lower edge of the back of the chair.
Old furniture is in all houses. Some prefer to get rid of it, while others continue to use it as it is. However, there are those who restore furniture, namely, they fit it. How to drag a chair with your own hands step by step - this question worries many people.
How to drag a chair with your own hands: a question that worries many housewives who want to tidy up an outdated headset. Before starting the operation, you need to stock up on the necessary tools:
Below we will consider the process of reupholstering the chair in stages at home.
After choosing the tools, we proceed to disassemble the lower part of the chair. Inside it usually has a frame made of wood, foam rubber on the back and seat, and also plywood, with which the back wall is fixed:
Here you need to remove the upholstery material. It is done like this:
You also need to get rid of pillows and other external details that exist on the old chair. Don't throw them away unless they're worn out and look good.
When there is a pattern on textiles, you should consider how the elements will look and fit together. If the fabric is fluffy, then it is important to check the direction of the pile. It should be pointing down.
Important! At this stage, you need to be careful so that the furniture in the future does not look ridiculous.
Cutting should be done with a margin, since the fabric does not always lie evenly and it is ideally enough. After a few fittings, it will be clear how much is required. When trying on, you need to use needles. With their help, the fabric is attached and the appearance is evaluated. Such a basting will not leave traces.
Advice! It is better to take the material in in large numbers. Extra useful for pillows. This will also avoid errors in fabric calculation.
Before fixing the fabric, you need to lay the parts on the frame and put foam rubber on them. If the foam rubber is thick, the corners that protrude can be cut off. Next, a synthetic winterizer is placed on top of the foam rubber and fastened with a stapler. Directly the fabric is attached like this:

Some wonder how to drag computer chair with your own hands? It is easier to carry out these works than to drag a home chair, as they are smaller in design. By following the rules and instructions, you can put your computer chair in order, bypassing the waste of a new one. How to drag an office chair with your own hands, masters of their craft can tell.
This video shows how to drag a chair with your own hands.
How to properly drag a computer chair, you will see in the video.
Reading time ≈ 5 minutes
Any old item furniture deserves new life. Especially when it comes to upholstered furniture, because its upholstery very quickly becomes unsightly. In an affordable way updates is the upholstery of the chair with your own hands. This gives significant savings, guarantees a boring pastime. Photos and videos will help in the work.
If you decide to change the upholstery of upholstered furniture, you need to prepare all the tools and materials necessary for such work. The most difficult thing is to choose the fabric of the upholstery of the chair. It must fit into the interior, be durable, resistant to abrasion. To determine the size of the cut, you can use a centimeter tape to approximately determine its quantity by adding up the dimensions of all the parts that need to be dragged. Be sure to leave the fabric on the hem.

A more accurate result can be obtained if measurements are taken when the chair is disassembled into individual parts. Then you can rip off fragments of the old fabric and measure them accurately. In this case, the seat upholstery material will be purchased in the required quantity.
The following tools will be useful for work:

Dismantling work always starts from the bottom. The chair is turned over and the legs or other base are removed. Usually, when assembling furniture, work ends with the design of the bottom. Therefore, it is advisable to disassemble the chair from here. The brackets must be bent, the screws unscrewed.
If the chair has been used for a long time and it has become soaked unpleasant odors, not bad parts, while they are disassembled, treat with a disinfectant.

Many armchairs have external wooden details, such as armrests. They are definitely removed. A screwdriver and a hammer will come in handy for this. Nails and staples can be rusty, so care must be taken.

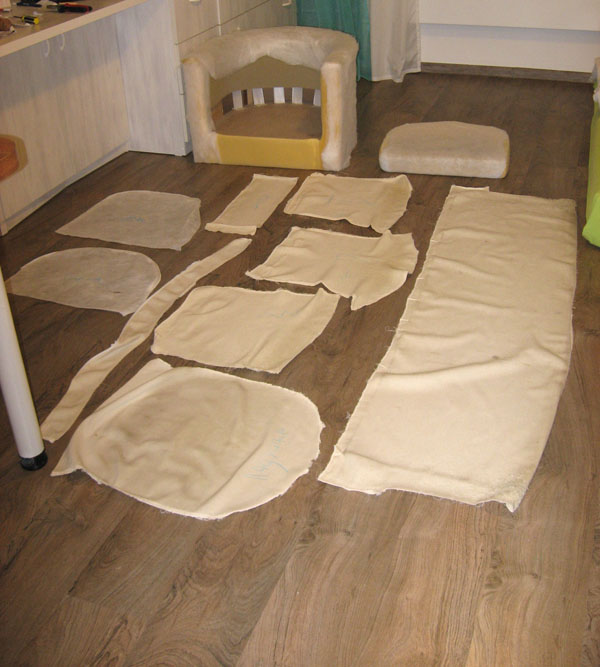
To be able to remove the fabric, you need to disassemble the bottom completely. To do this, remove the fabric from the bottom by bending the staples. If there is a plywood bottom, it is removed. Next, they begin to work with the upholstery, freeing the fixed edges. When removing fragments of old upholstery, one must be careful. After all, the old fabric is needed to make patterns for new parts. It is better to do this job with pliers and a regular screwdriver. If you pull hard on the fabric, it will tear.
In order not to get confused during assembly, instructions can be applied to the old fabric, reflecting the sequence of actions. After all, it will be necessary to assemble furniture according to the same principles as they dismantled.

For more strength upholstery fabric to wooden frame fastened with special brackets. It is very difficult to remove them. To straighten them and pull out the fabric, use a knife. If everything is done carefully, these staples can be reused. This will reduce overall costs.


Once all fasteners have been removed, the entire upholstery fabric can be removed. Sometimes, in order to get to the fasteners that grip the fabric, you have to tear the batting. When all upholstery fabric is removed. It is necessary to evaluate the quality of the filler. If it is worn out, you can add a new layer of batting or foam rubber. If it is generally in complete disrepair, it is replaced with a new one.

If a well-thought-out fastening system was not used in the manufacture of the chair, then over time the edges of the filler break off. To prevent this from happening with a new filler, clamps must be used. Then the edges will not break off, and the quality of the furniture will be higher.

In this chair, the upholstery was attached with buttons. All unnecessary fasteners are removed so that a new layer of batting or foam rubber lies without problems.

For cutting, it is necessary to lay out the old upholstery fragments on a new fabric. If there is a graphic pattern on the fabric, you need to think about how the individual elements will fit together, and in general, what will be on one or another part of the chair. If the material has a pile, you need to follow where this pile will be directed.

Cutting should be carried out with a margin. After all, it is unlikely that all the fragments will fit well the first time. You need to do a few fittings to see how the parts fit. For fitting, the parts are connected with a needle. The basting will not leave rough marks.
When all the parts are ready, you can start assembling. It will be carried out in the reverse order of the actions that you performed during dismantling.

All decorative upholstery parts are installed in their original place. You can make new ones, if the old ones are preserved, you need to think about how to properly arrange them. For the manufacture of new parts, it is necessary to use a thick cord, which is inserted into specially stitched strips, the width of which is about 2 cm.

Even a masterfully executed upholstery of an old chair will not give the desired effect without updating the wooden parts. Black paint will look relevant on the armrests. The use of paint in a spray can allows you to evenly apply the coloring layer.
Can be applied over a layer of paint protective covering, which will make the staining more durable. The same tool gives the surfaces a shine and a special smoothness. If there are doubts about the selection the right materials for dyeing, you need to consult the store. They will definitely help.

It is necessary to spread out the cover on the chair and check everything again. The fabric should evenly wrap around the chair, all fasteners should be hidden. If everything is in order, the edges are folded and fastened with staples. After completion of work, all edges must be bent.

On the sewing machine also grind off a removable cushion cover. Under the pillowcase, if dimensions allow, you can put another layer of foam rubber for greater comfort.

It will take about 6 hours to haul such a chair. The difficulty is that each chair has its own nuances and, most likely, you will have to figure out how to reupholster a chair in your home. However, compliance with the main condition - phased dismantling and subsequent assembly in the same steps - will allow you to change the upholstery of any upholstered furniture.
Tablets Dexamethasone is a glucocorticosteroid. Indications for...


Unfortunately, pain is something you have to deal with from time to time...