
The problem of wealth and poverty has always existed, exists now and in the future too...


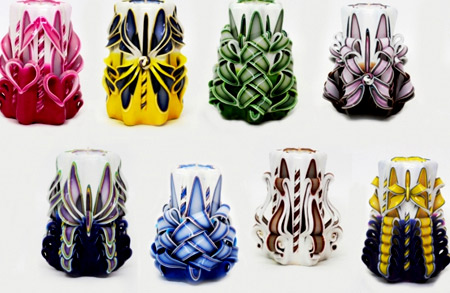
Carved candles are a unique and inimitable decoration for any celebration or. In addition, candles self made– an unusual and universal gift for holidays, for example, New Year, Easter, wedding. Decorative candles can be bought ready-made or made at home. Do-it-yourself home production of decorative candles will require special equipment and materials.
Several designs of homemade carved candles
The following master class will help you understand the intricacies of making carved candles.
Creating carved candles is a complex but interesting process. At the same time, it is important to prepare the equipment, which requires great responsibility. To make quality products, it is important not to make a mistake with your choice. High-quality paraffin, dyes and machine are the guarantee that decorative candles will be pleasing to the eye, and will not contain harmful components that may be released during combustion.
A paraffin furnace or melting pot is a container made of stainless or galvanized steel, divided into several compartments. In order for the paraffin in the containers to be liquid, an electric heating element is located under the melting bath, which must maintain a stable temperature of 80-90 degrees.
This is what a paraffin melting bath looks like Specialized companies offer equipment for carved candles of different depths and compartments, for several colors of paraffin:
On request, the store can make a paraffin melter for 10 or 12 colors. Also, the equipment can have different depths; the height of the finished handmade product will depend on it. Typically, the depth of containers is 20 and 30 cm - for medium and large candles. Equipment for carved candles can be purchased for an average of 13 to 30 thousand rubles.
But there are also compact options that can be placed directly on the stove. Such smelters take up little space, are easily portable, and cost less - from 8 to 9 thousand rubles.
To do carved candles at home, and not on a production scale - a compact option is quite suitable. Of course, with certain skills, you can make equipment for melting paraffin with your own hands.
 Example of handmade carved candles
 For this you need welding machine, Sheet steel, electric heater. Problem homemade options– constant monitoring of the temperature of the molten paraffin will be required. More serious production requires special equipment.
Molds for carved candles can be purchased in specialized stores. Finished goods come with a device for fixing the wick and have different configurations. Typically, a master class on making carved candles suggests using a blank cast in the shape of a five or six-pointed star. You can also make a base of the following shape:
You can make wedding carved candles from thin workpiece round or faceted shape.
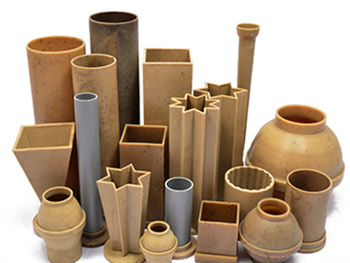 Various patterns of shapes for carved candles
 The material used for molds is different: plastic, silicone or metal.

Making handmade candles is impossible without the following materials:

Once all the materials and tools are prepared, you can begin to make original candles. A master class on making carved candles at home includes the following steps:
A master class on creating carved candles is not particularly difficult. Although the carver should definitely have artistic taste and imagination.
A novice craftsman or someone who wants to try their hand at making carved candles does not have to make the base for the candle themselves.
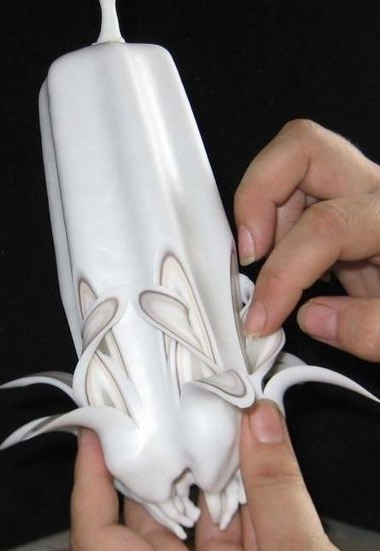 The process of making a carved candle
 You can choose a special store that sells ready-made samples of blanks various forms and sizes. When choosing finished base For a candle there is no need to make or purchase molds and wicks yourself. Paraffin blanks can be purchased from 90 to 200 rubles, depending on weight and shape.
Complete master class on making carved candles:

Of course, it is unlikely that you will get a masterpiece the first time; you need some skills and knowledge: at what angle to make the cuts and how to form this or that pattern. You will have to watch more than one master class and make more than one candle before you receive a handmade product that can be given as a gift or even put into production.
Undoubtedly, making carved candles is very exciting - it is an opportunity to combine an interesting hobby and get an additional source of income. Carved candles are especially in demand for holidays, weddings or as original gifts. Another positive point - own production and it’s easy to set up a store even at home.
The ideal way to decorate almost any holiday event is with beautiful candles, how to quickly and easily make them, which you will learn for yourself by reading detailed instructions. Today, candles in the interior can both bring aesthetic pleasure to the owners and guests of the house, and become an assistant in case of an unexpected power outage.
Also, self-made candles can easily become an interesting gift for family and friends, who will certainly appreciate the effort and time spent.

Some people think that candles are an exceptionally cute element of decor, which is true, except for those cases when scented candles are placed in the house, because they can replace a real expensive psychotherapeutic remedy, creating the right atmosphere for relaxation.

Of course, today candles are sold in almost all souvenir shops, however, if this time you plan to give it as a gift to a loved one, it's much nicer to do this item interior yourself.


If you are thinking about how to make candles with your own hands, then don’t worry, because the task may seem quite difficult only at first. With the right approach, you will quickly understand that the process of creating a candle is quite easy.

You can confirm this fact by simply contacting people who decided to start making candles, but got involved so quickly that it became not just an additional income, but also an exciting activity. The more often you practice making candles yourself, the better quality they will be every day.

You don't need large candles to create a home financial costs, therefore, in addition to the pleasure that you will get from the creation process, you will also be able to save a lot of money.

You really can’t make candles at home without special materials. You should prepare:


Firstly, you need to lower the prepared paper thread into the mold that you took to pour the wax/paraffin that was subsequently melted. Using a wooden stick, which should eventually end up on top of your form, you need to fix the upper end of the future wick.

Secondly, cut the paraffin (wax) into small pieces and place it in the prepared bowl. Next, you need to put a pan with clean water on low heat, place a bowl of wax in it and melt it. The main thing is not to forget to stir regularly so that lumps do not form.

Thirdly, pour a little of the previously melted wax into the mold, position the lower end of the wick directly in the center. All you have to do is wait until all the wax thickens slightly.

Fourth, fill with the remaining wax that was melted into the mold, and once the candle has completely hardened, cut off the part of the wick that will be superfluous. It is advisable to do this in no case earlier than twenty-four hours later.

Important point. You should not light candles that you think are ready until they are completely hardened. Remember that at least a day must pass from the moment the candle is created to its first use.

The real pinnacle of craftsmanship when creating candles yourself is not at all scenting or coloring them, but decorating them with a variety of natural materials, starting from coffee beans and ending with pine cones, seashells or herbs with an incredible aroma.

Important point. The materials should be laid out on the bottom of the mold prepared for the candle until the melted wax is poured into it.

Another popular way of decorating today is the decoupage technique, which involves decorating with napkins of different colors.


If you liked the instructions on how to make a candle with your own hands, then first of all you should know that to create a new candle you will need essential oils.


To give a decorative element a scent, just add a couple of drops of oil to the already melted wax immediately before pouring the mold.

If you want to achieve the relaxing effect of candles, you can use a combination of bergamot and lavender oils.

If you want to get rid of bad thoughts, it is better to choose rosemary and lemon oils. For peace of mind No better option than rose or geranium.

In order to create a candle, you must first purchase a special gel that will be used instead of paraffin. It has a number of advantages:

The technology for creating any gel candle is generally similar to the process of creating a wax candle, but there is a difference: it is necessary to pour pre-melted gel, not paraffin, into the prepared form. Moreover, this must be done in compliance with a couple of nuances.


Firstly, before the gel is poured into the mold, it must be heated. This will avoid the formation of unwanted bubbles on the candle.


Secondly, the form for creating any gel candle must always be not only transparent, but also beautiful. After all, in the future the candle will not be taken out of it.

The imagination of a person with a creative nature is practically unlimited: the cost of materials needed to create candles with your own hands is quite affordable today.

The process is quite interesting, it does not take much time, as it might initially seem when you see a photo of candles made with your own hands. Having created a beautiful, unusual candle once, you will definitely decide to repeat the experiment.

Knowing how to make truly exclusive candles yourself, being inspired interesting works talented people, you will always have an idea of what you can give as a gift to your friends, and how to decorate the table for a holiday, creating an incredible atmosphere of comfort.


I want to tell you how to make candles with your own hands at home. Although they are no longer relevant as light sources, they are excellent in their role decorative ornaments and original gifts. You will learn the most popular recipes that can be implemented even without artistic skills.
Recipes for making candles that are easy to implement without leaving home:

Wax candles have a very simple structure:

They are created from the following materials:
| Name | Purpose | Image |
| Wax or paraffin | Creation of the body of the manufactured product itself. To obtain such materials, you can use ordinary household candles. |  |
| Cotton thread or floss | Creating a wick that will actually emit heat and light, burning slowly |  |
| Pot | Organizing a water bath for melting wax or paraffin |  |
| A clean metal container, such as a ladle | Wax or paraffin content when melted in a water bath |  |
| Molds made of tin, glass or plastic | Shaping hardening wax or paraffin |  |
| Wooden stick or regular pencil | Wick attachment |  |
For the first time, I recommend taking someone as an assistant, since the melted wax will begin to set within fifteen minutes after removing it from the burner. Due to inexperience, you may not have time to complete all the necessary actions alone.
Now let's look at the step-by-step steps tasks:
 |
Step #1:
|
 |
Step #2:
|
 |
Step #3:
|
|
|
Step #4:
|
 |
Step #5:
|
It is better to use forms with smooth edges or disposable ones that can simply be destroyed. Then you won't have to leave ready-made candles in them.

A DIY colored candle at home is created almost exactly the same as a regular wax candle, with the exception of one additional ingredient: wax pencils.

They have very a large assortment possible colors, which opens up enormous possibilities for transforming the appearance of handmade candles:


If, after pouring each new layer, the mold is not placed directly on the table, but installed at an angle, then you can get more complex patterns than the “zebra”.

You don't have to limit yourself to adding just colored wax pencils. At home, you can also add a few drops of essential oil to the prepared solution before pouring it. In this case, your candle will begin to smell even more fragrant and even have a positive effect on the body.
Here are examples of the effects of some essences:


Here, in order to make a candle at home, a special candle gel is used instead of wax or paraffin.

This gives a very important visual effect - transparency, due to which adjustments are also made to the manufacturing process itself:


Human ingenuity does not stop at the above, which I want to prove to you by demonstrating the recipe for candles using fragments of natural fruits. To work you will need the following materials:
Having collected everything you need, let's get started tasks:
 |
Step #1:
|
 |
Step #2:
|
 |
Step #3:
|
 |
Step #4:
|
Just do not put lemon molds in the refrigerator under any circumstances, as the wax filling them may harden unevenly.

In this case, the set of materials and the process itself are similar to the same production of a classic wax candle. But coffee beans are also added to give the product a special ambiance.
And this can be done in four ways:


This is not exactly a recipe for making a candle, since the entire initial process completely repeats the creation of a wax specimen. But then, when it has completely hardened, you can start applying photographs to its walls. For this will be needed:
| Image | Name |
 |
Hardened paraffin or wax candle |
 |
Tracing paper |
 |
Printer paper sheet |
 |
Wax paper |
 |
Scotch |
 |
Scissors |
 |
Printer |
 |
Hairdryer |
Procedure looks like that.
Dinner for two, conversations with loved ones over a cup of coffee, long evenings and nights working at home, a movie marathon, relaxing with a book or meditation - such moments will become even more pleasant if cozy lights flicker in the room. Are you going to a party? Brew an original candle - such a handmade souvenir will definitely please the taste of those who are waiting for you to visit. In our article we will tell and show how to do unique decor fast and simple.
The process of candle making is quite fascinating and uncomplicated, and therefore has every chance of becoming an enjoyable hobby. There are many ideas for decorating such crafts; in this regard, you can experiment. However, the principle of their preparation is almost always the same.
So, arm yourself with the following materials: standard household candles; cotton thread; container for melting wax; dishes for a water bath; molds made of tin, plastic or glass; pencil or stick for installing the wick.
Procedure:
1. Take care of fixing the wick in advance. Tie one end of the thread onto the holder and lower the other end into the center of the mold.
2.Cut the candles into bars and place them in a melting container over a water bath. The fire should be slow, stir the wax continuously. The liquid will be ready when there are no lumps in it.
3. Pour some melted wax into the bottom of the modeling container. Attach the wick in the middle, wait about a minute for the part to harden.
4. Pour in the remaining liquid.
5. After 24 hours the work has completely hardened, cut off the excess length of thread.
6. Natural lamp is ready for use.


Fragrant and soothing, lavender will create the right atmosphere for meditation, reading and taking a bubble bath.
Complete the standard set of materials with essential oil, lavender sprigs, and a small glass jar.
Attach the dried flowers to the edges of the vessel, and then secure the wick and fill the container with some of the melted wax. Please note that the lavender must be placed strictly along the edge so that it does not catch fire during use. Heat the second part of the liquid again over low heat, adding a few drops of lavender oil, and smoothly pour into the mold.
Place a cute composition near your favorite interior items; it will complement any decor.


If you are a fan of this blessed drink, be sure to try to create your own composition that will completely suit your taste.
There are 4 ways to make such a decorative element.
1. For the first one, you will need the same tools as for an ordinary craft, as well as whole coffee beans. They need to be added to the heated wax and the prepared container filled with the mixture. Since the grains vary in size and configuration, each result will be unique.
2. You can decorate a ready-made candle with fragrant seeds. It is enough to secure the grains with glue or fix them on a still surface, pressing them lightly with your fingers.
3. Make a small candle. Remove the product from the mold and place it in a larger container. Fill the empty space with grains.
4. If you want your piece to delight you with a pleasant coffee smell, add ground coffee to the melted wax immediately before pouring. A burning fire will fill the room with an incredible aroma.


Lemon peel can serve as an original candlestick. Such an art object will complement the country style, loft, as well as Scandinavian and modern design.
To create 4 crafts you need to prepare: the appropriate number of threads, wax, equipment for a water bath, a couple of lemons. If desired, add aromatic components or dye to the substance. IN in this case We add lavender oil and dried flowers to the composition.
So, start by cutting each lemon in half and discarding the pulp. Next, heat the wax and add aromatic and floral elements into it, stir. Secure the wicks and pour the mixture into each lemon half. Finally, place the product in a cool place until it hardens. Please note that the refrigerator is not the most suitable option for these purposes, since the liquid may harden unevenly.


I want to make every holiday even more memorable and bright. In this matter, you will be helped by a wonderful decor with sparkles, which you can easily make with your own hands. It will allow you to decorate your home for a party or become an unusual gift for your friends.
During the manufacturing process, you can use either homemade or purchased base. Having prepared the candle, glue and glitter, you can start working. To create shimmer only in a separate area, you can use tape, thereby highlighting the required area. Cover the surface with a good layer of glue and, holding the part over a sheet of paper, sprinkle it liberally with glitter. Let the glue dry, then carefully remove the tape.
To get a truly unique product, you can sprinkle it with multi-colored glitter, and thanks to strips of tape of different widths, you can achieve a multi-level pattern.
Such a decoration will look gorgeous as a New Year's entourage.


As you know, candles are not only monochromatic and dim, but also multi-colored and bright. To create such decor with your own hands, you will need a little material, patience and a few hours of your time.
In addition to the main components for cooking, you will need wax crayons of selected colors and, if desired, aromatic oils.
Having prepared a clear liquid and a glass cup with a wick, rub and melt the first colored wax pencil. After this, mix it with wax and pour it into a container. To make the pattern beautiful and unusual, tilt and fix the glass until each layer hardens. When all layers are ready, let the product harden completely.
That's all! Multi-colored lights with a beautiful pattern are ready.


Thanks to paper molds, you can make a natural lamp of interesting geometric configurations. Their variety depends only on the stencil you have chosen.
We select a suitable template, and then print it on the printer. It is advisable to use thick paper. We cut out and glue each piece as shown in the photo. To prevent the paper from falling apart while pouring wax, it must be coated on the outside with paint and allowed to dry. As in other cases, we insert the wick and secure it, and then pour it into the stencil. When the liquid hardens, all you have to do is remove the paper.
Even an ordinary one will work perfectly as a form. eggshell. The production process is similar to the previous one and requires minimal effort. Nevertheless, products made using such templates will be a wonderful decoration in any interior and at any time of the year, but especially at Easter.


Candles made using this technique will be a wonderful decoration and an exquisite gift. Despite their incredible beauty and sophisticated appearance, needlework will only require time and effort from you.
We make a blank and let it harden. At this time, we will prepare various dried flowers, berries, leaves and other natural decorations. When decorating, we will use the decoupage technique. To do this you will need another candle, any tweezers and a tablespoon. Having warmed up the spoon, we carefully press the prepared gifts of nature into the surface, thus forming a unique pattern. If any of the elements does not look very attractive, you just need to cover it with a new layer of paraffin, and it will sparkle with new colors. To do this, you need to hold the wick and lower the product into heated paraffin.


Do you want a truly magical atmosphere to reign in your room? Then fill the space with the wonderful aroma of pine, lime, mint, lavender, bergamot or vanilla. Of course you can buy finished products in the form of air fresheners, but it is much better to envelop the house with the smell of candles created on the basis of natural ingredients. Plus, it's quite easy to do. Any scents are suitable, they can be combined with each other. We will tell you how to make several options for such multifunctional jewelry.
Decorate the products with fragrant pine needles. In this case, you can make the candles yourself or buy them in a store. We get the freshness of the needles from lightly heating real branches of cypress, pine or spruce.
Degrease the candlestick with an alcohol-soaked cotton pad, and place the pine needle branches under a press for several hours to make them flatter. Apply 10-15 drops of liquid wax to the bottom of a candlestick, for example, a glass or jar with wide and high walls, and fix the work.
Lubricate the finished branches with glue or spray them with an adhesive aerosol and secure them to the glasses so that their lower parts hang down slightly. Once the glue has dried, trim the edges of the plant. Note that the needles should not be placed inside the container, since in this case the fragrant trail will not come out. If everything went well, you will notice a beneficial effect - evaporation coniferous species will pacify nervous system, will help you relax after a hard day, and will also facilitate recovery from a cold, as pine needles are famous for their antiseptic properties.
Try creating a mix by adding a few drops of different essential oils into melted wax. Combine lemon and rosemary oil to tone the body, bergamot and lavender for relaxation, geranium and rose for calm and balance. Tandems of cedar and lemon, cloves and orange will also help to take away all sorrows. Vanilla, jasmine, ylang-ylang will create the atmosphere for a romantic evening.
The whole process is identical to smelting from any other material. The main difference is that our goal is still to create a transparent composition. That is why we must choose a transparent container, and also use the dye with caution so that our product does not lose its uniqueness. If you decide to place any elements inside the candle, the main thing is to place them at the level at which you want to see them (for example, parts strewn on the bottom will remain there). Glass balls, sea shells, flowers, leaves or dried fruits are suitable as decorations.


Stylish and well-executed interior decor speaks of the excellent sense of taste of the owners, and original decor with handmade candles emphasizes the individuality of the home.
Today you will learn how to make a candle yourself, spending a minimum of time and money.

All that is required from you is just desire! In this article we will talk not only about all the stages and subtleties of creating a candle, but also consider some ideas for decorating candles that will delight the eyes of both hosts and guests.

It may be hard to believe, but making and decorating candles with your own hands does not require any expensive or rare materials.

We will use only what is in the arsenal of any housewife. So, for work we will need:


This is all that will be useful to us in creating our own wax candle. Who knows, what if we end up with a real decorative miracle?

If you have ever watched a master class on candle decor, you know that the work of creating candles begins with making the wick. Regardless of what kind of candle you want to get in the end - wax, paraffin or gel, you won’t be able to do without a wick.

In order to make a wick with our own hands, we only need one single element - ordinary cotton thread without any impurities. If you want variety, take colored yarn, the result will surprise you!

As for the design of the wick, there are several interesting options:

Most often a flat wick is used. It consists of many thin threads intertwined with each other. As a result, three main threads are formed from them, which are also intertwined. This wick is the most versatile and suitable for any type of candle.

Crochet braid - very original solution. This wick is suitable for different types candles and various materials.

A twisted wick is made like this: three parts of the yarn are soaked in a saline solution and left for 10-12 hours. When the yarn is dry, twist all the parts together until you get the wick of the desired thickness.

If you don’t want to bother with making a wick, just take it out of a purchased household candle. Don't forget to saturate the wick with wax in advance to get a beautiful and even flame.

Let's start with the good news - there are no restrictions or strict rules in this matter. Your imagination will have plenty of room to run wild!

The most convenient are ready-made silicone molds, but if you decide to do everything yourself, you can easily use improvised materials. Yogurt boxes, tin cans, plastic cups are all perfect for making candles at home.

For example, let's take a plastic cup from your favorite yogurt. At the bottom, in the middle, you need to make a hole with a thick needle - this will be the place where we will insert the pre-prepared wick.

On one side of it, which remains outside the glass, you should tie a knot - this is done so that when pouring wax, it does not leak through the hole in the glass.

We place any wooden or plastic stick on the top of our form and tie the free end of the wick to it. Make sure that it is sufficiently tensioned and located exclusively in the center - this will ensure even burning and melting of the candle.

If you just wanted to learn the technology of making candles at home, then this step could be omitted. If you need unique candles to decorate your room, don’t neglect coloring.

For this purpose we will take children's colored wax crayons. They are the most the best option because do not dissolve in water, mix well with paraffin and will not “delight” you with a surprise in the form of an incomprehensible sediment at the bottom.
The technology for adding color to a candle is very simple: you just need to select a piece of chalk desired color and grate it. Mix the resulting shavings with cinders wooden stick and send it to melt. This seemingly simple process plays a big role in decorating candles and should not be skipped.

Take a regular tin can and lightly squeeze it around the edges - this will make it easier to pour out the candle. In the same jar we put everything from which the candle will be made and send it all to a water bath.

All you have to do is wait until the material is completely melted and you can start pouring. Remember that you should pour the candle into the mold gradually - first one layer, then the next and so on.

When the mold is completely filled, let the candle cool at room temperature. After this, the candle can be easily removed and the excess wick can be cut off, leaving about 1 cm. Our candle is completely ready - you can start decorating.

In addition to regular paraffin or wax candles, you can try to make more original options:

Gel candles. Making them yourself will not be difficult, because the recipe is already written on the packages of gel wax - use it! A much more interesting process is decorating gel candles. Any decorations that you like are laid out on the bottom of the mold, and then everything is filled with gel wax. The effect is simply incredible!

Aroma candles. As you know, hand-made candles not only have an aesthetic function, but are also able to exude the favorite aroma of the owners of the house. Add a drop of aromatic oil to the candle base, and you can arrange a whole aromatherapy session at home!

The interior of the entire room depends on the correct decoration of candles. If you want to make the design of the room truly original, photos of the decor of candles made and decorated with your own hands will help you with this.

Choose the option that you like, listen to yourself, experiment, create and you will definitely be able to create a real wax masterpiece.


The problem of wealth and poverty has always existed, exists now and in the future too...

Often, owners of summer cottages are concerned about the issue of saving territory. Successful...

Hot water taps are becoming commonplace in the private sector....