Quite often, the population is interested in how to find out if an apartment has been privatized or ...


What to do if you want to somehow decorate and diversify your interior, but do not know how to do it in an original way? There is a way out - you need a topiary, also known as a tree of happiness or a European tree. Today we will look at how to make such a decoration from artificial flowers and fruits with your own hands.


Artificial flowers, an oasis and a gun can be bought at any flower shop. If there is no oasis, then normal fit styrofoam: just cut a circle required size. The gun can also be found at a sewing or hardware store. Please note that the gun glue may be for various materials, their list is usually indicated on the packaging. But if for some reason the choice is poor, then take a transparent one - it is universal. You can also look for a wand in florist shops.

To get started, take a stick - this is the future tree trunk. If you don't have a stick, a few skewers, canapé skewers, or thick wire may work. In the last two cases, you will need to decorate the trunk with ribbon, colored thread or sisal fiber.
After the barrel is ready, connect it to the ball. After making sure that the stick is securely fixed in the ball, we proceed to the design of the latter.
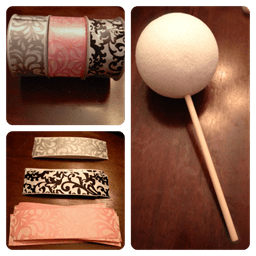
You need to attach the flowers with safety pins to the ball. You can additionally decorate the ball with threads or sisal fiber.
If you are not sure that you have firmly fixed the flowers or ribbon, additionally secure them with a glue gun.
Carefully! The glue is very hot, and it is impossible to quickly remove it from the skin - you are guaranteed to get a burn. The nose of the pistol also gets very hot, although it is hidden in protective insulation, over time it is torn off, and it also becomes dangerous. Keep the gun away from children and animals.
Now let's start decorating the pot. You can wrap it with burlap, paint it with paints or beads, putting them on hot glue.
Please note that the size of the pot dictates to us the size of the entire composition as a whole - keep the proportions.


Tip: Threads remain from hot glue - they stretch from the place of gluing behind the nose of the gun. Do not rush to pull them in the hope of getting rid of them - wait until the glue has cooled, and then safely remove it.
Pre-glue the holes in the bottom of the pot with hot glue.
Attention! Gypsum sets very quickly - in about 15 minutes, so do not hesitate to plant the tree in a pot.

Place the artificial grass in a pot, securing it with hot glue.
Tip: If the supply of glue has stopped, although the glue stick has not yet ended, carefully push it a little with a pencil.
Artificial flower topiaries are distinguished by sophistication and versatility, because you can create your favorite composition at any time of the year. Of course, in order to get a truly realistic picture, you will have to work hard after viewing a single master class! However, the end result will make you erase all the difficulties of the workflow from memory, making you enjoy only the end result.
Such crafts are very modern idea which has acquired its relevance relatively recently. Any person can cope with the task, even an amateur in matters of hand made. The main thing is to clearly observe the proportions and the basic principle of work.
The tree itself can perform several purposes at once:
By the way, it is better to make a grass topiary somewhat larger in height than a traditional flower arrangement. This is explained by the fact that such a composition will look much more convincing in enlarged sizes and, if the performer wishes, it can even outwardly resemble a real tree! However, unlike their live equivalent, topiaries do not have to be watered, fertilized, etc.
Unusual ideas for creating coffee bean topiary:
At the same time, the form of the composition does not change: everything is also a rounded tree in an exquisite pot. Of course, it will take quite a lot of time to paste over the crown, because gluing small fragments of artificial grass can sometimes be very tasty and monotonous! But you need to be patient! In any case, the end result will justify the efforts.
Topiary of perfect artificial flowers begins with the manufacture of a "tree" and the selection of the right pot for it. The "plant" itself consists of crumpled paper worn over wooden stick- everything is very simple and concise. It will be much more difficult to decorate the product in the future. One of the most important issues is the choice and decor of the pot, which plays an important role in this tandem.

And you can achieve harmony thanks to the following improvised materials:
Recently, the so-called shabby style has gained particular popularity - chic, characterized by blatant simplicity of lines and some negligence. The pot must be painted with a single-color paint, leaving scuffs and underpainting on purpose. If it was not possible to achieve this during the work, you can use sandpaper which will immediately solve all problems.
When installing a tree in a pot, you need to make sure that it is securely fastened. This can be achieved by pouring concrete into the dishes, and leaving the structure to dry for about a day. Now there is no doubt: the topiary will stand securely in place and withstand the loads that the future decor will place on it.
Any master class for making topiary makes this process accessible to everyone: parents, children, teachers, students. The main thing is the desire to concentrate attention and, in the end, to get a really stunning result.

For these purposes you will need:
Moreover, all selected elements may vary depending on the wishes of the performer. The main thing is that none of them stand out from the general ensemble.
When preparing artificial flowers for work, it is necessary to remove the legs from the root by treating the cut with sandpaper. Thus, it is possible to ensure a tighter fit of the material to the base. In order to make the composition look more realistic, the crown of the tree can be wrapped with artificial grass, giving it more natural look. As a "highlight" of the composition, small birds can act, snugly hiding in a green skinny.
The topiary will be exactly the way the master sees it! And this is the main advantage of such work!
That is why, starting work, you should keep in mind such a Talmud:
In order to create an exquisite topiary, it will take no more than a day. Artificial grass, flowers or decorative elements behave equally well in caring hands. Especially if the composition is made as a gift to a good or close person.


House and apartment design » Interior » Decor elements» Compositions of artificial flowers. 100 photos and ideas. Do it yourself for the interior
Today's article is devoted to interesting and unusual ideas artificial flower arrangements. Otherwise, we may have already learned how to make flowers for decoration from various materials, but unfortunately, there is not enough imagination to put it all into an attractive art object. Let's take a look at the most popular today's campaigns for the design of such decorative element like a bouquet.
If you are doing the central composition of artificial flowers, which is erected in the center of the room, most often the living room, and attracts the most attention, then a great idea is a small work in which large inflorescences are connected. In this case, nothing distracts from the beauty of the plants themselves, from the combination of shades. In the photo below you can see what the described interior flowers look like.
Of interest are both monofloral decor, in which plants of one type and one shade are usually used as the main component, as well as works of different textures. You have an example compositions of artificial flowers, photo which demonstrates what this principle of building a bouquet looks like. Cream roses in combination with delicate daylilies are made according to the principle of common shades, in a soft color scheme. Whereas the combination of peonies with hydrangeas, roses and chrysanthemums is completely built on the principle of contrast, when one shade emphasizes and sets off the beauty of another.
If for classic interior absolutely conservative in terms of form and content are suitable artificial flower arrangements, then for modern interior a bouquet can become another characteristic decorative element that emphasizes original taste their owners and their desire to comply with fashion trends. A combination of glass containers, vases, flasks, spheres with bright accents is very popular today. In the photo you can just see an example of these flower arrangements. It is here, as nowhere else, that the use of imitation is justified, because the shape of these vases is sometimes so unusual that living plants would not have a chance to survive in it for a long time, while maintaining an attractive appearance.
In addition, the popularity of environmental motives in modern design and it is precisely in it that non-natural plants have the greatest relevance. They connect in unusual DIY artificial flower arrangements along with tree cuts, roots, vines, grass. Moreover, such compositions of artificial flowers, as you see in the photo, are quite simple to do with your own hands, having already necessary components such as purchased plastic or fabric plants, grass, leaves, as well as branches, roots, even dried hay and grass brought from the forest or park. The easiest way is to pick up a wide vase or salad bowl, opaque, lay the material on the bottom like a floral sponge, that is, one in which all the elements will be securely fixed. Needs to be placed first wooden blocks at certain intervals, and then fill the free space with bright accents.
Unusual compositions of artificial flowers for the interior is today a very popular way to bring bright accents in modern apartment design. We want to show you two great ideas how to look at such crafts in a new way. The first idea is to place the bouquet not in a vase, on a horizontal surface, but directly on the wall.
It is the idea of vertical placement that unites flower arrangements of artificial flowers for the interior, images of which are posted above. In fact, attaching such elements to the wall is not so difficult if it is painted or pasted over with good quality wallpaper that will survive the addition of a decorative element without consequences for appearance. The main thing is that the bouquets do not have big weight, were bright and had unusual shape. Very often in numerous tips for this kind of crafts there are variations of the flower envelope, which we show you in the photo. It is made monolithically, that is, the stems are glued to inside paper or cardboard, so changing the arrangement of the elements will not work. However, the work itself is so simple that you can change it from season to season.
Vertically placed artificial flowers in the interior are not only hung on the wall, because bouquets hanging from the ceiling are both avant-garde and stylish. This fashion trend originated from the wedding and banquet hall fashion and has taken root so well that it is used to decorate an apartment on an ongoing basis. You can buy compositions of artificial flowers for the interior ready-made or made based on other techniques (for example, flower balls on ribbons are inspired by topiaries, and others are fashionable geometric volumetric shapes).
We hope that today's examples have shown you that whatever the options compositions of artificial flowers - in a vase, as part of crafts, in avant-garde combinations - this is a great opportunity to decorate your home and make it even more individual.
Master Class: flower arrangements"Flight of Fantasy"
Belashova Tatyana Anatolyevna teacher of the first junior group
Municipal Preschool Autonomous educational institution Kindergarten general developing species No. 11 MO Korenovsky district
Work description:
The master class is designed for parents and teachers, all creative people. I bring to your attention five compositions at once, I called the master class “Fantasy Flight”, each flower tree is your fantasy and such trees also symbolize in different ways when you do this original gift, be sure to put your “whole soul” into your work and then the result will be 100%.
Not a lot of history, we all know that the art of topiary has a long history. Original small trees, for the manufacture of which natural and artificial materials, your imagination and each tree will be original in its own way, it is very nice to receive such a craft as a gift and decorate your home with it.
Purpose:
The flower tree is intended for a gift to friends, acquaintances, as well as for interior decoration. Learn to create a flower tree from improvised material of artificial flowers, ribbons, beads.
develop creative imagination, fine motor skills of hands, eye and of course patience.
Develop accuracy, cultivate perseverance when creating a flower tree. In this master class, I will show you how to make five artificial flower topiary at once.
This is the beauty we will create with you:
To create our topiary we need:
Materials:
1. Flower pots
2. Artificial flower heads
3. Gypsum, water
4. Artificial grass (lawn)
5. Glue gun
6. Various decor (ladybugs, butterflies, grapes)
7. Skewers
8. Plastic ball
9. Ball
10. Penoplen
11. Tape tape
12. Toothpicks
13. Coffee beans


step by step works:
Each master in the manufacture of topiary uses the basis at his own discretion and for money. I tried many ways to make the base of a tree, the cheapest is to crumple the newspaper and wrap it with cling film to form a ball, flat paper or fabric flowers are easily glued to this shape, foam balls or children's balls are used to insert flowers or fruits with toothpicks straight into the ball, using a glue gun, if you make a heart, you can use foam (sold at any hardware store). To start making trees, you need the pots to be filled with plaster and of course have time to dry
And so we begin with the preparation of pouring gypsum into pots, dilute gypsum with water, set the "barrel" in this case I used 6-7 skewers


You don’t need to insert the barrel right away, after 10 minutes, when the gypsum turns into a thick “porridge”, you can insert the “trunks”


1. The first tree "Our Kuban sun"
For this tree, I used sunflower heads, coffee beans


2. The second tree "Passion"
In this tree, I designed the bottom, when the gypsum had not yet hardened with the help of canapes and grass, I inserted it into soft gypsum


3. The third tree "Tenderness"
For this tree, I used very delicate flowers, similar to jasmine flowers. Decorated the bottom with flowers, butterflies glued with hot glue


4. The fourth tree "Vine"
In the manufacture of this tree, I used artificial grapes, artificial grape leaves, flowers purple, and various decorations.


5. Fifth tree "Breath of summer"
This tree consists of a different set of wild flowers and you can arrange it at your discretion, the bottom can be arranged like this


In the end, our tree will look like this
To decorate your home original composition you don't have to look for it in the store. , created with your own hands, will surely fill your home with warmth and comfort.
Materials that will be required in the process of work:
- transparent vase;
- colored chalk;
- fine salt;
- grater;
- glue gun;
- artificial flowers;
- bugs for decor.
Prepare crayons and a vase. Its surface must be clean and dry.
Grate the chalk on a fine grater. The powder should not contain large particles.


Mix salt and crayon powder in separate bowls. Depending on the size of the vase, determine the number of tablespoons of salt for each layer so that they are the same height.
Do colored salt using chalk is quick and convenient, but the color is not very saturated. If you want to get bright shades, then try painting the salt with gouache. It will take a little longer, but the colors will be richer.
First, take five tablespoons of salt and add 7 ml of gouache, some water and mix thoroughly. The color must be uniform. Then put the salt on thick paper and dry it. To speed up this process, salt can be placed in the oven.
You can mix as you wish. different colors and get unusual shades of paint.
If your salt is coarse, then it must be crushed. Place in a bag and carefully go over it with a rolling pin.


Now fill the bottom and pour the second layer. You need to pour with a spoon, first from the edges, and then in the center.
To achieve the effect of "weaving" the layers, use a cardboard funnel to fill the container.

Alternate colors and make sure that the layers are the same. To make them wavy, sprinkle a little more colored salt on one side. And when you cover everything with the next portion of salt, the position of the previous layer will be fixed.
During operation, try not to tilt or shake the container, otherwise the layers will mix and the boundaries between them will become fuzzy.
This is what a filled pot looks like.

Prepare artificial flowers. Measure the desired height and cut off the unnecessary part.

In order for the flowers to adhere well to the base, you need to fix the surface above the salt with hot glue. First, circle the rim of the vase with hot glue. This must be done quickly, otherwise the glue will cool and not be fixed.

Then apply glue in a circle and make sure that there are no gaps between the strips of glue.


In this case, the flowers were very tall and did not harmonize with the vase. Therefore, the stem of the flower is glued to the floral wire. So we have achieved the desired height of the stalk.
Quite often, the population is interested in how to find out if an apartment has been privatized or ...

In all organizations, as a rule, sooner or later there is a change ...

A lot of people are thinking about how to find out whether an apartment has been privatized or not...