How I got cancer. Rami Blekt Intro to number four...

Recently, the origami technique has become very popular not only in our country, but also abroad. People began to attend master classes of this type more often. Let's first understand what art is. Origami is a technique for working with paper. She came to us from Japan. The advantage of this technique is that the figure is voluminous. But today we will hold a master class and teach you how to make paper origami birds. A very long time ago, people believed that a bird is a symbol of goodness and prosperity. She brings happiness and health, protects the peace of the house.
In this technique, we can make different figures of birds, animals, flowers, household items (such as a glass, a box, an envelope, etc.). Origami is also of a different kind, a little more complicated, it is called modular. The essence of this technique is that the figures are made from modules. In order to make some kind of figurine, first you need to make paper required amount modules, and then from them to make the figure you need.
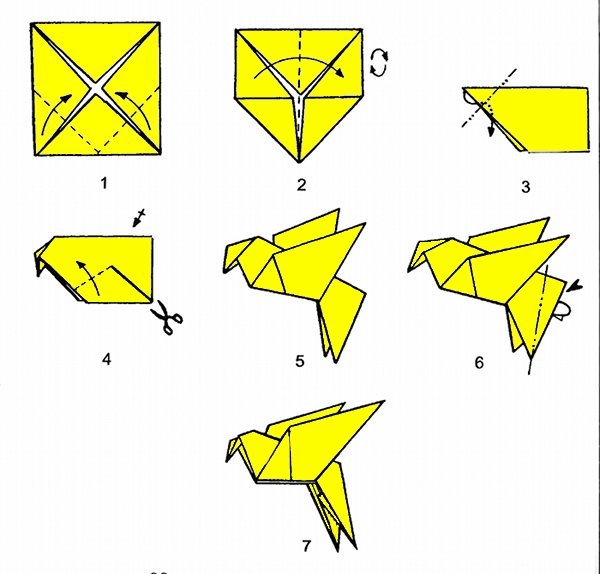
To begin with, let's try to make an easy origami, it will be such a dove.
We can decorate the children's room with them, and if we take beautiful paper, then even with such birds you can decorate a banquet hall for a wedding or wedding anniversary.
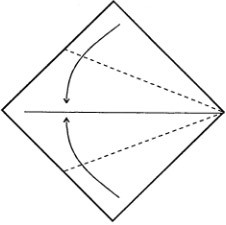
1) We need a square sheet. Let's bend it diagonally.
2) And now we need to bend the corners of the sheet to the center line.
3) Bend the corners to the center again.

4) Turn over our workpiece to the other side.

5) Fold it along the longitudinal axis.
6) Bend the left corner inward.

7) And its upper tip is also bent inward. This will be the nose. So in a few minutes we made a dove. It remains only to draw his eyes or decorate him, but this is up to you.

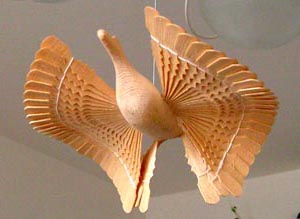
Basically, the bird of happiness is made of wood. They used to say that if you hang wooden toy above the baby's bed, then she will protect him and protect him from all ailments. Let's see pictures of these wonderful birds.

Today we will show you how to make this paper bird.
![]()
To do this, we need two sheets of A-4 format, preferably white color, PVA glue, scissors, ruler and pencil.
Now let's move on to the scheme of the bird of happiness.
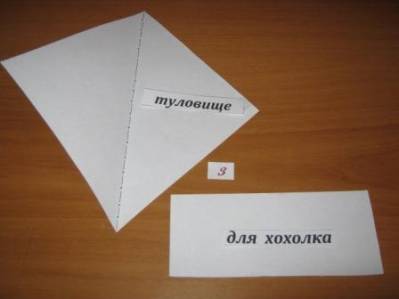
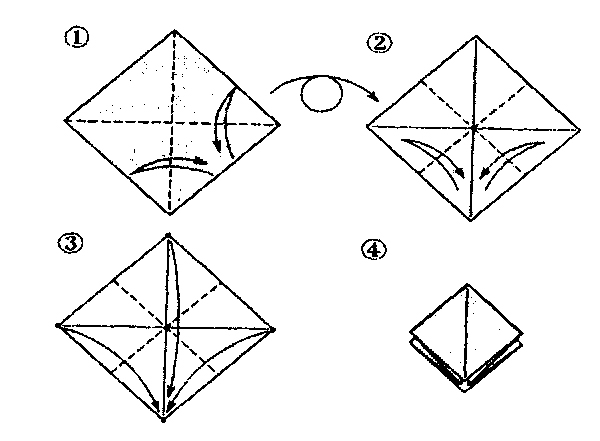
1) Take a sheet of paper, bend it in half to make two rectangles. Cut the sheet along the fold line. One rectangle needs to be bent so that a square is obtained.

2) Now we cut off the lower part of the rectangle, it will remain for the tuft.
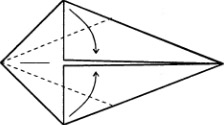
3) Take our square and bend both sides inward towards the middle. We do this from both ends.
![]()
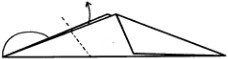
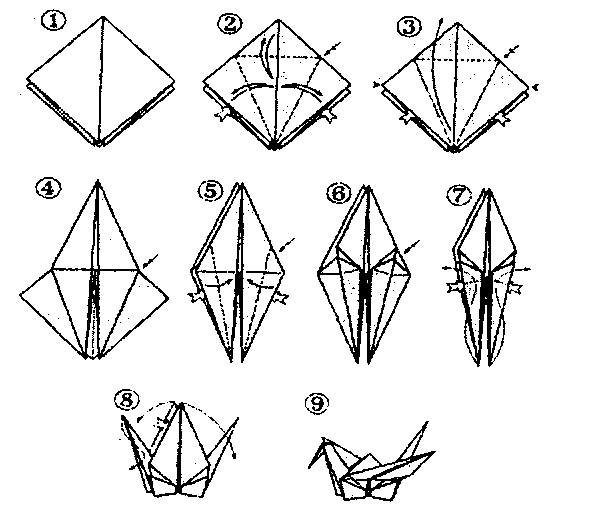
4) Then we bend our workpiece in half so that we get an isosceles triangle.
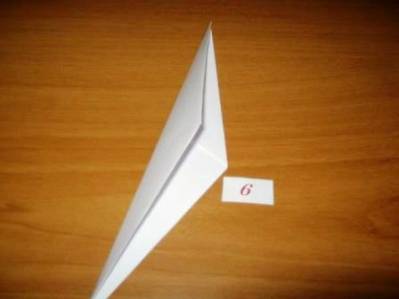
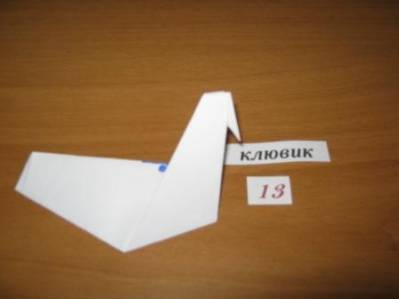
5) Now you need to bend the acute angle of our triangle as shown in the photo. This will be the head and neck of the bird.

6) And the other corner is also bent, as shown in the next photo. This will be her tail.

7) The end of the tail must be tucked in.

8) Let's move on to the head, now we need to make a beak. To do this, fold the ends of the workpiece along the fold inward and pull it outward. Here is our body and it's ready.
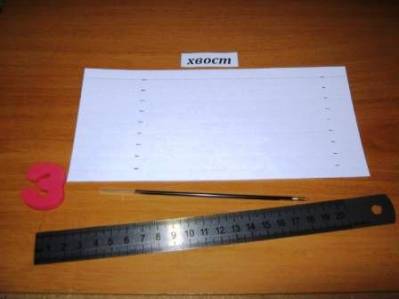
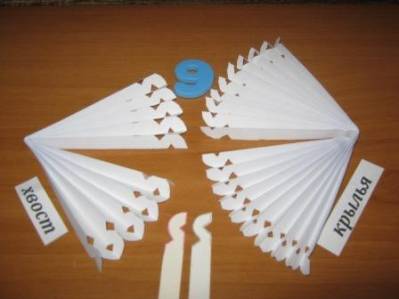
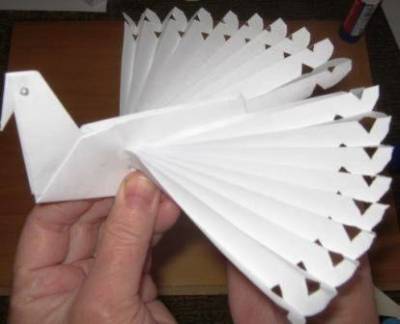
9) Now let's make the tail and wings. We take the second sheet of paper. For the tail you will need a size 20/10, and the rest will be the wings.

10) We need to make a blank for our tail. To do this, we use a rod that does not write, and draw lines through the entire sheet of paper 1 cm in size.

12) Then you need to decorate our additional elements, for this you need to apply beautiful pattern along the edges of the tail, wings and crest.
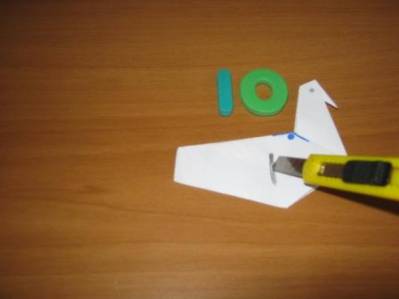
13) In order to insert the wings, you need to carefully make a cut in the base form.

14) We glue the last strips of wings to the body, and glue the tail into the crevice of the back.

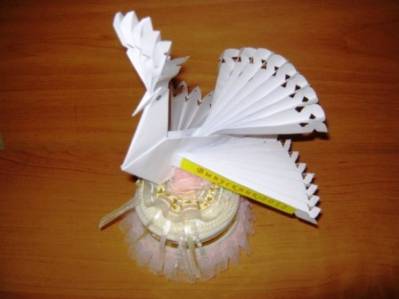
15) The tuft must be glued into the crevice of the head, which was formed when the beak was bent. And we ourselves finish the eyes of our beauty. Here the bird of happiness is ready. May it bring you prosperity, luck and happiness.
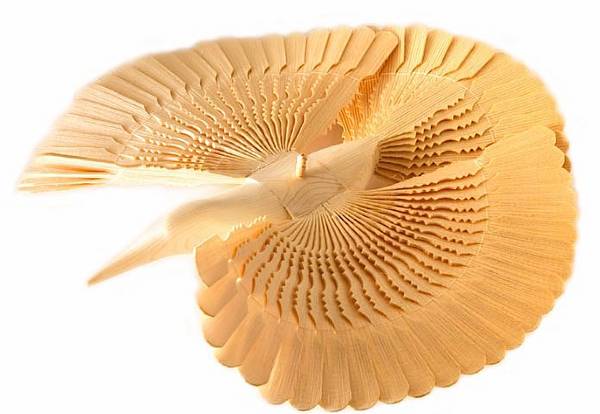
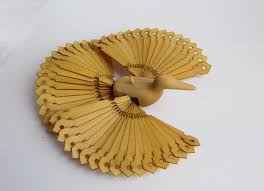
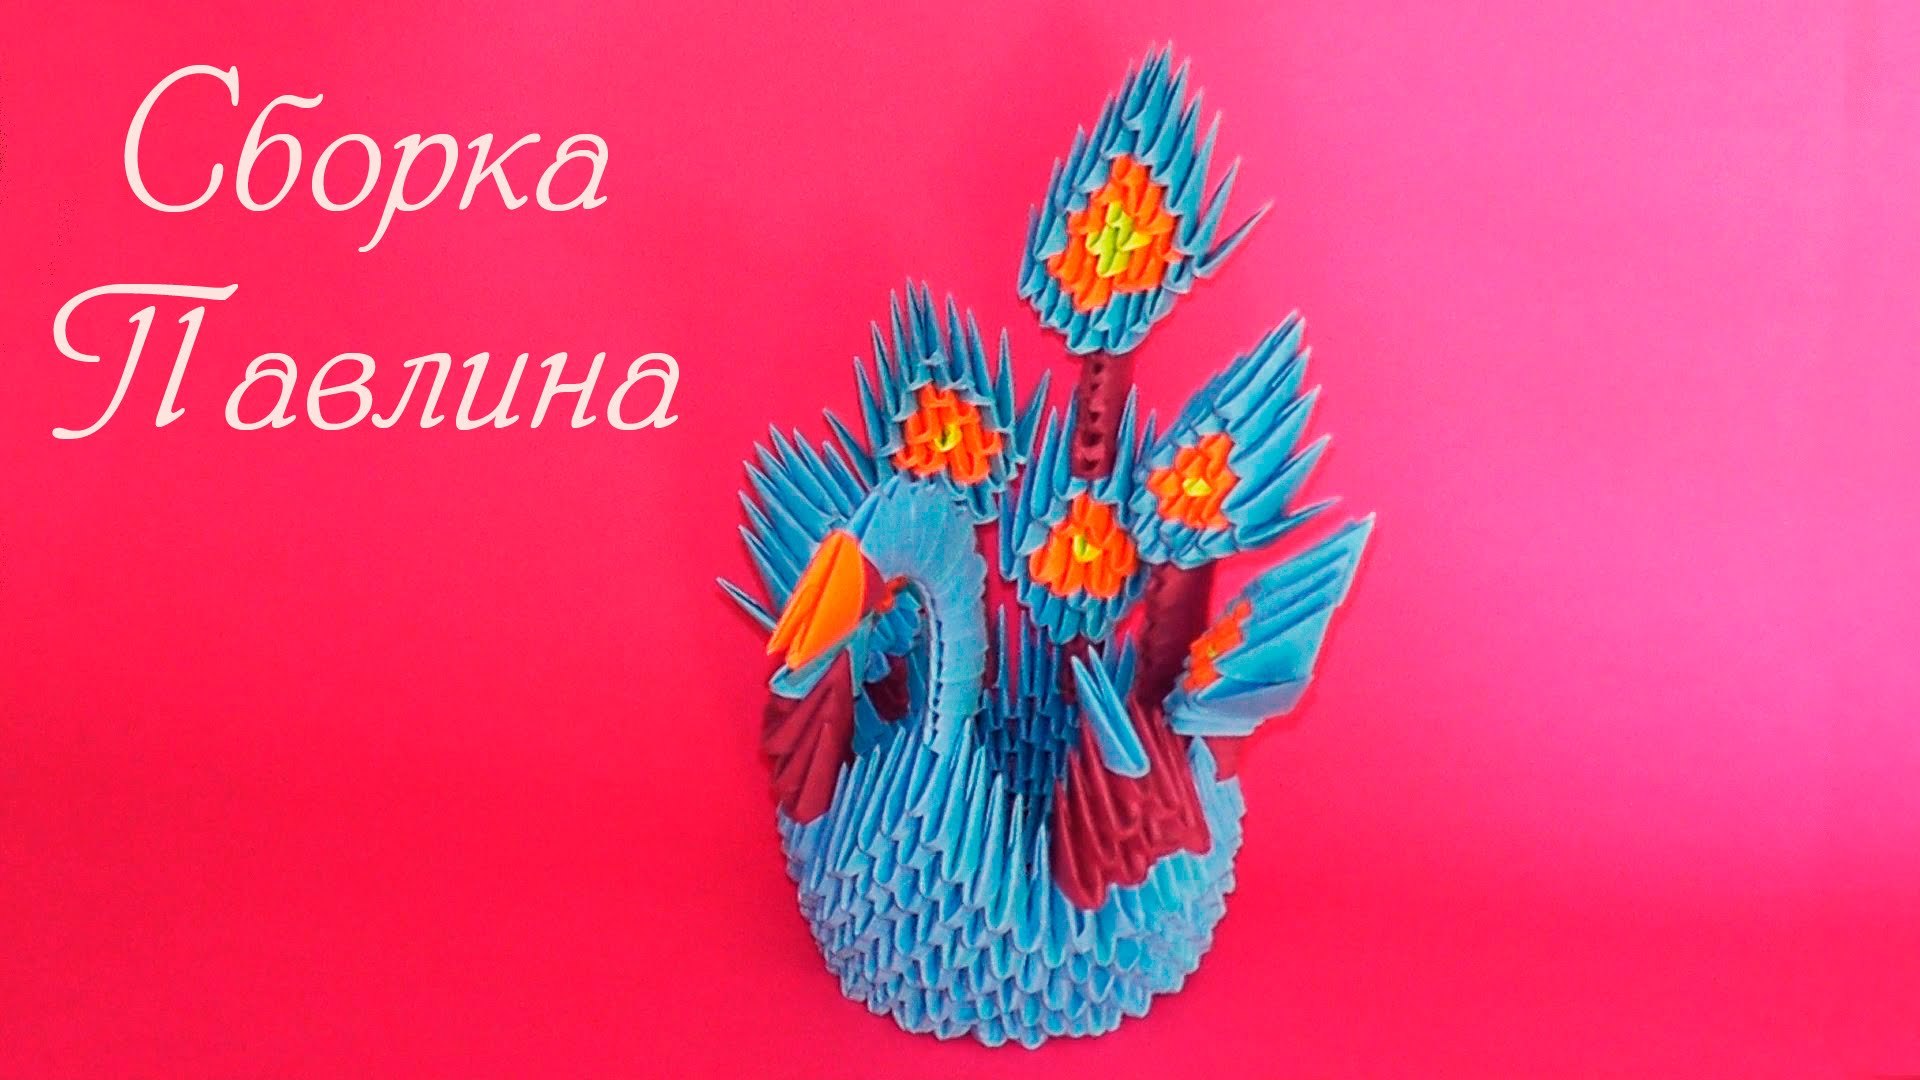
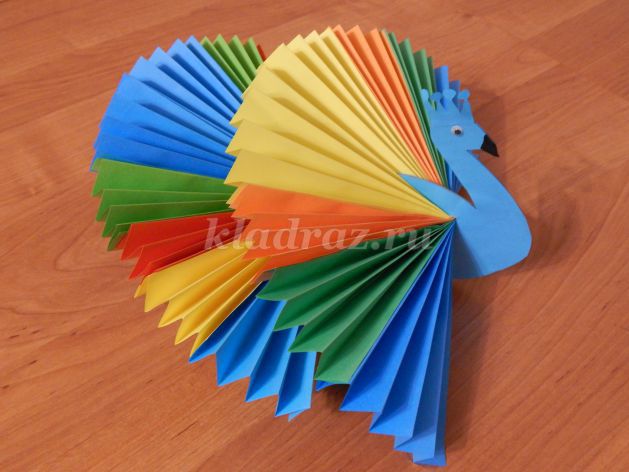
And now we suggest you watch a video on how you can make a king bird in the modular origami technique, or it is also called the Firebird. This figurine will a good gift for any celebration. Also decorate your home, room or office. To get started, we suggest viewing a photo of this wonderful craft.

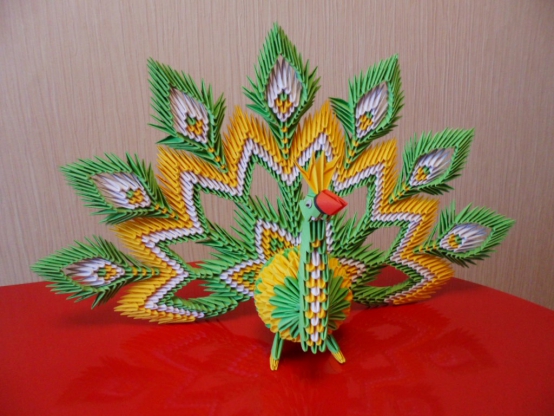
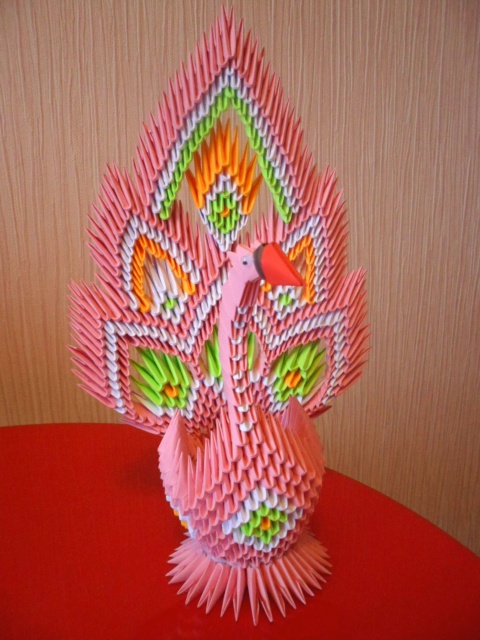

But first, we need to make the required number of modules that the bird will need: 217 blue, 45 white, 15 orange, 1 blue, 128 purple, 252 green triangular modules. And you can find the algorithm of work in the video.
If you have learned how to make origami birds that we showed you, then we suggest watching a few more videos on making other origami birds.
The purpose of the master class: introduce children and parents to the technique of origami.
Tasks:
Equipment and materials: colored printed paper, scissors, stapler, awl, decorated hoop with threads, clerical knife, tape recorder, music disc.
PROGRESS OF THE MASTER CLASS
Introductory part:
Hello dear parents. We are glad to see you and offer to make a bird of happiness together with your children, which will bring good luck and happiness to your families on its wings, and the joint production of a bird will bring you closer to your child.
Main part:
- We will make a bird of happiness out of paper using the origami technique. (Soothing melodic music plays)
You have two colored sheets of printed paper of the same color on your tables. We need one sheet for the bird's body and tail, and the second sheet for the wings.
Please take one sheet and fold it diagonally, make a square out of it (showing). Excess from the sheet you need to cut off this will be the tail of the bird. Set it aside.
- Did everyone make it?
We fold a bird out of a square - origami technique. Origami is the art of paper folding, which means “folded paper” in Japanese. This technique originated over a thousand years ago.
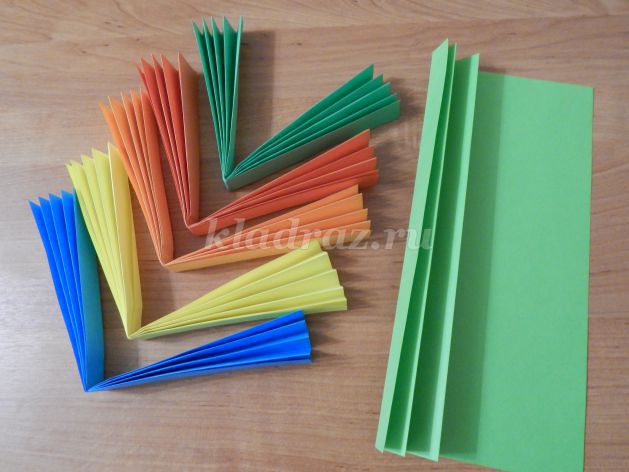
From the rest of the first sheet of paper, we will make a tail, folding it into an accordion 1 cm wide. Then, with small scissors, we will make undercuts at the tip of the tail and make triangular cuts along the entire length of the tail.
Take the second printed sheet of paper, make wings out of it, folding it into an accordion 1 cm wide. With small scissors we make undercuts at the tips of the wings and make triangular cuts along the entire length of the wings.
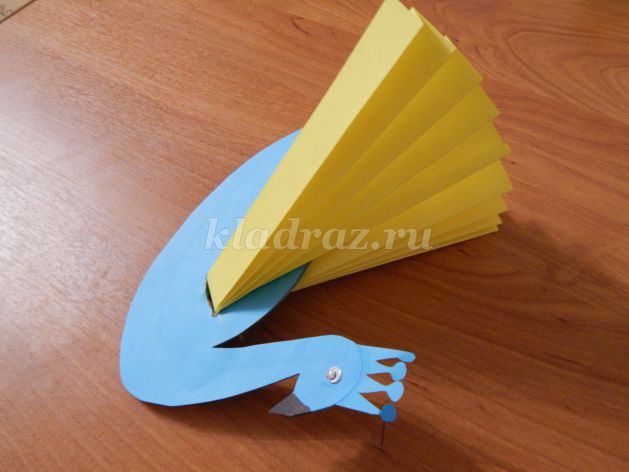
We make a hole in the body of the bird. To do this, we fold the workpiece - the body in half across. On the fold, we cut out a through slot, into which we insert the openwork wings, straighten them. Glue the tail.
Final part:
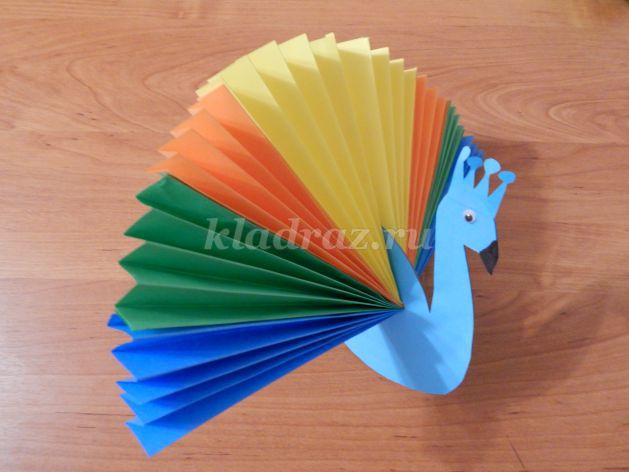
- We made a bird - a symbol of goodness, peace, love!
– Our happiness birds are ready, how beautiful and bright they turned out. Now we will fasten them to strings, on this decorated hoop. And we will hang the hoop in the gazebo on the playing area. They will delight us with their beauty every day.
- Thanks for participating. Goodbye!
Paper crafts are a wonderful way to have fun with friends and children, make original gift and just improve fine motor skills. Origami birds are created most often, since their schemes for beginners are the most understandable, and the resulting product is quite original and presentable.
The most active in the origami technique are cranes, swans or pigeons. Owls, gulls, and other representatives of the fauna are less popular, and more often precisely because of the difficulty of working with them. There are, of course, a lot of schemes for each of the birds: they differ both in the required level of training and in general view figurines.
All of them imply the presence of colored or plain paper, which will not tear from too frequent manipulations at a particular point, but will also be easily deformed. In addition, you often have to resort to using a simple pencil, ruler, protractor and scissors. However, in some algorithms, these devices may not be needed.
Paper swan is the easiest to make. You can often see such a bird as an element of table setting, when large napkins are folded in this way, placing them on an empty dish.
For manufacturing, a large sheet of paper in the shape of a square is required, on which a central line is outlined, and the side corners are tucked to it. The figure resembles an elongated rhombus. The triangles that made up its long part are bent internal corners, and the figure along the middle vertical is again folded in half.
The sharpest corner (lies at the base) is bent diagonally so that this part forms a perpendicular to the base, and its tip is directed by a new fold outward to the side. The head and neck of the swan are ready. It is enough to bend the tail along parallel diagonals twice with an accordion, and work with this origami bird is completed.
The dove is a symbol of peace and the easiest origami bird to make. There are certainly a lot of schemes for him, and beginners are encouraged to use the one that includes only 7 steps. You will need to stock up on colored paper, cutting out a square of 20 by 20 or a little large sizes so that it does not occur special difficulties when added. On the initial stage you will need to place it in front of you like a diamond, and then bend all the edges inward, aligning the tops in the center. You should get a square envelope.
Now the lower corners of the figure are tucked up to the center line and bent, turning the square into a pentagon. After that, along the same median vertical, it is folded, and the paper is rotated. Its widest side looks up, the acute angle is to the left, the diagonal goes down. At this step, an acute angle is bent, which will become the beak of a dove: it is advisable to stick to a diagonal of 45 degrees. However, it should be understood that it does not go back or forward, but folds inward, between the halves of the paper. And the top line will now bend the other way around.
Next you need scissors: at an angle of 45 degrees at the bottom right angle a diagonal cut is made. If it is difficult to determine its length by eye, you can find the middle on the right side of the figure, draw a line along it along the base, and the point of intersection of this line with the diagonal from the right angle will become the place where the incision ends. The left part of it is bent outward, forming the wing of a dove: this must be done on both sides.
The right one remains lowered: this is the bird's tail, with which 1 more manipulation must be performed. From acute angle start a diagonal to the upper base, measuring an angle of 20 degrees, and then bend the edges of the figure along this line inward. This completes the creation of an origami paper dove.
You can use another scheme of the same bird, which already includes 11 steps, but for someone in execution it may seem simpler than the previous one. A sheet of paper is selected with the same parameters, and is also located in the projection of the rhombus, after which it is folded in half along a vertical line and straightened back. Then the side parts must be tucked to the same middle, combining them with edges, and bend the top back.
The next step is to outline the lines: the side corners of the resulting triangle are folded towards the middle and straightened, then each of them bends outward, but only along the front side, so that the top remains intact. She will become the head of a dove at the final stage.
The lower ends of the side bends need to be removed inward, the angle at which this is done is taken as minimal - 7-10 degrees. After that, along the middle vertical, the figure is folded by moving away from itself: i.e. those sides that were in your field of vision should remain in sight, being external. Then the product is rotated so that the median line along which it was bent looked diagonally upwards: this is the back of the bird.
It remains only to bend the head inward - the upper corner, and fold the tail. The latter is reproduced as follows: first, the part is folded and straightened along a line close to the base, then along the one that is 0.5-1 cm (depending on the original paper size) to the right of it. Now, thanks to the outlined lines, it is easy to bend the latter with a movement of your finger so that it hides inside the bird. A simple origami dove is ready.
There were legends and songs about the bird of happiness, and for sure many at least once were interested in how it looks. However, its appearance in the minds of each nation is different: in particular, in Japan, the crane is called the bird of happiness. In this East Asian country, there is a belief that 1000 of these origami birds are able to fulfill even the most unrealizable, but innermost desire. Of course, this is just a beautiful fairy tale, but perhaps by the time when the 1000th crane flutters out from under your hands, your old dream will really come true?
To create such a bird, you need paper, preferably colored on both sides. Sheet sizes of 18 by 18 or 24 by 24 are preferred, because smaller settings make it harder to work out every detail if there is no significant experience in origami. And the last nuance that is important to consider when choosing paper is the degree of its softness and strength. Often you have to bend and unbend 1 line several times, after which some materials begin to tear at this place, which reduces the result to “no”.
Target: children and parents with origami technique.
Tasks:
teach parents how to make a bird of happiness using the origami technique;
to form the need to acquire new ones;
create a favorable atmosphere for informal children and parents who are passionate about a common cause;
develop aesthetic taste, sensory experience, creativity.
Equipment and materials: colored double-sided paper, scissors, decorated hoop with threads, pva glue.
PROGRESS OF THE MASTER CLASS
Introductory part:
– Hello dear parents. I am glad to see you. For my self-education, I developed a creative project "Magic Paper". Today I suggest you, together with your children, make a bird of happiness out of paper, which will bring good luck and happiness to your families on its wings, and making a bird together will bring you closer to your child.
People have always wanted to be happy. Since ancient times, they believed that there is beyond the seas and forests amazing bird who carries happiness on her wings. And if you really want to, then the bird of happiness will surely someday fly to them. It seemed to everyone that this bird should be unusually beautiful, and a bright and warm light emanates from it, which can warm everyone - all people with its warmth. Everyone dreamed of meeting a bird of happiness, so that she would bring joy, goodness and beauty to his house. But not everyone was visited by a bird. She visited only that house, where they loved each other, cared for others, worked with soul and did not refuse to help the poor and sick. Here she is a bird of happiness!
I suggestmake a bird of happiness using origami technique. What is origami?
Origami("folded paper") - the ancient art of folding figurines from. The art of origami has its roots in ancient China, where paper was invented.
Before starting our work, we will do exercises for our hands.
Finger game "BIRDS AND WIND"
little birds,
They fly through the forest
(thumbs of both hands are clasped, depicting the wings of birds)
(we wave our arms like wings)
Songs are sung.
(hands imitate the open beaks of birds)
A violent wind has blown
(We perform wave-like movements with the wrists)
I wanted to take the birds.
The birds hid in the hollow
(we bring the hands together, form a cocoon)
No one will touch them there.
(“we threaten” with the index fingers of both hands)
Main part:
Let's get to work.
(Soothing melodic music plays)
-You have two colored sheets of paper of the same color on the tables. We need one sheet for the bird's body and tail, and the second sheet for the wings.
Please take one sheet and fold it diagonally, make a square out of it (showing). Excess from the sheet you need to cut off this will be the tail of the bird. Set it aside.
– Did everyone make it?
We fold a bird out of a square - origami technique. Origami is the art of paper folding, which means “folded paper” in Japanese. This technique originated over a thousand years ago.
From the rest of the first sheet of paper, we will make a tail, folding it into an accordion 1 cm wide. Then, with small scissors, we will make undercuts at the tip of the tail and make triangular cuts along the entire length of the tail.
– Our happiness birds are ready, how beautiful and bright they turned out. Now we will fasten them to strings, on this decorated hoop. And we will hang the hoop in the reception of our group. They will delight us with their beauty every day.
- Thanks for participating. Goodbye!
Master class with step by step photos"The Bird of Happiness"
Author of the work: Pfaf Tatyana Mikhailovna, social teacher of MOAU "Secondary School No. 35 of Orsk"


How I got cancer. Rami Blekt Intro to number four...

Luck is one of the most unpredictable phenomena in a person's life. Its impossible...

The other world is a very interesting topic that everyone thinks about at least ...