"The woman is created for a man, not a man for a woman" - such a postulate ...


The laboriousness of the work in the construction of a four-tie roof is non-aid higher than the usual two-tie, but this does not mean that the four-tie roof is built with their own hands as simple as the usual, with two symmetrical skates. The main difficulty is that the four-tight roof requires a very accurate engineering calculation and technology knowledge, especially if you do not have good practices in the construction of this kind of roofs.
Why is the usual two-sheet roof suitable mainly on simple economic buildings, and for residential premises a four-sheet roof is chosen:
Important! The design of the roof in four slides, unlike the "doubles", has a high degree of adaptation.
For a climate with a large amount of precipitation, a Danish version with steep basic rods and two hips, for the steppe zone with strong winds, a low tent frame with large overhauls and an average tilt angle is perfect.
The most convenient will be the use of a four-piece roof in homes, where the attic room is not highlighted in the form of a residential area, but is used for economic purposes. Due to the appearance of two additional slopes, the space and useful attic area decreases by about 25%. But if desired and sufficient sizes of the attic room, instead of a attic, you can equip a small room, even with windows and a balcony, as in the photo.
But in this case, instead of a simple system of vertical racks, which relies with the skunk run, in the design of the four-page roof, it will be necessary to establish additional horizontal beams - the riglels that will play the role of ceiling overlap for the attic room.

First of all, it is worth dealing with the 4-stranded roof in the details differ from the double-stranded version.

The main difference between the rafter system in 4 skate from the double symmetric roof
Differences in the design will be most visual on the diagram with a simple rectangular version of the four-tie roof shown in the photo:

Important! Most of the elements of additional slopes require a very careful fit, so often diagonal rafters and narons are collected with preliminary "grab" on self-drawing, and only after final adjustment is replaced with a bolted compound or nails are replaced.
The most difficult in the construction of the rapid fourth roof system is the stage of hanging diagonal rafters. First, the angle of inclination of the diagonal rafters and the pressure with which they are based on the ski run, should be equal to the parameters of the pair of accident beams on the other side. Squate area and tilt angles in a four-piece roof must be absolutely equal.

Secondly, the imaginary line conducted between docking points or vertices of triangles formed by diagonal rafters on both sides should pass exactly along the axis of the timing of the skate run, both horizontally and vertically. In order to correctly align and adjust the position of the diagonal rafters, consists of the main difficulty of assembling a four-page roof.
At the stage of preparing the assembly of a four-page roof, laying the board or timber of Mauerlat, while it is important to thoroughly align the plane of the horizon board. There are preliminary marking of places for the installation of side rafters, shpotelnoe supports and tightening. Installation of a four-piece roof is greatly simplified if the reinforced concrete plate is used as the overlap.

After layering and fastening the tightening, they collect the skate frame or "bench". In fact, this is a rock timing bar installed on vertical racks. Racks are sewn the longitudinal and transverse crackers, which ensure the stability of the frame until the rafter assembly of the holmic rods.
Before the layout of the diagonal rafters, the skate frame is necessary to stop the pair of temporary beams, which are attached to the Mauerlat and to the extreme rack "benches". This will not allow the ski frame to overturn under the pressure of the diagonal rafters on the other side.
Next - the most difficult. First, they determine the real length of each of the covered beams, for this, at the point of the support on the end of the skate bar, a nail and the cord is measured from the length of the nail to the point of support on Mauerlat. Before installing the diagonals, each of the emerging rafters are measured and cut down on its length of the cord.

By setting the invoice elements to Mauerlat, determine the contact line and drove the contact surface. Cutting the plane of the support of the axial beams, they are placed on the end of the skate run.
The lower ends of the diagonal beams are installed in the angular joint of the Mauerlat vehicle with a cutting of the beam support surface according to the diagram. Sometimes the form of the subsidement is performed according to the template, but it is more reliable to perform the markup of the line manually.
Ideally, an imaginary vertical plane, carried out through any covered rafter, should be parallel to the plane of the hosted bar located on the opposite side of the four-sheet roof.
If everything is done correctly, the two diagonal rafting beams of the four-page roof will become exactly along the axis of the skate bar. To avoid a deflection, sufficiently long accesses, it is necessary to install a scroll and shrgel supports with the installation of temporary fasteners from the screws. Similarly, installed rafters from the opposite skate and align the elements with maximum accuracy. To increase the rigidity of the hollow rods, on the edges of the diagonal beams are cut and installed by several nigs.

After moving to laying ordinary rafting beams. Mounting on Mauerlat is performed by a standard bolt-nut compound or with steel corners. In the upper part, the rafter board is usually wedged along the pattern and stacked on the ram of the skate.

Usually, after hanging in the row at the skate run and Mauerlat, additional begles are installed in the upper part, which reduce the operating action of the fetal roof frame. After installing all the rafter beams and the alignment of the main power elements of the four-page frame, they switch to capital attachment of all rafters on Mauerlate and the skate run.
At the next stage, a cracker under ordinary rafters are installed and attached, "a" driving "of triangular rods with narcent beams is performed. Each of these members is cut into its length according to the scheme below and are installed in a checker order, it avoids the weakening of the beam due to the coincidence of the marbles from opposite sides.
All elements are fixed with nails, self-drawing and bolted compound with overhead steel plates and corners.
After assembling the main frame of a four-piece roof on the ends of the rafted filling of the kobycki - short boards forming a row of the roof over the wall. In the ends of the mare, the cut line is measured, cut the ends to be in the same plane, and the cornese board is coated. The lower part of the koblok is chipped by clapboard or ordinary board.
After processing wood beams, the antiseptic composition go to the packing of the shell boards. The thickness of the boards, the amount of material and the point of clogging of nails is chosen, based on what kind of roof is planning to lay on this four-paced roof.
The four-tight roof is deservedly considered one of the most convenient and practical roof designs. If you are going to build a four-page option with your own hands, except for the correct design of the design, you will need experience in alignment and fitting the position of each of the beams. Therefore, it will be correct to get the necessary experience and skill working with four-page roofs in more experienced masters.
The four-sheet roof, referred to as Walmova, is most popular in the construction of individual housing in most European countries. In addition, Scandinavia, similar climates and construction traditions with Central and North Russia. Varyags, as well as Eastern Slavs, preferred to build from solid wood and arrange simple duplex roofs. In our time of comprehensive globalization, all industries are subject to all industries, including architecture and construction. The hollow roof of the country house now fell in love with the residents of the CIS countries and became an integral part of the landscape of our villages and small cities.
We note the advantages and cons of the four-sheet roof in comparison with more common and structurally simple double.
Advantages of a holm roof:
Four-tight roof of a two-story country house. Large rains protect the walls from rain and snow
Disadvantages of a hip roof:


Another embodiment in the roof of full windows.

The main type of four-page roof. Two end sides have a triangle shape, other two trapezoids. Large saves protect the facade from precipitation well, and around the house you can safely get around in the rain.

Tent Roof Suitable for Square Plan House

Scheme of the rafting system of the Danish four-tie roof. A small forcepets at the top of the short slide is used for ventilation or lighting.

Vertical windows

This type of roof is called Dutch


The broken shape of the roof allows you to use the use of the attic space, but it costs more


Combined roof type, where the hip and double design is combined.

This roof is holm, but the slopes are much more than four. But the principle of which the rafter system is assembled is the same as the simple four-tie.
Consider how to make a four-piece roof yourself, while ensuring its reliability and strength. Select a simple design with a central support.
Since only part of the rafters in the central sector of the long side have a full length and converge in the zone of the skate, not the entire rafter system can be pulled by tightening - in the Valm zone they will not work as in a double roof. In addition, often in the struggle for the height of the attic floor, Mauerlat is significantly higher than the floor plane and beams (tensions). Therefore, we will proceed from the fact that in our case the rafter system of the four-sheet roof will not use the tightening as an element of the structure. The main burden in the center of the roof will be the beam, located in the zone of the skate: the covers and ordinary full-sized rafter legs will be relying on it.

Standard design of a four-tie roof with a support in the zone of the skate
The skate support beam must support racks. To perceive a rather solid load from them, in the perfect case the inner bearing wall should be at the bottom. If there is no, the beams of overlap must be quite powerful to withstand the weight of the central part of the roof. In the event that the first floor is blocked by precast concrete slabs of overlapping, their supporting ability, as a rule, sufficiently and pillars can be put on the plates through a horizontal wooden bar.
Not necessarily a support should be located in the zone of the skate. Racks can be placed on the sides of the skate, that is, the zones of the opiir, located along the skate can be two or more.

The photo shows that the horse does not relieve on the racks.
Opportuning the skate occurs on both sides along the skate on the racks. In this case, the racks support directly rafted, the beam was not applied. Each rapid bruus corresponds to its rack. Quite a solid solution.

Four-sheet roof over a small structure can be mounted without racks
With small spans (up to 4 meters) you can do without racks. However, if there is an opportunity, at least in the zones of the crossing of the skate with the winds, it is worth placing one tightening and a rack.

A small structure is blocked without the use of racks or tightening
The rafting of the tent roof system is almost identical to the holmic four-page. Only instead of the skate bar it is recommended to install a central support. Or arrange a closed reference contour from beams and racks.

Options for the rafting system of the tent roof. On the Scheme on the left, the angular raftered (Nakos) is based on a shprengel, a similar solution can be used for all types of holmic roofs.
The first thing, as in all types of roofs, Maurylalat is mounted. For frame houses, this is the top strapping of the wall panel, for cutters - the upper crown. As a Mauerlalate, a wooden timing is used by a cross section from 10x10 cm, more often than 10x15 or 15x15 cm. It is necessary to strive to ensure that it is solid throughout the entire length. Fastening a bar need to pay special attention. For the stone wall, a reinforced concrete monolithic belt will be a reinforced concrete monolithic belt in the Mauerlat's Opportion Zone with embedded items in advance (pins with thread from M12 and higher). If there is no such possibility, you will have to fix stiletto with metal spacel dowels in the masonry.

Mount Mounting Scheme in Stone Masonry
Connections Maurolat in length should not be done, but in the lining, with multiple points of the connection. The angles with metal plates, corners, brackets should be reliably connected.

Maurelata location scheme on the wall. Pay attention to the bog of the elements and the connection of the corners. On the right shows the installation of a bar on a monolithic belt.
The next step is to install the racks and the installation of the supporting skate or parallel side beams. For racks, as a rule, a 10x10-10x15 cm timber is chosen for a higher sections beam: 8x16, 10x20 or more. The optimal ratio of the width to height is 1 / 1.5-1 / 2, then the beam is less twisted when dried. This rule is fair both for the rafter timber.

The rack and the support beam in this case are parallel to the skate.
In frame-shield houses, the support beams are often not applied, they put only racks in the rafted step. In any case, the boll is put on the horse, only a smaller cross section. You can use an ordinary rafting element. The horse is based on temporary racks, which are then removed. Konk serves as a guide element for mounting the entire design.
Install racks in a frame house. After mounting, the rafter is cut into the desired height.

Such a reference contour put under the tent roof, it replaces the central support
In the third place they put the angular (invoice) rafters. The load on them is higher and the cross section should be higher. Although sometimes it is preferred to first put ordinary full length, and then mount the windows. This is not applicable.

Slinge system of a walm roof of a wooden cut. In this case, it cost without racks at all, instead we pulled the upper part with double horizontal screeds. Slinged on the cutting wall is better to mount on sliding supports.
First, the racks and the ski beam are mounted. The next step of the covered rafters is set ordinary. The angular (invoice) rafters are mounted from the bar of the same section as the rest. It is not right. The load on it is significantly higher and the cross section should be more powerful.

Sliding supports - the best solution of fastening rafters to the wall for the log
Then the remaining rafting legs are mounted, including shortened. The rafted themselves must be solid, as a last resort, it is necessary to install a lining of at least 1.5 meters long and consolidate them on both sides at several points. The compounds of wooden elements can be made overlap using overhead metal plates. In the support zones, rafters on Maurylalat and beams should be made of supporting languages \u200b\u200band use strong metal elements.

So fix rafters to Mauerlat and beams
In accordance with the table, we can approximately determine the cross section of a wooden bar for rafting legs.

For the corner raftered, the obtained value must be increased by no less than 1.5 times
The solo system is ready. Now it is necessary to choose the type of roof and go to the device suitable for it: solid flooring or crate, if necessary, interpretation and windproofs.
The four-piece roof with her own hands is a completely saturated task, at least for a simple house. General principles for all varieties of a hip roof: Mauerlat must be well fixed and connected on the corners, you need to start from the skate, the racks need good base. It is necessary to ensure reliable roofing with a large span and monitor the reliability of all connections.
The fixation of the elements will be better when using special modern metal fasteners for wood, and it will work easier. Of course, you must have at least the initial skills of carpentry. Very helps the presence of power tools: drills, disk or chainsaws. You also need to be equipped with a hand tool: saws, chisels, hammers. We will need measuring devices: carpentry, plumb, roulette, cord.
Roofing of four slopes - how is she good? The numerous operational advantages of this species will certainly exceed the disadvantages. Is there a simple rafting system of a four-page roof, as many newcomers are thinking? Soon you will definitely learn! Important nuances and features of the stages of the construction of a holmic roof we describe in this article.
There are two options for fourth roofs: hip and tent. The first type has a form of a rectangular envelope consisting of two main trapezoidal skates and a skate, and two frontal (side) rods - triangles:
Tent roof - these are four identical isceived triangles connected at the same top point (reminds the tent):

Both options include the installation, both urban and hanging rafters, which are installed using standard technologies.
In the absence of a central roof support, the choice is made in favor of the hanging of the rafter system. If you can find the upper and lower supports for each rafter, then you should choose a sleeve design. This option is easier and more affordable for non-professional masters. It is only necessary to remember the two main conditions: with hard attachment of the Niza and the top of the stopil, a strengthened Mauerlat is needed, since it is passed on to it; With a hinge fastening or semi-rigid connections (for example, the top of the hinge, and the bottom is hard or vice versa), Mauerlat does not need to increase:


The choice of one of the types of four-page roofs should be due to the form of the house itself. For square houses, tent rafters are erected, for rectangular - hip. Also, you can find complex multicate roofs of the combined view, which contain both hip and tent elements.
And the hip and tent structures retain the main functions of the bartal roof (for example, the possibility of arrangement of the attic) and look very aesthetic:

"Why is the depriving headache and complexity?", "You ask:" After all, you can build a simple bartal roofing much faster and cheaper. " Here, the masters emphasize some important points in favor of the choice of four slopes for the roof:
In addition to the listed "advantages", the roof with four slots is well saved to heat, it can be lined with any roofing material and always has a neat look.
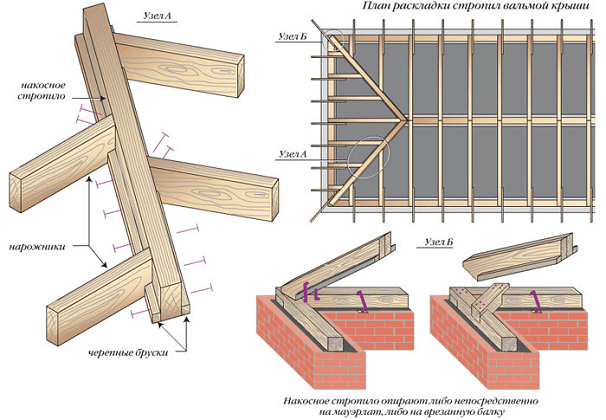
The rapid four-tight design consists of such elements: Maurylalat, skatear, central and hollow rafters, emergency legs, as well as, ice, racks, riglels, pier and other firming parts. Consider the most basic elements.
Mauerlat is the most important part of the design, as the entire rafter system holds on it. It is a powerful wooden timber 100x200, 100x250, 100x100, 150x250, 200x200 cm. Mauelalat made of solid high-quality wood, mainly coniferous breeds. The rafting hip roof system, as well as any multi-sighted roof, requires a solid fastening of the base bar. Mounting procedure Mauerlat in this case: the formation of a monolithic foundation in the end of the bearing walls with the installation of spiers; Laying waterproofing; Processing and installation of Maurolalat around the perimeter of the whole house; Enhancing by anchors and other fasteners for maximum basic reliability.
Maurylalat can be laid on the edge of the wall, or in the pocket of the bricks provided for the brickwork from the inside of the bearing walls.
The cable legs are called four angular rafters, which are based on the edges of the skate and the corners of Mauerlat. They are the longest among all the sropling legs of the system, so they must have a cross section of at least 100x150 mm for maximum stiffness.
The ski run is a horizontal beam that connects all the rafters, the top of the rafter system. The bar must be strengthened with racks and pins. Konk should be located strictly parallel to the plane of the attic overlap and perpendicular to the racks.
Rafters for a four-piece roof are divided into: central (attached to Mauerlat and Konk); Basic hollow (attached to the axis of the skate and Mauerlat); Intermediate and shortened (installed on the savory legs and Maurylalat, connect the corners of the rods).
Additional reinforcing elements include racks for skating timber, riglels or overlap beams, rapid legs, wind beams, etc.
Consider a phased process of building a rafter design. We have chosen for clarity the most popular option - a hip roof. The rafting system of the holm roof of the scheme of which step by step is presented to your attention below:

To portray your version of the holmic roof in the drawing, it is necessary to calculate the height, length, slope slopes and roof area. It is necessary for a clear and high-quality project implementation and selection of the desired amount of consumables:

Calculations should be started from choosing an angle of the roof rods. An angle of 20-450 is considered an optimal bias. The magnitude of the slope must comply with the climatic characteristics of the region. So, in particularly windy areas, the slope should be made minimal, and precipitation often falls out and abundantly, you need the highest angle of the skate. In addition to the weather environment, it is necessary to take into account the roofing material that is planned to be used. For the soft roof, the degree of inclination should be less for solid - more.
And one more small, but an important nuance on this issue - the angle of the slope is better to do the same for all four slopes. So the load will be distributed evenly, and the design will be maximum sustainable, and the aesthetic appeal will remain "at the height".
Now, knowing the angle of tilt and the width of the house, we can take advantage of a simple mathematics to calculate the height of the skate, the length of the rafter legs, racks and other parts of the solo system. When calculating the length of Stropilin, do not forget to take into account the nearest sinks (as a rule, its length is 40-50 cm).
The area of \u200b\u200bthe roof for purchasing the desired amount of roofing material is calculated as the sum of the area of \u200b\u200ball rods of the design.
To build a roofing frame, you will need standard tools and equipment: drills, screwdriver, jigsaws, hammers, chisels and so on. We already know the required amount of materials for the rafter system, so we can make them purchased. The lumber for the frame must be solid, not to have cracks, wormochin, have a bright shade, without gray or yellow plaque, smell fresh wood. The wet forest should not be laid on the roof immediately, it must be dried, to handle with antiseptic solution and dry again. The moisture content of the tree should not exceed 20%.
Mauerlat is the basic part of the entire rafter system. It transmits the spacer on the bearing walls of the house. Installing the Mauerlalate for a four-piece roof is no different from similar designs with two or one skate. This process is as described in the most detailed in our previous articles.

The base base, the parameters of which are described above, is placed on the armpoca and high-quality waterproofing. If you need to connect Mauerlat, then the bars are cut into half the cross section and combine the brackets with strong fasteners.
If inside the house there are bearing walls, then their ends need to be installed - the basis for the reference racks of the roofing system. If the bearing overlaps in the house is no longer, the attic floor is overlapped with reinforced beams, for which the roofs are subsequently installed, and after - the cake of the thoughtful overlap is stacked.
Beams must have a cross section of at least 100x200 mm. The step between them is 60 cm. You can correct this figure a bit, depending on the features of your home. The distance between the extreme beams and Mauerlatt should not be less than 90 cm. This distance is used to mount the semi-bullies of the cornese swelling (removal). Movers are attached to two extreme beams with strong anchors and reinforced metal corners.
Racks are an important detail to maintain the design, they redistribute the weight of the rafter system on the ice or overlap beams. Stands are installed strictly perpendicular to the layer plane. In four-page systems, the supports are mounted under the ski bar (hip roof) or under the angular rafters (tent roof):

Racks must be securely attached to the base with metal plates and reinforced corners. Ramans are installed as an additional support for racks. In the tent roof, the runs have a form of a rectangle, and for the Valm is ordinary skate runs.
After we were convinced of the correctness of the installed supports (using meter and level), you can mount the upper skiing bar. It is mounted on vertical racks and is enhanced by reliable metal fasteners (plates, corners, anchors and self-drawing). Now we take care of the corner deposits:

The first it is necessary to install side rafters, which are based on the ski bar and Maurylalat (or fixed with the removal). To do this, make a template rafylic with appropriate cuts. We apply a rafter foot to the skate, we celebrate the place was drinking with a pencil, then we celebrate the place of the rafter for docking with Mauerlat and we make a pressure. Once again, attach rapid to the supports to make sure that the dock is true and to correct the shortcomings. Now this sample can be used for the manufacture of all side rafalines. The installation of the rafter feet of the main skates is carried out according to the general rules described in the device of the two-tie rafaling system (see article and video).
The following are mounted diagonal (angular) rafters. Their upper edge is installed on the rack and docks with the edge of the skate bar. Before that, measurements and the corresponding marble of the rafter feet are made. The lower end of the diagonals is fixed in the corners of Mauerlat:


Since diagonal rafters are longer than all other legs, they require an additional support. This feature is performed by Sprengel - support beams, which are installed under each diagonal foot, in its lower quarters (it is here that the greatest load is happening). Shprengel, as well as skate racks, are installed on the support corner beams located in the ceiling beam plane.

Between the corner ribs, the space is filled with auxiliary rapid legs - naturines. The lower part of them is based on Maurylalat, and the upper one is on the diagonal rafter. The step between these fourths should be equal to the step between the side rafters (50-150 cm).
It remains to complete the final stage of the formation of a roofing skeleton - the installation of the crate. These are boards or bars of 50x50 mm, which are attached to rafters parallel to the skate run and Mauerlat. Step shape boards - 50-60 cm. This is quite enough to lay roofing pie. When a soft roof is envisaged, the lamp is placed in 2 layers (a control and a doomle).
So, we described the installation of a rapid system of a four-page roof, its basic principles, and even deepened a little in some nuances. Walm and tent structures - although not the easiest, but quite feasible option for each novice master. Especially if he has good helpers. We wish you success in your work!
Most often, the four-tight roof for the house is chosen due to external attractiveness, without considering that this design has other advantages: the ability to withstand large wind loads, increase the level of protection of the walls from moisture, allow equipping residential premises in the attic space.
Four-sheet roof with her own hands. Photo
Four skates are considered an optimal option for regions with strong winds and a large amount of precipitation. By deciding to build a four-tie roof yourself, it is necessary to consider that this design T repears accurate drawings and increased attention when measurements and markup.

The main difference between the four-tie (holm) roof with four rods from the design with two slopes is the lack of necessity in the side of the side frontones. A four-piece design consists of two trapezoid and two triangular rods, the latter replace the frontaths.

Under the roof can be simply an attic room or residential attic. The construction of a four-sheet roof begins with the definition of its purpose and selection of materials, taking into account pictures of climate. The amount of precipitation and wind power is important to take into account when choosing the corners of the rods, the thickness of the materials for the wooden components and the type of roof.
Important! Skate slope can vary from 5 to 60
Wooden components should be thicker than for a two-bund design. If the slope does not exceed 18 °, roll materials are suitable for the roof. With a bias of 18-30 °, it is better to choose a metal or ceramic tile.

Sale the eating roof do it yourself. Photo
Upon completion of the first stage, accurate diagram of the roofing device. You need to know what materials and in what volume you need to buy.

For the device of a four-page roof, wood conifers without defects with a humidity of 18-22% are used. First of all, the foundation is satisfied, evenly distributing the load on the supporting structures. Around the perimeter of the building stacked layer waterproofing And mounted mauerlat. - One-piece 10x15 cm or 15x15 cm and 15x15 cm. Connections are made in the lining, metal brackets, plates and corners are used for binders of corners.

The next step of construction of a four-sheet roof - installation of a liter. This is a bar, which serves as a support for racks and is located on the ground. Further on the ice, the racks (rear 10x10 or 10x15 cm) are mounted in the rafted step (no more than 2 meters), the skating beam is installed (10x20 cm), temporarily resting on special racks.

Important! It is necessary with increased attention to the corner of the installation of racks.

When the four-page roof is required, it is necessary to consider that it consists of their 4 planes. For sliding in the form of a trapezium requires side rafylaFor triangular - diagonal (invoice). This is a solid rear 10x15 cm or 10x20 cm, which is mounted in 50-150 cm increments. If you need to dock, the lining are mounted, secured in several places.


Four-sheet roof with her own hands. Photo
At points where the rafters are based on the base, you need to make words and secure the design with metal elements. From above, rafters are resting in the ram of the skate, connected to the racks with the help of grooves. To enhance the design, it is recommended to use diagonal supports, saws, steel connecting elements.

The final stage of the construction of a four-page roof with their own hands is the installation of the waterproofing layer, the counter tests, crates (or solid flooring). On rafters is stacked waterproofing material. His destination is to exclude the destruction of the rafting system due to moisture from the attic room under the roofing material. The film is stacked and tightly fastened for tightness.


Next step - device controls. This is a bar or an antiseptic blackboard. Fastened to the rafters, allows you to fix the waterproofing material, creates an airbag between roofing material and insulation.

For the crates are used dry boards with a width of 4-5 cm, which are attached to the counterclaim at a distance of 25-30 cm from each other. If there is no arrangement of residential premises in the attractive space, then the roofing material is then mounted. 
Under device warm mansard A pair insulating material (film, foil, pergamine) is mounted on rafters from the inside with the help of steppers, which prevents moisture from getting into the insulation. The heat-insulating material with a thickness of 15-20 cm is placed on vaporizolation.

The construction of the four-tie roof allows:
Despite the fact that the planning and process of the device requires large temporary and material costs, the device of a four-page roof is possible with the basic carpenter's basic skills. In the farm must be: gasoline, disk saw or manual, drill, chisels, hammers, level, cord, roulette. Before starting work, it is advisable to carefully look suitable for the content of the video.
"The woman is created for a man, not a man for a woman" - such a postulate ...

How is HIV on different time segments manifest? The reasons for the development of AIDS is ...

Stomach Cancer: Symptoms, Causes, Treatment of Stomach Cancer is a change in cell type ...