"The woman is created for a man, not a man for a woman" - such a postulate ...


The finishing technology of the house differs with their own hands depending on the material selected. In this article, we will tell about the types of foundations and their features. As well as consider in detail the most popular types of materials for finishing the base of the private house, in particular: decorative plaster, under natural and artificial stone, PVC panels and mosaic plaster and different types of tiles.
Therefore, when choosing materials for finishing the facade of the house, it is important to consider these nuances:
The materials presented have their own advantages, and also differ in the way they are applied and laying.
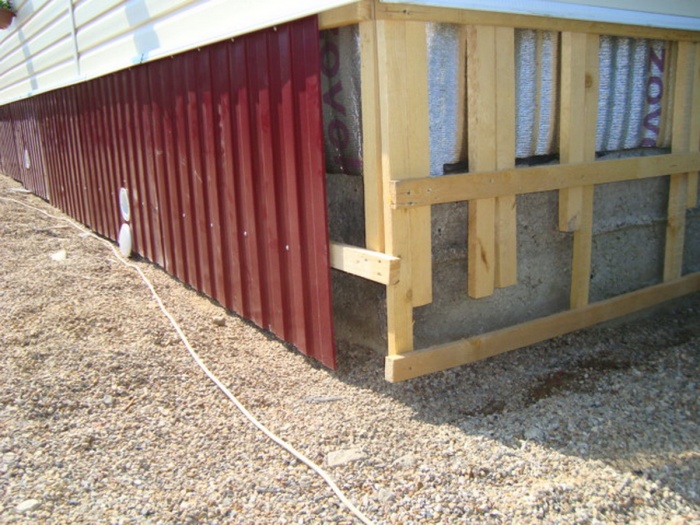
The foundation cannot be left without decoration, since the concrete is predisposed to the absorption of moisture, which has a destructive force when jumps in air temperature.
Before proceeding to finishing the private house, it should be carefully cleansed from dirt, to align the wall, chips and cracks. Next, the surface is covered with primer for better adhesion of finishing materials with a base.
Types of foundations:
Putting. To finish the foundation of the house with their own hands, you must first take care of the plum. If installing it incorrectly, the water will start assembling at the base of the base of the base and the wall. In order to prevent such a situation, it is necessary to plan water to be planted taking into account the cladding of the base.
The appearance of the foundation, separated by such a tile similar to the walls of clinker bricks. The advantage of tiles is that it has a smaller weight and thickness (8 - 20 cm).
Length and width are similar to brick. You can purchase additionally corners, to simplify the work and a beautiful appearance of the base.
Step-by-step instruction Finishes base:
 Very attractive in appearance, but it is expensive. The most sought-after materials for such a finish are sandstone or limestone. Marble or granite belongs to the most expensive natural materials. Sandstone and limestone are preliminarily rude by waterproofing. The laying scheme is the same as in cladding tiles. To secure elements, use glue for stone. Between small stones leave the seams, large - 2 mm. With the foundation outstanding forward, you need to install the eaves for the popular water.
Artificial stone is very similar to natural. Thanks to special additives and aggregates, manufacturers receive a stone with excellent operational properties.
Foundation finishing technician with artificial stone resembles tile laying:

 The polymer tile is an innovative material that imitates the "torn" stone and brick. Very easy by weight, which makes it possible to lay it on weakly infant structures. Manufacturers minimized the risk of cracking and chipping on the material, increased frost and moisture resistance. Therefore, in the processing of waterproofing means there is no need.

 The appearance of such a material resembles a clinker brick or sandstone. Its thickness is small, only 3 mm. The tile on the resins is elastic, which allows it to be used on rounded bases, it is also possible to be bending on the corners of the base. The material cuts with scissors, without much difficulty is attached to plaster, concrete and insulation. It has a smooth and rough surface and a wide color gamut.
Stage order:

 At the grainy structure. Grain size is about 3 mm. After the solution is applied to the wall, the pattern resembling a color mosaic is evaporated. The role of the fixing substance is resin.
Thanks to its qualities, the finish acquires moisture resistance. Mosaic plaster is resistant to low temperatures and external damage.
It can not be applied to limestone plaster and artificial materials. It is best to stay on concrete and mineral bases (cement, gypsum).
Application Procedure:

Often used for finishing small country houses and cottages. The combination of panels with siding looks very attractive.
Plastic panels are light and easy to work:

Finishing the foundation of the house with your own hands the assignment for anyone. The choice of materials in our time is so wide that any idea can be embodied in reality. The main thing is to adhere to the instructions for working with a specific type of material.
The base is the bottom of the facade of the house. The main purpose of the base is to ensure reliable protection of the facade from all sorts of pollution and various kinds of damage. It is for this reason that the constructive element under consideration should be made from reliable and durable materials. At the same time, the lower part of the house should be beautiful. To solve this problem, you can use a variety of various materials. At the same time, the trim of the base without any problems is performed with their own hands.
Regardless of which the material you decide to use with your own hands to finish, before starting work, the base should be cleaned from any kind of pollution and thoroughly align. To eliminate recesses, use a special leveling solution. Speakers are configured in a convenient way.
The surface of the base is necessarily soaked with a primer emulsion. Without such treatment, the base will absorb moisture from the adhesive solution, which will not be better reflected on the reliability and quality of the facing.

Some finishing materials, for example, artificial stone, before the start of installation, you need to process with special water-repellent compositions. They will help reduce the water absorption indicator of the finishing material and an increase in the stability of the facing to a variety of pollution.

A large selection of hydrophobizers is available on sale. These are colorless solutions to apply rollers, brushes and other comfortable tools. By cladding treated with a high-quality hydrophobizer, moisture will simply flock down, without absorbing the finish and leaving no traces on it.

The base with such a facing appearance very much resembles a wall laid out of simple clinker bricks. But the tile has a significantly smaller weight and is much fine-thin compared to the mentioned brick. The thickness of the tiles is usually varied from 8 to 20 mm. Width and length most often are the same as the clinker brick.
First step. Determine the starting level. To do this, add the value of the width of the future seam to the width of the element, and then divide the height of the base to the resulting value.
To calculate the principle is more understandable, consider the following example. The height of the house is 400 mm. The width of the tile used is 65 mm. Switch width - 6 mm. In total, you will need to stick 6 rows of clinker tiles. The starter level must be postponed by 26 mm down from the planned level of the earth.
As a result, an approximately 6 mm gap will remain as a result of the last upper number of facing. You will fill it with polyurethane or acrylic composition.

The second step. Place the facing on the entire surface. Lay out smooth horizontal rows. For fixation, use an elastic adhesive solution necessarily with frost-resistant properties. Sollar applies toothed spatula and on the base, and on the tile.
Do not cover with glue immediately large area. It dries on average for 15-30 minutes. Usually, for this time, it is possible to bind about 1 m2 base. Leave the finished facing to dry about 2-3 days.


Third step. Fill the seams with an elastic solution designed specifically for clinker fugging. The composition must have frost-resistant properties.
Such a tile does not require processing hydrophobizers and.
The finished cladding will be somewhat recessed into the surface (after the corresponding finishing finish of the outer walls), therefore there is no need to arrange the refrigerated cornice.

Stone facing has a chic appearance, but requires significant financial costs. Most often, limestone is used for the basements or sandstone. The most expensive and luxurious option is marble or granite cladding.
Finishing elements can have a different size and texture. At this moment, focus on your taste. Sandstones and limestone require pre-treatment with water-repellent compositions.

The order of facing the stone is very similar to the tile cladding and is performed in a few simple steps.
First step. Determine the lower level of stone fastening. The calculation is the same as in the case of the shelling previously considered tiles.
The second step. For a pre-purified base, apply a solution for gluing a stone. The same solution must be applied on the revolving side of the cladding elements. Use strictly adhesive for fixing the stone. The use of other compositions will cause the formation of cracks in the finish and will very quickly lead to peeling tiles.

Select the width of the seams according to the size of the tiles. Between small elements of the facing, leave the seams in half centimeters. Between large tiles enough 2 mm seam.

Third step. Fill the seams with a special composition for fugging. Make sure the makeup was frost-resistant and enough elastic.

If the plane of the base is issued against the background of the general plane of the house, be sure to install the protective treasure eaves. Without it, your facing will begin to crumble after the very first frosts.
Externally, such material is as much as possible to its natural analogue. Special additives and various types of aggregates allow you to obtain a finishing material with excellent operational and properties, and dyes - pick up the facing, perfectly inscribed in the landscape.
A large selection of materials in various forms that imitate a variety of materials are available on sale.

Facing is carried out almost the same as in the case of tiles.
First step. Apply to the pre-cleaned surface of the base and directly on the cladding of the glue composition. Clay can use elastic or ordinary. Specify the specific composition in accordance with the recommendations of the manufacturer of artificial stone.

Lick the entire surface. Seam can be done both narrow and wide ones.
The second step. Fill the seams specifically designed for this solution.

Third step. Cover the finished cladding of the water-repellent composition. Also, cladding elements can be subjected to this processing before they are mounted on the wall - no difference. Thanks to this processing, even after a few years, the finish will look almost like new.
At the end, it will only be left to install a tump to protect the base of atmospheric precipitation.

This is a relatively new finishing material. Externally, mimic the "torn" stone and decorative brickwork. Such a tile is characterized by a small mass, which allows you to successfully use it even for cladding structures with a small bearing capacity.
The facing in question is characterized by quite good plastic properties, which eliminates the risk of formation of cracks and various chips. The tile is resistant to moisture and negative temperatures. Pre-processing is not needed by moisture-repellent.

First step. At the pre-purified base, attach the clamp items. Collect the cake from wooden plates. Select a step between the rails according to the size of the cladding elements used.
The second step. Fill the cells of the crates insulating M material. If the insulation of the base is not included in your plans, you can also not do the crate. In this case, the tile will be attached straight to the wall.
Third step. Start securing the polymerpess tile from the lower corner of the base. For fixing, use screws. Capture tiles to the crate or the material of the house wall, depending on the selected installation method. Facing the entire base.
An additional advantage of using a polymer tile is the possibility of laying insulation simultaneously with the completion of the facing.

Externally, this material can successfully imitate sandstone or clinker brick. The big advantage of such a tile is surprisingly small thickness - 3 mm. The material is characterized by good flexibility, it can be used even to clamp arcuate grounds. Also, such a tile can be safely bent on the angular joints of the walls, which greatly facilitates the work.
If necessary, the tile is easily cut with scissors. It can be glued to plaster, concrete base and even on the insulation. Tile can have a corrugated and smooth surface. A good choice of colors is available.

First step . Determine the top level from which you start the installation of cladding elements. The best option is to lay a whole number of tiles. Therefore, determine how much horizontal rows of tiles can be glued to your basement, determine their total height, and then take away from the larger value. So you will define the desired gap.
Set aside the required gap from the upper boundary of the base. At the end, you will fill in the remaining cracker acrylic or other suitable composition.
The second step. Start gluing tiles. Installation of elements Start from the corner of the base. Glue apply already familiar to you with a toothed spatula. In one occasion, glue 4 rows of cladding at once.
Seams can not fill. With the functions of the aggregate perfectly cope with the protruding glue. You only need to carefully distribute it along the seams with a brush.
Third step. Protection tiles from rain. For this, the facing can be, for example, to cover with a polyethylene film. The protection can be removed after the complete drying of the glue, i.e. After 2-3 days.

Externally, such a cladding is practically no different from finishing with natural materials, it is much cheaper. To protect the base, be sure to install rain eaves (s).

Such plaster formulations have a grain structure. The grain size can reach 3 mm and even a little more. After applying the solution on the wall, a pattern is formed, similar to a multi-colored mosaic. The function of the binder component performs resin. Thanks to her, finishing at the same time receives vapor-permeable and moisture-proof properties.

Mosaic plaster is not afraid of frosts and various mechanical damage. It is forbidden to apply such a composition on heat-saving and limestone plasters. The base from various artificial materials is also not suitable. The best option is concrete and other substances based on mineral components, gypsum, cement and, of course, lime-sand plasters.
First step. Prepare the solution according to the manufacturer's instruction. Also prepare the tool for applying a stainless steel grater.
The second step. Start applying stucco from any comfortable angle, better from above. The layer must have the same thickness. The thickness of the decoration layer should be equal to the size of the grains contained in the plaster.
The applied composition should be smoothed with a grater to dry out. The stucco is applied and rubbed strictly in the same direction.

Third step. Treat the coating with a high-quality hydrophobizer.
Up to 8 kg of plastering can leave for 1 m2 of the base. Specific flow depends on the size of the crumb.
Thus, the decoration of the base can be performed using a wide variety of materials. At the same time, there is absolutely nothing complicated in the arrangement of any available cladding. You only need to follow the instructions and take carefully to the procedures performed.

PVC panels are great for facing small cottages and country houses. In particular, the plastic is combined with siding. PVC panels have a small weight, easily processing and do not deliver any hassle during the installation process.
First step. Fix the crate on the wall. It can be metallic or wooden. Choose that material with which you are more convenient and easier to work. Wood must be pre-impregnated with an antiseptic. Pagting the crates in accordance with the sizes of the panels.

The second step. Start the mounting panels. Start the skin with the bottom of the base. For fastening the panels of cladding to the crate can use selflessness or even liquid nails. Among themselves neighboring planks are bonded by factory ridges and grooves. Lick the entire surface.

Siding (PVC wall panels)
Third step. Close the top border with a special overhead profile.
Fourth step. Close the corners of the corner elements.
Additional facing processing is not conducted by the composition. For the trim, you can use panels of different sizes, choose to your taste.
Good job!
After the construction of the walls of the house there comes the time of his decoration, including the finishes of the foundation, or the base. In addition to the most obvious function - decorative - the finishing of the foundation of a wooden house or a brick structure performs several more important tasks.
In the article you will find a description of finishing materials for the base, tips on their use and photo of houses.
The easiest way is the Lighthouse Plaster. It is called so, because for her even application on the wall, the beam marks set. Most often, the regional coating is used not as final finish, but to prepare the wall before applying decorative plaster or finishing with other materials.

Decorative plaster does not necessarily ultimately give a flat surface. With the help of stencils, it is possible to apply a relief pattern, and with certain skills even to imitate stone or bricks.
Finishing the foundation Siding is a modern solution. This material weighs a little, sold in a variety of colors and textures and three standard sizes: 120 * 80 cm, 60 * 18 cm and 40 * 18 cm, easily mounted. For trim, the base is not used, but a special base siding is more durable due to the other composition. High-quality siding for the outer finish is withstanding high and low temperatures (from -50 to +60), not deformed, does not lose color in the sun and long retains a beautiful appearance and strength.

Before mounting siding to the bottom of the wall, install a special starting profile. Siding is attached to special horizontal or vertical guides, which are mounted on the wall. Between the panels are fasten with the groove-crease compound. In the corners, there are challenges. The finished base from above is closed with a special plinth. Additional processing siding does not require.
Professional sheet and professional flooring is a profiled metal sheet. These varieties are distinguished by the fact that on the stray profile is tougher. The main purpose of their purpose is to serve roofing material, but due to the strength, relatively low price and durability they are used for other purposes, for example, for finishing the foundation of the house by a straighteard, the construction of fences. Professional property can be both galvanized and have a polymer coating. For the finishing of the foundation, the professionalist is used by a wall of 0.6 mm thick. For the facing of the foundation, there are corners, a profile for guides, self-tapping screws, dowel anchors, ventilation grilles. First, the foundation is fastened with a crate of a metal profile or wooden bars. Then the professional flooring is cut and attached to it with self-reforms with a waterproof gasket.
This material can imitate any natural facing: wood, stone, brick.
The tile is glued to the aligned and primed surface of the foundation. In order to smoothly put the tile, the markup is pre-wall. You can stick to the tile not only directly to the concrete, but also to thermal insulation. They begin to lay the tile from the angle, while it is immediately necessary to make 4 rows. The glue protruding from the seams seals them. After the end of the work, it should be closed for 2-3 days to close the foundation from the fallout. During this time, the glue will dry. No additional processing of the foundation does not require.

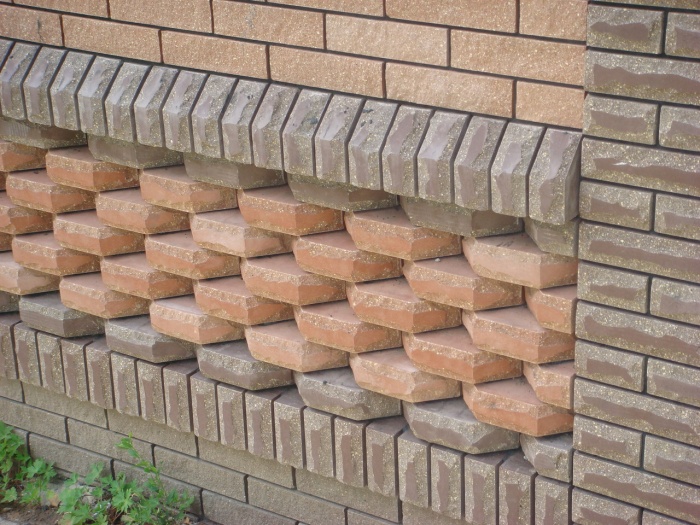
This is a variant of facing brick made of special clay species. It has an interesting appearance due to the unique drawing of the clay layers mixed in the production process, looks like a brickwork and gives the house with a hue of the antiquity.

This is a natural ceramic brick that is excellent imitating brickwork, additionally heat and protects the facade. Minus is a pretty heavy material. If you want to separate the foundation of the brick, it is necessary to plan it in advance, at the stage of development of the house project, so that the wall will accurately sustain the severity of the facing.
The foundation of the foundation at home under the stone is done using an artificial stone based on concrete. It can imitate river, sea, duck or natural stone, brick laying. Artificial stone for finishing the foundation of the house is significantly less than natural, durable, resistant to temperature drops. Mount it is simple: the tiles are glued to the aligned surface with special glue. After drying, the seam glue is filled with a hydrophobic behavior. The photo contains facades of houses with a stone finish.


To obtain a flat surface when finishing the foundation, a flat slate or cement-chip (CSP) is often used. As part of the slate - fiber from asbestos, portland cement, water. The composition of the CSP is a wooden chips, a portland cement, a chemical additive-mineralizer (aluminum sulfate, sodium and potassium silicates), water. Slate is pressed and unfastened, unfolded by strength and durability. CSP is less durable than slate, but it is easier, and due to the chemical mineralizer, the chips in its composition is protected from moisture. On CSP or slate usually apply a layer of decorative plaster or paint.
Most often, the foundation is not used for the finishing of the foundation, but the embossed, painted or coated stone crumb. Facade CSP-based plates have many advantages:
maintain more than 100 cycles of frost-defrosting,
To mount the CSP to the foundation, you need to prepare a crate. It is fixed on the prepared aligned surface of the foundation. The shade of the crates make no more than 60 cm. The crate can be made of wood or metal profile, the tree in this case should be sucked and processed by an antiseptic.

Attention! CSP - fragile material, it must be protected from shocks.
The holes are drilled in the CSP sheet, for this use steel drills, tungsten carbides are allowed. You should use drills for solid materials. Special galvanized nails, screws or self-tapping screws are used for attachment. The distance between them should be about 20 cm. It is not recommended to use fasteners designed for drywall.
The finishing of the foundation of a wooden house creates an additional heat and moisture insulating layer, increases the service life of the foundation. Usually, natural materials are used to finish a wooden house:

The foundations of wooden houses are separated by vinyl panels (siding).
The feature of the trim of the base in a wooden house is that in this case the correct waterproofing is particularly important. On the foundation at a height of 20-30 cm from the ground makes a waterproofing layer. Also laid thermal insulation. After that, you can trim the foundation. Some experts recommend doing this not after the completion of the walls, but as soon as the foundation is ready, not to damage it in the process of erection of the rest of the house.
Before finishing the foundation of the house with their own hands, first make it draft protection. It is carried out in several stages.
After these events, you can proceed to decorative facing.

Now you can find materials for self-cladding foundation for every taste and wallet. But it is important not so much to choose one of the many materials, how much to organize waterproofing and thermal insulation and high-quality work on finishing. Then the beautiful base of the building will not lose sight for a long time and will serve the protection of the house from external influences.
The base is the lower part of the wall of the building, encumbling it all over the perimeter. Its main function is the protection of the structure from cold or harsh environmental conditions. It is the finishing of a private house base that is not only the above functions, but also prevents its destruction and acts as an excellent designer solution in the decoration of the building.
The main purpose of finishing the foundation:


The trim of the base is done with a variety of materials, reliably protecting and decorating its surface. Starting the process of cladding the base is recommended before finishing the walls so that when using the sumps, they can be hidden under the lining material of the walls.
Before determined with the choice of material, you must pay attention to such nuances:
For cladding the base, materials are used to be written below.
 Ceramic
  Hyperpressed
  Hollow
  Slug
Slug Stacking technology is as follows:


Clinker has available cost and such advantages:
The mounting of the clinker tile can be carried out in two ways:


Artificial stone is concrete slabs having a decorative outer layer. To improve its characteristics, it is modified by special moisture-resistant additives, and for increased wear-resistance, its front side is painted.
This facing material is suitable for any facade coatings.
Technology of its fastening, all nuances:


Natural stone is a heavy material that consistently weights the power frame at home. Types of natural stone are used:
Benefits of natural stone:
The disadvantages of the material are as follows:
Fastening technology is as follows:


Plastic panels are very popular in the finishing of not only the base, but also the whole house. They have many advantages:
Fastening technology is as follows:


One of the available options for finishing the foundation is shuttering its surface. However, this finishes does not end, to protect the plastered layer on moisture and other external environmental factors, it must be treated with special moisture protection products, such as acrylic paint, water-emulsion or oil compositions. Thanks to them, the base is also being decorated.
Watching technology happens:
It is possible to apply the technology of decorative plastering, resulting from the surface externally similar to a fur coat. Dyes are added to the solution for color coats.
Mosaic plaster is also popular. It in its composition has a small crumb, which after drying creates the impression of a multi-colored mosaic. It has waterproof properties, due to the resin in its composition as a binder.


The manufacture of tiles made of polymer-sandy composite is an inexpensive option from the above. The advantages of this material:
The disadvantages include the absence of fair elements, which is why fitting in the corners finish.
The tile mount can be performed in two ways:


The manufacture of porcelain tiles is carried out from various types of clay with the addition of granite crumbs. Due to this, the material has a solid structure and is suitable for finishing not only walls, but also the base. The advantages of the material:
Laying tile is performed on a special adhesive composition. After that, the seams need to be treated with moisture-resistant compositions.


Decorating the finishing layer of the base of the base is carried out in such ways:
Photos of different ways to decorate the base are shown below.


The base is the basis of any building, so the importance of her finish speaks for itself. Since the base is constantly exposed to external environmental factors, finishing materials must have strength, resistance to moisture, cold and sunshine.
Finishing material should not only protect the base from adverse factors, but also to give an aesthetic type of building. Finishing the base is made before decoration of the walls. There are two types of decorations of the base, it is exalted and recessed, each of which has its advantages. To improve the adhesion of finishing materials and the foundation, primer is used.
Summing up, it can be said that the termination of the base is of great importance, it acts as not only with the decorating element when placing a private house, but also acts as his defender, so the base is one of the main parts of the building is its basis. Different building materials with different characteristics and properties are used for its finishing, the choice of which is made from the personal preferences of the owner and its financial capabilities.
Materials for finishing the base must have a long service life, have strength and resistance to moisture. Most popular materials such as clinker tiles, natural and artificial stone, PVC panels and decorative plaster.
Regardless of which material you have chosen, qualitatively fresk the base part of the house or the foundation will be possible only if the surface is prepared for work. It should be smooth and durable. It is also important that the base is clean and did not have visible defects. If defects are observed on the surface, they must be closed with the help of coating building materials. It is very good to eliminate irregularities fit the busting emulsion (it will act as waterproofing the coating).
The foundation of the building is always made from high-strength concrete or metal. However, the base of the house can be made of porous materials. One way or another, it should be processed with water-repellent means.
Surface facing options are usually chosen by the owner of the house independently. These works are performed only after the construction of a brick or wooden house will be completed.
Clinker tiles are considered one of the highest quality and reliable materials for trimming the base or foundation. Lining the base with such a tile is quite possible with their own hands. Upon completion of the work, the base will have such a form that it was made of massive clinker bricks.
Installation of clinker tiles.
The clinker tile has significantly smaller weight than the brick, so when using it, the load on the foundation and other buildings will be minimal. The thickness of the clinker tile is also small (as a rule, no more than two cm). The length and width of the tile is similar to the traditional brick. To simplify the conduct, you must additionally purchase the angular elements.
Before starting work, it is necessary to determine the level from which the installation of the first row of clinker tiles will begin. The level should be determined by dividing the part of the building on the tile width. At the same time, the seam width is added to the resulting number. If the building is a base of 40 cm height, and the tile has a width of 65 mm (with a seam width of 6-7 mm), then the space of 5-6 mm wide, which is usually filled with a polyurethane composition or acrylic.
To stick a tile with your own hands, use a special solution that is resistant to temperature differences, frost, moisture and other effects. It is very important to glue the tile immediately after a solution is applied to the surface of the baseway. 10 minutes after applying the solution hardens, so you need to work quickly.
The base of clinker tiles.
Seams that will be noticeable between clinker tiles are filled with a solution for clinker fugging. It is sold in any construction store. The tile will not absorb moisture, so no additional processing of moisture protection compositions is required. In the device of such a cladding, the base receives high-quality protection against moisture effects, and the creation of an additional waterproofing layer is not required.
When the foundation and base of the building are made of bricks, then a stone tile is often selected for cladding of the basement. Stone tile will give any integrated and spectacular appearance. Tile is made from sandstone (less often from limestone). In addition, you can find granite and marble varieties. The shape of the tiles can also vary greatly: traditional dimensions, oversized elements, massive plates, intricate forms. If we have a stone tile, then the appearance of the building will acquire a complete view that will fully respond to all the requirements for the exterior style.
A natural stone.
The principle of gluing the stone tile to the base is largely similar to the one that was described above. The tile is glued to the surface of the base using special adhesive solutions designed for the mounting of the stone tile. If standard glue is used, then after a while, the tile will begin to flap, so it will have to do everything again.
If you want to get the effect of a monolithic surface, you should choose a small format tiles, and when installing them between them, leave the minimum stroke thickness. All seams that will be formed between the tiles should be filled with an elastic solution having a high level of resistance to low temperatures. If the tile is sandstone or lime, it needs to be treated with waterproofing compositions.
When choosing materials for finishing the base and the above-ground part of the foundation, homeowners often stop their choice on artificial stone. This material is characterized by an attractive appearance, excellent working and operational characteristics. Due to the aggregates, as well as special additives, artificial stone has a high level of frost resistance, moisture, ultraviolet and other natural impacts. When operating, such a material is practically not destroyed, so you will serve how much how much the foundation of a wooden or brick house is like.
Facing with artificial stone.
Artificial stone successfully imitates natural materials (river stones, mountain and rock rocks). Products tend to have different sizes, so you will not see the repetition of the pattern on your base. Options for designing the base part of the building with their own hands when using artificial stone are distinguished by a large variety.
PVC panels as materials for finishing the base and foundation in recent years are used more and more. This is a completely appropriate facing material that is designed for use in various climatic conditions. With the panels of this type it is easy to work, they are well suited for the foundation of the building (the foundation, if it can be seen, is completely closed). Similar panels are easy to install with your own hands. Material is resistant to weather effects and mechanical loads.
PVC panels are mounted on the crate. Works on the installation of panels, as a rule, are performed using the starting plank, angular elements and dowels. The doom can be made of wood or metal. It is preferable to look like a metal crate, which, nevertheless, is not difficult to make it yourself.
The use of base siding.
With the help of PVC panels, you can close all defects of the base part of the building, as well as bind other zones of the building and household buildings.
Despite the small prevalence in the market, this material is great in order to close the base. Mosaic plaster has excellent performance, it does not pass moisture, and its composition includes a resin as the main binder. In addition, such plaster is resistant to temperature drops and mechanical load, so the material can be safely used in order to close the Country House.
Applying decorative plaster.
Mosaic plaster is applied to the surface with a special metal grater.
Many owners for the facing of the protruding part of the foundation (if the foundation is seen from under the ground) use precisely mosaic plaster, characterized by simplicity of application and an attractive appearance. The material can be applied without significant labor costs with your own hands on any part of the base or foundation.
The base covered with plaster.
Lining the base can be in various ways. You can close the lower part of the building with your own hands with a layer of plaster, put a stone or to shelter siding, that is, to separate in any way that you will like. All this can be done without attracting professional builders.
The choice of this or that way of cladding the base part of the building will depend, first of all, from the owner's budget, the possibility of installing a specific material, the need to mask irregularities and other defects of the base, as well as many other specific factors.
Close the base in the aggregate can be any finishing material. The main thing is that the selected material has resistant to various weather influences. In addition, if necessary, it should be provided on the site a drainage system that will effectively remove the extra moisture from the building.
For all issues related to the choice of finishing material for the base and the foundation, you can contact the specialists in the construction store or to the employees of the company that was engaged in the construction of the house.
"The woman is created for a man, not a man for a woman" - such a postulate ...

How is HIV on different time segments manifest? The reasons for the development of AIDS is ...

Stomach Cancer: Symptoms, Causes, Treatment of Stomach Cancer is a change in cell type ...