"The woman is created for a man, not a man for a woman" - such a postulate ...


The hanging garden on the gutters is a great way to use the vertical space around your home to grow flowers, edible and create a stylish separation of space or a garden screen, without spending too much money.
Materials
1 - 8 "White PVC Rain Groit Cut 3 Sections 32"
6 - White PVC Headers for Ghelobes
2 - 1/8 "Steel cable cut to the desired length
6 - clamps (see the image below)
6 - 1/8 »Steel Rods
2 - galvanized hooks
Instruments
Rechargeable Drill Screwdrift
Hand saw or nippers
Straight corner
Roulette
Permanent marker
1. Determine the center of your gutters and note (otherwise your gutter will not hang exactly).

2. Note and drill holes for steel cable rods. Find a drill with a diameter equal to the diameter of the cable to minimize the space for the maneuver.
3. Drill holes a few sizes more, make sure that you get a good drainage (roots of plants do not like to sit in water for a long time).


4. Find a place that illuminates the sun at least 4 hours. I placed my gutter on the gazebo, which I built a couple of years ago.

5. Drill the guide holes (the hole is slightly less in diameter than the diameter of the auger) to simplify the screwing of the hooks. Make sure that the holes are at the same distance so that the cable hangs straight down.
6. Stretch the gutter through the holes and secure them with transverse clamps at the desired height. You will notice that I placed the grid (usually used for drywall seams), remaining from another project, over drainage holes to save the soil from seepage. Nevertheless, I think that the holes are small enough, this step is not mandatory. I did it in a habit.
7. Fasten the gutter with transverse clamps and semicircular steel rods.


Now everything is ready to fill the organic soil and landing small root plants on your choice.
If you liked this material, we offer you a selection of the best materials of our site according to our readers. The selection is the top of the existing ecosalions, the generic estates, their history of creating and all about Ekodoms you can find where you most convenientlyWe continue the topic roof construction do it yourself. Today, dear blog readers, we will tell about how to do hanging rafal do it yourself. On all stages of creation, we will not only tell me, but also add a large number of photos. Read, see, ask questions!
If Maurylalat can be attached (in which way we attached it to you can read in the article) on the wall, using for lifting a remedy, then further work on the construction of the roof, including work with rafters, is not possible without a forest device, including Mobile. These forests we used both for lifting the height necessary for work, and as a working platform for a person and for laying the necessary building materials.
 For the construction of a house, we simultaneously used three such forests. For construction, at least two forests of this kind are needed. The photo shows how mobile forests are made. We recommend using our experience, as work on such forests is very convenient.
Now, when issues of convenience and safety of work are solved, you can begin the construction of the charter system.
In our house does not provide an internal capital wall, i.e. In addition to the outer walls there is no additional support and rafter legs will be relying only on the outer walls of the house. In this case, apply hanging rafal.
Rafyled - (Dr.-Russk. Row - "Roof, ceiling") - carrier, supporting the design of a bantal roof (Yandex.Cholovari).
It's time to put rafters. How to do it right?
 For rafters, we took a bar of 6 meters long and a cross section of 50 mm x 200 mm. If the cross section of the rafted is small - over time, such rafters can be saved.
The corner of the roof is in our case 33 degrees.
Below we will talk about the installation order of the rafter:


 About the additional attachment of rafters to Mauerlat, about how to lengthen hanging rafal For a sink and many more, we will tell you in the next article dedicated to
In an effort to comfortably equip living space, many people prefer non-standard designer solutions. They are able to make originality in the usual interior, provide additional comfort. Such objects include suspended chairs that can be made with their own hands.
Among the variety of suspended seats there are models that can be made independently. Such options will be the highlight of your interior. In addition, independent manufacture allows us to implement an individual intention, which is based on proven and reliable structures.
Unusual swing chairs are manufactured from various materials. A feature of such structures is their elegance, simplicity and possibility of using both hard and soft frames. These chairs will be able to become a stylish decoration of a country house, an unusual addition to the interior of the bedroom, living room, children's room or veranda.
No less popular is a cocoon chair or an egg chair. The feature of the model is the presence of walls that hide the inner space for about 2/3. Such chairs allow you to enjoy solitude, they are most popular among children due to external similarity with a hanging house suitable for games. Usually cocoons are made of natural materials intended for weaving.
In the role of the most popular self-made model, an armchair protrusion performed on the basis of a frame of hoop. Such a model can be equipped with a plurality of decorative elements, and its form harmoniously fits into the living space of modern apartments. In the manufacture of the chair-jacks, a variety of weaving techniques are used.
Choosing the materials necessary for the manufacture of suspended chairs, first of all, take into account the features of the model of interest.
To create seats of suspended seats, the masters use various techniques:
Remember that the selected materials must correspond to certain weight loads. Too thin fabric or openwork weaving can break under the weight of a large person. Elements of fasteners are also particularly fastened for special attention and testing for durability: chains, ropes, braid to hang construction.
Suspended chair swing from fabric - convenient addition of the country house  Children's Cocoon Chair like children
  Suspended Cocon Chair from Rotan is distinguished by durability and durability
  Suspended Nest Chair made of tight fabric Suitable for holidays in the country area
  Simple model of the chair-swing easy to make it yourself
  The original hanging chair, made by your own hands, will become the subject of the pride of the owners
  Suspended swing chair, woven in Macrame technique adds comfort and comfort
  Openwork seat for a suspended chair can be splashing from a thick cord
  Suspended chairs can be used as a baby cradle
The chair-swing right can be called one of the most simple models that can be made with your own hands. To create it, you will need:
Prepare everything you need, you can start making an unusual detail of the interior.
The resulting suspension chair swing can be additionally equipped with soft cushions that provide comfort.
For the manufacture of the original model of the suspension chairs, you will need:
The newcomers will come in handy a ready-made scheme of a cocoon that allows you to correctly calculate the dimensions of the future chair.
When making guided instructions.
You can use a thick pillow to give additional comfort to the sideways of such a chair.
Folding the frame in different ways. Newcomers will suit simple techniques that ensure a dense base for seating.
 Cope with such a weaving die even novice
  Different weaving schemes can be used for the manufacture of suspended rocking chairs.
  With the help of rods, you can create a dense base for the chair.
To create a chair-nest, which will be an exquisite decoration of an apartment or a garden, you must prepare the following materials:
Wrapped the hoop with a solid twine, fixing every tenth round with a node, this will not allow the cord to break.
To create the bottom, you can use a variety of crochet techniques. For the manufacture of such a seat you will need from 120 to 160 m cord. The exact amount depends on the selected knitting pattern.
For this option of the suspension chairs you will need:
Prepare the cords of the required length, proceed to their mount on the hoop.
If you need to create fringe, the length of the threads should be increased by about a meter and at the end of the work not to crop the remaining cord.
The resulting design additionally furnish with reliable stalls and a soft pillow.
The mounting chairs can be carried out in different ways. One option is the ceiling mount on the hook. The finished product, suspended in this way, can sway in different directions, but it is very problematic to move it to another part of the room.
This method can be used only in the presence of high-quality concrete overlap or with cable ceilings, allowing you to mount directly to beams.
Equally popular is the mount to the rack, which can be purchased in specialized stores. This design is equipped with circular platforms providing stability. The chair at the rack can be easily moved around the apartment and even take out to the street.
Another option is an axial fastening that allows you to fix the design between the ceiling and floor. This method is suitable for registration of children's rooms.
If the overlap in your house is not enough and void, it is possible to install a suspended chair using a chemical anchor. This method involves the introduction of a polymer paste into the ceiling cavity from the syringe, after which the product is set.
Simple options for making a suspended chair at home are available even to novice masters. Unusual designs decorate the interior, give the room originality and comfort. Successful to you work and create with pleasure!
Good time of day. If you have never seen KokeDama - Japanese ball from Moss, let me introduce you to a beautiful garden for a small space. Floating in the air, these plants do not occupy a surface space or even space on the wall.
In addition, you do not need to lay out money on cute pots and vases, as each plant is contained in its own moss container and suspended to the ceiling using low-cost twine.
If you are also convinced that you want this garden solution, which is necessary for small houses, follow these steps to make your own suspension garden.
What you need
Right plants for landing
Soil for plants bonsai
Peat Moss.
Clay (such as a bentonite clay, which is necessary as a binder)
Sheet Moss.
Twine
Instruction.
1. Mix the soil of bonsai, peat moss and clay into the ball, following the approximate ratio of 70% of the soil of bonsai and a 30% mixture of peat moss and clay. Mix the mixture with water so that all the elements bind to each other. Create a soil that will not fall apart, but not so tight that the roots of the plants will not be able to breathe, it is important that your cockflower bloom.

2. Using thumbs up, dig a small hole in the center of the soil ball. Shake the redundant soil from the roots of the plant before fixing them into the hole and form the soil around the roots.

3. Cover the ball with a leaf moss, gently pressing the moss plots into the soil. Do not worry if it does not entrenched on the spot in this place, wrapping with twine (step 4) will help.

4. Wrap the ball with twine, following all directions, including the bottom, before tying a node. To hang a cockdhide, cut off another long piece of twine and tie it on both sides of the ball.

5. Hang the cockdance into a slightly shady seat and provide daily spraying with water. When it comes time to pick up the plant, for this, immerse the ball - moss in a bucket with water, put it so that the plant is up to and let it absorb water for 5-10 minutes.

The best plants for the cockdad.
Choosing a plant for your hanging garden, it is necessary to select those that do not require the sun, because the moss prefers the shadow and wet environment. It is best to use a plant with a small root system. Here are some varieties that will grow in the shade.
Many varieties of fern, including fern hair Venus.
Fern Staghorn.
Potos
Philodendron
Begonia
Succulent
Puchia plant
It is unlikely that you can meet a person who would not have experienced the desire to stop in a comfortable chair and experience smooth swaying movements of the suspension design. Comfortable swings and at all times used great popularity. Today, a series of suspended seats is significantly expanded: the suspension sofas and chairs decorate many country areas, easily fitting into a landscape design.
The basis for the manufacture of suspended seats served ordinary rocking chairs. Wicker structures from rattan or vines became the most promising for furniture experiments, because they weigh quite a little, but at the same time they have excellent strength.

As a result of such furniture experiments, suspended chairs were created, resembling half a ball form
Semicircular structures are attractive in that they allow you to evenly distribute the entire load. In addition, it is convenient to hang, installing the device at the top point.
Suspended chairs can have several options.

Wicker armchairs from the vine, rattan, transparent acrylic or plastic have a hard housing. For convenience, they are complemented by decorative pillows and soft mattresses

The Hammock Chair is a softer suspended design. On swinging soft pillows you can always pamper yourself in moments of a relaxed rest.

Closed on three sides by wicker walls Cocoon Chair perfectly suitable to retire and abstract from the external fuss
Instead of traditional rattan or vines, synthetic materials are increasingly used in the design of suspended chairs, thanks to which structures become lighter, flexible and silent.
Options, as you can see, set. We specifically analyze 2 examples.
It is not difficult to build such an armchair. It is only necessary to own the basic technique of weaving Macrame.

Such a suspended chair will create a special atmosphere on the site, which has a pacification and peace
For the manufacture of the chair, we will need:
For the arrangement of the chair, it is better to use hoops made of metal-plastic pipes that have a cross-section of 35 mm. Metal-plastic pipes of such thickness have inside the metal braid and are able to provide sufficient suspension strength.
To make the hoop from the pipe, first determine the length of the segment, using the formula S \u003d 3.14xd, where S is the length of the pipe, D is the desired hoop diameter. For example: For the manufacture of the hoop d \u003d 110 cm, it is necessary to measure 110x3.14 \u003d 345 cm of the pipe.

Wooden or plastic internal inserts of the corresponding diameter are perfectly suitable for connecting the pipes of the pipes, secured by conventional screws
For weaving, a polyamide cord with a polypropylene campier with a thickness of 4 mm will be perfect, which can be purchased in a construction store. It is good because it has a soft surface, but in contrast to cotton fibers when viscous is capable of creating more dense nodes that will not "lay out" during operation. In order not to be discrepancies in color and texture of the material, the entire volume of the cord is desirable to purchase immediately.
Our task is to fully cover the metal surface of the hoop. For the design of 1 meter, the hoop with dense turns takes about 40 meters of cord. The turns do not rush with a good tension, overlapping the cord smoothly and neatly.
To make the winding more dense, every 20 turns make an array, with an effort twisting them in the direction of the winding until it stops. As a result, we should get a smooth and dense surface of the braid. And yes to protect your arms from the corner, it is better to spend this job in gloves.
When creating a grid, you can use any likely pattern of macrame technique. The easiest way to get a "chess" with flat knots.

Mesh weave a double polyamide cord, attaching it to the collapsed braid hoop by double nodes
During weaving, follow the power of tension of the cord. From this will depend on the elasticity of the finished grid. Free ends of the nodes are not worth cutting off. Of these, you can form a fringe.
Braided hoops collect in a single design. To do this, from one edge, we fasten them, winding together with one cord.
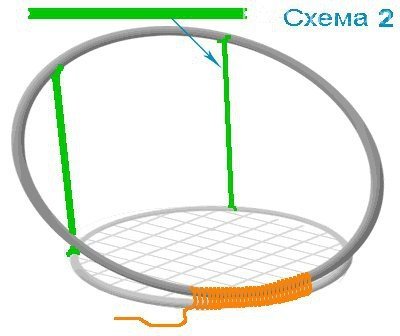
From the opposite edge of the opening vertically, we place two wooden rods that will serve as a support for the backrest
The length of the supporting rods can be any and is determined only by the selected height of the back. To prevent the slipping of the hoop, on the four ends of wooden rods make shallow propuls.
The braid of the backrest can also be anyone. Weave begin with the top of the back. Gradually dropping to the seat.
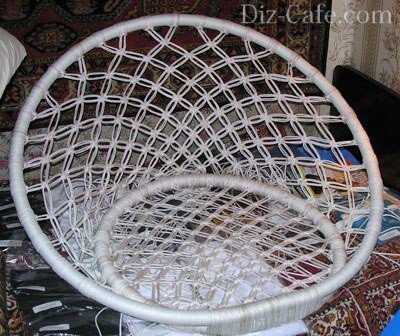
Free ends of the cords tighten on the lower ring, collecting their hanging edges into a loose brush
When the pattern is braided, the ends of the threads are fixed at the bottom of the back and make them the fringe. Strengthen the design will allow two thick cords that connect the back with a seat. Elegant pendant chair is ready. It remains only to attach the slings and hang the chair to the selected place.
If you do not want to deal with weaving, or for some other reasons, the first option did not come up, then it can be suitable.
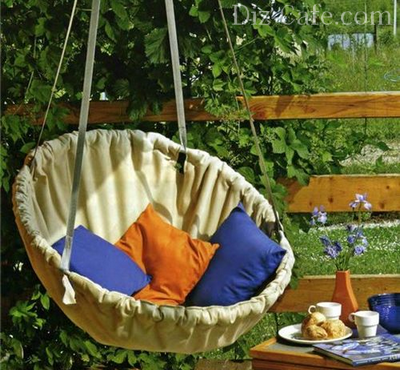
Cozy, smoothly swinging nest - an ideal place where you can relax, forgetting about your problems, or just to build
To make such a suspension chair, we will need:
You can make the hoop from a metal-plastic pipe that is sold in the form of a folded bay, or from bentwood bent. But when using a tree, it is worth being prepared for the fact that under the action of the difference in temperature, the hoop can quickly reform and deform.
Of the three-meter cut slices of crumb two equal squares, each size of 1.5x1.5 meters. Each of the squares separately fold four times. To make a circle from it, from the central angle with a radius of 65 cm we plan a circle and cut it out. By the same principle, we do and cut the circle from another square. On each of the resulting circles, retreating from the edges by 4 cm, the stroke line is scheduled for the inner contour.
We plan holes for the sling: we fold the quadruple circle and stroke it so that the bends are reference points. The first pair of sling will be placed relative to bending at an angle of 45 0, the second - 30 0. Having placing the corners under the slots for the sling, we again lay down both circles and stroke.
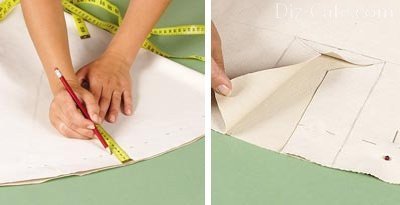
According to the number of four axes, we make rectangular slots in size 15x10 cm. Dresses make the contour of the Y-shaped markup, made inside the rectangles
To make the same slopes on both circles, connect the sections of the fabric and they spin them with pins. According to the contour of the first circumsion of the first circle, we make slits on the second cut of the fabric.

Petals of slots flexing inside out, sizing the edges of the phlizelin. Only then, we perform a complete slot, flashing it around the edge, retreating 3 cm
Step both circles together on a pre-intended stroke line, leaving a hole to insert the hoop. Free allowing to cut the cloth. The finished case is turned evident and irrigate.

From the material for filling, cut the strip of 6-8 cm wide, which we are experiencing the hoop. The trimmed frame insert into the case
Having retreated 5-7 cm from the edge, leafing between both sides. The edges of the opening left under the insertion of the hoop, turn inside out.

Non-crushed allowances I spoke with the front side of the pins, and we shoot the edges by recovering from the edge by 2-3 cm. According to the same technology, we proceed the whole edge of the cover
Fill with a case of syntheps, stretching the filler bands and fixing their edges with a secret seam. To strengthen the case on the hoop, in several places gear fabric.
Row mode for four cuts 2 meters long. To prevent the breaking of the threads, we melt the edge of the sling.

The mounted ends of the land stretch through the slits, form loops from them and spend 2-3 times
To be able to adjust the height and angle of the suspended chair, on the free ends, wear buckles. All slings we collect in one suspension, fixing on a metal ring.
Such an armchair can be placed in the garden, hanging into a thick branch of an empty tree. If you are planning a suspended chair to make the functional decoration of the veranda or gazebos, you will need to build a suspended structure.
The suspension system should withstand not only the weight of the chair itself, but also the weight of a person who sits on it.

To secure a simple suspended chair, the weight of which together with the person sitting in it is no more than 100 kilograms, it is enough to install a simple anchor bolt
With this method of fastening, you should consider the maximum load on the ceiling overlap, which is measured in kg / m 2, because the entire suspension system will act on this area. If the permissible load is less than the weight gained in the calculation, it is necessary to distribute the ceiling load, building a power frame that combines several anchor bolts.
Make such a chair, and you will get an excellent opportunity at any time relax, enjoying pleasant swaying movements, gaining peace and philosophical attitude towards all troubles.
"The woman is created for a man, not a man for a woman" - such a postulate ...

How is HIV on different time segments manifest? The reasons for the development of AIDS is ...

Stomach Cancer: Symptoms, Causes, Treatment of Stomach Cancer is a change in cell type ...