Very often in culinary recipes you can read something fabulous, for example: “Ah...


Tired of searching for the right furniture for your home or garden? Is the family budget depleted by renovations? Or maybe you just like to make interior items with your own hands, coming up with an original design and saving on materials? Either way, this collection of 50 creative DIY chair ideas is for you. Tall and low, massive and graceful, with backs and in the form of stools, for a city apartment or a summer cottage - everyone will find inspiration in our collection of original ideas.
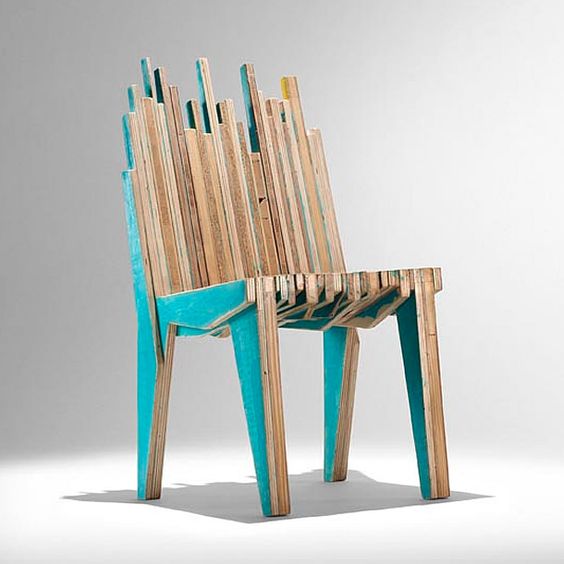
Handmade interior items add a special atmosphere to any environment. But it’s nice not only to create something original on your own, but also to save money, and maybe give new life to items or materials that have already exhausted their useful life. Designers offer us options for making chairs and stools from literally any available materials. But only you know what material is available to you personally, what will be easier to handle, and what design of chair is suitable for your interior or landscaping at your dacha or country house.


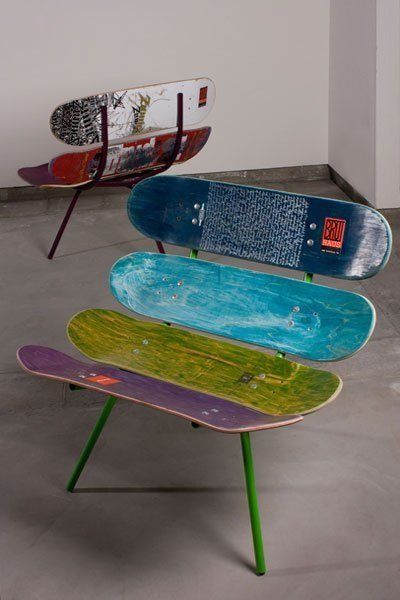
Old, unwanted skateboards can be an excellent material for making the seat and back of a chair, which is quite capable of becoming a spacious chair. The material of the boards is quite durable - the chair will last a long time if it is assembled well.
There is no need to throw away old buckets, just refresh the coating with new paint and screw the legs to the vessel.

What about garden furniture made from parts of garden tools? A little imagination, effort and free time - exclusive pieces of furniture for your summer cottage or garden plot are ready.

If a completely durable and stable chair has worn out the seat upholstery over time or the filling has sagged, use old belts to create an exclusive design.

Or maybe it’s the other way around - you have a car seat in good condition and to create a comfortable chair, or rather even an armchair, you only need to build a strong frame?

It is difficult to overestimate wood as a material for making furniture and interior items, especially in our country. For everyone who has already tried their hand at making wooden furniture or is just taking their first steps in this difficult but incredibly interesting business, we offer the following interesting options. They can be the starting point for creating your custom design. The advantage of making wooden furniture is not only that you can find a fairly pliable type of wood and make your design dreams come true, but also that the finished product will fit into almost any interior. Wood harmonizes perfectly with metal, glass, mirrors and glossy surfaces.


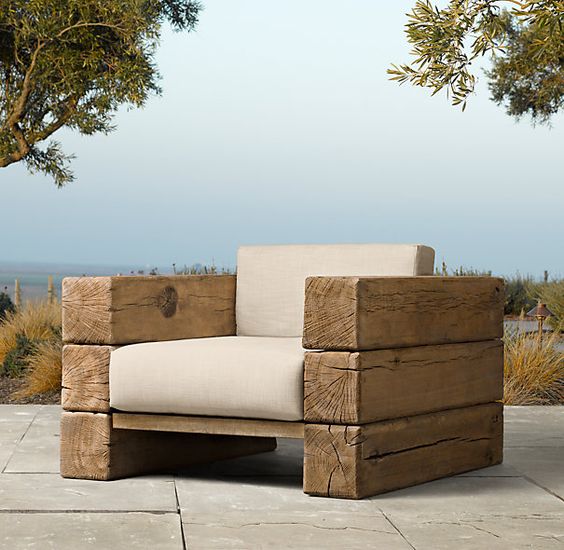
Not only in modern interiors, but also as garden furniture, wood products are very popular. It is only important to protect the surface of the wood from moisture - paint or varnish, impregnate with an antiseptic, to increase not only the service life of the furniture, but also by increasing personal comfort and safety.


Comfortable, practical, stable and at the same time mobile - stools that can be assembled like a paper construction set. They will fit perfectly into the modern style of interior design.


Wood products are not so much about color and texture as about shape. After all, many types of wood are quite pliable; they can be given a completely original shape. But in pursuit of originality, do not forget about the main purpose of your future masterpiece - the possibility of a comfortable location for relaxation, dining or work.


In some cases, there is no need to make a chair from scratch; it is enough to restore an old piece of furniture and give it the appearance that will most harmoniously fit into the interior of the room.


Some interesting ideas for reading lovers. A chair or armchair and a storage system for books – two in one. Convenient, practical, original.


What about a portable folding chair that, when not needed, can simply be placed against the wall or even hung on it? Of course, such a mobile piece of furniture has weight restrictions, but for a person of average build this design will be more than appropriate.

The combination of materials with different technical characteristics within the framework of the manufacture of one piece of furniture makes it possible to improve its properties of strength, wear resistance and durability. You can combine wood, metal, plastic, leather, and various types of rubber.


Most often, wood and metal are combined in the manufacture of handmade chairs. Such an alliance helps to obtain the most durable and resistant structures. In this case, parts of the future chair can be made by you or be parts of other interior items that you no longer need.


It is logical to combine wood with soft materials that increase the level of comfort of the chair, turning it almost into an armchair. And we are not only talking about cushions for seats or backs, but also quite exotic options - rubber, thread weaving, animal skin or its imitation, artificial materials.


Chairs with a metal frame are strong and stable, durable and able to take high loads. But such furniture has disadvantages - the seat is too cold (if it is also made of metal). Use pads made of foam rubber, padding polyester and other synthetic materials that can be washed in a machine. Or at least use removable fabric covers for the backs and seats.

The world of stools is vast and varied; photo in fig. give only a general idea of its range. It is with a stool that many amateur carpenters begin their creative journey: you can make a simple, but practical and pleasant-looking stool with your own hands in half an evening, and in the future, stools of other types will allow you to master the essential subtleties of furniture craftsmanship, and not a single product will be superfluous in the house.

Other pieces of furniture do not have such amazing properties; This is explained, on the one hand, by the fact that the stool is essentially extremely simple, purely practical and comes from ancient times: the wooden logs on which cavemen sat around the fire are already stools. For the same reason, a stool must endure everything, be strong, reliable, and durable.
On the other hand, the simplicity of the form and design allows the stool to fit into any interior and generally be at home in any environment. Over the centuries and millennia, this certainly had to be appreciated, and was appreciated, as a suitable basis for the embodiment of certain aesthetic concepts in the material. Such an exquisite piece of furniture as a banquette is also nothing more than a stool. Ornate design and decor require the use of complex technological techniques, so to make a luxurious stool, you will need a fair amount of skill and experience. It is much easier to purchase both when working with a familiar base, and here the stool provides a full range of products from the completely primitive to the most technologically sophisticated.
Stools are made from a variety of materials, from rope to stone. Plastic stools have long been commonplace, and forged or welded metal ones are also not unique, but in this publication we will figure out how to make a stool from wood. The reason, in addition to the “originality” of the material, is that it is a wooden stool can be extremely simple, durable, reliable, and at the same time have high aesthetic merits. How so? Well, let's go!
Making a stool begins with preparing the tool and workplace. Don't worry, we won't immediately advise spending a decent salary on a wood milling machine, drilling machine, planer saw and lathe. Let's try to do without even a carpentry workbench. Maybe it will come to all this when a taste for work appears and income from it appears. For now, we will limit ourselves to the minimum that will allow us to work from a table on the balcony or in the garage, laying a film on the floor so as not to spread sawdust. And this minimum of tools should be useful on the farm in general, in case (everyone has their own inclinations) the first stool turns out to be the last.

So, to begin with, in addition to an electric drill, you will need a pair of C-shaped carpentry clamps for 180-220 mm (top left in the figure), one (preferably 2) F-shaped for 400-500 mm, at the top in the center, and, preferably, clothespin clamp, top right. They are inexpensive, and their range of applications besides carpentry is very wide.
Buying a jigsaw, of course, would be a good idea; it is not that expensive and is suitable for a wide variety of jobs. But at first, you can use it instead... a frame hacksaw for metal; These are also sold as mini hacksaws. Just don’t take entirely plastic ones (bottom left in the figure, pos. a). This is a tool for rare occasional use. Such a miracle can be found on the Internet for as much as 18 rubles, but the plastic sponges are quickly eaten up by the steel of the blade, and an “ultra-cheap” hacksaw is not enough for a good stool. You need to take a mini hacksaw with a steel frame, pos. b. It will cost about 50 rubles, but you can work with it for a long time and regularly.
To work on wood, the blade is inserted into the frame hacksaw “incorrectly”, with the cutting edges of the teeth towards you (upper insert in pos. b). Then, using a section of the canvas in the frame, you can saw across the grain, along and obliquely. In any case, the cut comes out even and smooth, literally mirror-like; When sawing layer by layer, only under-dried or newly damp coniferous wood becomes a little shaggy. In this way, for example, the tenons for the groove are filed, see below. Again, the “wrong” way to cut wood with a frame saw is to start from the corner, because wood is softer than any structural metal.
Using a protruding section (cantilever) of the blade to make a curved cut is slower than with a jigsaw, but, with some attention and accuracy, just as accurate. When working at home, it is advisable to thread the blade, as it should be in a mechanic's fashion, with the ridges of the teeth away from you, so that the sawdust falls down, clogging the markings. In this case, you also need to saw like a metalworker: hold the tool level, without tilting it along the cut, do not lean too hard, and allow a swing (working stroke) of no more than 1.5-2 widths of the blade. Also, with the “wing” of the blade, the protruding ends of dowels and through tenons are sawed off no worse than with a special flexible saw, which is several times more expensive.
Next, wood files - rasps. You will need 2 of them: straight semicircular 200x20 mm, pos. in, etc. cabinet, also semicircular (250-300)x30 mm, pos. d. A cabinet rasp differs from a straight rasp not only in its narrowed end, but also in the method of notching. Both of them have a notch, of course, that is not at all the same as that of metal files; those on the tree instantly become clogged with sawdust. Depending on the properties of the wood and the area being processed (end, edge, face), it may be more convenient to work with one or another rasp.
Then, chisels. We will need simple straight wood chisels with a width of 6-8 and 20 mm. It would also be a good idea to purchase a set of 6-40 mm chisels, consisting of 3-5 samples. Often a set of chisels comes with a wooden mallet, which otherwise needs to be purchased separately. However, you can make a mallet, like a clothespin clamp, with your own hands from hard, fine-grained wood.
The dimensions of the stool seat, as a rule, are taken in the range from 300x300 to 450x450 mm or, if the stool is round, of the same diameter. Minimum – 250x250 mm; sitting on a 200 mm board is already uncomfortable; after 5-15 minutes, the edges of even a soft, but too narrow seat crash into the vast elastic “fifth point”.
The total height of the stool is taken, according to height, in the range of 420-480 mm. The height of a children's or utility stool can be reduced to 260-280 mm; in this case, the seat is made approximately 260x260 mm or with a diameter of 270-280 mm.
Note: When designing a stool yourself, you should remember that the contour of its supporting surface must be no less than 280x280 mm or a diameter of 320 mm for a stool of normal height and no less than 250x250 mm or a diameter of 290 mm for a stool of reduced height, otherwise both will turn out to be unstable. For decorative and folding stools, these values can be reduced by 1.25 times.
Yes, a good stool, incl. decorative for the living room, can be assembled from just 3 parts. Drawings of a product of this kind (stools-cabinets) are given on the left in Fig. The version of 4 parts is unsightly, but very durable, therefore it is more suitable as a working stool: you can attach a removable vice on it, drill, saw, chop, etc. In this case, it is better to take the overall dimensions of the 4-piece stool to be minimal, see above.

The sample on the left in Fig. – one of the very few types of stools that can be made entirely from chipboard with a thickness of 20 mm or more; The width of the connecting grooves in the parts corresponds to the thickness of the material. The base is assembled with glue (carpentry glue, nitro glue for wood, PVA or polymer for tiles like bustylate). Seat fastening – wood self-tapping screws or confirmatory screws (60-90) x 6 mm. Screw connections are also glued.
The fact is that chipboard really “does not like” loads on the layer and fastening at the end. In this design, the loads concentrated at the attachment points spread well and, if assembled correctly, delamination of the material is unlikely. But it is still highly advisable to glue pads made of hard, dense wood (oak, beech, hornbeam) with a thickness of 10 mm or more onto the heels of the legs. No need for rubber, it will stain and ruin the floor.
The version of the supporting structure of the stool, shown on the right in the figure, allows, on the one hand, to get rid of the rather labor-intensive and responsible cutting of long, even grooves, which is especially important when working with a hand saw. On the other hand, it allows you to get legs of a rather bizarre shape without a significant increase in material waste, because workpieces are marked with minimal technological gaps on a board 200-250 mm wide.
The “highlight” here is that 2 of the 3 parts of the previous design (namely, the legs) “halve” lengthwise. The base is assembled in a cross (diagram at the top right) similar to the previous one. option, i.e. with gluing all connections:
Also pay attention to the side surface, marked with the letter A. Before installing the seat, you can put on it a round shell, rolled from thin fiberboard. The shell is installed using glue and small hardware (screws, nails). After assembling and finishing the entire product, the shell can be decorated, incl. very impressive stucco molding from polymer clay and get a truly luxurious stool.
Stools-benches of a box-shaped design made of 4 boards (a seat, 2 side panels-legs and a vertical longitudinal insert-support beam, on the left in the figure) are widely known and have been described many times. However, such a stool is simple and cheap only in appearance: for proper strength and reliability, its parts need to be cut from a block of durable wood or chipboard with a thickness of 40 mm and a width of 250 mm. Both materials are not cheap; scraps suitable for a stool most often do not go to waste, and it is not easy to find them for sale or in your own pantry.

Meanwhile, a utility and work stool-bench can be made literally from scrap materials, scraps of timber from 30x30 and plywood from 2.5 mm as follows, on the right in the figure:
A simple full-size utility stool can also be made from scraps of timber, plywood or chipboard, see fig. It is more suitable for a seasonal garden. When used in the kitchen of a residential building, the design turns out to be rather weak, where this stool lasts for 3-5 years. The second option for using the same design is a smaller children's stool, see above; the dimensions of the parts are then proportionally reduced, except for the width of the connecting grooves.

A step stool with 2 pairs of X-shaped legs is also quite popular due to its low material consumption and good decorative qualities. However, in reality it turns out to be not so simple.
Take a look at the subassembly marked in red in the fragment at the top left of the figure. Performing a strong and reliable insertion of 3 beams in 2 mutually perpendicular planes is not an easy task even for an experienced carpenter; putting a dowel there will be unreliable, and the self-tapping screw in this case is outright hackwork: the double crosshair is heavily loaded and the steel hardware will tear the wood.

These problems can be circumvented by combining the beam and box-type load-bearing circuits of the supporting structure. We will leave the openwork of the beam frame in the most noticeable place - at the bottom - and we will achieve overall strength with an “oak” box-shaped top. Technically, this is achieved by reducing the angle between the legs to 60 degrees. Then, in order to maintain the overall height of the stool and the width of the contour of the supporting surface within acceptable limits, the crosshairs of the legs move upward. The V-shaped part of the now asymmetrical X is high and wide enough that a strong box can be made from 20 mm or thicker pine boards, chipboard or plywood, see left in figure.
Note: the missing overall dimensions can be taken from the figure; it is drawn to scale.
The longitudinal walls of the box do not have to be inclined; This is done to reduce the visibility of the box while maintaining maximum volume. If the longitudinal walls of the box are straight, it can be made narrower, as long as the V-shaped part of the legs fits inside. It also doesn’t hurt to deepen the box by moving its bottom down; the whole stool will only be stronger. In this case, 1-2 attachment points are added on the Λ-shaped parts of the legs, similar to the V-shaped part, marked in green in Fig. The box is assembled on dowels (see below) and glue or on steel corners applied from the inside. In this case, the box is first glued, and after 1/4-1/3 of the time the glue has completely hardened, it is finally fastened with steel.
The bottom of the box is sewn up with fiberboard; a spacious drawer for useful rubbish is formed under the seat: the supporting structure provides the stool with full strength and its seat can be removable or folding. The last option is better, because... When rearranging the stool, take it by the seat. Fastening the folding seat is a piano loop or a pair of small card loops. The latch in the lowered state is any suitable: a tight ball latch, a hook and a bracket on the underside of the seat, even a secret lock, if you so choose.
When making this stool, you will have to master at least one carpentry joint - cutting into half a tree, this is how the parts of the legs are connected. As they would say in America, President Obama’s youngest daughter (Jane Psaki’s grandmother, they say, is a smart and skillful lady) can cut two pieces of wood into each other using a router. Using a simple hand tool, a half-tree cut is made by making cuts according to the markings and selecting the excess between them. Working “only with your hands”, you need to take a closer look at how the layers of wood go on both sides and place a chisel to knock out the excess, so that the chip does not go deep into the mass of material, see above in Fig. The remainder is removed with the same chisel, acting as a chisel, without hitting with a mallet, and, if necessary, the bottom of the groove is smoothed with a rasp. There is no need to smooth it clean with sandpaper; rough surfaces will stick to the glue more tightly.
Note: Please note that the details of the legs of the step stool are a mirror image of each other both horizontally and vertically, at the bottom right in Fig. If you do not have experience in design work or have a naturally developed (convex, as they say) spatial imagination, it will be useful to first model the legs to scale or life-size, assembling their models from 2 layers of cardboard.
So we have already stumbled upon a dowel connection, one of the most commonly used in carpentry. In the future, we will need an equally common tongue-and-groove connection. How they are performed is shown in Fig. There is little left to add to it.

First, when choosing excess from the groove (pos. 1d), there is no need to bring it to complete rectangularity. It is better to leave the edges (short sides) of the groove rounded, and round the edges of the tenon accordingly, so the entire connection will be stronger.
Secondly, the tenon does not have to be made on a router; it will not take much longer to cut it out by hand with the same frame hacksaw. First, at the level of the base of the tenon, the workpiece is sawed across the contour 0.5-1 mm less than the required depth, retreating from the markings to the end of the workpiece by 0.5-1 mm. Drilling down to the full depth is also not a big sin, but then a shallow narrow groove will remain along the contour of the base of the tenon. If you don’t finish sawing a little, then the base of the tenon, due to the elasticity of the tree, will be slightly wider, and the whole connection will again be stronger.
The tenon is finally cut out from the end along the fibers, retreating 0.5-1 mm outward from the markings. Here, for the same reason, the cut is also not completed by 1-1.5 mm, and the excess is simply broken off. If the wood is straight-grained coniferous, the excess will at some point crack on its own and hang on the fibers or fall off. Adjust the tenon to size and round its edges with a rasp.
Note: When developing wooden structures yourself, do not forget - all tenons should be directed only and only along the layer! The thickness of the tenon for ordinary industrial wood, unless otherwise indicated on the drawings, is taken by default at 1/3 of the thickness of the thinnest of the mating parts.
As for dowels (round connecting bosses), it is better to buy ready-made wooden ones. The cost of ready-made dowels is cheap; they are already chamfered and grooved, which makes the glued connection stronger. Plastic dowels do not dry out along with the wood and therefore the connection weakens over time.
The main rule when choosing dowels is that their wood should dry out a little slower than structural wood or at the same speed; this condition is almost always met if the wood of the dowel is harder. Drying out the dowel is difficult because its contact with air is limited. As the part dries out, it will compress the dowel; The lignin between it and the dowel is gradually “soldered together” and the connection becomes stronger over time.
The diameter of the dowels is taken to be 2.5-3 times less than the thickness of the narrowest part to be connected; its length is 1.75 times the thickness of the thinnest part. The last dowel (if it is not through) should fit 2/3-3/4 of its thickness, and the rest of it should sit in the thicker part.
Note: holes for blind dowels in thin boards are selected so-called. with a Forstner drill, see below, leaving behind an almost flat bottom.
Well, are you going to make a tenon and groove with your hands? Then it’s time to start making a simple folding wooden stool, see picture, for a summer house, garden, picnic. 2-3 of these stools will not take up much space in the closet and will fit in the trunk of a car. Material: board or plywood. It is highly advisable to impregnate all parts from the latter with a water-polymer emulsion before assembling the product; it will not only protect against moisture and rot, but also strengthen the structure.

Taking a folding stool with a round seat simply by the seat is not entirely convenient, so the hand grip on the sample above is not a whim. In a solid board, the grip is cut out as usual: using a feather or core drill, holes are drilled along its edges (diameter - 24-36 mm; distance between centers 95-115 mm, depending on the hand), and the excess between them is sawed out. In this case, it is also convenient to use a frame saw.

It’s another matter if the grip is at the junction of the boards; This most often happens in classic kitchen stools, see below. Here the beak of the feather or the pioneer drill/guide pin of the crown when working with a hand drill will definitely go along the groove and the drill will lead to the right. A jig made of thick plywood or cutting a board does not help, the thin side of the feather or the teeth of the crown tear it, and they themselves catch on the steel jig.
It is for such cases, as well as for drilling holes with a flat bottom, that the Forstner drill is intended, see Fig., its side surface is smooth. When making a hand grip in the seat of a stool, first drill holes in the jig according to the dimensions indicated above; there is a surplus left! The jig is then placed in place, securely secured with a pair of C-clamps, and the edge holes are drilled. The excess in the part is chosen as always; the gap between the boards is not a hindrance for this.
Now we have classic stools for the kitchen. During use, they suffer more than others, so their design is carried out according to all the rules of strength: a rigid beam frame, capable of withstanding all operating loads, and a seat that must be held firmly in place, but in such a way that, if necessary, it can be easily repaired or replace. Therefore, the seat of a kitchen stool is made of panel boards from cohesive planks (see below) and attached to biscuit stands or directly to the frame on dowels.

The option with breadcrumbs is shown in rice; pos. A – its general diagram and names of its components. The advantage of this design is the low requirements for the quality of the seat shield. By installing a pair of crackers on each drawer (this will not reduce the overall strength of the product), you can make the seat out of separate boards, and on the original 4 crackers - with plywood or chipboard.

Pay attention to the drawers, these are not just boards, they are all over the furniture, and not only in furniture. In general, a drawer is a part that properly distributes loads in an assembly unit and is itself capable of bearing the load. Drawers can be found in the still, pipelines, etc., which have nothing to do with furniture.
Also pay attention to pos. E, it shows a way to check the evenness of pairs of legs using diagonals; it is basically the same as checking the squareness of the foundation. When assembling a classic stool, the evenness of the pairs is checked three times, see fig. right: in pairs assembled separately (left pose and red lines), between pairs (orange lines on the central pose) and the overall rectangularity of the frame (brown lines in the center). The seat is installed only after complete check of levelness; filing the legs of a finished stool is complete unprofessionalism.
Below in Fig. – drawings of a stool for the kitchen with a seat mounted on dowels. This design is less labor-intensive and material-intensive, because operations for the manufacture and installation of crackers are eliminated, but the seat panel must be firmly solidified, see below. If the frames are installed on the legs, they should not reach the floor by 20-40 mm, so as not to scratch it.

Note: The cuts of the tenons at 45 degrees in both cases are made with the same frame hacksaw. A fixed miter box (device for sawing at an angle) at fixed angles of 90, 45 and 60 degrees costs no more than 50 rubles.
The boards that will now be the plots of the set (package) are usually joined into boards with glue using special clips - weims, top left in Fig. In weims, small additionally secured shields, like for the seat of a stool, can be simply joined together end-to-end. Large panels, say, for a table top or the side of a cabinet, are joined together (middle row from left to right) with a tongue and groove, in a rebate, on dowels, dowels (lamellas) and other methods.

In handicraft work, clamps are sometimes replaced with various homemade devices on the same principle (compressing the set with pairs of wedges), at the top right, and now more and more often with large F-shaped clamps. In this case, a rather labor-intensive preparation of the plots is necessary for consolidation using methods a, c or d. However, there is still no guarantee that the set, when compressed, if it does not rear up all like an accordion, will go in a wave, because It is impossible to achieve absolutely precise mating of wooden parts under load due to the low local strength of the wood.
However, there is a way to attach the shield to the seat of a stool end-to-end, completely even and without complex devices, this is the so-called. twisted rim with cheek liners; its diagram is given below in Fig. Step-by-step bonding of the shield in a twisted wire is carried out as follows:
The cross section of the wedges does not have to be rectangular; it is possible to use round sticks cut obliquely; There is only one condition - the wedges need to be smooth. It is advisable to use a slippery propylene cord; packaging twine will do. The thickness of the wedges is determined based on existing experience. If there is none, then the package is first assembled dry, without glue, and the thickness of the wedges is selected so that they fit completely under the winding, pulling its turns tightly.
Sitting on a hard one for a long time is understandably unpleasant. A comfortable stool on a classic kitchen frame can be made with a wicker seat, without bothering with breadcrumbs, dowels and a shield, see fig. The seat material is colored propylene twine and smooth linen cord.

It is highly desirable for decorative stools in the living room to be beautifully soft, and it wouldn’t hurt to give a kitchen stool some shine. But there is not and cannot be a stool on which no one would ever stand. Or, at least, he did not feel a strong desire to do this for completely objective reasons caused by the prevailing circumstances. Hence the conclusion: the stool needs a soft, elegant pad on the seat - a seat - which, if necessary, could be removed without fiddling for a long time, and just as quickly put back.
The first thing that comes to mind in this case is a decorative pillow, see for example. video below. But the pillow can be accidentally dumped on the floor, and it itself will slowly slide down there. Another option is a case with a soft liner. A cover for a chair or armchair is a rather complex sewing product, but with a stool the situation is simpler.
Covers for stools are made mainly of the following types, see fig. Pos. 1 – cape with ties. This is the easiest thing to sew, but the ties stick out in plain sight, and there is a lot of fiddling around with them, especially if the stool is for children and the baby has figured out something of his own with the knots.

The next option is a cape with an elastic band. She can look great, pos. 2, and you can remove it by simply pulling it off. The structure of a stool cover is generally the same as permanent soft upholstery: from bottom to top, foam rubber, synthetic padding and upholstery fabric, but there are a couple of tricks here.
Firstly, it is better to take foam rubber from PVC, yellowish soft, pos. 3. It is not suitable for permanent upholstery of furniture, because... relatively short-lived. But in the case of a stool, another feature comes to the fore: it adheres well to wood, incl. varnished, so that the cape will not slide to the side and under the angry rider.
Secondly, it is better to cut the cover for a square stool diagonally, i.e. The warp and weft of the fabric should go from corner to corner. In this case, there is no need for cutting as such: the cut is thrown onto the seat (the folds create beautiful and smoothly fitting corners), where to cut is marked, cut and sewn.
Note: the cover for the round stool needs to be cut; an example of its manufacture - see the video below:
An option that is also quite soft, original, beautiful and grippy to wood is a rug for a stool using the patchwork technique, i.e. patchwork, pos. 4; see e.g. plot:
Finally, a knitted cape, pos. 5. This option is labor-intensive and almost exclusively decorative. It allows you to achieve a magnificent visual effect, but, alas, a knitted cape will retain its appearance for a long time only on a stool that is not sat on.
Stools with diverging legs are very elegant. It is generally accepted that they are not for everyone. The reason is drilling holes at a precisely specified angle; see fig. for example. drawings of details of a stool with turned legs. Here, firstly, you cannot do without a drilling machine. A relatively inexpensive benchtop stand for a drill does not help: the shaft cage in it is too short, which is why, in combination with the plastic body, the drill moves by half a degree, or even more. Such an error is enough to make the stool crooked and shaky.

Secondly, adjusting the parts of a stool of this design during the assembly process is excluded; everything must be done immediately exactly to size from solid, high-quality wood. See the steel plate at the bottom right in the picture? This is a gauge for checking the diameter of studs. In this case, regardless of the design and overall design, they must be round, i.e. You also need a wood lathe.
Now let’s go back to the “3 to 5” stool. Let's reduce the size g to 100 mm, this is acceptable. Is it now possible to make this stool with spreading legs? Quite. They will, of course, not be chiseled and not quite round, but the grace and lightness of the stool will be preserved. This is what the aesthetic potential of a stool means in practice.
An important attribute of every fisherman is a folding chair. Or you went on a picnic with friends, in which case a folding chair will also be very useful. It takes up little space, so it is easy to transport in the car. Stores provide a large selection of similar chairs. But why spend extra money when you can make such a chair with your own hands in a short time?!
Here we look at the three most commonly needed types of folding chairs:

We will need:


Let's move on to the collection. First, let's make legs for our stool. To do this, make small holes along the diameter of the bolts at the top of the future legs. Make sure that the bolts are screwed in completely and that their heads do not protrude. The axis must be placed as high as possible, otherwise the stool will be unstable.


Using bolts, rigidly connect the upper end parts of the legs with the crossbars, which will be located under the seat. Install two bars on the outer legs, and two on the inner legs.

Now we have two elements that act as hinges. Let's move on to installing the seat. Let's start with wide blocks. The overhang will be 15-20mm.

Let's move on to securing the crossbars; for this, use wide bars. One of them needs to be fixed on the outer legs, one is fixed on the end of the inner legs.

Next, stepping back 10 cm from the bottom of the legs, use self-tapping screws to secure the overhead legs.
After this, we fix the narrow internal blocks, which make it convenient and generally possible to unfold and fold the future folding chair made of wood. The principle is the same as what we used when working with wide blocks.

Now you need to be a little more careful, the height and overall performance of the entire structure depends on this. Within this scheme, the height of our creation can be 35-45 cm. Choose the height that will be convenient for you, and in accordance with this, install the second narrow parts of the seat.


Stepping back from the wide bars, secure the narrow elements of the seat at a distance of 1.5-2 cm. Life hack: if you insert a 2-centimeter square piece of wood between the middle parts, you can increase the height.

And with this, making a folding chair with your own hands can be considered complete. As an additional “accessory”, you can screw a handle to your stool, then it will be easier to carry, especially if you also need to carry tackle and a fishing rod in your hands. Just instead of short bolts connecting the internal crossbars, take the fasteners a little longer, then you can easily attach a handle to it.

To make this copy, prepare in advance:


Let's move on to the collection. Let's start with making the seat. To do this, mount the slats on the support bars using short self-tapping screws at an equal distance from each other.


Let's move on to assembling the frame. Its main components are the protruding legs and back of our wooden masterpiece. We select the part where the back will be and attach slats to it to support the back; in the lower part, one crossbar is enough for greater stability. The rear legs also have crossbars at the top and bottom.

So, we have two elements that need to be fastened together. To do this, use bolts of any convenient diameter, drill through holes in both frames and fasten them together.
We connect the front and back frames of the chair with bolts and nuts.

Advice: do not tighten the nuts too tightly, let the inner frame rotate freely, but not dangle.

You've probably already seen similar photos of a folding chair, and now this convenient and practical piece of furniture will appear in your home.


When fishing, sitting on the cold, sometimes wet ground is not only uncomfortable, but also unhealthy. Professional fishermen often use folding chairs. This is much more convenient and less harmful to your back and overall health. In addition, with such a chair it is convenient to quickly change the fishing location.

Since fishing chairs often get wet, the wooden base of such a chair is inferior to plastic and metal. Therefore, it is better to use plastic or metal pipes.

We will consider the option of assembling from plastic pipes.
We will need:

Let's move on to the collection. Connect the long tubes with bolts so that you get two identical crosses. Connect the opposite ends of the long tubes to the short ones using corners. This gives us the perfect frame for your new fishing chair. But we still have a piece of tarpaulin left, use it to cover the top of the structure and create a kind of seat.

Tip: Don't over-tighten the bolts or your chair will no longer fold. Let its elements move freely relative to each other.


Using the same instructions, you can make folding chairs for fishing from metal tubes.

That's all! The chair is ready. As you can see, it’s very easy to do everything and old, unnecessary materials that have probably been gathering dust on your balcony or in the garage for a long time will have a use! Good luck in job!


Making a chair yourself is an opportunity to make a piece of furniture comfortable for you. To do this, you need to make a lot of preliminary measurements and calculations. You can give any shape to the back, seat, or make an exclusive model for the interior.
The following materials are used in the manufacture of the chair:

When choosing materials, the flexibility of wood and other characteristics are taken into account. The material must be treated with stain. It reveals the structure of the wood, making the product very aesthetically pleasing. It is worth considering all factors that may affect its strength and durability.

Treatment with anti-corrosion compounds helps protect and extend service life. The material must be of high quality: without knots, cracks and fungi.

Material parameters:

When purchasing initial material, you need to take a little more than the intended amount.


A massive wooden chair is considered comfortable and durable. Thanks to its design, it is stable and reliable. The product is suitable for both adults and children. Kids will not be afraid, and the chair will withstand any load.

There are standard types of products:


The aesthetics and comfort of these models are quite high. The choice of manufacturing style and material depends on your desire. If you need to make a durable but lightweight chair, use plywood or boards.

The elegance of the design is determined by the carved legs and backs. Each of the above types has its own special use, creating coziness and providing maximum comfort for home, work or leisure.

First you need to decide on the model, and then move on to manufacturing. The sketch can be drawn up either by hand or using special programs. Detailed drawing and dimensions are required. For a visual representation, you just need to depict everything in advance. 
Accurate drawings and dimensions of the chairs are necessary for correct drawing, and then the actual production of the model. All elements must be clearly presented and drawn with indications of all dimensions.

When making furniture, it is important to first purchase or rent the necessary equipment:

It is important to select a place where the entire manufacturing process will take place.

After selecting the material, self-assembly is done, which is partially reminiscent of assembling a stool, but differs in the presence of a backrest. Tools required:

The whole point of the work is that chairs with a back are assembled in several stages. In the absence of drawings, the product may turn out uneven and distorted.


All parts must be sanded, and after the manufacturing process is completed, they must be stained and varnished. This will allow the chair to preserve the beauty of the product and its strength for a long time.

The seat can be covered with dermantine, leather or any other material. To prevent the product from spoiling the floor, you need to attach special pads to the legs made of rubber or felt. This will give the chair stability and protect the floor from damage.

The finished chair is kept in order using varnish and stain. If you want to add personality, you can paint with acrylic or chalk paint in even tones or add unusual patterns. If scratches occur accidentally, cover them with furniture putty.

The primer should be used to increase the wear resistance and strength of the chairs. Careful sanding must be done between coats. Finishing is the final stage of woodworking. There are several types of finishes:

Finishing serves as the final stage in the independent production of chairs. The choice of coating depends on the nature of the room and its features.

Making chairs yourself requires clear and thoughtful preliminary work, procurement of material, tools and drawings, which can be done both on paper and using computer modeling programs.


The final touch is decorating the product to your liking. To evaluate the quality of the work from the outside, you can take a photo of the chair. Having professional equipment in your arsenal, you can create a masterpiece for any type of room.


Furniture showrooms offer a wide range of chairs of various types, but choosing a comfortable model that fits in size is not easy. And the cost of a product does not always correspond to its quality. A profitable alternative is to make a chair with your own hands at home. By spending a little time and money, you can end up with an exclusive product.
You need to start making a chair with your own hands by choosing the type of wood. They are hard and soft. The first include beech, oak, birch, maple, walnut, cherry - all have high strength and resistance to deformation. Products made from such wood can last for decades, but they are also more difficult to process, since such materials have a dense structure. They are also distinguished by their high cost.
Soft woods - pine, spruce, linden, aspen, alder and others - are more susceptible to scratches and chips. They are inferior to solid ones in practicality. Their advantage is that due to its looser, straight-grained structure, such wood is convenient to saw, cut, sand and glue. The products are light and elegant. Materials made from soft rocks are much cheaper than materials made from hard rocks. There is particularly durable wood (yew, acacia, boxwood) - it is better not to process it at home.
Typically, chairs are made of timber (with a section of 60 by 40 mm or 40 by 40 mm) or boards 10-15 mm thick. You can also make furniture from a log; to do this, you must first dismantle it. This is done independently on a makeshift stand using a grinder with a circular saw. If you lack the skill, it is better to entrust the cutting to professional carpenters.
When purchasing blanks, you need to check the quality of the lumber. If the rules for drying wood have been violated, this can be determined by external defects: cracks on the surface, warping of the wood (bends, irregularities) and resin protruding in some places. Also, boards that are stored in damp areas should not be used to make a chair. All these factors negatively affect the strength and wear resistance of wood.
High-quality materials for chairs should be selected according to the following criteria:
Before starting work, it is useful to treat lumber with special antiseptics - this will increase their moisture resistance and prevent fungal infection. After impregnation with this composition, a chair made of solid natural wood becomes stronger and more durable.
Smooth surface, without knots, bends or distortions
 No cracks or chips
 The wood is dry, without signs of mold or wormholes
To ensure that the manufacture of chairs does not require extra costs, you must immediately decide which model to make. For the simple form option you will need:
The presence of a furniture jig will greatly facilitate the work - this simple device helps to make the necessary markings of connections quickly and accurately. Clamps will also be useful, as they firmly hold wooden parts during processing or adjustment, which eliminates distortions. You can quickly and efficiently round the corners of workpieces with a hand router (if you don’t have one, use a plane).
Putty can be replaced with a homemade mixture. To do this, sawdust must be mixed with PVA glue, and then the resulting mass must be covered with the head of the screw or the erroneous hole.


For a beginner in carpentry, it is better not to take on chair models with fine carvings, curly elements or curved backs. Often, novice craftsmen practice making stools to gain experience. If the farm does not require them, there is no need to transfer materials and time to them. By carefully studying the manufacturing instructions, you can immediately make a wooden chair with a simple design. This is a universal piece of furniture that, due to its design, will last a long time. It will fit perfectly into the interior of a country house, and can also be used as a kitchen chair. A regular model with right angles will require the following parts:
It is possible to install legs and drawers in larger quantities - it depends on the imagination of the master. The backs are also made in different ways. For example, you can make several narrow planks and place them vertically, fastening them at the top and bottom with transverse parts. Or make one wide plank and connect it to the back legs. The advantage of this model is its ease of implementation. Among the shortcomings, the only drawback is that the design is too primitive, which will not stand out against the background of the rest of the furniture.
The sketch and drawing of the future exclusive must exactly correspond to its purpose. For this reason, you should initially decide whether it will be just a chair for sitting or with additional functions.
Visually, this model looks like an ordinary chair, but its upper part is upholstered with foam rubber and fabric. To make an option with a soft seat, you will need to know how to work with a stapler. You will also need to stock up on additional parts and tools:
In addition to the seat, you can also make a soft back. In this case, you need to correctly calculate the amount of material so that there is enough for both parts.
The advantage of making such chairs yourself is the ability to choose the optimal size, taking into account your body type. However, you need to take the choice of texture seriously. Natural leather cannot be used to upholster kitchen chairs, as it stretches due to moisture and begins to bulge over time. It is better to choose jacquard - this material has excellent water-repellent properties.

The main advantage of this model is the presence of armrests. In addition, it looks more presentable, and if you decorate it with fabric, you will get a rather stylish piece of furniture. An amateur carpenter can easily make a chair of this shape with his own hands. The easiest way would be to make a model with a straight back. For stability, it is better to make the legs wide, using a 15 mm board.
The front legs should be longer than in a regular chair, so that their upper part can then be connected to the armrests. They are made 8-10 cm wide from 10-15 mm boards; the edge is usually rounded to make it more comfortable for the hands. For fastenings you will need furniture bolts - with their help the frame of the chair-chair will be assembled.
For an untrained craftsman who does not have woodworking skills, this design may be too complicated.

An excellent solution for small spaces. Thanks to its folding legs, it can be quickly assembled and disassembled. There are also disadvantages - lack of a backrest, fragility. Experienced craftsmen recommend making a folding chair from hardwood boards - oak, maple, birch, elm, then the model will be strong and stable. Pine planks are less durable. As a basis, you need to take 2 long slats, which will serve as both the front legs and the back, when they are connected from above by a transverse board. The rear legs are attached to the seat. They, unlike a regular chair, are shorter than the front ones.
In the folding version, it is important to position the central axis correctly so that the seating area does not end up being too high. To assemble a chair of this model, additional fasteners will be required: furniture bolts and nuts with matching washers. Such furniture is usually made according to a sketch, so it is very important that the craftsman knows how to work with drawings.

Outwardly, it looks like a massive chair with a back, and if you unfold it, you get a staircase of 2-3 steps. The main advantage is the height. With its help you can reach the very top shelves of cabinets, remove curtains, and in general this chair is very useful, especially during renovations. The disadvantages are that it is heavy and takes up a lot of space. If you are making this model for the first time, it is better to choose a drawing of a chair without intricate shapes of legs and additional elements (for example, there is a design in which the steps protrude in a spiral). In addition to other materials and tools for such a chair, you will need a piano hinge and 2 sets of guides - with their help the steps will extend.
It is not easy to make such a wooden chair with your own hands. This will require skills in working with a jigsaw, drill, and plane.

Thanks to the science of ergonomics, optimal chair sizes have been developed so that a person feels comfortable while sitting. These standards are designed for men with a height of 170-175 cm, and women with a height of 160-165 cm. The optimal parameters are as follows:
The chairs are designed according to GOST for people weighing up to 100 kg. Drawings and dimensions with standard parameters can be used by those whose height and weight correspond to the average data. For the rest, to find out how to make a chair that will be comfortable to sit on and not spoil your posture, you need to take your own measurements. To do this, you need to sit down, keeping your legs at right angles and measure the distance from the floor to the inner bend of the knee - this will be the height to the seat. Then measure the length from the knee to the hip - this is the depth of the chair. The distance from your hip to your neck will help determine the height from the seat to the top edge of the backrest.
 Optimal chair parameters
 Calculation of parameters for selecting an individual chair
There are other standards that will help you make the right choice. Correspondence of human height to the height of the chair in cm:
In this case, the angle of the bent legs should be 90 degrees. The most comfortable body position is considered to be one in which the depth of the seat is 2/3 of the length of the hips. With this position, the correct deflection of the lower back is maintained.
 Correspondence of a person's height to the height of the chair
The easiest way to make a drawing of a chair with your own dimensions is to rework an already finished one. To do this, you need to replace the inappropriate parameters (length of the leg from the floor to the seat and others) with the required numbers, and then draw a diagram according to the new input. To do this correctly and avoid distortions, it is important to take into account the proportions of each element and know exactly which parts should be identical and which should not. Another important nuance is that when replacing sizes, you must respect the scale. There is a second option to get a drawing of chairs with a back - enter your parameters into a computer program, which itself will draw a diagram.
 Rework a completed drawing, taking into account proportions and scale
 Enter parameters into a computer program, which will draw the diagram itself
When the main drawing with all the calculations of the planned model is ready, it is advisable to make a diagram of each part, especially if there are connecting grooves or holes. Making a wooden chair begins with cutting. You need to put a pattern on the board, trace it along the contour with a pencil and cut out the blanks according to the drawing.
All components must be made without errors, with an accuracy of up to 1 mm. The slightest deviation will cause a distortion, and you will have to “adjust” the part or cut out another one.

When the drawing is ready, you can begin processing the bars to make suitable components from them. To do this, you need to cut out the necessary grooves for connections on each part, indicated in the diagram. They are drilled out with a router. If you don’t have one, you can use a drill, which first drills several holes nearby, and then they are combined with a chisel. Then you should carefully sand all surfaces, removing unevenness and possible wood defects. Round right corners. The parts for the homemade chair are ready.
Sanding is done using medium-grit sandpaper.
 Left hind leg
 Section of the right posterior leg
 Left front leg from above
 Left front
 Sketch of the longitudinal base and footing
 Front transverse base
 Rear transverse base
First, you need to place a piece of plywood on the foam rubber and use a sharp knife to cut out a part from it with an allowance of 1-1.5 cm along the entire edge. Then cut out the fabric, cut it to the shape of the seat, adding 5-6 cm on all sides. After this, lightly glue the plywood to the foam rubber so that the parts do not slip when re-tightening.
Place the workpiece with foam rubber down on the wrong side of the material, and then begin re-taping using a stapler. Drive the staples side by side, at a distance of 0.5-1 cm, so that the fabric does not bulge. First you need to make 4 fixations in the center on each side - this way there will be no distortions. Then the fabric must be stretched at the corners, after which the remaining sections must be secured with staples. When finished, trim off excess fabric.
Kitchen chairs have to be washed frequently, so it is better to reupholster them with materials such as jacquard or leatherette.


A simple chair with a backrest must be assembled as follows:
After the glue has dried, you can attach the inner strips for the seat and install the seat itself. If there are pedestals in the drawing, they are attached at the end of the assembly. The finished chair must be turned over with the seat down until it is completely dry.

When the glue dries, you need to cut off the protruding dowel heads, putty all the holes in the screws, and then sand everything thoroughly. Then cover the entire surface of the wooden chair with stain. When the initial layer has dried, you can coat it with varnish. It is better to apply it in 2 layers. The chair can also be painted - latex or acrylic paints are suitable for wood.
It is better to pre-impregnate a chair for the kitchen or garden with a special water-repellent agent for wood.
 Cut off protruding dowel heads
 Fill holes, sand parts
 Cover the surface with stain and varnish
You can transform a boring chair using various decorating techniques. The simplest and most popular methods:
Apart from painting, there are also other ways to decorate furniture. A familiar and win-win decor for a chair is beautiful pillows, covers and capes. They come in a wide variety of shapes and colors. To turn an ordinary chair into an exclusive piece of furniture, you can use old curtains and tablecloths, things that are out of fashion, lace, ribbons, bows and much more. For example, pillows can be sewn using old padding polyester jackets as a basis. It is important to remember that all decorative elements must be made removable so that they can be washed or cleaned.
In order to understand the principle of operation and in the future to boldly take on figured, complex designs, you need to start making chairs with your own hands with simple models. To make rectangular furniture with a soft seat you will need:
You will need to make legs, drawers, slats for the seat and legs from the timber, and take an edged board for the back. Carry out the work following the procedure:
To make a decent first wooden chair with your own hands, the drawings must be simple and understandable, and the materials must be of high quality. If desired, any craftsman can master the basics of carpentry. You should start with the simplest furniture models.
 Cut the tree
 Make the required holes
 Fasten the back parts
Very often in culinary recipes you can read something fabulous, for example: “Ah...

Zucchini is one of the popular vegetables on our table. Almost everyone...

Lips are a symbol of passion, sexual desire, pleasure, and most often...