To conceive a child, the maturation of the follicle in the ovary is necessary. If this one...


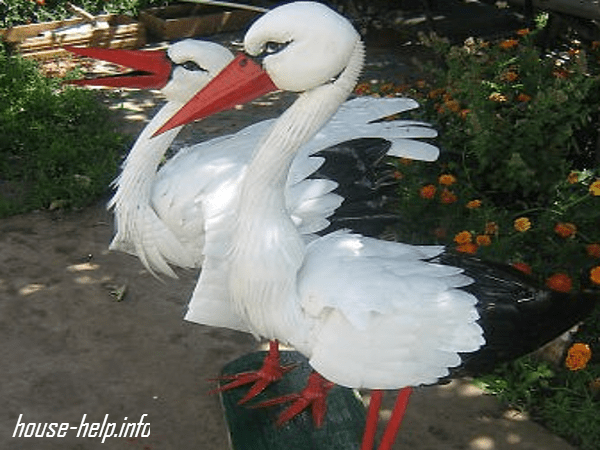
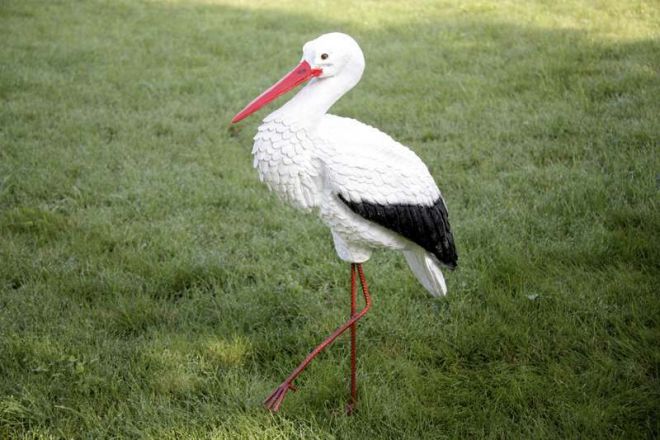
A well-groomed and ennobled cottage contributes to the creation of an atmosphere of peace and tranquility. A do-it-yourself stork for the garden is a great addition to flower beds, flower beds and lawns. This bird is a symbol of happiness, prosperity and prosperity. Garden sculpture of a stork looks good anywhere. You can install it on the ground, roof, pole or tree. To give the product realism, a technique such as building an artificial nest is used.
Figurines of storks for giving bring happiness and benefits, they are also a good decoration for lawns and flower beds.
To work, you need several plastic bottles in black and white. The basis of the structure will be a sheet of waterproof plywood.
To work, you will need the following tools and devices:
The stork can be made from plywood and plastic white milk bottles that are cut into fringes for plumage.
After the tools and materials are prepared, work can begin.
It is carried out in the following sequence:
The stork figure is ready. It can be easily attached to any surface. With the onset of inclement weather, it is better to remove the product and store it in a warm room until spring.
Back to index
As a rule, after carrying out external wall insulation, quite a lot of foam plastic scraps remain. They do not need to be disposed of. Many interesting and beautiful crafts can be made from this material. Polyfoam is light and easy to handle. You can make a stork out of foam plastic quickly, without the use of complex tools.
To work, you will need the following materials and tools:

Making a sculpture of a stork for the garden is carried out in the following sequence:
The final stage of needlework are the eyes. They are made from steel bearings or glass balls.
Back to index

An unused foam can can be successfully used to make a three-dimensional stork figure. With the help of foam, you can quickly make a three-dimensional blank, from which you can cut out the desired shape.
For work you will need:
There is a similar set in the closet of every house. Additional costs will not be required.
A garden decoration is made in the form of a sculpture of a stork in the following sequence:
To give the sculpture realism, you can use natural black and white feathers that are inserted into the tips of the wings and tail.
For reliability, they need to be planted on polyurethane glue.
The finished figure can be installed in the garden for a long time. The stork, decorated with acrylic paints, perfectly tolerates exposure to ultraviolet, cold and moisture.
Have you thought, dear readers, that it can be used as ... a material for the manufacture of art objects. Although it may not be art, as such, in its literal sense, but a decoration for the garden - a small sculpture, it is quite possible to do. Indeed, polyurethane foam is unusually plastic, quickly hardens and is easily processed - why not a material for creativity?
Today I will tell you how to make a sculpture of a stork out of polyurethane foam to decorate your garden or summer cottage. There are very few materials needed, and they are very cheap. If you pay attention to how much garden sculptures cost in hardware stores, you will realize that the price of a pair of foam cans is incommensurate with their cost. In addition, the stork will work out much better for us. So let's get started.
To begin with, we will select a suitable body for the stork - a frame on which foam will be sprayed. A plastic canister from under water with a capacity of 5 liters will do just fine. We make the neck of the stork from wire, and to add volume, you can wrap strips of foam plastic on the wire. The legs of the stork can also be made from wire, and the nose and head can be cut out either from foam or from wood - whichever is more convenient and preferable.


After making a simple frame, we start spraying foam on our sculpture - we do it carefully, presenting the contours of the finished stork. To make it easier, print out a large bird. If the foam does not fall as you intended, no problem - after drying, the excess is easily removed with a knife. By the way, if you wish, you can use real bird feathers for the tail - who knows, maybe you can do it instead of a peacock stork. After the foam has dried and finished with a knife, we paint the sculpture with ordinary acrylic paint, fix it in place in the garden, and invite friends to appreciate your creative genius. Good luck!

A well-groomed and attractive garden will always please the eye. To make your garden more comfortable, you can decorate it with various hand-made ones. Today we'll talk about how to make a stork for the garden and what materials can be used for this.
Let's start with the simplest - PET bottles.
Before you get started, you need to take a small sheet of plywood and make templates out of it. The templates must be made in the form of the body and wings of a bird, as shown in the image. You will also need opaque plastic bottles (preferably white or black), red tape and self-tapping screws. The procedure is as follows.

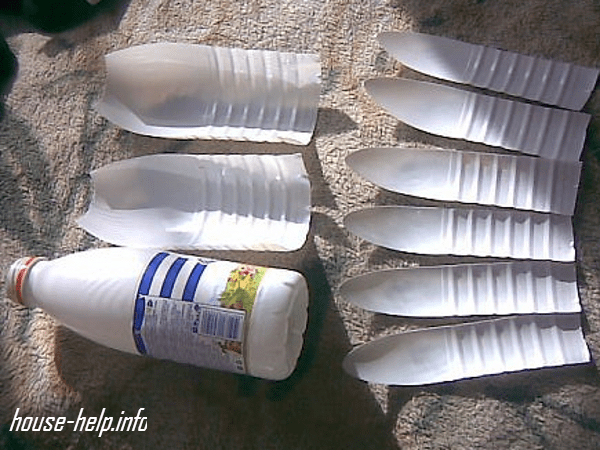
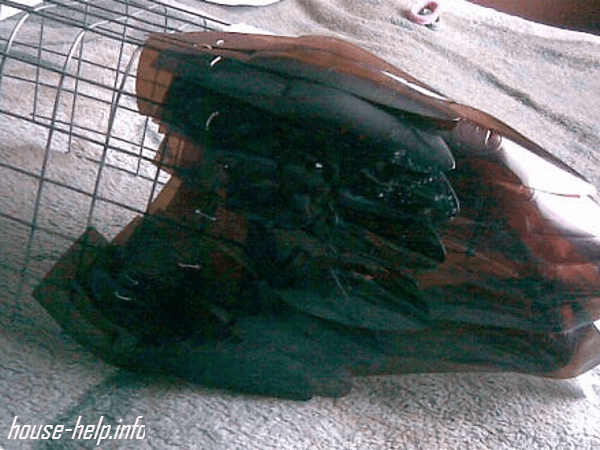
Step 1. First you need to connect the previously made templates with self-tapping screws. Plastic milk bottles will be used as feathers. The bottles should be cut into strips of the same width, and then make a fringe on the edges of each of them.
Step 2 Next, the finished feathers must be fixed on the "body" of the stork with a glue gun. It is characteristic that PET bottles of already black color will be used for the lower part of the body and tail (usually shampoo containers are used for this).
Step 3 The beak should be wrapped with red tape.
Step 4 For the manufacture of legs, ordinary wire is used. Eyes for a bird are bought at any needlework store. That's it, the stork is ready with your own hands!


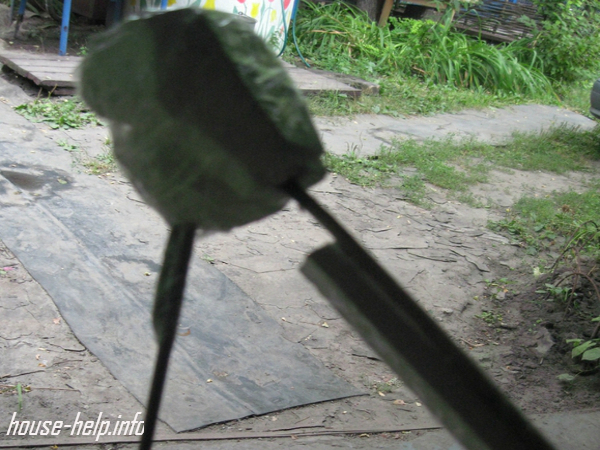
Now let's talk about another option for making a stork for the garden with your own hands. Now you need to pre-prepare a 5 liter plastic container, mounting foam, polystyrene and adhesive tape. The algorithm of actions should be as follows.

Step 1. First, body parts are attached to the bottle using a container. For the neck, an ordinary wire is used, overlaid with pieces of foam. The hips must be made in a similar way (using foam and wire). An ordinary large-diameter nail is quite suitable as a key.
Step 2 The blank will look at the preliminary stage as shown in the image below.
Step 3 For the legs of the bird (at least in this implementation), used electrodes are used. In the absence of electrodes, you can select a similar material - for example, a thick wire twisted into several turns, or metal rods from thin reinforcement.
Step 4 So, all parts of the "body" of the stork are assembled, but before proceeding to the next step, it is necessary to carefully check the strength and reliability of the fasteners.
Step 5 After that, the entire layout must be covered with mounting foam.
Step 6 All excess is neatly trimmed.
Step 7 Now the sculpture is almost ready. If the mounting foam is already completely dry, then the bird needs to be painted with acrylic paint.
Step 9 Natural feathers are inserted into the wings and tail to make the stork look as realistic as possible. See what a wonderful garden stork you will get (if you do everything right, of course).


Before you get started, make sure you have the following consumables:
five liter cans
plastic bottles (black and white);
· plastic tubes;
· thick wire;
foam plastic;
After that, you need to perform the following sequence of actions.
Step 1. Cut out blanks from foam, use a knife to outline the head. Cut out the eye sockets, make the beak flatter.
Step 2 Use sandpaper to make the surface as smooth as possible. Place toy eyes in the eye sockets (we have already talked about where you can get them).
Step 3 Cut a beak out of a plastic bottle and secure it with glue.
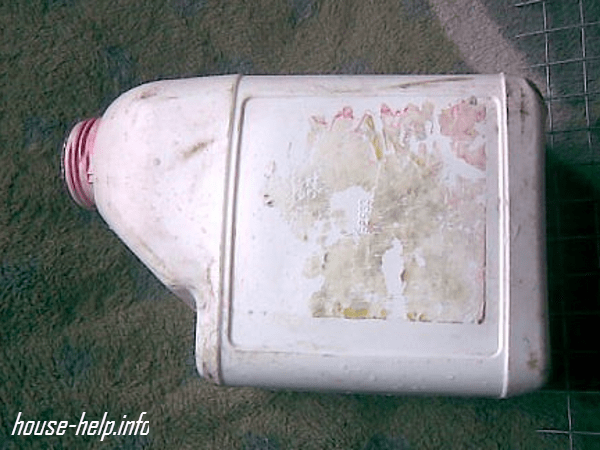
Step 4 From a plastic canister, make the body of a bird, cut off the handle.
Step 5 Cut out a piece of mesh large enough to wrap around the canister. Round the mesh a little so that it looks more like wings.
Step 6 A thick metal rod must be bent and legs made from it.
Step 7 Stork feathers are cut from white bottles.
Step 8 After that, you can proceed directly to the assembly of all elements. Work should start from the "tail".
Step 9 For the “neck”, a corrugation is put on the wire (for example, from a vacuum cleaner) or something similar. Feathers are attached with self-tapping screws. Due to the fact that the wings of our bird are folded, feathers can only be fixed on the stomach and a little on the sides.
Step 10 White bottles are cut in half, fringe is formed at the cuts. Bottles are attached to the "neck" with adhesive tape.
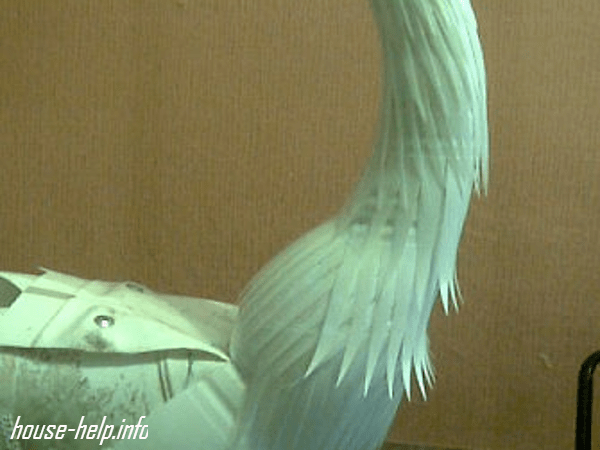
Step 11"Wings" must be done from one edge of the prepared mesh. It is important that the second row covers the first by 1/3. On the third row, white plastic is already used.
Step 12 For the "legs" of the stork, the corresponding blanks are cut from 0.5-liter bottles.


Step 13 It remains only to paint the "beak" and "paws" of the bird in red. That's it, the garden stork is ready with your own hands!
For a more detailed acquaintance with this manufacturing method, we recommend watching the thematic video.
A beautiful and bright figure of a stork will bring a touch of grace to the backyard landscape, especially if it is made by hand. It may seem that making a stork is difficult and requires many years of practice in needlework, but the method of making it is simple and the materials are inexpensive. Such a sculpture will be an excellent addition to the local area and decoration for a flower bed, lawn and garden plot, symbolizing the prosperity, well-being and family comfort of its owners.
A do-it-yourself garden stork is one of the favorite crafts of summer residents and gardeners and there are a lot of variations of its execution on the Internet, but the manufacturing principle is approximately the same in all cases, regardless of the materials used and the richness of the decor. Read how to make beautiful wooden signs for your home.
First of all, the head, neck, torso, wing frame and legs are made, which are connected with fastening tools.
All the remaining time is devoted to a rather painstaking procedure for cutting, fringing and decorating feathers - they will make up the plumage of the body, neck and tail of the bird. There are homemade options without the use of plastic bottles, but they are less common. Let's take a closer look at the different options for making a stork in this article.
The figure of a stork is made up of a head, beak, neck, torso, paws, wings and white plumage with layers of black feathers. All parts are fastened together with a furniture stapler and seated on universal glue.
The body of a stork can be cut out of a wooden block of the desired size, polystyrene foam or a 5-liter plastic canister.
The plumage of the stork is also made from transparent bottles, but then the plastic under the feathers should first be painted with white and black acrylic paints.
Having prepared the necessary materials and tools, you can begin to manufacture the components of the craft. Learn about beautiful wooden fences with your own hands.
It is important that all parts of the stork's body are proportionate to each other.
With a sharp knife, the contour of the head with the beak is cut out of the foam, after which the surface is polished, and the edges of the beak are leveled with sandpaper. If desired, the head can be painted with white paint - the coating will give the future product a rich white color and create an additional barrier from the sun, wind and rain.
The beak consists of 2 plates that are attached to the head with self-tapping screws. For a beak, the neck and bottom are cut off from a dark plastic bottle, and the rest is cut into rectangular plates. Triangles are cut from the resulting blanks, which will subsequently be the upper and lower parts of the beak.

The plates are bent in the middle and screwed to the junction of the head and beak.
The paws are cut out of 2 half-liter bottles with dark walls, after cutting off their bottom. The fingers of the future bird are cut off from the very edge to the neck of the bottle - you should get 3 in front and 1 in the back, and bend outward.

Each finger is shaped into a long, sharp triangle with scissors.
Processing blanks for feathers to give them a beautiful natural shape with feather veins is the most labor-intensive and long part of the work.
To cut feathers, the bottom and neck of the bottle are cut off, and the cylinder of the bottle is cut into 6 equal parts - 6 feathers. They will be of different sizes: for plumage of the body - small, for the tail - longer. Each feather needs to be given airiness by creating a fringed fringe around the edges. He will tell you about metal forged gazebos for giving.
Plumage on the neck can be done in 3 ways:

Each pen is a rectangular plate made of a plastic bottle with a rounded or embossed edge.
The body of a stork is conveniently made from a 5-liter canister, from which the handle is first cut off. Then a mesh is attached to the container, to which future feathers will be attached - it is bent and cut in the shape of a wing.
Next, you can proceed to assemble the main part of the product - a neck tube is inserted into the neck of the canister, and 2 holes are cut in the lower part, through which a long piece of a thick rod bent in half is threaded - these are paws.

The nets are fixed with wire or steel brackets on the canister.
The stork is assembled starting from the head - it is connected with a wire to a corrugated tube and additionally fixed with hot glue.
Feathers are fixed with a stapler, starting from the bottom of the canister and then upward in layers. The tail is attached to the back of the figure. The plumage is also applied to the mesh in layers, starting from the outer edge, and fixed with wire. In this case, black feathers are located on the outer edge. You will get only about 6-7 layers of feathers. The extreme row connecting to the tube is screwed with self-tapping screws.
Prepared plates with pointed edges from half bottles are wrapped around the neck.
The number of feathers depends on the location of the wings: the option under consideration is designed for folded wings, but when flapping, the wing mesh is covered with feathers from 2 sides and the back of the stork is also made.
After assembling the bird, you can proceed to the creative design of the craft.
Eyes can be bought ready-made in stores that sell parts for knitted and sewn toys, and glued with hot glue. For plug-in eyes choose large black beads or balls. You can also draw eyes - with simple black or colored paints to your taste.
It is necessary to paint feathers, if transparent bottles were used during work, before cutting them, after wiping the surface of the coating with an alcohol solution.

The beak and legs of the product also need to be painted with red paint. Alternatively, you can wrap them with red tape.
Craftsmen manage to create masterpieces from everything that was lying around in the garage, including, and also use the remnants of building materials after repairs. Several of these variations of garden storks can be safely taken into account - it will not be more difficult to make them than the previous version.
In this way, you can create a garden sculpture by turning and giving the figure of a stork a realistic image. The “skeleton” of the product will be a steel frame - steel bars are welded to each other, and then other elements of the stork's body are mounted on them.
To make a stork you will need:
You need to put on the body-bottle on the frame, and attach the sharpened pieces of polystyrene to each other with adhesive tape to the neck rod. Figured foam hips are fixed in the same way.
Even with the use of waterproof plywood, the possibility of the sculpture getting wet during the cold season increases, so it is recommended to store it indoors before the onset of heat.
To make a stork you will need:
It is advisable to apply the elements of the body and wings first on paper, creating a “pattern” of the details before cutting them out on a sheet of plywood. The wings are screwed to the body with self-tapping screws. The paws are made of steel rods and are attached with brackets to plywood sheets that act as a torso. Plywood sheets are also used for or.
Feathers are created from bottles, and each plate, in turn, is processed along the edges with scissors to obtain an airy fringe. The plumage is applied to the entire surface of the stork, starting from the back: first, black feathers are laid out, and then white, from which the tail of the bird is also created.

Each blank is sanded along the edges and the surface is primed.
The bars of the legs can be sharpened from the bottom edge so that they easily fix the product in the soil.
Styrofoam stork is a monolithic structure, lightweight and easy to manufacture.
For work you will need:
First of all, paws are made - the lower edges of 2 steel rods are sharpened, and the upper ones are bent for subsequent fixation in the foam body.
The main creative work on such a stork is to create the right foam blanks, because the finished bird will consist entirely of it. The body, head and neck are drawn in foam and cut with a saw. He will tell you about plastic barrels for watering at the dacha.
Iron rods are fixed in the stork's body with brackets, its surface is sheathed with a layer of foam for volume, and wing blanks are glued on top. The neck and head are mounted on a rod.

The stork's beak is painted red, and it is better to make false eyes, from beads or balls - this way the figure will turn out more expressive.
Next, the final modeling of the figure is performed, giving it smooth and beautiful features with sandpaper and a knife. This is the case when you do not need to make feathers for a bird - the relief plumage can be cut directly on the body of the product, simply by accentuating the edges of the wings with black paint.
The classical composition with storks in the nest traditionally symbolized a cozy house with a large family among the East Slavic peoples, indicating the fertility and hospitality of the owners. Installing storks in a nest on your own plot, in a flower bed, on the roof of a house or on a playground with children will help not only decorate the territory, but also show guests that the owners are jacks of all trades. He will tell about street country washbasins.
Old wheels from a bicycle, cart, trailer or wheelbarrow will fit under the nest frame. You can weave a nest from a bush and live or dry branches, securing the entire structure with steel wire and installing it on a special platform consisting of X-shaped linings.
How to make a stork from plastic bottles, see this video:
And your bird can also become the ancestor of a whole bird family in the country. For example, a stork can open a bird gallery, but homemade flamingos, peacocks, herons will continue it ... Fantasy is limitless! Some craftsmen simply paint a plywood blank, varnish it. It turns out such a kind of painting on wood, where fantasy images are combined with your own creative abilities.
Your garden will indeed become a place of miracles.

We list only the most popular options:
The easiest option is a plywood stork. You simply make a template with your own hands, according to which you cut out the future sculpture. Paint your bird of happiness on both sides with acrylic paints. Or those that you have, covering the pattern with construction varnish on top.
A stork in the country can only be the beginning of your creative experiments. As practice shows, appetite comes with eating: even people who are far from artistic work get a taste, and other interesting characters appear on the site over time. And this is great, they delight not only the owners, but also the guests, who are becoming more and more in connection with such country art.
Oksana Vladimirovna 20.12.2015
Interesting idea. But is there enough talent? And I'm also worried that the design will not be stable. If you make a body from a plastic bottle, then it will probably need to be weighted with something. Not to be blown away by the wind.
Artem 03.03.2016
I made a pig using a 5 liter plastic bottle, although they are mostly simply made from bottles, cutting out the shape they need, but I still had polyurethane foam and covered the bottle with it. The pig came out fat and looked natural. Only to smooth the foam in the form of leather, I used gloves and lubricated with oil, so the foam practically did not stick. Painted on top and done.
Sergey 14.06.2016
I also make garden sculptures using plastic bottles, but I prefer to cover them with plaster and give them any desired shape. Pretty easy and low cost. Then I just paint with any paint and the figure is ready.
Igor 01.02.2017I also want to make a couple of storks :) (I have two adults, only the price is exorbitant) There are pieces of hard foam, but it's scary to cut - I'm not an artist - an electrician :) 😮 . But, I think, I will decide all the same .. I will try to provide the result. By the way, the cart wheel has already been sculpted from foam plastic ..
Add a comment
To conceive a child, the maturation of the follicle in the ovary is necessary. If this one...

Work on oneself is a difficult process, therefore it requires balance from a person, ...

PUBLIC OFFER - on the conclusion of a contract of sale This document...