
Creating your own decor is the best option for those who...


If you have a carpentry workshop equipped by modern standards, making a garden chair from wood with your own hands is very simple. Even a novice carpenter can cope with this task. But what to do if the only tools in your arsenal are a hand saw and a drill?
The article describes in detail and shows how, with the help of these two “helpers,” you can make a durable, reliable and, moreover, aesthetically attractive garden chair. A three-dimensional model and a drawing with dimensions will help you quickly navigate the project and correctly manufacture the parts of the future item. The material also contains some recommendations for assembling and processing a wooden chair.


Tired of searching for the right furniture for your home or garden? Is the family budget depleted by renovations? Or maybe you just like to make interior items with your own hands, coming up with an original design and saving on materials? In any case, this collection of 50 creative DIY chair ideas is for you. Tall and low, massive and graceful, with backs and in the form of stools, for a city apartment or a summer cottage - everyone will find inspiration in our collection of original ideas.

Handmade interior items add a special atmosphere to any environment. But it’s nice not only to create something original on your own, but also to save money, and maybe give new life to items or materials that have already exhausted their useful life. Designers offer us options for making chairs and stools from literally any available materials. But only you know what material is available to you personally, what will be easier to handle, and what design of chair is suitable for your interior or landscaping at your dacha or country house.


Old, unwanted skateboards can be an excellent material for making the seat and back of a chair, which is quite capable of becoming a spacious chair. The material of the boards is quite durable - the chair will last a long time if it is assembled well.

There is no need to throw away old buckets, just refresh the coating with new paint and screw the legs to the vessel.

What about garden furniture made from parts of garden tools? A little imagination, effort and free time - exclusive pieces of furniture for your summer cottage or garden plot are ready.

If a completely durable and stable chair has worn out the seat upholstery over time or the filling has sagged, use old belts to create an exclusive design.

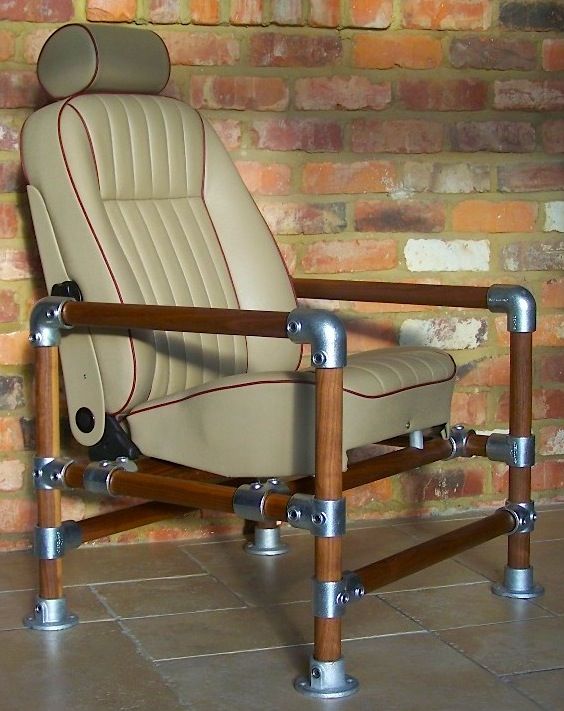
Or maybe it’s the other way around - you have a car seat in good condition and to create a comfortable chair, or rather even an armchair, you only need to build a strong frame?
It is difficult to overestimate wood as a material for making furniture and interior items, especially in our country. For everyone who has already tried their hand at making wooden furniture or is just taking their first steps in this difficult but incredibly interesting business, we offer the following interesting options. They can be the starting point for creating your custom design. The advantage of making wooden furniture is not only that you can find a fairly pliable type of wood and make your design dreams come true, but also that the finished product will fit into almost any interior. Wood harmonizes perfectly with metal, glass, mirrors and glossy surfaces.


Not only in modern interiors, but also as garden furniture, wood products are very popular. It is only important to protect the surface of the wood from moisture - paint or varnish, impregnate with an antiseptic, to increase not only the service life of the furniture, but also by increasing personal comfort and safety.


Comfortable, practical, stable and at the same time mobile - stools that can be assembled like a paper construction set. They will fit perfectly into the modern style of interior design.


Wood products are not so much about color and texture as about shape. After all, many types of wood are quite pliable; they can be given a completely original shape. But in pursuit of originality, do not forget about the main purpose of your future masterpiece - the possibility of a comfortable location for relaxation, dining or work.


In some cases, there is no need to make a chair from scratch; it is enough to restore an old piece of furniture and give it the appearance that will most harmoniously fit into the interior of the room.


Some interesting ideas for reading lovers. A chair or armchair and a storage system for books – two in one. Convenient, practical, original.


What about a portable folding chair that, when not needed, can simply be placed against the wall or even hung on it? Of course, such a mobile piece of furniture has weight restrictions, but for a person of average build this design will be more than appropriate.

The combination of materials with different technical characteristics within the framework of the manufacture of one piece of furniture makes it possible to improve its properties of strength, wear resistance and durability. You can combine wood, metal, plastic, leather, and various types of rubber.


Most often, wood and metal are combined in the manufacture of handmade chairs. Such an alliance helps to obtain the most durable and resistant structures. In this case, parts of the future chair can be made by you or be parts of other interior items that you no longer need.


It is logical to combine wood with soft materials that increase the level of comfort of the chair, turning it almost into an armchair. And we are not only talking about cushions for seats or backs, but also quite exotic options - rubber, thread weaving, animal skin or its imitation, artificial materials.


Chairs with a metal frame are strong and stable, durable and able to take high loads. But such furniture has disadvantages - the seat is too cold (if it is also made of metal). Use pads made of foam rubber, padding polyester and other synthetic materials that can be washed in a machine. Or at least use removable fabric covers for the backs and seats.

Self-made furniture undoubtedly has advantages over expensive samples purchased in specialized stores and showrooms. Man-made objects have precisely specified characteristics, and in addition carry a piece of the soul of the master who had a hand in their creation.
The simplest item of everyday use, a chair made of wood, is quite easy to make yourself, having basic knowledge in the field of carpentry and having studied the technical details. For productive work, the main thing that you should pay attention to is drawing up a clear action plan, having the appropriate tools and lumber, as well as the ability to organize your work according to the drawings.
Before you make a chair, you will have to learn the basics of carpentry and understand the features of using the most popular types of wood. Some types of wood are easier to work with than others and also have a greater margin of strength.

Glued is cheaper than solid, although in this case it is necessary to take into account the final goal and purpose. These subtleties will have to be taken into account so that the resulting product is durable and beautiful. It is important that the lumber is of high quality and has undergone the necessary pre-treatment.

No cracks are allowed on the boards; the edges must have even cuts and be thoroughly cleaned. Remaining knots can affect the production result, so you should not use such specimens to make your own work easier.

Pine and beech are the right choices, as they are strong enough and have the necessary characteristics to create a high-quality product. In addition, these breeds are quite common and availability problems usually do not arise. This is exactly the case when excessive savings are not the best choice, since we are talking about the production of an item of everyday use.
Before starting work, you should carefully prepare and study a lot of samples; photographs depicting chairs made by yourself in various modifications using different types of wood will help with this. You need to take care of the availability of tools, prepare enough lumber, or better yet, with some reserve. Such forethought will save valuable time and nerves if something does not go as planned during the process.

Having the ability to draw and create drawings will provide invaluable assistance in the project, although it is quite possible to get by with ready-made instructions and photographs of ready-made models. You will also have to take care of the presence of fasteners, screws, fittings, glue and other important details for production so that the structure is durable and reliable in operation.
Drawings of chairs that can be found in the public domain offer a choice of several of the most common and popular models. Folding and with a back, rocking chairs and on wheels differ rather in additional elements, but at the same time they are united by a common scheme.

Therefore, after practicing on easy modifications, which include a stool, it is easy to later move on to more complex and original options.

This does not mean that everything will be simple; it will require patience, skill and mastery of the main tool of any home craftsman - your own skillful hands.
Skills in handling tools will be useful in any case, since without them it is impossible to create wooden furniture. By devoting some time and attention to creativity, you can count on an excellent result that will delight your household and become an object of pride for the master.
Useful for beginners to gain confidence in their abilities. Fits perfectly into the concept of movement from simple to complex. This option will serve well as country furniture, and equipped with a soft base it will always come in handy as a convenient kitchen attribute.

First, work is carried out on measuring and preparing the material. You need four bars with an equal cross-section, which must be polished before further manipulations, and roughness and nicks are removed.

Eight jumpers are needed to secure the seat and ensure the structural strength of the legs. Spikes are made at the ends of the jumpers, and holes are drilled in the legs. This fastening, additionally reinforced with special glue, will help hold the structure and provide the necessary rigidity and reliability.
For the seat, it is better to use a solid piece of wood or several planks of equal width. Regardless of the chosen lumber, it will need to be carefully sanded to avoid injury later.

Assembly is carried out depending on the selected drawing using self-tapping screws, and glue will also be required at the joints. The finished stool should be left to dry for a while, and then varnished or a comfortable seat made of soft material.


Detailed assembly instructions and exact dimensions can be easily found or drawn yourself, and various options with photographs will make the creation process easier.
A chair with a backrest has a wide range of possibilities for everyday use. This model is most often found in finished drawings and has a lot of modifications. Among the general details, one can highlight features that are characteristic of all such types of chairs without exception.

The front legs must be precisely measured in length to ensure maximum comfort when seated. They can be straight or curved, decorated with various details of external decor - it all depends on the needs and imagination of the master.

The rear legs are the supporting part, and therefore are often thicker than the front ones, especially for variations with reclining and inclined backs. Moreover, in some cases it is possible to create a chair with legs of equal length and a right angle to the seat, that is, technically it will be a stool design, additionally equipped with a backrest as an element that increases ease of use.

The drawers, which are located under the seat, provide support for the horizontal part. They also strengthen the structure and help maintain the stability of the finished product.

Jumpers serve to strengthen the position of the front and rear legs, while in a number of models they are used in the amount of two pieces, and sometimes four are needed.


The back is just a distinctive feature and can be made in a variety of variations. A single piece or a composite of several parts, decorated with carved decorative elements or upholstered in fabric - here, too, everything will depend on the purpose of the item and on how much skill will allow you to realize the ideas that arise.

The seat of the chairs is usually made from a single piece of plywood, but sometimes an upholstered base can be used.

It is better to have fasteners and decorative parts that may be required during production in stock, since sometimes additional fasteners are required to strengthen the structure or serve other purposes

In addition to independently producing new items for country or apartment interiors, sometimes you can use designer tricks to give a new look to familiar things. A flight of fancy in the process can lead to the creation of stunning and absolutely unique items.

To restore chairs, you can use inexpensive paints and varnishes, old fabrics and woolen threads, and plastic. A preliminary sketch will be a very good assistant, which will help to better imagine the final result of the creative process.


It is also important to consider that the new item fits organically into the overall decor of the room, serves as decoration and retains its functional features.

In some cases, you first need to repair old furniture to restore its strength. Repair work can be carried out using knowledge in the field of carpentry. It may be necessary to purchase lumber to restore a dented seat or rickety supports.

Any chair will take on a new look and become an interesting interior detail if you equip it with soft upholstery or a cover. For upholstery, it is important to choose a fabric and match the color with the overall range of decoration in the room.

Handmade chair covers, in addition to their decorative function, carry a number of practical and functional advantages. For example, if there is a desire, then it is worth making several options for winter and summer conditions, and if necessary, the cover can be easily removed and washed or dry cleaned.
Having a good imagination, you can create amazing and unique things with your own hands at home, using your skills for good, and also saving money on the purchase of ready-made furnishings.


Handmade furniture is always very practical and unusual. You can adapt it to your own needs as efficiently as possible, and at the same time pleasantly surprise guests, friends and relatives with an original product, and simply accommodate them with comfort and convenience. So you can’t do without beautiful and comfortable chairs in almost any interior, be it an apartment or a country house.
Moreover, making them yourself is not so difficult, but rather even pleasant and interesting, since this process allows you to fully reveal your design abilities.


The first thing to think about when designing your homemade seating is the material. The right ideas can come spontaneously - for example, an old and unused wooden bed in the countryside can serve as a good base for several new chairs at once. Indeed, wood is perhaps the most practical and convenient option for creating seats. You can use oak, pine, and many other species. Which one to choose is a matter of taste and skill. So, oak or beech are difficult to process, but products made from them are textured, hard and reliable.
A homemade chair made of solid wood will look great both in a country house and in many city interiors, especially antique-style ones. In addition, this is one of the simplest options. It is easier to make a chair from wood than from plywood, chipboard or laminated chipboard. It can also be made from clapboard.


In the production of a wooden chair, boards, logs, beams and other items can be useful. Wicker chairs are usually made from wicker. Other popular materials include lining, profile pipes, and cardboard. Furniture can also be made from polypropylene or profile pipes. The use of pallets and even tires is allowed.


More complex options include glass and metal. To create a forged product, you will need certain skills, as well as the presence of welding equipment and, accordingly, a protective face mask. Forged seats are very strong and reliable, but when working on them, maximum concentration, clarity and a high level of professionalism are important, since the slightest inaccuracy in the calculations will make the chair “lame” or uncomfortable, and it will be difficult to correct such an oversight.
A glass chair is also an interesting option, but this is an even more filigree work. Such products look advantageous in modern and modern interiors.


You can combine materials. For example, the seat is made of metal, plywood or chipboard, the legs are made of bars, the back is made of boards. Within certain limits different textures of surfaces can be compensated for at the stage of varnishing and decorating. The main thing is not to fall into excessive eclecticism.
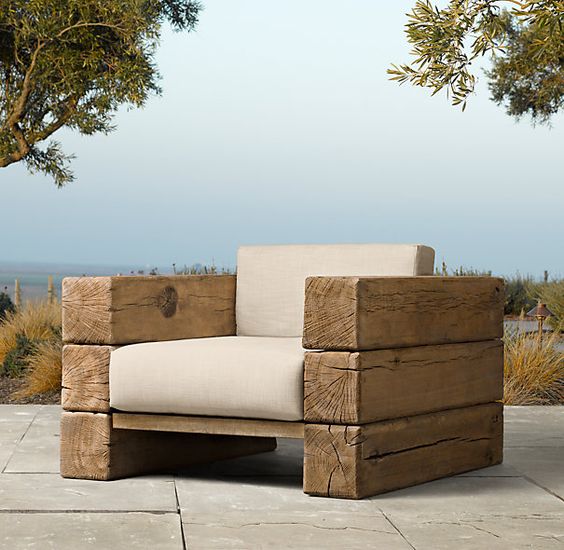
However, it is better not to limit your imagination. When making a seat, you can use almost any available means. Craftsmen make beautiful models from stumps, old logs, almost anything!
The main thing is that it is comfortable and sits softly. Do not forget that to organize the latter property, special bedding and softening materials are often used, which can even “level” the surface.


The seating area, organized independently, can be used in various interiors. Most often, such chairs are made for a summer house or country house, since they fit perfectly into the stylistic specifics of these premises.
In addition, any inaccuracies in work or shortcomings of materials here often turn into advantages, as they emphasize naturalness and naturalness. Therefore, old boards, logs, and unnecessary equipment are suitable as a base. Why not, for example, disassemble an old and shaky stepladder or ladder and make several chairs from it for a country table.


However, the seat can be made for any other room - the main thing is to find a reasonable and feasible idea and select the appropriate materials for it:
Let's add that you can attach wheels to any kitchen chair. In the dining area, especially if you live with children, it is very convenient.


Hand-made chairs can be used not only for sitting, but also for sleeping and relaxing. A rocking chair, a chaise longue, a hammock – these are all quite realistic projects.
There are several main types of homemade chairs. For example, a chair with a backrest can be folding, stationary, etc. Let's consider the main design features:
Making furniture with a back is no longer so easy. Firstly, you will need significantly more parts for the frame, and secondly, it is important to find a balance between the stability of the base and the ability to put pressure on the back so as not to tip over or fall to the side. The backrest can be reclining.


Please note that the base must also be foldable; therefore, it cannot be fixed rigidly.
There are also more interesting products, which, however, require higher professional skills for their manufacture. Thus, transforming seats can change their design during operation: height, backrest bend and other elements, and in some cases even adapt to the anatomical features of the figure. Such “growing” and sometimes even collapsible models are well suited for children and teenagers.


There are still a large number of variations. Design experiments here are practically not limited by anything other than the ultimate convenience and reliability of the product.
To make a wooden model you will need a classic working arsenal with an emphasis on carpentry. Nails, screws, bolts, self-tapping screws, screwdrivers, hammers, wood glue, grinding tools, a vice, as well as a milling cutter and chisel, a workbench and a jigsaw.
When working with a hand router, it is better to use protective gloves and a mask. If the chair is made of metal and glass, you will need appropriate cutters. You will also need measuring instruments: rulers, patterns, protractors and others.


It is important to prepare all tools in advance. It is better not to skimp on them, since they will allow you to create many chairs in the future, and will also be needed if you need to fix something in the finished model. High-quality equipment will also ensure maximum safety during work. Also stock up on basic medicines - iodine or brilliant green in case of cuts, cotton wool and bandages.
Equally important is the preparation of materials. When working on a wooden product, it is important to select boards, beams, chipboard or chipboard of the required sizes. For a functional chair with armrests, you need to assemble up to 20 components: legs, back parts, side slats, ceilings, the seat itself. It is better to always take material with a reserve - let there be a surplus, rather than not have enough of something.


Before you start, prepare your project. It is best to make an accurate drawing indicating all dimensions. Their choice is purely individual, but there are still some standards.
The height of the chair from the bottom surface of the leg to the seat can be varied from 40 to 60 cm. Another 20 cm should be allocated to the distance to the armrests. The sum of these numbers will determine the length of the beam for the legs. The width and length of the base are also variable. The average dimensions are 40*40 or 50*50 cm. The height of the backrest is another 40-50 cm. Moreover, it is better to calculate it from the seat, and not from the armrests.
It is reasonable to place the overlap itself for the back a little higher, leaving up to 15 cm “empty” - the body usually does not rest on this area anyway.
The model of the indicated sizes is suitable for both leisure and work. If the material does not allow, you can make furniture of smaller dimensions. In the case of a stool, the main thing is to decide on its height.


Another classic option is a chair with legs 45 cm high and a back 60 cm. Bar or high objects, on the contrary, can reach a height of 90-100 cm with relatively small seat dimensions, say 30*30 cm.
When working on a rocking chair, you will need a pattern. Since the project will use curves and arcuate lines, you need to accurately calculate their radius and angles of inclination.
Calculations must be as accurate as possible, and not tailored to the available material. Strategies in the spirit of: “the bar, of course, is long, although its length is still a little short, so I will indicate this in the project and then compensate” are doomed to failure. But while some options and subsequent modifications are still possible with wood, corrections with glass and metal are much more difficult.


Sometimes it will be impossible to redo something. So it’s better to immediately make a reliable drawing.
Making a chair is not a very labor-intensive process, but it requires concentration and precision. A simple small wooden product will require the preparation of blocks and furniture boards. The base and back do not have to be monolithic. So, the seat can be made from 3-5 boards: the distances between them should be small - then these voids can be compensated for by soft bedding. The situation is similar with the back. Each of the boards should be sanded.


Bent parts of products (for rocking chairs) should be selected more carefully than ordinary ones. When purchasing them, carefully read the instructions, which indicate the angles of inclination and other characteristics.
Among other technological features, we highlight the aspect of evenness and strength. If there are doubts about the practicality of the product, it is better to first develop a layout, and only then start working on the details.


So, all the materials have been collected, the tools are at hand, it’s time to get to work. For example, we will make a seat from wood. There are several basic techniques, but we will give only some advice, especially since the creation of a specific product is a creative process, and it cannot be “driven” into strict standards.
At the first stage of work, it is better to cut out the legs. Let's consider this using the example of a chair, where the legs also form the frame of the back. In this case, their length can vary up to a meter, but it is better for the chair to be higher. Take the bars with a reserve, since it is unlikely that you will be able to lengthen them or remake them later. In terms of thickness, 40 mm will be sufficient. We will make the front legs smaller - they will only go up to the seat.


We polish the made bars and try them on for each other. Sanding is especially important if the product is designed for children. Their skin is delicate, and even the slightest irregularities and lint can cause very unpleasant sensations.
Then you should determine the attachment points and make the spikes. After measuring, it is necessary to form grooves that will allow the product to be connected into a monolithic structure.
Now let's check the model for consistency of the parts, first without gluing. If everything is in order, you can fasten the bars that form the back. In our case, we will select five small boards and make the central one a little wider than the others.


A beautiful solution would be to use a figured board. It is more convenient, however, to make the back from a single solid material, but it depends on what you have on hand.
The next stage is the manufacture of side inserts and arched lintels. Everything must be strictly adjusted in size. After connecting and gluing, you can strengthen the structure with additional screws. Pre-check it for evenness so that you don’t have to redo anything. Please also pay attention to ensure that there are no unpleasant overlaps of some elements of the product on others: even minor flaws can lead to rapid wear and tear in the future.
The design can be improved with the help of additional strips. For example, install a crossbar to accommodate the legs below. It is optimal to do this at a height of 10-20 cm from the floor. You can also add armrests to the seat, redesign them, raise or lower them, change the angles.


And a few more tips on making. Use a miter saw when cutting the bars; for working on the back, a jigsaw will be useful. Particular attention should be paid to the connection of the rear leg to the seat. The third corner of this triangle is the back. It is the strength of the connection of these nodal points that determines the reliability, strength and quality of the product. To ensure that the workpieces are held more firmly during processing, do not hesitate to use a vice when grinding and sawing out certain parts.
If you wish make a folding chair, you will need additional wooden slats and a metal rod, for which you will have to drill separate holes. It will be fixed in the recesses of the legs. It is reasonable to prepare several provisions. Remember that at least the back and front legs of such a chair should move.
When working on a rocking chair, you can use a ready-made chair. It will be necessary to add special moving runners and armrests to it.


If the actions described above cause self-doubt and anxiety, start you can accumulate plumbing experience from a simple stool. It’s the easiest way to make it, and in the future you can turn the stool into a full-fledged chair.
You will need 4 bars. The lengths of the bars are up to 450 mm. The cross-section is 4*4 cm. It will be necessary to make 8 jumpers. The material must first be sanded. The seat itself can be made either from solid material or from separate boards, but they need to be well fastened. The first option for a simple stool is preferable.
We make grooves in the bars at a height of 25-30 cm from the floor. Their depth is up to 2 cm. Thus, the legs will be fastened to each other with a “rectangle” of overlap, as if twice – approximately in the middle and at the seat. We check for evenness and fasten all the parts. The simplest stool is ready.


To learn how to make a wooden chair with your own hands, watch the following step-by-step video.
Let's clarify a few more aspects related to the assembly. As a rule, this is the final stage, but here, too, without knowledge of the matter, significant mistakes can be made.
The fundamental point is to maintain a right angle when connecting parts. If you are not visually sure of this, ask another person to look or use measuring instruments. It is better to fasten the product with screws.
But successful assembly does not mean that the furniture is ready. It still needs to be finished for final commissioning. Don't be afraid to do it yourself. There are a lot of options here.


First of all, check the material for unevenness and absence of roughness. Only after this can the surface be varnished and painted. Often, products made from rough wood have to be varnished twice, since after the first procedure, nicks appear. Instead of varnish, you can use other substances - water-based acrylic impregnations, which not only more clearly emphasize the texture of the material, but also often more effectively protect the surface from high humidity and other negative environmental influences for the product.
Next, you can paint the chair, put a soft mat on it - both on the back and on the seat. Relevant and at the peak of fashion now is the carriage tie - an upholstery-decoration that looks like buttons sunk into the fabric. It is soft, aesthetic and beautiful. Most often, carriage screed can be seen on the backs of chairs. It gives them both rigor and visual richness. However, such a finish is not suitable for all interiors. In loft, hi-tech, minimalism, it is better to limit yourself to less textured solutions.


To make a beautiful chair, the best way to complete it is by decorating it. Technologies and design techniques will allow you to “tailor” the product to any, even very sophisticated taste.
Before choosing the appropriate technology, please note that many jobs are best done outside the home so as not to spoil or stain surrounding furniture, as well as to avoid harm to your own health. The varnish can smell very strongly, and for many this is an extremely unpleasant factor, sometimes causing allergic reactions. Thus, it is better to decorate a chair in a barn or country house, in rooms with good ventilation, or use water-based varnishes. However, the smell of paint still cannot be avoided.


For decoration you can use the following techniques:
This can be done using a regular wood carving knife.
This style is suitable for classic interiors and “antique” formats. With a monumental approach, carving will make the furniture more solid, and if, on the contrary, you need to “unload” the interior, neat and thin carving will add lightness and airiness to the chair and the room as a whole.


The ornament on the chair can be anything - floral and sea compositions look great. Colors range from bright green to black. It's a good idea to decouple only half of the seat. If you place two such interior items on a table (on different sides) decorated in the same color scheme, you can achieve very advantageous color combinations.


And finally, a few unusual ideas for creating chairs with your own hands.
If you have old tree stumps at your dacha, you can transform them into chairs. It will be enough to attach seats and backrests to them. When moving uprooted stumps, strengthen their base; the best option is to use logs or boards arranged crosswise.
An equally practical idea is to make a step stool. It will somewhat resemble a high bar stool, but at the same time have additional and rich functionality. It is enough to make two steps and fix the seat instead of the third. Its width should be approximately twice that of the steps. In terms of manufacturing technology, such a shelf is close to a regular stool, only high.


If you have polypropylene pipes, you can assemble a chair from them. For the seat you will need about 10 tubes, for the back 3-4 are enough. The legs should be made of thicker tubes to ensure stability of the product.
Another idea is a chair based on an old log. You will have to level its surface and attach a backrest, making it closer in format to a folding one. One of the disadvantages of this model is the difficulty in controlling the height. Such a chair is unlikely to be suitable for prolonged sitting, but it may be very popular with young children - it will become an indispensable toy for them.
Another look at design – maximum minimalism. The chair can be made in the form of an unfinished rectangle - the lower border where it touches the floor will remain open. To make it, you will only need three rectangular boards: two of them will become legs, one will become a seat. This design is very reliable in operation.


And the last example is a country seat with an uneven model back. The boards for its manufacture will have different lengths and will differ slightly in texture and color. It's important to find the right color combination– alternate and combine light (white, beige) and dark (gray, brown, black) shades. The seat will become, as it were, part or the beginning of the backrest. Armrests with this design can be made quite high. If the chair turns out to be wide, you will need to “secure” it with a third central row of legs.
As the experience of folk craftsmen and professional designers shows, when making a transforming chair, you should first of all start from your imagination and not be afraid to be creative. Seats can be made from almost any available materials. The main thing is to make them as convenient, comfortable and reliable as possible.
A chair is an important and irreplaceable household item, an achievement of European culture. This is a necessary part of the interior of any home, office or other premises.
Available in all kinds and shapes, these products can be made from various materials. The easiest and most reliable way to produce them at home is from wood material. This article provides a detailed description of the process of how to make a chair from wood with your own hands.
All parts of furniture products are made from a set of wooden blanks. The most common materials for chairs are beech, oak or ash. However, any wood you have on hand will do. For the production of any furniture, it is necessary to choose only dry wood.
Advice! It is advisable that drying be carried out in special dryers, because... Under natural conditions, wood is susceptible to damage from insects, and the humidity of the street air will not allow achieving high drying rates.
The homemade chair with a backrest, which is proposed to be made in this article with your own hands, is a kitchen sample that belongs to the standard solid wooden version.

In order to make a wooden chair with your own hands, you will need the following devices and tools:
Necessary materials:


The workpieces in places of bends are polished using a hand sander, and smooth surfaces are finished using a jointer and thicknesser.
When all the leg blanks and drawers are ready, you need to make precise markings for the tenons and holes for them. This is done with your own hands using a ruler, square and pencil.


The front side of our product is made by hand.
Start making the back. The back is made of solid thick timber. At the end of the beam, using a pencil and a pattern, mark the lines of the blanks for cutting on a band saw. After sawing, the workpieces are polished with a manual grinder.


After this, you should assemble the parts of the chair together. To do this, coat all the holes and grooves with your own hands and connect the rear legs of the backrest. Then the front and rear assembled legs of the product are connected to each other using drawers.

Important! For reliable gluing, all assembled parts of the chair must be clamped with clamps until the glue dries completely.
After the chair frame is completely assembled with your own hands, the seat is made. It is made from a solid board, 50 mm thick. The workpiece is cut out on a circular saw. After this, the workpiece is cut in half on a large band saw. It turns out 2 blanks for the seat.
The workpiece is completely sanded with a hand grinder and the corners are rounded. Then the edges are rounded with a hand router.


When the chair is glued, the chips and screw heads are filled with putty. The chair is completely polished with your own hands and coated with varnish. The homemade wooden chair is ready.
Any product made from pure wood is an expensive pleasure. And if the question concerns chairs, then at least 4 of them are needed. Therefore, mastering the manufacture of chairs from wood with your own hands is very beneficial for every owner. The complex and expensive woodworking machines described in the description of this process are not available at home. They can be replaced with simpler ones. For example, instead of a slotting machine, you can use.
Instead of a band saw, you can use a jigsaw. The seat can be made from a board glued together from slats of 20 mm thickness, followed by sanding.
The article describes the technological process as a general example of making wooden chairs with your own hands. In each individual performance, procedures and operations can be changed at the discretion of the master, taking into account technical capabilities.

The dacha is one of the most popular places for family holidays in the warm season....

Powerful low-voltage microwave transistors for mobile communications Magazine...