In 2018, organizations reported for the first time for 2017 and filled out the annual form...


Today, stores offer a huge range of toys, but they cost
quite expensive. For a child, try making them yourself. You can also invite your child to participate in the process, this will develop his imagination and logic, and in addition, you will get great pleasure from joint creativity. Below we tell you how to make a castle out of paper that both boys and girls will love. You can take the schemes described in this article as a basis, but this does not mean that you need to end there - use your imagination and create your own unique palace. Additionally, this product can be used as a decoration - a stand for confectionery products.
For a craft like a paper castle, you will need:
To learn how to make a castle out of paper, you need to study the following information:
Now all you have to do is come up with an interesting story and please your beloved child with a new fairy tale.
When you have children, it doesn’t matter at all whether it’s a boy or a girl, the main thing is that they all love fairy tales and believe in miracles. Any child will be happy with such a gift. To make a castle with your own hands as accurately as possible, you need to spend a lot of time and effort, but your beloved offspring deserve it.
To work you need to take the following accessories:

In order for the castle, made with your own hands from paper, to be the most accurate copy of the original, adhere to the following rules:

A paper castle, the diagrams of which are presented in this article, will help you realize your child’s dreams and give him a piece of happiness. If the craft will be used not only as decoration, do not forget about its sustainability. For example, you can fix each part with tape, which must be secured on the inside. The same palace can be made for a little princess, simply by decorating it in bright fairy-tale colors. Now you know detailed instructions on how to make a castle out of paper. Go ahead, please yourself and your child.
Every little girl certainly dreams of a brave and handsome prince on a white horse. And what is a princess without a real luxurious castle?
In this article we have prepared for you a very interesting master class on making a cardboard castle, which will become your favorite object for games. Not only girls, but also boys can play with a handmade cardboard castle. After all, in the castle you can organize large-scale battles, and not just wait for your lover in the highest tower.

So, to make a cardboard castle you will need the following materials: cardboard boxes, packaging and toilet paper rolls, as well as scissors, glue and paint.
Based on the cardboard wealth that you manage to collect, you must design your own unique castle.

Make the main buildings in the fortress from cardboard boxes. From small rectangular boxes you can make strong walls. You can use cardboard toilet paper rolls to make towers.


To construct roofs you will need cardboard.


Be sure to remember to cut out windows and doors, balconies and terraces in the buildings, then the game will be much more interesting.
DIY cardboard crafts for children will most of all occupy the attention of parents and heirs if they meet the vital interests of the growing child. It almost always turns out that not a single family is able to buy all the desired Barbie houses, or castles for Disney princesses, or parking lots for cars.
Moreover! This is not necessary, as psychologists and conscious, successful parents advise us. The unwritten rule says the following: a child should get only half of what he wants easily - from the store shelf, and he needs to “earn” the other half. And here it is appropriate not so much to demand good behavior, promising an incentive purchase of a toy, as to captivate the child with the joint construction of an exclusive long-lasting model.
Cardboard opens up truly limitless spaces for you – for creativity and construction based on your children’s favorite characters. Let's look at two cardboard crafts that any parent can make with their own hands!
It is no coincidence that we introduce you to this idea. Evaluate it carefully to understand its main and wonderful advantage: you can play with such a building anywhere, because it quickly and completely disassembles! You will not have any difficulties transporting not only from room to room, but also to a picnic, cottage or kindergarten.
In addition, the very principle of the cross-shaped representation of the walls allows you to create not only castles, but also shops, a school, a pharmacy and a cafe. In general, all those buildings and social circumstances in which your baby happens and in which he may become actively interested by the age of 2 or 3.
What do we need:
How we build:


We suggest you build another option - from the most ordinary box of some small household appliance, akin to a vacuum cleaner or food processor. When choosing, the main thing is that the cardboard box is large enough for the baby.
The set of tools is the same as in the DIY craft above.
What we do in an effort to diversify everyday life for children:

We use our imagination by choosing a fairy tale or trusting a spontaneous story about a beautiful princess and valiant knights. And we are happy to devote more than one evening to playing together with a young lover of the Middle Ages!
We hope that the DIY gifts presented to you for the children we want to attract will bring a lot of joyful communication and joint creativity to your home!
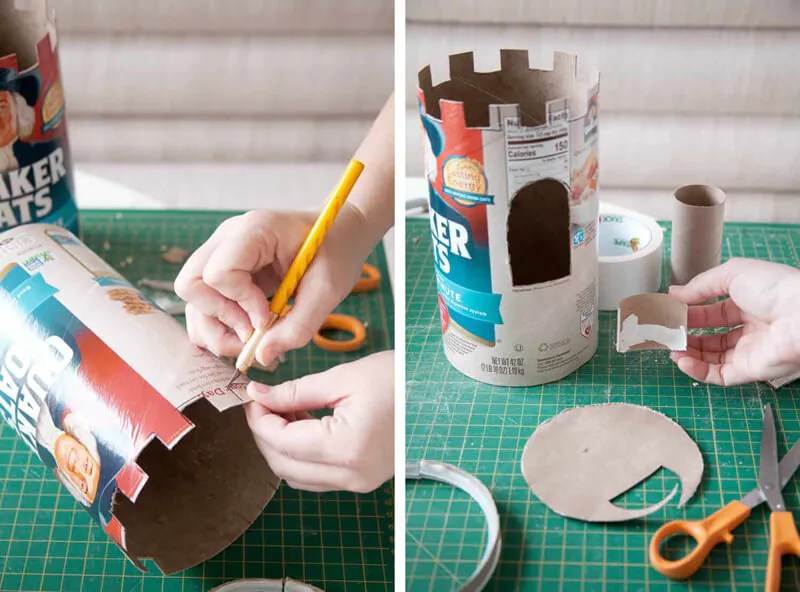
Find suitable cardboard boxes. Cereal boxes, tissue boxes, toilet paper rolls, etc. work well. Just make sure to gather enough cardboard, depending on how big the castle needs to be.
Create a template. This step is optional, but it will help you get accurate measurements, a sophisticated design, and stocked up on material. For inspiration, look at photos or illustrations of real castles and make a template and design on paper. Cut out the templates you made to transfer them onto cardboard. In the example given in this article, the castle will be very simple, so you won't need a complex design: just four walls and four rolls as towers. If you are doing a more complex castle project, you may need:
Assemble the cardboard pieces. For the simple project shown here, you simply need to install four long rolls in each corner of the printing paper box (don't secure them at this stage; you'll need to do that later).
Cover the entire lock and parts that will need to be attached later with foil. This will get rid of the cardboard look, and will create a smooth, shiny surface under the wall paneling that you will add later. At this stage, the lock should be very strong.
Wrap each side of the box with thick paper of a color suitable for the castle. The best colors for a castle are usually gray or silver, as they give the impression of weathered stone that is commonly seen on castle walls. Of course, if you prefer a pink castle, that's your prerogative!
Attach to the walls any elements that are not already part of the castle. In our case, in this simple castle, we need to glue towers in each corner on the castle walls. You may have to cut gaps in things like towers to get a good fit. If you are inserting pieces inside the box, be sure to attach them tightly to the base so that they do not tip or fall out when you move the lock.
Cut a square piece of thick blue paper, larger than the castle, that looks like a lake or moat surrounding the castle. This will create the effect of having water on the castle.
See how to make a castle from cardboard, paper, or plasticine. Pay attention to how to make a princess palace from lace and also from candies.
During the school holidays, children will need entertainment. Show them how to make a castle with their own hands, a palace to play with. They can make a small structure to launch dolls here or a grandiose structure with which they can play at home or outside in the country.
Take:
You can make a castle out of cardboard so that there are only walls. Take two sheets of this material and, using a stencil or by hand, apply elements such as a Christmas tree, clouds, snowflakes. It will be clear that this is an outside wall and it is snowing.

To make a stencil design, place it on cardboard, then apply paint using a sponge or foam rubber.
Then you will need to make slots for windows and doors. To do this, use a stationery knife. Decorate the top parts of the wall using scissors. There may be various towers and brickwork. Now make a cut in the middle from the bottom to the center on one rectangle of cardboard, and from the top to the middle on the other. Connect these two elements in a cross shape. You will have four open walls. If there are several children, they can even play hide and seek here. The presented templates will help you make this product.

Here's how to make a castle out of cardboard using just two large sheets of paper. And if you need to make such a structure for dolls, a small box will do. Draw square windows on it, and cut out the top to make a loophole. Cut a ladder from the roof of a cardboard box. To allow the toy characters to come inside, make a door that rolls down. To do this, cut it out only from the top and sides, and then lift it using two threads glued here.

If you wish, you can then work with your children to paint the outside of these walls so that they resemble stonework. You can cut out the knight's coats of arms to also attach them. It will be interesting for a child to play with such a castle.

If you wish, you can use adhesive tape with a brick pattern to do this.

If you connect the coats of arms on a thread, you can hang them on the top of the structure. Print out the heraldry elements shown so you can cut them out and use them.

You can make a castle consisting of 2 boxes. Cut off the top of the square one, decorate the cut area, and make windows. Take the second box, which is narrower, put it in the first, also pre-decorating it.

You can take a white packaging box. It's brown inside. When you form the elements of this structure, you will get a beautiful two-tone color.

A castle with towers will look beautiful. To do this, you need to take cardboard sheets and cut them into rectangles on top. Roll the other sheets into tubes to form the base of the tower. You need to make cones from other remnants of this material. Turn them over and secure them to the rolled elements.

Draw some brickwork on yellow paper, cut it out and glue it in some places. Here's how to make a castle out of cardboard.
You can make a small one using scrap material.
Take:
To make a cardboard castle, first prepare the necessary materials. You need to cut out three circles from red paper, cut the napkin into squares with sides of 2 cm. Make the same blanks from white paper.

To make the roofs for the tower, fold the red circles in half and in half again, cutting on one side. Now bring this edge to the one next to it and glue it together.


Take the bushing, place a toy from Kinder Surprise next to it and see how high the entrance should be. Also determine its width. Draw this door with a pencil and cut it out.

Take sheets of cardboard, bend their tops a quarter and draw stripes here to place the toy here and determine the size of the entrance.

Draw them and cut them out. Using a black felt-tip pen, draw wavy lines on the red roofs to create a tile-like appearance.

Now glue two squares onto the opposite top parts of the sleeve. Use them to glue the tower here. Do the same with the rest of the preparations.

Take squares cut out of sponge tissue and glue them so that they turn into tower windows.

Draw crosses here with a felt-tip pen that will help you understand that these are windows. Also, using this tool, apply a characteristic pattern on the door.

Using a utility knife, make slits on each bushing from bottom to middle. Now insert the pre-prepared walls into them.

Now the child will play with pleasure and invent entertainment for himself, connecting the past and the present. If he wants to make a gate for a car, then let him take two bushings and cut them from top to bottom on one side. You also need to use a rectangle of silver cardstock. It must be folded in half and the upper part cut out so that it becomes rounded.


Entertainment for small children can be done in literally an hour. You will now verify this.
Since childhood, girls dream of being princesses, and they will surely like such a beautiful house.

To make it, you will need:
You can use a box like this, making a slot on the side for the entrance, and a window on the other. To make the window openable, cut it on only three sides.

Now you need to cover it with self-adhesive film. If you don’t have self-adhesive film, then use washable or regular wallpaper with a brick pattern, decorated with flowers.
Glue film or wallpaper, decorate the window and entrance areas with strips of paper.

Here's how to make a palace to make it even more luxurious, you can cut out a crown from cardboard, paste it over and attach it to the top as a roof and decorative element.
The palace will also come in handy when you want to throw a birthday party for your daughter. The invited girlfriends will be simply delighted. To do this, you need to take a cardboard box, disassemble it and cut it out so that you get the walls of this structure. Glue flags and brickwork on top. Cover the palace with pink paper and attach various other elements here that will highlight the beauty of this building.

And you can decorate the windows in such a way as to draw characters from your children’s favorite books and cartoons in them.


Take:

First you need to fashion a lot of bricks from plasticine. To do this, it is most convenient to take the bars already in the set and cut them with a plastic knife. Now place the bottle on the base and start gluing it with the created elements.

You also need to cut out the top of this container, decorate it with plasticine circles so that they turn into tiles. Make the second tower in the same way, but without the roof. Make a small balcony from plasticine and place a princess figurine from the same material on top. Don't forget to make windows. Place the roof on top of the first bottle. Connect these two buildings with a plasticine fence.
You and your child can make a picture of lace for the New Year.

Take:
The first strip of lace needs to be cut so that it is glued to the bottom of a sheet of cardboard, positioned horizontally. Then you need to get two segments that are attached vertically here. On top, with a small gap, glue two rectangles, but smaller ones.

Then you need to connect the two pillars with a lace ribbon, the edges of which are folded and ironed at an angle. You will glue a smaller strip of sewing on top of two small rectangles.

Cut a 12 cm long strip from the lace ribbon and glue it on top of this palace. All that remains is to attach snowflake-shaped sequins to decorate the work.

The Snow Maiden can live in another castle. Or the child will place the princess here. This structure is also created using lace. Here's what you'll need to make the palace:
Making master class:
Draw the dial with a regular ballpoint pen, not a gel pen, so that the elements do not bleed onto the fabric.

Here's how to make a paper castle in which the Snow Maiden, the Princess can live, or it will become Cinderella's habitat.
And if you want to make an edible gift, then arrange it in the form of a princess castle. This can be presented to a girl or woman for any holiday.

To construct one, take:
Make the following items using Disney candy. Some candies need to be tied in tails of 4, and others in 5 pieces, so that as a result they form a ring. Use copper thread for this.

Then glue the ends together with a glue gun and turn them inside out.

Now take cardboard and cut out 2 blanks measuring 13.5 by 14 cm for a small tower, and one piece for a large one 17.5 by 20 cm. Twist them into tubes and secure them with a stapler.

Now you need to put the created candy circles on these blanks - 6 pieces with a diameter of 4 cm and 3 pieces with a diameter of 5 cm.

You need to cut out circles from the insulation and glue them into cardboard towers on one side and the other.

Take a mesh, cardboard, foil and cut out a quarter circle with a radius of 10 cm, two parts. You will also need one quarter-circle piece with a radius of 12 cm. Twist the cardboard cones and secure them with a stapler. Attach foil and mesh on top. Trim some of the tops of these shapes.
Cut out 12cm squares from the foil. You will need 13 pieces. They will need to wrap the Nut candies and then fix them on the skewers.

Decorate the roofs of the turrets with these candies. Cut a 35cm by 23cm rectangle of insulation to make a base on which you will place the castle buildings. Cover it with green film on one side and attach sisal of the same color to the other.
Cut squares of green film with sides 7.5 cm. You will need 16 pieces. Make 11 pounds on the toothpick halves. And 5 pounds should be made on pre-decorated sweets. Cut out squares with sides 7.5 cm from the green mesh. You will also need 12 pieces. Make pound cakes out of them too.

Cut out portraits of princesses from packages of Disney Prinses candy so that the shape resembles windows. Attach these blanks to foil and cardboard and cut out the same parts, but a little larger. Glue the windows together and glue them to the tower. Decorate the surrounding area with candies in sparkling papers, decorated with green candy wrappers.

To also decorate the space with a tree, cut out a square with a side of 18 cm from the film and wrap it around the Kinder Surprise. Attach the workpiece to a large skewer and decorate with beads. Take three Nuts and tie their tails. Secure with toothpicks. Secure it on one side of the lock with a tree, near which attach a “Nut” candy. We decorate here with light green and green pound cakes, between which you glue chocolate coins. And attach beads in front of the lock.

Here's how to make a castle out of cardboard, out of paper, make a palace out of plasticine, lace, or make it edible. Watch how others make a castle out of cardboard. Perhaps you too would like to create such a medieval building.
How to make a castle out of paper will clarify the second plot.
In 2018, organizations reported for the first time for 2017 and filled out the annual form...

Our planet is beautiful and amazing; there is no such planet in the entire universe. On the...

1. Russia is located: A) northern 1) metro Dezhneva B) southern 2) metro Chelyuskin...