The Eastern zodiac is represented by twelve zodiac signs, each of which...


Creating your own decor is the best option for those who really want to bring a special vision of beauty to the arrangement of their home. For beginners, master classes will be very interesting, which will allow you to understand how to create flowers from plastic bottles step by step with your own hands.
With such an unusual activity, it is very important to remember the basic rules for making flowers from plastic bottles and strive to comply with certain safety measures.
When creating flowers from plastic bottles, it is important to remember certain stages and important rules, because the finished result largely depends on this.
This step-by-step work is considered the basis, regardless of what kind of plastic flowers will be created.
Useful master classes will help you understand how to create flowers from plastic bottles step by step with your own hands. The task set can be accomplished even by novice decorators. It is very important to remember certain safety measures.

As you can understand, it is quite simple to observe safety measures, but the safety of the creative process largely depends on this.
Each master class will allow you to understand how you can step by step create beautiful flowers from plastic bottles with your own hands, and all the proposed ideas are accessible even to beginners.
Plastic daisies are practically a classic. At the same time, such ornamental plants can also please with their delicate beauty and naturalness.

Now you can admire the beautiful plastic daisies.
You can create beautiful sunflowers using plastic bottles. In this case, the creative process will also delight you with amazing ease.

Such sunflowers can decorate not only a house, but also a summer cottage.
Plastic tulips are also often created by decorators who want to decorate their homes.


Such master classes allow you to understand how best to create step-by-step flowers from plastic bottles with your own hands and what ideas are available for novice decorators who also want to transform their homes.
Magnolia
It is best to start your first experiments in manufacturing with the most basic crafts. Of course, luxurious roses and peonies look amazing, but it may happen that you simply won’t be able to make a beautiful but complex “craft”. In order to master the basics, we suggest you start with a simple magnolia. By the way, trees and bushes can be decorated with such flowers in winter, bringing the appearance of spring closer. Well, you can create a beautiful composition at home using the same dry branches.
From each bottle (you need to prepare as many of them as there will be magnolias), you should cut off the upper wide part along with the neck. In this neck you will need to cut out 7 petals of equal size and bend them slightly inward. The cut parts should be held over a candle flame for a short time - this way you will not cut your hands with them.
Of course, magnolia cannot be green, brown or transparent, which is why the craft should be painted in the shade of pink you like. For work, it is best to take acrylic paint; you can also use colored varnish or enamel. Don’t be upset if you weren’t able to cover the surface with paint evenly; on the contrary, it looks more natural this way. If you don’t have special paints and varnishes, then you can use regular gouache, just remember that after it dries, you will need to open the magnolia with clear varnish.

If you need to decorate flat surfaces, for example, a table or the wall of a country house, then learn how to make flower heads - it's incredibly simple. By the way, for this craft you need to use the bottom, which is why you can arrange a completely waste-free production by making such heads in parallel with magnolias. We also draw your attention to the fact that the beauty of the finished product will directly depend on the container’s capacity, so the most attractive ones will come from five-liter eggplants.
Step back a couple of centimeters from the bottom of the bottle and carefully cut off the bottom. Cut the bottom along the lines to make blanks for the petals. The middle will be used as the core and should be left untouched.
From here, cut out the thin stamens - make very thin cuts to the middle of the bottom, then bend them inward, giving the desired length and shape. Give each piece a petal shape, and be sure to melt the sections with the flame of a lighter.
If you are going to decorate your house with flowers, then you can use acrylic decorative paints for painting (they are usually used to paint ceramics or glass). If the decor will “live” outside, then it is best to take weather-resistant acrylic paints for outdoor use. Paint the craft in the color you like.
Of course, this is only one option for making a flower head, and then you can call on your imagination to help, “playing” with the color, size, shape of the petals and stamens.

The first step is to make cardboard templates for the flower details. They will need to be attached to a plastic surface and outlined with a marker, then cut out the required number of parts. Bend each one so that the parts are directed in one direction.
Grab the petal with pliers or tweezers, whichever is more convenient for you, and move the piece slowly over the flame of a candle or lighter. The shape will change, because under the influence of heat the plastic will melt. It’s just very dangerous to overdo it, because then the material can “fry”. Be sure to melt the sections too, running the flame along the contours. You need to carry out this manipulation with all the workpieces at once.

Well, now all the flower layers will need to be put together. You can “plant” them with PVC glue, or you can make a couple of holes in each part and sew them together, using a decorative button as a disguise.
The first thing you need to do is draw 7-8 templates that will be the same in shape, but reduced in size - it is this fact that will allow you to get a lush bud. You will also need templates for leaves and sepals.
Using a marker, draw the outlines onto the plastic, cut them out, and then immediately sort them by color and size - this will significantly simplify the subsequent assembly process. Using an awl, make a hole in each piece.

Hold each piece over the flame of a candle or lighter, then form the softened petals - they should bend upward. The center should not soften during this procedure, which is why it should first be covered with coins, which must be held with tweezers.
The sepals are made in the same way; a hole should also be made in the finished parts.
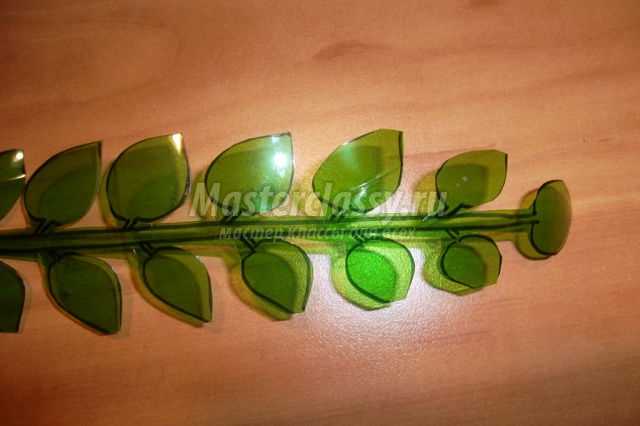
In order to make a stem, you need to take care of the braid. It should also be made on a plastic base. Cut the remaining middle part of the green bottle into a spiral; it should be quite thin, about 1 cm. Also cut out the leaves.
Heat the spiral over the tongue of the candle and wind it tightly around a piece of wire that will act as a stem. Do the same manipulation with the leaves, only you will need to not only give the required shape, but also “twist” the petioles.

Climbing flowers from plastic bottles step by step
If your interior contains columns or pipes, then they can also be adequately decorated - all you need is to make them curly DIY flowers from plastic bottles.
Cut the bottom of a plastic bottle, cut it in a spiral to make a ribbon about 10 cm wide. Draw a design on the surface of the ribbon with a marker and cut out a twig. Melt the cut out branches over the candle.
Use thick paper to cut out flower patterns; they should be different in size. Transfer the templates to plastic and cut out. Melt the parts over the candle tongue and make a couple of holes in each.
You will need wire to make a flower blank; string beads or beads that will act as the center. Put all the components together.
Make holes in the leaves on the branches in any order to attach the flowers. Fix the flower and twist the wire around the branch. Nip off the excess with pliers and secure the end of the wire closer to the branch. Heat the tips of the branches over the flame and bend them.

Gather all the parts together and wrap them with wire, leaving a small loop.
Master making, it is also a wonderful interior decor.
Flowers from plastic bottles for the garden
This decor is perfect for a personal plot, allowing you to make it original and exclusive. Your neighbors will probably be very interested to know how you can create such stunning beauty with your own hands.

Cut large petals from plastic bottles and paint them with yellow paint on both sides. The easiest way is to use the aerosol version (spray can), but it is quite possible to paint it with acrylic.
After the paint has dried, make holes at the base of the petals. Using wire, collect them into a sunflower. To make the middle, a bottle bottom is just useful (its texture will be beneficial). For the stem, use a metal rod.
Make several of these sunflowers to create a garden arrangement. You can add pots, toy bees and barrels to them - you will get a stylized apiary.

First of all, paint several vessels in different colors, it can be red, pink, white and yellow. Cut more thin "noodles". Secure the noodle petals with wire and place them in the cut off neck - then the flower will hold on better.
For the stem, you can take a tree twig, a metal rod or thick wire. Wrap the stem with suitable material, such as plastic wrap, polished paper, etc. Or you can simply paint the stem the desired color.
After you collect the chrysanthemum, you will need to stretch the petals from the unpainted side with a knife or wind them around a pencil so that they curl.

Flowers from plastic bottles - master class
Paint the flower in the desired color (it can be white, purple, blue, you can get creative and even cover it with spots), make a hole in the lid in order to then thread the stem. To make the twig more like a real stem, you can paint it with green paint.

Now you know with your own hands and you can always decorate the interior of your home and garden.
Flowers will decorate any area - from a summer cottage to a home windowsill. But not only living specimens can do this! Flowers made from plastic bottles will also cope with this task. They are not that difficult to make, and they will serve you for many years. Read on to learn how to make this garden decoration with your own hands.
This type of decoration is very popular among many summer residents and gardeners. You shouldn’t be surprised at all, because there are good reasons for this:

Anyone who is not too lazy can take part in landscaping their backyard space, because there are a great many ideas for creating stunning flowers from such material, starting with the amazing lily of the valley and ending with the magical lotus.
Very often, gardens and summer cottages are decorated with products made from this material in the form of a lily of the valley. The design is very picturesque and interesting. Even a beginner can make a lily of the valley from plastic bottles with his own hands, you just need to follow the step-by-step instructions.

To make the structure you will need the following materials:
Step-by-step instructions for making a lily of the valley from plastic bottles with your own hands:
In the photos below you can see several options for making lily of the valley for the garden:


The lotus is a flower that cannot but arouse admiration. A sophisticated and refined plant can win the heart of any person. Of course, it seems unlikely to grow a live lotus in the country, but for the garden and vegetable garden it is quite possible to make an excellent copy of it from a bottle.

To make a lotus from a plastic bottle with your own hands, you should first prepare:
You can make a flower from plastic bottles as follows:
You can simply stick lotuses from plastic bottles into any flowerbed in the garden or attach flowers to, to, or you can also place the lotus in an artificial pond.
Video: how to make a lotus from a plastic bottle.
You can make daisies in both small and large sizes. Also choose colors based on your own taste. According to the classics, this flower should be white with a yellow core, but you can paint the petals in bright colors or even make a seven-flowered flower, painting each petal a different color.
To make chamomile from plastic bottles you will need the following items:

Step-by-step instructions on how to make a chamomile from plastic bottles with your own hands for the garden:
Photo of one of the options for making a flower for garden decoration:

Video: master classes on making chamomile from plastic bottles with your own hands.
You can decorate your summer cottage, vegetable garden, or garden with a variety of designs. But flowers are always popular. We invite you to look at photographs of various flower arrangements for new ideas and inspiration: 
People have long been using not only ready-made, natural materials, but also creating completely new ones themselves, which do not exist in nature. These also include plastics.
The group of these materials is perhaps the most common, because today our industry produces a huge number of different products from plastics. They are different in purpose, shape and color.
Products made from plastic bottles are very popular in everyday life and for decorating homes and gardens. Plastic bottles have firmly established their position in our daily lives. The life of plastic bottles is not limited to one-time use, they are capable of more. To prevent bottles from polluting the environment, I want to show how you can give a second life to plastic bottles. Crafts made from plastic bottles amaze with their diversity. A plastic bottle is a second life, which will be much brighter, more varied than the previous one, and will be the main material when composing a bouquet. DIY crafts made from plastic bottles will decorate your garden plot, flower bed and will delight your eyes.
Plastic bottles for various drinks are mostly green or transparent. Products made from them are original, light and modern. There is no limit to imagination and creativity.
The work of making products from plastic bottles promotes the development of hand muscles, improves the eye, and consolidates labor skills and skills acquired when working with other materials. This is explained by the typical nature of work operations, characteristic of all types of labor.
The master class is designed for experienced needlewomen and beginners.
Target: to introduce teachers, educators, and parents to this type of creativity, and also show how to make clivias from plastic bottles and decorate the area with them.
Tasks:
Develop a product manufacturing plan;
Draw attention to this type of arts and crafts.
The leading idea is to decorate the garden plot with flowers from plastic bottles, to give yourself and people joy and a good mood.
Plastic bottles are a wonderful material
Cheap and accessible: can be obtained at any time;
You can give it the desired shape by processing it over a candle;
Products can be painted with alkyd, acrylic aerosol paints.
This is interesting
Clivia belongs to the Amaryllis family. The homeland of clivia is the humid subtropical forests of South Africa. These are perennial herbaceous plants with long, rosette-shaped leaves. Bright orange, yellow or red clivia flowers are collected in inflorescences. On one inflorescence there can be 2-3 dozen bell-shaped flowers, which bloom gradually and last a long time. There are several flower shoots on one plant. The shiny, long, dark green leaves are also very beautiful.
The most beautiful ornamental flowering plant, clivia, is distinguished by its simple beauty. There is nothing superfluous in this flower. It is beautiful at any time, be it flowering or resting. When Clivia blooms, it transforms itself and transforms the entire surrounding space with the abundant rich beauty of multiple large and very bright inflorescences. It seems that clivia is a messenger from a country where spring and an orange-yellow mood always reign!
Dangers at work:
Hand injury from scissors, awl;
Painting the product;
You can get burned while working on a candle.
What you need to do before you start:
Place tools and materials in the designated place.
What to do while working:
Be attentive to your work;
Place the scissors on the right with closed blades and rings forward;
It is better for older people to cut plastic bottles, as difficulties arise, especially at the very beginning of the work (it is difficult to pierce a bottle). The material is cut across and along the bottle with scissors quite easily. The most difficult to process are the bottom and neck of the bottle; here you need to work especially carefully so as not to injure your hand;
Work over the candle carefully so as not to get burned;
Work in a well-ventilated area.
Green (5-6) and transparent (7) plastic bottles,
Scissors;
PVA glue;
Glue Master;
Acrylic, alkyd aerosol paints (red, yellow);
Candle with a diameter of 2 cm;
Green electrical tape;
Wire of different diameters;
Large beads of two colors;
Oblong and round beads;
Thick threads (iris).

Making the core
1. Make 7 pistils and 42 stamens from large seed beads.
To make a pestle, take a thin wire 20-25 cm long, string a green bead on it, bend the wire in half and string 22 large green beads on two ends.
To make stamens, take a thin wire 20-25 cm long, string an oblong bead onto it, bend the wire in half and string 19 blue (white) beads on two ends.

2. To collect one flower, you need to take 1 pistil and 6 stamens. Attach the pestle with threads to an aluminum wire 20 cm long, lubricating the wire with PVA glue, and distribute the stamens evenly around it and fasten them with thread.

Making a flower
1. For 7 transparent bottles, cut off the top.
2. Cut each part into 6 equal strips towards the neck. Cut petals from each strip at the top, rounding the top.

3. Process each petal over a candle, giving the petals a rounded shape. First, work between the petals, and then the edges of each petal, pressing the other petals with your fingers.


1. Crafts from plastic bottles can be very beautiful - you just need to use containers made of a certain type of plastic and try to make not primitive flowers, but elegant ones.
Flowers from plastic bottles - elegant fantasies
This is proven by designer Veronika Richterova, whom we have talked about more than once and presented her work as an example of high taste (strange as it may sound when we are talking about crafts from plastic bottles), and also in this.
The master has wonderful works, looking at which it is impossible to believe that they are made of bottle plastic. I want to look at them and look at them. And this is quite possible not only in the pictures, but also if you make such garden crafts with your own hands to decorate your own plot.
So, we take plastic containers not from water or other drinks, but from shampoo, gel, and other cosmetics or detergents.
It is advisable that bottles for elegant flowers should initially be the color you want. That is, so that crafts made from plastic bottles do not have to be painted, it is unlikely that you will get a better color than it was specified during production. In addition, you won’t have to worry about the paint being washed off in the rain or peeling off in the sun. Of course, any plastic on the street fades over time. But when it fades, then paint it. At the same time, update your flower bed. For the centers of flowers, you can use decorative caps from containers.
It’s good if you have curly scissors, the blades of which give a wavy edge. If you don’t have such scissors, you will have to try to cut out the “wave” with ordinary scissors. In principle, it's not that difficult.
In principle, the pictures show very well exactly how to make such flowers. Try not to cut small elements - then you will need to fasten them, and this is not always easy. If you want curved petals, hold the piece over the fire and shape it. But don’t bring it too close to the fire - the plastic melts and burns very quickly, almost instantly.
2. But, by the way, this property can be successfully used to make a flower stem. You can simply take a rigid metal wire or rod of small diameter and, wrapping strips of plastic (here you can use regular bottle plastic), melt it.
And flowers from plastic containers are so different! Let's try to make a beautiful flower with graceful petals. It will be fantasy: for some it will remind one of cosmos, for others of daylily, for others of heliopsis, zinnia, Christmas star, etc.
We use a plastic bottle, well washed and dried.
Cut the bottle in half crosswise. We try to make the cut as even as possible - this determines whether the flower petals will be the same in length. If you are making a flower with children, they may need help cutting the plastic.
Cut the plastic bottle into five or more pieces. Here we also try to cut, maintaining an even distance between the stripes - the future petals of the flower.
We take each strip with our fingers and bend it outward from the neck.
Cut out petals of the desired shape from the strips. Here they are so graceful and pointed.
It's time to paint the flower blank. Cover the table tightly with a layer of paper or old oilcloth, prepare paints and brushes.
If we buy paint specifically for painting plastic crafts, choose a glossy one - it gives a beautiful shine.
To enhance the effect, you can add glitter to the paint - special glitter. By the way, such glosses are found not only in nail polish - they are introduced into interior paints and varnishes. You can buy it in construction stores or in shops that are so loved by handicraft masters.
We make the background color of the flower with the main color (in this case, red). The plastic is transparent, you can paint the workpiece on one side, but it is better to paint both - this way the flower will look more elegant.
After the petals have dried, we draw the details with a different color of paint - we paint the tips, and put neat dots on some petals. To make it easier to draw a clear, even point, we do this not with a brush, but with the tip of a toothpick, knitting needle, kebab stick, etc.
We paint a small ball of polystyrene foam or other material - it will be the convex center of the flower.
We attach the ball to the center of the workpiece - screw it with wire, making holes with an awl, or glue it with glue for external use. For example, very good in this regard
The stem for the flower can be made from wire, painted green. Or you can buy special stems for artificial flowers in a store that sells products for florists. They are often available in wire form (called gerbera) - you can make stems of any height.
Large flowers made from plastic bottles are not uncommon, but try to “grow” huge flowers from this material and you will see how your garden has changed thanks to them.
Huge flowers look fabulous and bring magic to the world around them.
For one such flower you will need:
10-12 plastic bottles with a capacity of 2 liters or 3-4 plastic bottles of water with a capacity of 3-6 liters;
Plastic bottles or bottles are prepared - clean and dry. Working with them is basically the same, you just get more petals from 1 bottle.
Cut off the necks and bottoms of the bottles/bottles.
We cut out large, simply huge flower petals - to the entire height of the containers.
Let's start coloring the petals. We choose the color as desired, paint that matches the look. The paints that are most often used for other plastic crafts are described here in great detail.
You shouldn’t paint the entire petal with one paint - if you make it two-color, with veins and spots, it will look more vibrant. We use one light paint, the second one is darker. You can use three colors in one product, but no more, otherwise it will be too “variegated”.
You can paint the petals on one side (the plastic is almost transparent), or on both sides.
First we make the middle of the flower. To do this, cut out a circle from plywood or use the bottom of a plastic bottle. We paint the middle in the color we need. Attach to the knitting needles in the center.
We begin to attach the petals one by one to the middle. For reliability, we also attach each petal to a knitting needle or rim.
When all the petals are in place, we mask the fastenings in the middle with thinly cut strips from a plastic bottle. By the way, the voluminous center of the flower is very beautiful.
If there is a wheel fork, turn it into a “stem” (paint it green. If there is no fork, put a rubber/plastic hose on the reinforcing rod, paint it green and also get a stem. However, you will have to tinker with attaching the head to such a stem flower.You can make a bolted fastening or securely wind the parts with metal wire.
Huge magical flowers made from plastic bottles look great both in groups and individually. We sit them down and admire our work.
Crafts made from plastic bottles are multifaceted in terms of themes: figurines of animals, insects, and people are created from this material.
If you are going to connect the layers to the petals with wire, you will have to make holes in the plastic. You can do this instantly with a hot nail or awl. To prevent the fastening from spoiling the appearance of crafts made from plastic bottles, make holes in those places that will subsequently be covered with the next layer.
It is very easy to staple the layers together, but you will need a stapler to do this. By the way, this is a very useful household item - it holds together almost any materials.
We make the middle of the flower - to do this you need to find and attach a suitable lid to the center of the craft or use some kind of ball (tennis ball, for example), cutting it in half.
It is not difficult to attach such flowers from plastic bottles to the surface - you can simply nail them or use wire.
Plastic bottles, which are most often used to create crafts for the garden, are a convenient material in terms of cutting, durability, etc. But often the flowers from it turn out to be “flimsy”, with thin petals that scream: “We are made of plastic!”
Dense, evenly colored petals
In many cases, even coloring does not help. It’s especially offensive when you make flowers from plastic bottles: beauty seems to be implied, but, frankly, it’s not there. What to do?
You can do like designer Laura Karnitz, who creates amazing crafts for the garden and interior from PET bottles with denser plastic, namely bottles for shampoos, cosmetics and household products, milk, etc.
Another good thing about these bottles is that the plastic is already painted, and the colors are very beautiful. That is, all that remains is to work with scissors, then fasten the parts, and the craft for the garden is ready.
There are many techniques for creating plastic flowers for the garden, but there are some that allow you to make very lush heads. Here is one of them, very simple, by the way.
Wonderful flowers from plastic bottles are obtained not only from round containers. For example, you can make a mesmerizing lily from an ordinary flat shampoo bottle. And you won’t have to bend the petals to give them shape: you will only need to cut off the corners of the bottle - the bend is already there. If the result is not satisfactory, you can always correct the details of the flower over the fire.
There are two options for creating lotuses from plastic bottles: one is easier, the other is more difficult.
Lotuses made from plastic bottles - looks interesting
And, as often happens, a more complex option also gives a more interesting effect: flowers from plastic bottles - delicate lotuses - turn out lush and “full”.
Although the simple option is interesting, especially if there are a lot of flowers.
As for the material, it is better to use plastic bottles with dense, light-colored plastic - for example, milk bottles or bottles for shampoos and other cosmetic products.
In general, the task of creating such flowers from plastic bottles is not particularly difficult. The only thing is that you will need a strong fastening so that the lotus does not fall apart into its components (petals). If you are going to decorate some small container with these flowers and you know for sure that you will be moving them, except occasionally, you can fasten the petals into a flower with glue (hot glue, for example, or some kind of “thermonuclear” construction glue).
Such containers, which are essentially mini-ponds, are sometimes made to decorate verandas, terraces, patios, etc.
But if you do everything “for real,” spend a little time, make a hole at the base of each petal (with a hot nail) and tightly connect the petals into a flower with wire (it won’t be visible anyway).
Here's how to make the middle.
Making these flowers from plastic bottles is as easy as shelling pears. Cut off the top of the bottle and make petals along the edge of the cut. The flower stand is also the top part of the bottle, but larger. We insert the flower with the petals with the neck into the neck of the stand, with the center inside, with the help of which the lotus will be tightly secured in the stand.
These simple flowers make wonderful borders for small flower beds.
In both cases, we paint the petals with acrylic paint (easier than aerosol, “spray can”). The color can be white or pink (like most lotuses), although if you paint it yellow and decorate a decorative pond in your garden, you will get wonderful water lily nymphs (which, in fact, are the same lotuses, but not so “glorified”).
The Eastern zodiac is represented by twelve zodiac signs, each of which...

Love or adventure? So, if you dreamed of a hand in a man’s hand, it means...

Fate prepares surprises and difficult life trials for people who see...