


Peeling skin can be caused by a variety of factors. To deal with ...

In construction, the carpentry trait (called the scriber in modern format) is essential. Without a line, sawing logs, or the production of building forms is problematic to organize. A scriber is required for marking on wood surfaces. The markup can be straight, curved, consisting of several parallel lines. We take one board, remove the edge from it, which will be needed in order to obtain the line outline for the imprint already on the next strip - this strip leans against the 1st. The line is drawn precisely due to the carpentry line.
You should have in your arms following list of things:
1. Ordinary hammer;
2. Welding tool;
3. Drill, drills (tools must cope with metal)
4. Hacksaw for metal;
5. Grinder (there must be a cutting and grinding wheel);
6. Files, taps and dies;
7. Levels - horizontal and vertical (old building levels);
8. Plumb line.
No specific materials are needed for the carpentry compasses. You will have to spend only on various nuts and washers, if you do not have such things in the house of the appropriate size.
The heads of the bolts need to be welded to the hand scissors. A pencil and needle attachment is required. In this case, the thread on the ends of the bolt comes to the rescue.
First you need to make a needle, then a slot for installing it. When making a pencil mount device, make sure the needle will fit in the mount. The levels noted above are required for bubble flasks.
The amount of dilution of the pencil and needle should be as accurate as possible. For this purpose, we use an adjustment bar. You can securely fix the bar with nuts. A clamp is used to fix the compass in the extended position, with which the bolts and washers do an excellent job. You need a mounting platform - this way you will be able to fix the levels. The lead of a pencil may deteriorate during work. There is a chance that the compass will break when you re-erect it. This problem is solved using a special template. This design is made with a head and a screwdriver. An alternative method is to use an extra needle instead of a pencil.
The key tool at hand is an exceptionally thick wire. You can also use a method that involves driving 2 guests of sufficient length into a good wooden handle... A locksmith compass is a must. In order for the drawing to be as correct as possible, the distance between the teeth of the tool must not be increased. But if you are a beginner, following these rules is difficult without work experience.
This term means a compass of mechanical action. It has a built-in corner, due to which you can achieve the correct marking of the line (it does not matter whether it is vertical or horizontal). If you use the scriber correctly, then as a result, there will be not the slightest free distance between the logs.
Why is a scriber not exactly a carpentry trait? Since the "fresh" instrument has two levels. They decided to implement them in view of significant savings time. If earlier it was necessary to make a rough line, then with the arrival of the scriber, you can proceed immediately to the final correct marking. The term "scriber" comes from Canada. But in Russia, workers still call the improved carpentry trait the carpenter's compass. However, on technical characteristics different terminology does not affect in any way.
Cutting a longitudinal groove is an operation that combines all types of corner cuts from logs and carriage. On this and subsequent pages of the site, we will consider the logical elements of work, how and what is done, but these elements have little to do with the construction of a real log house. In real construction, log houses, groove and corner cuts are interconnected and work, depending on the type of corner cuts, is carried out in a complex.
The general rule for constructing a log house is to place the logs according to the principle "butt to the top". The logs have a thinning from the butt to the top. The alternation of thin and thick ends along the height of the wall allows you to align the walls of the log house. The lower log is leveled into the horizon with the lower hump, the upper one - with the upper hump. Thus, two logs stacked on top of each other are obtained with approximately parallel longitudinal axes. After drawing and cutting the longitudinal groove, their top becomes close to horizontal. Another log can be placed and drawn on it. So the wall gradually grows, the top of which tends to the horizon.
The marking of the longitudinal groove and bowls of the corner cuts is done with a special tool - a "line". This tool can be made from available tools, for example, from wire with a diameter of 8-10 mm. The wire is bent with the letter V with the legs about 10-15 cm long. In order for the “devil” to scratch the wood and leave a mark, the ends of the legs are sharpened. The tool is attached to a stick or hammer handle. In order to fix the size of the extension of the legs of the "line", a wedge is inserted between them, and the legs themselves are wrapped with a cord. The real carpentry "trait" is an expensive tool, the imported version is called a scriber. In modern drawing tools, levels are built in, allowing you to control the retention of the legs of the line in an upright position. The whole work of felling depends on the "correctness" of this tool. For the manufacture of one single log house, it is possible that there is no need to purchase an expensive tool; it can, with varying success, be replaced with a carpenter's compass and a short level. Unproductive and long? Yes, it is, but if no one urges you to work, then you can.
To line one log to another, they are stacked vertically (butt to the top) on top of each other and secured with staples. Depending on the region of construction, the width of the longitudinal groove is determined (Fig. 2) and a horizontal line with a length equal to the width of the longitudinal groove is applied to the thin end of the log. One leg of the "line" is attached to the center of the drawn line, and the second leg is pushed apart and touched the top of the hump of the log. The tool is ready for use - its legs are set apart to the required distance
Without knocking down the extension of the legs of the "line", starting from the end of the line of the width of the longitudinal groove, touching one leg of the "line" of the hump, the logs lead it along the surface of the hump. In this case, the other leg of the line scratches the end of the other log, exactly repeating the line of the hump of the first log. At the end of the log we get the profile of the transverse groove, scratched with a line (Fig. 11). To improve visibility, it can be outlined with a pencil.
Further, pushing the handle of the "line" between the logs and leading the tool along the logs, scratch out two lines - this will be the border of the groove. Approaching the other end of the log, they also draw the profile of the longitudinal groove on it. Then outline the other side of the log. That is, in principle, the whole operation for marking the groove. When drawing the logs with the sliding of the handle of the "line" between the logs, a groove that is even in width is obtained, but it is not horizontal, but an inclined repeating run of the logs. The next highest groove will be inclined to the other side and so on to the very top of the wall, the grooves will alternate the slope. It is quite obvious that the method is applicable only to logs with very little or no escape, practically cylinders, where the slope of the grooves will be almost invisible. Or to log cabins, all the logs of which are calibrated and have approximately the same thickness in the cuts (regardless of the run) and in which the slope of the grooves is not given importance.
Different-sized logs with a runway are cut in a slightly different way. The lower log is laid on pads, its lower hump is leveled into the horizon (as far as possible) and fixed with brackets. Another log is laid on it, turning the butt to the top of the lower log. At this log, the upper hump is leveled into the horizon, after which the log is fixed. The marking of the width of the longitudinal groove and the opening of the legs of the "line" are made, as in the first version. But the outline of the groove along the logs is carried out horizontally, focusing on the horizontally laid hump of the lower log. Modern carpenters have a "feature" with water levels, but in extreme cases, you can use the usual coated lace stretched between the markings on the ends of the logs. When outlining, the tracing ends of the legs should be on the same vertical. The longitudinal groove will turn out to be horizontal, but of variable width - tapering to one side. Incorrect delineation of the groove and / or the wrong choice of opening the legs of the "line" leads to a "kiss". This is when, as a result of engraving and cutting a groove, the end of one of the logs only slightly touches the other. Of course, about any width of the longitudinal groove and heat engineering characteristics the log house is no longer in question.
Next, a third log is placed, its upper hump is leveled into the horizon and a groove is drawn. Then the next one and so on to the top, all the grooves of the log house are horizontal. But another option is also possible. The third log is not leveled into the horizon, but only the hump of the fourth log is leveled. It turns out, as it were, a pairwise cutting of the wall, inside each pair of which, you can make both an inclined and a horizontal groove.
What to choose? The answer can only be given by the logs themselves, since horizontal grooves on logs with steep slopes can cut up to half the thickness of the log.
After drawing in, the log is freed from temporary fastening with staples and turned over, guiding it with scratches upwards. To make it easier to see, the scratches are outlined with a pencil. With strong blows, immersing the heel of the ax blade to the depth of the groove, cross-shaped cuts are made along the entire length of the log. The center of the ax blade should touch the scribbled lines. Then a groove is made with the toe of the ax blade: cutting it between the notches and picking out the wood. The work can be accelerated if you use electric, chainsaws. In this case, the notches on the log are not made, but many transverse cuts are made with the end of the chainsaw and one long cut along the log. Try not to cut to the full depth of the groove, but leave 0.5–1 cm for manual rework of the groove. This will lengthen the life of the chopped structure.
The groove is cleaned with an "adze", tilting the log to the side convenient for trimming. Teslo is an ax, the cutting plane of which is directed not along the handle, like in a conventional ax, but across it, like in a pickaxe, but with a rounded cutting edge. There are two types of adze: large and small. With a large adze, the carpenter works while standing, applying with two hands strong blows along the log. With this tool, you can immediately select a groove without using a conventional ax. A small adze is operated with one hand while sitting on a log. This tool is used to "finish" the groove after a larger adze or ax.
Next, the correctness of the groove selection is checked: the log is “planted on a firebrand”. The hump of a solid log is coated with a colored pigment (previously it was done with coal or ash, hence the name) and a log with a groove is planted on it. Remove the grooved log and watch how the colored pigment has blotted out the groove. A clean place means that the groove has not touched the smeared hump, the blurred place, on the contrary, shows that there is excess wood that did not allow the log to "sit down" - it needs to be removed. So gradually, the groove is finalized until it is completely erased. This means that the groove is completely in contact with the hump of another log.
There is another way to check the correctness of the groove selection - a wooden "woman". They take a piece of log (with an impressive name - "baba") up to one meter long and tap the connected logs with it. Then the log with the groove is removed and they look where there are jammed places meaning excess wood in the groove. "Baba" must be made of soft wood, otherwise it will crush the front surface of the log to be tapped.
|
|
According to the classical scheme, during the felling of a log house, the bowls are first selected in rough form. Then the log is "planted" - thrown in place from above below the already finished one. Then, with the help of a line, the outlines of the laying groove and the bowl are marked on the opposite lateral surfaces of the log. Then the log is removed, the groove with the bowls on the ground is sampled. Or it is not removed when it is inconvenient or the log house is cut into a low foot. It is interesting that some constantly practicing carpenters, with a firm hand and a normal eye, are able to cut the paw of a dovetail without drawing in. They say that there are modifications of the carpentry trait, supposedly allowing you to mark a log in one step. But, this is not so, or we are talking about the highest skill of individual carpenters.
|
|
|
In the marking tool, you can clamp both a regular slate pencil and a specialized "point" round, oval or faceted.
Leaving a perfectly readable line on concrete, stone, metal surface, dry and wet wood. There is also an interesting invention - a gas rod from the Fisher Space Pen, which writes in bold not only literally on everything, but also at an impressive range of temperatures, in snow and water (no difference). The carpenter's line is sometimes equipped with a mirror, so that it is more convenient to draw at a height at an outstretched hand or in hard-to-reach places. Many things used to be marked with this ancient instrument. They even traced (beat off) for their tight adjoining subsequently boards before cutting.
We are constantly talking about professional tools. Why do they make log cabins under Teslo. How to control the vertical deviations of the walls with a special plumb line. Some change the shape and quantity of the tree. Others work with appearance log house. There is a third measuring group of specific devices. Without each of them, you cannot ensure the quality of your home. For example, the traits of a carpenter.
|
|
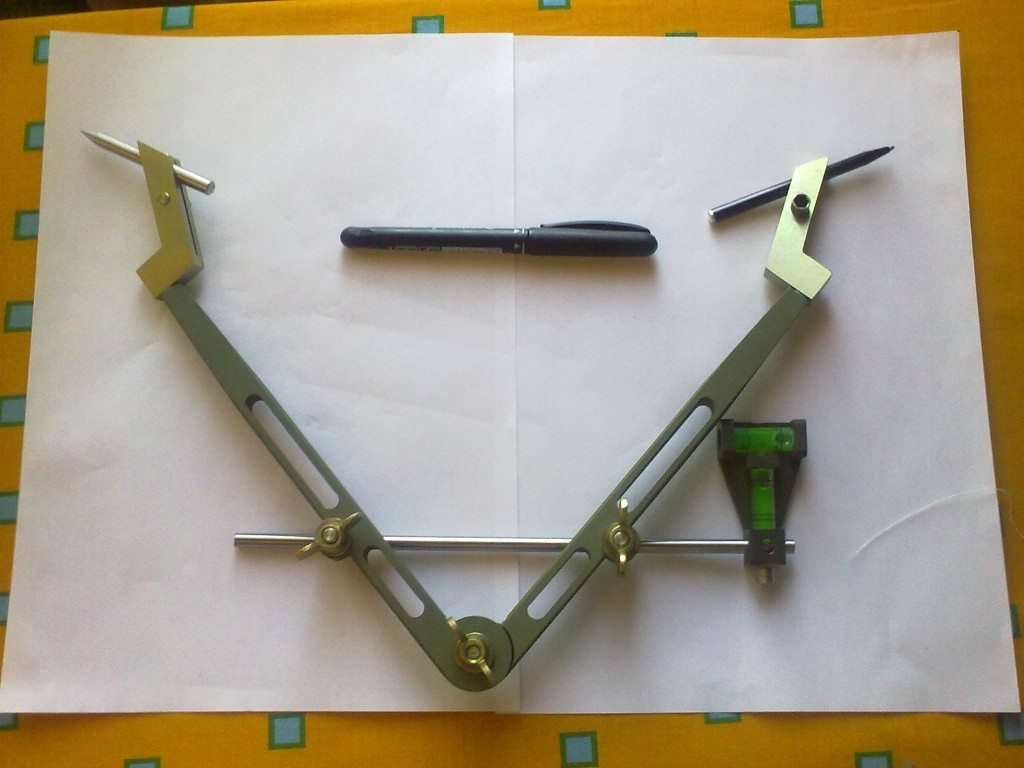
A carpenter's line (karakul) or a scriber (imported analog) is a carpenter's tool for preliminary marking. It is used when drawing on the surface of a tree the boundaries of a sample of an inter-crown laying groove and elements of a corner cut. The line looks like a large modified metal compass with a special pencil and a reinforced lead. Leaves a well-defined mark on a log natural moisture... Many of the carpentry traits are equipped with a water or spirit level. Often two for position control in two dimensions. The line does not require a pencil (the smaller tool in the photo on the left) for smooth markings.
According to the classical scheme, during the felling of a log house, the bowls are first selected in rough form.
Then the log is "planted" - thrown in place from above below the already finished one. Then, with the help of a line, the outlines of the laying groove and the bowl are marked on the opposite lateral surfaces of the log. Then the log is removed, the groove with the bowls on the ground is sampled. Or it is not removed when it is inconvenient or the log house is cut into a low foot. It is interesting that some constantly practicing carpenters, with a firm hand and a normal eye, are able to cut the dovetail paw without drawing in. They say that there are modifications of the carpentry trait, supposedly allowing you to mark a log in one step. But, this is not so, or we are talking about the highest skill of individual carpenters.
|
|
|
In a marking tool, you can clamp both a regular slate pencil and a specialized "dot" round, oval or faceted. Leaves a perfectly readable line on concrete, stone, metal surfaces, dry and damp wood. There is also an interesting invention - a gas rod from the Fisher Space Pen, which writes in bold not only literally on everything, but also at an impressive temperature range, in snow and water (no difference). The carpenter's line is sometimes equipped with a mirror, so that it is more convenient to draw at a height at an outstretched hand or in hard-to-reach places. Many things used to be marked with this ancient instrument. They even traced (beat off) for their tight adjoining subsequently boards before cutting.


The scriber is a carpentry marking tool that replaced the carpentry line.
This is a tool for drawing crowns in the process of felling log cabins. Drawing logs requires skill, since the quality of felling depends on the hardness of the hand. For the accuracy of the "landing" of the upper crown, the line must be drawn evenly and without deviations from the horizontal and vertical.
With the help of the SCRIBER, the deviation from the horizontal and vertical planes can now be controlled visually. This allows, with a neat approach, to do just one sketching.
Assembled weight:
450 gram
Equipped with level:
dimensions:
Works on solution:
from 24 to 360 mm Main parts: “legs” are made of aluminum alloy, which are heat-treated (increased strength) and coated with anodizing - anti-corrosion coating. The rest were made of structural steel and coated with an anti-corrosion coating - zinc. Repeated holders rotate on thermoplastic washers, which significantly reduces friction when turning. Holders are designed to work with Fischer pencils and rods. Manufacturing technology using programmable machine tools allows you to obtain accurate parts, which in turn guarantees high precision markup.
=-=
buy a carpentry line, buy a carpentry line, buy a carpentry line, a scriber, a carpentry line tool, buy a line markup tool, buy a tool for a felling, buy an accurate line markup tool, a line for a log house, buy a line for a log house, buy a scriber
Moscow. Sergey
Contacts 8 (917) *** 37-23
Sergey
to write a message
Assembled weight: 450 gram Equipped with level: type 2D (cross spirit level, 1 vertical and 1 horizontal) Dimensions: length 270 mm; width 190 mm; thickness 40 mm.
Works on solution: from 24 to 360 mm Main parts: “legs” are made of aluminum alloy, which are heat-treated (increased strength) and covered with anodizing - anti-corrosion coating. The rest were made of structural steel and coated with an anti-corrosion coating - zinc.
The repeated holders rotate on thermoplastic washers, which significantly reduces friction when turning. Holders are designed to work with Fischer pencils and rods. Manufacturing technology using programmable machine tools allows you to get accurate parts, which in turn guarantees high accuracy of marking.


The scriber is a carpentry marking tool that replaced the carpentry line.
This is a tool for drawing crowns in the process of felling log cabins. Drawing logs requires skill, since the quality of felling depends on the hardness of the hand. For the accuracy of the "landing" of the upper crown, the line must be drawn evenly and without deviations from the horizontal and vertical. With the help of the SCRIBER, the deviation from the horizontal and vertical planes can now be controlled visually. This allows, with a neat approach, to do just one sketching.
Assembled weight:
450 gram
Equipped with level:
type 2D (cross spirit level, 1 vertical and 1 horizontal)
Dimensions:
length 270 mm; width 190 mm; thickness 40 mm.
Works on solution:
from 24 to 360 mm Main parts: “legs” are made of aluminum alloy, which are heat-treated (increased strength) and covered with anodizing - anti-corrosion coating. The rest were made of structural steel and coated with an anti-corrosion coating - zinc. The repeated holders rotate on thermoplastic washers, which significantly reduces friction when turning. Holders are designed to work with Fischer pencils and rods. Manufacturing technology using programmable machine tools allows you to get accurate parts, which in turn guarantees high accuracy of marking.
=-=
buy a carpentry line, buy a carpentry line, buy a carpentry line, a scriber, a carpentry line tool, buy a line markup tool, buy a tool for a felling, buy an accurate line markup tool, a line for a log house, buy a line for a log house, buy a scriber
How vertical deflections of walls are controlled with a special plumb line. Some change the shape and quantity of the tree. Others work with the appearance of a log house. There is a third measuring group of specific devices. Without each of them, it is impossible to ensure the quality of the log house. For example, the traits of a carpenter.

The carpentry trait (karakul) or the imported analogue of the Scrayber is a carpentry tool for preliminary marking. It is used when drawing on the surface of a tree the boundaries of a sample of an inter-crown laying groove and elements of a corner cut. The line looks like a large modified metal compass with a special pencil and a reinforced lead. Leaves a well-defined mark on a log of natural moisture. Many of the carpentry traits are equipped with a water or spirit level. Often two for position control in two dimensions. The line does not require a pencil (the smaller tool in the photo on the left) for smooth markings.
According to the classical scheme, during the felling of a log house, the bowls are first selected in rough form. Then the log is "planted" - thrown in place from above below the already finished one. Then, with the help of a line, the outlines of the laying groove and the bowl are marked on the opposite lateral surfaces of the log. Then the log is removed, the groove with the bowls on the ground is sampled. Or it is not removed when it is inconvenient or the log house is cut into a low foot.
Some constantly practicing carpenters, with a firm hand and a normal eye, are able to cut the paw of a dovetail without drawing in. They say that there are modifications of the carpentry trait, supposedly allowing you to mark a log in one step. This is not so, or we are talking about the highest skill of individual carpenters.


In a marking tool, you can clamp both a regular slate pencil and a specialized "dot" round, oval or faceted. Leaves a perfectly readable line on concrete, stone, metal surfaces, dry and damp wood. There is also an interesting invention - a gas rod from the Fisher Space Pen, which writes in bold not only literally on everything, but also in an impressive range of temperatures, in snow and water.
The carpenter's line is sometimes equipped with a mirror, so that it is more convenient to draw at a height at an outstretched hand or in hard-to-reach places. Many things used to be marked with this ancient instrument. They even traced (beat off) the boards before trimming them for their tight adjoining later.
Peeling skin can be caused by a variety of factors. To deal with ...

Today, many people know what scoliosis is. This disease in the last ...

An even spine is not only a beautiful posture, but also the health of everything ...