The diseases of the spine - a large group of diseases that suffer over 85% ...


In a cozy house, it is impossible to do without hangers - outdoor, wall or ordinary shoulders in the closet. But besides its utilitarian function, storing clothes in a straightened form, this is also a way to show your creativity, the ability to do something with your own hands for everybody. Original floor hanger for clothes with their own hands or originally nailed hooks in the hallway - well, how to do without them? To make the simplest tremens for jackets or horns for a hat, you don't need to be a master for all hands, it is enough to have a tool and some creative ideas.
To quickly clean up the house, streamlining things in the closet, it is important to have a sufficient number of space where it will easily be scented:
But for each such thing, a special device is needed:
It is easy to build many varieties of hangers for clothes - with your own hands, photo:
If you reconsider old things from the grandmother's cabinet or chest, there will probably have quite interesting shoulders share of clothes. Vintage tremendals and homemade hangers If they do not pull on the rank of "antiques", it may well be the basis for the update or even become a unique art object. Once neither try to transform the old hanger of the masters of folk crafts, needlewomen and just lovers of something "creating"! For example, clothes hanger photo.

Helders from grandmother's house did in the era, when plastic or plastic products were not released. An old wooden basis can be used as an original decor object, especially if the cabinet is missing in the room. They can be transformed in any way or use any suitable technique:
It does not hurt on an old basis to make soft "shoulders" for knitwear so that it does not slip and did not stretch. These simple devices are also easy to make "from scratch" from the girlfriend. But if you need a wall-mounted foundation for hooks from a tree or an original hanger-rack for clothing outdoor, then materials, tools and woodwork skills are necessary.
Although the wall hanger is the simplest adaptation that is suitable for self-making, it is not necessary to make it rude and primitive. Even if it is planned to be used temporarily, for example, in the country, it is still better to make beautiful to the clothes hanger of the wall decorated the house for many years.
For high-quality product, it will take good wood, board or trim bar, the required length - on a width of 2-3 freely hanging tremenders with jackets. The board should be strong and dry, without cracks, with antiseptics processing. On this basis it will be necessary to fill a few hooks:
The simplest one-row hanger is useful in any room:
In the children's or room, the teenager is also needed a simple wall hanger - catching schoolchildren to order, hang casual clothes on her shoulders so that it does not reverse.
Tip: The simplest hanger is a hook board and mounted loops for mounting on the wall. But do not forget that it can not be signed on an inactive wall or whitewash. From the unprepared surface, clothes will be dirty. Therefore, a wooden shield, polyethylene film or Watman mowed onto the wall in unfinished room under the hanger. And wet outerwear will dump wallpaper or painted wall on a prepared wall.

If you have some kind of original idea regarding the design of the product, it is not necessary to make it in the form of an oblong rectangular disc. Wooden base under the clothes hanger for clothes with your own hands can be performed as:
After making the foundation, wood must be observed and belonging or processed by another way. It is important that the wood does not give the prerequisites for the formulation when using homemade hanger. Hooks or "carnations" of hangers It is advisable to make any original way, suit:
Hooks, "carnations" or "holders" for hangers do not necessarily do from wood or metal, they can also be bought in a business or construction supermarket. Natural material is also suitable - dry branches, swirls, cuttings or root trimming. They are necessarily cleansed from the crust, cut or drank excess, grind and operate with varnish.
Another standard hanger option is wooden planned parallel. They will not only be the basis for hooks, but also a decorative shield for clothes on a whitewash wall or just a beautiful interior item. It will make a little longer on her manufacture, but this design looks more solid, than just a hook board. And if you attach a visor on hats - this will already be a full-fledged hanger for clothes to the hallway with your own hands.

Hanger for the hallway should be enough:
Ideally - on a small interval of the wall in a narrow hallway there must be fit:
It is this multifunctionality that it is important to consider when building homemade hangers for an entrance hall. Therefore, it is reasonable not just to make the board with hooks, but it is nice to check out:
Tip: The dimensions of such hangers should not be arbitrary, they are measured with the part of the wall that the hanger should be located.

It is usually enough space about 1m wide, in the height of the clothes hanger in the hallway, with their own hands there must be more head level. There are 2-3 rows of hooks, plus a visor (shelf) under hats, plus the trempel and outerwear. The reliability of connecting the side shield shelf can be connected to the plates at an angle of 45 ° C. The hanger must be attached to the wall by brackets or dowels.
Another kind of devices for placing clothes at the entrance to the building are a floor hanger for clothes with their own hands. They can often see:
They are usually called "standing" or "horn" hangers, and they are made of tubular metal. They are notable for the fact that they are comfortable to hang out not only the upper clothes, but also hats, bags and umbrellas. And although they are not so resistant, as nailed to the wall of the hangers, are more compact and mobile. They can be rearranged in any place or remove to the storeroom for summer time.
In homes and apartments, this type of hangers are used less often than public places, but it is also easy to do it yourself. There are some good ideas, for example, use:

Attention: Whatever the design, it is important to comply with the underlying condition - the stability of the floor hanger. This depends not only on its design, but also from the support. It can be a rotating disk, 3-6 legs or crosses.
It is easy to make hanger-hangers for clothes on our own, while as the basis use any healthy material:
The basis for the hanger "Holders" remains to wrap the syntheps (by another filler) and to see any beautiful cloth. This is the best option for jerseys. A beautiful satin bow or face from a small soft toy will add originality. Such hangers will like children. The main thing is to find a suitable metal for the hook of the shoulders.

Interesting ideas on the independent manufacture of hangers of any type can be embodied using a variety of faded materials.
1. Metal. Trimming steel wire, tube or corner hide for metal hangers for clothes. Depending on the flexibility and thickness of the metal, the design can be reached or combined with welding. Form and product design - to choose from, watch photo:

2. The remains of the bar, board, veneer and other wood are suitable for wall hanger or universal product in the hallway. Detailed video will be useful for those who love work on the tree;
3. Parts of the old furniture are also easy to transform into a hanger, for example, building a multifunctional model based on the chair. This design is convenient because the jacket and trousers from the costume, shirt and tie are conveniently located on the same module.
4. The original base under the hangers-shoulders will be the original device in the room where the closet is temporarily missing. Any wooden stalk is suitable, which is suspended to the ceiling parallel to the floor at a level of slightly above growth.
5. Old "Hunting" idea is to use deer horns instead of hooks for hanger. They can be attached to any base - for wall hanger or vertical rack with horns. The horns of the moose are suitable.
6. The design of plastic pipes will like fans of technical crafts.
7. Small hangers for the cabinet are also needed, for example, in the form of a connected rings from cardboard or plastic. They are suitable for hanging scarves and cervical headscarves, belts and belts.
8. The simplest wire hanger "Samokrutka" with clothespins along the edges - a great device for storing trousers or skirts. The shape of such simple shoulders can be classic, in the form of an arched clips or in the form of an intricate labyrinth - as prompts fantasy.

When choosing a material, shape and design of the hangers worth considering, in what style your interior is decorated:
Read more about the independent manufacture of hangers. Watch the video:
One way to make the house is alive - fill it with original things. Even a simple furniture accessory as a hanger for an entrance hall with their own hands, as shown in the photo selection, it can become a real decoration.
It is necessary to stock up the necessary tools: drill, screws, cross screwdriver, 2-3 drills, hacksaw, roulette, fitting (devices for spilling boards with different angles of the bevel), level. To give a finished and neat look, you will need a skin with a large and small grain, varnish, a stain or paint.
From materials for hangers with their own hands, you will need:
 Wall-mounted hanger drawing
 Prepared all the above, you can work for work - start creating a hanger to the hallway with your own hands. First you need to do a cross. The cooked bars are cut in half (each support of the hangers must be a scope of at least 30-35 cm), processed with a skin, are connected at right angles. For a dense connection on the parts of the Cross, it is necessary to choose a chisel to deepen in the width of the bar, combine the selected areas, they will be tightly, fixedly connected (see photo). Now, with the help of the fitting, 4 bars are peaked, which will serve as a support for the trunk of hangers, they must be screwed by self-drawing to the legs, as well as to the trunk.
 Bar for the base of hangers
  Future legs hangers
 Before screwing the screws, you should drill the hole of the drill, it will save the product from small cracks that can significantly reduce its service life. The diameter of the drill must be less than that of self-drawing. Molded holes should be filled with glue for strength, and only then turn the screws.
 Details of lateral support
  The legs are screwed to the base of the hanger
  For installation of lateral support, carbon black is used, as well as a gun, or a hammer with nails
 Rubber is glued on the legs of the hanger, after gluing the product should not swing or slide - you will have to try.
Now you can go to the top of the hanger, place the hooks. It is not necessary to attach them directly to the trunk, it is better to attach a small square with in advance crochets. There is also an option: 4 brus combined with spanking with fittings are attached to the barrel, slightly retreating from the top. Under each self-solen, the hole is drilled and is filled with glue, this is a rule for the item that will be subjected to solid loads.
Now the product is over, you can go on an appearance. Taking emery paper, you have to go through the surfaces. It is better to cross the cross, cover with a cloth - close a rough design. Wash the hanger, cover with varnish (or paint and also label - it will save a fresh look for a long time).
 Decor of the top of the hanger
  Decorating the tops of the hanger
If a lamp is found in the house, then work is reduced repeatedly. It is necessary to remove electrical equipment, clean and paint (the excellent effect will give metal aerosol paints). For hooks, you can make a multiple holes with a drill on metal, to turn steel hooks (s figurative). If there are some skills to work with the metal - bend them from steel wire and weave.
You can still use the real village (well-dried, of course). Fully remove the bark, sand. The stand will serve roots, also peeled and properly focused. The branches leave only durable, located close to the trunk - Krone should not go beyond the support. Such a hanger in the hallway will be a real pearl of the interior created by their own hands. However, it is necessary to prepare for a long search for a suitable copy, and then - to long and very careful processing.
A simple and interesting option, on the basis of which a variety of wall hangers can be obtained into the hallway. The toolkit is given in the previous description, and the following materials are:
Timber is better to take processed, it will significantly speed up the product assembly process. Make this hanger in the hallway is extremely easy, boards, at the top and bottom are attached to the wall. The length of these fasteners depends on the length-planned length and must correspond to the length of the shelves (it is necessary to think over the dimensions of the new furniture accessory in advance).
Rakes are installed on these boards, with a small distance between them. Vertical location Check the level. At the bottom of the shelves for shoes, bars are used for this. Shelves are on the floor, which will later be able to calmly sit on them to convert. All joints are necessary to strengthen the corners, check the strength and loyalty of the lines.
A gross design of bars can be seen by rail, it will give the product a neat and finished look. Then the upper shelf is installed, it should be attached at the level of the top mounting board. Self-tapping screws should be included in the support, that is, they should be equal to the sum of the rack thickness and the fastener. Beautiful wrought-iron corners are suitable for this shelf, which will become aesthetic addition to a new piece of furniture. The final chord is the screwing of hooks, and then - treatment with a verse and varnish, or painting.
The design of this hanger can be modified, for example, to expand it with additional slats and attach a mirror or additional shelves.


If the mirror is without a frame, a solid plywood will be screwed onto the rail, its dimensions can be slightly less than the mirror. The mirror is glued with mirror glue, in addition, it is necessary to stick two bilateral scotch strips to fix it until the glue is grabbed. As an additional support for the mirror, you can install a narrow shelf right below it. If such a design does not seem reliable, you can attach it using a special fastener.
Another option is a frame as for a photo. It is made of a textured board, carefully polished and covered with varnish, or from a platband.
Thus, you can summarize the basic principles of wall-mounted hangers in the hallway, and vary them at their own wishes. Reiki can be replaced with a solid shield, which can not only paint, but also bold (leather, cloth, apply decoupage techniques). A little imagination, and in the hallway there will be an absolutely original, unique work.

Complete the functions of the hangers in the hallway and a small roomy locker, you can, developing a product with several (1-3) photo based on the photo and hooks for clothes, thus obtaining wall accessories.
For this, all with the same already named tool set, you need to prepare several strong good quality boards, with processing. The boards from the old furniture are suitable - because the tree retains strength for many years, and furniture parts are also qualitatively processed.
Thinking the size and number of shelves, you can start work. In the photo with drawings, it is reflected as precisely and in what order the assembly occurs. Cutting the boards of the desired size, you can start an assembly by attaching the side panels to the bottom shelf. Boards are attached to the back side of the sidewalls, the amount depends on their width. The height of them can be calculated, based on how much the shelves are planned, what a height will be.
Mondering that the hanger must withstand not only an indefinite amount of clothing, but everything that is located on these shelves must necessarily apply furniture corners, strengthen the design, without fearing to move.
How to screw up, described above, and in this model hangers the reliability of all fixings is particularly relevant. The boards that will be screwed, which will become shelves, and to the bottom of the frame - another strong plank, which will not allow things to fall out. And screwed on it (after painting, varnishing and other finishing works) hooks.

The design is attached by reliable screws directly to the wall. As an option - attach 2-4 ears for mounted locks, and hang the product on them (a solid fastener is screwed into the wall on the dowel). The ears are made from alloy steel, and, carefully attaching them to the hanger, you can be calm, it will not fall soon.
In fact, starting to look at things from the point of view of their additional non-traditional functionality, it is easy to make outdoor and wall hangers from anything, literally from what is lying without affairs and dust in the storage rooms.
Having treated the branch selected in the forest, you can fix it on the wall, and supplying semi-healthy hooks, use as a hanger. The set of pins with branches attached on the shelf can also serve as a hanger in the hallway, and the shoulders can be used. Old cutlery can also be turned into stylish hooks. It is worth trying, there is nothing more fascinating than without extent to create a comfortable space around him with your own hands.


Coming home, we try to quickly remove shoes and outerwear. Just throw it on a chair or dresser - a faithful way to remember the findings of the wardrobe and bring even more mess into a small room. The problem is solved 2 ways - installation of a wardrobe or equipment of a small hanger in the hallway, in case there is very little free space.
About these small storage systems and will be speech in today's material. Today it is necessary to choose furniture for not much difficulty, and regardless of the size of the room. But if you have failed to decide on the right model, rely on your own strength, after preparing the sketch.
For hospitable hosts, the product is paramount importance, it is it used to accommodate things in the corridor. Traditionally, they have it in close proximity to the entrance door so that no one walk in the dirty shoes by floor. The variety of this furniture is impressive even experienced designers. Pick up a beautiful model, the corresponding interior is easy. It can be made and own.

Wall furniture must match the 3rd criteria:
Before, it is necessary to determine in advance with its appearance and functionality, clarify the material from which the walls are made.
In the case of plasterboard, wall furniture is not suitable. The optimal option is outdoor solutions. From mounting to the surface of the finishing material, it is better to refuse it initially, in order not to restore it.
For fastening products to such walls requires special dowels, special tools and equipment. Without preparatory activities, the design may not withstand the weight of furniture and things that is fraught with a drop in the design.

In this case, outdoor models with a number of hooks look more advantageous. They do not fall, because things are evenly distributed over the entire length. The main advantages of such products are mobility and minimum weight, with high reliability. For the hallway, it is easiest to make a hanger with your own trees, chipboard or fiberboard. The finished product is decorated with an ornament, the pattern is either just painted paint, opened with varnish.
Palm Championship traditionally holds natural wood, since it is easy for it to give any shape, in accordance with the prepared sketch.

The most beautiful hangers are made of wood. The structure of this wood is different, so screwing the hooks, you must be extremely neat.
Previously, it is necessary to prepare the following tools and materials:
Prepare wooden billets of suitable size. Material must be stuck. To form a perfectly smooth surface, the tree passes the "sandpaper". As for the finish, here you can be guided by your own taste - open the surface of paint, varnish or stick on it with decorative paper. At the final stage, hooks (screwdriver) are attached to the board.

The manufactured hanger in the hallway with your own hands should be not only beautiful and comfortable, but also reliably fixed to the wall, withstand the weight of the outerwear. Specialists identify 2 ways to fasten furniture.
The process is completed - wall-mounted furniture is ready for operation.

Before making a final decision on the manufacture or acquisition of hangers for clothes, it is important to consider a number of nuances. First of all, the availability and area of \u200b\u200bthe free zone for furniture placement. In the second - style of the hallway and other rooms in an apartment or house. Third, the height and place of furniture placement.
Criteria for selecting hangers for a corridor or hall:
Floor furniture is distinguished by conciseness and ease. If necessary, it can be quickly removed or moved to another place. This is one of the best options for the hallway of the mid-size. Be that as it may, and the hanger is an important practical attribute of any interior, regardless of the size and style.

This furniture takes at a minimum of space, but accommodates a large number of things. For each item of the wardrobe, a separate hook is given, so that there are no problems with the search for the desired things. Near the entrance door you can organize a compact storage system, in which there is a place and hats, and umbrellas, and bags.
There are several main ways to attach hooks and hangers to the wall. You can go through the smallest resistance and secure the product without special equipment. But connoisseurs of sophisticated and original solutions over this issue should be reflected separately. In the case of wooden hangers, it is often limited to metal hooks. Such systems are attached to the wall on the screws.

As for hooks, they differ in the method of fastening:
It requires a minimum of time and practical skills to install them, so they have gained tremendous popularity from consumers. But the elements listed above are also a significant drawback - they do not withstand a big weight (the dumble or a fur coat will not be hung on them). The region of their use is limited to head removes and light accessories.


In the hallway without a hanger, it is not on the floor to throw off races, coats and hats. You can, of course, drive out several large nails into the wall, but it is not quite aesthetically. Yes, and wallpapers will be sued, stupid from the outerwear. A much more pleasant eye and practical will be real - or who like it. And it is possible to build it yourself, and for this you do not need to be furniture as ars.
We will need skillful hands, a simple home tool and minimum materials. You can even use waste, by the way. Or in the forest Beautiful twigs with knots found.
So, the arsenal of the tool will be:
To create some embodiments of the hangers, more metallic corners can be useful, jigsaw (if you need to cut curly surfaces). If you want to create, then the need for a welding machine. However, it will not need for simple products.
Simple hanger in the corridor do it yourself
Now about the materials. The most popular is wooden boards, plywood and bars, as well as their trimming. We often make hangers and wood stoves - it is better to take the laminated, which look more pretty. However, you can paint the usual chipboard, pre-progressing. It turns out also effectively.
And if you have an old floor lamp with a steady basis, which all the hands do not reach drunk, then you can give it a second life in the form of a floor-type hanger. To do this, it is enough to remove the lampshade along with the fastening for the lamp and disconnect the network wire. It remains to paint the product into a lured color, not forgetting the hooks before the upper metal circle - there are well-woven out of the wire.
By the way, hooks for hangers in the corridor - an important detail. They should be big and comfortable. You can buy them in the store furniture accessories, and you can show fantasy. Natural materials are a good help in work. Moreover, the products of them are exclusive - there will be no such things for anyone. For example, you can use knots and branches as hooks, sandwiched and varnished. Beautiful and functional.
Another interesting and original version - hooks of teaspoons bent in half. Or aluminum forks. In both cases, the handle is the bottom (main) part of the product. You can still bend hooks from thick wire, by placing them with decorative elements - beads, for example.
Photo walls B. oshlock in the hallway with your own hands
From the knives of the keys from clothespins old door handles
From sticks from bicycle rolls from bitch
But before starting to create a masterpiece, please look, the drawings that we picked up for you.
Drawings hangers in the hallway
 Natural
 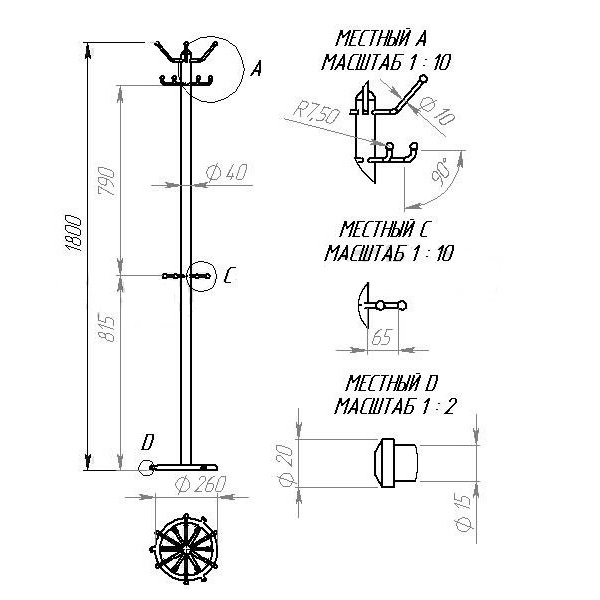 Outdoor
The base of the hangers - the shield on which hooks will be placed. It can be done solid (from wood plate or centimeter sheet plywood) or lattice. The last option is preferable - it is easier, and the material goes less.
The next video promises to teach you to create your own hands wall wooden hangers in a hallway from one board:
It is important here to take care of a severe basis that should not be turned over.
Now - a post of hangers.
Those who have a welding apparatus and likes to work with the metal, you can make a huge and durable metal hanger. To do this, it will take a pipe with a diameter of about 3 centimeters, as well as steel bars for legs and hooks with a diameter of 1.6 and 1 centimeter (respectively). The legs will be three - they are smoothly fused and weld to the pipe. The top make several hooks, as in such finished products. And then the design color.
Outdoor hanger that is easy to create with your own hands

Natural wood is easy to process and finish, besides eco-friendly. In addition, almost every crash owner will have trimming of rails, bars, boards or pieces of plywood. A little fantasy, a couple of free evenings - and here before the delighted households the original hanger. Just needed - two longitudinal planks, several transverse (by the way, good for this purpose use ready-made platbands) and hooks at their discretion. For example, wooden swirls, furniture handles or bright plastic cups.
Very grateful material are wood plates. Of these, it is possible to cut out all sorts of curly products using a jigsaw. For example, a hanger, the contours of which are made in the form of a stylized tree - it is now fashionable. Cutting it, we paint into a fun color (not forgetting pre-irregularities to smooth out the essay) and the crepim dowels to the wall. Then at the ends of the twigs attach hooks for clothes. By the way, for such a tree and thick faeer can be taken.
Before proceeding to the direct manufacture of hangers, we advise you to pay attention to the master class in the video below, which will tell how to create a creative hanger in the form of a tree for your corridor:
You can build from chipboard and easier option hangers in the hallway do it yourself,for example, a solid or lattice shield (the simplest wall-mounted hanger design). And taking laminated plates, we will get rid of the need to finish. But the ends must be processed - for this, a special edge is sold, which is welded using an iron. And also: to cut the laminated sheets only with the inside, but they crack.
Want to create a hanger from wood to the hallway with your own hands? And, preferably, with a shelf for hats? Easy! See closely the following video:
Press the class
Tell VK
Wall hanger in the hallway is an important storage element. Many apartments planning have narrow corridors in which the full cabinet is not always obtained, so the owners are looking for alternative options. I want to keep the design of the apartment, comfort and ease of use.
Variations of hangers can be a lot from the most standard and simple miniature shelves to futuristic and most unthinkable ideas.
Most popular materials for the manufacture of hangers: wood and metal.
Forged metal hangers are striking with the beauty and smoothness of the forms. They are used in the interiors in the style of Provence and Art Deco. This embodiment is attached to the self-tapping screw, and more often they are hung on them. 
This option of hangers can be attributed to horizontal. Their function consists only in keeping upper clothes. Metal hangers often have a shape, which gives them paintings.

A variant of a combination of forged elements and leatherette or tissue is very interesting. Looks unusually and luxuriously. Such a hanger will issue any corridor and will become his highlight.

The photo presents combinations of materials: wood with a cloth and metal with a cloth. The functionality and uniqueness of products are preserved. In the first embodiment, the tree gives an array and the founding of the furniture, and on the second, the metal facilitates the composition and gives the grace.

Wood hangers can be mixed with a mirror, a shelf for shoes or for head instruments. The photo presents a very compact option of the hallway.

A hanger may have sections: for short and long upper things, which allows you to prevent pollution on the wall.

A hanger from a tree is finished with a shelf and a mirror, also an excellent option for small vessels.

When choosing a material, it is necessary to navigate its strength, whether the finished product will withstand heavy winter things.
For this feature, you can strengthen the mount: use not only self-tapping screws, but also furniture corners.
Materials can complement each other carrying their functions. Metal, as more durable, is based on the construction, and the tree as decorative elements.

I picked up a lot of ideas when the hanger was done with a soul of girlfriend. This can serve as inspiration for many families. I believe that in the interior you need to leave the pattern, because any design is unique with your non-standard solutions.
The photo is quite ordinary segment of the board segment made in the marine style. The corresponding background and hooks in the form of anchor attach to the entire hallway.

An interesting forged light option may not quite from the girlfriend, but there is a place to be. Very functional and elegant option, contains a stand for shoes and for hats.

United in the form of rhombuses, rails with wooden hooks, it looks very eco-friendly and stylish. Placing hooks at different height allows you to hang a lot of things and do not create an untidy bunch.

The curved sheets made of thin aluminum are peculiarly decorated with walls. And make such a hanger at home will be very easy. To do this, you can buy a sheet of thin aluminum in building stores. This material easily cuts and pretty suppliance.

Hanger of pallets is the most affordable and modern version of the hallway decor. Creates an atmosphere of the loft and suitable for non-standard young people.

And, most importantly, that completely eco-friendly and strong material. With the help of corners and screws, you can also build a stand for shoes and a shelf. You can simply cover with varnish or verse, then the beautiful pattern of the tree will last, and you can paint with color dense paint under the overall tone of the interior.

For minimalistic designs hanger in the photo - just a find. Convenient, without unnecessary parts and looks very stylish. Inside the rod is inserted, which allows you to make shoulder from the hanger.

I will give a small master class on the manufacture of wooden hangers hangers. It turns out two rows of hooks. The option is unusual, but very functional.

Having a different width racks, you can create the simplest version of the furniture, simply allowed the hooks and adding transverse crossbars for fastening.

For nature lovers, you can use images of animals and birds, and artificially aged wooden product will give the story a horizon.

An interesting option to combine two materials: wood and metal. Modern compact hanger with built-in hooks.

Many times have met the ideas of hooks from cutlery: forks and spoons, like on the bottom photo.

An interesting version of plastic hangers for a small family. In the summer, only the role of decor can perform.

To make a hanger, you need to take several boards or ready or purchased in the store. You can use any wood: pine, oak, birch.
We will analyze two options for hangers.
Cut out the same sidewalls, top and middle crossbar, to which you need to roll the hooks.

Cut out beautiful bends on the sidewalls and all the details of the hook.

We connect to the finished design with self-draws, furniture corners.

We look at the hook places and weiss them.

The finished product is tested for strength and covered with varnish.

You can make an even simpler version of the clothes hangers.
The photo presents the diagram and dimensions of the future product.

We take purchased boards or lamellas, in this case the wood of pine was used.
We measure the same distance between the vertical parts and from the wrong side of the Frame Frame. We assume any fasteners. The shelf will be hung on the self-tapping screw.

On the front side at the same distance from each other, dripped hooks. And admire the result obtained.

This hanger model can be supplemented by a shelf, give contrasting colors. The photo presents the option when the crossbars go not from the wrong side, but with facial.

Tell VK
The diseases of the spine - a large group of diseases that suffer over 85% ...

Naturally, when you go somewhere, especially abroad, I always want ...

Oksana hello. Of course, the stars from this hotel can be cleaned long ago. I...