Few films about the war do not see a potbelly stove with flaming firewood, next to which the soldiers crowded and confer about something.
A simple shape in the form of a barrel, a knee brought out through the window and a couple of logs could quickly and efficiently heat even a large room. Why such a design was called a potbelly stove has remained in history, but even today this stove enjoys well-deserved popularity. Below we will analyze how to quickly make a potbelly stove with our own hands, show the most effective models, and also see photos and videos of the most successful stove models.
Advantages and disadvantages of using bourgeois
By analogy with any other heating devices, potbelly stoves also differ in certain pluses and minuses in work.
Of the positive properties, the following can be noted:
- use of an unlimited range of solid fuels - firewood, sawdust, coal, wood chips, briquettes, pellets, peat, etc. In some cases, even recycled engine oil is used as fuel;
- the possibility of making a potbelly stove with your own hands (see drawings below) practically from improvised materials;
- the compact size of the oven, which allows it to be placed even in a small room;
- there is no need to install a chimney, foundation and platform.
The negative features include:
- the need to protect against falling out of the furnace of combustion objects - coals, sparks, etc.;
- strong and rapid heating of the oven walls, which increases the risk of injury to others;
- high fuel consumption - it is rational to use such a furnace only for short-term heating.
Varieties of furnace designs
Structurally, a potbelly stove is a rectangular or oval container equipped with a firebox with a door, an ash pan and a knee for smoke removal (similar to a chimney).
The preferred material is stainless steel or cast iron. Cast iron accepts any type of fuel, but at the same time it is fragile - a sharp cooling of the potbelly stove body is prohibited.
On an industrial scale, potbelly stoves are divided into the following categories:
- oven with hob;
- pyrolysis;
- equipped with a casing that increases heat transfer.
The main feature of the potbelly stove is that in most cases it is made in a handicraft way, using metal boxes, cans and other suitable containers for this. Next, we will tell and show how to make potbelly stoves with your own hands - drawings, photos, videos
Furnaces are divided into the following categories:
- production material - cast iron, steel, brick;
- functionality - with a hob, air heaters and gas generators;
- type of fuel - solid and liquid.
classic oven
A sheet metal stove is a traditional option that fully reveals the characteristics of a potbelly stove.
Manufacturing process
Necessary materials:
- metal sheet 4 mm;
- fittings with a diameter of 10-15 mm for the grate;
- corners;
- pipe (diameter according to the scheme);
- Bulgarian;
- welding.
Video 1 An example of making a beautiful potbelly stove with your own hands
Cut out all the details of the body according to the drawing with a grinder from a sheet of metal

On the back and side walls, weld the corners with hot welding, on which you will then lay the grate and another sheet (in the drawing), which will have to hold the bricks.

Properly made grate will help increase the burn time of firewood. If it is not a solid steel sheet, but a type-setting grate made of reinforcement (up to 15 cm in diameter), the smoldering fuel itself will suck in the necessary air, due to burning it will be more complete and long-term.
Next, cut out 2 doors (for the firebox and ash pan) and put them on the hinges. On the upper part, cut a hole for the pipe, to which you weld a sleeve 200 mm high. After that, you weld or put on a pipe to the sleeve, the bending angle of which is 450.
The technology of the most efficient potbelly stove was presented by V. Loginov. A metal sheet is used as a material, grates are reinforcement, hot welding is used to connect parts, and pneumoscissors or a grinder are used for cutting.

To increase heat transfer, it is necessary to provide a certain resistance coefficient of the chimney.
How to determine the diameter of the chimney
Calculate the volume of the combustion chamber (liter) in relation to the diameter of the pipe (mm) in a ratio of 1:2.7. For example, if the volume of the furnace is for furnace gas, a resistance must be created. From thermotechnical calculations, the volume of the combustion chamber in liters should be 2.7 times less in numerical terms than the diameter of the pipe in millimeters. For example, if the volume of the furnace is 70 liters, then the diameter of the pipe will be 182 mm.
Potbelly stove from a milk can
The second most popular material for the manufacture of potbelly stoves after a metal sheet is a milk can. This is easily explained, since the airtight case is almost ready, and everything else can be done by hand in just a couple of hours.

Manufacturing process
- Punch with a chisel or cut a crescent-shaped slit under the neck. This future blew
- At the bottom of the can, cut a hole for the pipe, where the sleeve will be inserted and the chimney will be put on.
- The grate in such a potbelly stove is best made serpentine or type-setting from reinforcement, but at the same time it is necessary to carefully insert it into the can so that no additional holes are needed to be cut.
- Dimensions potbelly stove from a can - in the drawing. The finished structure should be put on legs or made of bricks.
The longer the chimney, the lower the heat loss.
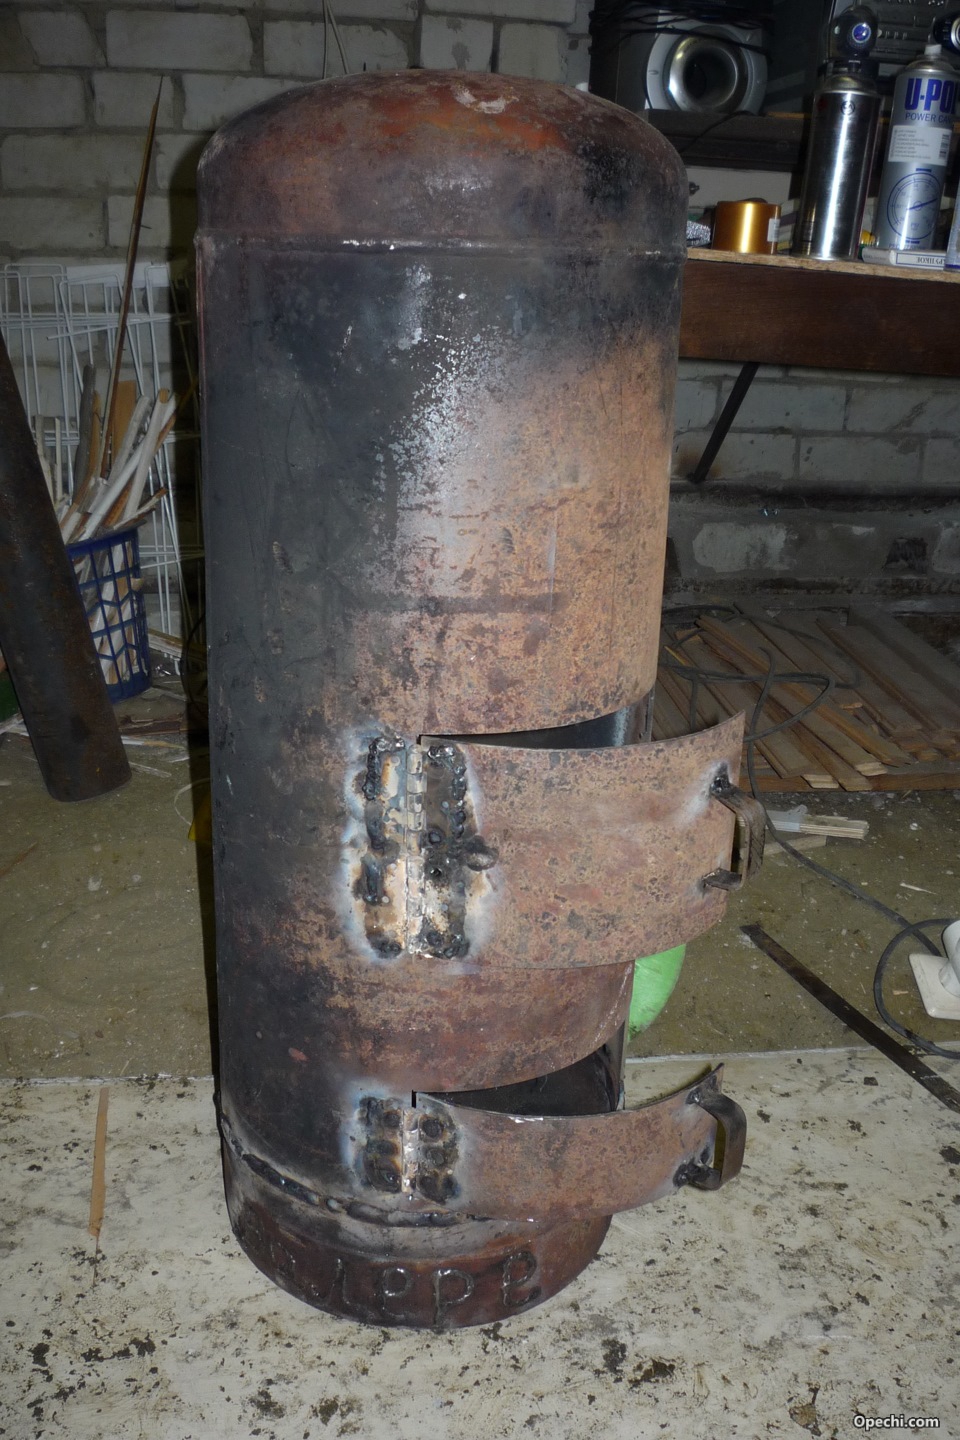
Potbelly stove from a gas cylinder
An excellent material is a gas cylinder, which also fully ensures the tightness of the structure and its safe use.

Materials and tools:
- spent gas cylinder;
- metal sheet 4 mm;
- pipe (diameter see above);
- fittings for a set of gratings;
- corners;
- furnace door;
- Bulgarian
- welding.
- To begin with, knock down the upper rim with a crane and cut a crescent-shaped hole under the blower on the bottom of the cylinder
- Weld a pipe to the bottom of the cylinder, where the sleeve will be inserted and the chimney will be put on.
- It is better to make a grate in such a potbelly stove made of fittings, in this case there will be a natural tightening of air and the fuel will burn out almost completely.
- The dimensions of the potbelly stove from the cylinder are in the photo. The finished structure should be put on legs or made of bricks.
Video 2 An example of making a potbelly stove from a gas cylinder at home
The potbelly stove has gone through a variety of times and has proven that it is the most reliable and easiest way to heat small spaces. Despite the relative simplicity of the design, in its manufacture it is necessary to observe certain proportions in order to increase the burning time of the bookmark and, accordingly, the efficiency of the furnace.
Photos of the most effective bourgeois women according to readers
.jpg)
.jpg)
.jpg)
.jpg)
.jpg)
Photo 11 Oven type "Bubafonya"

Photo 12 Potbelly stove that works

Winter in Russia is more than winter. It's no secret that at this time of the year it is uncomfortable to be outside with heating, but what if there is such a need? For example, you need to visit the garage and spend some time there. And the love of the strong half of humanity for gatherings with friends in the company of their iron horse is known to everyone.

Of course, gatherings with even a small “minus” outside rarely bring joy if the garage is not heated around the clock. There is a way out if you can install a home-made potbelly stove in the garage.

Features: pros and cons
The advantages of a homemade stove made from a barrel usually include:
- fast heating at the cost of a minimum amount of fuel;
- simplicity and accessibility;
- the ability to make it with your own hands from a variety of materials, even improvised ones;
- unpretentiousness in the choice of fuel (firewood, mining, diesel fuel, coal, peat, etc.);
- sometimes, for better heating and heat transfer, a kind of “maze” of metal sheets is installed on the furnace.


The statement will also be true enough that the disadvantages of a stove made from a barrel are perhaps more than advantages:
- large heat losses and, as a result, significant fuel costs during prolonged use;
- if a potbelly stove is made from an ordinary barrel, then one must be prepared for the fact that it will last for a relatively short time due to the insignificant wall thickness - they will quickly burn out;
- Poor temperature control
- if the potbelly stove is made in a horizontal version, it will take up a rather large space in the limited space of the box;
- the vertical orientation of the stove will give a gain in the use of space, but the walls will burn out faster than that of a horizontally placed potbelly stove;
- due to the burning of the walls, the stove can be a fire hazard and will require more attention when heating;
- such a furnace needs a high chimney with a height of more than 4 m, which will have to be cleaned regularly.

Most of these shortcomings can be eliminated if the body of the potbelly stove is made from a gas cylinder. It has thick, heat-resistant steel walls that weld well.

Preparing an old cylinder for welding is very important because of the possible presence of explosive gas residues inside, even if the neck is removed.
There are several preparation options: you can simply fill the balloon with water and leave it for a long time or add alkaline substances to the water to neutralize the gas. However, this method is considered the most reliable:
- the cylinder in a vertical position must be securely dug in order to cut the hole with a grinder;
- completely fill it with water, wait a few hours;
- mark the cutting line;
- cut with a grinder until a through hole appears - water begins to flow out;
- complete the cut and drain the water - the risk of fire is guaranteed to be eliminated.


Principle of operation
Let us consider in more detail the scheme of work of a home-made potbelly stove:
- through the blower, combustion air is supplied to the furnace;
- during the combustion process, heat is released, which heats the bricks and the walls of the furnace;
- smoke, soot and combustion products are drawn out through the chimney;
- regulation of combustion with obtaining the necessary heat transfer is carried out by increasing / decreasing the open gap of the blower door;
- a potbelly stove is heated using various types of both liquid and solid fuels (wood, mining, diesel fuel, coal, peat).

Potbelly stove at work
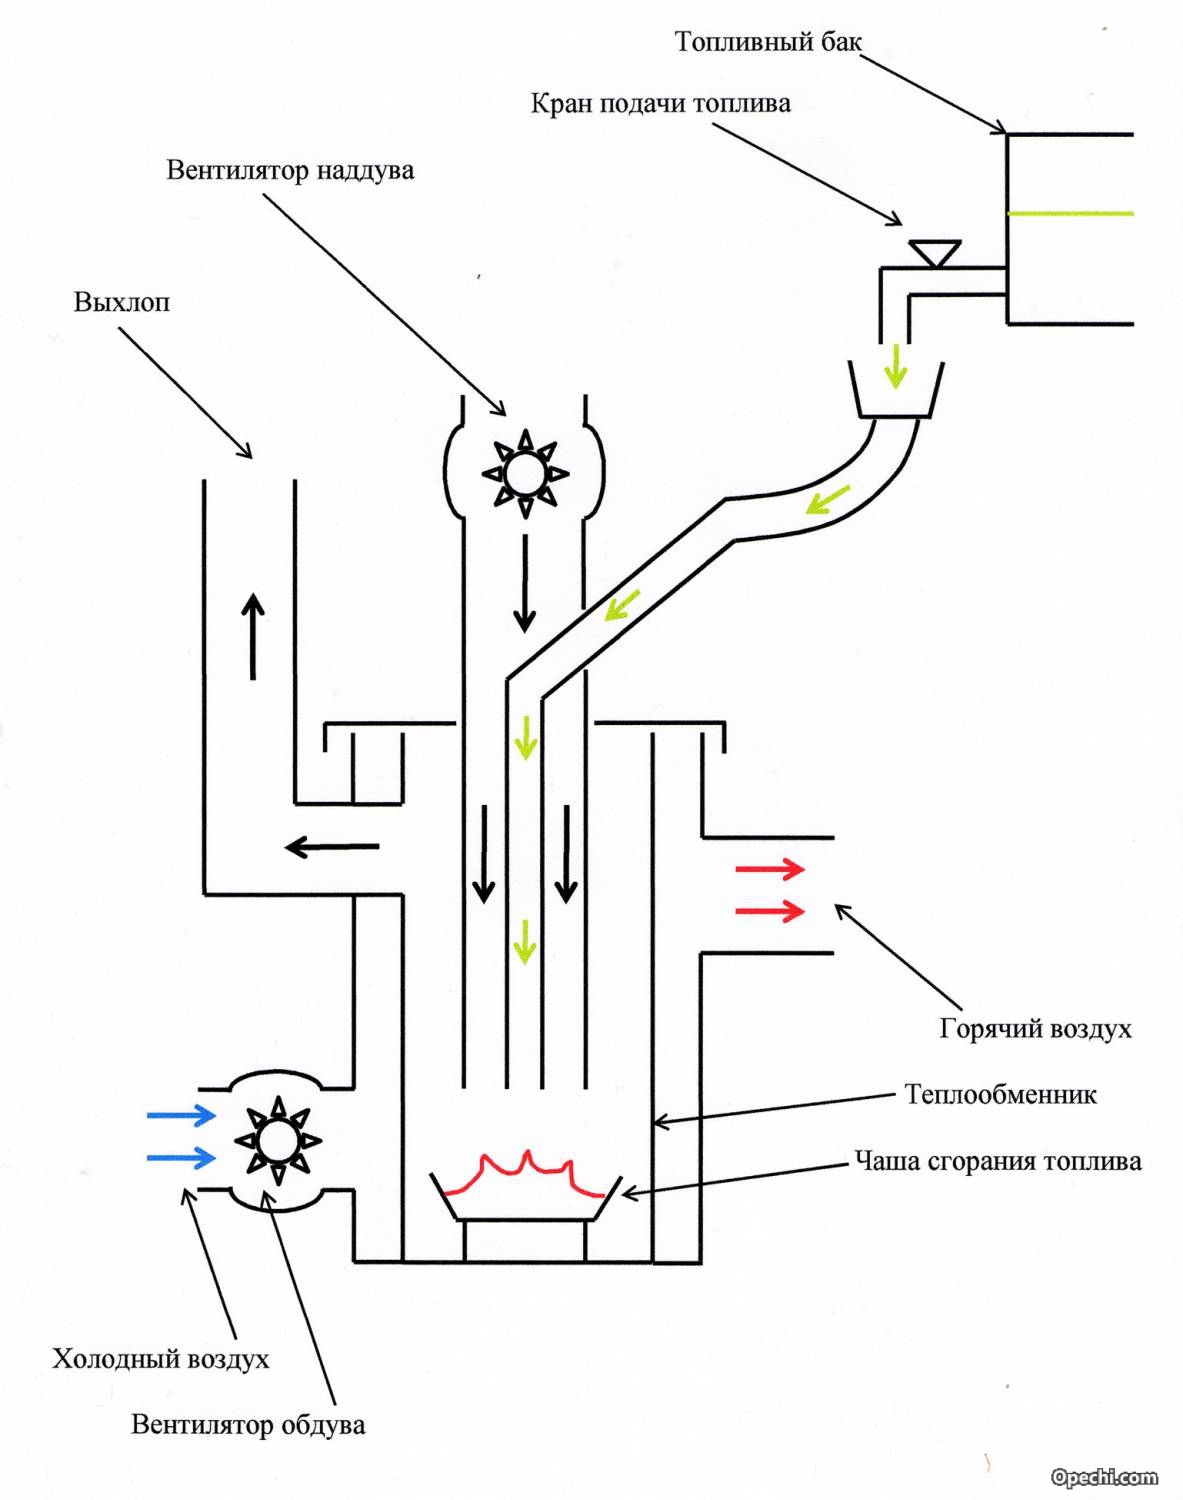
The potbelly stove, which is not fueled by wood, but by used oil, has its own characteristics. It can be either a small stove for an ordinary garage or a device designed to heat large areas. In any case, all models work according to the same principle and have similar designs and the principle of operation.
- Potbelly stove has 2 parts. Used oil is filled into the lower part, where it is kindled and brought to a boil.
- Vapors are drawn out through a perforated pipe for oxygen access, where their initial afterburning takes place.
- The vapors are completely oxidized and burned in the upper part connected to the chimney.
- The temperature in the lower tank is relatively low, the upper chamber heats up to the maximum, heating the room. Its walls can even glow from the heat. Accordingly, this affects the choice of material for the manufacture of chambers.


Drawing-scheme of a potbelly stove at working out with conditional dimensions and proportions.

Let's consider the advantages of bourgeois women at work.
- Unpretentiousness and "independence". It is not necessary to constantly lay firewood or perform any actions, the main requirement is the correct adjustment of the filler neck gap (10-15 mm).
- Efficient heat dissipation.
- No soot from the chimney, the stove does not smoke.
- Relative fire safety, since fuel exhaustion is difficult to ignite, and only oil vapor burns.

Flaws:
- noise;
- characteristic smell (it is sometimes eliminated by installing a water circuit or an air heat exchanger with a pressurized fan that directs part of the air from the chimney to another room for heating);
- the combustion chamber (connecting pipe with perforation) and the chimney have to be cleaned quite often;
- the coked layer of burnt oil in the lower chamber is also quite problematic to remove.

When using a potbelly stove with mining fuel, it is necessary to adhere to the mandatory rules.
- It is not allowed to use oil mining with gasoline or other combustible impurities.
- Particulate filtration is required.
- Water must not be allowed to enter the mine.
- Strong drafts are not allowed.
- Compliance with all fire regulations when installing the stove in the room.
- Reliable ventilation is essential.

- It is strictly forbidden to leave the stove unattended, to sleep with the stove running.
- Do not use water for extinguishing!
- Horizontal sections of the chimney hood are prohibited. Permissible chimney slope angle is 45°.
- The chimney must have a length of 4 to 7 m.
- It is recommended to pour mining into the furnace to a height of less than? volume of the lower chamber.
- It is necessary to have a powder fire extinguisher and / or sand in the immediate vicinity of such a furnace.

DIY manufacturing
Drawings and dimensions
The potbelly stove will produce maximum efficiency, subject to compliance with the calculations made.


Consider the design of the chimney.
- The vertical part (up to 2 m) is covered with fireproof thermal insulation.
- The pipe is inclined or parallel to the floor (2.5-4.5 m), the distance from the ceiling in the absence of heat-resistant protection on it is 1.5 m, from the floor - 2.2 m;
- The diameter of the chimney must be calculated with great accuracy so that its operating speed is less than the combustion rate of the fuel, and it would not throw out all the heated air together with the combustion products to the outside immediately, but let it heat the walls, which is the main feature of this type of stove. The calculated permeability of the pipe should be 2.7 times the volume of the furnace. That is, with a firebox with a volume of 40 liters, the chimney should have a diameter of 106 mm.
- If there are grates in the potbelly stove, the height of the firebox is calculated from the top of the grate.
- Complete combustion of the fuel can be ensured by creating a high temperature, which can be achieved by using a metal or brick three-sided screen around the potbelly stove. Install it with a gap of about 70 mm from it. The reflection of heat also has a fire-fighting function.


- A litter or a fireproof surface under the stove is strictly required, because:
- thermal radiation from the furnace comes in all directions, including down;
- the floor may become very hot, and this will lead to a fire.
Sheet metal is used as a bedding, the area is larger than the vertical projection of the stove on the floor by 350-400 mm (preferably 700 mm). Sheets made of other non-combustible materials with a thickness of more than 1 cm can be used.

Chimneys are installed in different rooms in different ways.
- Part of the pipe is led out through the garage wall, this is the most common type.
- The chimney is completely left inside the garage box and exits through the roof. Thus, the garage is heated better, but the installation process itself is much more time consuming.


Necessary materials and tools
For self-manufacturing of potbelly stoves in the garage, you will need the following materials and tools:
- sheet metal for the manufacture of an ash pan and a hob if the stove is located horizontally;
- metal for the chimney pipe (preferably with two elbows);
- materials for fixing grates and supports;
- oven doors;


- cast iron discs;
- welding machine;
- grinder;
- welding wire/electrodes;


- a hammer;
- tape measure / centimeter tape;
- chisel;
- pliers;
- drill;
- metal cleaning brush;
- chalk pencil.


Consider the manufacturing process step by step.
- As already mentioned, the furnace can be manufactured in a horizontal and vertical version.
- The dimensions of the stove are selected based on the dimensions of the garage box, taking into account all fire safety measures.
- The walls must be welded from sheet metal with a thickness of more than 4 mm.
- The grate is welded inside the firebox or placed on fasteners welded to the firebox walls from the inside (removable version). It can be purchased in retail chains or made with your own hands from a sheet of steel by drilling holes no more than 20 mm in diameter, or from thick wire.
- Weld the bottom.


- A convenient hole is cut out for supplying fuel and lower by 5-7 cm - for the ash pan.
- Doors can be made from sheet steel yourself, or you can purchase a ready-made cast-iron block.
- The stove is installed in the selected location of the garage.
- At this stage, the chimney is connected. The longer its indoor section, the warmer it is in the garage, since it also heats the air around it.
- At the last stage of work, you need to put the potbelly stove on its legs. They are made from pieces of a profile, connected by welding or screwed to the body with screws. You can also use a metal box without a front wall (used as a woodcutter), bricks or forged elements can also be materials for the base.


Where to place?
Compliance with fire safety rules for garage use and operation of a potbelly stove is vital. Here we are talking about the safety of the car, and the preservation of the life of the person himself. The location of the stove is one of the important tasks. Most often, they choose the corner of the garage box, formed by two walls, which is located opposite the gate. Direct contact between the stove and the car is strictly prohibited.
The distance must be more than one and a half meters. Similar conditions must be observed for the distance from flammable substances and objects.

The surface of the walls near the potbelly stove should be covered with refractory material. They can be additionally overlaid with bricks. If the garage is wooden, then the distance from the surface of the stove to the nearest wall should exceed 1 m.
If a potbelly stove is used for heating or cooking, it is very important to follow the rules for its operation. Their implementation, in addition to fire safety, will help increase its service life.
- Before the first kindling, the stove must be checked and checked for tightness of all connections, assemblies, immediately correct all imperfections in order to avoid the penetration of combustion products and carbon monoxide into the garage.
- For well-defined reasons, the chimney must be brought out. Its part, located inside the garage space, must be sealed.
- The chimney is strictly forbidden to lead into the ventilation system. Even if the stove is installed in the basement, it must have a separate chimney.
- The passages of the wall or ceiling of the chimney must be insulated with refractory non-flammable materials.


- A sand box and a fire extinguisher must be kept in the garage, in accordance with fire safety regulations.
- The potbelly stove is also used as a stove and for boiling water. To do this, a hob with burners is installed on it (usually it is made of a cast-iron stove) or a tank for heating water.
- The potbelly stove heats up quickly, but also cools down quickly. Such a disadvantage can be partially compensated by a brick screen that accumulates heat and returns it to the room as it cools down after the potbelly stove goes out.
Direct contact of the screen and potbelly stove is prohibited. The gap between them is left at least 10 cm.


- Typically, a brick screen is heavy, so it will most likely need its own foundation. Consider the stages of its manufacture.
- Dig a hole about 50 cm deep.
- The bottom of the pit is covered with a layer of sand (average sand consumption is 3-4 buckets), tamped.
- The next layer is 10-15 cm of crushed stone, which is also rammed.
- The laid layers are leveled, then poured with a layer of cement mortar.
- Wait for the complete hardening of the cement layer. The longer the hardening time, the better (usually the time interval is more than a day or longer, this will give the foundation additional strength).
- Then lay several layers of roofing material.
- The screen itself is laid out in half a brick, the initial two rows are made with continuous masonry on roofing material. In the 3-4 row, it is necessary to make ventilation gaps, then again continue to lay the brick in a continuous layer.

The correct methods for cleaning a potbelly stove are mainly to remove contaminants inside the chimney, which is relatively rare. Mostly use a brush. It is quite possible to make it with your own hands from a cylinder-shaped brush by tying it to a rope.
It is best to use brushes with bristles made of plastic or iron wire. The diameter of the brush is selected in such a way that there is no significant resistance during the passage of the chimney.

Cleaning is used in order to increase the passage of the smoke flow through the pipe, to improve heat transfer. The sequence of the cleaning process:
- plug the furnace hole with a rag;
- make 2-3 careful movements with the brush so as not to break the tightness of the chimney (make stops if the brush moves freely);
The human body is able to function normally in a narrow range of temperatures. Prolonged overheating or hypothermia is not only uncomfortable, but also deadly. The task of maintaining a normal temperature regime is the task of survival. Having a normal apartment, efficient utilities, you don't have to worry about it. But for a number of reasons, you may find yourself out of your home, the work of public services may be paralyzed by technogenic or social factors, so having a fallback option is not at all superfluous. Or you simply decide to save on heating by installing a highly efficient stove (efficiency up to 60%) at home, in the garage or in the country house that runs on almost any type of fuel (up to sawdust and paper waste). The stove, which will be discussed, was developed at the beginning of the last century in Russia, in conditions of complete paralysis of utilities, fuel shortages, harsh winters, and the collapse of industry. That is why it had to be economical, "omnivorous", and made in artisanal or semi-artisanal conditions. This problem was solved, and as a result, a stove appeared, which is now known as a potbelly stove.
It is easy to buy a potbelly stove in a specialized store or on the Internet. The choice is rich, as is the price range: from antique cast iron to modern professional military ones, of various capacities, stationary and portable. From cast iron, steel ... Or order a furnace in the workshop, where metal products are produced according to the individual wishes of the customer. And the third option for those who know how and love to work with their hands: you can make a potbelly stove yourself.
The ideal material for a potbelly stove is cast iron. Sheet steel, at least 3 mm thick, is well suited. Some craftsmen offer to make from aluminum. But it is a fusible metal, and the furnace from it is short-lived. So if you are offered a potbelly stove from a milk can, refuse.
How to make a potbelly stove with your own hands?
The simplest potbelly stove from a barrel. For manufacturing, you need a steel barrel with a volume of 100-240 liters. Design advantages:
- you can make it in an hour.
- production price - one barrel.
- does not require welding.
Flaws:
- low efficiency.
- local overheating in the central part.
A simple and cheap homemade potbelly stove can be made from a gas bottle. The advantages of such a stove are low cost. The cylinder body is an almost ready-made furnace, and its manufacture takes little time. The disadvantage is that the efficiency is lower than that of a classic potbelly stove.
If you decide to make a potbelly stove from a gas cylinder, then first of all this cylinder must be safely disassembled.
Vertical potbelly stove from a cylinder:
The above furnaces are very simple, but they have low efficiency, which means high fuel consumption.
The most efficient do-it-yourself potbelly stove (+ drawings)
 If you want to make more efficient homemade potbelly stove with high efficiency Let's take a look at the theory. At first glance, the potbelly stove looks extremely primitive: a simple metal box in which firewood burns ... In fact, this stove was developed by highly qualified specialists, and there are many tricks in it.
Scheme of the simplest do-it-yourself potbelly stove
- Pipe. In an ordinary stove, heat literally flies into the chimney, uselessly warming the street. The trick of the "potbelly stove" is that the throughput of the chimney is less than the capacity of the stove to produce gases. Therefore, the heated gas, before it “squeezes” into the chimney, circulates inside the stove, giving off heat to the walls, and gets pretty chilled outside. To achieve this effect, the diameter of the chimney pipe (in mm) must be 2.7 times larger than the volume of the furnace in liters.
- Screen. Simple circulation of heated gas is ineffective, the gas cools quickly and does not burn out. In addition, the fuel should not burn, but smolder, so there should be a high temperature inside the stove. For this, a metal screen is used on three sides: from the sides and from the back. The screen is separated from the walls of the furnace by 50-70 mm. It reflects most of the IR radiation back into the firebox. Due to this, the temperature inside the furnace rises, which allows the stove to work in pyrolysis or smoldering mode, and the temperature of the stove walls decreases, which reduces the likelihood of burns or fire. In addition, the screen performs another function. When you just fire up the stove, a lot of heat is released at the beginning of combustion, which can simply fly out into the chimney. The cavity, which is formed between the screen and the walls of the stove, retains the heated air, the heat from which, due to convection, goes into the room.
- Chimney. The combustion of gases during convection inside the furnace is not complete, and the gas enters the chimney not completely cooled. So a properly arranged chimney allows you to further increase the efficiency of the potbelly stove. First, there is a vertical part covered with thermal insulation, 1-1.2 m high. Then there is a horizontal or slightly inclined part (burs), at least 2.5 m long, and preferably 4.5 m. A properly made bur gives off at least a quarter of the heat from ovens.
Safety regulations:
- Under the potbelly stove, it is necessary to make a litter, the furnace is installed on a sheet of metal with an offset of 350-600 mm along the contour of the furnace. Under the sheet - thermal insulation: asbestos sheet, basalt or kaolin cardboard at least 6 mm thick.
- The hog must be at least 1.2 m away from walls covered with non-heat-resistant plaster. From wooden walls - at least 1.5. The distance from the floor is preferably at least 2.2 m. If this is not possible, the bur is covered with a metal mesh screen.
More complex do-it-yourself stove stove options
From the very beginning, the stove was designed exclusively for dry wood or peat. Then small modifications were made to it to adapt it to other types of fuel: a grate and horizontal partitions were added to form smoke channels.

Heating and cooking potbelly stove. The point is that due to the design, on the left bend, the gas pressure is always less than atmospheric pressure, so carbon monoxide gases will not get from the burner into the apartment. If you additionally bring the potbelly stove pipe to a distance of at least 1.5 m above the roof ridge (and equip it with a “fungus”), you can safely add a second burner.

Multi-mode potbelly stove for slow burning with Loginov's air regulator. The slow burning mode is provided by air supply from above, so that the smoldering fuel itself sucks in as much as necessary. The grate is not solid, but a set of individual cast-iron grates (they can be mounted - dismantled through the firebox door) fixed on steel corners welded to the walls or pieces of reinforcing bars. The blower was round, with a M60x1 branch pipe fixed on screws or rivets.
Such a furnace is capable of operating in three modes:
- The blower is completely open - the potbelly stove is heated with solid fuel: firewood, coal, peat, pellets.
- The Loginov throttle is screwed onto the blower, the grate is removed - the potbelly stove operates in slow burning mode on waste fuel: sawdust, chips, paper waste, etc.
- The grates are installed, the outlet pipe of the gasifier is mounted in the blower - the potbelly stove is working on mining, dark furnace oil.
There is another trick to increase the efficiency of the potbelly stove. During development, these furnaces were made in such a way as to heat a large room with IR radiation. Modern apartments are smaller, and the stove overheats the walls in vain. To avoid this, you can surround the potbelly stove instead of the screen with a U-shaped hot water boiler. This will not affect the operation of the furnace, the walls of the boiler will reflect infrared radiation no worse than the screen, plus you will have a hot water tank for technical needs. In a dacha, garage - just a godsend. A potbelly stove for a wood-fired cottage, also with a water heating function, is the most convenient and economical option of all possible.
How to heat a potbelly stove?
To obtain maximum efficiency, it is necessary to put so much fuel so that circulation is formed in the furnace.
To determine the required amount of fuel, do the following:
- Prepare a bucket of fuel.
- We put fuel in the stove to a minimum, only for kindling, kindle it.
- We put fuel in the stove until the beginning of the hog glows cherry.
- We look at how much fuel you took from the bucket - this is the minimum amount of bookmark.
- We add a little more, until 1/5-1/6 of the far part of the hog remains dark.
- We look at how much they took - this is the maximum amount of bookmarks.
There are no related articles.
A compact stove for heating a small room, commonly called simply a potbelly stove, will soon celebrate its 100th anniversary. Having appeared in the 1920s, such metal stoves with a chimney became simply irreplaceable during the Great Patriotic War. The potbelly stove does not give up its positions to this day, remaining a necessary attribute of a garage, greenhouse or country house. Such a stove is needed wherever people need to warm up and cook food, despite the lack of central heating.
The potbelly stove has its advantages and disadvantages. The undoubted advantages of such a heating device include:
- energy independence and autonomy;
- cheap fuel in the form of coal, firewood, sawdust, wood chips, peat, used technical oil, diesel fuel, paint waste, etc.;
- fast heating;
- small dimensions;
- installation without a foundation;
- capital is not needed;
- ease of operation;
- low financial costs in the case of making a stove with your own hands.
However, the stove-potbelly stove also has disadvantages:
- good ventilation is required in the room;
- high fuel consumption;
- the need for constant monitoring of the fuel level;
- quick cooling (however, we will fix this drawback - to increase the efficiency, the stove can be overlaid with bricks).
Note: If you feel the need for such an apparatus, then you have two options - buy an industrial-made metal stove or make it yourself.
First, we’ll talk about purchased stove stoves, the cost of which starts at about 4,000 rubles (for example, the Ugolek stove) and rises to 40,000 rubles and more (this cost is typical for stove stoves with beautiful names “Bavaria”, “Baron” and etc.).
With heat exchanger
In the middle of this price range are, for example, potbelly stoves with a water heating circuit and a heat exchanger, an army cast-iron stove, a long-burning potbelly stove of the Klondike type.

The material for stoves and fireplaces made in workshops is usually stainless steel and cast iron. The standard drawing assumes the presence of a bunker with a firebox door, an ash pan, a chimney pipe. However, it happens that a potbelly stove is equipped with a hob, burners and even an oven. The enterprises also make heater stoves, as well as potbelly stoves, in which, to increase the efficiency, a ceramic or steel casing is installed, which significantly increases heat transfer. If you wish, you can buy a stove-stove stove or just a stove with a gas generator for your home.
Potbelly stove-homemade
Making a potbelly stove with your own hands is easy even without a drawing. Improvised materials are suitable for work, whether it be a gas cylinder, a milk can, a barrel, a piece of pipe, or sheet iron lying around in the garage. Having decided what can be put into action, choose for a potbelly stove with your own hands a drawing of a rectangular or circular section of the combustion chamber.
For example, you need to make heating in your country house yourself and you have an unused milk can (for arranging the stove itself), a bent piece of pipe (to create a chimney) and a piece of metal reinforcement with a diameter of at least 6 mm (for a grate). To make a stove out of all this, it is enough to be friends with the tools, as well as apply a little ingenuity.

The can is installed on its side - this is the basis of our do-it-yourself potbelly stove, its combustion chamber. A rectangular blower is sawn under the neck, the edges are processed with a file. The blower can be left in this form, or you can attach a damper to it, getting a stove with adjustable draft at the exit.
In the upper part of the bottom of the can, you yourself need to make markings for the chimney (it should be 2-3 mm smaller than the diameter of the pipe). We cut a hole and tightly drive a piece of pipe adapted for the chimney into it. Half of the work is done.
Next, we deal with the insides of the potbelly stove. With our own hands we make a grate in the form of a “snake” from a metal rod. We introduce the rod into the neck of the can and position it so that the grate stands horizontally in the future combustion chamber. That's all! If desired, you can put the resulting stove on an iron pallet and a rack of bricks. This will help to avoid heating the floor, as well as minimize the likelihood of a fire.
Note that a similar algorithm of actions can also be applied if you want to have a potbelly stove from a barrel. Such stoves cannot boast of long-term burning, but they cope well with the function of quickly heating the room.
The second life of a gas cylinder
It's a good idea for a small oven to reuse containers that can handle a lot of heat. We have already talked about barrels, but how do you like, for example, a potbelly stove from a gas cylinder or even two? These containers are good because they allow you to make a stove for a country house or garage, both vertically and horizontally.
To create such a potbelly stove, you will need the following tools:
- welding machine;
- grinding machine with circles;
- drill with drills;
- brush with metal bristles;
- tape measure and construction pencil for marking;
- hammer, chisel, pliers.
Materials for making a stove with your own hands need the following:
- 1 or 2 gas cylinders;
- Metal sheet for the ash pan and hob (thickness must be at least 3 mm);
- cast-iron doors (old ones are suitable, for example, from a wood-burning stove, or do-it-yourself made from sheet metal);
- chimney pipe;
- thick metal fittings for the manufacture of legs and grate.
Before starting work in a gas cylinder, open the valve and leave it in this state for at least 12 hours so that the container is ventilated. Another way to clean the cylinder is to fill it to the top with water, and then empty it completely.
For a vertical potbelly stove, the gas cylinder is placed in a standard position for it, the neck is released and markings are made for the future firebox and blower. The marked pieces are cut out with a grinder. A grate is made separately - for this, reinforcement cut to the required dimensions is welded in the places marked from the bottom of the cylinder.
Hinges are welded to the cylinder, on which the doors are hung. Further, hecks are equipped, which are designed to secure and increase the efficiency of the potbelly stove. A smoke exhaust pipe is welded on top or side of the cylinder.
For a horizontal potbelly stove, the cylinder is installed on the "legs" sideways. A square hole is cut out in it for the door and a round one for the chimney pipe. Instead of a grate, a series of holes are drilled at the bottom, and a rectangular container is welded below the cylinder to collect the ash. The stove is almost ready, it remains to hang the door with your own hands and install a chimney.
If desired, the complete set of vertical and horizontal stoves from gas cylinders can be expanded with a hob made from a sheet of metal attached on top.
Free fuel
Note: If you want to minimize the cost of fuel for a potbelly stove, consider making a home-made design for heating on automobile oil drained from the car.
A working potbelly stove is especially good for garage owners. The drawing of its design includes two tanks connected by a pipe, as well as a chimney.
To create a furnace for mining, you will need the following materials:
- Metal 4 mm thick for a potbelly stove.
- 6mm thick metal for top tank lid.
- Metal rods for the legs of the stove (3-4 pieces of suitable thickness).
- A pipe made of heat-resistant material for connecting tanks (diameter at least 100 mm, length approx. 400 mm).
- Chimney pipe (length not less than 4 m).
Work on the formation of a potbelly stove for working out is carried out in the following order:
- Legs are welded to the lower tank.
- A lid with holes made for oil and air is welded onto this tank from above.
- At least 50 holes with a diameter of 9 mm are made on the connecting tube.
- Weld the tube to the lid of the lower tank.
- A second tank with a filler neck and a chimney pipe is welded on top.
It is easy to use such a potbelly stove. Oil is poured into the cold machine through the filler neck almost to the top, not reaching the reservoir cap of just a few centimeters. Kindling material in the form of rags or newsprint is also laid there. It remains to set it on fire, and soon you will enjoy the warmth.
As a rule, such stoves "use" from 700 to 2000 ml of used oil per hour. Potbelly stoves at working out allow you to boil water and cook simple food. However, their operation requires the obligatory presence of good ventilation in the room to remove carbon monoxide, as well as compliance with fire safety rules (combustible materials must not be placed near the stove, use flammable materials such as gasoline, acetone, etc.). The waste tank must be protected from water ingress. Refueling with oil is carried out only after the stove has completely cooled down.
Sheet metal
How to make a potbelly stove out of metal? This project can be implemented by yourself if you have welding experience, as well as the necessary tools. From the materials you will need the following:
- sheet metal (its quantity determines the size of the stove);
- steel corners 5 mm thick;
- metal tube about 30 cm long;
- pipe with a diameter of 180 mm.
To get a potbelly stove, you need to weld a rectangle of metal sheets butted together (without a lid yet). On one side, place a blower and a furnace door. The internal space of the stove is divided into a smoke circulation, a firebox and an ash pan.

In the last two compartments, a grate is installed that will hold solid fuel. To do this, steel corners are welded inside the potbelly stove on the sides at a height of up to 15 cm. A grid welded in advance is laid on them (it can be made of steel strips welded to thick metal bars at a distance of about 5 cm). It is better to make the grate removable, so that later, when it burns out, it would be possible to replace it without any problems. In addition, the removable grate design makes it easy to clean the heater.
Let's return to the construction of the stove. In order to increase the efficiency of the potbelly stove, you can make fasteners for a removable reflector (a metal sheet with a thickness of at least 12 mm), which will separate the furnace and smoke. To do this, two metal rods are welded on top. After installing the reflector, you should get a channel for smoke.
Having equipped the inside of the potbelly stove, you can weld the top metal sheet, which will become the cover of the structure. A hole is made in advance in it for fixing the chimney pipe. Further, jumpers are equipped in the stove, delimiting the doors made for the ash pan, reflector and grate. As a rule, a small door is equipped under the ash pan, but two steel doors are made to the full width of the stove, so that it is convenient to get the reflector and grate.
The next step is to weld latches and legs to the structure (metal tubes with a diameter of up to 3 cm and a length of 10 cm are suitable for them), as well as chimney pipes from a curved pipe with a diameter of about 18 cm (note that the chimney is placed on a 20 cm sleeve ). The sheet metal potbelly stove is ready.
warm brick
A potbelly stove on wood, coal and other types of fuel can significantly increase its efficiency. To do this, it is enough to build a screen of baked clay bricks around it with your own hands. If you look closely at the drawings of such a mini-building, you can see that the bricks are laid at a short distance from the walls of the stove (about 10-15 cm), and if desired, around the chimney.

Bricks need a foundation. Do you want the masonry to last a long time? Then pour the base at a time to form a monolith. The material for the foundation is better to take concrete, which should be reinforced with steel reinforcement with your own hands. It is desirable to make a reinforcement layer at a distance of approximately 5 cm from the surface of the concrete pad.
Ventilation holes are made at the bottom and top of the brickwork, which will ensure the movement of air (heated masses will go up, cold air flows from below). Ventilation also prolongs the life of the metal walls of the potbelly stove, postponing the moment of their burnout due to cooling by circulating air.
Bricks laid out around the stove accumulate heat, and then give it away for a long time, warming the air in the room even after the potbelly stove goes out. In addition, brickwork additionally protects objects surrounding the stove from fire.
If desired, the stove can be completely laid out of brick. Such a structure is beneficial in that it will last for many years without additional effort on the part of the owner. However, there are also certain disadvantages. The disadvantages of this option include the following:
- the process of laying out such a stove is quite laborious and is suitable only for those people who have experience in masonry with their own hands;
- a brick potbelly stove is quite expensive, as it requires the use of refractory materials, including special clay for mortar.
In order to get a small stove on wood, it is enough to lay out a cone measuring 2 by 2.5 bricks, 9 bricks high. In the combustion chamber, 2-4 rows are laid out from fireclay bricks. Ordinary clay baked brick is suitable for a chimney, into which you must remember to insert a stainless steel sleeve.
Whatever the method of making a miniature stove or a potbelly stove with your own hands, you make them according to a drawing or by eye, the main thing is that at the output you get an effective heater, and in an expanded configuration also a hob for cooking. Look around for suitable materials (barrels, sheet metal, etc.) and go to your own homemade stove or even a potbelly fireplace!
And in a private country house, and in your own garage or workshop, it is always nice to have a mobile or stationary potbelly stove. To date, many different models of these heaters are on sale, but they can be expensive. Therefore, if you have experience working with metal, suitable material and the right tools, often stoves are made independently.
Which model of a wood-burning potbelly stove to choose with your own hands is up to the master, since these home-made appliances can have a very different look and be made both from new material and from improvised metal objects.
Craftsmen have learned to adapt metal barrels with walls 2.5-3 mm thick, gas or oxygen cylinders, pipes of medium diameter, metal sheets and even disks from large automobile wheels for the manufacture of stoves-potbelly stoves.
Tools for making potbelly stoves
To work with metal, you will need special tools, some of which are available in almost every private house, while others will have to be bought or rented.
- Angle grinder machine - "grinder" and consumables in the form of cutting discs and grinding wheels.
- A welding machine with a power of 200 A, as well as consumables - electrodes Ø 3 and 4 mm. In addition, you will definitely need a special mask and protective suit.
- Metal brush.
- Slag hammer.
- Measuring tools - a folding ruler, a long metal ruler, tape measure, chalk or marker.
- Pliers, hammer, chisel.
- Drill with drills for metal of various diameters.
The choice of a stove model most often depends on where it is planned to be located, since residential premises require a more aesthetic appearance of the heater and increased safety. Therefore, for installation in a house, an option made of metal sheets or a piece of medium-diameter pipe is best suited.
Any of the existing models is suitable for, but it is better to choose one that will help not only bring heat into the room, but also warm the water.
To finally make a choice, it is worth considering different options and familiarizing yourself with the process of their manufacture.
Gas bottle stove
The installation of a potbelly stove from a cylinder can take place in different ways:
- Using one cylinder with its vertical or horizontal arrangement;
- Using two cylinders that are installed perpendicular to each other.
The second model will give more heat, since the heating area of the furnace is almost twice as large.
The cylinder itself has a neat appearance, you can make a hob on it, and if you give the finished stove a decent appearance, then it can be installed even in a living room.
Materials for manufacturing
For the manufacture of the first model will need one cylinder, for the second, respectively, two, but besides this for the manufacture of oven will need:
- A steel sheet with a thickness of at least 3 mm - a jumper between the firebox and the ash pan, as well as a hob will be made from it.
- If you want the stove to look more respectable, then you need to purchase a finished cast-iron door with a cast pattern for the firebox and ash pan.
- If the appearance is not so important, then the door can be made from a fragment of metal cut from the cylinder itself or from a steel sheet.
- Chimney pipe with a diameter of 90 —
100 mm.
- Reinforcing bar with a diameter of 12 —
15 mm or steel corner for the manufacture of the grate and legs. cast iron can also be purchased at a specialized store, or the bottom of a horizontally laid cylinder, in which holes are drilled, can serve as a grate.
Any of the models can be made not only from large cylinders, but also from small ones - this will depend on the place allotted for the furnace.
Gas cylinder preparation
Before starting work, the cylinder must be prepared, especially if the container is not new, but has already been in operation. In this case, a certain concentration of gas can always remain inside the cylinder, and if a spark occurs during its cutting, an explosion is possible. It is impossible to neglect measures for the appropriate preparation of the container, since do work it will be extremely dangerous.
Preparation is carried out in the following sequence:
- First of all, the valve, which is located on top of the cylinder, is unscrewed, the hole in which it is installed is released. The container is left on the street or in the utility room for about a day, filling it to the top with water.
- After this time, the water from the cylinder is drained. In this case, it must be taken into account that the liquid will have an unpleasant odor, so it must be drained away from housing.
- The washed cylinder may well be used in operation, since the last remaining gas must be removed from it along with water.
Making a vertical furnace from a cylinder
- The first step is to mark the prepared cylinder - it indicates the location of the firebox and ash pan. For this procedure, you will need a marker and a flexible measuring tape - thanks to her rather rigid, but elastic tape can be measured and drawn locations doors.

- The next step is to carefully cut out the marked parts with the help of a grinder. Cut fragments are almost always used for further work.

Cutting openings for the firebox and ash pan doors
- These elements are scalded, adding bumpers, hinges and a latch-handle, and they make excellent doors.
- Next, the inner diameter of the cylinder is measured, and according to this measurement, a ring is rolled up from a thick wire, which will become the basis for welding the reinforcement. Thus, a grate for a furnace is made.
- Then, the installation level of the grate is outlined. The grate should be located 30 ÷ 50 mm below the edge of the cut opening for the firebox door. The grate becomes, thus, the separator of the chamber of the ash pan and the firebox. Reinforcing bars are welded at a distance of 8 ÷ 10 mm from each other.

- Hinges attached to the door are welded to one side of the firebox opening. It is very important to accurately align the installation site so that the doors close and open easily.

- On the opposite side of the loops, a hook-loop for the valve, open from above, is fixed. It must securely keep the door closed while the oven is heating.
- In the same way, the door is fixed on the ash pan.
- It is recommended to cut off the top of the cylinder to weld on top of a round metal panel that will act as a hob.
- The chimney can be removed both through the top of the cylinder and through the rear or side wall of the furnace. If you choose the second option, then the top hob will be much larger, as it will be freed from the chimney.
If the cylinder stands vertically, it will take up much less space than the horizontal version, but you must also remember that any oven must be located at a distance of 200 mm from the wall, and the walls themselves must be covered with heat-resistant material.
Effective potbelly stove from two gas cylinders

To make such a potbelly stove, you will need two cylinders, which, when heated, are able to heat the room much faster. In addition, if desired, it is quite possible to arrange a hot water tank in the vertical part of the furnace, if you install a hermetically sealed container inside, bring the tap out and cut in the pipes for supplying and extracting water.
- The first step is to prepare the balloon, which will stand horizontally. The upper part is cut off from it, so that a round hole with a diameter of about 30 - 35 mm is less than the inner diameter of the cylinder.

- In the bottom part of the future furnace, holes with a diameter of 10-12 mm are drilled in several lines, which in this case will serve as a kind of grate.

- A metal box is welded under this "grate" - this will ash pan-blower. It is then necessary to install a tightly closing door on it, which prevents coal and ash from falling out. As an air regulator she used this model will not.
- Legs from corners or fittings are welded next to the ash pan.

- A round hole is cut out on top of a horizontally located cylinder, from the side opposite the furnace door, on which the vertical part of the furnace will be installed.

- A door is installed, which is best made from the head of another cylinder. A hole is cut out in the center, into which a branch pipe with a diameter of about 76 mm is welded. This branch pipe is equipped with a valve, with which you can regulate the flow of air into the furnace, and hence the intensity of burning firewood. Door hinges are recommended to be placed on top - under the influence of its gravity, the lid will securely close the combustion chamber window and minimize air suction.
- The most difficult thing in preparing the upper, vertical part of the potbelly stove is the process of marking and cutting out a certain shape, which is ideal for putting on and welded to a horizontal body.
- In this case, an additional heat exchange chamber is arranged in the vertical part of the furnace, i.e. the smoke, getting into this section, does not immediately go into the chimney, but lingers in the arranged chamber.

- To do this, metal plates with holes are welded inside the vertical body at a certain distance, which can vary from 250 to 400 mm. Holes should be cut closer to the edge of the metal round piece. When installing them, the hole on the first jumper must be located on the opposite side from from versions on the second jumper and so on. The best option in this case would be to install three similar jumpers located equidistant from each other.
- The vertical assembly with the baffles already mounted is installed and welded from above to the horizontally mounted casing. A pipe for connection is welded onto the upper cylinder.
Video: potbelly stove of two gas cylinders
Potbelly stove from a cylinder installed horizontally
This version of the potbelly stove is made from a single cylinder, and the technology of doing work is in many ways similar to the option described above. Therefore, it is only worth considering difference of some elements.

- Instead of a vertical assembly, only a pipe for connecting a chimney pipe is welded in the rear upper part of the cylinder.

- A rectangular hole is cut out for the furnace door - it is quite possible to fit it in size to the finished cast-iron door. If it will be purchased in a store, then you should pay attention to the doors designed for blowing holes in brick ovens - sometimes they are ideal for a potbelly stove from a cylinder.

- You can make a door cut from a balloon rectangular part. It is well suited for the resulting hole in terms of the size of the sides, but in the middle of it there will be a hole from the valve. It will need to be welded with a patch cut from a metal sheet.
- In both the previous and this version, a hob can be added. For this, for example, from a steel bar with a thickness of 5 —
8 mm, a rectangle is bent, which is welded onto the container, creating a small but fairly flat surface.
- You can use two steel strips instead of wire, welded on both sides of the cylinder for its entire length.
Potbelly stove from a barrel
A potbelly stove made from a barrel is more voluminous and takes up much more space than a cylinder stove. That is why it is able to heat a room with a larger area. Such a stove can also be horizontal or vertical, but both the first and second options are used to heat not only utility and technical premises, but also housing.

To make this potbelly stove, you will need a metal barrel, a steel sheet and a chimney pipe with a diameter of 100-150 mm.
Vertical potbelly stove
- The barrel is measured and marked on its surface. locations the doors of the blower and the firebox, as well as the place of the cut. It should pass below the edge of the firebox by 30 ÷ 50mm.
- Then the barrel is cut into two parts, and each of them is first worked separately.
- A round plate is cut out of a steel sheet, equal in diameter to the size of the barrel. It provides a hole for the passage of the chimney pipe.
- A hole is also cut in the top of the barrel so that it can be aligned with the hole on the round piece that will become the hob.
- The chimney branch pipe is welded into the hole in the barrel, and then from above, through the hole, a hob is threaded onto the pipe and placed, which is welded to the sides of the barrel. The air space created between them, which is the height of the rim, will help keep the hob hot for a longer time.
- Further, a round metal part with holes cut in it - a grate is also welded to the underside of the upper part. Another option is to weld two semicircular brackets under the finished cast-iron grate. The photo clearly shows how these elements look and are located.
- When the bottom and top panel of this part of the stove are ready, you can cut a hole for the firebox door according to the markings made earlier.
- The cut out part is scalded around with metal strips, hinges and a handle with a vertical latch are fixed to the door.
- Next, the hinges for the door and the hook for the valve are welded to the body. This process must be carried out very carefully, accurately calculating the installation distances, since the door should open and close easily, and the valve should freely enter the holder arranged by the hook.
- In the lower part of the barrel, an opening is cut for the ash pan. The door is being prepared and hung - in the same way as in the case of the combustion chamber.
- After that, both parts are connected into a single structure by a welded seam.
Horizontal potbelly stove from a barrel
The process of manufacturing a horizontal version of a potbelly stove from a barrel is carried out in almost the same way as from a cylinder.

- In the upper plane, a window is marked and cut out, on which a door made from a cut piece of metal will be installed. Connections of the door with hinges and hinges with the body are made with the help of rivets.

- The regular pressure relief hole in the barrel, 20 mm in diameter, is used as a blower. There is no separate door for the ash pan provided.
- It is recommended to immediately make a stand to accommodate the future stove. It is made from scraps of pipes or a corner, so that the shelves ensure the stability of the barrel laid on them, without backlash.

- The next step is the manufacture of a grate from a metal sheet 3-4 mm thick. First, the area is measured and, according to the data obtained, a panel of the required size is cut out, in which holes for air supply are drilled. The finished grate is laid on the bottom of the barrel in such a way that at the highest point, in the center, the distance between the grate and the inner surface of the barrel is about 70 mm. The grate is not fixed rigidly - it should be easily removed to clean the stove from accumulated ash.

- A special connecting node is made for the chimney pipe in the rear upper part. After marking the desired diameter with a grinder, diametrical slots are cut at an angle of 15 º from one another - a total of 12 cuts will be obtained. The resulting "teeth" are bent up - the chimney pipe inserted then will be attached to them with rivets.
Video: the simplest horizontal potbelly stove from a barrel
Potbelly stove from rims

A potbelly stove can also be made from two disks from large wheels and a piece of large-diameter pipe - it must be selected for the diameter of the prepared disks. The height of the segment may vary depending on the preferences of the master and the stability of the structure, but are usually limited to 300 - 450 mm.

There is nothing complicated in the scheme and manufacturing process of this version of the potbelly stove, but it is more suitable for technical and utility rooms than for residential ones.
- Separate elements of the future stove are being prepared - two disks, a pipe segment, a metal sheet and a chimney pipe.
- All three parts are welded together into a single vertical structure. To facilitate the adjustment of the pipe diameter to the discs, it is permissible to cut off the outer edge from the latter along the circumference, on one side.

- Further, an opening for the firebox is marked on the pipe and cut out with a grinder.
- The cut-out part is scalded around the perimeter, a valve and hinges are installed on it, thereby obtaining the necessary door.
- Then, you need to make a hole for the blower, otherwise the fire in the furnace simply will not burn. To do this, a window of 100–120 mm in width and height is cut out in the lower disk.

- A hole for the chimney is cut from the back of the upper disk and a pipe is welded into it.
- It is recommended to make a hob from a steel sheet with a thickness of 4 —
5 mm. It is tightly welded to the edge of the upper disk, thus becoming an additional heat exchanger.
- The same is done with the bottom of the furnace in order to arrange a full-fledged ash pan and increase the safety of operation of the potbelly stove.
In fact, such a potbelly stove is, rather, a fire fenced with metal, and is neither economical nor easy to use. However, for garage needs and subject to free source materials, this is a completely acceptable option.
Video: an example of an effective potbelly stove made of rims
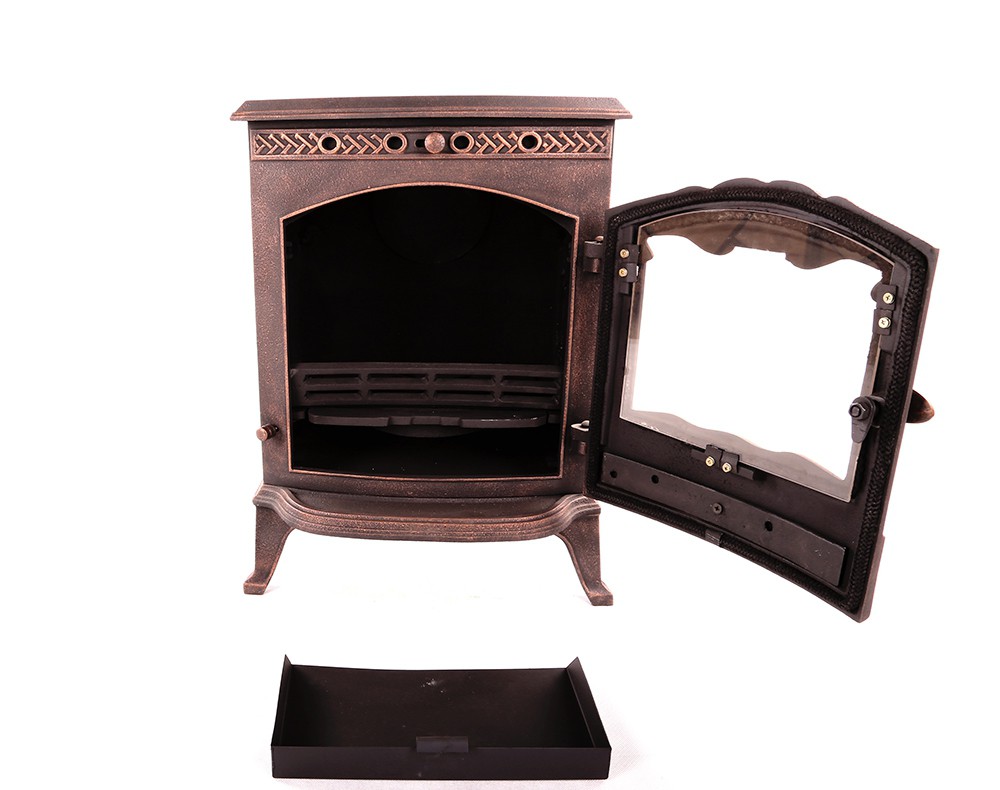
Potbelly stove "Gnome"
One of the most popular of all homemade bourgeois is compact. It looks neat and can be designed for installation in any room. This potbelly stove is well suited in size for small country houses, as it does not take up much space and is an indispensable assistant in cooking and heating rooms.

One of the most common models is the potbelly stove "Gnome"
A similar model of a potbelly stove can be equipped with internal partitions - plates, then it will receive the properties of additional heat transfer, or you can make the most common case with division into a firebox and an ash pan.
The first version of the stove will keep the heat in the room for a long time, and this is very important if summer residents live outside the city from early spring to late autumn, when the nights are cold.
In order to make such a potbelly stove, you need to purchase a steel sheet with a thickness of 3 —
4 mm, flue pipe, angle 40 × 40 or 50 × 50 mm. For the burner, the lid can be made independently or bought ready-made.

- Relying on drawing, on metal sheets draw details potbelly stoves: panels all walls, a grate and two plates for fixing them inside the structure.
- Rectangular holes are cut in the front panel for the firebox and blower. The cut pieces of metal are used to make doors. They are scalded with a corner and valves and hinged hinges are immediately fixed on them. Then, the doors are attached to the front panel.
- On the same panel, only from its inner side at a distance of 150 ÷ 160 mm from the top, one of the plates is welded, which will regulate the output of heated air. The plates must be 80 ÷ 100 mm shorter than the length of the side walls of the housing.
- After that, on the back wall, at a distance of 70 —
80 mm from the top, the second plate is welded. In combination, these two plates form a zigzag labyrinth for smoke during the combustion of the furnace. Thanks to this, each of the corners of the potbelly stove body will warm up.
- Two holes are cut in the hob - for the burner and for the chimney.
- Legs made of thick reinforcement or a corner are welded to the bottom wall of the body. You can choose a frame option from a corner, which includes legs and a base for fixing the bottom and lower edges of the side panels on it.
- Before welding the side parts to the frame or to the bottom panel, it is necessary to mark and weld the corners on them for the entire length of the panel, they must be welded at the same level, since their role is to serve as brackets for laying the grate.
- In the panel prepared for the grate, holes with a diameter of 12 ÷ 15 mm are drilled in a checkerboard pattern, at a distance of 30 ÷ 40 mm from each other. Another option for a grate can be a grate welded from reinforcing bars. The possibility of purchasing a finished cast-iron grate should not be discounted.
- Installation and welding of all walls of the potbelly stove are carried out. The main thing is to achieve complete tightness of the welds, so sometimes it becomes useful to install a 30 × 30 mm metal corner outside. This will slightly make the overall structure heavier, but will give it additional strength and reliability.
- The top cover is welded with a chimney pipe and a cooking ring.
- To make the stove look respectable, you need to clean all the welds and cover its surface with heat-resistant paint.
It makes sense to additionally install a screen on the side and rear surfaces, which will increase the safety of the stove and create a powerful convection flow of hot air, which significantly speeds up the heating of the room. The screen panels are mounted on racks in such a way that they are spaced from the stove body at a distance of 30 to 50 mm.
Video: a master class on making a potbelly stove from a steel sheet
What to consider when installing a potbelly stove
A self-made one will bring warmth and comfort to a house or outbuildings, without causing problems, only if safety regulations are observed during its installation.

- The surface on which the oven is to be installed must be rigid and fire resistant. This can be, for example, brickwork or ceramic tiles. You can also use sheet of asbestos the top is covered with a metal sheet.
- Around the stove, heat-resistant drywall or asbestos sheets are installed on the walls. Wall cladding with ceramic tiles or bricks is also suitable.
- It is forbidden to place combustible materials and compositions near the furnace, not far from the furnace.
- The chimney must also be insulated from combustible surfaces when passing through a wall or attic floor.
- It is very important for safety to equip a reliable ventilation system so that carbon monoxide cannot accumulate in the room.
- In order for the furnace to work for a long time and efficiently, only high-quality material must be chosen for its manufacture.
- Before installing the potbelly stove in its permanent place, street tests must be carried out, paying special attention to the quality of welds and the accuracy of fitting all parts.


