Physicist and astronomer Stefan Feeney of University College London, one of the...


- one of the main components of any computer. The amount of RAM has a big impact on the overall performance of a computer. If there is not enough memory for current tasks, then the computer will run slowly. In this article, we will talk about how to add RAM to the computer and solve this problem.
Step number 1. Determine the number of free slots for RAM.
If you want to add RAM to your computer, then the first thing to do is determine the number of free memory slots on your motherboard. This can be done using programs, but in this case there is a small risk of getting incorrect information. Therefore, it is better not to be lazy and see for yourself. To do this, completely turn off the power to the computer, put it on its side and remove the side cover.
The RAM slots will be located to the right of the CPU cooler. On budget or compact motherboards, there are usually only two slots. There are usually four slots on mid-range motherboards, and even eight memory slots can be used on the most expensive motherboards (in this case they are located on both sides of the processor cooler).
Slots for RAM
Pay attention to how many slots are free. This is how many RAM modules you can add to your computer. If all the memory slots are already occupied, then in this case you can add RAM to the computer only by replacing the already installed memory.
Step number 2. Determine the current memory configuration.
When adding RAM to a computer, you need to strive to ensure that all memory modules are as similar as possible to each other. They must have the same volume, the same timings and of course the same type (DDR, DDR2, DDR3 or DDR4). Using the same memory modules will avoid potential compatibility issues.
Therefore, since you have already opened the side cover of the computer, then remove one of your memory boards and. Usually there is a sticker on the RAM with all the information you need written on it. You can read about how to remove and install the RAM module at the end of the article.
RAM spec sticker
If there is no sticker, then you can get information about the installed RAM using the CPU-Z program. Run this program on your computer and open the SPD tab. Here you will find the characteristics of each RAM module.
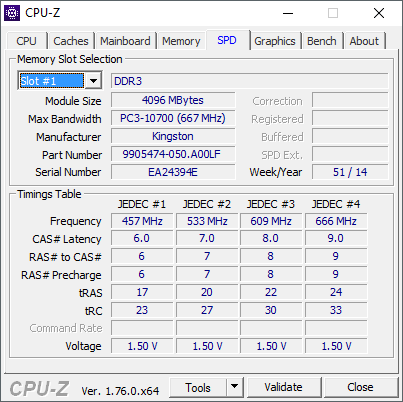
Characteristics of RAM in the CPU-Z program
In the upper left corner of the SPD tab there will be a switch that allows you to switch between the characteristics of different memory modules.
Step number 3. We buy new memory modules.
Based on how many free RAM slots you have, as well as what characteristics of the already installed memory, you can determine what memory modules are needed and how many can be installed. The ideal option is to find on sale exactly the same modules as you have on your computer, from the same manufacturer and with the same characteristics.
If you cannot find exactly the same memory, then buy modules from another manufacturer, the main thing is that their characteristics match those that you already have installed.
If you completely change all memory modules, then it is no longer necessary to maintain compatibility with old modules, the main thing is that the new ones are supported by your motherboard.
Step number 4. Adding RAM to the computer.
After the necessary modules are purchased, you can proceed to them. If you need to remove already installed modules, then for this you need to release the two latches that are located on the sides of the module, and while holding the module by the ends, carefully pull it out of the connector. In this case, you do not need to apply great force, the module should come out of the connector without difficulty.
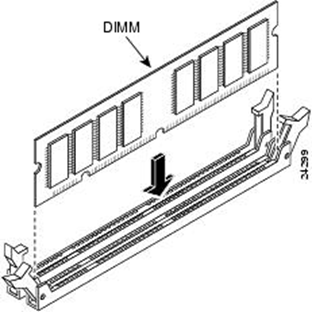
Installing the RAM module
Installing the module in the slot is carried out in the same way. Open the latches on the sides and carefully insert the module into the slot on the motherboard. It is important to correctly orient the module in the slot. To do this, pay attention to the connector and the module itself. The module will have cutouts that must match the jumpers on the connector (key). Usually the module gets into the right position in two clicks. After the memory module is inserted into the slot, you need to close the latches on the sides of the slot. After that, you can collect the computer.
(English) we went through the basic concepts and characteristics of RAM. In this article, we want to touch on topics that often cause controversy, and try to understand the following myths and statements:
Myths about RAM | All DDR3 memory is the same
This topic alone deserves a separate article, but we will try to discuss it briefly and outline a few theses.
We generally recommend checking with RAM manufacturers who spend a lot of time testing memory on various motherboards. Motherboard manufacturers also provide Qualified Vendor Lists (QVLs) of RAM that they have tested on a particular board. But usually these lists indicate a small number of manufacturers whose memory was in the laboratory. Therefore, it is better to check with the memory manufacturer's list. you can find a lot of useful tips and tricks on RAM modules for hotel platforms and motherboards, as well as information about their speed and compatibility with different processors.
Myths about RAM | Just need to add more RAM
JEDEC is an association of electronic device manufacturers and developers that sets industry standards for widespread adoption among its members. Since some RAM manufacturers have exceeded the JEDEC maximum of DDR3-1600 CAS 11 (and later CAS 9) and are offering tighter timings and higher data rates, mixing different RAM modules has not been as easy as originally thought.
Simply put, mixing RAM modules from different sets does not guarantee stable operation, even if you have two identical sets of the same model line. We'd like to add that DIMMs that don't work well together can often, but not always, be made to work by adjusting voltages and/or timings. For article "DDR3 memory: how to improve system performance?" two companies instead of single sets of 32 GB RAM at 2400 MT / s sent us a pair of identical sets of modules in a 2 x 8 GB configuration. Initially, they did not work together, but with the help of minor adjustments, we achieved a positive result.
What is the problem? After all, the modules have the same frequencies, timings and voltage.
DRAM mainly consists of memory chips soldered to a printed circuit board. During the production process of a certain RAM model, a manufacturer may use up a certain batch of printed circuit boards, and then switch to new PCBs from a different production batch, which, as a result, may affect a number of characteristics.
The same thing can happen with solder. The manufacturer may start using a different type that has slightly modified conductive properties.
Also, the crystals themselves can be different. During the production process, the chips are binned, that is, sorted according to their quality.
Let's look at this concept from a theoretical point of view. In one production batch, there may be, say, 1000 memory chips that are split or binned. 200 chips can be classified by a manufacturer as entry-level chips, 350 slightly better, 300 even better, and 150 first-class chips. They then sell these chips to different memory module manufacturers.
If you buy DDR3-1866 memory modules from several companies, then most likely you will get different PCBs, solder with different conductive properties, and, quite possibly, chips of different levels from different manufacturers.
The memory chips themselves are produced by several different companies, which only exacerbates the compatibility problem. You probably already understand why mixing different RAM modules often causes problems.
We also noticed that most of the new RAM lines use 4 Gb chips, while the old lines use 2 Gb.
Myths about RAM | There are only a few DIMM manufacturers
This is both a myth and a delusion. There are several memory chip companies and many manufacturers of RAM modules. There are RAM modules made by one or more companies for other companies. For example, AMD Radeon RAM is made by Patriot and VisionTek.
Myths about RAM | DDR-3200 support means any RAM can be used
To use expensive 3200 MT/s memory, you need a processor that can handle such a high transfer rate. Otherwise, the memory will only work in 1333, 1600, or 1866 modes.
In the days of Intel LGA 775 processors, overclocking of the CPU and RAM was performed primarily through the FSB (system bus). Let's say you have a Q6600 processor and your motherboard supports 1066MHz FSB. In this case, the processor will operate at a native frequency of 2.4 GHz, and the memory at a speed of 1066 MT / s. If you want to overclock the processor by increasing the FSB frequency to 1333, then it will operate at a frequency of 3 GHz, and the memory at 1333 MT / s. In other words, the memory speed was limited by the FSB frequency limit. The memory controller was located in the chipset, more often in the northbridge of the motherboard, and also worked at the FSB frequency.
Today the memory controller has moved to the CPU. So the CPU is the main driver of memory operation at the advertised frequencies. Processors based on the Haswell architecture are designed for DDR3-1600 memory, and mid-range and high-end non-K-series chips, as a rule, can work quite stably with memory up to 1866 - 2133 MT / s. The K-series processors are overclockable and their controllers support enthusiast-oriented higher data rate modules.
AMD's current FX processor line supports "up to 1866 MT/s per DIMM channel". However, you may run into problems running memory in 1866 mode on entry-level and sometimes mid-range processors. This is partly due to the fact that the memory controller of the FX processors is optimized for DDR3-1333 (according to the BIOS and Kernel Programming Guide). Like any other processor, FX chips can be overclocked to run at speeds even higher than DDR3-1866, but this will negatively affect stability.
Myths about RAM | When installing different modules, RAM runs at the speed (timings) of the slowest DIMM
Suppose you have a DDR3-1600 CAS 9 module and you add another module, but already 1866 CAS 9. This may cause the RAM to run at the default settings set by the motherboard, i.e. 1333 CAS 9 or 10 (many AMD motherboards use 1066 by default). Or both modules will work in 1600 CAS 9 (10 or even 11) mode if DOCP, EOCP, XMP or AMP technologies were enabled before installing the DDR3-1866 module.
But you can also set the options manually. Typically, in such scenarios, we would try 1866 mode at 10-10-10-27, increasing the voltage a little, about + 0.005 V. Depending on the results, you can adjust the voltage of the memory controller.
Myths about RAM | Cheaper to buy two sets of DIMMs than one large and expensive set
Even if you buy two identical sets, there is no guarantee that they will work together. RAM modules sold as a set have been tested for compatibility. Manufacturers do not guarantee the performance of mixed kits, even if they use the same memory module models.
Customers often do this with high speed modules and rely on XMP for setup. When XMP is enabled, the motherboard can read the profile of two sticks of RAM and set the secondary timings accordingly, but the tRFC timings for two modules can be set to 226, while a four-module bundle would need a value of 314. This problem is difficult to detect, since users rarely go to the settings of secondary timings.
Myths about RAM | RAM runs faster when all slots are occupied
Two sticks of RAM give less load on the memory controller than four. It takes less power, the memory controller needs less voltage to run smoothly, and the RAM is usually slightly faster, although it's not noticeable. The same goes for 3- and 4-channel motherboards. Users are often misled into thinking that four DIMMs (often sold as quad-channel kits) always operate in quad-channel mode, even though dual-channel motherboards cannot in principle do so.
Myths about RAM | RAM faster than 1600 MT / s does not give a performance boost
The validity of this statement depends on several factors. For processors with an integrated graphics core or APU, this is completely wrong, since the video core uses system memory, and the faster it is, the better!
Most RAM tests measure read, write, and copy speed. Many gaming tests when changing RAM 1600 to 2133 show an increase in frame rate from 3 to 5 FPS. This is because in most games, RAM is primarily used as a conduit for transmitting information to the GPU, as well as a buffer for frequently accessed data. The fact remains, RAM can boost FPS quite a bit. Since the price difference between 1600 and 2133 memory is not always large, sometimes buying faster RAM can be justified.
In addition, the WinRAR archiver takes data from RAM and compresses it in RAM before writing it to disk. When changing from DDR3-1600 memory to 2400, the speed increase in tests using WinRAR can reach 25%. There are many other memory-intensive applications: video editing, image manipulation, CAD, and so on. Even a small speed advantage can save you time if you're working on these types of applications.
If you use your PC in office single-tasking, like taking notes, then browsing the web, then watching a video, then you definitely don't need faster RAM. If you prefer to multitask, for example, you have a bunch of browser tabs open at the same time, while working with large spreadsheets or watching a video in a window, or working with images and performing a virus scan in the background, then faster memory can bring certain benefits.
You can test this yourself by running some similar applications with 1600 MT/s memory and then with faster RAM. After downloading several applications, run a benchmark such as SiSoftware Sandra and archive a large file with WinRAR at the same time. While these tasks are running, go through the open Windows windows, then check Sandra's results and backup time.
Myths about RAM | 8 GB is enough for the next ten years
If you really don't like multitasking, then 8 GB will be enough. But this does not apply to gamers and enthusiasts. Five years ago, 2 GB was enough, then 4 GB, and so on.
Another fact: computer manufacturers often skimp on RAM. For example, when 2 GB seemed enough, they installed 1 GB. Today, 6 - 8 GB of RAM is considered the norm and 16 GB is also not uncommon, so it is unlikely that the level of 8 GB will last long as a standard. Games use more and more RAM. If you're building a new system and want to keep it up to date in a few years, we recommend 16 GB of RAM.
Myths about RAM | You will never be able to use 16 GB of memory
This misconception is a continuation of the previous one, but is more relevant to users of memory-intensive applications, as well as those who work with large amounts of files and data. The more RAM you have, the more data it can hold for instant re-access, instead of going to a file on your hard drive or the network to re-download.
Many people use more than 20 GB of memory in the system at the same time almost every day, and this is becoming the norm among members of the Tom's Hardware forum, who often discuss the possibility of maximizing the performance of their 8 and 16 GB RAM kits.
Remember also that manufacturers do a lot of research and contact with software developers and users. So there is certainly a reason why modern motherboards are designed to support 32GB, 64GB, and 128GB (or more) of RAM.
Myths about RAM | I'm not using all the RAM, so the extra memory won't speed things up.
In some situations, increasing the amount of RAM can speed up some processes. Many programs adjust the amount of data stored in memory based on the amount of RAM available, so more RAM saves time by putting more frequently accessed data in RAM (rather than on the hard drive). This can be especially useful when you are working on projects with a variety of images or videos, CAD, GIS, virtual machines, etc. Another advantage of a large amount of RAM is the ability to create a RAM disk to load games, applications and other data. Such a drive has its hidden drawbacks, but many users are delighted with this feature.
Myths about RAM | 64-bit OS allows you to use any amount of RAM
Many people think that you can use an infinite amount of RAM with a 64-bit operating system, but this is not the case. As an example, here are the limits on the amount of RAM in Windows 7:
| RAM limits in Windows 7 | ||
| x86 (32-bit) | x64 (64-bit) | |
| Windows 7 Ultimate | 4 GB | 192 GB |
| Windows 7 Enterprise | 4 GB | 192 GB |
| Windows 7 Professional | 4 GB | 192 GB |
| Windows 7 Home Premium | 4 GB | 16 GB |
| Windows 7 Home Basic | 4 GB | 8 GB |
| Windows 7 Starter | 2 GB | does not exist |
And in Windows 8:
| RAM limits in Windows 8 | ||
| x86 (32-bit) | x64 (64-bit) | |
| Windows 8 Enterprise | 4 GB | 512 GB |
| Windows 8 Professional | 4 GB | 512 GB |
| Windows 8 | 4 GB | 128 GB |
Myths about RAM | 1.65V memory can damage Intel processors
For its processors, Intel recommends 1.50V memory at a certain data rate. For Haswell, this is DDR3-1600. What's confusing, however, is that Intel also certifies RAM (even DDR3-1600) that runs at 1.60 and 1.65 volts. Keep in mind that 1.60 - 1.65 V is considered normal for DDR3-2133 and higher RAM.
Most memory with lower data rates (such as DDR3-1333 and 1600) use 1.50V or less. We recommend that you refrain from buying RAM with these speeds if it is 1.65 V, as this may mean that the manufacturer used the cheapest and poor-quality memory chips. Why would RAM with good chips need 1.60-1.65 V at all? To further save yourself from future problems, we would recommend not buying DDR3-1866 memory that exceeds 1.50V unless it has low timings (CL7 or CL8).
Myths about RAM | Dual-channel mode doubles the data transfer rate, i.e. the RAM works twice as fast
This is another misconception. When you install two sticks in dual channel mode, the memory controller does not see the RAM as two separate 64-bit devices, but as one 128-bit device. Theoretically, this should double the bandwidth, but in practice, the speed gain is 20-50 percent on Intel processors and slightly less on AMD chips.
This article was written with the participation of many members of the forum, but there are too many to list them all. We would also like to thank the wonderful employees of companies such as Corsair, G.Skill and Team Group, whose knowledge and experience in this area has helped us a lot.
As always, comments and constructive criticism of the article are welcome.
Instruction
Determine how much memory is already installed. Go to the start menu and select "Settings", then "Control Panel" and "System". Select the General tab. The amount of memory installed on your computer will be shown at the bottom of the page.
Determine what type and amount of memory you need to purchase. Check your user manual for the maximum amount of memory your computer can handle. The guide will also help you choose the type and speed of memory you need. Buy operational memory online or at your local computer store.
open case computer. Refer to the instruction manual if necessary. Remove all metal rings, watches or . Turn off the computer, unplug it from the electrical outlet, and then touch the metal case to eliminate any static electricity. An antistatic wrist strap can also be used for this purpose.
Locate the memory slots on the motherboard computer. If necessary, refer to the instruction manual. If there are no free slots, you will have to remove one or more of the installed memory cards in order to be able to add a new one. memory.
Install new memory. To do this, open the holders in the free slot and carefully insert the memory card into it. Make sure the memory card module is securely inserted into the slot and attach the holders.
Test the installed memory. Close the case and turn on the computer. If the computer starts beeping, then memory installed incorrectly. Then repeat step 5 to make sure memory securely inserted into the slot. If the installation was successful, check that the system has detected the new amount of memory (step 1).
Related videos
Increasing the random access memory (RAM) greatly improves the performance of your computer. Moreover, it does not require knowledge about the filling, it is enough just to carefully install the module into the motherboard slot.
You will need
Instruction
Purchase a suitable RAM module. Modern computers use DDR, DDRII and DDRIII strips, which differ in connectors and speed. You can find out what type of memory is used in your PC in the passport that was issued upon purchase.
Completely turn off the power of the computer and absolutely all the wires going to the back of the case. Place the system unit on a stable surface and unscrew the side cover with a screwdriver. Some blocks are equipped with special fasteners instead of screws, and to remove the cover, it is enough to unfasten only them.
Find the block for installing RAM. It includes several connectors with latches, in which the RAM bar should be installed.
Bend back the special fasteners on the edges of the free slot. Take the bar that you are going to install in the system unit by the edges and insert it, aligning the slot at the bottom of the module with the slot in the RAM slot. As soon as the bar is clearly fixed, reinstall the latches in their original position, thereby fixing the installed module. When properly positioned, the fasteners will firmly press the installed RAM.
Close the computer cover, connect the power and test the computer. To make sure the memory was correctly detected by the system, right-click on the "My Computer" shortcut. The line "Installed memory" will indicate the total amount of RAM. If this figure has increased, then the installation was done absolutely correctly.
Let's look at options on how to increase the computer's RAM in various ways.
Consider all the ways to increase RAM. Surely one of them will be useful to you.
The most convenient and easy way is to purchase an additional RAM module. If you chose this option, deciding not to bother with others, be prepared for the fact that you will have to “climb” into the system unit to install the module. But before that, you need to take into account several important criteria.
When buying, be sure to pay attention to:

So, if an additional RAM module is purchased, you can proceed with its installation. For this:

If you still failed to independently increase the RAM of your PC using an additional module, you should first make sure that the module itself is working and after that contact a specialist for help in installing it.
A new module is quite expensive, especially for some PC models, so do not rush to buy it. Perhaps the problem can be solved by free methods.

This method has been used recently, but it has already become one of the most effective and simple. Adding memory in this way became possible thanks to the introduction of ReadyBoost technology into operating systems. It is designed to connect a USB flash drive to a PC and use its memory for work. But in order for everything to work out, you need a flash drive with the following characteristics:
Using Readyboost technology, you can connect several additional memory devices to your computer at once, but the size of the flash drive must be larger than the amount of PC RAM.
To add more memory to your computer using a flash drive:
Now there will be more memory, and you can immediately use it.
During its work, the computer uses the so-called virtual memory, consisting of random access memory (RAM) and the paging file. Windows uses this file to store the information necessary for the work of programs, similarly to RAM. This way of working with files is of course slower than loading into RAM, but if the latter is not enough, this will help to unload it. The size of such a file is determined automatically by the operating system, but it can be increased if desired. This operation on Windows 7 looks like this:
Now there will be as much memory as you specified.
The operation of increasing memory using the paging file on Windows 8 and 10 is almost identical to Windows 7, but here you need to enter "Performance Options" in the computer's search box, then click "Advanced". Then everything is done in exactly the same way as on the "seven".
This method is not difficult, but you should not resort to it if you are not confident in your abilities.
So, to increase the memory on the computer:
If everything is done correctly, the PC memory will increase.
Thus, you can independently increase the RAM of your PC, and in several paid and free ways. Choose the most suitable for you and forget about the lack of memory for a long time.
Most novice users are sure that the more amount of RAM, the faster your computer will run. However, the speed of the computer still directly depends on the correct selection and installation of components. Correct selection and installing RAM modules- the most important condition for the successful operation of your computer.
In this article, we will consider the issues of choice and ways to install RAM and its competent layout in motherboard connectors .
– install memory modules with the same size;
– the modules must match in operating frequency (Mhz), otherwise they will all operate at the frequency of the slowest memory;
- combine timings, memory latencies (delays);
– memory modules are better than one manufacturer and one model.
All these tips do not have to be strictly followed, the cases are different. Even if memory modules differ from each other in terms of manufacturer, volume and frequency of operation, this does not mean that they will not work. In this case, there are no special memory layout secrets - just installing them is enough.
There are also no features when installing obsolete types of memory such as SDRAM(The rule of thumb here is the more the better.)
But in modern computers, motherboards support special working memory modes. It is in these modes that the speed of the RAM will be the most efficient. Therefore, to achieve the best performance, you should consider the operating modes of the memory modules and their correct installation.
single mode (single channel or asymmetric mode) – this mode is enabled when only one memory module is installed in the system or all modules differ from each other in terms of memory size, operating frequency or manufacturer. It does not matter in which slots and which memory to install. All memory will run at the speed of the slowest memory installed.
If there is only one module, then it can be installed in any memory slot:
Two or three different memory modules can also be installed in any configuration:
This mode is more of a necessity when you already have RAM, and increasing the amount of memory and saving money is in the first place, rather than achieving the best computer performance. If you are just about to buy a computer, it is best to avoid this kind of memory setup.
dual mode (two-channel or symmetrical mode) - the same amount of RAM is installed in each channel. Modules are selected according to the frequency of operation. To facilitate installation, on motherboards, the DIMM sockets for each channel are color coded. And next to them is the name of the connector, and sometimes the channel number. Also, the purpose of the connectors and their location by channel must be indicated in the motherboard manual. The total amount of memory is equal to the total amount of all installed modules. Each channel is served by its own memory controller. System performance is increased by 5-10% compared to single-channel mode.
dual mode can be implemented using two, three or four DIMMs.
If two identical memory modules are used, then they should be connected to the same-named connectors (in the same color) from different channels. For example, install one module in a slot 0 channel A, and the second - in the connector 0 channel B:
That is, to enable the mode dual channel(interleaved mode), the following conditions must be met:
– the same configuration of DIMM modules is installed on each memory channel;
– memory is inserted into symmetrical channel connectors ( slot 0 or slot 1).
Three memory modules are installed in a similar way - the total amount of memory in each channel is equal to each other (memory in the channel A equal in volume in the channel B):
And for four modules the same condition is fulfilled. Two parallel dual modes work here, as it were:
Triple Mode (three-channel mode) - the same amount of RAM is installed in each of the three DIMM channels. Modules are selected by speed and volume. Motherboards that support 3-channel memory typically have 6 memory slots (two for each channel). Sometimes there are motherboards with four connectors - two connectors make up one channel, the other two are connected to the second and third channel, respectively.
With six or three RAM slots, installation is just as easy as with dual-channel mode. With four memory slots installed, three of which can operate in Triple Mode, the memory should be installed in these slots.
Flex Mode (flexible mode) - allows you to increase the performance of RAM, when installing two modules of different sizes, but the same frequency of operation. As in the dual-channel mode, memory boards are installed in the same-named connectors of different channels. For example, if there are two memory sticks with a capacity of 512Mb and 1Gb, then one of them should be installed in the slot 0
channel A, and the second - in the slot 0
channel B:
In this case, the 512MB module will work in dual mode with the 512Mb memory of the second module, and the remaining 512MB from the 1GB module will work in single-channel mode.
These are all recommendations for combination of RAM. There may be more layout options, it all depends on the amount of RAM, motherboard model and your financial capabilities. Also on sale were motherboards with support quad mode memory work - this will give you the maximum performance of your computer!
Physicist and astronomer Stefan Feeney of University College London, one of the...

Introduction Military monastic orders, orders of chivalry, orders of meritIn 1120...
