INSTRUCTIONS AND PROPHECIES OF THE Blessed MOTHER ALIPIA GOLOSEEVSKY, Kyiv...


The potbelly stove is an iron, compact-sized stove with a chimney at the top. It consists of a chamber where solid fuel is poured, a grate in the form of a metal grate, a pipe - a chimney and an ash pan for collecting ash.
With the ability to handle the welding machine, the device is easy to manufacture, and at the same time, it will serve faithfully in an unheated room, in the field, in the absence of central heating for more than a dozen years.
Manufacturing options:
It is a metal box, you can independently weld the structure of steel sheets. For a rectangular potbelly stove, an old automobile tank, a box will fit perfectly.
Usually, this form is chosen when it is necessary to cook food on the stove.
On a capacious platform, you can immediately put 2 large pots or containers for heating water.
The manufacturing principle is simple: doors are built to cover the blower and the combustion chamber, a hole is made for the chimney, combustion products must leave the room in a timely manner, otherwise you can inhale carbon monoxide.
The most common type of potbelly stove. The cylinders have thick walls, the furnace is durable, mobile, fireproof.

First, a drawing is drawn, markings are made. The door for the combustion chamber will be located in the center of the cylinder. It blew in the same plane, only 10-12 cm lower.
Instruction:
For cooking on the top of the stove, the design is slightly different:
When making a furnace from a pipe, weld the bottom of it, as well as a part on top:
The option is distinguished by a specific smell, which during the combustion of fuel will be emitted by oil mining, even in the presence of an exhaust hood.
Instruction:
Before starting work, prepare the tools:
For the case you will need a pipe 30 cm in diameter, at least 5 mm thick. You can use sheet metal of the same thickness instead of a pipe.
For the chimney, you should choose a pipe 12 cm in diameter, at least 3 - 4 mm thick. To avoid burning out, a metal box is suitable for the ash pan, so you need to choose a durable sheet metal.
First you need to cut the metal, taking into account the thickness and length of the desired blanks.

Chamfer parts from parts, the touch to the furnace will be safer, and the welding seams will be strong:
The design is installed in the following sequence:
After all welding work, check the quality of the seams, tap them. If there are defects, correct them immediately. At the end of the work, weld the upper part of the device.
In order for the potbelly stove to radiate heat for as long as possible without throwing another portion of firewood, it does not burn out quickly, it is possible, the fuel will not burn, but smolder, the heating process without laying firewood can be extended for several hours.

The manufacture of a furnace for long burning is somewhat different from the usual design.
A balloon is best suited for the furnace:
 Like any other heating device, the stove has both pros and cons.
The undoubted advantages of a homemade oven are:
The disadvantages of the oven include:
Furnaces were popular in the first half of the last century. They warmed the soldiers' dugouts, dugouts, and heating wagons.
Today, stoves still heat garden houses, garages, warehouses, greenhouses, that is, where there is no gas pipeline, and electrical appliances are inefficient, while burning a lot of electricity.
The material for the construction is cast iron or stainless steel. The furnace consists of a container, an ash pan, a branch pipe, a chimney, a furnace door.
The types are distinguished:
Any home-made heating device is designed to heat the room, making it more comfortable, but along with this, such devices are far from safe, fraught with ignition, fire.

When installing the structure, it is very important to follow the safety rules:
An excellent budget option for a heating and cooking stove is a potbelly stove. It is incredibly convenient and easy to set up and operate. It is good to have such a device in the country, in the workshop, and in many other places. A water potbelly stove can heat several rooms. There are many different models on sale today, from unpretentious functional to sophisticated retro. But their price cannot be called low. Therefore, craftsmen with some experience, having tools and suitable metal, can try to make an effective potbelly stove with their own hands.
 Drinking from a balloon
 The simplest version of a potbelly stove can be made from improvised materials. A thick-walled barrel, an old industrial can or a gas cylinder (of course, empty) is suitable for this.
Resourceful craftsmen use pipes of suitable diameter, disks from overall wheels and sheets of metal.
When choosing the initial tool for work, it should be taken into account that too thin metal deforms when heated strongly, and the product from it will lose its shape. The optimal thickness of the material is 3-4 mm.
For convenient and efficient work on the manufacture of even a small potbelly stove with your own hands, you will need the following:
Several rows of holes are drilled in the bottom of the potential firebox (sidewall of the cylinder), which will play the role of a kind of grate. An ash pan is located along it - in our case, a box made of thick metal. It must be equipped with an airtight door that prevents ash and hot coals from escaping.
On the sides of the ash pan, the legs of the structure should be welded. A round hole is made on top of the lying balloon.
The vertical part of the potbelly stove will stand on it. It is convenient to make a door from the head of the second cylinder; a branch pipe with a valve is not welded into it - to regulate the intensity of combustion. If the door hinges are located at the top, then the lid under its weight will fit snugly against the furnace opening, which will reduce air suction to a minimum.
A special screen, the panels of which are installed on the rear and side surfaces, will not only increase the operational safety of the system, but also, thanks to the formation of an additional convection flow, will significantly increase its performance.
A potbelly stove is an ideal solution in conditions when it is necessary to provide heating for small-sized premises (garage, utility room, bath heating), spending a minimum amount of money. You can save money by using materials that almost everyone has, as well as by the ease of doing it yourself. Next, we will consider what a potbelly stove can be made of and give specific drawings.
Regardless of the chosen drawing or design features of the potbelly stove, in order to carry out work on its manufacture, in addition to materials, it is necessary to prepare the following tools and equipment:
It is understood that each of the listed tools is designed to work with metals.
Potbelly stove can be made by hand from:
The type is selected from the availability of materials, as well as the preferred complexity of the work performed.
Here are the features of making a stove from metal sheets that use different raw materials for heating: mining and firewood.
To start working with your own hands, a metal sheet of about 5 mm is prepared (it is this width that allows the stove to warm up quickly and effectively heat the garage) and pipes (needed for a chimney and some other elements). For a more accurate understanding of the manufacturing principle, see the drawing: 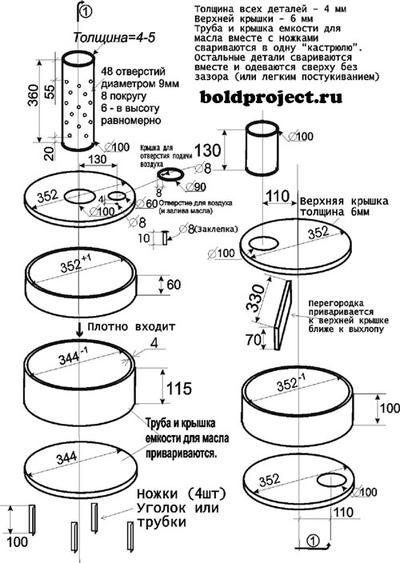
Let's get started:
Attach the potbelly stove to the chimney and try to heat the garage. To do this, pour fuel into the lower tank and set it on fire. When it flared up, you need to close the processing hole with a sliding lid.
Important: To paint the structure, use special heat-resistant paints.
This option is suitable when you need to heat a garage or sauna rooms designed for relaxation.
The features of the model, the manufacture of which we will describe further with our own hands, lies in the high heat transfer and the ability to adjust the traction force.
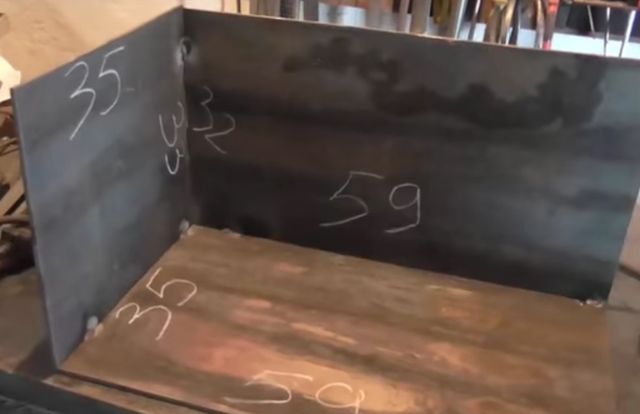
Our oven will measure 45x45x80. Such dimensions are enough to heat the average room. It will fit long firewood and is easy to move.
In this case, we will not give a specific drawing, and will try to explain as much as possible in words. Before starting work, we buy:
When everything you need is prepared, we begin to work with our own hands in the following sequence:
Important: To ensure traction, the doors are attached so that there are small gaps.
This option implies the simplicity of doing the work with your own hands and an aesthetic appearance, which will allow you to heat not only the garage, but also small rooms in the country.
Work algorithm:
If everything is done correctly, the potbelly stove will be able to completely heat a garage or other small room.
From any old can, a potbelly stove can be made with your own hands. For this you need:
Let's get started:
The design implies a minimum of manufacturing costs and you do not need to have professional skills to perform the work. With its help, you can safely heat the garage and other utility rooms.
If you have a gas cylinder lying around on your site, use it to create a potbelly stove.
Work sequence:
Such a stove will heat a garage or a small house in the country.
A potbelly stove is a fairly simple device for heating rooms. When doing work, remember that the stove must not only heat, but also meet the minimum fire safety requirements.
In Russia, then the USSR, potbelly stoves were used where there was no central heating: in front-line dugouts and dugouts of the Great Patriotic War, in state institutions of the same time, in heating cars. See a photo of a potbelly stove made by yourself on the website.
Many Russians are sure that this is only a simple Russian invention. And some are wrong. In the United States, the same homemade products have been used for centuries, being called "fat belly", in Japan - "darums".

The revival of bourgeois women took place in Russia in the second half of the 20th century due to the massive appearance of garages, garden plots, where they were the only means of heating thin-walled buildings.

After the improvement of these mini-ovens - and for cooking: a pot or pan was placed on a stove attached to the top.

Until they were replaced by a centralized supply of methane, gas-balloon stoves or wood-burning bricks. They also came in handy in the 90s of the crisis years due to interruptions in gas and other types of fuel. It's good that at least there was plenty of firewood.

Its main feature is the simplicity of the design. Even with many additions to it, the principle of operation of a metal stove remains the same: everything that is at hand burns and heats summer residents.


Although at the same time half of the thermal energy escapes through the direct-flow pipe. But no one writes off even a heating source that has rusted from time to time.

It is easy to make such a temporary stove in a day or two. But first draw up the drawings of the potbelly stove with your own hands. Much of what is stored in the closets of rural houses and dachas goes into action. These are milk and water metal (but not duralumin) cans, barrels from diesel fuel, vegetable oils, pipes, boxes, corners.

Nothing expensive, including a tool - in the villages every owner has it at hand. High-quality assembly using gas or electric welding.

But neighbors who have units will help with this. Welding machines provide greater reliability and rigidity of the assembly. How to make a potbelly stove with your own hands, step by step instructions below.

Stock up on a hardened chisel, a hammer, a chimney, a piece of rod with a diameter of 0.6 - 1.0 cm. Prepare an electric drill with a drill one centimeter in diameter. If there is a grinder, you will speed up the assembly twice.


In one part of the cover, at the very bottom, drill 5 - 7 holes for future traction. Bend a long rod with a snake and with legs, at least four. These will be the grates when you insert them into the can.

Straighten the snake inside so that it lies horizontally and firmly just above the holes. Firewood will burn on this “grill”, and good air draft will go through the holes and with the help of a chimney. It will be the catalyst for combustion.

For the chimney, fit a piece of water pipe, even used, with a diameter of 7-8 inches. Near the bottom or on the very bottom, strictly perpendicular to the grate, cut through with a chisel or saw through a circle with a grinder.

Insert the pipe into it a few centimeters, and from the outside fix it tightly with a clamp on the bolts or weld it to the can. The can stove is designed for a horizontal position.

Weld legs to it and put it where the potbelly stove will heat the house, garage. This is a very flammable device, so place it on a metal sheet and at least half a meter from wooden structures.


The disadvantage of the stove: you can’t even heat the kettle on it - there’s nothing to put on. And yet it will be an effective potbelly stove with your own hands, and read about the improvements below.


She will correct the situation, and even cook borscht and fry cutlets on this potbelly stove. Not only an old barrel is suitable, but it is better if it is a decommissioned 50 liter gas cylinder.

His walls are thicker, they will heat up a little longer, but they will also hold more heat. This is the perfect sauna heater. And if you impose sea or river pebbles, other strong stones, then it will be easy to raise steam in the room.

It will stand upright. The blower will also have enough space, and a lot of firewood can be laid in the firebox above it. The exhaust pipe can be made not straight, but with knees for a greater return of thermal energy in the steam room.

If a potbelly stove is necessary for a country house, then weld a metal platform on top, you will cook food and cook tea on it.

To do this, it is necessary to overlay two-thirds of its parts with refractory bricks, placing it on horizontal ribs, leaving free access to the firebox and blower. It will be a heat shield that will keep the generated energy much longer. Holes must be drilled in bricks for better heat transfer.


The second option: a potbelly stove plus a water heater. Scald the gas cylinder from which the stove is made with sheet steel of at least three millimeters thick.


So that in the resulting container can hold at least 30 liters of water. Weld the water inlet and outlet pipes to it, connect the pipelines for heating the adjacent room. For better convection, connect a small circulation pump.

The ideal stove is a do-it-yourself gas stove. She does not need a chimney, because no smoke is released when the gas is burned. Its analogue is a room gas stove with an oven.

It is not difficult to make - take ... a ready-made potbelly stove, insert a steel pipeline with a nozzle from an old gas stove into it. Connect it to a standard gas hose with a reducer from a household gas cylinder.

There is no exact consumption for a potbelly stove, you can navigate the stove for 4 burners. The capacity of the cylinder (for 50 liters) with 21 kg of propane-butane is enough for 34 hours of operation of such a stove.


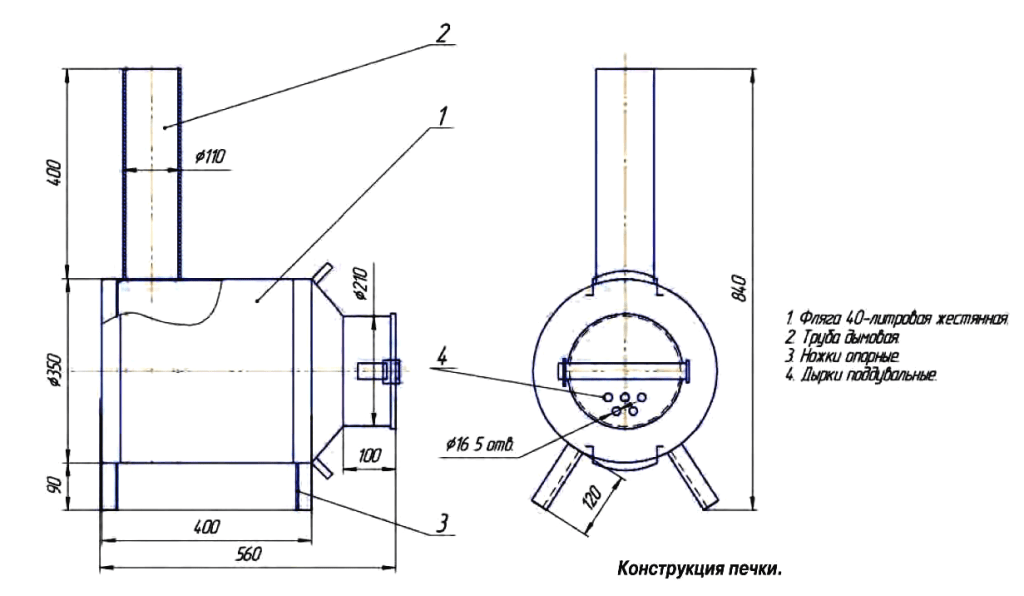
A small country house, garage or workshop can be heated with a small compact metal stove called a potbelly stove. It can be made both from an old steel pipe, a gas cylinder, a barrel and even an old flask, or welded from sheets of metal. The most important thing is that the metal for the manufacture of such a furnace is not too thin.


Potbelly stove from a gas cylinder, an old flask, barrels and a spent fuel stove

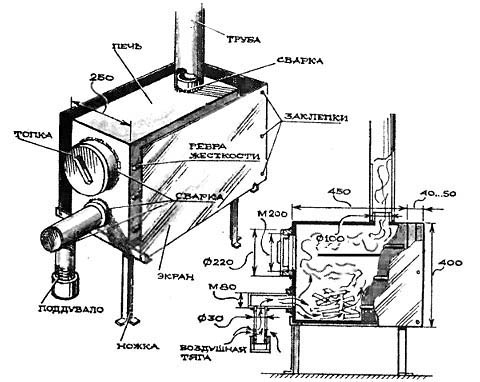
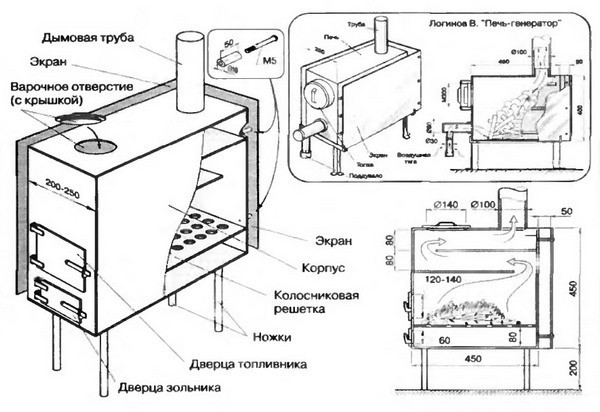
The simplest design is the Gnome stove, which consists of a box with a pipe welded to it.
An important difference loginov ovens is the presence of two plates ( reflectors) in the upper part of the furnace compartment. Because path of gases at the same time, the heat transfer of such a potbelly stove is significantly higher than that of a conventional metal furnace.
Advice. If it is required to reduce the size of the Loginov furnace, then it is desirable to change only its width. When changing the length and height of the structure, its efficiency can be significantly reduced.

Detailed diagram of Loginov's potbelly stove
Box welding
4. To avoid mistakes, the oven box is first only tacked by welding in several places, and only then, after checking its horizontal and vertical, its seams are welded.
Important! All connections in the body are carefully welded; to check seams for tightness, you can coat the joints with chalk or kerosene.
5. Welding seams are cleaned with a metal brush.
6. The internal space of the potbelly stove is divided into three parts: a firebox, a smoke chamber and an ash pan. To separate the firebox from the ashpit, a grate is laid between them, on which the fuel will be placed. To do this, at a height of 10-15 cm from the bottom of the furnace from the sides and on the back of the box are welded corners 5x5 cm on which the lattice will be located.
Advice. The grate is best made from 2-3 detachable parts. Otherwise, when replacing a burned-out grate, it will be difficult to get it out of the furnace.
7. The grating is welded from thick steel bars or strips 30 mm wide. They are attached to 2 stiffeners - rods with a diameter of 20 mm. Since the grate burns out over time, it is better to make such a grate removable.


Making a grate
8. At a distance of 15 cm from the top of the box, two strong rods are welded on which will be placed one or two removable reflectors- thick-walled metal sheets that will delay the flow of hot gases and send them for afterburning. However, they should not completely block the oven. In order for hot smoke to be able to enter the pipe, about 8 cm is indented from the front (for the first sheet) and the back of the furnace.


Scheme of the passage of gases in the simplest potbelly stove and a furnace with an installed reflector

pipe hole
10. The front part of the stove with holes cut out in it for the doors of the furnace and ash pan, is welded last.
11. The size of the firebox door should be sufficient so that it is possible to load fuel and change the grate without effort. The hole for the ash pan is made a little smaller.
12. The hinges are first welded to the door, and then to the potbelly stove body. They can be bought ready-made or welded from two tubes of different diameters. Door handles can be made from a strip of metal or a bar.

Door welding
Important! When attaching doors, fit them to the body as tight as possible; for this, they are straightened (aligned) and cleaned with an emery wheel. The wedge locks that close the doors are fitted to the body as tightly as possible.
13. On such an oven you can cook food or warm water. To do this, a hole of the required diameter is cut in the upper part of the box. Burner for oven, which will be inserted into this hole, can be purchased at any hardware store.
14. For ease of use design mounted on legs or a welded pipe stand.
15. The chimney is connected to the stove using a sleeve.
16. For inserting a slide gate, regulating the exit of smoke, two holes are drilled in the pipe. A metal rod is inserted into the holes and bent at 90 °. A "penny" made of metal is attached to it in the center of the pipe - a gate, the diameter of which should be slightly less than the diameter of the pipe itself by 3-4 mm.

Smoke damper

Chimney Hogs
A tall person can touch a heated pipe, so the bur must have a protective cover in the form of a mesh. To avoid burns, the distance from the floor to this pipe should be 2.2 m. The vertical part of the pipe coming from the furnace is additionally wrapped with thermal insulation.
Important! The pipe should be located away from the plastered walls at a distance of 1.2 m. The distance from wooden structures is 1.5 m.
Advice. Laying a pipe through a wooden ceiling and roof is a rather laborious process. It is much easier to bring it out through a hole in the wall or window.

Smoke outlet through the window
Important! A working oven requires supervision. You should not leave the room where the potbelly stove is heated for a long time.

Installing a potbelly stove on a brick base
But if a conventional heating stove installed in premises for permanent residence has an extensive network of chimneys that trap heat, in a potbelly stove it goes directly into the pipe, so its efficiency is not too high. That is why it is too "gluttonous" and requires a lot of fuel.
To reduce fuel consumption, you can use the following tips from experienced stove-makers:
firebox door and blower in such an oven should be as tight as possible; otherwise, the air supply to the potbelly stove will increase, and the fuel will burn out too quickly;
to regulate the output of warm smoke in the chimney it is desirable to provide a gate valve;
next to the oven, you can provide side metal screens at a distance of 5-6 cm from the stove, in which case it will heat the room not only due to heat radiation, but also with the help of convection (warm air circulation);
a potbelly stove, “dressed” in a metal casing, will help keep the heat much longer;

Potbelly stove in a casing

Round furnace with an afterburner and a casing with a heat gun
To retain heat in the room, it is necessary to increase the elbow in the pipe; however, at the same time, soot will linger in them, therefore it is desirable to create a collapsible structure;
the pipe can also be given a stepped shape: place the knees in stages, with each step making a turn of 30 °; at the same time, each of the knees must be securely attached with bars to the wall;


Stove with chimney elbows
chimney capacity should be less than the productivity of the furnace itself, in which case hot gases will not go into the pipe immediately; its diameter should be only 2.7 times larger than the volume of the furnace, for example, with a furnace volume of 40 liters, the diameter should be 110 mm;
you can increase the efficiency of the furnace and with the help of blowing the chimney with a fan- this will turn the stove into a kind of smoke gun;
to reduce air circulation firewood in the oven should fit as tightly as possible; if it is heated with coal, it is necessary to stir up the resulting ash as rarely as possible;
to adjust the air flow, the door to the blower can be made adjustable by providing it with vertically located slots and shutter, which will cover these gaps;
to increase the heating area, it can be ribbed, that is, welded onto its body perpendicular to the furnace metal strips;
if you put steam on the stove buckets or metal box with sand, then they will accumulate heat and store it even after the furnace is extinguished; sand backfill or heat accumulator made of stones can be sewn inside the metal body of the furnace;

Scheme of a potbelly stove with sand filling, the furnace is made of a pipe with a diameter of 500 mm, its length is 650 mm
Bake, lined with 1-2 layers of brick, will keep warm much longer;

brick screen
The volume of the furnace also matters: the more the area of its walls, the more heat they will give into the room;
bricks or sheet metal, on which the stove is installed, will help not only to protect the room from fire, but also to keep warm.
INSTRUCTIONS AND PROPHECIES OF THE Blessed MOTHER ALIPIA GOLOSEEVSKY, Kyiv...

Eufillin dropper in ampoules is used to treat pathologies that ...

Among all ointments for the treatment and prevention of joint diseases, the most ...