INSTRUCTIONS AND PROPHECIES OF THE Blessed MOTHER ALIPIA GOLOSEEVSKY, Kyiv...


The summer time gives us the warm sun, greenery, flowers and a great opportunity to take a shower in the fresh air. After the tightness of a city apartment, this procedure brings a pleasant feeling of renewal and unity with nature.
Despite the simplicity of the outdoor shower design, there are many interesting options for its implementation. We will get acquainted with the most interesting and profitable for construction in a summer cottage in this article.
It's no secret that you can build a summer shower for a summer residence from different materials. For the frame, you can take profile metal or wooden beams. To fill the walls of the booth, cellular polycarbonate, corrugated board, tarpaulin, plastic wrap, siding, blockhouse are best suited.
In addition to using a frame structure, the walls of the shower cabin can be made of blocks or bricks. The washing compartment can be single or interlocked with a toilet. This solution reduces the cost of construction and allows rational use of the area of the site (photo No. 1).
Photo No. 1 "Two in one" - a popular way to combine a shower with a toilet
The simplest and most inexpensive outdoor shower is a frame made of wooden bars sheathed with a planed board (photo No. 2-3).
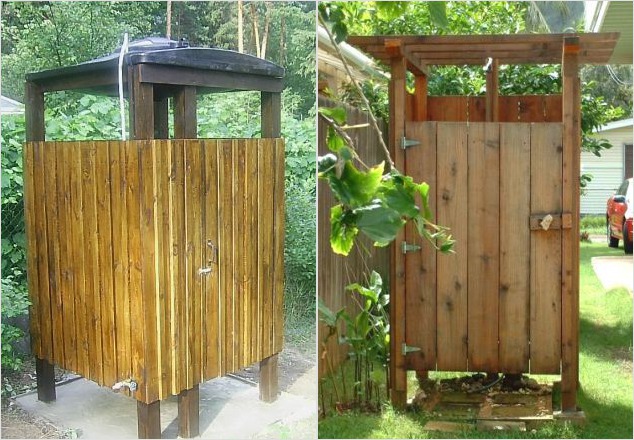
Photo No. 2-3 Summer shower with a cabin made of timber and boards

Photo No. 4 An example of the simplest prefabricated structure made of timber and boards, which can be covered with an awning
The main thing to pay attention to in this case is the strength of the frame on which the container will stand. The frame racks must be protected from decay and reinforced with corner braces. The concrete floor can be replaced with a standard shower tray by directing soapy water from it into a common septic tank.
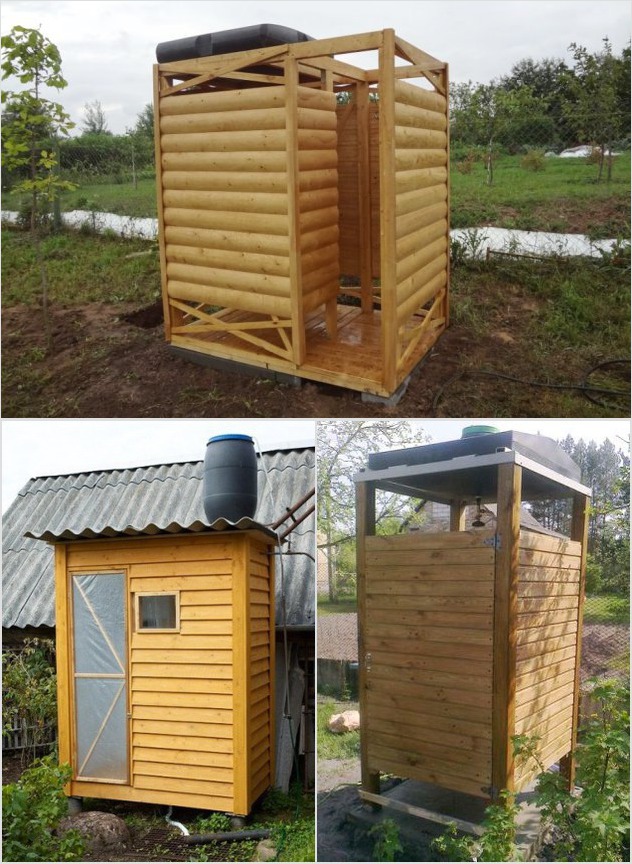
Photo No. 5-6-7 Variants of interesting, but at the same time simple wooden showers
If you have a grinder and welding, then you can make a summer shower with your own hands from a metal profile and cover its walls with a tarpaulin. If there is no welding machine, then the frame is assembled using threaded connections, and the corners are reinforced with steel “kerchief” plates (photo No. 8-9).
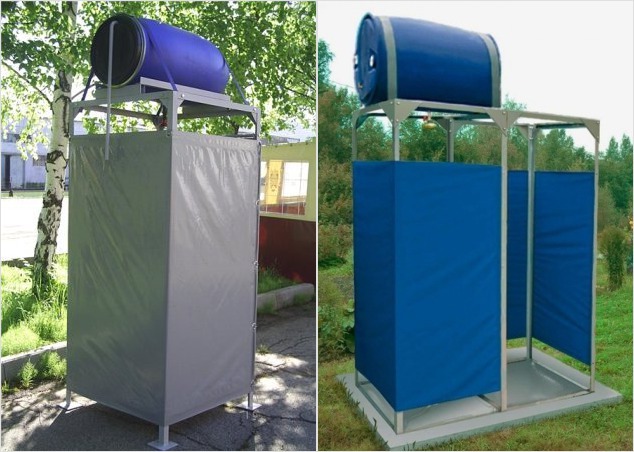
Photo No. 8-9 Summer shower from a metal profile covered with tarpaulin
This version of the shower is more convenient than a single cabin, since it has two isolated compartments: for undressing and washing.
Photo No. 10 shows a garden shower popular among summer residents. It also uses a metal supporting frame, but the filling of the sidewalls is made of a film screen, put on rings and a cord.

Photo No. 10 Shower stall with a metal frame and a screen made of polyethylene film
The metal base of the booth is easily combined with corrugated board. So it turns out a simple and reliable design, well protected from the wind (photo No. 11).

Photo No. 11 Shower cubicle sheathed with corrugated board

Photo No. 12 Garden shower with a dressing room (220x100) from profiled sheet and pipes
In the factory, outdoor shower cabins are most often made using two materials: a profile pipe and sheet polycarbonate. If you want to save money, the same design can be assembled by independent efforts. It turns out aesthetically pleasing, durable and practical (photo No. 13-14).
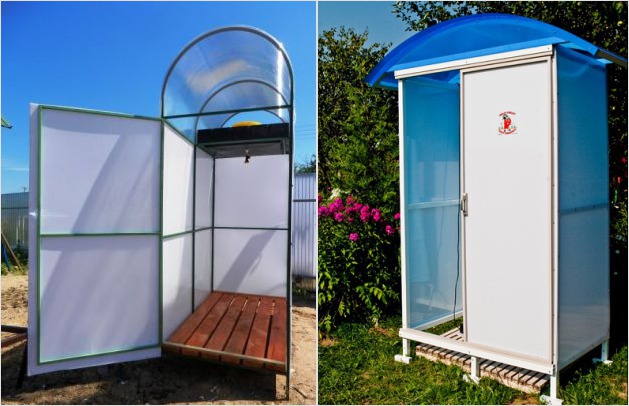
Photo No. 13-14 An excellent shower for a summer residence - a profile pipe and cellular polycarbonate
The dimensions of this design are designed for the installation of a flat plastic tank with a "watering can".
The shape of the shower cabin does not have to be rectangular and closed on three sides. Photo No. 15 shows an interesting solution based on a wooden beam wall and a metal pipe along which the screen moves. You can't put a heavy tank on such a shower. It is designed to supply heated water from a domestic water supply.

Photo No. 15 The original "corner" street shower
A frame for a summer shower is not needed if you attach it to the wall of the house. To do this, you need to line it with a waterproof material and bring the mixer with a hose to the surface. By filling the floor with large pebbles and making a simple drainage, you will get what you dreamed of: a cozy corner for water procedures, filled with air and light (photo No. 16). If you do not like the open version of the wall-mounted shower, then put a lung against the wall as in photo No. 17.
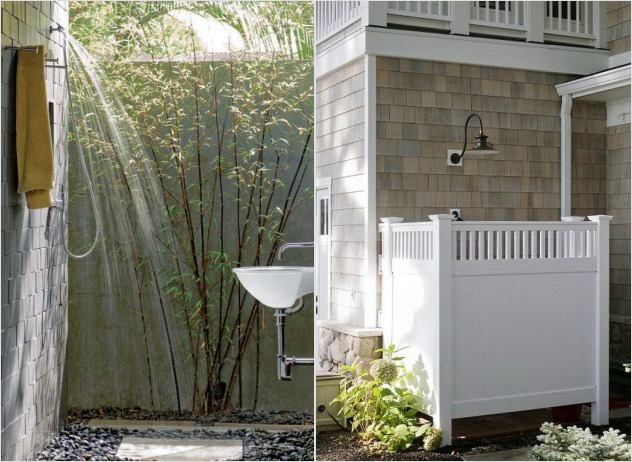
Photo No. 16-17 You can take a shower in summer not only in a cabin, but also near the wall of the building, and the wall shower enclosure will protect you from prying eyes
Weaving plants can be successfully used to fill the walls of an outdoor shower. All that is needed for such a solution is a lattice screen made of mesh, on which ivy, hops or grapes will weave a living carpet.
Considering the materials from which you can build a shower structure, do not forget about natural stone. The option shown in photo #18 will perfectly complement the landscape design.
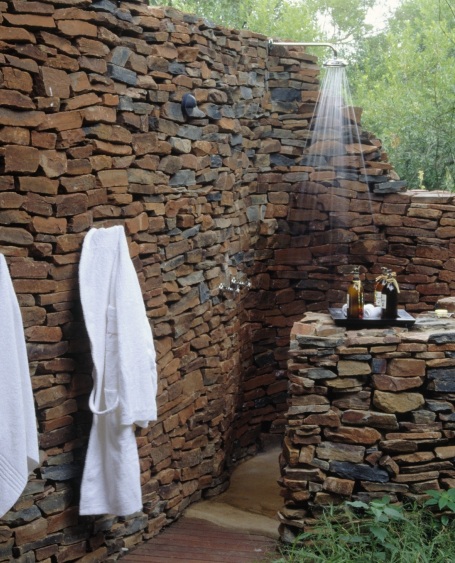
Photo No. 18 A wall of wild stone, curled up like a snail, is the best place to place a summer shower
The laying of the fence in this case is made dry, without the use of mortar. It is not needed here, because a flat stone was used in the work. It is securely held in the wall array due to its weight. The considered option does not involve the installation of a container, since its appearance will spoil the beauty of stone lace. The shower head is supplied with water from an external water supply.
If there is an old tree on your site, do not rush to cut it for firewood. Its trunk can be used as an original outdoor shower installation. Surround it with a curvilinear concrete wall, and your creativity will delight neighbors and friends (photo No. 19).

Photo No. 19 An old tree on the site is not a hindrance, but the basis of the original shower design
Continuing the review of the options for a summer shower, we note that it can be built not only from purchased, but also from inexpensive improvised materials.
In photo # 20 you see such a design. Its frame is made of wooden bars. Weaving from a willow vine, which grows next to summer cottages, was used as a fence.

Photo No. 20 Simple, inexpensive and beautiful - a wooden frame sheathed with willow vines
If you are going to build a utility block of bricks in the country, do not forget to plan a shower compartment in it (photo No. 21-22).
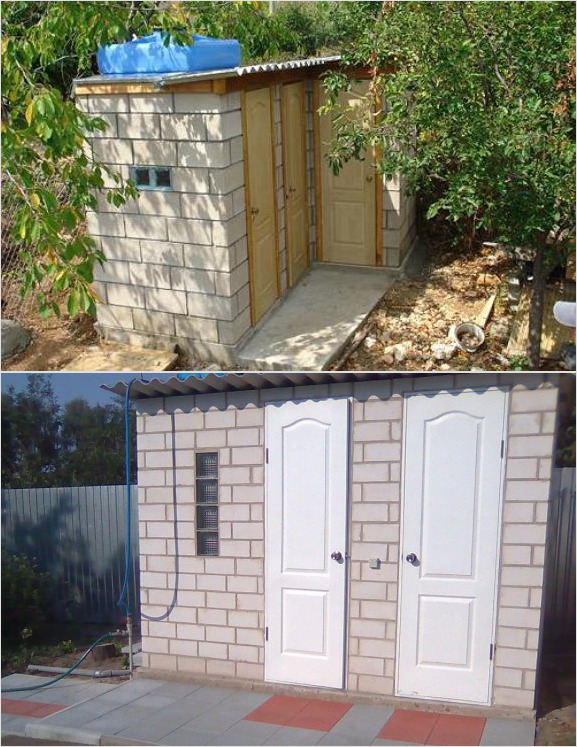
Photo No. 21-22 Compact hozbloki "shower shed" from blocks
On the solid stone walls of such a structure, you can easily install any volume and shape.
Shower cabins of factory production are presented in several options. In some, the metal frame is equipped with a screen made of synthetic fabric. Others are sheathed with cellular polycarbonate or made entirely of modular plastic panels. The buyer is offered two planning solutions: an outdoor shower with and without a dressing room.
The average price of an outdoor shower with a moisture-resistant awning and a 200-liter plastic tank (heated) is 15,000 rubles. For a frame-tent structure, supplemented by a locker room and a washbasin, you will have to pay at least 18,000 rubles.
A single cabin made of cellular polycarbonate on a galvanized frame with a heated 200-liter tank can be bought at a price of 20,000 rubles. This design can be supplemented with a locker room, paying about 5,000 rubles for it.
A summer shower cabin made of plastic on a metal frame, equipped with a heated tank, will cost no less than 24,000 rubles.
Note that prices can vary greatly in the regions of the Russian Federation, so you can get the most up-to-date information from local manufacturers.
The choice of material in this case depends on the set of tools that you have. If the farm does not have a welding machine and a grinder, then the frame is made from planed bars. You can sheathe it with a board, plastic clapboard, or simply fix waterproof film material on the racks.
A summer shower made of polycarbonate on a metal profile is more durable than a wooden one and is not much more difficult to assemble. For this work, you need to prepare a steel corner 50x50mm or a profile pipe with a section of 40x20mm (wall thickness 2 mm). The number of purchased profiles is calculated based on the dimensions of the shower: height 2.1 meters, length and width - 1 meter.
Cabin dimensions may differ from those indicated, since its length and width depend on the dimensions of the purchased tank. The length of the racks must be taken 10 cm more than the height of the frame (for concreting).

It is more convenient to assemble the sidewalls on a flat asphalt or concrete platform, using the welder's magnets to fix the profiles.
The sequence of operations looks like this:

After that, it remains to weld the door frame and fix the hinges on it. The work is completed by cutting the cellular polycarbonate and fixing it with self-tapping screws to the shower frame. To collect water, you can use a steel pallet or, at the concreting stage, make a drain channel by installing a ladder and a sewer pipe in it.
Unfortunately, we never have enough time to take a hot bath. The rhythm of life is so great that it is not possible to devote an hour of your time to the bathroom almost every day. Think about it, how many times have you enjoyed hot foam in the last six months? Probably once or twice at the most.
And the rest of the time you just climb into the bath under an impromptu shower and vary between narrow and smooth walls of the container. So, isn't it better to save yourself from such torment and install a shower cabin?
Modern shower cabin
Today, plumbing manufacturers offer a lot of options both in price and design. You can purchase simple shower cabins, consisting of a tray, doors, the walls are the walls of the bathroom.
Or more complex designs - shower boxes. They are a limited and completely isolated space, consisting of a pallet of various sizes, doors, walls or additional functions such as hydromassage or.
However, not all of us can afford such large-scale shower cabins, both in terms of size and price. Therefore, our craftsmen offer you to make a tray for a simple shower cabin yourself.
The issue is especially relevant for small Khrushchev apartments, where the bathroom does not allow you to place not only a bath, even just an acrylic tray.
shower box
Of course, you can go the easy way and wall up the finished pallet into the floor during the renovation of the bathroom. However, remember, an enameled pallet will slip, while an acrylic one is easily scratched, fragile, and may eventually lose its color.
Buying a pallet made of ceramics or marble will not justify itself, because we want to save money, but this will not work with such materials.
Steel pallets will also not be a joy for you: today they are made of thin steel, it makes noise, and the enamel on the surface quickly cracks.
Therefore, a more practical solution would be to make a brick pallet and finish it with tiles.
The advantages of a do-it-yourself pallet:

As you can see, making a pallet with your own hands is your chance to show your plumbing and design skills. Not to mention the fact that this is a chance to save money and save the family budget.
In order to properly direct your forces, you must imagine what you have to do.
So, the design of a homemade pallet consists of a concrete base (or brick), tiled, there is an outer wall so that water does not fall on the bathroom floor.
Inside the structure there should be a ladder to drain water into the sewer.
The concrete/brick base must be treated with a cement-based waterproofing material and only then can you proceed with the tiling.
During the work you will need:
Basically, these are all the materials that should come in handy during work.
Do-it-yourself tile shower tray.
For lining the shower tray, you will need the following materials:
All of the above tools will be needed at the last stage of finishing the pallet.
In order to finally make a high-quality, reliable, attractive and, most importantly, durable pallet, follow our instructions.
Step 1: Preparing the Surface for the Pallet
The first stage must be performed at the earliest stage of bathroom renovation. Try to do it before finishing the walls and floor.
So, clean the floor, sweep it. Treat the area where the pallet will be, that is, the floor and walls with waterproofing material. Experts recommend using bituminous mastic.
Carefully process all junctions of the shower tray with walls and floors.
Protects surfaces from mold and moisture. At the stage after the waterproofing material has dried, a floor heating system is usually laid.
Waterproofing will protect surfaces from mold and moisture.
Then bed on the treated area with a greenhouse film - this item is optional.
Step 2: laying the base
When the waterproofing layer is completely dry, proceed to the formation of the contour of the future pallet. Classic size for a pallet: 90x90 cm.
To do this, use a silicate or ordinary brick. Experts recommend purchasing red brick, as it is resistant to moisture.
For laying bricks, use cement mortar or any other, bought in the store. Do not forget to lay a metal mesh on the base to strengthen the structure.
When installing the bottom of the tray, be careful: the water outlet must be a 30-degree angle, not a 900.
Now leave the pallet for three to four days.
Step 3: second part of pallet laying
After a few days have passed, cover the pallet with waterproofing material again (bituminous mastic). So, you will increase the moisture resistance of the future design.
Make the sides of the pallet a little higher by about one brick. Then make a cement screed both inside and outside the structure. Make a screed based on cement and sand with crushed stone impurities.
We make a screed
The bottom of the pallet must be made with a slope of 1-1.5 cm to the drain hole. Use a spatula and trowel to level the surface.
To simplify the work, apply plaster beacons, but do not forget to remove them later.
When the cement screed dries, the entire surface of the pallet, both inside and out, is again treated with a waterproofing mixture. So, moisture will not get into the layers of the screed, and will not destroy the brick.
Step 4: align the design
When the surface of the pallet is completely dry, apply a leveling compound to it. Do not forget to make a smooth and light recess around so that the water flows freely into the sewer.
Almost the last preparation of the pallet: when the leveling layer is dry, apply the waterproofing material again. Do not neglect such frequent use of the protective layer. So, you protect yourself and the neighbors downstairs, who probably won't get yellow spots on the ceiling.
Step 5: finishing the outside of the pallet
Prepare the adhesive composition according to the instructions indicated on the package. Be careful: you may have to prepare the glue several times. There are mixtures that spoil quickly if left unused for several hours.
You need to lay the tiles from the far corner, which is visible at the entrance to the bathroom. Be sure to check with a consultant or read on the adhesive package what exactly you need to apply the adhesive: on the surface or on the tile.
Check each tile with a building level. For proper laying, the tiles are tapped with a rubber mallet.
When laying each subsequent tile, do not forget about the formation of seams with the help of crosses.
Step 6: Finishing the pallet with grout
After fully laying the tiles on the pallet, you need to protect all the seams. Why do you need grout and a rubber spatula. Choose not only a waterproof, but also an antibacterial mixture.
Fill all seams with a special waterproof mixture, remove the remains with a clean cloth. To make the seams the same and uniform, go over them with the reverse handle of a rubber spatula.
Step 7: finish
Wash the entire pallet with a wet cloth, thereby removing any remaining adhesive or grout from the surface of the cladding.
When the grout is completely dry, the tile must be washed again and wiped dry.
The shower tray is ready, in a few days you can use it.
Ready shower.
Remember, instead of tiles, you can use mosaics. Today it is sold in whole sheets, which are placed on the adhesive composition. In the same way, apply glue with a spatula to the mosaic sheet and apply it to the surface of the pallet.
After laying the mosaic, also seal the seams, only in this case, remove the residues immediately, because then it is almost impossible to remove them. After drying, also wash the lining and wipe dry.
You just have to remove the metal cover from the drain, install glass doors and taps. After three days, your shower is ready to use.
To make a pallet with your own hands, you will need two weeks, no more. But at the same time, how much less money will you spend! Don't be afraid to experiment and you will succeed.
Progress has come to the point that you can purchase a one-piece outdoor shower module in a building supermarket for about ten thousand rubles. However, you can save at least twice and do the same with your own hands. Before you start building a shower in the country, you need to carefully work out the details, such as the project itself, in which part of the site the shower will be located, and decide what materials it will consist of. In addition, you need to take into account the usability factor both in use and in maintenance.
Set yourself the following goals:
Water should not stagnate, so a slight elevation is required for the location of the shower. It is not worth starting the construction of a shower in a depression or lowland, as the water will have nowhere to drain.
 Choosing the right place for a shower will help to avoid problems in the future
  Gravel padding contributes to the rapid absorption of water into the soil
 If you have a barrel as a source of water, then it would be more appropriate to place the building in a place where it will be as accessible as possible to the sun in order to ensure good heating of the water. If you need artificial heating, then choose a place based on the location of the water supply.
Another factor for convenience will be not too far away, so that you can quickly get home after water procedures.
It is important that it is convenient to be inside almost any person. On average, the parameters can be as follows:
Such dimensions will require a minimum area and consumption of materials, as it is adapted to the standard dimensions of building materials.
 Optimally comfortable dimensions for a shower in the country
 To perform the work, you will need typical tools: a tape measure, a hammer, a level, a screwdriver and a saw.
 Tools needed to build a shower
 What materials you need depends on what you decide to build a shower from in your summer cottage. But in any case, a supply of nails, screws, and plumbing materials such as pipes, a tank, faucets, a watering can is necessary.
Regardless of whether you are building a shower for a summer residence from polycarbonate, brick, slate or any other material, you will need cement, sand and filler for the foundation. Try to calculate the amount of bulk materials so that there is no excess left.
In the final stage, do not forget to please yourself with decorative elements and necessary accessories, such as hooks and a curtain.
In addition to complex designs, you can also use minimalistic versions.
Portable shower - the name speaks for itself. To operate it, you will need a capacity of 20 liters (it will last for about 10 minutes). Having filled the tank with water, it is left in the sun to heat the water. At the right moment, just place it at the required height and use it.
 Inexpensive shower option that can be used anywhere
 This option will work well if you are in a place where there is no access to a stationary shower. And to everything else, you can use a portable shower to give anywhere.
 Portable shower toptun
 A shower in the house, or rather directly next to it, will be simple and convenient. A shower of this type can be located against the wall of the building. Installation is pretty simple.
This type of shower is convenient because it does not require much effort to install and can be disassembled for the cold season.
In addition, the water does not need to be heated in the sun, it comes from a public water supply. As a result, you get a warm or even hot shower in the country without much effort. The walls of the shower can be made of polycarbonate or other quickly assembled material. However, be careful that drain water does not begin to undermine the foundation of the house.
 This summer shower uses hot water from home.
 One of the most popular shower options is a stand-alone version combined with a change house. It can be either a whole room divided into parts, or made from different modules.
 Combined construction of a change house with a shower
 Country souls of this type are temporary and require a frame, since, unlike brickwork, it is quite easy to disassemble. The frame can be either wooden or metal. In both cases, special treatment is required to avoid damage from moisture.
In order to assemble this design, a lot of work is not required. We mark the territory and level it. It is desirable to create a pillow-mound of sand and granulation. Then we lay the boards and install the assembled structure or assemble it on site.
Portable shower in a case. There can be many types of such a soul. But the essence remains the same everywhere - the volume of water for a maximum of two, problems with heating water. But this soul does not need a drain pit either - the ecology can definitely cope with a couple of tens of liters of dirty water.
No doubt, it is most convenient not far from the site and with all amenities. Nevertheless, such versions can be a good help in the field.
Different types of building country showers require different levels of training. This means that the basis is also needed different.
For a portable shower, you only need to remove about 15 centimeters of a layer of earth and fill it with sand mixed with gravel.
For more complex buildings, a foundation will already be required. Its depth depends on the load that the building materials will give. For a vertical brick shower 300 centimeters high, you need 30 centimeters of foundation.
 Capital construction of a shower in the country
 The bookmarking algorithm is quite simple, namely:
For normal operation of the drain pit, an average of 2 cubic meters is required. In order for it to be durable and serve you as long as possible, it is advisable to strengthen the walls of the pit. This will help to avoid scree soil. In addition, it is desirable that the drain be located a couple of meters from the shower itself. This is necessary for two reasons: to prevent washing and destruction of the foundation and the formation of unwanted odors.
Given the above, make a personal calculation of the volume of the pit based on how much water will go there at a time.
You should also make sure that the pit does not dry out and does not overflow - both of which will damage the operation of the pit. You should not drain into a common pit, as this will adversely affect the microflora, and it will quickly fill the pit.
 A drain hole for a shower can be made from old tires and placed directly under the building
 The choice of container for collecting water is very large. The stores have tanks of various shapes and sizes, it all depends on your needs. The most convenient is a flat tank, black, because due to the narrow layer of water, the rays do not have to penetrate far, and the black color absorbs more heat - as a result, the water heats up faster. Such tanks are equipped with special outlets for water, which simplifies the installation of the system.
 The flat black tank heats up faster in the sun
 You can artificially heat the water with a heater. Care should be taken here - the insulation can pass through and a short circuit will result in the toga or the water will be energized.
 Shower tank with built-in shade
 If it is not possible to buy a container in a store, you can make it from improvised materials, for example, a household barrel or weld it from metal sheets.
When purchasing and installing a tank, consider how its weight will be distributed and how much water your family will need. To simplify the intake of water, you can bring a hose to the tank.
Lighting will be useful, as you will have to take a shower in the dark. However, when laying and wiring wires, follow the safety rules:
For ventilation, make a window or a special hole with a grill or mesh so that debris and insects cannot get inside. Ventilation will help to avoid wrangling and bad smells in the shower.
 For good ventilation it is necessary to make an opening window
 It is logical that it is best to finish with those materials that will not deteriorate due to moisture getting on them, it can be plastic, plastic, oilcloth and even linoleum. If you decide to make a wooden shower for a summer residence, then all the material must be primed before painting, and then covered with hot drying oil (each board separately).
It is worth taking care of the floor covering. On a concrete or sand floor, you can lay a wooden grate, also treated with drying oil, and a rubber mat on top.
 As a floor, you can use a wooden grate
 Inside, a dressing room with various accessories will also be useful. Shelf in the shower can be made together with hooks to conveniently fold or hang clothes and accessories. Keeping the locker room dry is also important, so you can raise the floors using any means at hand that will ensure the stability of the lattice.
The main stage of work when installing a cabin in a bathroom is the installation of a shower tray. You can do this yourself, subject to technological requirements.
The easiest way to mount acrylic, ceramic or steel products - this does not require unique knowledge and complex tools. But with certain skills in construction and repair, it is possible to equip a bathroom with a concrete pallet, ennobled with ceramic tiles. Installation of a shower tray made of marble or cast iron must be carried out by specialists due to the heavy weight of the products.

Shower trays come in various shapes - square, rectangular, with rounded edges. The choice here depends on the desire of the owner. It is much more important to consider the depth of the structure when installing:


In some cases, a waterproofed floor with drains for draining water acts as the bottom of the shower cabin.
Pallets are also built-in and removable. This moment must be taken into account during installation.
No less important is the wall thickness of the selected plumbing element.
Pallets with thin walls are made of acrylic and plastic. The advantages of such models include ease of transportation and installation, as well as a budget price. But thin-walled models have a number of disadvantages:
The coating of steel pallets may peel off, rust spots appear on damaged areas. Acrylic analogues are easy to scratch if, for example, you decide to wash your beloved dog.
Ceramic pallets, or those made from brick and concrete, are more durable. The most durable are cast iron models.
The installation of a shower tray can be done in various ways:
The base is chosen depending on the configuration of the model and its technological characteristics. The need for a foundation is due to the fact that the drain hole must be located above the level of the sewer line so that the water leaves well. Masters believe that the angle of inclination from the bottom to the entrance to the sewer line should be at least 3 degrees. If it is not possible to make a pedestal or lower the sewer inlet, a special pump will be required to pump out the water.

Most deep models are equipped with a special metal profile frame. But if the tray is thin-walled, the feet of the swimmers will quickly push through the bottom between the guides, especially if the owners of the bathroom are not distinguished by a fragile constitution. In these places, the acrylic options may even form through cracks. Therefore, deep, thin-walled pallets also require a stable foundation.
Installation of a ceramic shower tray is possible without a foundation, directly on a flat floor without a mounting gap.
Here it is necessary to monitor the quality of laying sewer lines so that the drain hole is higher than the outlet, and the water quickly leaves the tank. The element itself is attached to the floor with glue or a cement tile mixture.
Cast iron elements are usually simply placed on the floor. Their height is sufficient for reliable discharge into the sewer. The same goes for stone products. But there may be a problem with the siphon. It will have to be equipped directly on the floor surface, or a flexible unit must be connected and hidden in a specially equipped niche in the wall.

Consider how to mount different types of foundations when installing shower trays.

If you still choose this type of base, a lot of time for installation will not be required. The main steps here will be:
Under the bottom, you can place a plate of extruded polystyrene for thermal insulation of the area. Mounting foam is used in the same way. This is especially important when installing steel pallets. It will also help reduce the sound of falling water.
When the installation of the shower tray is completed, you need to check its stability. If the pallet staggers or creaks, additional supports from steel corners or brick posts will be required.
To protect the thin bottom and give the structure stability, you can make a removable formwork and pour concrete. The installation of the shower tray will be carried out on the resulting pedestal. This method has disadvantages: it is impossible to check and fix the leak. Replacing the sewer unit, and bringing the siphon down is also quite difficult. Alternatively, you will have to use flexible connections and hide the siphon in a niche in the wall.
This is an excellent solution for most pallets, eliminating any deformation and extending the life of plumbing. The main thing is to choose the place where the siphon will be installed.

Bricks in this case are laid not only around the perimeter of the product. Otherwise, the bottom will bend over time. In designs with legs, to eliminate this drawback, an additional support is provided in the center. Since there is a bulge there, you cannot install a similar model on a flat brick foundation. It is necessary to provide a recess for this tubercle.
The correct technique for creating a brick base is as follows:


The installation of the shower tray is carried out after 3 days, when the masonry fully rises.
If the pallet is semicircular, on the bend, the bricks are laid out with a fan of bonded edges.

A welded frame made of metal corners 20 by 20 mm can act as a support in the center of the bottom. It is installed between rows of bricks and is fixed to the floor with dowel-nails. Acrylic should be protected from friction against metal surfaces with a layer of insulating rubber glued to the metal.
A deep pallet on a high foundation will require the creation of a ladder to the entrance to the shower stall. Steps can be created from concrete or bricks and overlaid with tiles. The walls behind the pallet are finished with tiles or other waterproof material. The tile adhesive must also have excellent moisture resistance.
Each shower enclosure comes with assembly instructions. Additional tools and materials are also indicated there. But if you decide to choose your technology, then you should take care to select the appropriate tools and consumables. In most cases you will need:
If you need to do brickwork, you will additionally need a mixture for mortar and a trowel.

Regardless of the type of pallet, it is necessary to prepare the bathroom for its installation. For this you should:
An important point is the wiring. It must be hidden and moisture resistant, with a minimum number of twists. For the connection, you should choose a copper three-core wire with a cross section of 2.5 mm or more with double insulation. It is laid directly from the electrical panel with the installation of a residual current device.

Most modern showers are equipped with acrylic trays. They are easy to assemble:

Now you can attach the decorative part of the pallet, or do it during the installation of the entire booth. To check the correct installation, you should carefully stand in the pallet and feel how stable and reliable it is.

After completing the work, check all attachment points, as well as the water supply and its drainage. If there is a leak somewhere, tighten the connections a little more. If necessary, carry out additional insulation work.
Similar designs are made by stamping. They do not involve the manufacture of legs at the same time with the body. The installation of a steel shower tray is carried out on a special stand: a profile laid along the perimeter of the bottom, to which threaded bushings are welded. The legs are screwed into them.

For correct installation you need:

It is possible to strengthen the steel pallet with the help of supporting pillars, for example, made of brick. They must necessarily correspond to the structure in height. Otherwise, the support elements may push through the bottom.

To make the steel pallet look aesthetically pleasing, you can overlay the stand with bricks and glue it with tiles. It is placed with a slight slope towards the pallet so that water does not accumulate.

Such products are heavy and massive, so they are installed on the floor without any stands and legs. They sometimes have niches for the siphon, but more often the structures are monolithic, with only one drain hole. In this case, you will either have to use a flexible drain system, or install the tray on a pedestal. The last option requires the following steps:
The facade parts of the pedestal are faced with ceramic tiles or mosaic modules. Joints of products of any type are treated with sealant. If the appearance does not suit the owner of the shower cabin, you can strengthen the joints with plastic decorative corners, which are fixed with glue or sealant.

It is realistic to create a shower tray with your own hands, without purchasing a finished product. The advantage of this option is in the individual design. You can choose any shape, size and color of the cladding.
How to install a shower tray:

After the final solidification, the surface is covered with tiles, mosaic modules or other waterproof decorative materials.

Most often, small chips and scratches occur on the surface of acrylic products. Do not be upset, such damage is easy to repair. With the help of a special restoration composition, it is possible to eliminate even through breakdowns.
Cast stone products are restored in the same way.
Ceramic pallets are difficult to restore. Even the strongest adhesive will not last long, and the structure will, unfortunately, collapse rather quickly.
In products made of steel and cast iron, enamel most often suffers. If there are no through breakdowns, then it is not difficult to repair the damage. To do this, use liquid acrylic with a hardener. Either epoxy is applied, and liquid enamel is applied on top.
Installing a standard shower tray with your own hands is quite realistic. However, if you want to create a shower cabin of an unusual shape, or have purchased an extremely expensive or complex model, it is better to seek the help of professionals.
Hot weather is a rarity in most of our country. On cold days, it is simply not possible to heat the water in the tank to the desired temperature. There are not many people who want to take an ice shower.
By country shower, most people mean a simple design with a barrel on the roof. Such a shower has the following disadvantages:
To realize the idea, you need to familiarize yourself with the advice of craftsmen. A country shower will allow the family to comfortably take water procedures.
Mobile shower works according to the following principle. Any container is installed next to the device. It can be a bucket or a bowl. Warm water is poured into it. After that, the end of the hose is lowered into the container.
The device that pumps water into the shower looks like a rug. A hose with a watering can is connected to one end of the pump. Thus, you can get a stream of water that will flow while trampling on the rug. This option is convenient because the mobile shower can be used not only in the country. The device is useful for people who want to maintain hygiene during a hike. Even in such Spartan conditions, you can wash yourself. The advantage of such a shower is the ability to adjust the temperature of the water.
How to make a summer shower in the country with your own hands - to build a reliable structure, photos and sizes are carefully selected.
When building a stationary shower, the owner needs to decide where to take the water. If the site already has a semblance of a drain pit, then you can divert water directly there. But this is not the best solution, as many people use bacteria to process wastewater. An increase in humidity will have a negative effect on the rate of purification of the contaminated liquid.
In the process of building a shower room, it is best to make a separate drain hole. To strengthen the bottom of the pit, you can use broken bricks.
The hardest thing to strengthen a hole dug in sandy soil. Its walls will be eroded by sewage during operation. Therefore, it is necessary to sheathe the walls of the sandy recess with boards.
The owner can save money when building a shower at the expense of materials. For the erection of the soul, there is no need to erect. In the construction of the foundation, foundation blocks are most often used. They are set according to the level and the shower is raised 20 cm above ground level.
This height is enough so that the treated wood does not rot. When building a base, it is not necessary to use wood. You can weld a metal case and put it on paving slabs. If desired, you can strengthen the base by pouring it with concrete.
There are no specific standards regarding the framework. The shower cabin, as a rule, consists of several parts. In one compartment you can arrange a dressing room. In another room there is a water heater. Firewood can be used as fuel.
A room for storing inventory can be attached to the shower. If you are planning a lighter structure, then you can use the following option - instead of a door, hang a curtain. This will facilitate the construction and reduce the cost of construction. Be sure to consider the height of the people who will go to the shower. The optimal height should be 2.2 meters. The width of the structure must be at least 0.9 meters. In the manufacture of the frame, you can use not only metal, but also wood.
For the manufacture of a metal frame, it is desirable to use corners with a thickness of at least 4 millimeters. The width of the shelf depends on the load. The frame will hold the water tank. What if you plan to supply a 100 liter plastic container?
In this case, it is necessary to carry out the procedure for sheathing the shower cubicle on both sides with a special clapboard. This material is considered the most practical. It has an attractive appearance and is able to withstand a humid environment for a long time. But for this it is necessary to process the lining with a special solution.
To make a metal frame, you can use scraps of metal pipes. The wall thickness of the pipe must be at least 3 mm. Otherwise, the design of the shower may not withstand the load.
You can strengthen the frame with a crate. To do this, weld additional corners to the structure. In the absence of a welding machine, it can be fixed with bolts.
To build a shower in the country with your own hands, you need to calculate the volume of the tank. For a family of 4, you will have to put a barrel with a volume of 100 liters. For the manufacture of a wooden frame, you can buy a bar. The fastening of the bars is carried out according to the tenon-groove system.
Do-it-yourself summer shower for a summer residence can be built without the use of expensive materials.
The film is considered the cheapest material for shower wall cladding. The disadvantage of this option is that the service life is too short. In a year you will have to buy a new film. Therefore, summer residents prefer more reliable materials that can last several seasons.
It is better to give preference to fabrics with impregnation. This material is used for the manufacture of awnings and tents. When buying lumber, keep in mind that fresh lining cannot be used. The reason is that any lumber undergoes shrinkage.
During the drying process, the material loses its shape and former dimensions. This affects the quality of lumber. On its surface, various defects may appear that reduce strength. Warping and cracks are the most common flaws that have a negative impact on wooden structures. In a structure built from fresh lumber, gaps may appear in a year. Do-it-yourself shower in the country, drawings, dimensions, photos are of interest to many users who wish to warn themselves against these shortcomings.
For sheathing, you can use the profiled sheet left after the construction of the fence.
Polycarbonate is a transparent material that will decorate any shower room. Do not allow cracks to appear, as dust and moisture will get into them. This is a favorable environment for the reproduction of algae. Gradually, the walls of the polycarbonate will be completely covered with greenish vegetation.
When building a shower, a ventilation system must be provided. Constant moisture can cause wood to rot. A fungus appears on the walls, destroying the structure.
Any container is suitable as a shower tank. It can be a metal or plastic barrel. However, plastic barrels heat water worse. For the middle band, this can be critical, since the water needs to be heated.
Ice water is unlikely to please the owner of a country house. Although plastic containers are cheaper than metal ones. But this is the only advantage of such barrels. It is best to install metal containers. Not only are they easier to install. The owners do not have to think about how to fix the metal barrel. In such a container, water will heat up much faster. The process of heating water can be accelerated by painting the container black. The disadvantage of this option is the appearance of rust.
People are wondering how to make a shower in the country with their own hands and how to choose the right water tank, when studying a photo of a building, you can decide on the right choice of design and water tank.
Sometimes a septic tank is installed directly under the shower. In this case, the boards are laid with a gap of 3 mm. Water will flow down and fall directly into the drain hole. In sandy soil, water will not stagnate.
But for clay soil, this version of the septic tank is not suitable. To organize a normal drain, you need to dig a hole in another place. A pallet for building a septic tank can be bought at the store. The finished pallet must be selected based on the size of the future building. It is necessary to install bars around the entire perimeter, otherwise it will hang out.
The foundation can be laid out of bricks. At the bottom of the building you need to lay a layer of gravel 15 centimeters thick. After that, a drain pipe is installed. After the concrete hardens, you can continue the construction of the shower.
Most summer residents have a desire to swim in the soul after excavation. The procedure has a positive effect on human health. Of course, you can buy a shower ready-made. But this will increase construction costs.
It is cheaper to make a shower on your own, without the help of specialists. The water must flow at a certain slope. Don't forget to waterproof your shower. With the help of a waterproofing film, you can prevent the appearance of an unpleasant odor. To do this, you need to lay a special grid. The recommended depth of the drain pit is 2 m.
To save heat, it is necessary to install a polycarbonate roof on top of the tank. It will create a greenhouse effect. A mandatory element of the tank is a sensor that informs the user about the water level. In the absence of water, they can burn out. Therefore, this parameter must be constantly monitored. To equip the floor in the shower, it is necessary to install a drain pipe.
What if there is no running water in the house? To fill the tank you have to carry water in buckets. This is way too labor intensive. Before building a shower, think about the water supply. If you have running water, you can fill the tank quickly enough. Just open the faucet and wait until the container is filled to a certain level.
Advanced home owners have come up with a scheme that automates this process. This can be done using the float system. It is imperative to provide for the installation of a system that is designed to drain excess water. According to the law of physics, the warmest water is on top. Therefore, water intake is carried out from above. At the bottom of the tank, you can install a hose for draining water into the sewer.
Of course, you can use the energy of the sun. In this case, you do not have to spend money on electricity. However, this method has a significant drawback. With the help of the sun it is difficult to warm up a large amount of liquid. In addition, this method can not be implemented in all climatic zones.
In this case, you can use heating using devices that use electricity. The heaters can heat the water to the desired temperature. A person who decides to take a shower sets the temperature himself.
In order for the warmest water to enter the watering can, it is necessary to attach a piece of foam to the hose. Therefore, water is taken from above. To speed up the heating of water, you can make a coil.
A shower can be built at the farthest end of the site, near the fence. On sandy soil, water will not linger in the sump. Due to the rapid absorption of water, rotting of wooden materials that are used as sheathing materials can be avoided.
When building a shower near the fence, the owner gets an advantage. In this case, it is enough to install 3 pillars. So that the pillars do not stagger, it is necessary to dig holes 78 cm deep, fill everything with rubble, tamp and pour concrete.
After leveling the floor, wood processing begins. You can buy aspen boards and impregnate them with a protective layer. Then the lumber is processed with a grinder.
When installing shelves, consider the weight of the barrel. It must withstand a load of at least 100 kg. Corners will rust during operation. To increase the service life of the metal frame, paint with a special paint that can be applied directly to rust.
To install polycarbonate, you can use self-tapping screws. Violation of technology can lead to cracking of polycarbonate sheets in sunny weather.
Therefore, people prefer a summer shower equipped with a heating system. To obtain a convenient and practical design, great attention must be paid to the construction site. A draft after a shower can lead to a cold. With the help of heating elements, you can heat water to a certain temperature even in cold weather.
The simplest design of the drain pit is considered to be the shape of a cube. But this option has a significant drawback. The walls of such a pit lose their strength.
It is best to use a cylindrical drain pit. In this case, the load is distributed evenly and the probability of failure is reduced. In order to increase the life of the shower structure, it is necessary to use bio-based products. Many bacteria are able to process waste. Water will quickly soak into the ground.
The advantage of a plastic tank is that the water does not bloom in them, the joints do not rust, and the properties of the water do not change.
Electric heaters can be installed with your own hands. However, it is best to purchase a ready-made tank equipped with a built-in heater. In this case, the system controls all parameters automatically. The unit has a control panel and switches itself off in case of emergencies.
Humidity in the shower. Therefore, during construction, the following points must be taken into account:
INSTRUCTIONS AND PROPHECIES OF THE Blessed MOTHER ALIPIA GOLOSEEVSKY, Kyiv...

Eufillin dropper in ampoules is used to treat pathologies that ...

Among all ointments for the treatment and prevention of joint diseases, the most ...