So I bring to your attention a simple, but very long recipe for cooking ...


By
Ideal pocket light for applying makeup
Illuminated mirror for everyday skincare and makeup application
A small pocket mirror with bright LED light will help you tidy up your makeup even in pitch darkness. The lower mirror is magnifying. Illuminated pocket mirror is an indispensable accessory for facial care while traveling.
BUY FOR 212 - 217 RUBLES with free delivery by Russian Post
BUY FOR 213 - 219 RUBLES with free delivery by Russian Post
By
DIY Illuminated Mirror In this project, I'll show you how to make an elegant, real bathroom mirror with hidden LED lighting. Firstly, it looks very beautiful, and secondly, it is an excellent decor element for the bathroom. Pretty simple to make and with the presence of hands should not cause any particular difficulties. So, let's begin!
First, I purchased an ordinary finished mirror, with a polished edge, measuring 91.4 x 76.2 cm.
Then I picked up the necessary tools: Reinforced tape, electrical tape, a knife, polyethylene packaging film, a metal ruler 1 m long, a respirator and goggles. Please note that the knife must be hard and very sharp, it is best to use a utility knife with a thick blade and a metal blade holder. You will also need a small sandblaster and an air compressor.
For a sandblaster, it is best to use dry, white quartz sand. But, since I didn’t have it, I used regular yellow, after sifting it through a fine metal mesh to remove debris and large fractions.
Then, turning the mirror upside down, using reinforced tape, I made a preliminary beating of the strip, which will later be highlighted from the front side. The inside of the square on the mirror is covered with cloth or any other suitable material. So that it does not fly away anywhere, I glued it with adhesive tape. To prevent getting non-glued areas, I also glued the middle of the broken strip with adhesive tape.
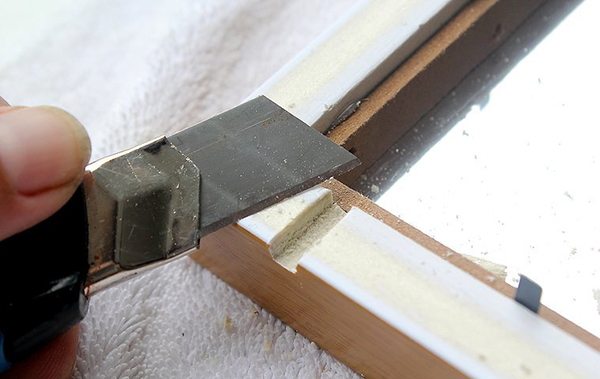
Having fixed the metal ruler with the help of clamps, I cut through the reinforced tape, according to the markings that I made earlier. I advise you to firmly fix the ruler, otherwise, it may move and the knife blade will go to the side. Also, to make a perfectly even cut, I recommend using an additional bar with which you will hold the knife blade on the other side of the ruler. Be very careful at this stage, as any unnecessary scratch will then be clearly visible from the front of the mirror, and this will no longer be corrected!
Then remove the adhesive tape on the cut areas. You should get a flat strip around the entire perimeter. Make sure that the rest of the plane is securely sealed, as this strip will be sandblasted further.
Using a sandblaster, remove the backing from the mirror around the entire perimeter within the cut strip. I had the mirror covered with two coats, blue paint and a reflective silver finish. Therefore, in order not to damage the glass, I removed both coatings in two steps. When working with a sandblaster, be sure to use a respirator, goggles and gloves, because you will even have sand in your ears!
After finishing mirror processing, you should end up with something like this:
Next, empirically select the internal distance around the perimeter from the transparent strip, where it is best for you to place the LED strip. By changing the distance, you can optimally select the brightness of the backlight.
Then I made the back frame from red oak blocks. You can use the size of the bars at your discretion, the main thing is that they be higher than the inner sheet of MDF (it will be discussed later). With the help of a cutter, I made grooves on the bars in advance for a tight installation of the back cover and opened them with black paint and varnish from the front and rear outer sides. The size of the back frame is determined based on the size of your mirror, my frame, for example, is 3 cm smaller than the mirror itself around the entire perimeter.
Cut the back cover to fit your back frame. In order for the lid to fit snugly into the frame, at the last stage, you specially made grooves in the bars, i.e. the lid is flush with the frame. I used an old piece of plastic for the lid, but any other strong material that can support the weight of the mirror will do.
Then, to mount the LEDs, I cut a rectangular piece out of 1/2" thick MDF. The size of this piece depends on the internal distance from the transparent strip where you decide to mount the LEDs. In my case, the rectangle turned out to be 1.5 cm smaller from the perimeter of the transparent strip. I carefully glued the cut piece of MDF in the center of the mirror, keeping the same indents on each side, using mastic (you can use suitable glue or epoxy). Then I glued the outer back frame in the same way.
From the inside, on the end of the outer and inner frame, I glued LED strips with a warm white glow. The transformer for powering the LEDs was taken out of the mirror, although if you tried, you could place it inside. The wire from the LEDs led out through the back wall, so that it was not visible.
Then I installed a homemade mount on the wall and back cover. Fastening on the back cover, fastened with short self-tapping screws that reach the MDF, but do not reach the mirror. I drowned the transformer in a niche where there is an outlet, since I specifically installed such an outlet. As a result, after connecting the transformer and connecting to the outlet, I got such a unique mirror!
Each owner wants to bring a touch of originality to his interior. And everyone has their own methods for this. Some come up with an original design of the room, thanks to various shapes of the ceiling and walls, while others make a choice in favor of One of these interior items that will catch the enthusiastic looks of your guests will be a table with an infinity effect.
The effect of infinity is achieved through the use of LED technology. It is they who are able to decorate your home, and in some cases even change it beyond recognition. The infinity effect table, the photo of which is presented in this article, is a modern, innovative piece of furniture that can change the idea of \u200b\u200bdesign even the most notorious skeptic.
The secret of visual infinity is hidden in the use of LED backlighting, and there can be a huge variety of color solutions. It is she who is built into the space between reflective surfaces. As a rule, the upper mirror is taken translucent, so that the radiation from the LEDs can be seen by others.
To control the backlight, a special remote control is used or, if a table with an infinity effect was made with your own hands, an on-off button.
The use of tapes with absolutely safe for human health and the environment, so the table with the effect of infinity can be located anywhere. In addition, these lamps are famous for their durability and efficiency. A product with a tunnel effect will serve you for quite a long time, thanks to its reliability and ease of use. Such a table can be seen in:
The price of such a piece of furniture is not encouraging, and the purchase is not always affordable for an ordinary resident of the country. However, you can get an unusual little thing if you know how to handle tools. Just make a backlit table by yourself.
To do this, you will need the following materials and tools:
All wires are mounted in the legs of the table.
First of all, you need to develop a drawing, taking into account all the dimensions of the future piece of furniture. From MDF (or wooden boards), mirrors, you need to make blanks, according to your calculations. There should be 3 wooden templates with an inner hole, one of which has a larger inner diameter of approximately 1 cm. This is where the LED strip will be located. The resulting blanks must be glued, not forgetting to insert one mirror between the two lower templates. Then you need to carefully smooth all sides and corners.
Next you need to attach the cover. Better if it is removable. This will provide access to electricity. This cover for the future table can be designed for your interior. You can paint it or decorate it in any other way.
In the opening of the table top, it is necessary to drill holes that are necessary for mounting the LEDs. Now you can insert the tape into this opening and fix it in a way convenient for you. The best option would be to use glue, the effectiveness of which you will be 100% sure of.

Now you should cover all this with a second mirror, translucent.
All wires are led out through the legs of the table. To do this, they must be with a wide cross section and through holes.
To enhance the effect or give more originality, absolutely any object can be placed between two mirrors. This is done so that the infinity effect table fits perfectly into the overall concept of your room.

In addition, you can safely combine LEDs of various shades. Connecting pieces of tape is not difficult even for an inexperienced craftsman.
A similar effect can be used not only to make a table, but also to decorate doors or any other surfaces. And a table with the effect of infinity, made with your own hands, can only be the beginning.
I will make Infinity mirror made to measure. From order to finished product 14 - 21 days. Delivery in all regions of Russia by the best transport companies with 100% insurance.
First and foremost, I work alone.
From all this it follows that the cost of an infinite mirror will be much lower than competitors. I have my own workshop, my own tools and no other "unnecessary" employees. All the way of the infinite mirror from the layout to the finished product is done by me.
I have been making infinity mirrors for over 5 years. During this time, I learned how to qualitatively and inexpensively collect options of different sizes with a wide variety of glow models. I have long erased the boundaries for the manufacture of mirrors, they do not heat up, they shine brightly and for a long time. Here are my benefits:
In the bulk, I make three options for frames for the infinity mirror. Their use is determined by the location of the product. For the living room and living room, wood is the most practical; for the bathroom, airtight aluminum or plastic is suitable.
When installing the power supply inside the frame, I use only aluminum or plastic. Wood prevents proper ventilation of the heating PSU.
Another important difference between my mirrors is that I strictly measure the inner perimeter of the frame so that the LED strip lies strictly in the places of the cut. Thus, I achieve an ideal light contour without gaps and overlays.
In fact, it is a composite object consisting of at least three layers:
The light emitted from the source is reflected in the mirror and translucent glass, forming a tunnel of reflections, tending to the depth and to the center. Under ideal conditions, almost infinite convergence of reflections can be achieved using two conventional amalgam mirrors. But this option is unrealistic - a person cannot see through the reverse side of an ordinary mirror. Therefore, on the side that will be directed towards the person, a translucent mirror is used. Already on the basis of its name, it is clear that it will be on it that the main reflection losses will be, therefore, each reflection from it will be weaker by a percentage of the throughput of such glass. There are several options for making such mirrors, and I initially use the best ones.
With the correct arrangement of all three layers, the effect of infinity, or the "tunnel of infinity", as many used to call it, is achieved. Of course, it is not infinite, but it can be brought closer to such.
Often, in the manufacture, many neglect the rules and laws of optics, which greatly limit the operation of the mirror and its effect. I calculate the layers of the finished tunnel mirror with millimeter accuracy, thereby achieving tremendous success.
By the way, the most common option is a mirror with an infinity effect on the wall. I recommend ordering this for your specific size. Why hang a piece of furniture of a standard size and watch an empty field of wallpaper around when you can use the empty space for good!
I use several options for light sources. In 100% of cases they are LED:
I discuss each order with the client, carefully listen to his wishes and the operating conditions of the item with the effect of infinity. Based on his requirements and my experience, I find the most correct way to make an infinite mirror.
"Sofia-Led" offers to order a mirror with the effect of infinity of any parameters. For the manufacture of each light tunnel, high-quality, durable materials are used, which are distinguished by a high degree of strength.
Remember! The more complex the project, the more interesting it is for me! Do not forget also that you can buy an endless mirror as a gift to your friends. They will definitely thank you!
Information for managers and various organizations carrying out repair or restoration work at the facilities for which my products are planned to be ordered. Follow the link and read the requirements.
Recently, orders for the manufacture and installation of an endless mirror in the ceiling, including in the tension one, have become popular. Having developed my own concept, which is fundamentally different from the usual one, I now proudly declare that I will make for you an endless mirror that can be built into the ceiling of any complexity. This type of placement is not dangerous for residents, since I calculate all the loads and make a 50% margin of safety.
In view of the fact that they usually want to install a large endless mirror in the ceiling, the weight of the overall structure of which can exceed 200 kg and more, I do not recommend using a solid mirror. In this case, I recommend using several elements, the dimensions of which are approximately equal to 1 sq.m.
Theoretically, it is not difficult to explain such an optical effect. You can create an illusory endless tunnel even with the help of an ordinary candle: this magic was used by many girls of almost all generations, conducting fortune-telling rituals. Due to the multiple reflections of the light source from the real and imaginary surfaces of the mirror, it seemed as if the candle fell into a tunnel without end and edge. All this can be easily explained in terms of quantum physics.
Infinity mirrors are a wonderful piece of decor that can become the main accent in the interior. Most often they are used in the design of commercial premises: nightclubs and bars, cafes, showrooms, offices. However, you can decorate an apartment with such an art object. It will look appropriate in a gothic or industrial style bathroom or hallway with elements of minimalism, pop art or techno.
A mirror with infinite depth can be used not only for its intended purpose, as a wall structure with lighting, but also as an element of other furniture. It will become an original tabletop for a coffee table, a facet of a cubic design, a decoration for the floor and more. It can be a full-fledged ceiling chandelier or an additional light source.


You can order an LED art object far from everywhere, but this is not necessary, because making a mirror with an infinity effect with your own hands is not so difficult. All that is needed is to purchase materials, build a frame and assemble the structure according to ready-made instructions and diagrams. At the final stage, the LED strip is glued - and the eye-catching installation is ready.
To create the effect of an infinite mirror, you need to prepare materials and tools, namely:
To make a mirror surface with a partial reflective effect, most likely, you will have to do it yourself. To do this, you need to paste over ordinary glass with a sun-protective reflective window film, having previously cleaned and degreased it. It will be necessary to cut off such a piece of material so that it is slightly larger in area than the glass surface (goes beyond its limits on all sides).
To apply the film on the glass, you should start from one corner, gradually lubricating the surface with liquid soap. It must be constantly ironed to avoid the formation of air bubbles.
There are a number of specific requirements for the light source. First, it must not generate heat. Secondly, be bright enough and not get lost behind a mirror film. The ideal option would be an RGB LED strip. The working rating of its voltage should be equal to 24 volts. This is the most optimal solution.
 Mirror
 Tools
Tools
 Light source
 sun protection film
 bar
bar
The frame can be any wooden frame of the appropriate size with a depth of at least 1.3-1.5 cm. The design can be done with your own hands. To do this, you need 4 bars of wood 2 cm wide. Next, you need to follow a simple instruction:
If the finished frame is taken as the basis, then tinted glass and an additional smaller inner frame are inserted into it, which will serve as a stop for the inserted mirror. Recesses are made in it for the wire for the LEDs using a cutter (on the back).
 Pick the right frame
 Prepare glass
 Make a hole for the wire
To assemble a structure with infinite mirrors, everything should be ready. Remains only:
After that, you need to decide how to make the ends invisible. They can simply be painted over or covered with a U-shaped profile, which can be fixed with a sealant. Alternatively, a plastic cable duct (without cover) can be used.
 cut film
 Apply film to glass
 Insert glass into frame
 Fix the inner frame
 Fix the LEDs
 Insert mirror
The traditional lamp with the effect of an infinite mirror provides for the location of the LED strip around the perimeter of the frame, but it can be beaten in a slightly different way. With the help of LEDs, you can not only depict some geometric shapes, but also whole words. To do this, an additional structure of rails is glued to the mirror along with the frame.
If self-adhesive tape was purchased, then fixing it is not difficult. If it does not stick, then it is fixed along the inner perimeter of the frame using a conventional adhesive. When it comes to connecting LEDs, there are always two options. If color effects are needed, light bulbs are connected through controllers. If you connect the RGB lamp directly to the power supply, it will shine in white.
 Connect to power supply
Request a Sample
* Your personal data is used solely to contact you, without transfer to third parties.
You can make the interior stylish and unusual with the help of an endless mirror, which creates a visual illusion and surprisingly transforms the room.
Thanks to the effect of the tunnel, such a mirror expands the space and amazes the imagination with its bottomless depth. Moreover, the darker in the room, the more mysterious the volumetric reflection, lost in the twilight, will look.
 |
 |
The cost of a tunnel mirror depends on its size:
| Size (mm) | 600 x 800 | 700 x 700 | 800 x 800 | 900 x 900 | 900 x 1000 | your size |
| Cost, rub.) | 19200 | 19600 | 25600 | 32400 | 36000 | dog. |
Such a decoration will look very impressive in a club, hotel, bar and any other institution where all the most original and fashionable design trends are highly valued.
Infinite Mirror will give any interior an ultra-modern look and perfectly fit into the futuristic style. With it, you can transform a wall, ceiling, bar counter or countertop. This is one of the most spectacular and fashionable ways to enliven and visually expand the room.
The visibility of the depth of reflection, that is, the effect of an infinite mirror, is created using bright LED backlighting and multiple reflections of light in two parallel mirror surfaces.
Mirrors have different transmission and reflection coefficients. On the back wall there is an ordinary mirror with a reflection coefficient of 100%. The front of the mirror is a one-way glass through which only 50% of the light passes and is reflected. LEDs are placed along the perimeter between these two parts.
In this way, infinity mirror effect is that you can see each multiple reflection of the light source, but the brightness of each subsequent image is reduced by 2 times. The gaze of the observer is presented with an endless cascade of lights, leaving in the dusk. Illumination can be single-color or multi-color at the request of the customer. The thickness of the mirror panels varies from 5 to 10 centimeters, and the appearance of a bottomless depth is created.
The endless mirror "Tunnel" is equipped with a backlight brightness adjustment using a remote control. The brighter the light, the stronger the illusion of depth. When the backlight is turned off, the device looks like. You can change the glow modes and color transitions, and in some models there is a “music” mode in which the LEDs flash to the beat of the playing music.
 The shape, size and design of this unique piece of decor are chosen individually and are limited only by the customer's imagination. You can experiment with the effect of an infinite mirror by placing one shape in another (for example, a circle in a square or vice versa) and complicating the optical illusion in this way. Such experiences will be of particular interest to designers who are ready to turn the most daring ideas into reality.
By purchasing this product, you will bring a touch of novelty to your home and you will definitely be satisfied. You can purchase this stylish item not only for yourself, but also as a gift to your loved ones or work colleagues. Such a pleasant surprise will amaze your friends and will be remembered for a long time.
To order a Tunnel mirror, it is enough to choose its size, shape, number and color of LEDs, type and shade of the frame (wood or metal), features for adjusting the brightness and level of reflection depth, as well as the installation location (wall, ceiling, countertop or even floor).
You can buy an unusual mirror on ours. We are professionally engaged in the manufacture and processing of glass products and offer our customers elegant exclusive products that combine beauty and excellent quality. Our factory has at its disposal high-precision equipment that allows us to perform work quickly and without the slightest flaw.
So I bring to your attention a simple, but very long recipe for cooking ...

Trout in cream - general principles of preparationBefore cooking trout ...

Alexander Gushchin I can't vouch for the taste, but it will be hot :) Contents The usual...