Tablets Dexamethasone is a glucocorticosteroid. Indications for...


Good day everyone! February 14 is followed by another holiday, which is celebrated in our country annually on February 23. Last time we talked about what, and also did with the children
Today we continue and will, together with the children, congratulate our defenders and make interesting and original cards for them.
This type of work for schoolchildren or kindergarteners is the most common. Because it is not so difficult to make such a miracle, you just need to listen to the instructions of the teacher and everything will work out.
So, if you have not yet decided to do this and give it as a gift, then perhaps you will stop at this option.
On this day, all mothers, daughters, grandmothers and indeed the entire female half of the population congratulates the male half on this celebration. It is so customary that the symbols of this holiday are state flags, military equipment and other vehicles, as well as stars on shoulder straps.
Therefore, all drawings or pictures are directly related to this. I propose to make the first option out of paper - this is a tie using the origami technique.
And I also really liked the idea with a dollar bill, or you can take our rubles and roll it up, like this, it looks pretty cool, and as they say, a small stash is at hand.

For the smallest craftsmen of the second junior group of the kindergarten, you can make work from plasticine.

Now we will make a postcard on which the car will be depicted. Such an adorable and fun creation you can make with older and preschool kids, or use in elementary grades.

Stages of work:
1. Prepare everything you need for work, these are paper, glue, scissors and pictures with cars.

2. Cut out the necessary details to complete the plot.
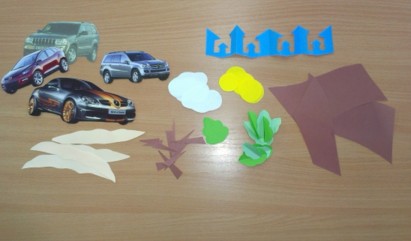
3. Then, to make the machine seem voluminous, make an incision, while folding a sheet of paper in half.

4. Here is such an interesting and cute story.
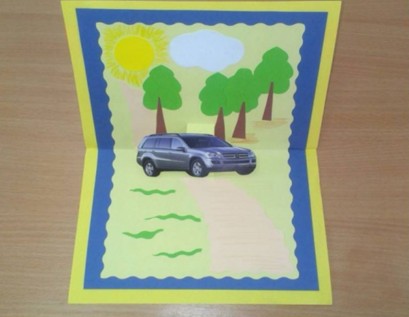
5. You can decorate the outside as you like, using various decorations and decors.

6. You can do it as an application, or simply draw with colored pencils or felt-tip pens.

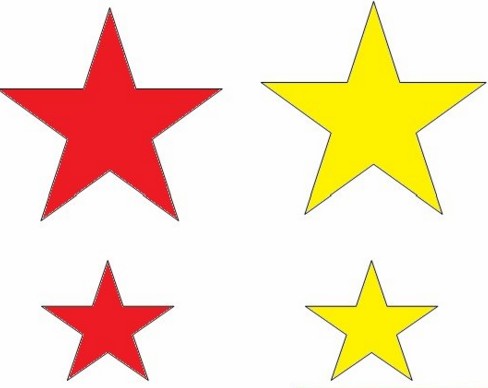
I give you a few ideas that impressed me, you can take them as the basis of your work and create your own plot. See how bright you can make a star.

Miloi is very talentedly executed, even a flower is not at all superfluous here.

Wow, a message or a little surprise).

In general, it looks wonderful and not primitive.

So, do something for everyone!

And surprise, in general, act.

And I also offer you a step-by-step instruction that you can take for your creative work in the scrapbooking style, here:
I want to make and decorate a postcard in a special way, I know that many are interested in options for bulk products, because they look great and amazing. Moreover, if there is a step-by-step instruction, then you and your children at school can do such a miracle.
Or you can create this creation at home, and then your son or daughter will give it to dad.
Stages of work:
1. First of all, you will need to find a double-sided cardboard, it is advisable to take blue or blue, this will be the background of the sea. Then fold the blue sheet in half and glue the base in the form of a boat to it.

2. Accordingly, in order to glue the base from the ship, you first need to make it, for this, find the image of the ship or ask me for a template, I will send it to you for free by mail. So print it on A4 sheet and cut out the desired image along the contours with a clerical knife.


4. Glue the white base gently to the blue base.

5. This is how it should work out for you.

6. Looks just fantastic beautiful and charming.

You can make a simple application from colored paper and from geometric shapes, for this, draw patterns, and glue the composition on them.


You can go another simple way, print this sample, and then color it or make an application.

I liked another type of postcard, I am happy to show it to you.
We will need:

Stages of work:
1. Draw the templates, as I showed you in this picture, it’s not difficult, even a beginner can do it. But what color to make for each workpiece, decide for yourself, this is a creative work that can be done in a labor lesson.

2. For the base, it is best to take colored cardboard or double-sided or plain. Fold the paper in half and cut out a circle on one side.

3. Now it remains to design the product. Find the right text or write your own by hand.

4. Glue the congratulations inside the card.


6. And the front side will look like this. It's like a ship is floating on the waves.

I also saw such a handsome boy yesterday, I suggest you build it too.
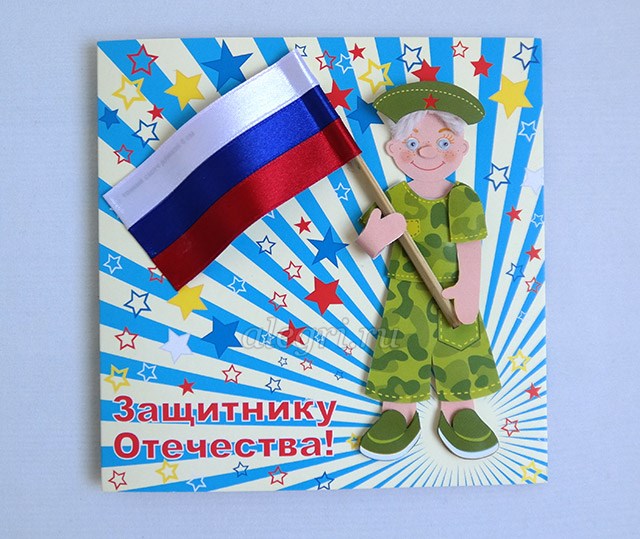
To create such a charm, cut the blanks with scissors.

Glue everything you have in mind on the background you want. The flag can be made from satin ribbons and a match, or use a cotton pad instead of a stick.

If you want a masterpiece in general, take a look here, a stylish and very cool idea for children of any age.

An excellent option would be a rather unpretentious postcard with the image of a bear cub in military uniform. You need to make such a background on a piece of paper using a printer.

Cut out the stencils according to the pattern.

Then glue them to the background.

And on the back, write or print a congratulation.

Well, I also found such a simple idea for very small young talents.
We will need:
Stages of work:
1. Print the stars on an A4 sheet, or make stencils, and then draw them on colored paper and cut them out.
2. Fold the embossed cardstock in half. Cut out two strips of colored paper and glue them overlapping. Also decorate with a star.
3. Such a very beautiful and cute result, write wishes on the other side.
It will be really cool if you make a postcard and, in addition to everything, present a small souvenir in the form of

Those who are familiar with this technique will easily create any plot).

And for those who are not familiar yet, I found a video for you from which you will learn how to do this:
You can deviate from the topic and make it out of numbers, but in the same style.

The easiest option can be an origami souvenir, using colored double-sided paper or a white A4 sheet.

It turned out a small shirt with a tie.

In addition to everything, since this is a postcard, you will need to come up with a poem or congratulation and read it with expression.
Or you can go another way to make a blue or light blue sheet tie first, and decorate it with all sorts of stickers, sequins, rhinestones, etc.

And then glue it and you get the easiest gift option.

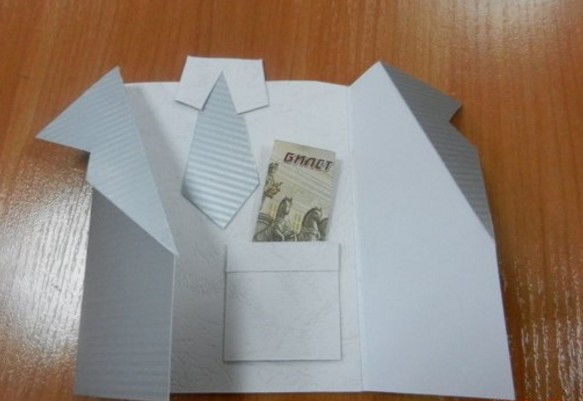
And if you want to do something more serious, then use this instruction.

It is necessary, as shown in the figure, to make a product layout.
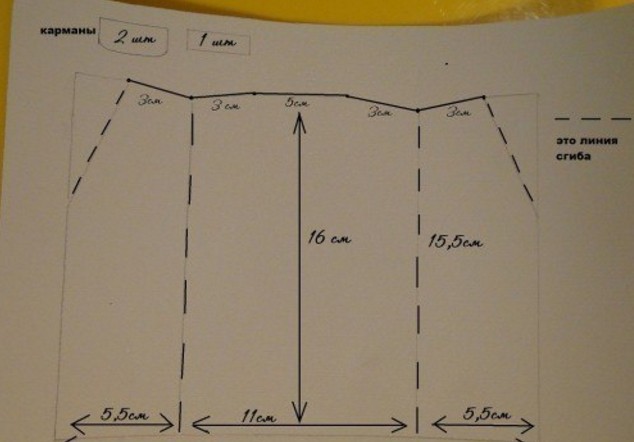
Then use the ruler to collapse along these lines. Of course, draw the lines with a pencil, not a felt-tip pen, a felt-tip pen is shown here so that you can see it better.

This is how the jacket looks like.

It remains to make a collar, make it according to the scheme.

Then cut and roll.

Finish by gluing the right touches to complete it, this is a satin ribbon or paper tie and a poem.

You can also make a postcard with a little secret.

Take a piece of paper and make these marks as shown.

Plus there will be a vest.

The result can turn out for you, the main thing is to try to do this work with great love, and then, what could be more pleasant to give to grandfather or dad on the long-awaited day.

If you want to be original, you can put a bill or something else more impressive.
You can even stick a calendar.

Such products are usually in great demand because they look spectacular and beautiful.

See how cool they designed a regular photo frame. Make a boat or steamer first.

A diagram of such a craft is presented here.

You can use another option, like this, you have to stick the desired images on a piece of paper.

And then color it with paints or felt-tip pens. Blanks can be downloaded and printed.

 By this principle, you can do other work.


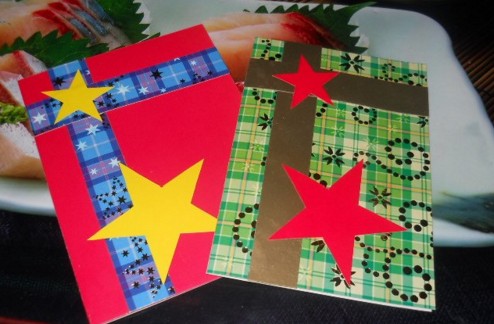
Every boy or guy does not dream of a good set of tools, right? So let's give him a dream.

For the next work, you will need 2 pieces of paper. different colors, a pencil, a glue stick and a clerical knife, because the protrusion style will be applied.

It will turn out very stylish and tasteful.

You need to print the template on the printer, request it from me. And then connect the white base and blue images.

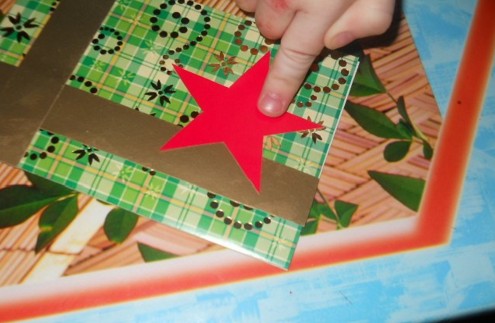
From corrugated paper or thick cardboard, carefully cut out the stars, 3-4 pieces and glue on the base.

That's all dear friends and subscribers. If you were interested, share this note on social networks or leave your feedback on this post. Good luck to all! And our defenders of good health, success in everything! Bye everyone!
Sincerely, Ekaterina Mantsurova
A beautiful and courageous holiday, which every year, in my opinion, is celebrated in our country on a larger scale. After the collapse of the USSR, there was some strange period when Defender of the Fatherland Day was celebrated very modestly and even bashfully: they simply congratulated men out of habit, trying not to focus on the fact that they are, first of all, OUR DEFENDERS.
There is a great selection of ideas on how to congratulate men in the office!
Sincere patriotism is back, and it's wonderful! I propose to congratulate and honor our boys and men so that they feel really strong and courageous.
All this must somehow be reflected in the design of the premises. For now, I'm just going to remind you of some simple tricks that you can use in the classroom, school hall, office, or small coffee shop.
Balloons now come in all colors and shades, so I think it’s not so difficult to choose a green gamut that everyone present will associate with the camouflage clothing of our soldiers.
There are also ready-made camouflage balls. It's even easier here - you don't need to select any shades.

From balls of such shades, you can weave a garland into 4 balls or simply place balls with ribbons under the ceiling. Ribbons, by the way, are best done in the colors of the Russian tricolor.

 Of course, you can use ready-made flags and small flags made of fabric and other materials. Nowadays, you can order flags of all sizes with delivery in two clicks. For decoration by February 23, a few bright “touches” are enough in addition to green balloons.
Another good option for creating a huge flag is polysilk. This is a non-woven material that is sold in rolls. Waterproof and very lightweight. Such a flag can be made to the entire wall.

Another noticeable decoration for our premises on February 23 is large balloon figures. In principle, you can make a tank, an airplane or a comic figure of a soldier in uniform, but more often they stop at the numbers “23” of an impressive size. They can be up to 2 meters high.

The easiest option is foil balloons in the form of numbers. They can be filled with helium or inflated with ordinary air (in this case, they must be fixed to the wall). Such figures come in different colors, size - from 30 cm to 2 meters. Sold in online holiday stores. If the figures are part of the composition of their balloons, the decorators will bring everything with them and inflate it in your room. They look like this:

 Cheap and cheerful - lots and lots of colored paper airplanes. They can be hung from a false ceiling grid at different heights, or simply placed randomly on walls, doors, and furniture. For these purposes, you can use double-sided tape or easy-to-remove chewing gum for decoration.
 Still in many stores "Everything for the holiday". They are sold folded, take up very little space and can be used repeatedly. Naturally, we are interested in red and gold stars. By the way, they are perfectly combined with floor decorations made of balls.
At first glance, paper pompoms do not look manly. They are too airy and frivolous. But! I suddenly saw that white and bright red pompoms are very reminiscent of carnations - the same flowers that are on almost all men's postcards. Do you agree? .

Now you can buy a poster of any size, there are a lot of offers on the net. These can be modern posters or copies of propaganda stories from the Second World War. In any case, these images create the right atmosphere on Defender of the Fatherland Day. Of course, pictures look better in frames under glass, but you can just make a collage on the wall.

This is, first of all, about the inscription "February 23". Now I won’t repeat what decorative techniques you can use, I’ll just give a link to my own.
 Yes, camouflage fabric is sold in specialty stores. It can be used to decorate walls and holiday stands. Wrap large boxes of household appliances with such a cloth and frame photographs of Russian soldiers from different years.
This is a place where everyone wants to be photographed. In order for everything to go emotionally, make a background of fabric, ribbons or balls, and put interesting accessories next to it - fake weapons, hats and raincoats. Let your guests have something to show on the pages in social networks!
I hope that for the flight of your imagination, I have collected enough ideas for decorating the premises on Defender of the Fatherland Day.
We present to your attention original postcards in the cutting technique for February 23. Such postcards can also be presented for other holidays by changing the inscription, for example, to “Navy Day”, “Air Force Day”. And also you can think over the initial design yourself, changing it to a hobby or a dream, then this idea will come in handy not only for a military holiday.
In order to create a postcard by February 23, you will need:
For the base of the postcard - colored pastel paper;
For liners - office paper;
Stationery / dummy knife;
Glue,
For tinting the edges - a stamp pad / acrylic paints + a brush (hard);
Creasing tool.
1. At the end are the templates that you will need to print. Cut out, crease along the fold line and bend the base of the postcard.

2. Cut out a rectangle from office paper slightly smaller than the folded postcard (reduce the width and length of the postcard by 5 mm - the appropriate size for the inscription (congratulatory)). Decorate it with stamps, a corner punch, etc. Glue to the base of the postcard.

3. Prepare another insert for the card - a lining between the front side of the greeting card and the part with the greeting text. This part is scored at a distance of 2-3 mm from the edges along the longer side, and a fold is prepared. After that, you need to apply glue to this small lapel, and glue the sheet along the fold lines of the base of the postcard.
4. Tint the edges of the postcard (in this case, silver acrylic paint was used for one postcard, and a “golden” ink pad was used for the other).

5. Prepare lettering for the postcard. Why in a text document you need to make the inscription "February 23", set two spaces between the letters. Choose a font, set the appropriate size for the letters.
Cut out each letter separately in a “square”, tint the edges and put them on pastel paper (on the base of the postcard). Cut again, leaving a small allowance. And stick it again - now on the paper used to line the inside of the postcard.

6. Arrange the letters on the front of the card as you wish and stick each detail onto the foam tape. You can do this in a chaotic manner, as in the version of the postcard with airplanes (they used foam tape of different thicknesses), or in a line, as on a postcard with a helm and anchor.

A postcard by February 23, if desired, can be decorated with suitable elements - buttons, ribbons, pendants, etc.
Everyone on earth knows: dad's holiday in February! This simple couplet reminds us that in a few days the whole country will celebrate the popularly beloved holiday Defender of the Fatherland Day. On this day, we congratulate our beloved men: husbands, fathers, brothers, grandfathers. And, of course, I would like to thank them for their care, warmth, courage, strong character and love.
How to congratulate your main protector of the family - your spouse? This question is asked by women the day before. But, besides, children also like to congratulate dad and, of course, want to give him a gift with their own hands and, perhaps, hear praise from dad. Let's think together how to congratulate dad so that he likes it?
Many women consider February 23 to be a great occasion to renew their husband's, so to speak, "men's set" - socks, tie, shaving accessories, a lighter (if he is a smoker), shower gel and the like. In addition, on the Internet you can peep ways to design such a set, such as this option:
In addition to gifts and treats, give your beloved man a gift that you can write in a beautiful postcard. And again, we recommend that you make a unique little thing that your protector will be delighted with and will certainly put it on his desk. This is a vytynanka postcard for February 23.
We talked more about the technique of openwork paper cutting in an article about. And now we suggest that you continue to improve this type of creativity and make vytynanki by February 23. For example, this technique can be applied in the manufacture of the original postcard.

The boat will look best if you transfer the template to pastel paper. Print this template and use a carbon paper to transfer it to a postcard blank. Carefully cut out the necessary contours with a clerical knife.


You can decorate the card to your liking, as well as make a three-dimensional inscription. Print out the templates of these inscriptions, transfer them to the selected thick paper and stick the inscription using bulk tape.

The vytynankas look very original against a background with a contrasting color. Thick paper is taken, again, you can use pastel paper, the sheet is folded in half. On the top, you cut out the image, and put a contrasting background inside. You can decorate the card with letters, beads or make inscriptions with your own hand. Below, see an example of a finished postcard and templates for cutting protrusions by February 23.
Good afternoon dear readers! On the eve of Defender of the Fatherland Day, we have prepared original and not complicated ideas for children, today we offer interesting options for greeting cards. They perfectly express love and respect for a loved one. After all, the postcard is made by hand, it is much better than any other purchased in the store.
Some of them the child will be able to make on their own. To create others, you will need the help of your mother. But still, it is a very exciting and interesting activity.
You can make such a simple postcard from colored paper in just a few minutes.

We will need:
Stages of work:
1. We adjust black paper to white. Straighten and fold in half.

2. Unfold and fold again. But now, each edge is brought only to the middle. This is where the first bend is located.

3. And add it up again. Thus, we get a sheet folded in four.

4. With a simple pencil, draw half of the heart. Next, cut along our drawn line. As a result, we get a heart card. It is black on the outside and white on the inside.

You can write a holiday wish on a white background.
5. We bend the front black side of the heart (top). It turns out the collar of a black jacket.


7. We just have to decorate the postcard. Cut out two buttons from green paper. Their diameter is 1-2 cm. Draw holes on them with a black felt-tip pen. And glue on the right side of the jacket.
8. Next, cut out a small pink rectangle. Fold it in half and cut out the bow. The edges will be slightly wider than the middle. Unfold and glue the bow to one of the front sides of the white shirt.
9. The postcard is ready. It remains only to write a wish inside.

And you can also make a postcard and put a little gift for dad

And how do you like this postcard, in my opinion it is very original, and on the reverse side you can write a wish for dad, he will be very pleased.

And how do you like this postcard, with a real silk butterfly:

And here is a great idea with ties:

These gifts for dad from daughter:

And in this version, you can write a message to dad:


In this card, we draw a shirt and glue a pasta bow, which we pre-paint with paints

And here is another example, here you need to cut out numbers and stars from paper, paint with felt-tip pens and tie a bow from fabric, then glue all these elements on colored paper.

Such a postcard can be done with the guys who have already learned how to use scissors.

We will need:
Stages of work:

2. Expand and glue a sheet of white cardboard to it.

3. If the sheets of cardboard are of different sizes, cut off the edges of the postcard with scissors.

4. Draw a star at the top of the postcard. Cut out carefully.

5. On cardboard (red) draw a star. In size, it will be slightly smaller than on the postcard. The red asterisk will be voluminous, so below is a template.

6. Cut and bend it along the dotted lines, also fold the gray ears. As a result, we get such a voluminous star.

7. Glue the red star to the inside right side of the postcard.

8. Now you need to cut out three strips of black and two strips of orange colored paper. Each about 5 mm. width. Next, glue them to the bottom of the postcard, in a checkerboard pattern. Cut off the excess edges.

We suggest cutting out the numbers from red cardboard and sticking it to the postcard.
Here is a greeting card we got. If desired, you can write a beautiful poem inside it.
Here are some more postcard options with a three-dimensional star:


How do you like this performance?

Here are some more interesting examples of pictures, for younger kids:

Airplane made of colored cardboard:

Tank - this postcard is not difficult to make, and dad or grandfather will be very pleased to receive it as a gift

Also, a craft made of matches comes out very beautiful:

In fact, making this postcard is very simple, but it turns out very cool. For it, you need matches, a cardboard base, glue, scissors and ordinary postcards (or print on a printer) with the theme of February 23rd.

2. Then we glue stickers or postcards

Here is such a beauty:

This card is perfect for little kids. It is not difficult to perform. The only thing the teacher needs to do is to prepare all the details of the application in advance.

We will need:

Stages of work:
Glue the brown rectangle to the blue background.

Place a green triangle above it. This will be the top of the rocket. Now our future rocket resembles a tall house. Next, glue red triangles on both sides of the rocket. Place two yellow illumination windows in the middle.

And in conclusion, we will decorate our rocket with a red star.
Postcard is ready!
Here are some more application examples:

The basis of this postcard is a disposable plate painted with paints, but such a circle can also be cut out of plain paper, painted with paints, glued on the sun and the ship.

But the idea is completely for the crumbs of the younger group:

A beautiful appliqué made of felt, of course, here you need the help of an adult to cut out the details, and the child needs to carefully glue everything.

An unusual, albeit very common, origami shirt card. If you have not yet made such a postcard. We advise you to try.

We will need:
Stages of work:
We bend a sheet of blue paper in half (along the longer side). We unfold and re-align each edge to the middle, as we did in the first version of the heart card. Next, bend the two edges in the form of a collar.

We turn over to the other side and the sleeves of the shirt come out.

On the opposite side, bend the edge by about 5 mm.

Turn over to the other side and bend the corner with the tip to the middle. Do the same with the second corner.

Fold the card in half. We get this little blue shirt.

Now glue all the details with glue or tape.
Let's start making a tie. We cut out a yellow square 7 by 7 cm. We place the square on the table in the form of a rhombus. Draw a vertical line in the middle. We bend the upper corners to the middle.

We turn the tie and bend the upper corner by about 1 cm. And now we raise the small corner up again.

We turn over again and make such a fastener, bend the top of the tie a little. Bend the vertical halves. We glue everything well.

Now we decorate the shirt with a tie, using adhesive tape or glue. The top of the tie should go a little under the collar.

Fold blue cardstock in half. Glue the shirt to the front of the card.
Our holiday card-shirt is ready.
Inside we enter a holiday greeting. Such a card is suitable not only for February 23, but also for the birthday of dad, brother or grandfather.
Here is a clear diagram:

And this is what the tie looks like on paper:

Shirt pattern:

And now we repeat on paper:


And now I want to show you what beautiful variations you can do:


It all depends on the availability of colored paper and your imagination, thousands of variations of this postcard can be made from the brightest and most cheerful to official business ones, look here:


But what kind of tuxedo can be made with wishes on the shirt

Here are some examples of ties:

It’s not difficult to make such beauty - it’s interesting for kids and it’s nice for dads!
Quilling is a very interesting and exciting activity for those who love to make all kinds of paper crafts. In the people, he received the name - paper rolling. And this is justified, because all the crafts (using this technique) are made from twisted strips of paper.
Compositions made using the quilling technique are voluminous and flat. This is not a very difficult activity that can be done together with children. But to achieve beauty in crafts, you need to show a lot of patience and perseverance.

Let's start making postcards for Defender of the Fatherland Day.
We will need:

Stages of work:
We fold a sheet of green cardboard in half. Glue half of the yellow sheet of colored paper inside.

And now let's start decorating postcards using the quilling technique. We insert a strip of yellow paper into the hole in the quilling tool rod and carefully wind the paper around it.

Make sure that the paper roll does not fly off the rod.
Thus, we wind the strip until it is completely on the rod. Now carefully remove it and give it the shape of a leaf. We glue the end of the strip with a glue stick so that the roll does not unwind back.

As a result, we should get nine yellow leaves. Next, we make one brown, flatter one. We twist six circles from burgundy paper. All this is sorted out in the form of a tank.

We make a cannon from a yellow, burgundy and brown strip.
Now let's get down to the number 23. Slightly fold the yellow strip and bend it in the form of a deuce. Do not forget to wrap its bottom tip. We also make number 3.

It remains for us to make curls to decorate the holiday card. Here it is worth showing imagination. For example, if you bend half of the strip in one direction, and the other half in the opposite direction. You get such a beautiful decorative element.

With the help of a brush and transparent glue, we attach all the details to the main postcard. Paste cut-out pictures on a yellow background and write wishes.
The quilling postcard is ready!

We will need:
Stages of work:
We bend the white sheet in half and draw a steamer, clouds and seagulls.

We bend the inner ledges of the steamer.

Fold the cardboard in half. We straighten the ship, paint it. Glue the topmost part and sides to the middle of the postcard. Using a pencil, bend the middle of the steamer outward.


Decorate the clouds with a blue felt-tip pen. Postcard-ship is ready.
What do you think of the idea of a ship with waves?

And I really liked this postcard, isn't it great?

A ship with sails is also very beautiful:

Choose with your child the option that you like the most and create for the joy of your men!
Below are a variety of templates. They can be used to decorate and decorate your works dedicated to February 23:

Here is a template for an airplane postcard with a pilot:


Do-it-yourself postcards in this technique are simply amazing. Before that they are beautiful, unusual and original! And they can even serve as an interior decoration and harmoniously fit into the design of the apartment, such a gift will definitely not gather dust on the shelf, it will find a place of honor.
Therefore, I propose to watch the MK video, where the author gradually demonstrates the creation of such a super postcard.
I wish you success in creating holiday cards for Defender of the Fatherland Day!
This is where my article came to an end, I hope you liked the postcards and you will take note of the ideas and create your own for your men, and in order not to lose the article, do not forget to bookmark it and press the social network buttons!
Take care of your defenders!
Until new posts!
Tablets Dexamethasone is a glucocorticosteroid. Indications for...


Unfortunately, pain is something you have to deal with from time to time...